Aussie Traveller 7.6LPM User manual

12V RV WATER PUMP
OWNER’S MANUAL
7.6LPM
11.4LPM

1300 663 868 | enquiries@aussietraveller.com.au | aussietraveller.com.au
BRISBANE SHOWROOM: 11-15 Oasis Court, Clontarf QLD 4019 | MELBOURNE SHOWROOM: 235 Barry Road, Campbellfield VIC 3061
1
WARNING
READ and UNDERSTAND the Owner’s Manual completely before using this potable water pump. Install,
test, and use only in accordance with the Owner’s Manual instructions. WEAR personal protective gear when
filling, using, cleaning, and servicing the water pump.
DO NOT START water pump until ready to use to avoid unintentional distribution.
FOR INDOOR USE ONLY.
ALWAYS keep a fire extinguisher nearby.
Improper use of the water pump could result in serious injury to the operator or nearby persons/animals
or could cause damage.
Read this installation instruction thoroughly.
Incorrect installation or operation may void any warranty.
Incorrect use or operation may cause serious injury.
INSTRUCTIONS FOR INSTALLATION, TESTING, OPERATION,
SERVICING, AND STORAGE
12V RV Pump: For use in RVs to transfer potable water, indoor use only.
HAZARD SIGNAL WORD DEFINITIONS
HAZARD SIGNAL DEFINITION
This is the safety alert symbol. It is used to alert you to potential personal injury hazards.
Obey all safety messages that follow this symbol to avoid possible injury or death.
DANGER DANGER (red) indicates an imminently hazardous situation which, if not avoided, will
result in death or serious injury.
WARNING WARNING (orange) indicates a potentially hazardous situation which, if not avoided, could
result in death or serious injury.
CAUTION CAUTION (yellow) indicates a potentially hazardous situation which, if not avoided, may
result in minor or moderate injury.
CAUTION CAUTION (yellow) used without the safety alert symbol indicates a potentially hazardous
situation which, if not avoided, may result in property damage.

1300 663 868 | enquiries@aussietraveller.com.au | aussietraveller.com.au
BRISBANE SHOWROOM: 11-15 Oasis Court, Clontarf QLD 4019 | MELBOURNE SHOWROOM: 235 Barry Road, Campbellfield VIC 3061
2
TABLE OF CONTENTS
INTENDED USE ___________________________________________________________________ 3
SUMMARY OF IMPORTANT SAFETY INFORMATION _________________________________ 4
Before Installation During Installation General Safety Operation __________________________________________
Accident Procedures ________________________________________________________________________________
WARNING LABEL LOCATION _______________________________________________________ 5
INSTALLATION ____________________________________________________________________ 7
Step One: Prepare for Installation ___________________________________________________________________ 7
Step Two: Mounting _______________________________________________________________________________ 7
Step Three: Plumbing _____________________________________________________________________________ 7
Step Four: Connect pump to 12V DC power supply ___________________________________________________ 8
Step Five: Check and test the installation of the pump________________________________________________ 10
OPERATION ______________________________________________________________________ 11
Preparing the Pump for Use ____________________________________________________ 11
Using the Pump ________________________________________________________________ 12
Step One: Operate the pump ___________________________________________________________________ 12
Step Two: Clean pump after each use_________________________________________________ 13
STORAGE ________________________________________________________________________ 13
Preparing for storage_____________________________________________________________________________ 13
Removing from storage___________________________________________________________________________ 14
TROUBLESHOOTING _____________________________________________________________ 15
SPECIFICATIONS _________________________________________________________________ 17
ACCESSORIES ___________________________________________________________________ 19
EXPLODED VIEWS________________________________________________________________ 20
LIMITED WARRANTY _____________________________________________________________ 23

1300 663 868 | enquiries@aussietraveller.com.au | aussietraveller.com.au
BRISBANE SHOWROOM: 11-15 Oasis Court, Clontarf QLD 4019 | MELBOURNE SHOWROOM: 235 Barry Road, Campbellfield VIC 3061
3
INTENDED USE
The pump is intended for use in RVs to transfer potable/drinking water, for indoor use only.
The pump is intended for intermittent or continuous duty when the proper operating criteria is met.
The technical specifications for your pump are provided in the Specifications section of this manual.
Follow all safety precautions presented throughout the manual. A summary of important information can be
found at the beginning of this manual.
EXAMPLE PLUMBING SCHEMATIC

1300 663 868 | enquiries@aussietraveller.com.au | aussietraveller.com.au
BRISBANE SHOWROOM: 11-15 Oasis Court, Clontarf QLD 4019 | MELBOURNE SHOWROOM: 235 Barry Road, Campbellfield VIC 3061
4
SUMMARY OF IMPORTANT INFORMATION
WARNING:
Read and understand this owner’s manual completely before using the pump, particularly the plumbing section.
Improper use of the pump could result in serious injury or illness for the operator or nearby persons/animals, or
cause damage to the environment.
LISTED BELOW is a summary of safety information of particular importance. See individual sections of this
owner’s manual for more details.
BEFORE INSTALLATION:
READ and FOLLOW the plumbing instructions and warnings in the RV Waterpump manual.
CHECK for properly sized wiring and correct electrical protection.
CONFIRM the mounting location will allow adequate ventilation to prevent overheating.
TURN power OFF to the existing pump(s) and any live electrical circuits.
RELIEVE system pressure.
DISCONNECT the main power to the pump.
DURING INSTALLATION:
EXERCISE CAUTION when attaching pump to 12 Vdc power supply. Follow the steps listed in the
Installation section of this manual when connecting the pump to the power supply.
CHECK and TEST installed pump as directed in this manual.
DO NOT MODIFY pump design.
GENERAL SAFETY:
READ and FOLLOW instructions and warnings in this manual.
READ and FOLLOW instructions and warnings in the RV waterpump manual.
DO NOT USE flammable or corrosive chemicals in this pump.
OPERATION:
BEFORE USE
INSPECT and PREPARE pump before each use as directed in this manual.
DO NOT TURN ON POWER to pump until ready to USE to avoid unintentional flow.
DURING USE
TURN OFF power to pump and RELIEVE system pressure before leaving pump unattended.
SEE Troubleshooting section of this manual before attempting any repairs. Wear personal protective
equipment and follow safety instructions.
AFTER USE
It is recommended that water supply lines and waterpump are flushed after use.
ACCIDENT PROCEDURES:
Immediate response is necessary in the event of a pump leak. See instructions below:
PUMP LEAK - If the pump develops a leak, immediately stop using. Turn off power to the pump and refer
to the troubleshooting section of this manual, as applicable.

1300 663 868 | enquiries@aussietraveller.com.au | aussietraveller.com.au
BRISBANE SHOWROOM: 11-15 Oasis Court, Clontarf QLD 4019 | MELBOURNE SHOWROOM: 235 Barry Road, Campbellfield VIC 3061
5
WARNING LABEL LOCATION
Always make sure warning labels are in place and in good condition. If a warning label is missing or not
legible, order new labels or unsafe operation could result. To order replacement warning labels, please call
Aussie Traveller on 1300 663 868.
7.6LPM 11.4LPM

1300 663 868 | enquiries@aussietraveller.com.au | aussietraveller.com.au
BRISBANE SHOWROOM: 11-15 Oasis Court, Clontarf QLD 4019 | MELBOURNE SHOWROOM: 235 Barry Road, Campbellfield VIC 3061
6
MODEL PORTS MINIMUM INLET HOSE SIZE MINIMUM OUTLET HOSE SIZE
7.6LPM 3/4" Quick Connect 1/2" (12mm) Inside diameter 1/2" (12mm) Inside diameter
11.4LPM 1/2” NPS – M 1/2" (12mm) Inside diameter 1/2" (12mm) Inside diameter
INSTALLATION
STEP ONE: PREPARE FOR INSTALLATION
This pump is self-priming.
The pump is for indoor use only and should be mounted on a solid surface in a location that is dry and
provides adequate ventilation.
DO NOT locate the motor near plastics that could melt or combustible material. The surface temperature
of the motor may exceed 93°C (200°F).
Prior to installation ensure properly sized wiring, proper electrical protection and adequately sized
plumbing lines and connections.
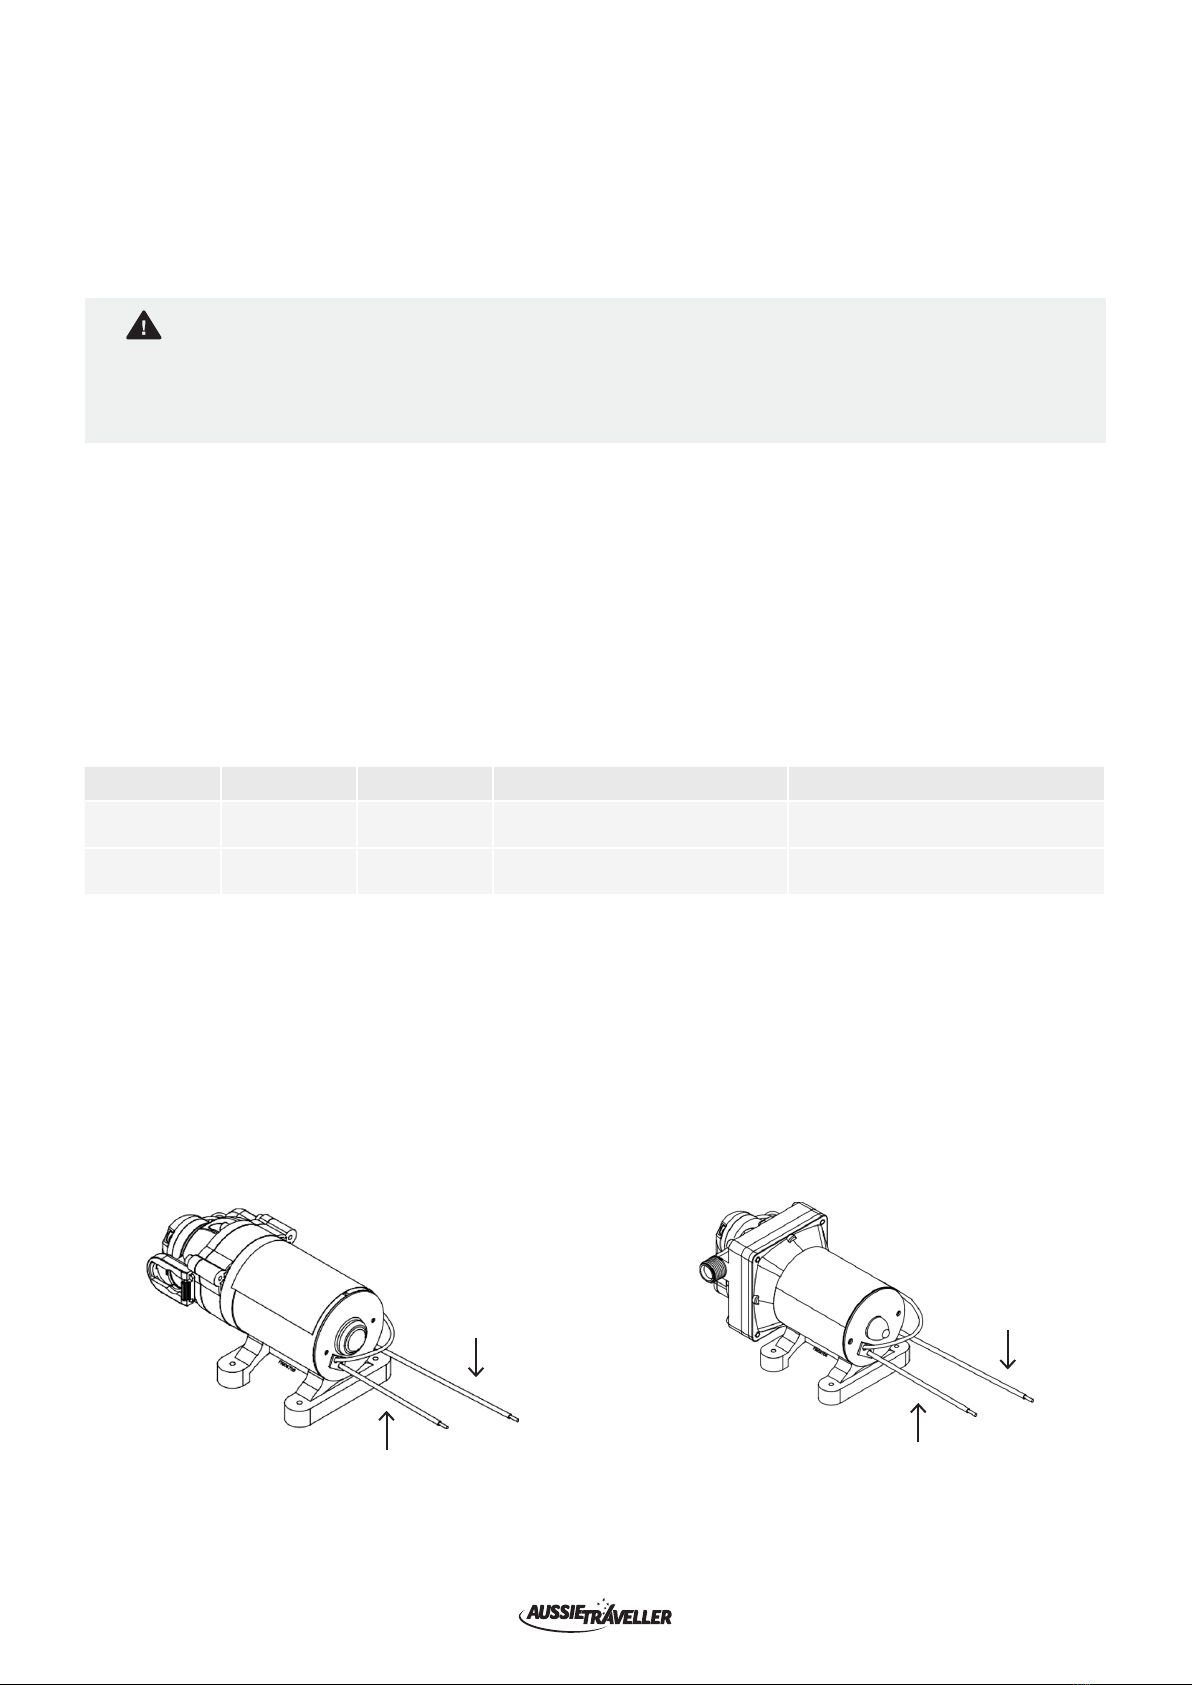
STEP TWO: MOUNTING
The pump may be mounted in any horizontal position. If mounting the pump vertically, the pump head
should be in the down position so that in the unlikely event of a leak, fluid will not enter the motor.
Secure the rubber feet with #8 fasteners. DO NOT compress the feet, doing so will reduce their ability to
isolate vibration/noise. (Note: fasteners are not included.)
Mount pump within 1800mm (6 feet) of the tank for best pump performance and longer pump life.
STEP THREE: PLUMBING
See table below for port size and recommended hose sizes.
Remove shipping plugs from pump ports.
Use included swivel fittings to connect flexible high-pressure tubing to the NPS ported pumps.
Use included quick connect fittings to connect flexible high-pressure tubing to the quick connect ported
pumps.
To insert quick connect fittings, lubricate O-ring with water and twist fitting while inserting into pump port.
CAUTION
NOTE: We do not recommend the use of rigid pipe to plumb the inlet/outlet ports.
Tubing/hose should be flexible, compatible with potable water and rated for the pump’s maximum
pressure. At least 450mm (18” ) length is suggested to minimize stress on the fitting/ports and reduce
noise. Allow for the shortest possible tubing/hose route and avoid sharp bends that may kink over time.
The tubing/hose should be anchored where it meets rigid pipe/hard plumbing to reduce vibration.
Installation include potable water approved 50-mesh strainer is required to prevent foreign debris from
entering the system.
NOTE: We do not recommend the use of rigid pipe to plumb the inlet/outlet ports.
If a check valve is installed in the plumbing, it must have a cracking pressure of no more than 2 psi
[.14 bar].

1300 663 868 | enquiries@aussietraveller.com.au | aussietraveller.com.au
BRISBANE SHOWROOM: 11-15 Oasis Court, Clontarf QLD 4019 | MELBOURNE SHOWROOM: 235 Barry Road, Campbellfield VIC 3061
7
INSTALLATION (CONTINUED)
STEP FOUR: CONNECT PUMP TO 12 VDC POWER SUPPLY
This pump is self-priming.
The pump is for indoor use only and should be mounted on a solid surface in a location that is dry and
provides adequate ventilation.
Caution must be exercised when making connections to a 12V DC power supply to avoid shock.
ALWAYS follow the safety instructions and steps listed below in exact sequence when connecting the
pump to a 12V DC power supply.
1. PREPARATORY SAFETY
ALWAYS use eye protection.
NEVER smoke or work near sparks or other sources of ignition.
2. ELECTRICAL REQUIREMENTS
The pump should be on a dedicated (individual) circuit, controlled with a double pole switch (CE/UL/
CSA certified) rated at or above the fuse ampere indicated by the pump motor label. Depending on
distance of the power source from the pump and ampere load on the circuit, wire may need to be
heavier than indicated by the chart.
Use an approved wire of the size specified below or heavier.
3. CONNECT PUMP TO 12V DC POWER SUPPLY
Connect the pump to a 12V DC power supply using the following procedure:
a. Strip off about 15mm (1/2”) of insulation from the end of each power supply wire.
b. Position the pump’s red wire parallel with the positive (+) wire from power supply. Secure using a
twist-on wire nut.
c. Position the pump’s black wire parallel to the negative (-) wire from the power supply. Secure using
a twist-on wire nut.
WARNING
MODEL VOLTAGE FUSE AMP WIRE LEADS WIRE SIZE (STRANDED MTW)
7.6LPM 12V DC 10A RED (positive +)
BLACK (negative -) #14 AWG (2.5mm2) or heavier
11.4LPM 12V DC 10A RED (positive +)
BLACK (negative -) #14 AWG (2.5mm2) or heavier
7.6LPM
POSITIVE (RED)
NEGATIVE (BLACK)
11.4LPM
POSITIVE (RED)
NEGATIVE (BLACK)

1300 663 868 | enquiries@aussietraveller.com.au | aussietraveller.com.au
BRISBANE SHOWROOM: 11-15 Oasis Court, Clontarf QLD 4019 | MELBOURNE SHOWROOM: 235 Barry Road, Campbellfield VIC 3061
8
WARNING
INSTALLATION (CONTINUED)
STEP FIVE: CHECK AND TEST THE INSTALLATION OF THE PUMP
Serious injury could result from leaks if pump is improperly assembled, installed or the design of the
pump is modified.
Follow the steps below to ensure the pump is properly installed. Never modify the pump design.
1. CHECK INSTALLATION
Check installation to ensure the pump is properly mounted, wired, plumbed and in safe working condition.
2. ELECTRICAL REQUIREMENTS
Test the system for leaks with potable water:
a. Fill the tank with CLEAN potable water.
b. The pump is an “on demand” pump. When turned on, the pump will prime itself, then turn off once
reaching pressure. When the demand for flow continues, the pump will automatically re-start.
c. Check for leaks throughout the system. If a leak is detected, fix the leak and re-test the system with
potable water.
WARNING
OPERATION — PREPARING PUMP FOR USE
Inspect and prepare pump before each use.
Read instructions below carefully for inspecting and preparing the pump.
Damaged or clogged equipment could result in leaks or uncontrolled distribution.
Leaks could result in injury to the operator or bystanders.
IMPORTANT SAFETY RULES:
POWER OFF: Make sure all power is OFF before cleaning, inspecting, or servicing the pump.
GUARDS / SHIELDS: Make sure all guards and shields are replaced after servicing the pump.
REPLACEMENT PARTS: If a part needs replacement, only use parts that meet the manufacturer’s
specifications. Replacement parts that do not meet specifications may result in a safety hazard or poor
operation of the pump.
1. ENSURE CLEAN SYSTEM
Ensure the pump has been thoroughly flushed, drained, and sanitised.
2. INSPECT & REPAIR
Ensure the pump has been thoroughly flushed, drained, and sanitised.
a. Inspect hoses/lines for exposed mesh and holes. Replace all worn or damaged hoses/lines.
b. Inspect fittings for cracks and leaks. Replace Aussie Traveller pump if needed.
c. Partially fill system with CLEAN potable water and turn on to test for leaks. Repair as needed.
IMPORTANT: After any repair work has been done, ALWAYS test for leaks with potable water one final time
before using.

1300 663 868 | enquiries@aussietraveller.com.au | aussietraveller.com.au
BRISBANE SHOWROOM: 11-15 Oasis Court, Clontarf QLD 4019 | MELBOURNE SHOWROOM: 235 Barry Road, Campbellfield VIC 3061
9
OPERATION — USING THE PUMP
STEP ONE: OPERATE THE PUMP:
ALWAYS wear personal protective equipment when operating or servicing the pump.
1. REVIEW SAFETY INFORMATION
Review the Summary of Important Information section provided in this manual.
2. WEAR PERSONAL PROTECTIVE EQUIPMENT
Wear personal protective equipment as needed.
3. TURN ON POWER
Turn on the power to the pump.
NOTE: The pump will start automatically when power is turned on. The pump will cycle on and off as
needed to retain pressure in the hose.
4. PRESSURE SWITCH OPERATION
The pressure switch reacts to outlet pressure, and interrupts power at the preset shut-off pressure
indicated on the pump label. When outlet pressure drops below a predetermined limit the switch will close
and the pump operates until the shut-off pressure is achieved. The shut-off pressure is set to factory
calibrated standards.
NOTE: If the plumbing is restrictive or the flow rate is very low, the pump may re-pressurize the outlet
faster than the fluid is being released, causing rapid cycling (*ON/OFF within 2 seconds). If the pump
is subjected to rapid cycling during normal operation, or for infrequent periods, damage may occur.
Applications which exhibit rapid cycling should have restrictions in the outlet minimized.
5. LEAVING UNATTENDED
If the pump must be left unattended at any time:
a. Disconnect power to the pump.
b. Relieve system pressure.
6. DISCONTINUE USE IF CLOGGED OR INOPERATIVE
If the pump becomes clogged or inoperative during use, discontinue use immediately.
Do not attempt to service while water is in the pump and power is connected.
Return to the troubleshooting section of this manual before attempting to service.
DO NOT operate the pump at pressures which cause the motor to exceed the amperes rating indicated on
the name plate.
Improper adjustment of the pressure switch setting may cause severe overload or premature failure. Failures
due to improper adjustment of the pressure switch setting will not be covered under the warranty.
CAUTION
WARNING

1300 663 868 | enquiries@aussietraveller.com.au | aussietraveller.com.au
BRISBANE SHOWROOM: 11-15 Oasis Court, Clontarf QLD 4019 | MELBOURNE SHOWROOM: 235 Barry Road, Campbellfield VIC 3061
10
CAUTION
OPERATION — USING THE PUMP (CONTINUED)
STEP TWO: CLEAN PUMP AFTER EACH USE
The pump should always be stored indoors.
For long term or winter storage, prepare the pump by running RV antifreeze through the system. This will keep
internal parts lubricated, protect against corrosion, and keep the unit from freezing.
The pump will be damaged if it freezes.
Protect the pump from freezing during storage by following the instructions below
STORAGE
PREPARING FOR STORAGE:
1. ADD ANTI-FREEZE
Pour RV antifreeze into the pump system.
NOTE: RV antifreeze is non-toxic and biodegradable and generally safer for the environment than
automotive antifreeze.
2. OPERATE BRIEFLY
Turn on the pump and run the pump system briefly until fluid is distributed through plumbing system.
REMOVING FROM STORAGE:
1. DRAIN
Drain the antifreeze left in the plumbing system into a suitable container.
2. FLUSH WITH WATER
Fill the potable water tank with CLEAN potable water and run through the system. Operate the pump
system until the system is completely flushed. Be sure to set up containers to capture the antifreeze
flush water.
3. DISPOSAL
Dispose of the antifreeze and flush properly with potable water.
4. SANITISE
To ensure clean, safe drinking water, it is important for your health to sanitize the potable water system if
the pump has been sitting in storage or has not been used for a while. The clean and grey water holding
tank, hot water tank, and the water lines are potential places for bacteria to grow.
Before you start, read all of the instructions in this manual on how to properly sanitize the plumbing
system.
Before you get started, there are some things to consider:
You will need at least 5 to 10 hours of time to complete this task.
Remove the water filters while sanitizing the water system and consider replacing the water filter
when you have completed the sanitation.
If you have a hot water tank, this is an ideal time to flush out the hot water tank.

1300 663 868 | enquiries@aussietraveller.com.au | aussietraveller.com.au
BRISBANE SHOWROOM: 11-15 Oasis Court, Clontarf QLD 4019 | MELBOURNE SHOWROOM: 235 Barry Road, Campbellfield VIC 3061
11
STORAGE (CONTINUED)
4. SANITISE (CONT.)
Sanitise your potable water system.
1. Determine the size of your water system, the potable water holding tank, plus the hot water tank and
15 litres for your water lines, depending on your set up. Refer to your owner’s manual.
2. Prepare a 5% sodium-hypochlorite solution using chlorine bleach (non-scented and non-gel) and
water. Use the chart below for mix concentrations.
3. Add bleach mixture to the water tank – NEVER POUR STRAIGHT BLEACH INTO THE FRESH
WATER TANK!
4. If you have a bypass for your hot water tank, make sure that is set for normal use so that the bleach
mixture will be pumped through the hot water tank.
5. Top off the potable water tank with potable water.
6. Run the chlorinated water through all lines (hot and cold, one at a time) for one to two minutes. You
should be able to smell the chlorine.
7. Top off the potable water tank again.
8. Let it sit for 4 hours minimum; overnight is best. The most important thing is to wait the appropriate
amount of time for the tank to be properly sanitized.
NOTE: Doubling the bleach will not cut the time in half! Drain and rinse the water tank and water lines
several times with fresh, CLEAN water. The water should now be safe to drink, but if the chlorine odour
is too strong, add a mixture of 1/2 cup baking soda and a gallon of fresh water to the water tank and
repeat the potable water flush.
FRESH WATER TANK SIZE AMOUNT OF BLEACH MIX INCLUDING WATER
40 gallons (152 litres) 1 cup (240 ml) 4 gallons (16 litres)
50 gallons (190 litres) 1 1/4 cup (300 ml) 5 gallons (20 litres)
60 gallons (227 litres) 1 1/2 cup (360 ml) 6 gallons (24 litres)
80 gallons (302 litres) 1 3/4 cup (420 ml) 7 gallons (28 litres)
100 gallons (380 litres) 2 cups (480 ml) 8 gallons (32 litres)

1300 663 868 | enquiries@aussietraveller.com.au | aussietraveller.com.au
BRISBANE SHOWROOM: 11-15 Oasis Court, Clontarf QLD 4019 | MELBOURNE SHOWROOM: 235 Barry Road, Campbellfield VIC 3061
12
WARNING
TROUBLESHOOTING
Before troubleshooting or attempting to service, read the following safety rules to avoid risk of electric shock.
BEFORE ATTEMPTING TO SERVICE THE PUMP:
1. PERSONAL PROTECTIVE EQUIPMENT
Wear personal protective equipment while servicing your pump.
2. REVIEW TROUBLE SHOOTING TABLE
Review the troubleshooting table below for the type of problem you are experiencing. However, DO NOT
attempt to repair until the steps listed below are followed.
3. EMPTY & FLUSH
Empty the pump system and flush the pump system with potable water as directed in the Storage section,
removing from storage.
4. DISCONNECT POWER/RELIEVE PRESSURE
Disconnect power to the pump and be sure all system pressure is relieved.
5. PREFORM REPAIRS
Follow the directions provided in the troubleshooting table to repair the pump.
6. TEST AFTER SERVICING
After servicing, ALWAYS test the pump for leaks with potable water before using.
PROBLEM CAUSE SOLUTION
Pump will not turn on
Bad electrical connection Check battery connections
Short in wires Check condition of wires
Fuse blown (if applicable) Replace fuse
Locked drive Replace pump
Faulty pressure switch Replace pump
Incorrect voltage Check voltage (±10%)
Pump will not prime
Out of water Refill water tank
Inlet air leak Tighten hose clamps/Replace pump
Inlet/Outlet tube restriction Remove restriction
Clogged intake valves Remove obstruction
Clogged intake tube Remove obstruction
Low pressure/flow
Inlet air leak Tighten hose clamps/Replace pump
Worn diaphragm Replace pump
Worn valves Replace pump
Inlet/Outlet tube restriction Remove restriction
Incorrect voltage Check voltage (±10%)
Clogged intake valves Remove obstruction
Clogged intake tube Remove obstruction
Pump leaks
Loose fasteners Tighten fasteners
Pump seals degraded Replace pump
Leak in diaphragm Replace pump
Pump starts with faucets closed
Leak in the system Tighten leaking hose clamps/fittings
Faulty pressure switch Replace pump
Air trapped in system Purge the air from the system
Rough operation
Flexible mounting surface Mount pump on rigid surface
Loose pump head Tighten fasteners
Compressed base feet Decompress base feet
Rigid plumbing Plumb pump with flexible plumbing

1300 663 868 | enquiries@aussietraveller.com.au | aussietraveller.com.au
BRISBANE SHOWROOM: 11-15 Oasis Court, Clontarf QLD 4019 | MELBOURNE SHOWROOM: 235 Barry Road, Campbellfield VIC 3061
13
SPECIFICATIONS (CONTINUED)
MODEL 7.6LPM 11.4LPM
PART NUMBER 266701001 266701002
ELECTRICAL CONNECTION 12V DC 12V DC
AVERAGE OPERATING AMP DRAW 5.5 Amps 5.5 Amps
MAXIMUM AMP DRAW 9.5 Amps 9.5 Amps
MAXIMUM FLOW 2.0 GPM [7.6 LPM] 3.0 GPM [11.4 LPM]
MAXIMUM PRESSURE 60 PSI [4.1 bar] 55 PSI [3.8 bar]
PORTS 3/4" QC 1/2" NPS-M
OVERALL DIMENSIONS 209.4 × 105.6 × 101.6mm 209.9 × 125 × 110.5mm
WEIGHT 1.8kg 2.0kg
The noise emissions from this product do not exceed 70 dB(A).

1300 663 868 | enquiries@aussietraveller.com.au | aussietraveller.com.au
BRISBANE SHOWROOM: 11-15 Oasis Court, Clontarf QLD 4019 | MELBOURNE SHOWROOM: 235 Barry Road, Campbellfield VIC 3061
14
SPECIFICATIONS (CONTINUED)
7.6LPM PART NUMBER: 266701001
TECHNICAL DRAWING

1300 663 868 | enquiries@aussietraveller.com.au | aussietraveller.com.au
BRISBANE SHOWROOM: 11-15 Oasis Court, Clontarf QLD 4019 | MELBOURNE SHOWROOM: 235 Barry Road, Campbellfield VIC 3061
15
SPECIFICATIONS (CONTINUED)
11.4LPM PART NUMBER: 266701002
TECHNICAL DRAWING

1300 663 868 | enquiries@aussietraveller.com.au | aussietraveller.com.au
BRISBANE SHOWROOM: 11-15 Oasis Court, Clontarf QLD 4019 | MELBOURNE SHOWROOM: 235 Barry Road, Campbellfield VIC 3061
16
ACCESSORIES
PART NUMBER DESCRIPTION INCLUDED WITH MODEL
05100050001010 QC - 1/2” Hose Barb Straight Fit 7.6LPM
05100050001020 QC - 1/2” Hose Barb Elbow Fit 7.6LPM
05100050001040 QC - RV Pump Filter 7.6LPM
05100050004010 NPSM - 1/2” Hose Barb Straight Fit 11.4LPM
05100050004020 NPSM - 1/2” Hose Barb Elbow Fit 11.4LPM
05100050004040 NPSM - RV Pump Filter 11.4LPM
05100050001010
05100050001020
05100050001040
05100050004010
05100050004020
05100050004040

1300 663 868 | enquiries@aussietraveller.com.au | aussietraveller.com.au
BRISBANE SHOWROOM: 11-15 Oasis Court, Clontarf QLD 4019 | MELBOURNE SHOWROOM: 235 Barry Road, Campbellfield VIC 3061
17
EXPLODED VIEW - 7.6LPM
1
2
3
FIG.06681
REFERENCE NUMBER PART NUMBER DESCRIPTION QTY
1801452 Pressure switch assembly 1
2A2060R Complete pump head assembly 1
3789952 Motor assembly, 7.6LPM 1

1300 663 868 | enquiries@aussietraveller.com.au | aussietraveller.com.au
BRISBANE SHOWROOM: 11-15 Oasis Court, Clontarf QLD 4019 | MELBOURNE SHOWROOM: 235 Barry Road, Campbellfield VIC 3061
18
EXPLODED VIEW - 11.4LPM
FIG.06683
3
2
1
REFERENCE NUMBER PART NUMBER DESCRIPTION QTY
1801452 Pressure switch assembly 1
2A3055R Complete pump head assembly 1
3789888 Motor assembly, 11.4LPM 1

19
WARRANTY STATEMENT
Aussie Traveller Pty Ltd ACN 642 775 460 (Aussie Traveller) oers the following warranty in relation to the products it supplies directly or
through an authorised manufacturer, dealer or approved service repair agent (Product).
Australian Consumer Law
The benets of this warranty are in addition to any rights and remedies imposed by Australian State and Federal legislation that cannot be
excluded. Nothing in this warranty is to be interpreted as excluding, restricting or modifying any State or Federal legislation applicable to the
supply of goods and services which cannot be excluded, restricted or modied.
If you are a consumer as dened in the Australian Consumer Law: Our goods come with guarantees that cannot be excluded under the
Australian Consumer Law. You are entitled to a replacement or refund for a major failure and compensation for any other reasonably foreseeable
loss or damage. You are also entitled to have the goods repaired or replaced if the goods fail to be of acceptable quality and the failure does not
amount to a major failure.
Warranty
Aussie Traveller warrants that, subject to the exclusions and limitations below, all parts of the manufacture and assembly of the Product will be
free from defects in materials and workmanship (Warranty) for a period of 12 months from the date of purchase as follows:
1. This Warranty is activated at the time of purchase by the nal retail customer (being the owner of the Product).
2. In the event the Product is purchased by a manufacturer, dealer or approved service repair agent, this Warranty will commence at the
time the nal retail customer makes payment for the Product to the wholesale purchaser.
3. If the Product is purchased directly from Aussie Traveller for use by nal retail customer and not to be on sold in any way, the Warranty
will commence at the time of the original purchase.
Warranty Period
This Warranty cannot be assigned or transferred to a subsequent owner of the Product.
The purchaser or nal retail customer should inspect the Product immediately when received or at vehicle handover, to ensure that it appears
free from any damage or defect, and matches the description provided.
If after accepting the Product, a defect appears in the manufacture or assembly of the Product before the end of the Warranty Period and
Aussie Traveller nds the Product to be defective in materials or workmanship, Aussie Traveller will, in its sole discretion, either:
a. replace, repair or refund the Product or the defective part of the Product free of charge; or
b. cause the Product or the defective part of the Product to be replaced or repaired by a qualied repairer free of charge.
In arranging Warranty inspection, service and repair, Aussie Traveller will seek to provide the details of an approved service agent within your
geographic area. Should one not be available, or if the Product is in use in travel, Aussie Traveller reserves the right to seek to arrange a repair
or replacement at the next available location on the route of travel.
Aussie Traveller reserves the right to replace defective parts of the Product with parts and components of similar quality, grade and
composition where an identical part or component is not available.
Products presented for repair may be replaced by refurbished goods of the same type rather than being repaired. Refurbished parts may be
used to repair the Product.
Aussie Traveller Awning Products
This Warranty covers specied defects in materials or workmanship for Awning Products as follows:
1. The vinyl fabric is warranted against:
a. holes caused by mildew (mildew will form on dust and dirt and stain fabric if fabric is not kept clean).
b. excessive cracking, peeling, hardening or loss of strength while used under normal conditions.
c. excessive fading (a slight colour change may occur due to ultraviolet rays).
2. All hardware components including the roller are warranted not to bend or break under normal use (excluding high winds, water pooling
and accidents).
Making a Warranty Claim
If a defect covered by this Warranty appears, the Customer must rst contact Aussie Traveller within 7 days of rst becoming aware of the
defect. Aussie Traveller will assist the Customer to rectify and resolve any Product issue that may arise.
When making a claim under this Warranty, Aussie Traveller requires that the following information be provided before any further action will be
taken.
1. Original Invoice (Document or Number);
2. Make and model of the Product;
3. Make and model of the vehicle (if Product tted);
4. Vehicle build date (if Product tted);
5. Vehicle chassis number;
This manual suits for next models
1
Table of contents
Popular Water Pump manuals by other brands

Hydro Leduc
Hydro Leduc XPi Start-up instructions

PSG
PSG Wilden PS220 Series Engineering, operation & maintenance

Graham
Graham 1 Series Installation, operation & maintenance manual

Roberts Gorden
Roberts Gorden EP 301 Installation, operation & service manual

Pressol
Pressol Pneumatic grease pump 50:1 operating instructions

EINHELL
EINHELL GC-DP 3730 Original operating instructions

Wilo
Wilo SiFire EN 100/200-205-45 E Installation and operating instructions

Zoeller
Zoeller 55 Series installation instructions

EINHELL
EINHELL GC-GP 1046N operating instructions

Draper
Draper PWP27 instructions

Pentair
Pentair STA-RITE DOMINATOR instruction manual

Wilo
Wilo RAIN1 Series Installation and operating instructions