Autel OTOFIX SW2101 User manual

i
Trademarks
OTOFIX is a trademark of Autel Intelligent Technology Corp., Ltd.,
registered in China, the United States, and other countries. All other
marks are trademarks or registered trademarks of their respective holders.
Copyright Information
No part of this manual may be reproduced, stored in a retrieval system or
transmitted, in any form or by any means, electronic, mechanical,
photocopying, recording, or otherwise without the prior written permission
of Autel Intelligent Technology Corp., Ltd.
Disclaimer of Warranties and Limitation of Liabilities
All information, specifications and illustrations in this manual are based on
the latest information available at the time of printing. Autel Intelligent
Technology Corp., Ltd. reserves the right to make changes at any time
without notice. While information of this manual has been carefully
checked for accuracy, no guarantee is given for the completeness and
correctness of the contents, including but not limited to the product
specifications, functions, and illustrations.
Autel Intelligent Technology Corp., Ltd. will not be liable for any direct,
special, incidental, indirect damages or any economic consequential
damages (including the loss of profits).
IMPORTANT
Before operating or maintaining this unit, please read this manual carefully,
paying extra attention to the safety warnings and precautions.
For Services and Support
www.otofixtech.com
(833) 686-1349 (OTO-1FIX) (North America)
0086-755-86147779 (China)
For technical assistance in all other markets, please contact your local
selling agent.

ii
Safety Information
For the safety of yourself and others, and to prevent damage to the device
and vehicles upon which it is used, it is important that the safety
instructions presented throughout this manual should be read and
understood by all persons operating or coming into contact with the
device.
Use the device only as described in this manual. Read, understand, and
follow all safety messages and instructions in this manual.
Please use the power adapter that has the CCC certificate and complies
with related standards.
Safety Messages
When using the smart watch, please follow the tips in 【IMPORTANT 】.
Those safety messages are provided to help prevent personal injury and
equipment damage.
IMPORTANT
Do not drop your equipment or place heavy objects on it. Otherwise, the
device may be damaged.
The screen is made of glass. If the device is hit hard or squeezed by
heavy objects, do not touch or remove the glass fragments from the
device. Stop using the device immediately and contact technical support
personnel for repair or replacement information.
Keep the device away from high temperature or high pressure. The
operating temperature of the device should be -20 ° C to 60 ° C, and the
storage temperature should be -40 ° C to 85 ° C to avoid damage.
Do not touch the device with rain, extreme humidity, sweat, or other liquids
to avoid short circuit or fault.
Do not remove or modify the device. Opening or modifying your equipment
without authorization will void your warranty.
Please use the charging base that comes with your purchase. Otherwise,
the normal charging speed will be affected, resulting in abnormal charging,
and even damage to the device.

iii
When your equipment reaches its service life, dispose of it in accordance
with local environmental laws and regulations. Some internal parts may
explode, leak or have adverse environmental effects if not handled
properly.
Electronic Device
Do not use this device in places where the use of wireless devices is
expressly prohibited, otherwise it will interfere with other electronic devices
or cause other dangers.
FCC Statement
This device complies with Part 15 of the FCC Rules. Operation is subject
to the following two conditions: This device may not cause harmful
interference, and this device must accept any interference received,
including interference that may cause undesired operation.
Warning: Changes or modifications not expressly approved by the party
responsible for compliance could void the user's authority to operate the
equipment.
NOTE: This equipment has been tested and found to comply with the
limits for a Class B digital device, pursuant to Part 15 of the FCC Rules.
These limits are designed to provide reasonable protection against
harmful interference in a residential installation. This equipment generates
uses and can radiate radio frequency energy and, if not installed and used
in accordance with the instructions, may cause harmful interference to
radio communications. However, there is no guarantee that interference
will not occur in a particular installation. If this equipment does cause
harmful interference to radio or television reception, which can be
determined by turning the equipment off and on, the user is encouraged to
try to correct the interference by one or more of the following measures:
Reorient or relocate the receiving antenna. Increase the separation
between the equipment and receiver. Connect the equipment into an
outlet on a circuit different from that to which the receiver is connected.
Consult the dealer or an experienced radio/TV technician for help.
RF warning statement: The device has been evaluated to meet general
RF exposure requirement. The device can be used in portable exposure
condition without restriction.

iv
CONTENTS
Safety Information................................................................................................. ii
Safety Messages................................................................................................... ii
Electronic Device..................................................................................................iii
Using This Manual................................................................................................. 1
1.1 Conventions.................................................................................................... 1
Start Using............................................................................................................... 3
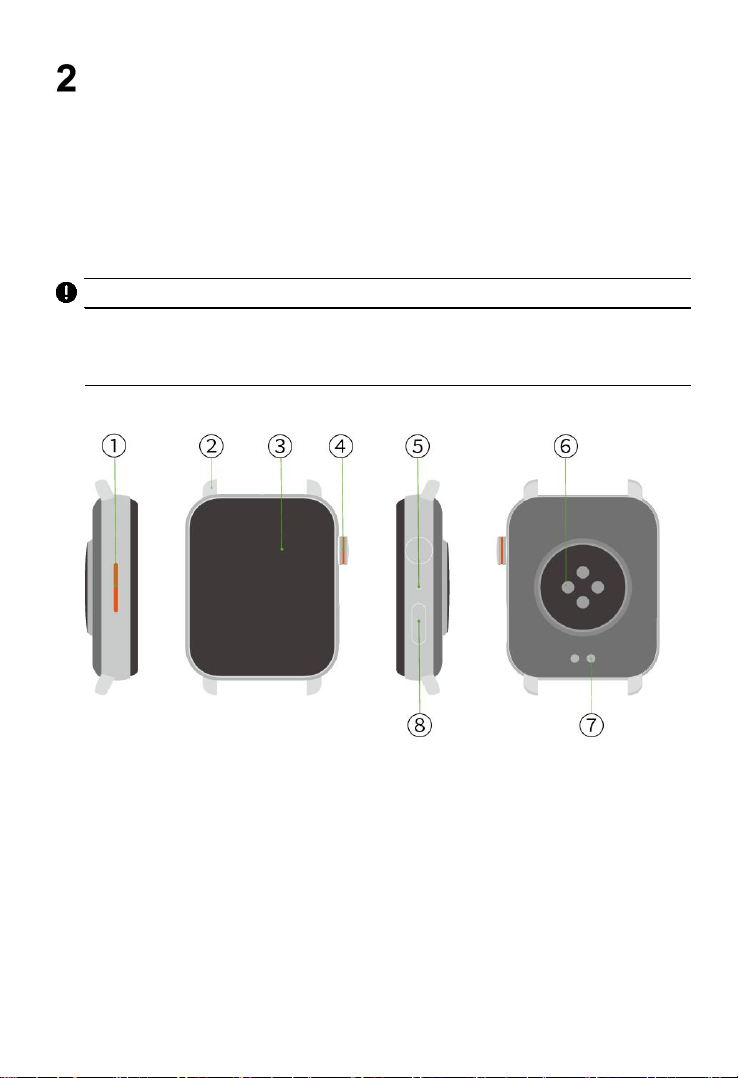
2.1 OTOFIX Watch............................................................................................... 3
2.2 Smart Watch Buttons and Touch Screen...................................................5
2.3 Power on/ Power off/ Reboot....................................................................... 7
2.4 Match the Smart Watch and Phone............................................................ 8
2.5 Commonly Used Function.............................................................................9
2.6 Do Not Disturb Mode...................................................................................10
2.7 Upgrade the Smart Watch System and App............................................10
2.8 Factory Reset............................................................................................... 11
2.9 Charge the Device....................................................................................... 11
Basic Functions....................................................................................................13
3.1 Notification.....................................................................................................13
3.2 Make a Call................................................................................................... 14
3.3 Answer or Reject Calls................................................................................15
3.4 Play the Music.............................................................................................. 15
3.5 Stopwatch/ Timer......................................................................................... 16
3.6 Set a Clock....................................................................................................16
3.7 Use the Flashlight........................................................................................ 17
3.8 Use the Compass.........................................................................................18
3.9 Check the Weather Information................................................................. 18
Basic Functions....................................................................................................19
4.1 Scientific Exercise........................................................................................19
4.2 Activity Record..............................................................................................20
4.3 Track the Movement....................................................................................20
Health Management.............................................................................................21

v
5.1 Measure the Heart Rate..............................................................................21
5.1.1 Measure the Heart Rate Continuously.............................................. 21
5.1.2 Measure the Exercise Heart Rate......................................................22
5.1.3 Measure the resting heart rate........................................................... 22
5.1.4 Heart rate notification........................................................................... 23
5.2 Sleep monitoring.......................................................................................... 24
5.3 Breath Training............................................................................................. 25
5.4 Blood oxygen saturation test......................................................................25
5.5 Stand reminder............................................................................................. 26

1
Using This Manual
This manual contains device usage instructions.
The picture is only for reference, please make the object as the standard.
1.1 Conventions
The following conventions are used.
Bold Text
Bold text is used to highlight items such as buttons and menu options.
Example:
Tap【OK】.
Notes and Important Messages
Notes
ANOTE provides helpful information such as additional explanations, tips,
and comments.
Example:
NOTE
Pair the watch and your vehicle before the Smart Vehicle Key work.
Important
IMPORTANT indicates a situation which, if not avoided, may result in
damage to the test equipment or vehicle.
Example:
IMPORTANT
The product is not waterproof, please keep the watch and charging base
dry before or in or after charging, or there are short circuits or other risks.

2
Hyperlink
Hyperlinks, or links, that take you to other related articles, procedures, and
illustrations are available in electronic documents. Blue italic text indicates
a selectable hyperlink and blue underlined text indicates a website link or
an email address link.
Illustrations
Illustrations used in this manual are samples, the actual testing screen may
vary for each smart watch being tested. Observe the menu titles and the
on-screen instructions to make correct option selection.
Procedures
An arrow icon indicates a procedure.
Example:
To power the smart watch on
Long press the【power button】to power on.
Or the smart watch power on automatically when charging it.

3
Start Using
OTOFIX Watch is a smart watch with a smart vehicle key function, which
supports remote control of vehicles. It also provides multi-dimensional
intelligent services, such as exercise status recording, health monitoring,
music playing or storing and so on.
This manual describes the structure and operation of the watch, and how to
use it.
IMPORTANT
The smart watch comes with 4GB of memory and the available storage
capacity is about 2.6GB because the system of watch will occupy some
memory.
2.1 OTOFIX Watch
Figure 2.1 Overview of the Smart Watch
①Speaker
⑤Microphone
②Smart Watch Ear
⑥Heart Rate Sensing Area
③Touch Screen
⑦Charging Contacts
④Power Button
⑧Smart Vehicle Key

4
To install the smart watch band
Lay the smart watch flat with the back of the watch up, and the
side with the buttons facing you.
①Insert the pogo pin on the watch band into the watch ear on
the side near you ; ② Slide the metal buckle toward the side
near you until it there is no space to move;③ Align another
side of pogo pin into the another watch ear and install it.
Repeat these steps to install another watch band.
Figure 2.2 Install the Watch Band
NOTE
Lay the smart watch flat with the back of the watch up, and slide the pogo
pin to disassemble the watch band.

5
Figure 2.3 Wear the Smart Watch
Wear the smart watch as the picture show. Attach the Heart Rate Sensing
Area to the wrist to maintain a comfortable and fit wearing state. In order to
ensure the accuracy of heart rate measurement, please wear the smart
watch correctly. Avoid to wear the smart watch on joints. Do not be too
loose or too tight in normal status, but wear tight during exercise.
IMPORTANT
The smart watch is made of professional health materials and has passed a
strict skin allergy test, so you can wear it with confidence. If you feel
uncomfortable when wearing your smart watch, please take it down and
consult your doctor.
Please wear your smart watch correctly, with appropriate tightness, and
allow your skin to breathe. And keep the smart watch clean and dry.
2.2 Smart Watch Buttons and Touch Screen

6
Figure 2.4 Smart Watch Buttons
Table 2.1 Power Button Description
Operation
Function
Short Press
Locked screen:Short press to light up the screen.
In the page of application list : Short press to show
the standby screen.
In the page of standby screen: Short press to show
the access the application list.
Long Press
Power off: Long press for 2 seconds to power on.
Power on: Long press for 5 seconds to show the
shutdown or restart icon.
Power on: Long press for 12 seconds to restart the
smart watch.
Table 2.2 Smart Vehicle Key Description
Operation
Function
Short Press
Short press to lock your car.
Long Press
Long press to unlock your car.
IMPORTANT
Pair the smart watch and your vehicle before the Smart Vehicle Key work.
Table 2.3 Gesture Description
Operation
Function

7
Swipe the
Screen to the
Right or Left
Swipe the screen to the right or left to switch
between different interfaces.
Swipe the
Screen Right
Swipe the screen to the right to return to the
previous interface.
Raise Your
Wrist
In Normal Mode: Raise the wrist to brighten the
screen and return to the standby screen.
You can also raise the wrist to brighten the screen
and start the voice-recognition.
In Sports Mode: Raise the wrist to displays the
sports data interface.
Put Down
Your Wrist
Put down your wrist to lock your smart watch.
NOTE
Set【raise wrist screen】to brighten the screen when you wear the smart
watch and rise the hand. You can tap the 【power button 】to enter the
application list>Tap >【Display & brightness】>【raise wrist screen】,
turn on the【raise wrist screen】, set the beginning and end time .
Set the time to lock the smart watch: You can tap the【power button】to
enter the application list >Tap >【Display & brightness 】>【auto
screen time】, set the time to lock the smart watch.
In standby screen, swipe the screen right to show the interface of sports
recording, music player, heart rate data, smart vehicle key.
2.3 Power on/ Power off/ Reboot
To power the smart watch on
Method 1: Long press the【power button】to power on.
Method 2: Charge the smart watch to power it on.
IMPORTANT

8
When battery is running low, the smart watch is unable to power on.
To power the smart watch off
Method 1: Long press the【power button】, tap【Power off】.
Method 2: Tap the【power button】to enter the application list>Tap
>Swipe down the screen to choose【System】>Click【Power off】.
IMPORTANT
When battery is lower than 5%, the smart watch power off automatically and
can not be powered on.
To reboot the smart watch
Method 1: Long press the【power button】, tap【Reboot】.
Method 2: Tap the【power button】to enter the application list >Tap
>Swipe down the screen to choose【System】>Click【Power off】.
To force a reboot
Long press the【power button】for about 12 seconds to reboot.
2.4 Match the Smart Watch and Phone
By default, the smart watch bluetooth is on. Android users and iOS users
can follow these steps to match.
To match the smart watch and phone with Android system
Download【Autel Link】App through the phone App market, or scan
the【Autel Link】App QR.
Figure 2.5 Autel Link App QR
Register and log onto your account of【Autel Link】App.
Open the phone【Bluetooth】, access the【Autel Link】App, tap
【Devices】 >【+】>【Scan QR to add】or 【Add by model】.

9
When choose【Scan QR to add】, then scan the QR on the smart
watch screen with your phone. When choose【Add by model】, then
tap【OTOFIX watch】>【Start Pairing】>select your device>start
to match.
When the match requirement appear on the smart watch, click【Pair】
then【OK】to finish the match.
To match the smart watch and phone with iOS system
Download【Autel Link】App through the phone App market, or
【Autel Link】App QR.
Enter the phone system>Open the phone【Bluetooth】>Check the
smart watch name that you need to match>Enter the【Autel Link】
App>Scan the smart watch QR>Choose the correct smart watch
name>Start to match.
NOTE
When match the phone and the smart watch successfully, the smart watch
will automatically synchronize time with the phone.
2.5 Commonly Used Function
After successfully matching, you can access【Autel Link】App to apply some
commonly used functions, such as 【Face Gallery】,【Music】,【Clock】,
【Contacts】,【Weather】,【Vehicle Key】.
To apply those functions
Access the【Autel Link】App>【Devices】>Tap the Connected
OTOFIX WATCH.

10
Figure 2.6 Commonly Used Function
2.6 Do Not Disturb Mode
After entering the 【Do Not Disturb 】mode, incoming calls and message
reminders are forbidden, the alarm clock does not vibrate or ring, and the
screen does not turn on when you raise your wrist.
You can also set a regular 【Do Not Disturb】time period, and the smart
watch will enter the【Do Not Disturb】state on time.
To set【Do Not Disturb】mode
Tap the【power button】to light up the screen then swipe up to open
the status bar and turn on .
To set the regular time of【Do Not Disturb】mode
Tap the 【power button】to enter the application list>Tap >
【Sound & vibration】>【Do Not Disturb】>【Timer on】>Adjust
the 【Do Not Disturb time】.
2.7 Upgrade the Smart Watch System and App
To upgrade the smart watch system
Access the【Autel Link】App>【Devices】>Choose the connected
smart watch>【Firmware update】>【Update now】.

11
To upgrade the Autel Link App
Please update the【Autel Link】App in Android App Market or iOS
App Store.
NOTE
You need to re-pair your phone and the smart watch after finishing the Autel
Link App update.
2.8 Factory Reset
To reset the smart watch
Method 1: Tap the smart watch【power button】to enter the
application list>Tap > 【Factory reset】>【OK】.
Method 2: Access the Autel Link App>【Devices】>Choose the
connected smart watch>【Reset】>【OK】, tap 【OK】again when
a pop-up appear on the smart watch.
NOTE
When choose【Factory reset】, the stored data will be deleted.
If tick【Clear pke data】, the original pke data will be deleted from smart
watch.
2.9 Charge the Device
To charge the device
Connect the power adapter to the power outlet, then connect the USB
port of the charging base with the power adapter.
Place the smart watch horizontally on the charging base. Align
magnetic contacts on the charging base and that on smart watch.
IMPORTANT
Please use the attached charging base, and the charger with a rated output
voltage of 5V and a rated output current over 1A to charge the smart watch.
When the smart watch has a low battery, connect it to the power source,
and an icon of charging will be displayed.
The charging time is about 1 hour. Under different environmental conditions,
the required charging time varies slightly. When finish the charging, please
disconnect the charger in time .

12
The smart watch and the charging base and is not waterproof, please keep
them dry before or in or after charging, or there are short circuits or other
risks.
The smart watch can be fully charged when the charging temperature is
between 0 and 45 ℃; It can not be fully charged when the charging
temperature is between 45℃and 60℃.
In order to protect the battery life of the product, the charging current will be
reduced in a cold and low temperature environment, and the charging time
may be longer, but the battery life will not be affected.
To check the battery power
Method 1: Tap the【power button】to light up the screen, then slide up
to enter the status bar. And you can check the battery level of the
smart watch.
Method 2: Access the【Autel Link】App>【Devices】> Click the
connected smart watch to view the battery power.

13
Basic Functions
3.1 Notification
After the smart watch is successfully paired with the Autel Link App, the
message reminder from the phone will be synced to the smart watch.
Therefore, the smart watch will vibrate to remind you when there is a new
message in the status bar of the phone. You can swipe the screen down to
view the content of the message.
Each message supports one screen display. You can click the news to read
it. Please follow these steps to set up a message reminder.
To set up a message reminder
Access the【Autel Link】App>【Devices】>Tap the connected
smart watch>【Notifications】>Turn on the notifications switch,
allow the【Autel Link】App to sync the information and choose the
applications whose message you need to sync.
NOTE
The message reminder from phone application can be received by the
smart watch. But you can not reply the message.
If you set the Do Not Disturb mode or do not wear the smart watch, the
smart watch will not receive notifications.
If a new message comes while you are viewing the content of the message,
the new message will automatically pop up to cover the content of the
message currently being viewed.
When the mobile phone and the smart watch are connected via Bluetooth,
the mobile phone receives WeChat and QQ news, which will be transmitted
to the smart watch via Bluetooth and has a delay.
When the phone is connected to the smart watch and other Bluetooth
devices at the same time, the smart watch’s message or incoming call
reminder still works.
WeChat/QQ voice and picture messages reminders can be received on the
smart watch, but the content can not be heard or read. Only the words of
【Voice message】,【Picture】will be displayed.
To delete the news

14
Tap the【power button】to light up the screen>Swipe down the
screen to check the news.
Choose a piece of notification, you can swipe right to delete a single
message, or click 【Delete All】at the bottom of the message list to
clear all unread messages.
3.2 Make a Call
After pair the smart watch and your phone successfully, there are three
ways to make a call by smart watch.
After setting the frequently used contacts in the Autel Link App on the
mobile phone, the name and number of the contact will be synchronized to
the call app of the smart watch, and then the smart watch call can be made.
You can also directly enter the number to be dialed on the smart watch to
make a call. Or dial the number in the record through the call record on the
smart watch end.
The specific steps are recorded below.
To add/ delete frequent contacts
Access the【Autel Link】App>【Devices】>Tap the connected
smart watch>【Contacts】.
Tap【Add】>Select some contacts>Tap 【OK】to add frequent
contacts.
Tap 【Delete】>Select some contacts>Tap 【OK】to delete
frequent contacts.
To call by smart watch
Tap the【power button】to enter the application list>Tap >Tap
【Contact person】>Choose one contact and make a call.
Tap the【power button】to enter the application list>Tap >Tap
【Keypad】>Input the phone number and make a call.
Tap the【power button】to enter the application list>Tap >Tap
【Call Log】>Choose the phone number and make a call.
NOTE
You can make a call only after the smart watch and your phone are paired
successfully.
Up to 10 frequently used contacts can be kept.

15
To make a call through the smart watch 【Contacts】, the smart watch and
the phone need to keep the normal connection.
Up to 50 call records can be saved.
In the 【Call Log】interface, swipe up to the bottom of the screen and click
【Clear All】to clear all existing call records.
3.3 Answer or Reject Calls
When the smart watch and the phone are connected normally and there is
an incoming call, the smart watch will vibrate to remind you and display the
number or name of the caller. You can choose to answer or reject the call.
NOTE
The caller ID is the same as that on the mobile phone: when there is a
incoming call, the unknown caller ID displays the phone number; the
contacts in mobile phone address book show the preserved ID of contact.
If you set the Do Not Disturb mode, the smart watch will not receive
incoming call notifications or vibrate or brighten the screen to remind you.
When it is inconvenient to answer or you need to end the call, you can hang
up through clicking the red button on the smart watch screen.
When calling, the volume of the call can be adjusted.
3.4 Play the Music
The smart watch can play the stored music. It can also play the music on
the mobile phone after turning on the 【Control music in mobile phone
through watch】in the Autel Link App, which is only supported by Android
phones.
To store/ play/ delete the music in the smart watch
Access the【Autel Link】App>【Devices】>Tap the connected
smart watch>【Music】>【Music Management】>【Add】. Then
the added music will be stored in the smart watch.
Tap the【power button】to enter the application list>Tap >Tap
to play the music.
Swipe left to enter the【Local list】. Select the music you want to
delete, swipe right and tap 【Delete】to delete it from the playlist.
Table of contents
Popular Watch manuals by other brands

Pyle Sports
Pyle Sports PSGP410 quick start guide

Citizen
Citizen E610 instruction manual

IWC Schaffhausen
IWC Schaffhausen PORTUGIESER GRANDE COMPLICATION operating instructions

houtman
houtman Pilbara Series Owner's handbook

Danish Design
Danish Design IQ Q231 Series manual

Fossil
Fossil DIGITAL MY TIME YOUR TIME manual