AV Access BizEye 80 User manual

BizEye 80
4K UHD USB Camera
User Manual

www.avaccess.com
Introduction
This product is a 4K Ultra HD USB camera. It features an
ultra-wide angle and distortion-less lens. It also supports
high-quality video up to 4K 30fps, auto color-correction and
white balance, performing well in different lighting
environments or sunlight. Its built-in auto noise reducing mic
can pick up clear sound within the distance of 3m.
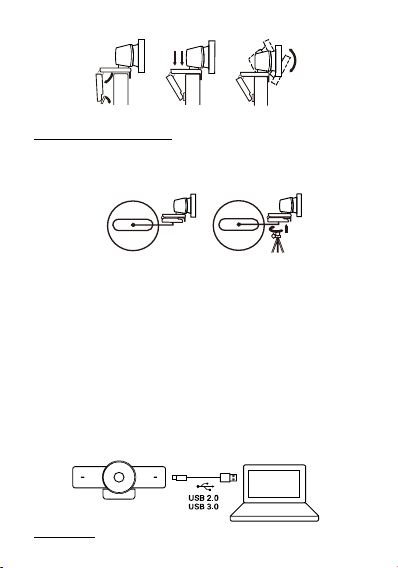
It is easy to install. It is fully compatible with most operating
systems, such as Windows 7/10/11 and Mac OS, and works with
popular calling and streaming platforms including OBS (Open
Broadcasting Software) and XSplit Broadcaster for abundant
application scenarios.
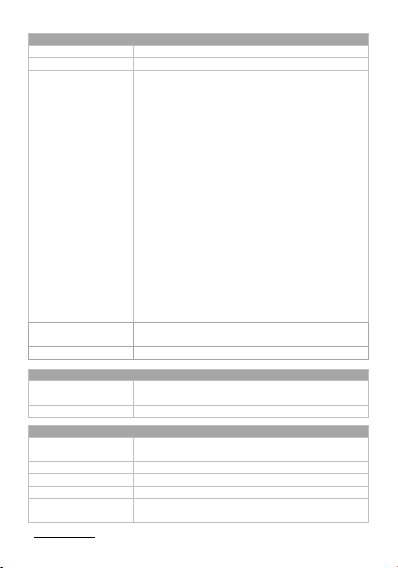
Features
Supports 4K Ultra HD up to 4K@30fps encoding output, and
down-compatible with 1080p and 720p.
Supports MJPEG, YUY2, NV12, H.264 and H.265 video
compression to comply with most application platforms.
Full functional USB 3.0 / USB 2.0 connection, power supply,
video and audio all in one via USB 3.0 Type-A to Type-C
cable.
120° ultra-wide-angle distortion-less lens.
Built-in auto noise reducing mic, which can pick up clear
sound in the distance of 3m.
Fully supports UC and web conferencing platform, like Skype
business, Zoom, WebEx, etc.
Auto Framing / Presenter Tracking based on AI technology
makes meetings more intimate and friendly.
Supports ePTZ with a maximum of 5x digital Zoom.
Equips multiple-purpose mounting clip for easy installation

www.avaccess.com
on the top of a laptop, a display or a universal tripod.
Package Contents
USB Camera x 1
USB 3.0 Type-A to USB Type-C Cable x 1
Quick Start Guide x 1
Panel
1. Microphone
2. Camera Lens
3. Status LED
•When USB camera is
powered on, the LED will
light green for 6 seconds
and off.
•When USB camera is
transferring data, the LED
will light green
constantly.
4. USB Type-C port
Installation
For placement on a monitor
1. Place your webcam on a computer, laptop or monitor at a
position or angle you desire.
2. Adjust the webcam to make sure the foot on the universal
mounting clip is flush with the back of your device.
3. Manually adjust the webcam up/down to the best position to
frame yourself.
3
1
1
2
4

www.avaccess.com
1 2 3
For placement on a tripod
1. Locate the M12 tripod thread on the bottom of the webcam.
2. Secure the webcam on your tripod by twisting it into the
M12 thread.
1 2
3. Place your webcam with the tripod anywhere you desire to
the best position to frame yourself.
Note:
•Tripod is not included in the package.
•For best performance, install this device within the height of
100cm above the desktop is recommended.
Connection
Connect the USB-C port of this device to the USB-A port on your
computer using the cable provided.

www.avaccess.com
Note:
1. After this device is connected to a computer, its camera and
microphone can be detected by the system and specific
application in the name of the following:
Camera Name: BizEye 80 | Microphone Name: BizEye 80
2. By default, the microphone is turned off. To access to its
features, please visit www.avaccess.com to download and
install AV Access BizEye App.
Specifications
Camera
Lens
Fixed Focus
Sensor
CMOS, Effective Pixel: 8.0M
Scanning Mode
Progressive
Viewing Angle
120° (FOV)
Horizontal Rotation
Range
Leftward: 30°, Rightward: 30°
Vertical Rotation
Range
Downward: 90°
ePTZ
Supported | 5 x Digital Zoom
Shutter
1/30s ~ 1/10000s
Tracking Mode
Auto Framing (default) / Presenter Tracking / Off
White Balance
Auto
Digital Noise
Reduction
2D, 3D digital noise reduction
Backlight
Compensation
Auto
Note: The tracking mode can be switched among the above modes through
AV Access BizEye App. To download this App, visit www.avaccess.com.

www.avaccess.com
USB
Operating System
Windows 7/10/11, Mac OS™ 10.10 or higher
Color / Compression
MJPEG (default) /YUY2/NV12/H.265/H.264
Resolution and Frame
Rate
MJPEG: 320x240@30fps, 640x360@30fps,
640x480@30fps, 1280x720@90fps*/60fps/30fps,
1920x1080@60fps*/30fps, 2560x1440@30fps*,
3840x2160@30fps*
YUY2/NV12: 320x 240@30fps, 640x 360@30fps,
640x480@ 30fps, 1280x720@30fps*,
1920x1080@30fps*, 2560x1440@30fps*,
3840x2160@15fps*
H.265/H.264: 320x240@30fps, 640x360@30fps,
640x480@ 30fps, 1280x720@30fps,
1920x1080@30fps, 2560x1440@30fps*,
3840x2160@30fps*
Note:
(1) Resolutions and frame rates that marked with
asterisks (*) are not available in USB 2.0 mode.
(2) In USB 3.0 mode, default resolutions and frame
rates are 1280x720@30fps.
(3) In USB 2.0 mode, default resolutions and frame
rates are 1280x720@30fps for MJPEG/H.265/
H.264, and 640x480@30fps for YUY2/NV12.
USB Communication
Protocol
UVC 1.1
USB Cable Length
1.5m/4.92ft
Input/Output Interface
USB Interface
1 x USB Type-C: USB 3.0, up to 5Gbps (USB 3.0 Type-A
to USB Type-C cable is recommended)
Mic
2 x Mic
Physical Parameter
Operating
Temperature
0°C ~ 40°C (32°F to 104°F)
Storage Temperature
-20°C ~ 60°C (-4°F to 140°F)
Input Voltage
5V (USB power supply)
Power Consumption
2.1W (Max)
Size
140.3mm x 61.5mm x 73.7mm/5.52” x 2.42” x 2.9”
(with Bracket)

www.avaccess.com
Physical Parameter
Net Weight
0.14 kg/0.31lb (with Bracket)
MTBF
>
30000h
Troubleshooting
1. What if this device is not detected on the computer?
•Verify the USB Type-A to Type-C cable is connected
properly between the computer and the device.
•Connect the device to the computer’s another USB
Type-A port instead.
2. What if this device’s microphone is not detected on the
computer?
By default, the microphone is turned off and thus cannot be
detected by a computer. To turn it on, please visit
www.avaccess.com to download and install AV Access BizEye
App.
3. What can I do if display image is blurred?
Wipe the camera lens with a cleaning cloth to remove stains
on the lens.

Table of contents
Popular Camcorder manuals by other brands

Samsung
Samsung VP-DC161(i) Owner's instruction book

Sony
Sony DCR-TRV360 - Digital Video Camera Recorder Service manual

JVC
JVC GR-DVL220U Service manual

ClearClick
ClearClick HD Video Capture Box Ultimate 2.0 Users manual & quick start guide

Sony
Sony 3-288-523-13(1) operating guide

Sony
Sony DCR-TRV19 Manual de instrucciones / Manual de... operating instructions