manuals.online logo
Brands
  1. Home
  2. •
  3. Brands
  4. •
  5. BAHAMA
  6. •
  7. Patio Furniture
  8. •
  9. BAHAMA Jumbrella Operating manual

BAHAMA Jumbrella Operating manual

© 2019 Bahama GmbH - Germany www.bahama.de
- Important Information –
Jumbrella
the LARGE-SIZE
parasol
1
General Instructions 06/10 –
on Unpacking, Pre- & Posterection Handling, and on the Operation
of the Architectural Folding Structure Bahama »Jumbrella«,
»Jumbrella Wave« and »Jumbrella XL«
Edition: 11/2015
[These written instructions to be handed onward to the erector as well as to the regular operator
of the umbrella(s) immediately on delivery of the structure(s), prior to commencing unpacking].
Preliminary Recommendation.
In deciding to select one or several Bahama Jumbrella (incl. Wave or XL) structures you have settled on an outstanding
brand product.The very expenditure for it (them) ought to be reason enough for carefully reading these »General
Instructions« [a copy of it with its title distinctly readable from outside is in a transparent plastic pocket sticked onto
one (of the two) solid head cover(s) of every umbrella package shipped by the factory] before starting to unpack the
structure(s). To preserve both the functional and the visual i.e. aesthetic value of your investment, utmost care in
unpacking, pre-erection handling, in erecting, posterection handling, and in the operation of the Jumbrella, Jumbrella
Wave or Jumbrella XL is of the essence.
1. Unpacking and Preparing the Jumbrella for Erection.
For Jumbrella XL: Please refer to the manufacturer’s additional “Instructions on how to unpack an XL on site”, which
is always attached to the opening head cover of the XL’s heavy transport cylinder.
1.1 Recommendation:Put the no less than 4-metre long heavy-duty cardboard cylinder on two normal chairs (w/o
arm-rests) or two trestles set up at an inter-distance of 2.5 to 3 metres.
1.2 Open the cylinder packing at the head end where the black & white directional arrow stickers point to.Wholly
remove all of the 5 screws from both head cover and cylinder wall. Take the umbrella accessory package out of
the cylinder end; you’ll need it lateron.Have a help firmly hold the opposite cylinder end as you seize the bottom
end of the major pole to start pulling the structure (without canting it) by up to an estimated 3/4th of its length
out of its transport cylinder.Have the help release the non-opening end of the cylinder and, instead, have him
hold the bottom pole end level to enable you to now seize the umbrella corpus in order to further pull it out
and hold so to prevent it from crashing down onto the ground (which, if it happened, would cause unnecessary
damages to it).You may now carefully lay the yet soft-wrapped umbrella corpus back down onto the chairs.
1.3 Store the empty (reusable) transport cylinder, its head cover and its fastening screws in some absolutely dry
place. You might need it again sometime, for either transport or inter-storage of the subwrapped structure.
1.4 Wherever you carefully deposit (never drop) the yet soft-wrapped structure temporarily (prior to erecting it
eventually), on the chairs, or on the ground:
1.41 Don’t remove (yet) its either plastic hose wrapping or reusable protective cover (depending on how it was
ordered)! Leave this ’inner’ soft wrapping on until advised to remove it more below herein.
1.42 To move the yet soft-wrapped umbrella on site (prior to erect it to its vertical position in place):Lift it (by
no less than two persons –in case of the larger models & especially Jumbrella XL by no less than 4 persons)
at a time, and carry it! Never, in whole or in part –e.g. with one end –, move, pull, push, or drag along the
umbrella corpus over the ground nor over/against any other solid object! If this advice is disregarded, or
is not being taken duly serious, visible membrane surface damages will surprise you upon first unfolding.
The Jumbrella XL is to be erected either manually via the footings tipping hinge (pls. mind the axle that
needs to be inserted into the roll bearings!) or by means of a suitable lifting device.
1.43 Whether you deposit the umbrella corpus on the ground, on two chairs, or on any other appropriate
podium or the like, make sure that such base is clear of sharp edges and/or any solid protrusions that might
damage the wrapping and, through and underneath/behind this, the multiple fabric layers of the
membrane wound all about the frame corpus.
the LARGE-SIZE
parasol
2
2. General Procedures for Erecting & Installing in Miscellaneous Footing Devices.
2.1 Every Jumbrella comes with its bottom major pole end factory-preassembled relative to the type of Bahama
footing component that was selected by the orderer, and that either was shipped together with the umbrella
or had been shipped ahead for preparatory works on site.Such factory-anticipated preassembly also comprises
wiring/ earthing and plug connection if the umbrella concerned was ordered to be with (optional) built-in
Bahama »Light« or »Magic« a/o »Sound« or Bahama »Heater« and »Light« or »Magic« a/o »Sound« respectively.
2.2 Every Jumbrella coming factory-equipped with its suitable ADAPTER (massive aluminium rail insert).Its primary
function is to stiffen and reinforce the major pole in its most stressed sector extending from the top rim of the
pole’s exterior sleeve up to some 20 cm above. Furthermore, since being the interiorstiffening & reinforcing
element inside the major pole, the ADAPTER offers all tapholes (visible behind and concentric with respective
bore-holes in walls of major pole and exterior sleeves) necessary for final on-site installation of the umbrella in
the predetermined type of footing. Eventually, the ADAPTER comes with firmly built-in plug unit where the
counter-plug at the uppermost end of the 230-(or 108/130-) volt AC feed cable (from position of the external
ON/OFF control box, in & through the ground, conduit extension and in-ground sleeve [in concrete] further up)
is to be plugged in during installation of the umbrella(s) factory-equipped with optional Bahama »Light« or
»Magic«.
2.3 Except for with »Light«/»Magic« and/or »Sound«-equipped Jumbrella editions coming factory-preassembled
to be installed in »Universal In-Ground [concrete] Sleeve« # 0451-99/E or #1451-99/E and Jumbrella models
from Ø 5.6 m round, from 5.00 x 5.00 m square and from 5.00 x 3.75 m rectangular, respectively, the ADAPTER
is coming with its entire length wholly inserted flush with the bottom end of the major pole of the structure
and, during transport, is held in position by a visible fastening screw some 30 cm up from the bottom pole end.
Such ”wholly-inserted” supply status to be maintained unchanged o n l y i f the structure –come it with or
without Bahama »Light«/»Magic«/»Sound« –is going to be installed in either a »3-piece Universal In-Ground
Base« with tipping joint, a Bahama »Portable Universal (heavy-weight) Foot« from the # U333-line, or in the
Bahama »Heavy-Duty Flat (steel-plate) Foot« # 0334/E; # 0334-10/E; # 0335/E or # 0335-12/E. The ADAPTER of
the Jumbrella XL generally remains wholly inserted in the major pole!
–In contrary to that:
Remark: All permanent installation systems based on whatever type of BAHAMA »Universal In-Ground Sleeve« [#
0451-99/E or 1451-99/E] or »Asymmetric Universal Underground Footing« console [# CHIRA-0451/2007
or CHIRA-1451/2007] have in common that –on completion of installation of the structure –the interior
ADAPTER is to extend half-way (≈ 32-33 cm) ”down” into the receiving sleeve in concrete, and half-way
”up” into the major pole of the structure. In this case either disengage the wholly inserted ADAPTER by
unscrewing the aforementioned fastening screw (remove wholly, temporarily) and pull it out of the
bottom pole end or –in case of the aforementioned models –insert the ADAPTER into the major pole.
Screw in again & tighten the fastening screw (with its soft plastic washer). The correct amount of the
ADAPTER’s extension is positively achieved as its ’new’ i.e. alternate receiving tap-hole shows up in, and is
concentric with, the mere borehole in the exterior pole wall; so no precision measuring required to re-
engage the ADAPTER inside the pole.
2.4 It would lead too far herein to refer to the individual specific working steps required for final installation as
these steps vary relative to both the umbrella model/size & equipment (with/without »Light«/»Magic«;
»Heater«, etc.) and its applicable type of Bahama footing device as this was selected when ordering.Said steps
are referred to in additional specific documentations (drawings, descriptions, etc.).
3. Common Posterection, Unfolding & Tensioning Steps.
the LARGE-SIZE
parasol
3
3.1 During and upon basic erection the umbrella corpus to be in its soft-wrapped condition still (either plastic-hose
material or optional reusable protective cover wrapping)!
3.2 Just temporarily engage the pole in its footing component in concrete to ensure that the structure will not be
lifted out of its footing again (e.g. by a sudden gust) during the following working steps.
3.3 To remove the protective soft wrapping material:
3.31 Use a free-standing safety stepladder secured by a second person standing on the ground. Set it up across
and closest to the now standing umbrella structure.
3.32 Use the white/clean protective gloves from the structure’s accessory kit coming with to prevent the fabric
corpus from getting dirtied unintendedly.
3.33 If the fabric corpus is in standard plastic hose wrapping:Manually untie (don’t use scissors, knife or any
other tool –take note of the specific ”Take care!” warning notice visible and legible on or through either
plastic hose or protective cover packing material !) the fabric ribbon bow at the bottom of the hose
wrapping so that the hose regains its full width at the bottom.
3.34 If the fabric corpus is in a reusable protective cover:Untie its cords at the bottom.
3.35 Initially from the ground, then from your rising position on the ladder, gradually shift hose material or
cover up as much as practicable.Eventually, from your highest position required on the ladder, pull hose
or cover off the top of the umbrella structure.Recommendation:Store up hose or cover for reusage when
required.
3.4 Both the cone-shaped solid top cover (apex element) and the (white) screw-ball to be taken from the accessory
package coming with every Jumbrella.The larger & heavier models come with a factory-fixed crane eyelet,
which has to be removed first. Put the solid cover on top of the structure.Make sure it touches down and
engages distinctly.Insert the screw-ball or eyelet, respectively through the central opening in top of the cover
(receiving taphole right underneath), screw in and tighten it so that it cannot unloosen again by itself.Remove
the ladder since it is no longer required from now on.
3.5 Unlock and take both cylinder locks out of the tension latches.Partly (by some 30 degrees off its down position)
open the left-hand latch so that it gets free from the blocking device (active only with the closed umbrella) on
the major pole.Leave the left-hand latch in this partly opened/spread position.
3.6 Remove the Bahama Swiftbelt (buckle harness) from the umbrella corpus.With your hands clean (or wearing
white protective gloves from the umbrella’s accessory package), manually unwind the fabric layers of the
membrane (wound all about the frame body) to neutral i.e. unwound & untwisted. The membrane should now
”hang” relaxed for the following workings steps:
3.7 Slightly lift all 8 [10 or 12] rib (arm) ends off the structure to release the folding frame from its potential dead-
centre configuration.From your operator position (facing the empty lock ports in both latches):Hook your finger
tips under 2 extreme arm (rib) ends next to each other, and pull them towards your position to unfold the
Jumbrella.With traditional i.e. valance-equipped membrane editions, interrupt unfolding in order to check
valance shields not twisted (not jamming) about arm (rib) ends.If one or more of them twisted, clear them
down before recontinuing to unfold.
3.8 Manually unfold further up to a 70 to 80 percent OPEN canopy configuration that allows you to get under it
comfortably into your new position right in front of the major pole:Due to its mass centre-balanced kinematic
design, the canopy stays put, it doesn’t recollapse by itself.With both hands on shift the ”carriage” (bearing
tensions latches, sliding on major pole) up further, hold it in position with your left, open the RIGHT-hand
tension latch up widely so to be able to engage its spring clip in the counter-catch overhead. Turn the right-
hand latch down by approx.half its way or as required to enable you to also engage the left-hand spring clip in
its counter-catch overhead.Thereupon, wholly turn down both latches at a time: When both latches have been
turned down wholly, the canopy has reached 100 percent of its factory-predetermined amount of induced
overall tension required!
the LARGE-SIZE
parasol
4
Rule 1: To Unfold & tension the Jumbrella, always start with the RIGHT-hand tension latch (refer to
3.8), not vice versa!
Rule 2: Particularly when unfolding & tensioning the factory-new Jumbrella for the very first time, you’ll
perceive that tensioning particularly the right-hand latch requires a surprisingly high effort.If,
on first-time unfolding, the structure has been kept OPEN & continuously exposed to
weathering for 8-10 days, the initially observed, apparently high amount of manual force will
be distinctly lower as you unfold the Jumbrella a second time.This phenomenon is due to the
fact that the ”residual stretching” potential, that is inherent in the new fabric material as well
as in the entire membrane made of it, works out only under the combined conditions of
maintained overall tension on one and permanent weathering influence on the textile material
on the other hand.–
3.9 Reinsert cylinder locks into their ports in the tension latches, lock them up, and pull keys off.
3.10 Within its footing component type-related radial adjustment range of approx. 22.5°, turn the Jumbrella about
its centre axis to align its relevant canopy edgeline concerned (arm end to neighbouring arm end with
round/octagonal, diagonal-arm end to next diagonal-arm end with square and/or rectangular models) strictly
parallel to the respective counter-edgeline of an already installed Jumbrella adjacent to yours particularly when
adjusting SQUARE and RECTANGULAR canopy structures in ”additive plan configurations” (in row, across, or
”big square”), or to the frontline of e.g. any nearby building, wall, hedge, or the like.As the desired ideal canopy
edgeline position has been found, secure it by tightening at least one of the major screw-bolts (major pole fixed
to In-Ground Sleeve, Portable Foot or On-Deck Base).Done this, recheck ideal edgeline position maintained still
so that readjustment/recorrection not required.If not, unscrew again, and repeat the aligning and tightening
procedure.
Rule 3: Precision adjustment (alignment) of the relevant canopy edgeline easier done by manually
controlling the Jumbrella at one of its extreme rib ends (rather than at the major pole).
3.11 Firmly tigthen all of the remaining major screw bolts of the footing component (varying relative to the selected
type of footing device).
3.12 Reinsert the cylinder lock into its port either in locking ring (of Universal In-Ground Sleeves), or in locking block
(of 3-piece Universal In-Ground Bases with tipping hinge, Portable Universal Foot and Octagonal On-Deck Base
as well), lock it up, and pull the the key off.This is to prevent the Jumbrella from being dismantled & removed
from its footing (by unauthorized hands). The Jumbrella XL, however, is an exception:Due to its considerably
high dead weight, such theft-prevention device is not necessarily required. The XL Locking Block is nevertheless
available as optional accessory.
4. Detensioning, (Re-) Folding & Securing the Jumbrella
4.1 Unlock and take both Bahama cylinder locks out of the tension latches.
4.2 First turn up to detension & disengage (spring clip) the left-hand tension latch:The canopy (membrane) relaxes
partly.Then turn up to detension & disengage (spring clip) the right-hand tension latch:The canopy
(membrane) relaxes wholly, and the carriage slides down slightly (by a couple of cms).
Rule 4: To detension & (re-) fold the Jumbrella:Always start with the LEFT-hand tension latch, not
vice versa!
4.3 Still from your operator position in front of major pole:Use both hands to slide the carriage further down (on
major pole) by approx. 40 to 50 cm.The canopy stays put in this intermediate configuration.Make sure the left-
hand latch is in a partly spread position (some 25-30° off vertical), –right-hand latch turned down wholly (non-
observance of necessary spread position of the left-hand latch may damage or even destroy its [closed-
configuration] blocking device –exception to this: the Jumbrella XL models!).
the LARGE-SIZE
parasol
5
4.4 Proceed to the periphery of the canopy to continue from outside.With your finger tips push two arm (rib) ends
further down and –at the same time, positively –wholly towards the major pole until you perceive an obvious
(yet soft) mechanical detent.
4.5 Very important now : Pull each of the 8 (10, or 12, nbrs. depending on
the very model) fabric sections wholly out of the frame corpus.Flatten
i.e. smooth these now quasi triangular sections by distinctly stretching
their centre pleats in one outwards and down at their lowermost/most
extreme ends, and wind the so prepleated membrane sections in o n
e sense all about the frame corpus –as illustrated schematically herein
right!–Also, in this context, please observe ”Rule 5” per sub-para 4.8
more below !
4.6 Hold this wound-about ”package” in shape, attach the Bahama
Swiftbelt (buckle harness) a hand’s breadth above the lowermost ends
of arms, pull it reasonably (not sharply) tight, and press the clamping
buckle closed –as illustrated herein right. Should the triangular fabric
sections not lie flat and smoothly underneath the tightened Swiftbelt,
again flatten them by stretching outward. –CAUTION: To strap the
closed umbrella package don’t use any wire, nor cord, nor any adhesive
tape material! Should the respective umbrella come with more than
one Swiftbelt (this is the case with larger square and rectangular models
due to their different arm lengthes), all Swiftbelts have to be attached
in accordance with the original arrangement upon delivery.
4.7 Turn the (yet partly spread) left-hand tension latch down wholly:By doing so, the cam protruding from the
inward face of the latch must fully insert into its counter-port on the major pole –exception to this:the
Jumbrella XL models. Reinsert both cylinder locks into their empty ports in latches, lock them up, and pull keys
off –so to prevent the Jumbrella from getting unfolded by unauthorized persons.
4.8 In case you intend to refold and secure the Jumbrella for a longer term i.e for more than 1 to 2 weeks, and
provided the structure was orderered to come with its (optional) reusable, made-to-measure protective cover
(strongly recommended by the manufacturer):
[Using a free-standing safety step ladder to be placed across and close to the folded structure:]
4.81 Unscrew the (white) screw-ball/ crane eyelet in zenith to remove the cone-shaped cover from top of the
structure.It is recommended to store parts in a place that you’ll recall as you’ll need them again for
reunfolding the structure.
4.82 Pull the reusable protective cover over the top of the umbrella and, gradually, further down until it fits
the top of the corpus.Wind binding cords twice about the bottom surplus of the cover, tighten both ends
(to prevent vermin from getting inside), and tie them up thoroughly so that they cannot untie by
themselves.
Rule 5: Prior to closing & securing the umbrella for more than 2 days (48 hours) make sure its fabric
membrane is absolutely dry, not wet, humid or damp, nor just ”hand-dry” (risk of damp-stains) !
5. Miscellaneous, Manufacturer’s General Recommendations, Warnings, etc.
5.1 Except for and during speedily unfolding and/or refolding the Jumbrella under zero- or low-wind conditions, it
must n e v e r b e k e p t in any intermediate or transit configuration between »UNFOLDED &
TENSIONED« and »(RE-) FOLDED & SECURED«!
the LARGE-SIZE
parasol
6
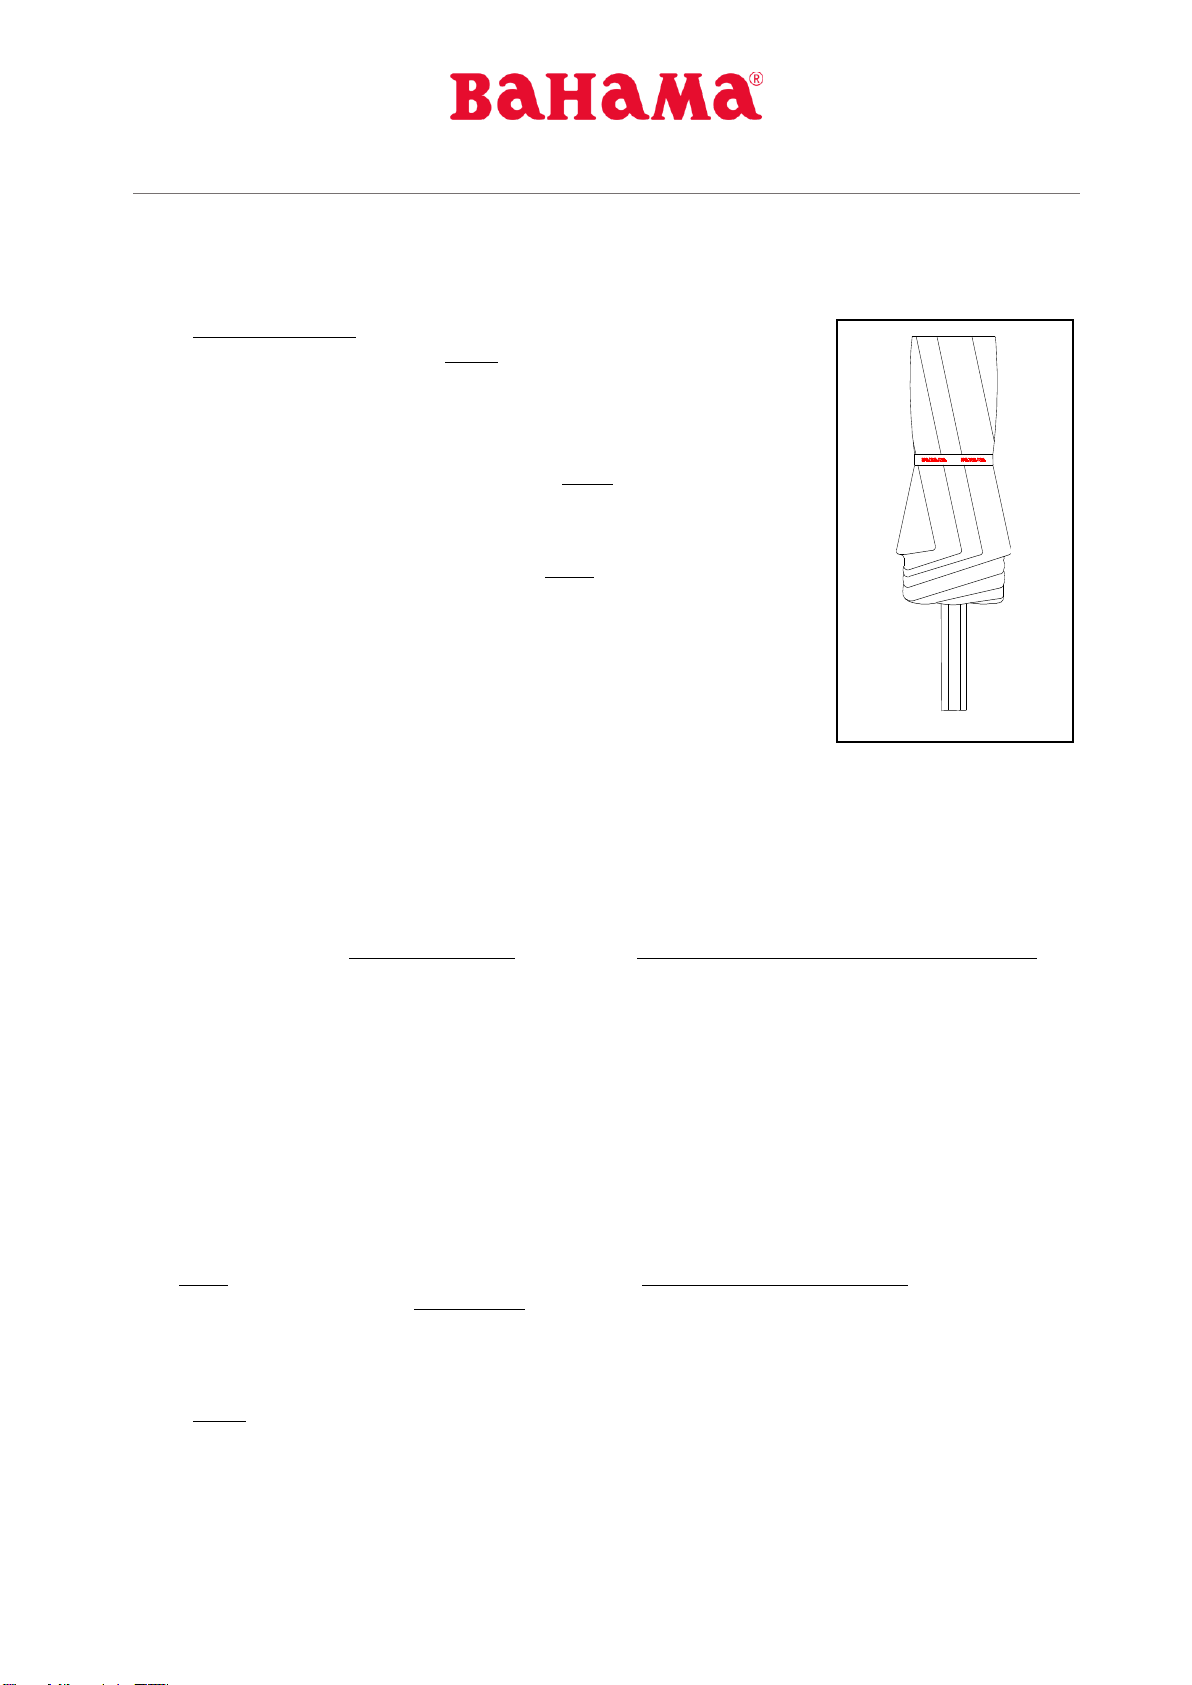
// As to the REFOLDED & SECURED (harnessed) configuration of the Jumbrella structure:
If you disregard the proper refolding, fabric-gathering, spiralling and harnessing steps as described in
the ”very important” sub-paragraphs 4.5 through 4.7 herein above (in, for instance, just refolding the structure
without executing all indispensable subsequent fabric and structure-securing steps), this will –sooner or later –
result in unnecessarily premature heavy damages to and, eventually, destruction of the fabric membrane, such
damages and/or destruction indicating the characteristic ”fluttering effects”.
They are caused by countless impacts of wind acting on the non-gathered and non-secured (non-”quieted”) fabric
sections of the membrane over weeks and months, or e.g. overnight, regularly. Unfailingly visible signs of
commencing fluttering damages are several few centimetres long, salient crack-like horizontal traces spaced
parallel to each other and all of them to the outer edgeline of the membrane, accumulating all about the
(theoretical) radial centreline within in each section of the membrane. In the final stages of the evolution of
fluttering damages, a large, more or less triangular band of cracks and even physical tears, whose lengthes will
have grown up to 20-50 cm and beyond, extends from the zenith (of the structure) down to and, if membrane
equipped with valance, beyond the roof edgeline of each major fabric section concerned. –By experience,
fluttering damages and, eventually, complete destruction are the most frequent reason for as unnecessary as
premature wear and tear of any fabric membrane. It’s an aerodynamical peculiarity of fabric membranes
damaged or destroyed by fluttering effects that the leeward fabric sections (”leeward” to be referenced to the
permanent position of a structure relative to the yearly average direction of winds registered locally/regionally)
are damaged sooner and throughout more severely than the ”windward” fabric sections. //
5.2 Provided the selected original Bahama footing component has been set, cast in, preassembled and/or mounted
on site in compliance with the manufacturer’s drawings, their written supplementary instructions and/or other
written type-related recommendations issued by the factory, the properly unfolded, tensioned & locked
Bahama Jumbrella is capable of withstanding unusually high wind velocities (see model-associated wind limits
–varying relative to both model/size and type of footing component selected/applied –published in the
respective catalogues/brochures).Unless heavy winds, storms, thunderstorms or the like have been forecast
on TV or radio, it is not recommended to unnecessarily (re-) fold & secure the properly unfolded & tensioned
structure.Opposed to the widely spread opinion according to which daily unfolding & refolding decreases wear
and tear and be, consequently, apt to extend the endurance particularly of the fabric membrane, latter –even
though more exposed to weathering –lives the longer the less frequently the Jumbrella is refolded overnight.
5.3 Should you already be caught in a storm or a typical squall front (typical of preceding a thunderstorm), don’t
try (surely with the presumedly best intentions) to detension & refold the Jumbrella: Apart from the augmented
risk of an accident (with bodily injuries), the probability of damaging or even destroying the structure, in part
or in whole, under already prevailing heavy-wind conditions is by far higher than the one of the structure getting
damaged or destroyed as it is in its unfolded & fully tensioned configuration. As a rule of thumb: Never ever try
to detension and refold the Jumbrella under already prevailing heavy-wind or storm conditions!
5.4 Procurement of spare/replacement parts: No matter which part or parts might be required, always advise your
supplier of the Jumbrella structure(s) of its(their) unmistakable serial number(s) to make sure that costly errors
or misunder-standings are precluded.You’ll spot the serial number (SNR) embossed on the stainless-steel brand
plate that is on the exterior carriage body (on major pole), a hand’s breadth above the tension latches (operator
side).–
© 2017 Bahama GmbH, Germany.
Any and all product- or procedure-related changes are subject to manufacturer’s editorial amendment
without prior notice.»BAHAMA« is an internationally Registered Trademark of BECHER Textil- & Stahlbau
GmbH, Germany.–This document including its contents and terminologies, in whole or in excerpt, shall not
be copied or duplicated, nor otherwise be reproduced without prior written authorization by Bahama
GmbH, Germany.
Bahama GmbH
Tel +49 (0)2265 998 0 made in germany
[email protected] Gewerbeparkstrasse 34
www.bahama.de D-51580 Reichshof issued & printed in 05/2017
© 2018 Bahama GmbH - Germany www.bahama.de
Always remember to …
-properly fold and secure your umbrella when heavy winds
have been forecasted
-fabric that gets stuck between the spokes is prone to receive
friction marks and/or holes
-pull the fabric carefully out of the spokes and fold the
membrane around the umbrella frame
-only use a Bahama Swift Belt to secure the umbrella. Other
items such as ropes and tapes will damage the textile
membrane
© 2018 Bahama GmbH - Germany www.bahama.de
Winter Storage …
-For winter storage, the membrane of your umbrella should
be absolutely dried through. Otherwise, non-removable
mould stains will develop.
-In case your Bahama umbrella is to remain installed
outside during the winter, you should take off the
membrane, secure the frame with the Bahama swift
belt and wrap it with the basic protective cover, which
is tied up on its lower end.
-You may also use the protective cover comfort with
telescopic rod, which facilitates the cover up as the
removal of the membrane, top cover and ball is not
necessary. A step ladder is not needed either.
-In the event that your Bahama umbrella is equipped
with any electro-mechanical options such as Lighting /
Led-Lighting, Heating and Sound, you should make sure
that all switches in the External Control Unit are turned
OFF!
© 2018 Bahama GmbH - Germany www.bahama.de
Care and Maintenance of your Bahama Membranes and
Umbrellas …
-While rodents usually disdain clean(ed) membranes, they
have a tendency to infest dirty and deteriorated textiles,
which - in turn - can only be disposed after having been
eaten away.
-During spring season, the processing time for cleaning/
repairing your returned membranes or umbrellas is of
approx. 3-4 months.
-Depending on your confirmation of our cost estimate, this
processing time is of only approx. 4-6 weeks during the
months of September through November.
-Furthermore, we will grant you a discount of 10 % on the
membrane cleaning charges during these months
(September through November).
-Providing that textile membranes have been handled
with care and were subject to normal strain, they will
have reached their maximum age after 4-5 seasons.
The reasons for this are –among others –the
increasing UV radiation and environmental emissions
as well as longer operating times. In the event that your
membrane was ordered some time ago, you should
contact us and discuss the cleanability before you
return the membrane to us for cleaning and/or
repairing purposes.
Jumbrella |Operating Instructions
Page 1 .
Page 2 .
Important Information:
Larger Jumbrella models have tension rods
with twin hooks (red arrow) instead of single
hooks (blue arrow).
The twin hook system facilitates the opening
of the larger umbrellas.
Swift Belts:*
all rectangular
models receive
3 swift belts
exception: 4 x 3 m
(receives 2 pcs. only)
Jumbrella |Operating Instructions
• how to properly operate, fold and secure a Jumbrella
• approximate time required until completey secured: 5to 8 minutes
Safety Notice:
Operating, folding and securing should be carried out under
no- or low-wind conditions only !
Important Information:
Should you notice that a brand-new membrane leaks rainwater during the very first rainfalls it is
exposed to, there is no need to be concerned! The textile membrane and its sewn joints, made
of polyester fabric, cannot be 100% impermeable to rainwater from the very first minute on.
The initial leakage along the sewn joints will gradually diminish and disappear eventually. The more
intensively a Jumbella with a brand-new membrane is kept outdoors, tensioned and exposed to
different weather conditions (wet/dry/cold/warm), the earlier the leakages will disappear.
all round and square models
receive 1 swift belt only
1
1
2
Bahama GmbH |Gewerbeparkstrasse 34 |D-51580 Reichshof
T+49 (0)2265 998 0 | F +49 (0) 2265 998 300 |info@bahama.de |www.bahama.de
Page 3 .
Step Description
1
Fully closed and secured Jumbrella
(6 x 4.5 m) with 3swift belts*.
*the number of Bahama swift belts used for securing varies
depending on the umbrella size (please refer to page 1)
2
Use the key to unlock both cylinder locks.
Then remove these and keep them for
reinsertion once the umbrella has been fully
opened.
3
Partly open the left tension latch so that the
unfold prevention (red arrow) device
disconnects.
Image
Jumbrella |Unfolding & Opening
T+49 (0)2265 998 0 | F +49 (0) 2265 998 300 |info@bahama.de |www.bahama.de
Page 4 .
Step Description
4
Use a step ladder*and remove the swift
belts.
*the use of a step ladder is only required for larger
models.
5
Loosen the fabric sections that are winded
around the Jumbrella frame.
6
Especially for Jumbrellas with valances make
sure that the valances are not turned
upwards at the canopy edgeline.
7
Now slightly pull the diagonal spoke towards
you as much as is needed to ….
Image
Page 5 .
Step Description
8… get underneath the Jumbrella.
9
By using the right-hand tension latch push the
carriage upwards to engage the spring clip
into the first hook on the tension rod.
10
Turn the right-hand latch all the way down
and then …
11
… engage the spring clip of the left-hand latch
into the first hook of the tension rod as well.
For Jumbrellas with single hook system
this is already the final step !
Image
Page 6 .
Step Description
12
Now turn the left-hand latch all the way
down.
13
The Jumbrella is now pre-tensioned only.
Jumbrellas with the single hook system
are now fully tensioned !
14
Use the right-hand tension latch to engage
the spring clip into the second hook on the
tension rod.
Steps 13 - 18 are not applicable for
Jumbrellas with single hook system.
15
Turn the right-hand latch all the way down
and then …
Steps 13 - 18 are not applicable for
Jumbrellas with single hook system.
Image
Page 7 .
Step Description
16
… engage the spring clip of the left-hand latch
into the second hook of the tension rod as
well.
Steps 13 - 18 are not applicable for
Jumbrellas with single hook system.
17
To finalize tensioning turn the left-hand latch
all the way down.
Steps 13 - 18 are not applicable for
Jumbrellas with single hook system.
18
Once this step is completed the Jumbrella is
fully tensioned and unfolded.
Steps 13 - 18 are not applicable for
Jumbrellas with single hook system.
19
Now reinsert both cylinder locks to prevent
unauthorized indiviuals from manipulating
the umbrella structure.
Image
Page 8 .
Step Description
20
Your Jumbrella is now open and fully
tensioned.
Step Description
21
The Jumbrella in its open and fully tensioned
condition.
Both tension latches have been secured by a
cylinder lock.
Reverse Order
Jumbrella |Closing & Securing
Image
Image
Page 9 .
Step Description
22
Use the keys to unlock both cylinder locks.
Then remove these and keep them for
reinsertion once the umbrella has been fully
closed.
23
Start the closing process by pulling the left-
hand tension latch slowly upwards.
Steps 23 - 27 are not applicable for
Jumbrellas with single hook system.
24
Then disengage the spring clip from the
second hook…
Steps 23 - 27 are not applicable for
Jumbrellas with single hook system.
25
… and re-engage it in the first hook.
Steps 23 - 27 are not applicable for
Jumbrellas with single hook system.
Image
Page 10 .

Popular Patio Furniture manuals by other brands

Costway OP70840 user manual

Costway

Costway OP70840 user manual

paramondo parapenda installation instructions

paramondo

paramondo parapenda installation instructions

Simply Shade Ibiza SSUWA811SS instruction manual

Simply Shade

Simply Shade Ibiza SSUWA811SS instruction manual

Frontgate 68286A Assembly and operation

Frontgate

Frontgate 68286A Assembly and operation

Costway OP70380 manual

Costway

Costway OP70380 manual

Doppler Goliath 5x5 Assembly instructions

Doppler

Doppler Goliath 5x5 Assembly instructions

LAZBOY 780-01291193-9 owner's manual

LAZBOY

LAZBOY 780-01291193-9 owner's manual

vipp VIPP714 quick start guide

vipp

vipp VIPP714 quick start guide

J&J Global Patio Premier 203037BR manual

J&J Global

J&J Global Patio Premier 203037BR manual

Blooma Karaya 3663602734697 Assembly instructions

Blooma

Blooma Karaya 3663602734697 Assembly instructions

Costway PATIOJOY HW65357 manual

Costway

Costway PATIOJOY HW65357 manual

Home Decorators Collection YJAF052-C Use and care guide

Home Decorators Collection

Home Decorators Collection YJAF052-C Use and care guide

Extremis Pantagruel picnic Assembly instructions

Extremis

Extremis Pantagruel picnic Assembly instructions

Kettler TIFFANY 01672-000 user manual

Kettler

Kettler TIFFANY 01672-000 user manual

Uberhaus 77735146 Operator's manual

Uberhaus

Uberhaus 77735146 Operator's manual

Balkene Home 62173 Assembly instructions

Balkene Home

Balkene Home 62173 Assembly instructions

Cello Capri instruction manual

Cello

Cello Capri instruction manual

Garden Oasis 813-1717-186 owner's manual

Garden Oasis

Garden Oasis 813-1717-186 owner's manual

manuals.online logo
manuals.online logoBrands
  • About & Mission
  • Contact us
  • Privacy Policy
  • Terms and Conditions

Copyright 2025 Manuals.Online. All Rights Reserved.