B&C Technologies EL-6 User manual

Washer-Extractor
EL-6 Computer Programming
and Operating Instructions
B&C Technologies
Panama City, FL
(850) 249-2222
(850) 249-2226 FAX
www.bandctech.com
Revision 2.1
8-Oct-2008
1 3
2
45 6
7 8 9
0
ENTER
PAUSE
INS
TEMP
DEC
LEVEL
INC
TIME
POWER FAILURE
BALANCE RETRY
TEMP PROBE FAULT
PN 230-004
ADVAN
DEL
RESET
PROGRAM N?


Table of Contents Introduction
Customer Service
Replacement Parts
Quick Reference
Safety Information
Key Symbols
Important Safety Information
Programming
Motor Programming
Motor Programming Flow Chart
Cycle Programming
Wash Program Creation
Wash Program Flowchart
Cycle Execution
Malfunction Alarms
Service Functions
Metric Conversion Chart
Centigrade to Fahrenheit
Centimeters to Inches
Blank Programming Chart
Water Level Guide
Speed Guide
Appendix A - Build a Heat Cycle
3
3
4
5
6
7
8
10
11
19
21
22
24
25
29
29
30
31
32
33
34
B&C Technologies
Panama City, FL
(850) 249-2222
(850) 249-2226 FAX
www.bandctech.com

Introduction
3
EL6 Computer
The EL-6 Computer is a powerful and
programable solid state controller. Up to 30
programs, each with up to 15 cycles can be
programmed. In addition, the EL-6 can display
5 languages - English, Italian, German, Spanish
and French. The water level can be
programmed, and is accurate to 1 cm (0.4 in).
Spin speeds are fully programmable in RPM.
In the event of power failure, the operator is
prompted to continue the cycle, or abort it.
Keypad
7
8
9
DEL
RESET
Number key, Insert Key. Enables a new
cycle to be inserted in an existing program
during programming. During operation,
press and hold for cylinder RPM.
Number key, Decrement Key. Lowers the
current value during programming mode.
Number key, Increment Key. Raises the
current value during programming mode.
If pressed simultaneously with the TEMP or
LEVEL key, allows temporary
modification.
Number key, Temperature Key. Allows
temporary modification of the target
temperature if used with the INC and DEC
keys. Displays current temperature in wash
cylinder.
Number key, Level Key. Allows temporary
modification of the target water level if
used with the INC and DEC keys. Displays
current water level in wash cylinder.
Number key, Time Key. Displays the
watch dog timer value for the current step.
Number keys
Number key, Pause Key. If pressed during
operation, pauses the wash program
indefinitely. Not active during distribution
or spin.
Advances to the next program step.
During final spin, the remainder of the spin
is aborted. If pressed before starting a
program, it allows the operator to begin the
program at any segment. During
programing, skips to the next segment.
Confirms settings in creation and editing of
wash programs. During operation, shows
the current segment or program number.
Deletes any selection or setting.
Terminates the current activity (operation
or programming). While the machine is
powered but not executing a program, can
be pressed with RESET to see the current
firmware version.
Starts execution of the currently selected
wash program. Restarts a paused
program. When pressed with RESET,
function codes can be entered to program
and setup the machine. See the quick
reference list on the next page.
1
3
2
4
5
6
0
ENTER
PAUSE
INS
TEMP
DEC
LEVEL
INC
TIME
ADVAN

Quick Reference
4
To access this mode, press START and RESET together, then at the
prompt (n?), key in the desired number. Detailed explanation of each
function starts on page 25.
Highlighted items are safety related and SHOULD NOT BE
CHANGED!
DO NOT ALTER THESE VALUES WITHOUT CONSULTING B&C
TECHNOLOGIES OR A QUALIFIED TECHNICIAN!
12 Programming cycles
27 Creation of Programs
45 Programming motors
144 EL6 Win communications mode
118 Disable Machine (Display shows ! - exclamation point)
181 Resets controller - erases all memory
201 Language option (1 - Italian, 2 - English, 3 - German, 4 - Spanish, 5 - French)
205 16 or 24 outputs (B&C uses the 24 output version)
207 Maximum RPM
209 Temperature Hysterisis (min 1 deg, max 10 deg) Default is 3 deg.
210 Display temperature in degrees C
211 Display temperature in degrees F
212 Maximum water level that can be set (10 - 100 cm)
213 Minimum water level for heating (2 - 30 cm)
214 Display number of hours of operation
215 Display total number of washes
216 Display number of washes since the last maintenance
217 Reset maintenance request
218 Display and set number of washes until maintenance request
219 Spin slow down time (40 - 200 sec)
220 Erases Programs and cycles
221 Copy from control to memory card
222 Copy from memory card to control (only programs and cycles)
223 Copy from memory card to control (programs, cycles, and parameters)
225 Disables Advance Key
230 Maximum water level allowed during spin (2 - 60 cm)
P r o g r a mmi n g
S ys t em S e t u p

.
Anyone operation or servicing this machine must follow the safety rules in
this manual. Particular attention must be paid to the DANGER,
WARNING, and CAUTION blocks which appear throughout the manual
The lightening flash and arrowhead within the triangle is a
warning sign alerting you of the presence of dangerous
voltage.
The exclamation point within the triangle is a warning sign
alerting you of important instructions concerning the machine
and possible dangerous conditions.
This warning symbol alerts you to the presence of possible
dangerous drive mechanisms within the machine. Guards
should always be in place when the machine is in operation.
Be careful when servicing any drive mechanism.
This warning symbol indicates the presence of possibly
dangerous chemicals. Proper precautions should be taken
when handling corrosive or caustic material.
This warning symbol indicates the presence of hot surfaces
that could cause serious burns. Stainless steel and steam lines
can become extremely hot and should not be touched.
This warning symbol indicates the presence of possible
dangerous pinch-points. Moving mechanical parts can crush
an/or sever body parts.
Before servicing any equipment, make certain it is
disconnected from the electrical power source. Never allow
operation of the machine when any safety device is
malfunctioning. Never bypass safety devices.
Key Symbols
5

Important Safety Information
SAFETY CHECK LIST
Before Initial start up of a B&C washer –
extractor perform the following safety check:
A. Make sure all electrical and plumbing
connections have been made in
accordance with applicable codes and
regulations.
B. Make sure the machine is
grounded electrically.
C. Make sure the machine has
flexible water fill and drain
connections of the correct size,
length and type, with no kinks,
and that they are securely
attached and/or clamped.
D. Make sure any transport brackets have
been removed.
Before servicing any equipment, make certain it
is disconnected from the electrical power
source. Never allow operation of the machine
when any safety device is malfunctioning.
Never bypass safety devices.
6
Before machine is placed in operation, the door
safety interlock must be checked for proper
operation as follows:
A. When the washer is energized
electrically and in operation, the
loading door must be locked in
the closed position. Verify this by
attempting to open the loading
door when the machine is
operating. If necessary, check the
door safety interlock and sensors
for proper operation. Consult
the service manual, or call a
qualified service technician if
necessary.
B. When the washers loading door
is open, it should not be possible
to start the machine. Verify this
by attempting to start the washer
with the door open. Also, close
the door without locking it
and verify that it is not possible to
start the machine with the door
not locked. If necessary, check
the door lock sensors for proper
operation,. Consult the service
manual, or call a qualified
service technician. If additional
information is required, contact
your local distributor or call the
manufacturer of the machine.

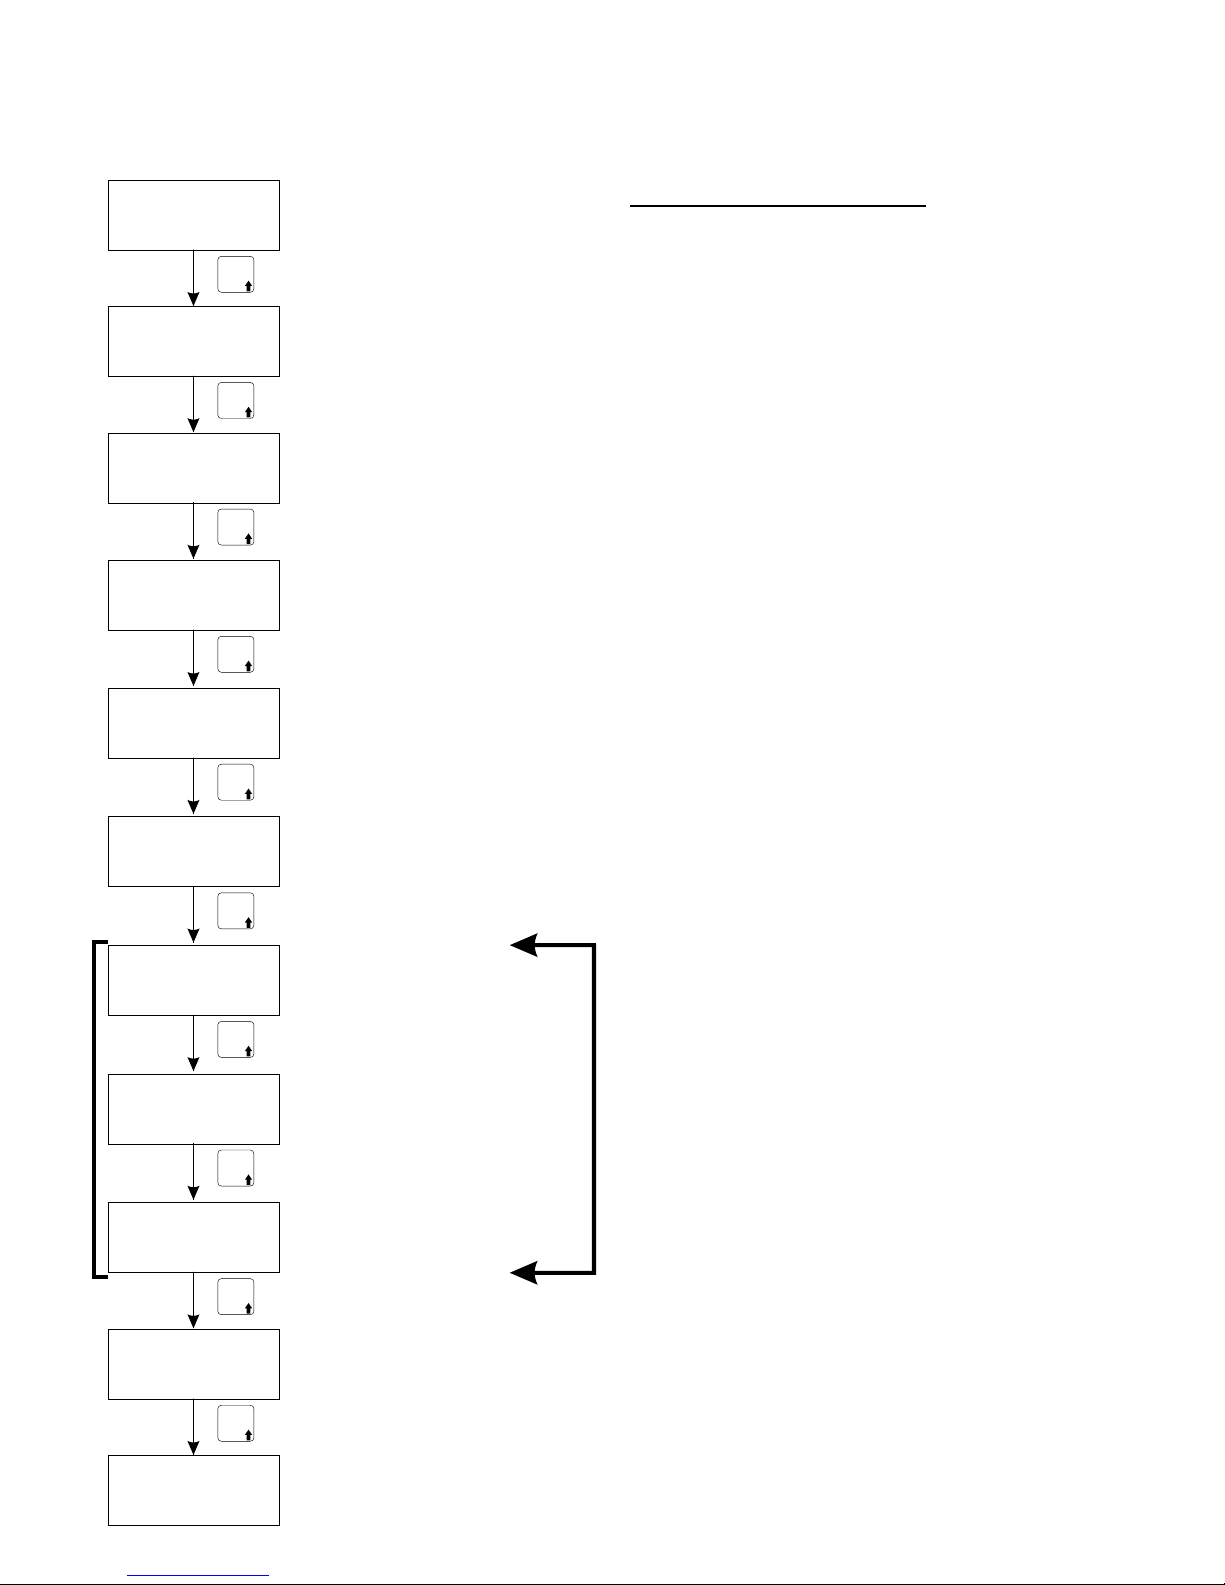
Programming
Programming the EL-6 takes place on three
levels:
1. Programming motors (Function 45)
Allows 15 different agitation profiles to be
created. For each profile, the clockwise rotation
time, the counterclockwise rotation time and
the pause time can be programmed. (Factory
defaults are shown on page 9).
2. Programming cycles (Function 12)
Each grouping of steps creates a sequence of
events in which various functions can be
activated or deactivated (drain, cold fill, spin,
etc.). Going from one step to another requires
reaching a water level, temperature, or a time
value. There are five different programmable
cycle types: Prewash, Wash, Rinse, Spin and
Unroll (Shakeout). Each cycle can be assigned
a number between 1 and 99. (See the EL6
Stock Programs Listing for details on factory
settings).
3. Wash Programs Creation (Function 27)
Consists of putting the various cycles as
programmed above together to form a
complete wash program. Up to 30 programs
can be stored, each with 15 cycles. (See the
EL6 Stock Programs Listing for details on
factory settings).
POWER
PROGRAM #
RUN?
EXECUTE CYCLE
END
n?
PROGRAM
CREATION
MOTOR
PROGRAMMING
CYCLE
PROGRAMMING OPTIONS
START + RESET
NO
RESET
YES START ACCESS CODE ACCESS CODE ACCESS CODE ACCESS CODE
7

Programming
8
Motor Programming
To access the motor programming mode, press
START and RESET together. The display
shows:
n?
Enter 45 at this prompt, followed by the
ENTER key. For two seconds, the display will
show:
* EDIT MOTORS *
You are then asked to enter the motor routine
number to be programmed (1 - 15).
MOTOR No.
You may now enter the number and press the
ENTER key. There are now two cases:
1. The motor routine does not exist.
2. The motor routine does exist.
New Motor Routine
In this case, you are prompted to enter a
clockwise rotation time with this message:
T. FORWARD = S
Enter the desired time in seconds (0 through
239), followed by the ENTER key. The display
will change to:
T. PAUSE = S
Enter the desired time in seconds (0 through
239), followed by the ENTER key. The display
will change to:
T. REARWARDS = S
Enter the counterclockwise time in seconds (0
through 239), followed by the ENTER key.
The display will show:
Pressing ENTER will store the motor timing
routine and the display will change to request a
new access code:
n?
Enter 45 at the prompt to program additional
motor timing sequences as required. Pressing
RESET instead of ENTER will exit
programming.
Editing an Existing Routine
If the motor routine number you entered is
already present, the display will show:
EXISTING!
Pressing the INC and DEC keys allow you to
step through the values for Forward, Pause,
and Backwards. Pressing ENTER will allow
you to modify the value on the display
After having viewed or modified the backwards
value, pressing the INC or ENTER key displays:
Pressing the ENTER key again displays the
forward rotation time:
T. FORWARD = XXs
STORE?
STORE?
Pressing ENTER confirms the changes made (if
any) and exits programming
Pressing RESET exits the current programming
mode and leaves the existing values as they
were.

Programming
Motor Programming continued
Notes on Motor Programming
There are a number of different modes
available for motor programming:
1. Forwards - Pause - Backwards
T. FORWARD = XXs
T. PAUSE = XXs
T. BACKWARDS = XXs
2. Forwards - Pause
T. FORWARD = XXs
T. PAUSE = XXs
T. BACKWARDS = S0
3. Forwards
T. FORWARD = XXs
T. PAUSE = S0
4. Pause - Backwards
T. FORWARD = S0
T. PAUSE = XXs
T. BACKWARDS = XXs
5. Backwards
T. FORWARD = S0
T. PAUSE = S0
T. BACKWARDS = XXs
The minimum pause time that can be
programmed between forward and backwards
is 2 seconds. The maximum time is 239
seconds.
Cylinder speed is programmed during cycle
programming. In this mode, each step can be
programmed with different values if desired.
B&C Stock Motor Assignments
9
Motor Number Forward Pause Reverse
1 16 4 16
2 4 16 4
3 5 115 5
14 0 0 1
15 1 0 0
Motor 1 - used for normal wash agitation.
Motor 2 - used for gentle wash agitation.
Motor 3 - used for soak formulas
Motor 14 - Used for Unroll cycles (reverse only)
Motor 15 - Used for Spin cycles (forward only)

10
Programming
Motor Programming Flow Chart
POWER
PROGRAM #
EXIST?
n?
START +
RESET
RESET
45
ENTER
*EDIT MOTORS*
MOTOR N
YESNO
T. FORWARD = S
T. PAUSE = S
T. BACKWARDS = S
# OF SEC
ENTER
# OF SEC
ENTER
# OF SEC
ENTER
T. FORWARD = S0
T. PAUSE = XXs
T. BACKWARDS = XXs
EXISTING!
ENTER
INC
DEC
DEC
INC
STORE?
yes
ENTER
STORE
VALUES
no
RESET

Programming Sequence
Cool Down
3
INC
Bal. Load
3
INC
Drain
3
INC
Cold Water
3
INC
Hot Water
3
INC
Heating
3
INC
Detergent 1
3
INC
Detergent 2
3
INC
Detergent 3
3
INC
Detergent 4
3
INC
11
To turn on a function, press Enter, to turn off a function press Reset. Note: Setting a function to
zero DOES NOT disable that function.
Min. Level
ENTER
3
INC
Max Level
3
INC
Temp.
3
INC
WDT
3
INC
Motor
3
INC
RPM
More information on page 15
Level
3
INC
Temp.
3
INC
WDT
3
INC
Motor
3
INC
RPM
More information on page 16
Yes drains the machine.
No means the drain is closed.
Yes to turn on the cold water valve.
No means the valve is off.
Yes to turn on the hot water valve.
No means the valve is off.
Yes turns on the heat output, you
will be prompted to enter the temperature.
No means the heat output is off.
Yes to turn on chemical signal 1, and
flush cup 1 in the supply dispenser.
No means the supply is off.
Yes to turn on chemical signal 2, and
flush cup 2 in the supply dispenser, if
equipped. No means the supply is off.
Yes to turn on chemical signal 3, and
flush cup 3 in the supply dispenser, if
equipped. No means the supply is off.
Yes to turn on chemical signal 4, and
flush cup 4 in the supply dispenser, if
equipped. No means the supply is off.
continued

Programming Sequence
12
Hard Water
3
INC
Relay 16
3
INC
Relay 11
3
INC
Relay 12
3
INC
Relay 13
3
INC
Motor
3
INC
RPM
3
INC
Relay 17
3
INC
Relay 18
3
INC
Relay 19
3
INC
To turn on a function, press Enter, to turn off a function press Reset. Note: Setting a function to
zero DOES NOT disable that function.
Yes to turn on chemical signal 5, and
flush cup 5 in the supply dispenser, if
equipped. No means the supply is off.
Not Used
Yes turns on Auxiliary Fill.
No means the valve is off.
Injection flush - only used on machines
with stainless steel vacuum breaker.
No means the supply is off.
Yes turns on drive balance relay - only
used in extract cycles. No means the relay
is off.
Yes enables the machine to rotate, in
concert with RPM, below. No means
no cylinder rotation. More information
on page 8.
Set the RPM - see chart on page 29 for
details on recommended speeds for a
particular machine.
Yes to turn on chemical signal 6.
No means the supply is off.
Yes to turn on chemical signal 7.
No means the supply is off.
Yes to turn on chemical signal 8.
No means the supply is off.
continued
Programming Sequence
13
Relay 20
3
INC
Relay 21
3
INC
Relay 22
3
INC
Relay 23
3
INC
Relay 24
3
INC
End Step
3
INC
Level
3
INC
Temp.
3
INC
Time
3
INC
WDT
3
INC
Store?
To turn on a function, press Enter, to turn off a function press Reset. Note: Setting a function to
zero DOES NOT disable that function.
Yes to open Auxiliary Drain, if
equipped. No means drain is
closed.
Not Used
Yes to activate the buzzer.
No means buzzer is off.
Yes to turn on Cold Spray, if
equipped. No to disable.
Flashes for 1 sec.
Pick only one of the three!
Yes ends the step based
on water level. Use Watch
Dog Timer.
Yes ends the step based
on Temperature. Use Watch
Dog Timer. See Heat cycle
tutorial in Appendix A.
Yes ends the step based
on time. Do not use Watch
Dog Timer.
Example Cycle Construction:
Step 1 (Fill Step)
Turn on hot, cold or both.
Turn on Motor, and enter RPM.
Turn on Level and enter water level (see chart, pg 31)
Turn on WDT and enter a time (9m, 0s typically)
Press enter to store.
Step 2 (Chemical Dose Step)
Turn on Chemical output
Turn on Motor, and enter RPM.
Turn on Time and enter a time (ex: 0m, 10s)
Press enter to store.
Step 3 (Top off - make sure we are still at level)
Turn on hot, cold or both.
Turn on Motor, and enter RPM.
Turn on Level and enter water level (see chart, pg 31)
Turn on WDT and enter a time (9m, 0s typically)
Press enter to store.
Step 4 (Wash/Agitation Time)
Turn on Motor, and enter RPM.
Turn on Time and enter a time (ex: 9m, 30s)
Press enter to store.
The EL6 Stock program list (with your machine, also
available on our website, www.bandctech.com) is of
great use when customizing and creating wash programs.
There are many built in cycles available for use or
modification in custom programs. Here some commonly
used cycles:
Spin9: Drain routine - used after each bath cycle, but
not prior to the final spin.
Spin1: Low speed extract, 30 seconds
Spin2: Medium speed extract, 5 minutes.
Spin3: High speed extract, 5 minutes.
Note: Intermediate spins are not recommended - if the
EL6 cannot achieve a good balance, the program will be
terminated.
Note
OR
OR
Press ENTER to store.
Yes turns on the Watch Dog Timer.
Enter minutes and seconds.
No turns off the Watch Dog Timer.
Yes to turn on Hot Spray, if
equipped. No to disable.

14
Programming
Cycle Programming
Cycle libraries can be created for later use in
the Wash programming step. When the
machine is stopped, press the START and
RESET buttons together. The display is:
n?
Using the keypad, type 12 and press ENTER.
For two seconds, the display shows:
* EDIT CYCLES *
The message for choosing the programming
cycle is then displayed:
PREWASH = ?
Pressing INC or DEC will show the other cycle
types in succession:
WASH = ?
SPIN = ?
RINSE = ?
UNROLL = ?
When the cycle type you wish to edit is
displayed, press ENTER to begin creating or
editing of the cycle. As an example, we will go
through programming a Prewash cycle.
PREWASH = ?
Using the numerical keypad, enter the cycle
you wish to create or modify. After you have
entered the number and pressed ENTER, there
are two possible cases:
>The cycle chosen does not exist and has
to be programmed. (This Page)
>The cycle chosen does exist. If this is
the case, you can view and modify the
cycle as needed. (See page 17, and
charts beginning on page 11).
New Cycle Creation
If the cycle you chose does not exist, you will
be taken directly into the programming mode.
For two seconds, the display will show:
START STEP 1
The display then changes to:
COOL DOWN? NO
You can now define for step 1 whether the cool
down feature is activated. If you wish to
activate cooldown, press ENTER, and the
display changes to:
COOL DOWN? YES
To implement the cooldown phase, five
additional parameters must be entered. These
are discussed in the next section. If you do not
wish to activate the cooldown phase, press INC.
The display will show:
BAL LOAD? YES
You can now define for step 1 whether the load
balancing is enabled. Load balancing is
essentially a modulated fill. A target
temperature can be programmed and the
machine will use a combination of the hot
water fill valve and the cold water fill valve to
maintain a given temperature. If you wish to
activate temperature controlled fill, press
ENTER. The display will change to:
BAL LOAD? NO
To implement temperature controlled fill, four
additional parameters must be entered. These
are discussed in the next section. If you do not
wish to activate temperature controlled fill,
press INC. The display will show:
DRAIN? NO

15
Programming
Cycle Programming continued
To activate the Drain and end Step 1, press
ENTER. Pressing INC or DEC will scroll
through the other functions to end the step.
The step can end with a Water Level, a Water
Temperature, or an elapsed Time. Select one
of the functions by pressing ENTER changes
the display and prompts you to enter a value
for the particular function.
Example
LEVEL NO
LEVEL = cm
ENTER
Type the required value in using the numerical
keypad and press ENTER.
In the event that you choose a level or a
temperature to end the step, you will be
prompted with:
WDT = NO
This is the Watch Dog Timer. Press ENTER to
set the value.
WDT = m
Set the time in minutes, press ENTER
WDT = s
Set the time in seconds, press ENTER. This is a
time limit in which the temperature or water
level you have programmed should be reached.
If the level or temperature cannot be reached in
the given amount of time, the control will
display an alarm. Press ENTER to continue
after an alarm. Be sure to enter a time that is
reasonably longer than the presumed time for
filling or heating. 9:00 (nine minutes, zero
seconds) is good for a fill, 30:00 (thirty minutes,
zero seconds) is good for a heat step.
The display now shows:
STORE?
Pressing STOP will cancel the programming
and abort any parameters you have entered.
To save, press ENTER. Now the start of a new
step will be indicated. For two seconds the
display shows:
START STEP 2
At this point, you may continue adding steps to
the cycle using the same programming
sequence as used for Step 1. If programming is
complete, press STOP. The display now shows:
The display then changes to:
COOLING? NO
PREWASH = ?
You may now program another Prewash cycle,
or select one of the other cycle types and
continue programming. To exit from cycle
programming, press RESET.
Cooldown Phase
The cooldown phase allows you to specify a
temperature to reach before draining the
machine. There are five parameters to be
programmed: Minimum Level, Maximum
Level, Temperature, WDT, and Motor. The
cooldown phase operates as follows:
>The water is drained to the minimum
level as mentioned above.
>Cold water is then added up to the
maximum level as mentioned above,
and the temperature is monitored.
>Draining and filling continue until either
the temperature is reached, or the WTD
(watch dog timer) has expired.
The motor profile chosen is active throughout
this step.

16
Programming
Cycle Programming continued
Load Balancing /
Temperature Controlled Fill
The Load Balancing option is essentially a
temperature controlled, or modulated, fill. Cold
and Hot water are added to the machine while
the temperature and level are monitored. Four
parameters must be entered: Level,
Temperature, WDT, and Motor. The option
functions as follows:
Cold or Hot water is added to the machine
depending upon the temperature set (Hot if the
water temperature is lower than programmed,
or Cold if it is higher) until the programmed
water level is reached. Then the next step of
the cycle can begin. During this phase, the
WDT (watch dog timer) is active, which will flag
a fault if the fill time is longer than the
programmed WDT. The chosen motor routine
is active for this entire process.
Heating
Throughout the programming of the steps,
when heating is inserted, this tells the control to
regulate the temperature. In a step that ends
with a required temperature, the heating value
must be greater than or equal to the step
ending temperature. For example, if 50
degrees was set for heating, but 70 degrees was
required to end the step, the machine could
never reach 70 degrees, causing a fault from
the Watch Dog Timer. In cases where the step
is ended by time or level, the temperature can
be selected from 30 to 93 degrees C. See
Appendix A for details on building a Prewash,
Wash, or Rise cycle that uses heating.
RPM =
Enter the desired value and press ENTER to
confirm. In Prewash, Wash, Rinse, and Unroll,
the maximum speed is 100 RPM. Use
Programming Code 207 to set maximum Spin
RPM.
Programming Sequence
For Prewash, Wash, Rinse and Unroll, the
programming sequence is as follows:
>Cooling
>Load Balanced (Temp Controlled Fill)
>Drain
>Cold Water
>Hot Water
>Heating
>Detergent 1
>Detergent 2
>Detergent 3
>Detergent 4
>Hard Water (Detergent 5)
>Relay 16 (Not Used)
>Relay 11 (Aux Fill)
>Relay 12 (Injection Flush)
>Relay 13 (Drive Balancing)
>Motor (Agitation profile and speed)
>Relay 17 (Detergent 6)
>Relay 18 (Detergent 7)
>Relay 19 (Detergent 8)
>Relay 20 (Aux Drain)
>Relay 21 (Not Used)
>Relay 22 (Beeper)
>Relay 23 (Cold Spray, HP Series)
>Relay 24 (Hot Spray, HP Series)
Motor
For the motor function, after pressing ENTER,
you are asked to enter a motor function
(programmed earlier, see pages 8-10). When
you have confirmed the selection with ENTER,
the display shows:

17
Programming
Cycle Programming continued
Editing an existing cycle
If the cycle you chose already exists, the display
will show:
EXISTING!
At this point, four choices are possible:
KChoose another cycle by pressing STOP
LAccess the existing cycle by pressing
ENTER. In this case, INC or DEC will
display the various segments, and the
configuration can be modified by using
the ENTER and RESET keys as
described in the previous section.
MInsert one or more steps. To do so,
scroll through the steps by using the
ADVAN key. The display will show
START STEP X for two seconds,
followed by EXISTING! To insert a step,
press INS and the display changes to:
START STEP 1
COOLING? NO
Followed by:
You may now proceed to program the new step
using the techniques described earlier. After
confirming storage of the new steps, press
STOP.
NRemove one or more of the steps from
the existing ones. Proceed by pressing
ADVAN as describe above in (3). When
the message
EXISTING!
appears after the step you wish to
remove, press the DEL key. The
following message appears:
DELETE?
To confirm deletion of the step, press the
ENTER key or press RESET to cancel the
operation. After confirmation, press the STOP
key to exit.
Each cycle can comprise a maximum of 100
steps.
A total of 400 steps can be programmed.
See the EL6 Stock Programs Listing, included
with your machine, or available from our
website (http://www.bandctech.com) for details
of the cycles included with your machine from
the factory.
Note: The factory programs and cycles can be
altered at will. There is no way to restore the
factory programming without manually
inputting them, or via download with the EL6
Win 2 programming software, also available for
download on our website.

Funct ion 1 2 3 4
Cool Down
Bal Load
Drain
Cold Water
Hot Water Yes Yes
Heating
Chem 1
Chem 2 Yes
Chem 3
Chem 4
Hard Water (Chem 5)
Relay 16
Relay 11 (Aux Fill)
Relay 12 (Injection Flush) Yes
Relay 13 (Balancing)
Motor 1 1 1 1
Speed RPM 42 42 42 42
Relay 17 (Chem 6)
Relay 18 (Chem 7)
Relay 19 (Chem 8)
Relay 20 (Aux Drain)
Relay 21
Relay 22 (Buzzer)
Relay 23 (Cold Spray)
Relay 24 (Hot Spray)
Level cm 24 24
Temp C
WDT m:s 09:00 05:00
Time m:s 1:00 7:00
End Step
Step
The figure at the right shows a typical fill
bath.
Step 1 - Fill to a water level with hot
water. Watchdog timer of 9:00 allows
time to fill before an alarm is generated.
Step 1 ends when the water level is
reached.
Step 2 - Chemical 2 output is on, Relay
12 (injection flush) is on (not required
for machines with plastic vacuum
breaker). Step 3 ends when a time of
1:00 elapses.
Step 3 - Top off step, same as step 1,
except for a shorter Watch Dog Time.
Step 4 - This is the wash step. No
relays/outputs are on. Step 4 and the
entire cycle are complete when a time of
7:00 elapses.
A note about the Watch Dog Timer:
The Watch Dog Timer makes sure that
the machine reaches level or
temperature in a timely fashion, and
ensures that the water or heat doesn’t
stay on until someone notices a
problem. Don’t be confused - Step 1 will
end when the programmed water level is
reached, NOT when 9 minutes has
elapsed.
Programming
Example Cycle
18

19
Programming
Wash Program Creation
When the machine is stopped, press the START
and RESET buttons together. The display is:
n?
Using the keypad, type 27 and press ENTER.
For two seconds, the display shows:
EDIT PROG. No.
At this prompt, type the program number you
wish to create or edit, followed by the ENTER
key. Again, two situations are possible:
>The Program does not exist and must be
created.
>The Program already exists and can be
viewed and modified.
Creating a new Wash Program
The display reads
NOT FOUND!
for two seconds, then:
C1>?
At this prompt, press ENTER. The display
changes to:
C1>PREWASH = ?
Using the INC or DEC key, you can select the
type of cycle to insert: Prewash, Wash, Spin,
Rinse, and Unroll. For example, if you wish to
insert a wash cycle you have named 3, press
INC until the display changes to:
C1>WASH = ?
Confirm the selection by pressing ENTER. The
display changes to:
C1>WASH = No.
Type 3 on the keypad, the press ENTER. Wash
3 is now stored as the first segment of the
program. The display will prompt you to enter
a second cycle:
C2>?
At this prompt, press ENTER. The choice of
cycle will be displayed as previously. Programs
can be compiled with up to 15 cycles chosen
from those in available in the cycles library (see
the EL6 Stock Programs Listing). The same
cycle can be used repeatedly in a wash
program. After you are through programming,
and have confirmed the last cycle, press STOP
to terminate programming. The display then
shows:
STORE?
Press ENTER to store the program. Press
RESET to cancel and return to the beginning If
while programming, you enter a wash cycle
that does not exist, the following message will
appear:.
NOT FOUND!
Since the wash cycle doesn’t exist, you will
have to create it before adding it to a wash
program.
Editing an Existing Program
In the event the wash program already exists,
the display will change to:
EXISTING!
for two seconds, followed by the display of the
program contents. For example:
C1>RINSE = 1
By using the INC or DEC keys, the various
cycles comprising the wash program can be
viewed. The program can be modified, and
cycles can be added or deleted.
Deleting a Cycle
Using the INC and DEC keys, find the cycle
you wish to delete. While the cycle is
displayed, press the delete key, then press the
Table of contents
Other B&C Technologies Washer manuals


Popular Washer manuals by other brands


Philco
Philco PLDI 138 CQTL owner's manual

Hotpoint Ariston
Hotpoint Ariston WMSD 723B EU Instructions for use

Whirlpool
Whirlpool W10860701C Use and care guide

Hotpoint Ariston
Hotpoint Ariston FMG 723 Instructions for use

Indesit
Indesit IWSC 5085 Instructions for use

Samsung
Samsung R1031GWS YLR Service manual


