banks Ram-Air 42155 User manual

Banks Ram-Air®
Intake System
2003-2007 Ford Power Stroke 6.0L
Turbo-Diesel F250/F350/F450 Trucks
THIS MANUAL IS FOR USE WITH SYSTEM 42155 & 42155-D
Owner’sManual
with Installation Instructions

Banks iQ System
(P/N 61151-61152)
-5” touchscreen interface that can
control the Banks Diesel Tuner and/or
SpeedBrake on the fly.
- Interchangable gauge display, read
and clear codes, monitor engine
diagnostics, log data, time your
vehicles runs and much more.
Banks Monster®Exhaust System
Sport (P/N 48790-48793)
Single and Dual (P/N 47285-47292,
47606-47609, 48783-48788)
- Increases exhaust flow, cuts
backpressure, lowers exhaust gas
temperatures (EGTs) and increases
power.
High-Ram Intake
(P/N 42750-42751)
-Increases flow and provides more
uniform air distribution to the
engine for more available power at
a given boost level.
Banks Techni-Cooler®System
(P/N 25974-25975)
- Provides increased air flow to the
engine by increasing air density for
more increased power, lower EGTs
and improved fuel economy.
Banks Brake
(P/N 55467-55468)
- Increases the stopping power of
your truck and extends the service
life of your brakes
Also Available from Banks Power
03-07 Ford 6.0L
2

Banks Billet Torque Converter
(P/N 72522)
-Higher torque capacity over stock
- Lockup clutch is slip-resistant so
transmission fluids stay cooler and
transmission life is prolonged.
Banks SpeedBrake
iQ Compatible (P/N 55455-55456)
PDA Compatible (P/N 55457-55458)
- Allows for controlled hill decent at
a user defined vehicle speed.
Boost and Pyro Gauges
(P/N 64507)
- Keep your engine safe by
monitoring vital engine parameters
Banks Bullet
(P/N 66524-66525)
- Adds power safely to your vehicle
- Displays critical engine functions
- Engine safeguards
- Change power levels on-the-fly
Banks Diesel Tuner
Six-Gun w/ switch (P/N 61023)
Six-Gun w/ iQ (P/N 63749)
EconoMind w/ switch (P/N 63743-
63745)
EconoMind w/ iQ (P/N 63747-63748)
- Adds power safely to your vehicle
- Engine and transmission safeguards
- Change power levels on-the-fly
Thermocouple
- Add a temperature limiting function
to your Diesel Tuner
AutoMind Programmer
(P/N 66110)
- Contains Banks tunes that boost
your vehicles HP, Torque and MPG.
- Displays a host of critical engine
functions
- Provides “service technician”
diagnostic capabilities
- Has upgradeable functionality, so it
will never be out of date
Banks Stinger Systems
(P/N 46465-46486)
Contains:
- Ram-Air Intake system
- Monster Exhaust (single or dual)
- EconoMind Tuner w/ Banks iQ
Banks PowerPack Systems
(P/N 46497-46519)
Contains:
- Ram-Air Intake system
- Monster Exhaust (single or dual)
- EconoMind Tuner w/ Banks iQ
- High-Ram
- Techni-Cooler System
Banks Six-Gun Bundle
(P/N 46594-46613)
Contains:
- Ram-Air Intake system
- Monster Exhaust (single or dual)
- Six-Gun Tuner w/ Banks iQ
Banks Big Hoss Bundle
(P/N 46623-46643)
Contains:
- Ram-Air Intake system
- Monster Exhaust (single or dual)
- Six-Gun Tuner w/ Banks iQ
- High-Ram
- Techni-Cooler System
3

Dear Customer,
If you have any questions
concerning the installation of
your Banks Ram-Air System,
please call our Technical Service
Hotline. If you have any
questions relating to shipping
or billing, please contact our
Customer Service Department.
Thank you.1
1.For ease of installation of
your Banks Ram-air intake system,
familiarize yourself with the procedure
by reading the entire manual before
starting work. This manual contains 20
pages of copy, illustrations and parts
listing. If any pages are missing from
this manual please call Gale Banks
Engineering immediately for a
replacement.
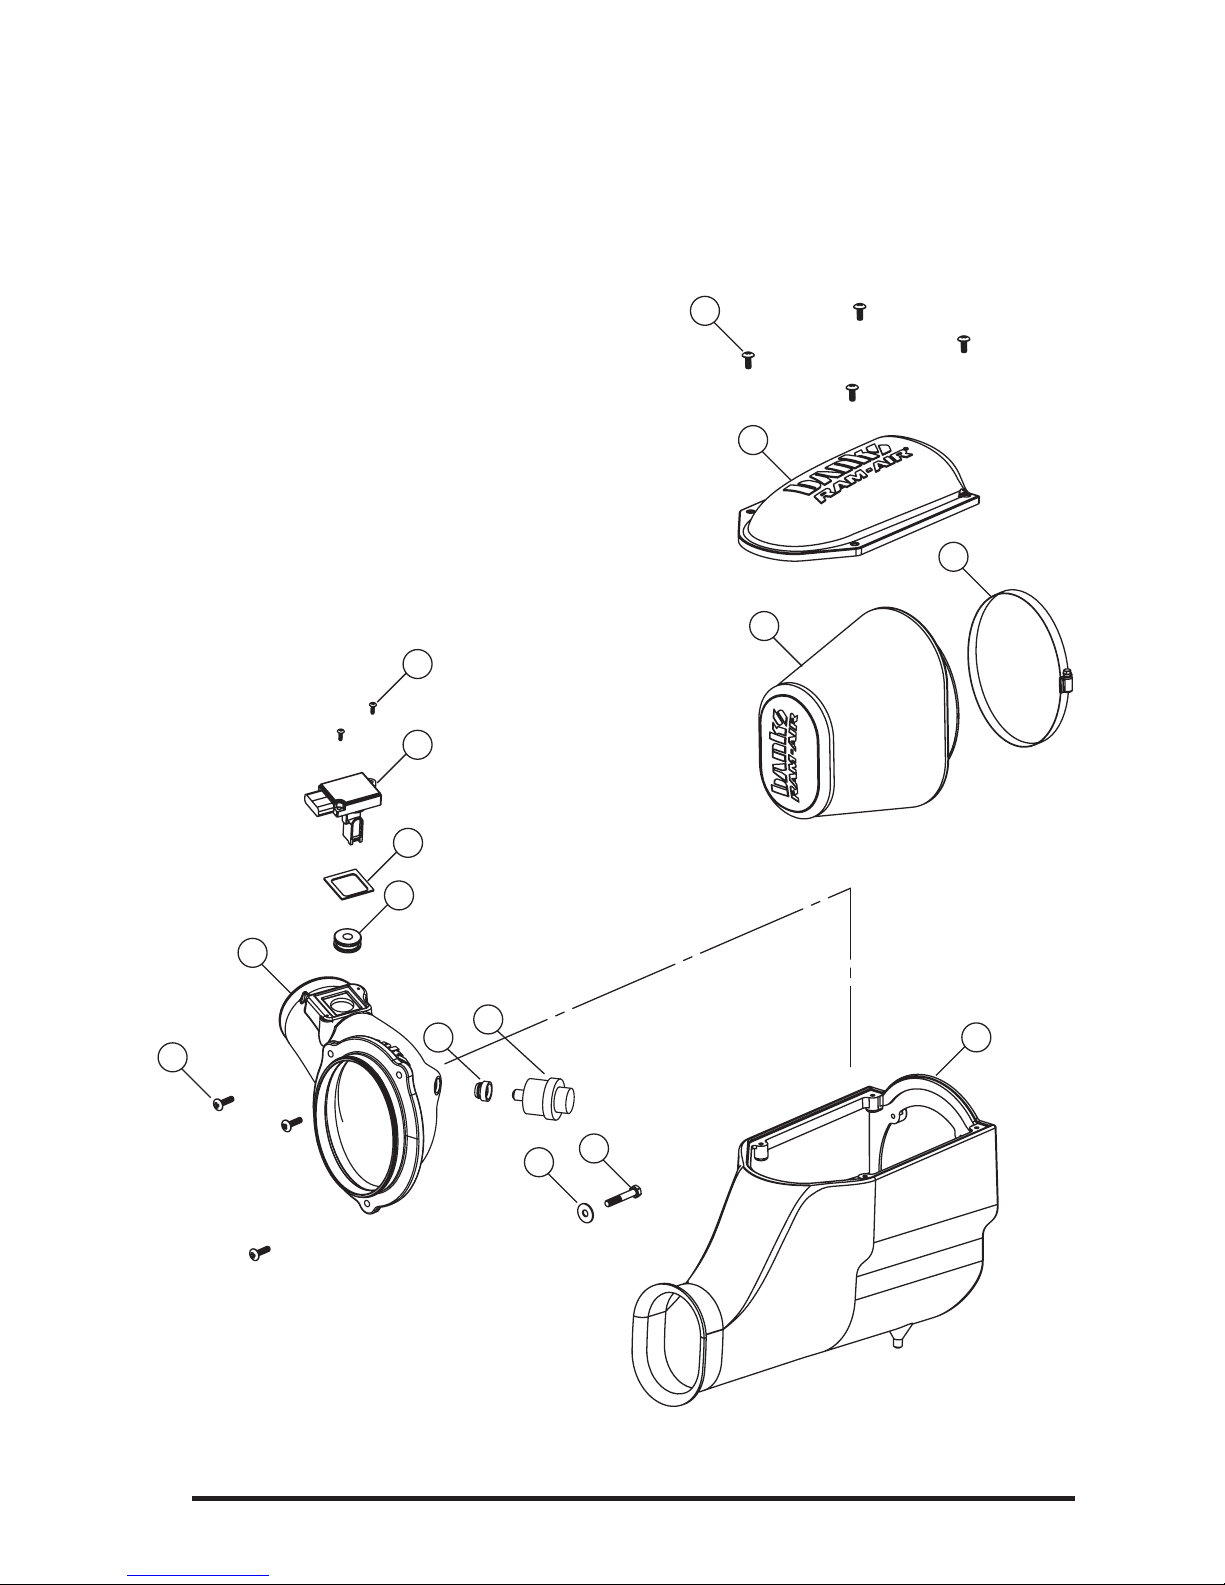
2. The exploded view of the Ram-Air
assembly (pages 6-7) provides only
general guidance. Refer to each step
and section diagram in this manual for
proper instruction.
3. Throughout this manual, the
left side of the vehicle refers to the
driver’s side, and the right-side to the
passenger’s side.
4. Disconnect the ground cable from
the battery before beginning work. If
there are two batteries, disconnect
both.
5. Route and tie wires and hoses
a minimum of 6 inches away from
exhaust heat, moving parts and sharp
edges. Clearance of 8 inches or more
is recommended where possible.
6. During installation, keep the
work area clean. If foreign debris
is transferred to any Banks system
component, clean it thoroughly before
installing.
7. When raising the vehicle, support
it on properly weight-rated safety
stands, ramps or a commercial hoist.
Follow the manufacturer’s safety
precautions. Take care to balance the
vehicle to prevent it from slipping or
falling. When using ramps, be sure the
front wheels are centered squarely on
the topsides; put the transmission in
park; set the parking brake; and place
blocks behind the rear wheels.
: Do not use floor
jacks to support the vehicle while
working under it. Do not raise
the vehicle onto concrete blocks,
masonry or any other item not
intended specifically for this use.
: The Banks Oiled
Ram-Air Filter comes pre-oiled
and no oiling is necessary for
initial installation. Service the
filter as specified in the Ram-
Air Filter Cleaning Instructions
Section of this manual.
General Installation Practices
4

Tools Required:
•3⁄8” drive ratchets with metric and
standard sockets
• Standard and Phillips head
screwdrivers
• Standard and needle-nose pliers
• Clean shop towels or rags
•5⁄16 nut driver
Table of Contents
Section 1 ......................6
General Assembly
Section 2 ......................8
Ram-Air Installation
Section 3
Oiled Air Filter Cleaning Instructions..17
Dry Air Filter Cleaning Instructions ...18
5

Section 1
GENERAL ASSEMBLY
Figure 1
2
5
8
4
9
12 11
13
14
3
7
1
10
15
6
6

Item # Part # Description Qty
1 42156 HOUSING, RAM-AIR FILTER 1
2 42165 COVER, RAM-AIR HOUSING 1
3 42158/
42158-D
AIR FILTER ELEMENT, RAM-AIR SYSTEM 1
4 42159 INTAKE TUBE, RAM-AIR SYSTEM 1
5 92904 HOSE CLAMP, #104 1
6 93070 GASKET, MAF SENSOR 1
7 93628 GROMMET, INTAKE AIR TEMPERATURE SENSOR 1
8 91133 SCREW, TRUSS HEAD, PHILLIPS, 1⁄4-20 X .75 4
9 91136 SCREW, TRUSS HEAD, PHILLIPS 1/4-20 X 1 3
10 91719 SCREW, TRUSS HEAD, PHILLIPS, 6-32 X 1⁄22
11 91794 SCREW, HEX HEAD, M8 X 1.25 X 50 1
12 91702 WASHER, LARGE, M8 1
13 * STOCK GROMMET, FILTER MINDER *
14 * STOCK FILTER MINDER *
15 * STOCK MAF SENSOR *
16 * STOCK INTAKE AIR TEMPERATURE SENSOR *
* These are stock components that will be reused with the Banks Ram-Air System.
7

Use the Bill of Materials Chart and
the General Assembly Drawing to
reference component nomenclature
and location. Use caution when
working in the engine compartment.
Make sure the engine has been OFF
for several hours and cool.
You are about to install the Banks
Ram-Air Intake System. Read and
follow all steps before working on the
vehicle. Some components from the
stock air intake system will remain
in service. Take care when removing
stock air intake components to not
damage them.
1. Remove the auxiliary air inlet hose
located on the front of the factory air
filter cover. Use pliers to remove the
auxiliary air inlet hose clamp and set
aside. See Figure 2.
2. Unfasten the four tension clamps
located on the top of the factory air
box.
3. Loosen the hose clamp on the air
inlet bellows located next to the Mass
Air Flow (MAF) sensor. See Figure 3.
Note: Some vehicles do not have a
MAF sensor but instead utilize an
Intake Air Temperature (IAT) sensor.
Both sensor types are installed in the
same location on the intake tube.
4. Locate the MAF/IAT connector,
press the release tab and carefully
remove the MAF/IAT connector and
set aside.
5. Remove the Air Filter Minder by
gently twisting and pulling out of the
rubber grommet. See Figure 4.
Note: Leave the Air Filter Minder
connected to the attached electrical
connector and set aside.
6. Separate front and rear air filter
covers from center filter element.
Remove the center filter element and
set aside. See Figure 5.
Section 2
RAM-AIR INSTALLATION
Figure 2
8

Figure 3
Figure 4
9

7. Remove the front air cover by
withdrawing and lifting out of engine
bay.
8. Remove the rear air cover.
Note be careful when handling the
rear air cover the MAF/IAT sensor is
attached and will be reused.
9. Remove the Torx (T-20), MAF
sensor screws using the supplied
Banks Torx tool bit. See Figure 6.
10. Carefully remove the MAF/IAT
sensor and set aside.
11. Locate the supplied Banks MAF
sensor gasket or Banks IAT sensor
grommet and the Banks Intake tube
from your kit. Install the supplied
gasket or grommet as shown in
Figure 7A and Figure 7B.
12. Install the MAF sensor to the
Banks intake tube using the supplied
screws.
Note: Do not over tighten the screws.
Or, install the IAT sensor into the
grommet by inserting in the sensor
until it seats flush on the grommet.
13. Locate the previously removed
factory rear air inlet cover and remove
the rubber grommet used to secure
the air filter minder.
14. Install the rubber grommet to the
Banks Intake tube.
15. In the engine compartment
towards the front-top radiator brace,
on the (drivers-side), locate the long
radiator/intercooler fastener bolt. See
Figure 8.
16. Remove the wire harness loom tie
down from the long bolt.
17. Remove the long bolt using a
10mm wrench.
18. Remove the wire harness loom
fastener from the wire harness.
Figure 5
10

Figure 6
Figure 7A Figure 7B
11

Figure 8
Figure 9
12

19. Using the supplied large washer
and bolt install and tighten the
radiator/intercooler fastener. See
Figure 9.
20. Locate the Banks air filter housing
and drop in and insert the inlet then fit
the air housing feet into place on the
factory grommets. See Figure 10.
21. Feed the rear Banks intake tube
through the opening of the Banks air
filter housing and fasten into position
using the supplied screws. See Figure
11 and Figure 12.
22. Insert the intake tube into the
factory bellows and tighten the hose
clamp.
23. Connect the MAF/IAT connector
to the MAF/IAT sensor.
24. Insert the air filter Minder into the
intake tube. See Figure 13.
25. Place air filter hose clamp on air
filter. Do not tighten the clamp.
26. Drop in Banks air filter with hose
clamp and fit air filter lip onto intake
tube securing that the air filter is
inserted properly. Using hand tools
tighten the air filter hose clamp. See
Figure 14.
Warning: Filter may come loose
at connection point due to oil
residue. Clean the air filter
connection points with a non-oil
based solvent such as Acetone,
Mineral Spirits, Denatured
Alcohol, or Lacquer Thinner. Read
and follow the manufactures
operation instruction for non-oil
based solvent cleaner. Be careful
not to apply cleaner to cotton
filter media or damage to media
may result.
Figure 10
13

Figure 11
Figure 12
14

Figure 13
Figure 14
15

Figure 15
27. Place Banks cover onto air filter
housing and secure lid using the
supplied Phillips screws.
28. Re-connect battery grounds.
You have successfully completed the
installation of the Banks Ram-Air Intake
system. See Figure 15. Make sure to
go over all hose clamps for tightness
and connectors for a secure fit.
-END, SECTION 2-
16

17
OILED AIR FILTER ONLY
: The Banks Ram-Air
Oiled Air Filter comes pre-oiled
and no oiling is necessary for
initial installation. Use Banks
Ram-Air Filter Cleaning System
(part#90094), available from Gale
Banks Engineering to service the
Air FIlter. Follow the instructions
included with the cleaning sys-
tem to clean and re-oil your Bank
Ram-Air Oiled Air FIlter.
1. PRE-CLEANING
Tap the element to dislodge any large
embedded dirt, then gently brush with
a soft bristle brush. NOTE: If complete
cleaning is not practical at this time,
reoil the element and reinstall in your
vehicle.
2. SPRAY-ON CLEANING
Spray air-filter cleaner liberally onto
the entire element and let soak for 10
minutes.
3. PAN CLEANING
Large air-filter elements can be
rolled or soaked in a shallow pan of
air-filter cleaner. Remove immediately
and let soak for approximately 10
minutes.
: NEVER use gasoline,
steam, caustic solutions, strong
detergents, high-pressure
nozzles, or cleaning solvents to
clean the filter element. All of
these can cause harm to the filter
media as well as SHRINK and HARDEN
the rubber end caps.
4. RINSING
Rinse off the element with low-
pressure water. Tap water is okay.
Always flush from the clean side to
dirty side. This removes the dirt
and does not drive it into the filter.
5. DRYING
Always dry naturally. After rinsing,
shake off all excess water and let the
element dry naturally.
6. AEROSOL OILING
After cleaning air filter always reoil
before using. Spray air filter oil down
into each pleat with one pass per
pleat. Wait 10 minutes and re-oil any
white spots still showing.
7. OILING HINTS
Never use a Banks Ram-Air filter
without oil (the filter will not stop
the dirt without the oil). Use only air
filter oil. Air-filter oil is a compound
of mineral and animal oil blended
with special polymers to form a very
efficient tack barrier. Red dye is
added to show just where you have
applied the oil. Eventually the red color
will fade but the oil will remain and
filter the air. NEVER USE Automatic
Transmission Fluid. NEVER USE Motor
Oil. NEVER USE Diesel Fuel. NEVER USE
WD40, LPS, or other light-weight oils.
8. REINSTALL
Reinstall your Banks Ram-Air filter
element with proper care. Make sure
the element seats properly in the filter
case. Install the cover making sure it’s
in the right position. Tighten all the
nuts, bolts, screws or clips to factory
specifications.
9. DO NOT DISCARD
Affix the “Do Not Discard” sticker to
the filter case (included with every
Banks replacement element). Make
sure you put the sticker in a highly
visible place to alert your mechanic
not to discard.
10. PERFORMANCE HINTS
Service every 50-100,000 miles on
Section 3
AIR FILTER CLEANING INSTRUCTIONS

18
street-driven applications. Service
more often in offroad or heavy-dust
conditions. If an air-filter restriction
gauge is installed, then change the
element when the air-filter restriction
reaches 18”–H2O.
: Extremely fine
dust from agriculture or offroad
use will pull the oil from the
element. Frequent reoiling of the
element’s clean side might be
required. Completely service when
practicable. For extra protection
use an air-filter sealing grease
on rubber ends of the element.
Service only with air-filter cleaner
and air-filter oil.
DRY FILTER CLEANING
Clean every 50-100,000 miles on
street-driven applications. Clean
more often in offroad or heavy-dust
conditions. If an air-filter restriction
gauge is installed, then change the
element when the air-filter restriction
reaches 18”–H2O.
1. PRE-CLEANING
Carefully tap the air filter element to
dislodge any large embedded dirt or
debris.
2. CLEANING
Spray an appropriate DRY AIR-FILTER
CLEANER SOLUTION liberally onto both
sides of the entire filter element with
the majority applied to the dirty side.
Soak for 10 minutes. Do not allow the
DRY AIR-FILTER CLEANER SOLUTION to
dry on the air filter.
: NEVER use gasoline,
steam, caustic solutions, strong de-
tergents, high-pressure nozzles, or
cleaning solvents to clean the filter
element. All of these can cause harm
to the filter media as well as SHRINK and
HARDEN the rubber end caps.
3. RINSING
Rinse the filter element with cool or
warm (not hot) water from the clean
side out in order to flush the dirt out
of the filter. It may be necessary to use
your fingers on the hose to apply light
water pressure. Repeat steps 2 and
3, until the water flowing through the
media is completely clear of any dirt
and debris.
5. DRYING
After rinsing, gently shake off exces-
sive water and allow to dry naturally.
Re-install the filter onto the intake sys-
tem, airbox or custom assembly once
it is dry or just slightly damp. Follow all
original installation instructions.
6. REINSTALL
Reinstall your Banks Ram-Air filter
element with proper care. Make sure
the element seats properly in the filter
case. Install the cover making sure it’s
in the right position. Tighten all the
nuts, bolts, screws or clips to factory
specifications.
7. DO NOT DISCARD
Affix the “Do Not Discard” sticker to
the filter case (included with every
Banks replacement element). Make
sure you put the sticker in a highly
visible place to alert your mechanic
not to discard.
8. PERFORMANCE HINTS
Service every 50-100,000 miles on
street-driven applications. Service
more often in offroad or heavy-dust
conditions. If an air-filter restriction
gauge is installed, then change the
element when the air-filter restriction
reaches 18”–H2O.
-END, SECTION 3-
If you’re looking for quality performance air intake systems, visit our website.
This manual suits for next models
1
Table of contents
Popular Other manuals by other brands

Alcoma
Alcoma ZENITH 80 Installation and operation manual

LAMBORGHINI
LAMBORGHINI INOVA 20 C W TOP - SCHEMA manual

Webasto
Webasto Thermo Top E Installation documentation

Mercedes-Benz
Mercedes-Benz Conecto manual

American Bath Factory
American Bath Factory Sistine Stone Neo Corner-Hnf installation guide

Custom Dynamics
Custom Dynamics GEN200-KIT-1157 Installation instructions manual