Bastl 1983 User manual

1983

1983
Introduction
The 1983 translates MIDI information into analog CV and
GATE signals. Since the MIDI protocol defines notes of
absolute pitch, translating MIDI into Volt per Octave
standard is tricky because the base pitch of the oscillator
under control would always oset the tone. The 1983 is
capable of listening to simple waveforms of oscillators
(triangle, pulse, sine or saw) to read their frequency and
adjust the base pitch to make the oscillators play the
correct note of the pitch defined by the MIDI note. The
1983 does that for all available 7 octaves to ensure precise
tuning. Because several tuning systems might be used in
music (equal temperament, just intonation, concert A =
432Hz, etc.), the 1983 oers a µTune feature to adjust the
pitch of every semitone as desired. This can have a huge
impact on the sound in polyphonic and paraphonic
patches as you can set mathematical ratios of tones so
that they can interact with harmonics or other tones.
The 1983 has 4 channels of CV and GATE and these
Outputs can be configured into several dierent
LAYOUTS:
■4-VOICE POLYPHONY
■3-VOICE POLYPHONY + 1-VOICE MONOPHONY
■2 MONOPHONIC VOICES WITH VELOCITY
■1 COMPLEX MONOPHONIC VOICE
■4 MONOPHONIC VOICES
■8 GATES
■4 GATES WITH VELOCITY
■8 CC CHANNELS
■4-CHANNEL QUANTIZER

Each of these LAYOUTS has a LEARN mode to help you
set up a MIDI Channel, MIDI Note or MIDI CC Control
Change (continuous controller, such as a mod wheel) to
respond to. All of this can also be set manually in the
menu.
In all Layouts, Channel D can be set to translate MIDI
Clock to CLOCK and RESET.
All Layouts respond to MIDI Pitch Bend messages (range
can be set in the SETTINGS) and some respond to
Velocity and Aftertouch.
The 1983 has 4 CV Inputs which, when used, allow the
module to be used as a creative tonal tool (arpeggiator /
sequencer) rather than just a MIDI Interface. When these
Inputs are unused, the 1983 is just a straight up converter.
The WINDOW jack opens up creative voice allocations,
the UPDATE jack can time-quantize the rendering of the
Outputs to fit on a grid or a trigger pattern, the
TRANSPOSE jack can arpeggiate notes or just simply
transpose, and the PORTAMENTO jack can slow down
the transitions between notes.
In QUANTIZER mode, these 4 CV Inputs (also marked as
QA, QB, QC, QD) can be used as a quantizer CV Inputs
instead: turning the 1983 into a 4 channel performance
quantizer. The quantizer scales can be either defined by
playing MIDI Notes in legato or edited in the LEARN mode.
All the 1983 settings can be stored as a PRESET, and 10
dierent presets can be stored and loaded from the
memory. The 1983’s firmware can be updated by MIDI
SysEx playback.
NOTE: MIDI standard was introduced in 1983 and it
seemed like the future.

1983 Features
■4 channels of CV and GATE
■LISTEN input per channel for automatic tuning
■automatic tuning by a single press of a button
(oset & scaling correction)
■several tuning systems (equal temperament, just
intonation, A = 440/432 Hz etc.)
■LAYOUT selection (4 voice, 3+1 voice, 2 velocity
voice, 4×1 voice, 1 voice, 8 gates, 8 CCs,
4 triggers + velocity, quantizer)
■each layout can map outputs of Channel D to MIDI
Clock (adjustable divider) and Reset
■LEARN mode to assign MIDI channel and other
properties
■UPDATE jack to quantize outputs to clock or trigger
sequences
■WINDOW jack to creatively allocate notes in the
buer to available voices
■TRANSPOSE CV to shift outputs by semitones,
fifths or octaves
■PORTAMENTO CV to adjust glide time
■responds to MIDI Note On & O, CC (also Sustain),
Velocity, Pitch Bend, Clock, Aftertouch
■µTune scale editing per each semitone in octave

Technical details
■7 HP
■PTC fuse and diode protected 10-pin power connector
■24mm deep
■power consumption +12: < 60 mA, -12: <20 mA

MIDI to CV converter
The 1983 module translates MIDI data to analog signals.
There are several ways in which this conversion can
happen, and the 1983 can also modify the way Outputs
behave based on the CV Inputs. Therefore, it is a good
idea to take a look at the general signal flow first.
Signal Flow
CV Outputs
CV Outputs output voltages between -0.4V and 7.2V;
therefore, they are capable of driving 7 octaves using the
One Volt per Octave standard. The Outputs always
automatically calibrate themselves at startup to output
precise voltages and they have 12-bit resolution. Besides
producing precise voltages, the Outputs can be adjusted

to compensate for tuning oset and exponential curve
error for any oscillator by creating a tuning correction
thanks to the frequency measurement of the LISTEN
Inputs. The exact rendering of each output is dependent
on the Layout and Learn settings and can also be aected
by some of the CV Inputs. You can also use the UP and
DOWN buttons to transpose octaves (more on that later).
Gate Outputs
GATE Outputs are capable of producing voltages of either
0V or 5V depending on whether the gate is High or Low.
The exact functioning of each Output depends on the
Layout and Learn settings, and can also be aected by
some of the CV Inputs.
Gate LEDs
GATE LEDs mostly indicate the current state of the GATE
Output. In modes other than the home screen, these LEDs
are also used, together with the display, to communicate
more information.
Listen & Tune & CV
Each Channel has a LISTEN Input to measure the
frequency of the oscillator under control, so the 1983 can
perform its automatic tuning operations.
Connect the output of a simple waveform (triangle, singe,
pulse, saw) of an oscillator to the LISTEN Input. Then
connect the 1983 CV OUT of the same Channel to the Volt
per Octave input on that oscillator. Now the oscillator can
be automatically tuned by hitting the TUNE button.
The easiest way to tune:
Momentarily disconnect the Volt per Octave input of your
oscillator from the CV Output of the 1983 and set it to
produce frequencies in the lower audio range. If your

oscillator has an LED indicating the oscillation, set it at the
border between the LED emitting steady light and starting
to flicker. Connect the CV Out to the V/Oct In again and
press Tune.
NOTE: The oscillator frequency can be set even under
20Hz but not too much lower. If the oscillator is set too low
the calibration will take too long and the tuning procedure
will time-out without completing.
Tune
The TUNE button initiates the tuning algorithm. The 1983
only tunes the oscillators on a user request i.e. by pushing
the TUNE button. There is NO automatic tuning
happening in the background.
Initially, the tuning is done by measuring two tuning points
per every octave and adjusting the CV, so that these points
are as precise as possible. All other semitones are
interpolated between these points. Scanning the
frequency response of an oscillator might take between
1-5 seconds, mostly depending on how much in tune the
oscillator is and how low its base pitch is set (measuring
low frequencies takes more time).
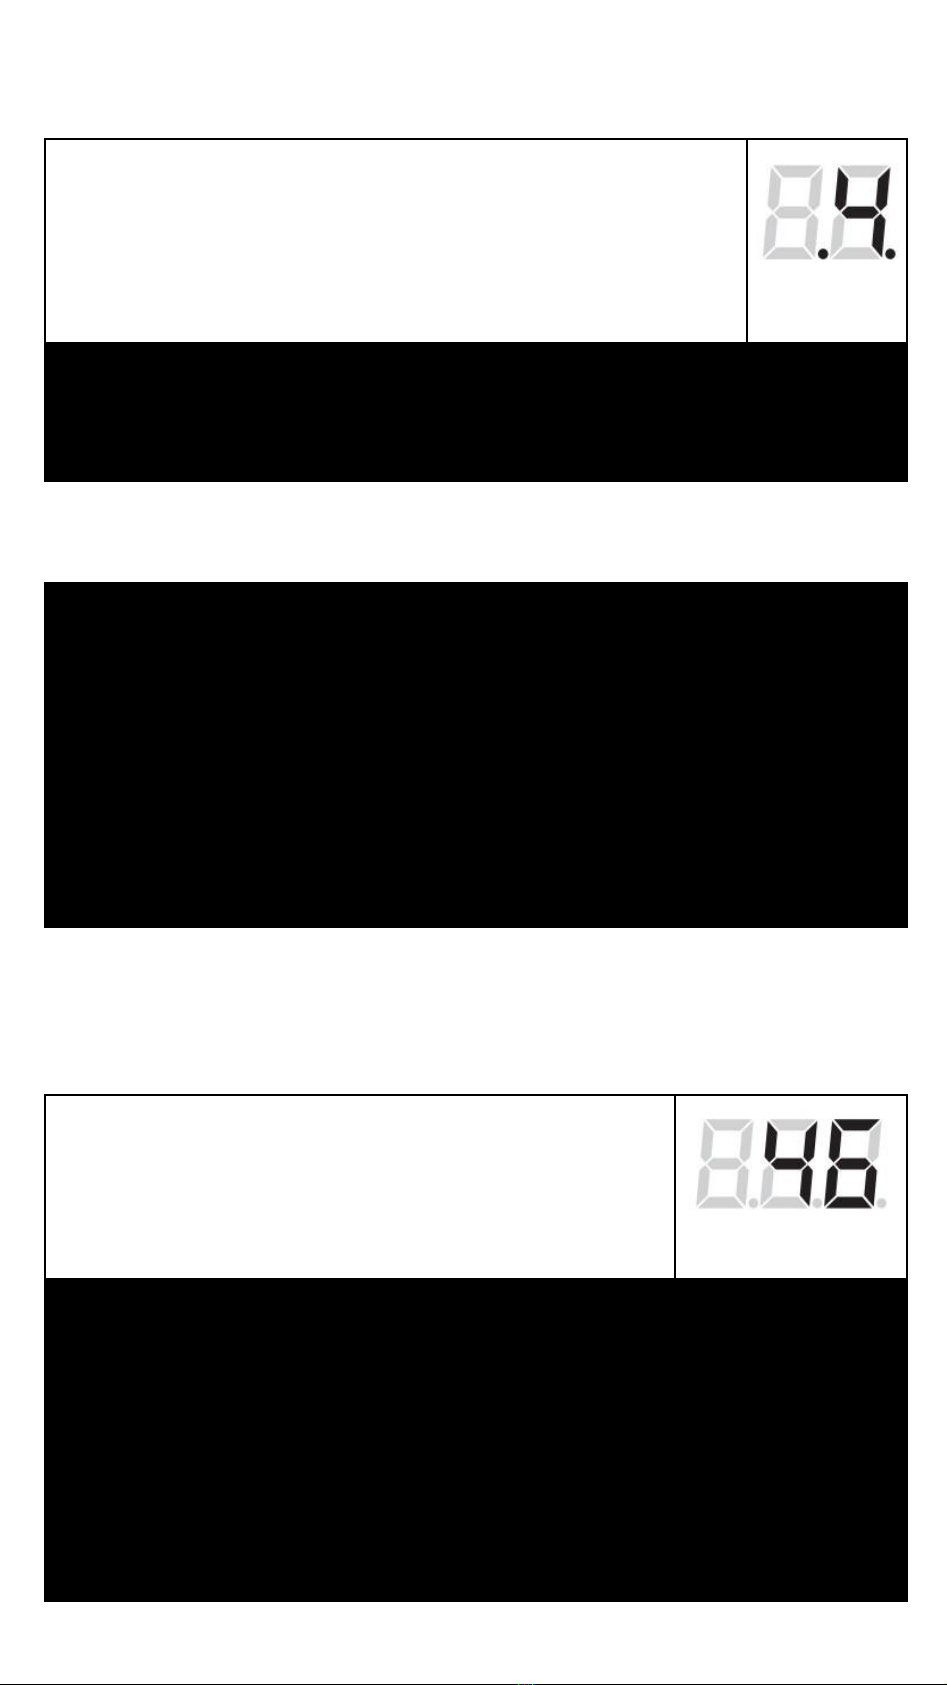
During the initial tuning procedure, “T.” (with a dot) is
displayed and when the oscillator is successfully
calibrated, the corresponding GATE LED will light up.
The second time the tuning algorithm is initiated, it only
tries to compensate for potential drift of the oscillators, so
it will take far less time to complete. It does not change the
current note being played unless the note is higher pitch. If
the frequency is quite high, the 1983 transposes it a few
octaves down to do the measurement to ensure high
precision of measurement. It only checks whether the
frequency is correct, and eventually adjusts the tuning

compensation according to the potential drift. This is very
useful in live performance scenarios.
During the re-tuning procedure, “T” (without a dot) is
displayed and when an oscillator is successfully
calibrated, the corresponding GATE LED will light up.
If full re-calibration is required, hold the TUNE button for
more than 2 seconds to start scanning all octaves.
Octave Selection
Press the UP or DOWN button to transpose the Outputs
one or several octaves up or down. Press both the UP and
DOWN buttons at the same time to reset the octave
selection settings.
Note on tuning precision: This is a very interesting topic,
since the default tuning system we use in western music –
equal temperament – is “out of tune”. It is a compromised
tuning system that allows transposing music into all keys,
but does not keep mathematically correct tuning intervals.
Some acoustic instruments play only mathematical
intervals by their physical definition.
However, most tuners are set to indicate tuning in equal
temperament at 440 Hz. Not all tuners respond in exactly
the same way and some have problems telling the
frequency of certain notes.
The 1983 was calibrated by cross-referencing a KORG
chromatic tuner, the iPhone app IntaTune and the tuner in
Ableton Live and often the readout was dierent on the
individual tuners by a cent or two. Two cents might actually
be an acceptable error for a tuner itself. The 1983 has two
cent precision. The minimal, barely noticeable, dierence
humans can hear is 5-6 cents for trained musicians and a
lot more for untrained musicians (100 cents = semitone).

µTune
The µTune mode allows you to adjust all 12 semitones in
an octave UP or DOWN by fine increments. Custom
tunings can be edited and stored as presets.
NOTE: This is especially useful for setting precise
mathematical ratios between notes – just intonation or
pythagorean tuning (equal temperament is “out of tune” in
this sense). This is useful especially when working with
polyphony and paraphony. Certain tones and their
overtones (harmonics) can become other notes'
overtones and they can create beating eects between the
tones and the overtones.
WARNING: Once you do this, it is really hard to go back to
equal temperament :-))) There is a great tuner app for
iPhone called IntaTune which was also used while
developing this module.
µTune Preset
Hold SET and press TUNE to enter the µTune PRESET
mode. The sign “µ” and the number “0-9” will alternate.
The number represents the µTune PRESET number, and
you can browse the presets using the UP/DOWN buttons.
There are 10 dierent presets in the module, and by default
a few dierent tuning systems are programmed, but they
can all be adjusted.
0-5: the same equal temperament, tuned to A = 440Hz
6: equal temperament, tuned to A = 432Hz
7: just intonation in the key of C
8: just intonation in the key of Bb
9: just intonation in the key of D
All presets can be adjusted and stored.

µTune Edit
To enter the µTune EDIT mode, hold SET and press TUNE
again (while in a µTune PRESET mode). Now you are
adjusting the current preset. The display shows a selected
semitone that can be fine-adjusted by pressing the
UP/DOWN buttons. (“C” means C, “C.” means C# etc.)
To select a semitone, send a MIDI Note or hold SET and
press UP/ DOWN. Press the UP/DOWN buttons (without
SET) to make fine adjustments for each semitone (it will
repeat for all octaves). Think of this as tuning a guitar –
strum a string and adjust the tuning. Press SET to leave
the µTune EDIT mode; press it again to leave the µTune
PRESET selection mode.
Menu Structure
Measures the LISTEN INPUTS and adjusts
the CV OUTPUTS accordingly.
TUNE
UP/DOWN
+/- octave
UP+DOWN
DOWN+UP
reset octave
SET+DOWN=LAYOUT MODE
layout symbol blinks
layouts with "." activate
MIDI .CLK .RST feature
– UP/DOWN select LAYOUT
– SET exits to HOME SCREEN
LEARN in QUANTIZER MODE (display shows note)
– LEDs indicated weather the note is used for quantizing
– UP/DOWN browsing thru notes
– TUNE activates/deactivates the selected note
– SET+UP/DOWN changes MIDI channel per channel
– SET+TUNE+UP/DOWN
SET+UP=LEARN MODE
LEDS indicate LEARN ZONE
displays ch/note/cc
numbers sequentially
– UP/DOWN changes LEARN ZONE
– incoming MIDI message sets ch/note/CC/ number and
MIDI channel
– SET+UP/DOWN adjusts the ch/note/CC number
– SET+TUNE+UP/DOWN adjusts the MIDI channel
– SET exits to HOME SCREEN

SET+TUNE=µTUNE MODE
displays µ+preset number
– UP/DOWN selects PRESET
– SET exits to HOME SCREEN
⬇
SET+TUNE =µTUNE EDIT
displays note
notes with DOT are C# D# F# G# A#
– UP/DOWN changes tuning for particular note
– incoming MIDI note selects which note is adjusted
– SET+UP/DOWN selects note to be adjusted
– SET+TUNE+UP/DOWN adjusts the MIDI channel
– SET exits to µTUNE MODE
SET+SET (double click)=SETTINGS MODE
displays settings page LEDs and display
blinks holding SET displays value on the page
– UP/DOWN selects settings page
– SET+UP/DOWN sets the settings on the page
– SET exits to HOME SCREEN

CV Inputs
There are 4 CV Inputs (WINDOW – QA, UPDATE – QB,
TRANSPOSE – QC and PORTAMENTO – QD) that turn
the 1983 into something more than just a MIDI interface: a
very creative tonal tool, sequencer or arpeggiator. In all
modes except the QUANTIZER mode (when they are
used as QUANTIZER Inputs QA, QB, QC, QD), these CV
Inputs serve the following purposes:
Window
The WINDOW CV aects how MIDI Notes are allocated to
the CV Outputs. Each voice allocation PRIORITY
algorithm (LOW, HIGH, ORDER) assigns an order to the
notes. If more polyphony is required than the selected
layout might provide, all the other notes are stored on a
“waiting list” until all notes are released (if played legato).
The “Window” can redefine which of these notes on the list
will appear at the Outputs and which will not.
The “Window” can be moved around the buer (waiting
list) by two dierent methods:
1positioning the “Window” by CV
2triggering the “Window” to move to the next position
See the Settings chapter on how to set this up.
NOTE: Window does not apply for Layouts T,G,C,Q
Transpose
The TRANSPOSE jack can be used to oset the pitch of
the CV Outputs. It can aect one or several Outputs, and it
is always quantized. The aected Channels and the
Transpose Mode can be selected in the SETTINGS menu.
All transpositions are read as 1V/Oct and are added to the
output as 1V/Oct or as respectively compensated voltages
if the LISTEN Inputs are used.

THE TRANSPOSE MODES ARE:
Semitone Transpose osets the Output by a number of
semitones corresponding to the input voltage.
Fifth Transpose osets the Output by a fifth or an octave
(or their multiples) corresponding to the input voltage.
Octave Transpose osets the Output by an octave (or
multiple octaves) corresponding to the input voltage.
Each mode can aect Channel A, Channels A+B,
Channels A+B+C or Channels A+B+C+D. See the
Settings chapter on how to set this up.
NOTE: Transpose does not apply for Layouts T,G,C,Q
Update
If the UPDATE Input is used (a cable is plugged into it), the
1983 does not update the OUTPUTS unless the rising
edge of a trigger or clock is detected at the Input. This
could be used with a clock to time-quantize the updating of
the channels, or more creatively with triggers (and with the
WINDOW jack) to create interesting melodic variations.
NOTE: Update does not apply for the following Layouts: Q
Portamento
The PORTAMENTO CV adds portamento (slew) to the
rendering of the Outputs. The transition between any two
notes will be rendered as a slide with a time constant set
by the CV. The range spans from a few milliseconds to 5
seconds.
The Portamento can be applied to Channel A, channels
A+B, Channels A+B+C or Channels A+B+C+D. See the
Settings chapter on how to set this up.
NOTE: Portamento does not apply for the following
Layouts: Q

Layouts and Learn Modes
The 1983 has multiple Layouts for various musical
applications and the Outputs are configured in dierent
ways to translate MIDI information. Each Layout can have
several “Learn Zones” which can have independent
settings of MIDI Channel, Note or CC. This adjustment can
be done in the Learn Mode, and that mode is slightly
dierent for each Layout.
TO ENTER THE LAYOUT MODE, HOLD SET AND
PRESS DOWN.
Press UP/DOWN to change the Layout.
Press SET to save and leave.
TO ENTER THE LEARN MODE, HOLD SET AND
PRESS UP.
Press UP/DOWN to change the Learn Zone.
Further settings depend on the selected Layout. See
below.
Press SET to save and leave.
MIDI Clock “.” Dot
Each Layout has a version with and without a DOT “.”
appearing on the display. The “dotted” layout always uses
Channel D to output CLOCK and RESET information
derived from the MIDI Clock and MIDI Start & Stop
messages.
The CLOCK is always a subdivision of the MIDI Clock, and
the DIVIDER can be set in the SETTINGS.
The RESET pulse is sent each time the module receives a
MIDI Start or MIDI Stop command.
The CLOCK Output will only start to render the pulses after
receiving the MIDI Start command, and will stop with
receiving the MIDI Stop command.
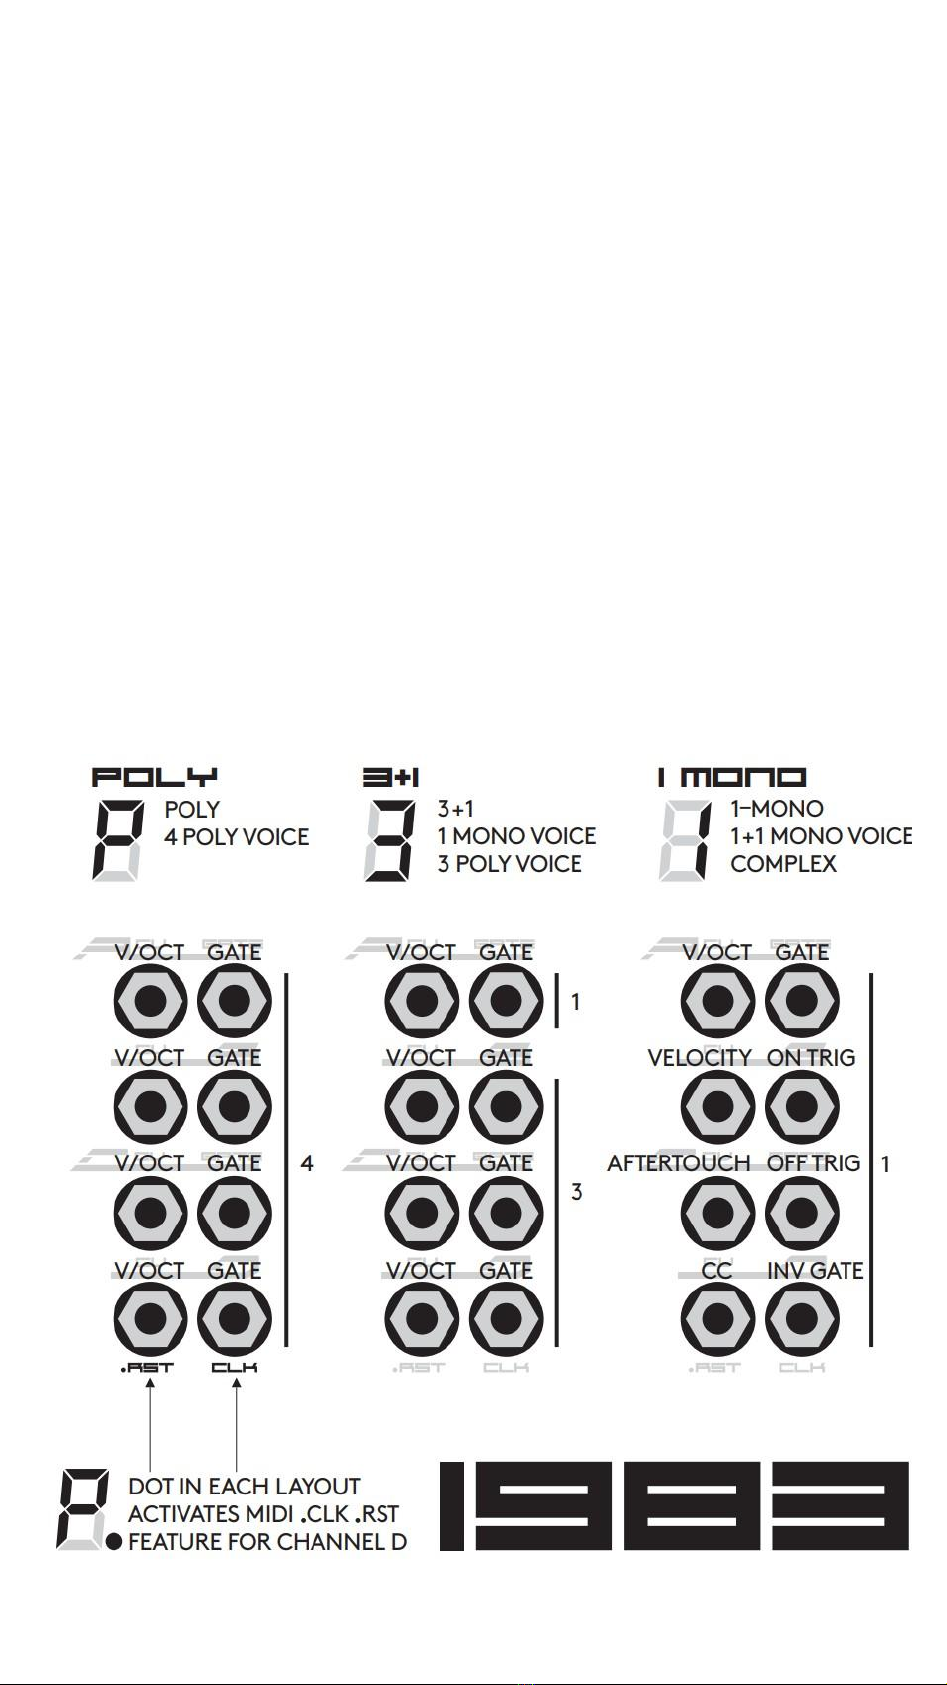
“P” 4 Poly Voice
This Layout is a four-voice polyphonic, which allocates
voices based on the PRIORITY settings. In the HIGH and
LOW priority, Channel A has the highest priority. In the
ORDER mode, the voices are naturally allocated using the
Robin Round algorithm. All GATE Outputs behave as
expected.
LEARN MODE: There is just one Learn Zone in which you
specify a MIDI Channel to listen to. Send a MIDI Note on
the desired channel to set the channel, or hold SET and
press UP/DOWN to change the MIDI Channel. Setting “0”
means it responds to all channels (known in MIDI as the
“Omni” mode).

“3” 1 Mono Voice + 3 Poly Voice
This Layout has one monophonic channel, and a
three-voice polyphonic channel. This way you can play a
bass line and chords on top of it. Each of these can have a
dierent MIDI Channel specified. All GATE Outputs
behave as expected.
LEARN MODE: There are two Learn Zones in which you
specify a MIDI Channel to listen to.
Send a MIDI Note on the desired channel to set the
channel, or hold SET and press UP/DOWN to change the
MIDI Channel. Setting “0” means it responds to all
channels (the Omni mode).
“1” 1 Mono Voice
This Layout is one complex monophonic voice with
velocity, CC, mod wheel and aftertouch.
CV A outputs V/Oct voltage.
CV B outputs velocity voltage 0-7V.
CV C outputs channel aftertouch voltage 0-7V.
CV D outputs assigned MIDI CC 0-7V.
GATE A is a normal gate.
GATE B is ON TRIG – triggers each time the note has
changed. The trigger is 2 milliseconds long.
GATE C is OFF TRIG – triggers each time the note has
been released.
GATE D is an inverted gate.
LEARN MODE:There is just one Learn Zone in which you
specify a MIDI Channel to listen to.
Send a MIDI Note on the desired channel to set the
channel, or hold SET and press UP/DOWN to change the
MIDI Channel. Send a MIDI CC to assign its values to
appear at the Channel D Output.
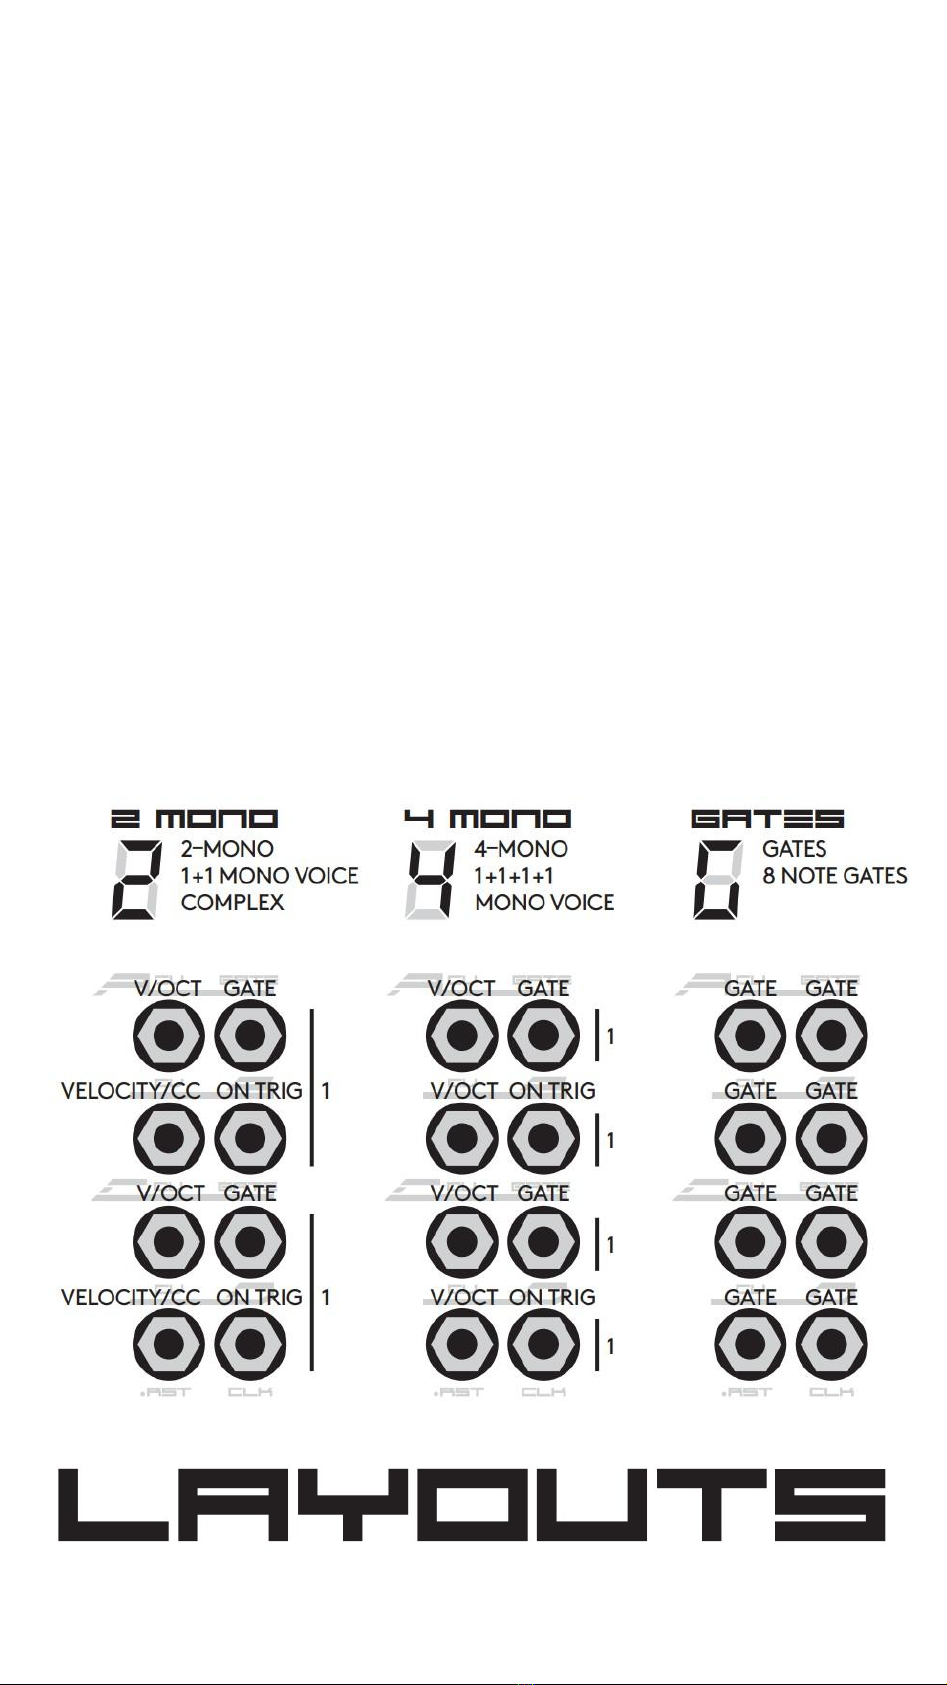
“2” 2 Mono Voices
This Layout supports two monophonic voices with velocity.
CV A – pitch and CV B – velocity are one voice and
CV C – pitch and CV D – velocity are the second voice.
GATE A and C are normal gates.
GATE B and D are ON TRIG – they trigger each time the
note has changed.
LEARN MODE: There are two Learn Zones in which you
specify a MIDI Channel to listen to.
Send a MIDI Note on the desired channel to set the
channel, or hold SET and press UP/DOWN to change
MIDI Channel. Setting “0” means it responds to all
channels.

“4” 4 Mono Voices
This Layout consists of four simple monophonic voices. All
GATE Outputs behave as expected.
LEARN MODE: There are four Learn Zones in which you
specify a MIDI Channel to listen to.
Send a MIDI Note on the desired channel to set the
channel, or hold SET and press UP/DOWN to change the
MIDI Channel. Setting “0” means it responds to all
channels.
“G” 8 Gates
This Layout outputs eight gates for the specified MIDI
Notes. Both CV and GATE Outputs output 5V gates.
GATE LEDs are dimmed by default, and they light up with
full intensity if the GATE Output on the Channel is HIGH
and, contrarily, they turn o if the CV Output on the
Channel is HIGH.
TIP: Use the four gates coming out of the CV Outputs with
PORTAMENTO to achieve voltage controlled envelopes.
LEARN MODE: There are eight Learn Zones to specify a
MIDI Note and a MIDI Channel for each GATE Output.
Browsing the Learn Zones, the LED lights up with full
intensity when a GATE Output is selected, and all LEDs
are dimmed and one turns o when a CV Output is
selected.
Send the requested MIDI Note on the desired Channel to
set the Channel. Alternatively, you can hold SET and press
UP/DOWN to change the MIDI Note, and hold SET and
TUNE and press UP/DOWN to change the MIDI Channel.
Setting “0” means it responds to all channels.
Table of contents


