Battery Doctor Battery Life Preserver 20395 User manual

5.3 The LED indication on Main Device
– Blue LED Flash: The battery power is connected and the unit will start monitoring the drain on the battery.
– Red LED Flash: The battery power was disconnected automatically due to low voltage (12.0V or lower).
– Yellow LED Flash: The battery power was disconnected by remote control.
– No LED Flash: If No LED Flash, that means the unit has entered into BYPASS mode. To get the unit out of BYPASS mode, connect the supplied
push button switch, press it once and it will exit BYPASS mode. The push button switch acts as a RESET switch when pressed.
5.4 What to do if the battery power is disconnected automatically (not by Remote Control):
Battery Life Preserver™ Automatic Battery Disconnect will prevent the battery from going “dead” by disconnecting power from the battery
automatically when the battery reaches 12.0V or lower, saving power for emergency engine start.
If the remote control was not used to disconnect the battery power and the car has no starting power, the Battery Life Preserver™ Automatic
Battery Disconnect has disconnected the power from the battery automatically, due to drain on the battery by some car accessory or power
been left on causing this drain on the car battery.
5.5 Follow these simple instructions to reconnect the battery :
5.5a To reconnect the battery and use the emergency starting reserves:
- Switch ignition and all accessories to off
- Connect the supplied RESET button to the main unit
- Wait 1 minute
- Press the RESET button to reset the Battery Life Preserver™ Automatic Battery Disconnect
- Or simply press the on the remote and then start the engine.
5.5b If the engine does not start after 5 seconds of cranking, (it is generally recommended not to crank the engine for more than 5 seconds at a
time) release the key, wait four minutes and try again.
After reconnecting and restarting the vehicle, leave engine running at least 30 minutes to restore the battery’s charge. It is recommended to
a have an auto repair professional check the battery to make sure it is still able to hold a charge and to check if it is receiving a charge from
the alternator.
5.5c It may be required to reprogram any vehicle memory devices or accessories after reconnection.NOTE: Battery Life Preserver™ Automatic
Battery Disconnect will not disconnect the battery as long as the engine is running.
6. LIMITED WARRANTY
WIRTHCO ENGINEERING, INC., MINNEAPOLIS, MN 55439 MAKES THIS LIMITED WARRANTY TO THE ORIGINAL PURCHASER AT RETAIL OF THIS PRODUCT. THIS
LIMITED WARRANTY IS NOT TRANSFERABLE.
WirthCo Engineering, Inc. has a limited warranty for this battery disconnect for one year from date of purchase at retail against defective material
or workmanship. If such should occur, the unit will be repaired or replaced at the option of the manufacturer. It is the obligation of the purchaser to
forward the unit together with proof of purchase, transportation and/or mailing charges prepaid to the manufacturer or its authorized representative.
• This limited warranty is void if the product is misused, subjected to careless handling, or repaired by anyone other than the manufacturer or its
authorized representative.
• The manufacturer makes no warranty other than this limited warranty and expressly excludes any implied warranty including any warranty for
consequential damages.
• This is the only express limited warranty and the manufacturer neither assumes nor authorizes anyone to assume or make any other obligation
towards the product other than this express limited warranty. The manufacturer makes no warranty of merchantability or fitness for purpose of this
product and expressly excludes such from this limited warranty.
• Some states do not allow the exclusion or limitation of incidental or consequential damages or length of implied warranty so the above limitations
or exclusions may not apply to you.
• This warranty gives you specific legal rights and you may also have other rights which vary from state to state.
7. TROUBLESHOOTING
7.1 VERY IMPORTANT: The installation must be correct and all the connectors have to be screwed tight, ensure the ground is good and tight.
7.2 The LED color should be BLUE for watch mode.
7.3 Press the RESET button, on the main unit, the LED will be off. Press the RESET button on the main unit again, the LED should go back to BLUE for
watch mode.
7.4 To use the remote control to active the immobilizer function, press and hold the button for a few seconds. The buzzer should beep once and the
LED light on the main unit should change to YELLOW to indicate the system is in lock mode and immobilized.
7.5 Now try to start the engine. The engine should not start.
7.6 To mobilize, press the button on the remote. The beep will sound twice and the light on main unit turns to BLUE indicating the Battery Life
Preserver™ Automatic Battery Disconnect is in battery watch mode. Try starting car, it should start.
IMPORTANT SAFETY INSTRUCTIONS • SAVE THESE INSTRUCTIONS
WIRTHCO ENGINEERING, INC. • MINNEAPOLIS, MN 55439
© 2014 All rights reserved
IMPORTANT SAFETY INSTRUCTIONS • SAVE THESE INSTRUCTIONS
WIRTHCO ENGINEERING, INC. • MINNEAPOLIS, MN 55439
© 2014 All rights reserved
OWNER’S MANUAL (MODEL #20395)
Battery Life Preserver™ Automatic Battery Disconnect Switch
Instruction Manual — Read Instructions Carefully for Safe Operation
READ THE ENTIRE MANUAL BEFORE USING THIS PRODUCT.
FAILURE TO DO SO CAN RESULT IN SERIOUS INJURY OR DEATH.
WORKING IN VICINITY OF A LEAD-ACID BATTERY IS DANGEROUS. BATTERIES GENERATE EXPLOSIVE
GASES DURING NORMAL BATTERY OPERATION. FOR THIS REASON, IT IS OF UTMOST IMPORTANCE
THAT EACH TIME YOU UNINSTALL OR INSTALL THE BATTERY DISCONNECT, READ THIS MANUAL AND
FOLLOW THE INSTRUCTIONS EXACTLY.
This manual will show how to use the Battery Life Preserver™ Automatic Battery Disconnect safely and effectively. Please read, understand and follow
these installation instructions and precautions carefully, as this manual contains important safety and operating instructions. The safety messages used
throughout this manual contain a signal word, a message and an icon.
The signal word indicates the level of the hazard in a situation.
indicates an imminently hazardous situation which, if not avoided, will result in death or serious injury to the operator or bystanders.
indicates a potentially hazardous situation which, if not avoided, could result in death or serious injury to the operator or bystanders.
indicates a potentially hazardous situation which, if not avoided, could result in moderate or minor injury to the operator or bystanders.
indicates a potentially hazardous situation which, if not avoided, could result in damage to the equipment or vehicle or
property damage.
Safety messages in this manual contain two different type styles.
• Unnumbered type states the hazard
• Numbered type states how to avoid the hazard.
The icon gives a graphical description of the potential hazard.
1. IMPORTANT SAFETY INSTRUCTIONS
Risk of electric shock or fire.
1.1 Use only recommended attachments. Use of an attachment not recommended by WirthCo Engineering, Inc. may result in a risk of fire, electric
shock or injury to persons or damage to property.
1.2 Remove personal metal items such as rings, bracelets, necklaces and watches when working with a lead-acid battery. A lead-acid battery can
produce a short circuit current high enough to weld a ring or the like to metal, causing a severe burn.
1.3 Do not operate the battery disconnect if it has received a sharp blow, been dropped or otherwise damaged in any way; take it to a qualified
service person.
1.4 Do not disassemble the battery disconnect switch. There are not any replaceable parts or parts that require maintenance. Tampering or opening
the battery disconnect switch will void all warranties.
2. PERSONAL PRECAUTIONS
Risk of explosive gases
2.1 Working in the vicinity of a lead-acid battery is dangerous. Batteries generate explosive gases during normal battery operation. For this reason,
it is of utmost importance to follow the instructions.
2.2 To reduce the risk of a battery explosion, follow these instructions and those published by the battery manufacturer and the manufacturer of
any equipment used in the vicinity of the battery. Review the cautionary markings on these products and on the engine.
2.3 NEVER smoke or allow a spark or flame in the vicinity of a battery or engine.
2.4 Be extra cautious to reduce the risk of dropping a metal tool onto the battery. It might spark or short-circuit the battery or other electrical part
that may cause an explosion.
3. PREPARING TO INSTALL
Risk of contact with battery acid. Battery acid is a highly corrosive sulfuric acid.
3.1 Consider having someone close enough by to come to help in case of an accident when working near a lead-acid battery.
3.2 Have plenty of fresh water and soap nearby in case battery acid contacts the skin, clothing or eyes.
3.3 Wear complete eye and body protection, including safety goggles and protective clothing. Avoid touching the eyes while working near the battery.
3.4 If battery acid contacts the skin or clothing, immediately wash the area with soap and water. If acid enters the eyes, immediately flood the
eyes with cold running water for at least 10 minutes and get medical attention right away.
3.5 Clean the battery terminals before installing the battery disconnect. During cleaning, keep airborne corrosion from coming into contact with the
eyes, nose and mouth. Use baking soda and water to neutralize the battery acid and help eliminate airborne corrosion. Do not touch the eyes,
nose or mouth.
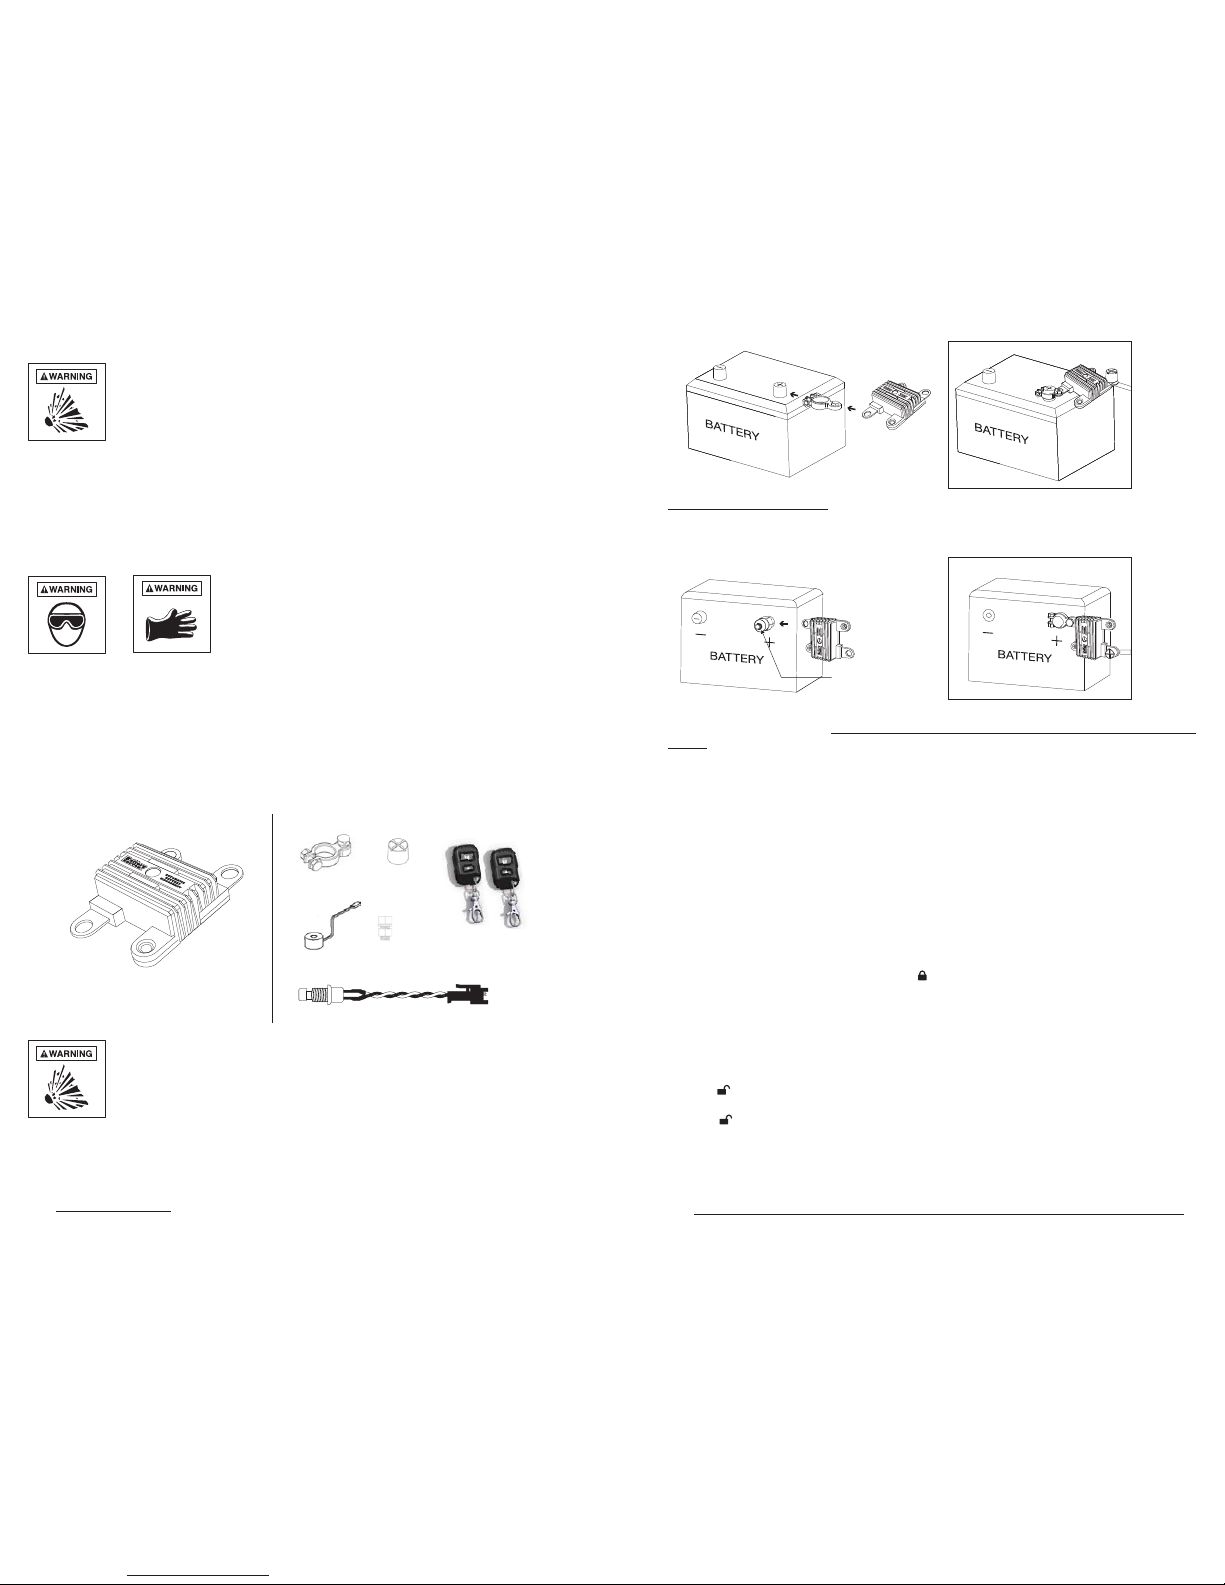
4. INSTALLATION
Battery Disconnect with LED indicator Installation Accessories:
Battery Terminal Positive Post
Buzzer/Speaker Bolts
Reset Button
Remote x 2 PCS
(Key FOBs)
Risk of explosive gases
4.1 Ensure all accessories and ignition is turned off. The best way to ensure the ignition is not turned on or accidently turned on is to not have the keys
inside the starter switch.
4.2 Locate the battery and gain access.
4.3 Remove the NEGATIVE (NEG, N, -) cable from the car battery first. This is intended to prevent sparking during the installation.
4.4 Remove the POSITIVE cable (POS, P, +) from the battery post of the vehicle.
4.5a For Top Post Battery Connection: Connect the POSITIVE (BATT+) side of the Battery Life Preserver™ Automatic Battery Disconnect to the positive top
post of the vehicle battery using the included battery terminal. Be sure to tighten the bolts securely.
Final Assembly
4.5b For Side Post Battery Connection (GM Style): If the battery style is a side post style, it will require the purchase of the side post battery adapter
like the Battery Doctor #30300. Once the side post battery adapter is installed, connect the POSITIVE (BATT+) side of the Battery Life Preserver™
Automatic Battery Disconnect to the positive side terminal post of the vehicle battery using the included battery terminal. Be sure to tighten the bolts
securely.
Side Post Adapter
#30300
Final Assembly
4.6 Connect POSITIVE (POS, P, +) battery cable to the terminal marked (+CABLE) on the battery disconnect. Firmly attach it with the included Positive
Post and screws. Ensure it is tight and secure. Use the vehicle insulator cap to cover the connection for proper insulation on the battery terminal when
completed.
4.7 Reconnect the NEGATIVE (NEG, N, -) cable, which had been removed in 4.3 back to the negative post of the vehicle’s battery. Before tightening the
negative terminal, place the negative wire (black wire) of the battery disconnect to the negative terminal bolt and tighten securely.
4.8 Attach the buzzer/speaker. The buzzer/speaker plugs directly into the battery disconnect switch harness. Ensure the surface of the location is clean
before attempting to mount it. Pull off the double sided tape from the bottom of the Buzzer and attach it on to a secure place away from any moving
parts or any heat source of the engine. Always use wire ties to secure any loose cables.
4.9 The installation of the Battery Life Preserver™ Automatic Battery Disconnect is now complete. The main unit will show a Blue LED flashing if the unit
is operating properly. If the LED is flashing any other color or no color at all, verify all connections and repeat the above procedures if required. At
this stage the Battery Life Preserver™ Automatic Battery Disconnect can be used to prevent battery drain or with the remote control it can immobilize
the engine by cutting off battery power and prevent battery drain at the same time.
4.10 The Battery Life Preserver™ Automatic Battery Disconnect comes with a separate RESET button switch. This switch could be attached and installed
permanently or it can be left unattached and only used when needed. If the RESET switch is left unattached, make sure to keep it in a secure and
safe location.
5. OPERATING INSTRUCTIONS
5.1 Activating the Battery Life Preserver™ Automatic Battery Disconnect using the remote control (Key FOBs)
5.1a To disconnect the vehicle from the battery completely, press the button on the remote control. This will completely disconnect the
battery, cutting off all power to the vehicle. This will erase any memory presets and clock when using this function.
5.1b To use the Battery Life Preserver™ disconnect to monitor the battery and disconnect the power once the battery reaches 12.0V, then do not
press any buttons on the remote. Once the engine is shut off, the battery disconnect will automatically switch to monitoring mode. When
the battery reaches 12.0V for 30 seconds or more, the unit will automatically disconnect the power from the vehicle saving enough battery
starting power.
5.2 Deactivating the Battery Life Preserver™ Automatic Battery Disconnect (to turn off the anti-theft function)
5.2a Press the button on the remote control to deactivate the Battery Life Preserver™ Automatic Battery Disconnect anti-theft function. This
will reconnect the battery.
5.2b When the button is pressed, two short acoustic 110 dB “Beeps” will sound, the blue LED indicator on the remote control will light up
and the LED color on the main unit will change to blue, to indicate that the battery has been reconnected.
Please note, when it is installed, the Battery Life Preserver™ Automatic Battery Disconnect automatically begins to monitor the battery. If using
the remote to disconnect the battery, please hold the remote button for a few seconds. The few seconds delay on the remote button is a safety
feature, to prevent accidental pressing of the remote button to disconnect the battery.
NOTE : If the battery is disconnected using the remote control (key FOBs), then it can ONLY be reconnected by using the remote control again.
Popular Switch manuals by other brands

Minicom
Minicom RJ-45 user guide

Moxa Technologies
Moxa Technologies PT-7728 Series user manual

Nectarine Health
Nectarine Health Satellite manual

Linkskey
Linkskey LDV-DM712AUSK Quick installation guide

AXESS ELECTRONICS
AXESS ELECTRONICS HS2 user guide

Bühler technologies
Bühler technologies Nivotemp NT-EL Installation and operation instructions


