Bavarian RC Messerschmitt Me-410 Manual

Bavarian RC Messerschmitt Me-410
© 2021 BAVARIAN RC. Plans and instructions provided free of charge. Copies allowed for personal use only. Not for commercial use.
-1 - Version Beta 1.0
Bavarian RC Messerschmitt Me-410 –Build Instructions
Note: Some pictures were taken from different prototypes. There might be evolutions in the plans
that are not matching the pictures.
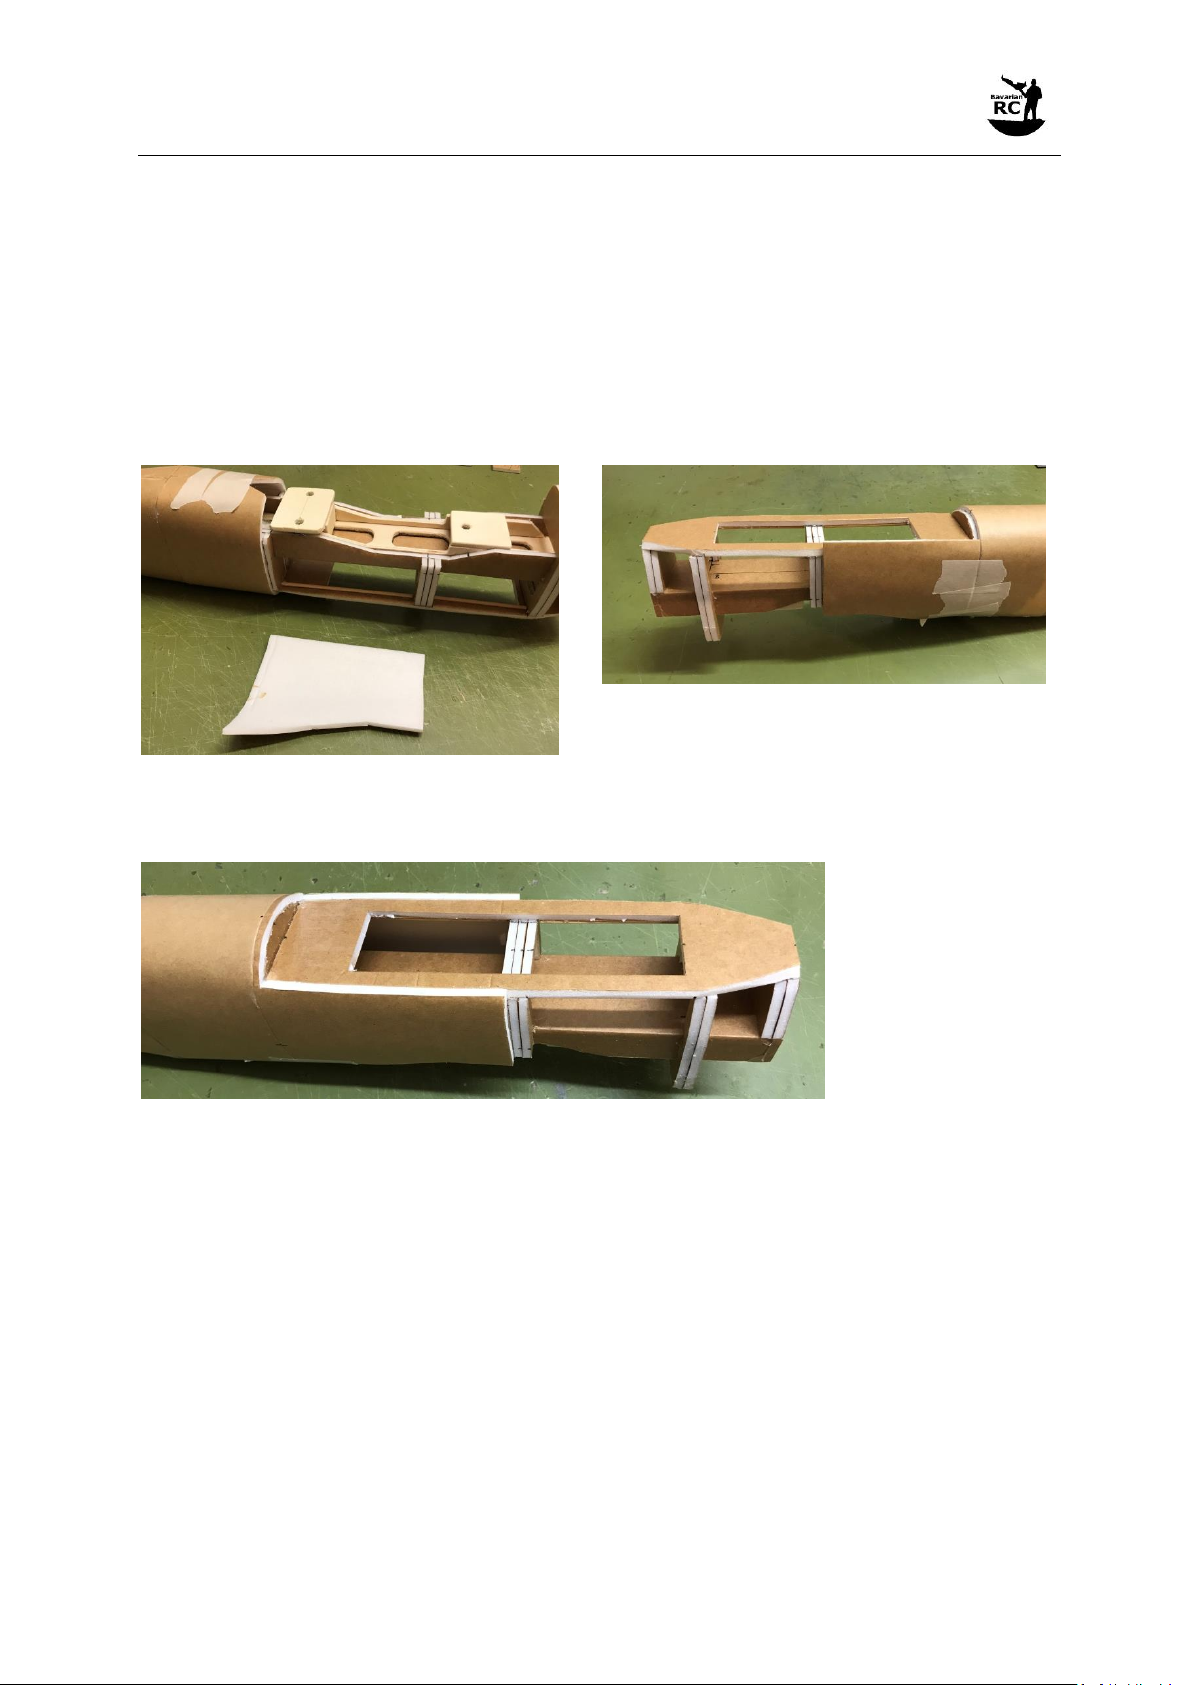
Fuselage
-Glue together the 3 layers of the Spine (LH, center, RH)
-Glue together the two Formers H2.
-Slide the Formers H2 onto the spine and glue them in place. Make sure they are at a 90
degree angle towards the spine.
-Glue Former H1 in front of Formers H2 and make sure to remove any glue from the
rectangular cut-out. Punch through the hole for the push rod sleeve.
-Glue together the two Frames L for the LH side and the two Frames L for the RH side
-Glue the Push rod support and Frames L (LH and RH) to the Spine.

Bavarian RC Messerschmitt Me-410
© 2021 BAVARIAN RC. Plans and instructions provided free of charge. Copies allowed for personal use only. Not for commercial use.
-2 - Version Beta 1.0
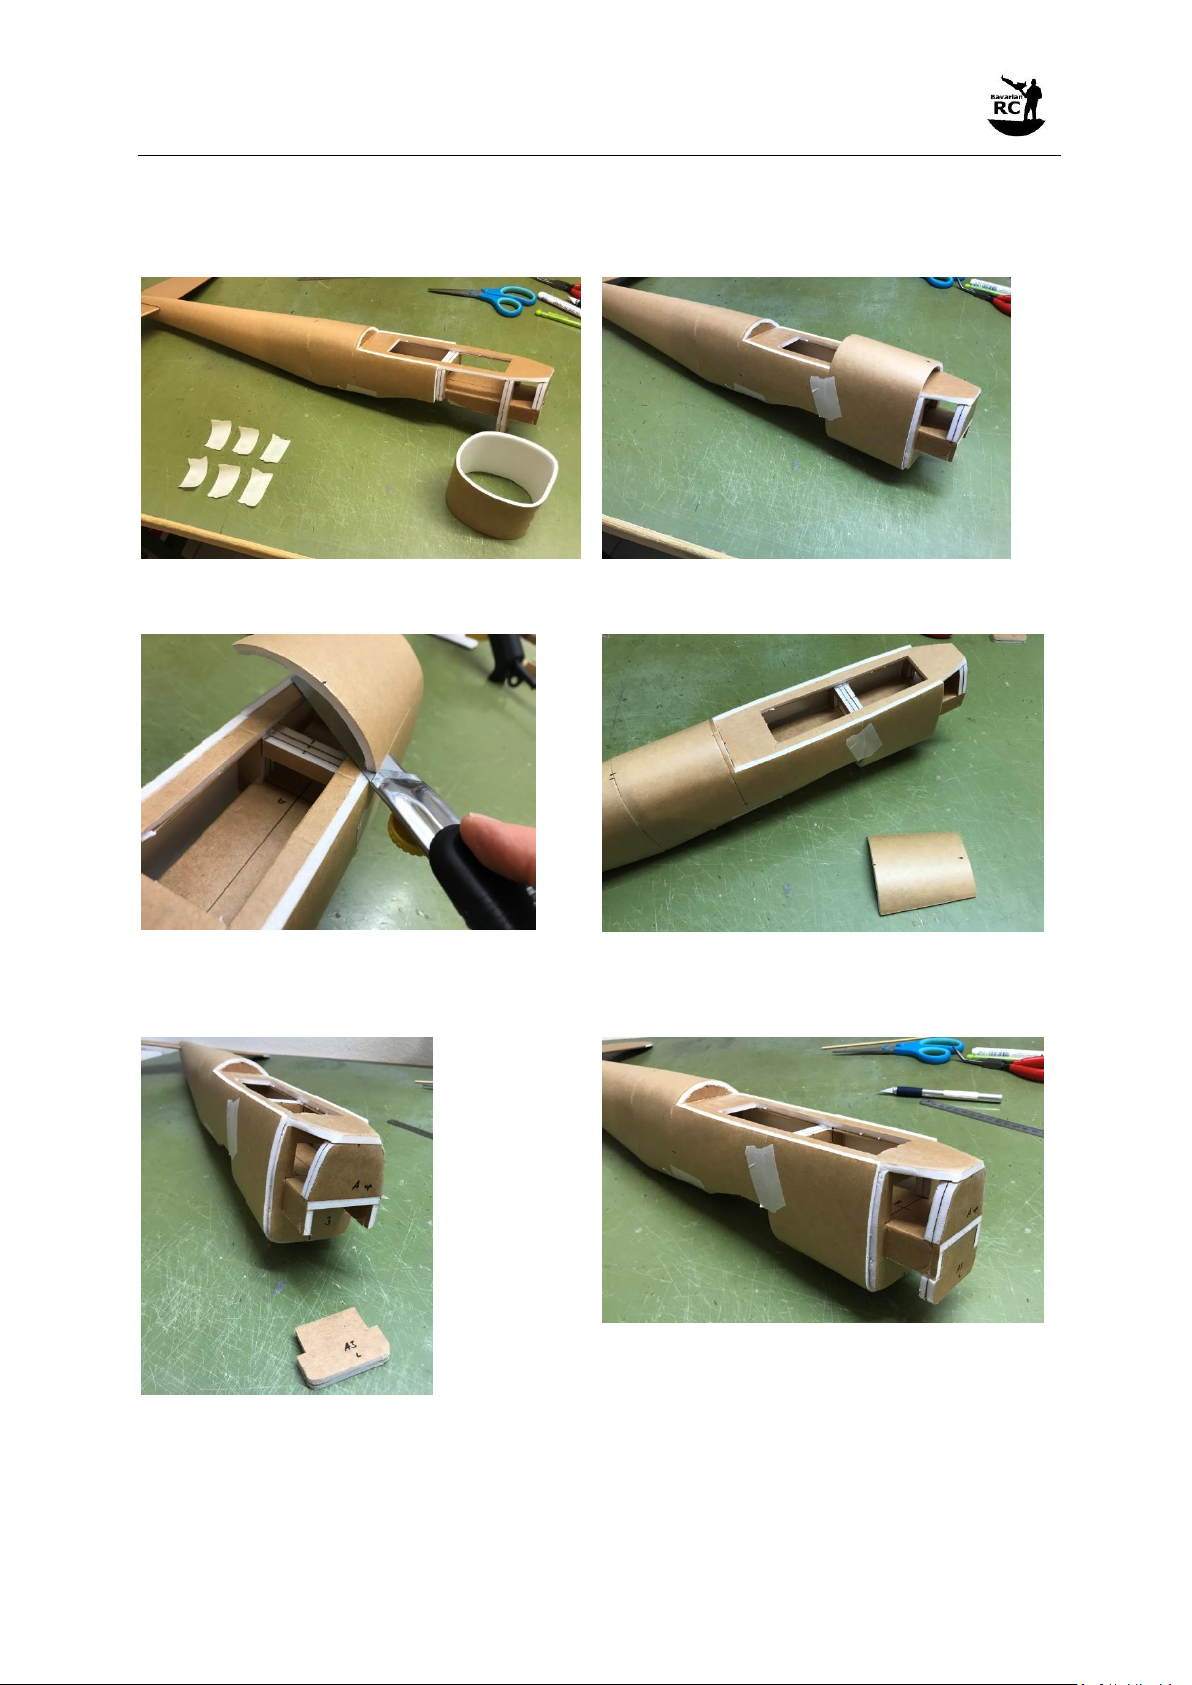
-Cut a bevel along the upper and lower edge of the Spine.
Bottom view
Top view
-Insert the push rod sleeve into the hole in formers H1/H2 and route it over the push rod
support and through the cavity in Frame L.
-The sleeve should be flush with Former H1 and overlapping the spine at the rear end by
about 15mm.
-Apply hot glue to secure the push rod sleeve on the Former H2, the push rod support and
Former L.
-Now take the Fuselage tail skin. Make sure that the openings for the HSTAB on the Fuselage
tail skin are not yet cut, just make a score cut.
-Remove the paper from the back side of the Fuselage tail skin.
-Take a BBQ skewer and open up the cut on the rear end of the Fuselage tail skin for the push
rod sleeve.
Bavarian RC Messerschmitt Me-410
© 2021 BAVARIAN RC. Plans and instructions provided free of charge. Copies allowed for personal use only. Not for commercial use.
-3 - Version Beta 1.0
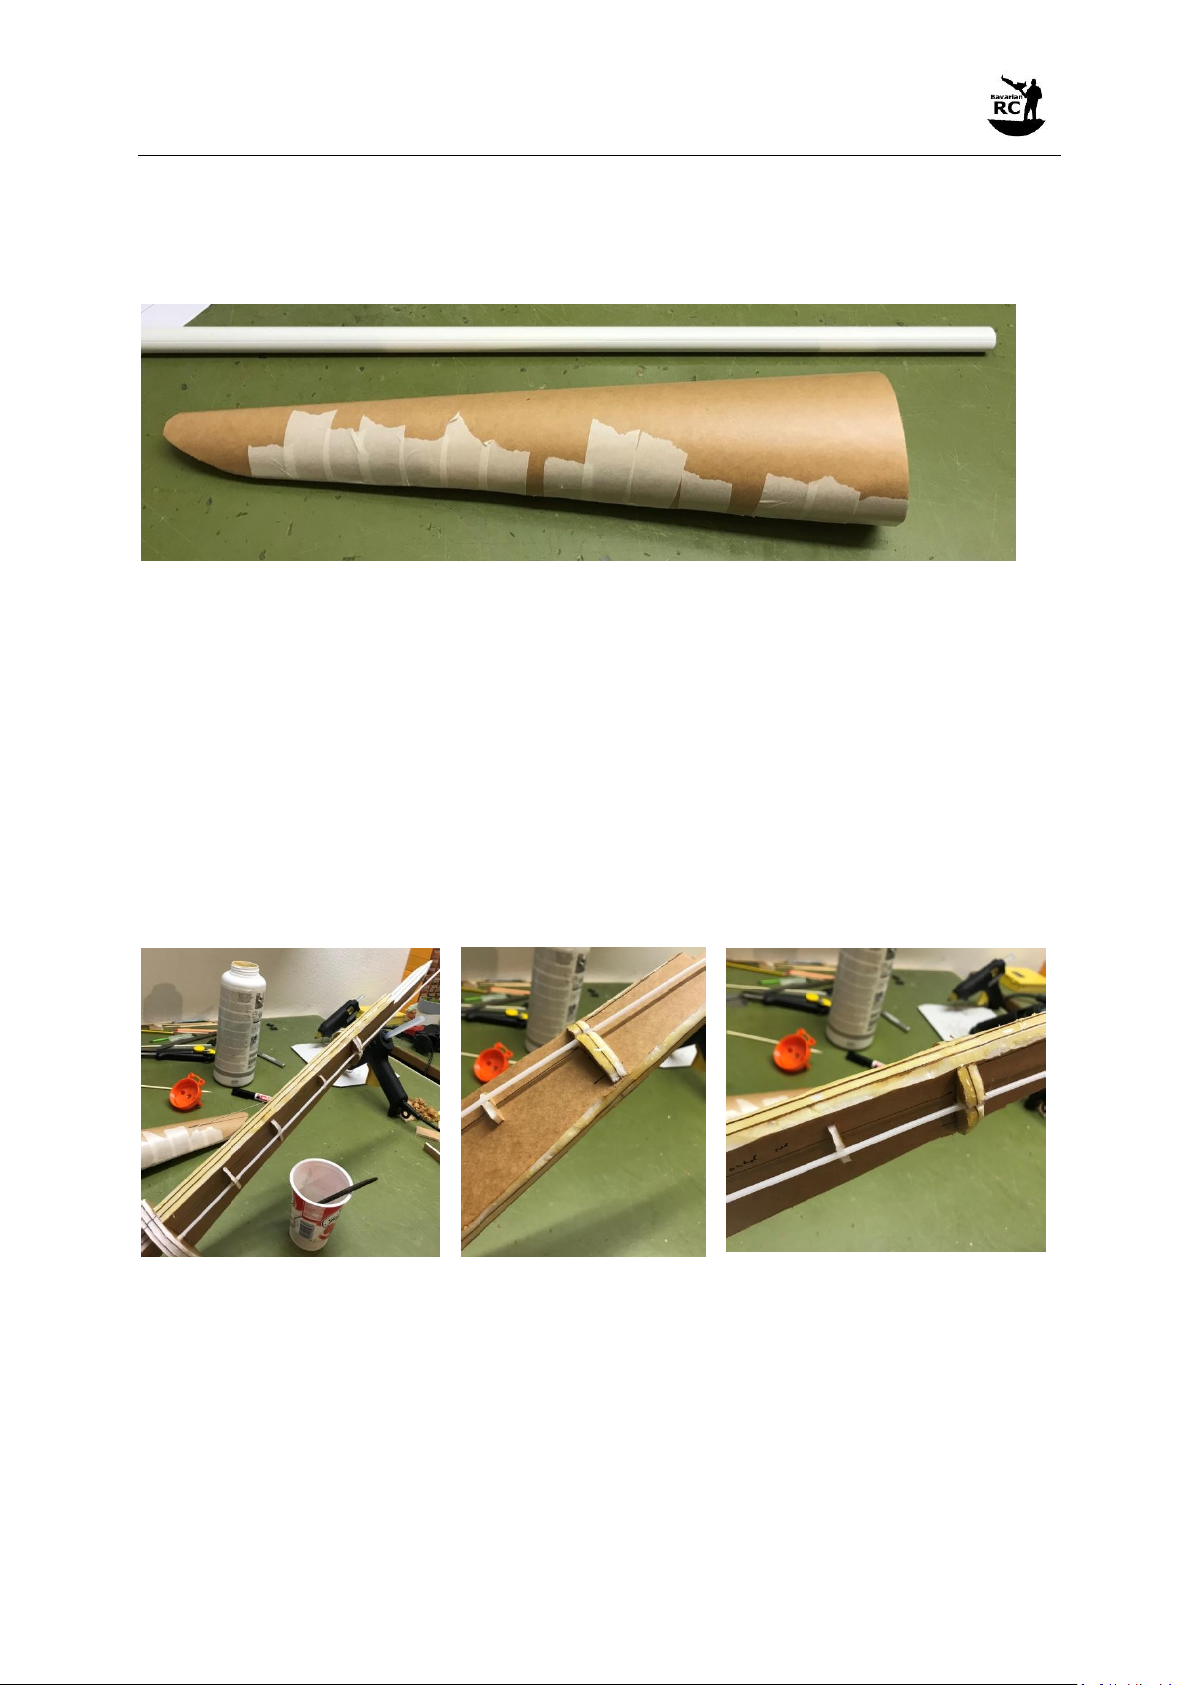
-Mold the skin to build a long tube. Take your time on this step as the radius is rather tight.
Use a PVC pipe to support the molding.
-Glue together the skin at the edge and secure it with tape.
-Take a 1.0 mm push rod (~ 1 meter length) and insert it into the opening of for the push rod
sleeve on the Fuselage tail skin. Push it all the way to the forward edge of the skin.
-To test fit the Fuselage tail skin insert the push rod (with the part that is protruding on the
forward edge of the skin) into the push rod sleeve.
-Slide the skin onto the spine. The push rod will help guiding the push rod sleeve through the
opening in the Fuselage tail skin .
-Test fit the skin on the spine and adjust the bevel on the spine as required.
-When fitting the skin, make sure that the forward edge of the skin is flush with the forward
edge of Former H2. Former H1 must remain free.
-Apply polyurethane glue (e.g. Gorilla Glue) to the edges of the spine and formers L. Don’t
apply glue to Former H2 yet.
-Slide the Fuselage tail skin onto the spine (again using the push rod like above) but stop
before reaching former H2

Bavarian RC Messerschmitt Me-410
© 2021 BAVARIAN RC. Plans and instructions provided free of charge. Copies allowed for personal use only. Not for commercial use.
-4 - Version Beta 1.0
-Now apply hot glue around the circumference of Former H2 (not on H1).
-Push the Fuselage tail skin further forward to be flush with Former H2 leaving Former H1
free.
-Make sure that the center mark of the skin top is aligned with the center mark of Former H2.
-Let the glue cure overnight.
-Glue together the two Formers F2.
-Test fit the Formers F2 on the forward edge of the spine (flush with the fwd edge).
-Apply hot glue to the mating surface of formers F2 and attach them to the spine. Make sure
that the former is perfectly aligned with the fwd edge of the spine and is at a 90 degree angle
towards the spine.
-Take the Lower deck and mark the position of Formers A2, B and D on the upper side.
-Remove the foam from the cavities.
-Apply hot glue to the cavities and make an A Fold.
-Test fit the lower deck on the fuselage. Make sure the lower deck perfectly fits to the cavity.
in former H1 and formers F2 and is fully in contact with the lower edge of the spine.
Bavarian RC Messerschmitt Me-410
© 2021 BAVARIAN RC. Plans and instructions provided free of charge. Copies allowed for personal use only. Not for commercial use.
-5 - Version Beta 1.0
-Apply hot glue to the mating surface of former H1, formers F2 and the spine and attach the
lower deck.
-Test fit the Lower deck reinforcement (plywood) on the underside of the lower deck. Make
sure it is all the way back (flush with the rear edge of the lower deck). Also make sure to have
the right orientation (see “FWD” marking).
-Glue the Lower deck reinforcement in place.
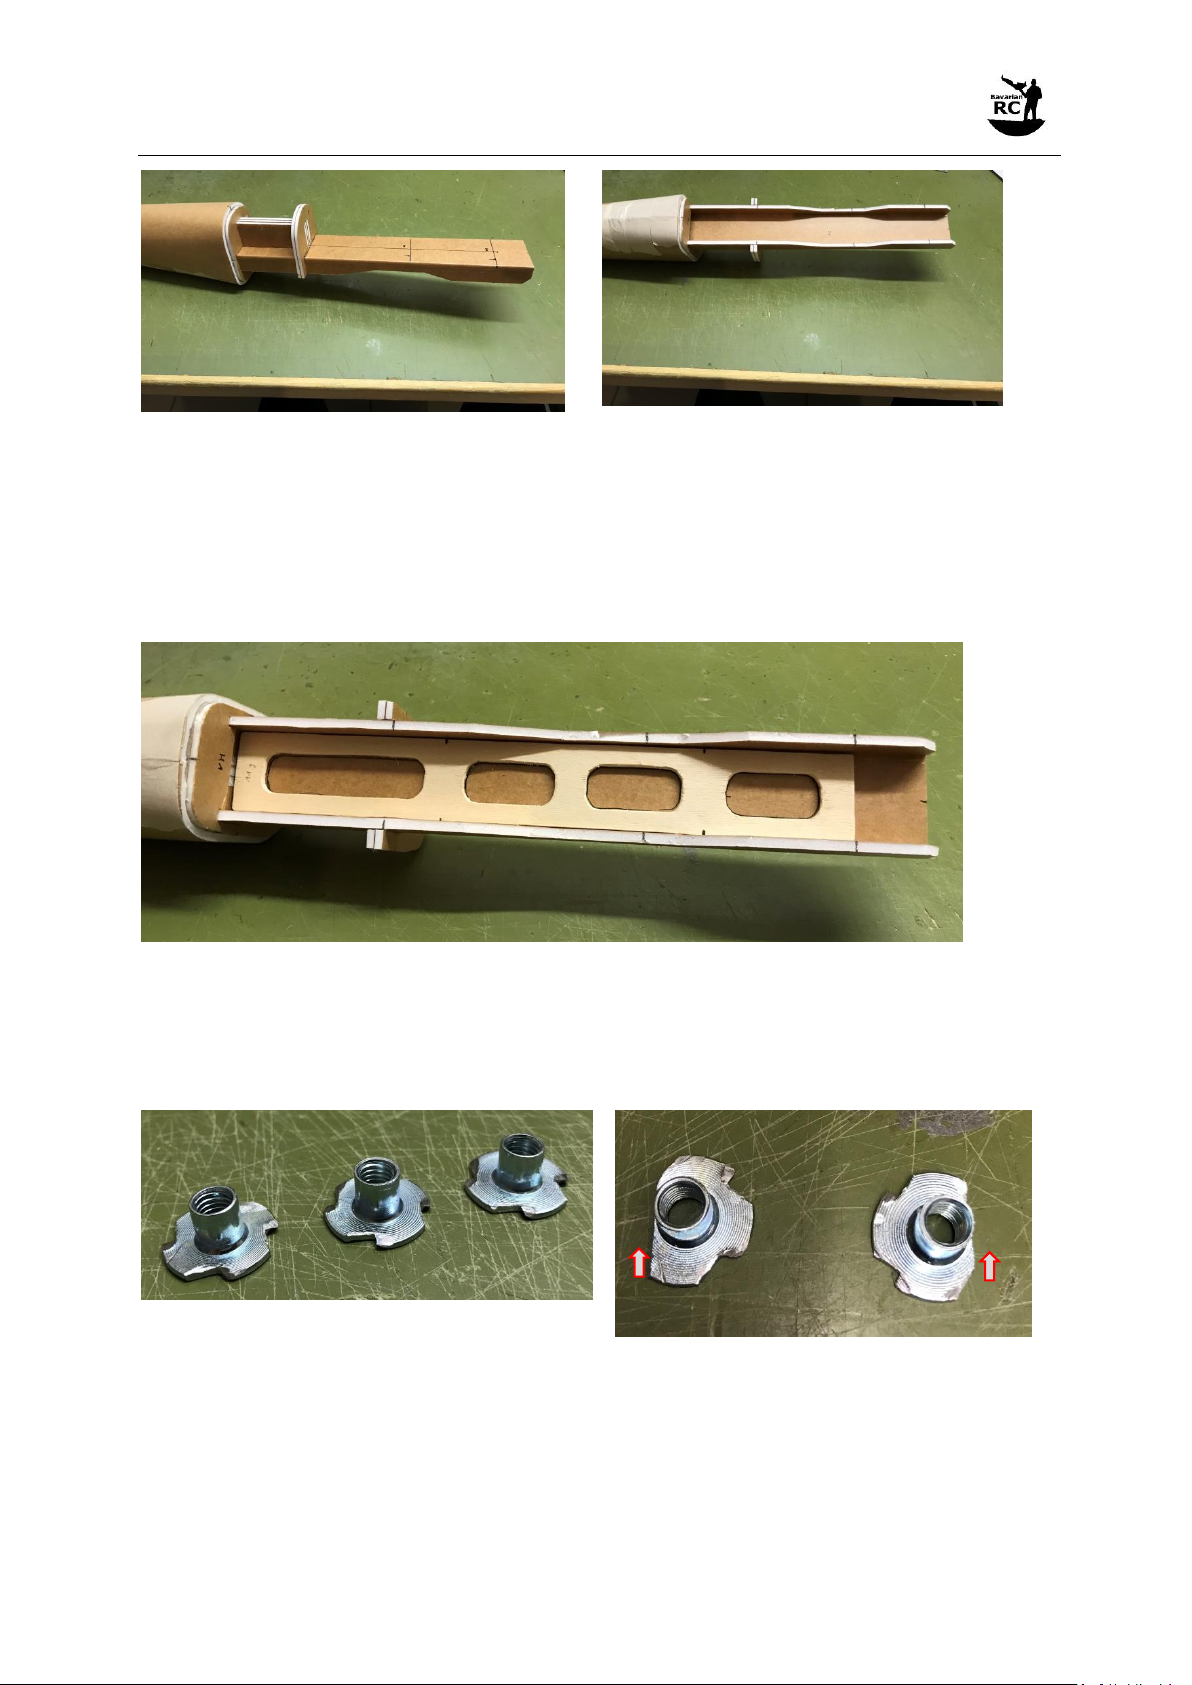
-Take three knock-in nuts M6 and cut off the spikes.
-Glue one of the knock-in nuts to the Lower deck wing support front (plywood) with the
thread of the nut centered with the hole in the support.
-On two of the knock-in nuts cut off on side of the flange.
-Glue the two knock-in nuts to the Lower deck wing support aft with the removed flange side
facing outwards. Again align the threads with the holes in the support.

Bavarian RC Messerschmitt Me-410
© 2021 BAVARIAN RC. Plans and instructions provided free of charge. Copies allowed for personal use only. Not for commercial use.
-6 - Version Beta 1.0
-Make a test fit of the Lower deck side reinforcement on the inside of the lower deck (align
the markings of the cutout in the rear part with the marking on the Lower deck
reinforcement).
-Glue the Lower deck side reinforcement to the side of the lower deck.
-Test fit the Front wall and Rear wall of the aft support together with Lower deck wing
support aft (the walls should be flush with the front and rear edge of the support).
-If necessary remove some foam from the lower deck side walls to ensure the fit of the knock-
in nuts.
-Glue the Front wall and Rear wall in place.
-Glue the Lower deck wing support aft in place. Make sure the center line connecting the two
knock-in nuts and the marking on the Lower deck reinforcement are aligned. Also make sure
to have a really strong bond as your wing will be held mainly by this joint.
-Test fit the Front wall of the fwd support and the Lower deck wing support front. Again the
front wall should be flush with the forward edge of the support.
-Glue the Front wall in place.
-Glue the Lower deck wing support front in place. Make sure the center line of the knock-in
nut is aligned with the marking on the Lower deck reinforcement. Also make sure that you
have the correct orientation. Again this should be a really strong bond.

Bavarian RC Messerschmitt Me-410
© 2021 BAVARIAN RC. Plans and instructions provided free of charge. Copies allowed for personal use only. Not for commercial use.
-7 - Version Beta 1.0
Horizontal Stabilizer
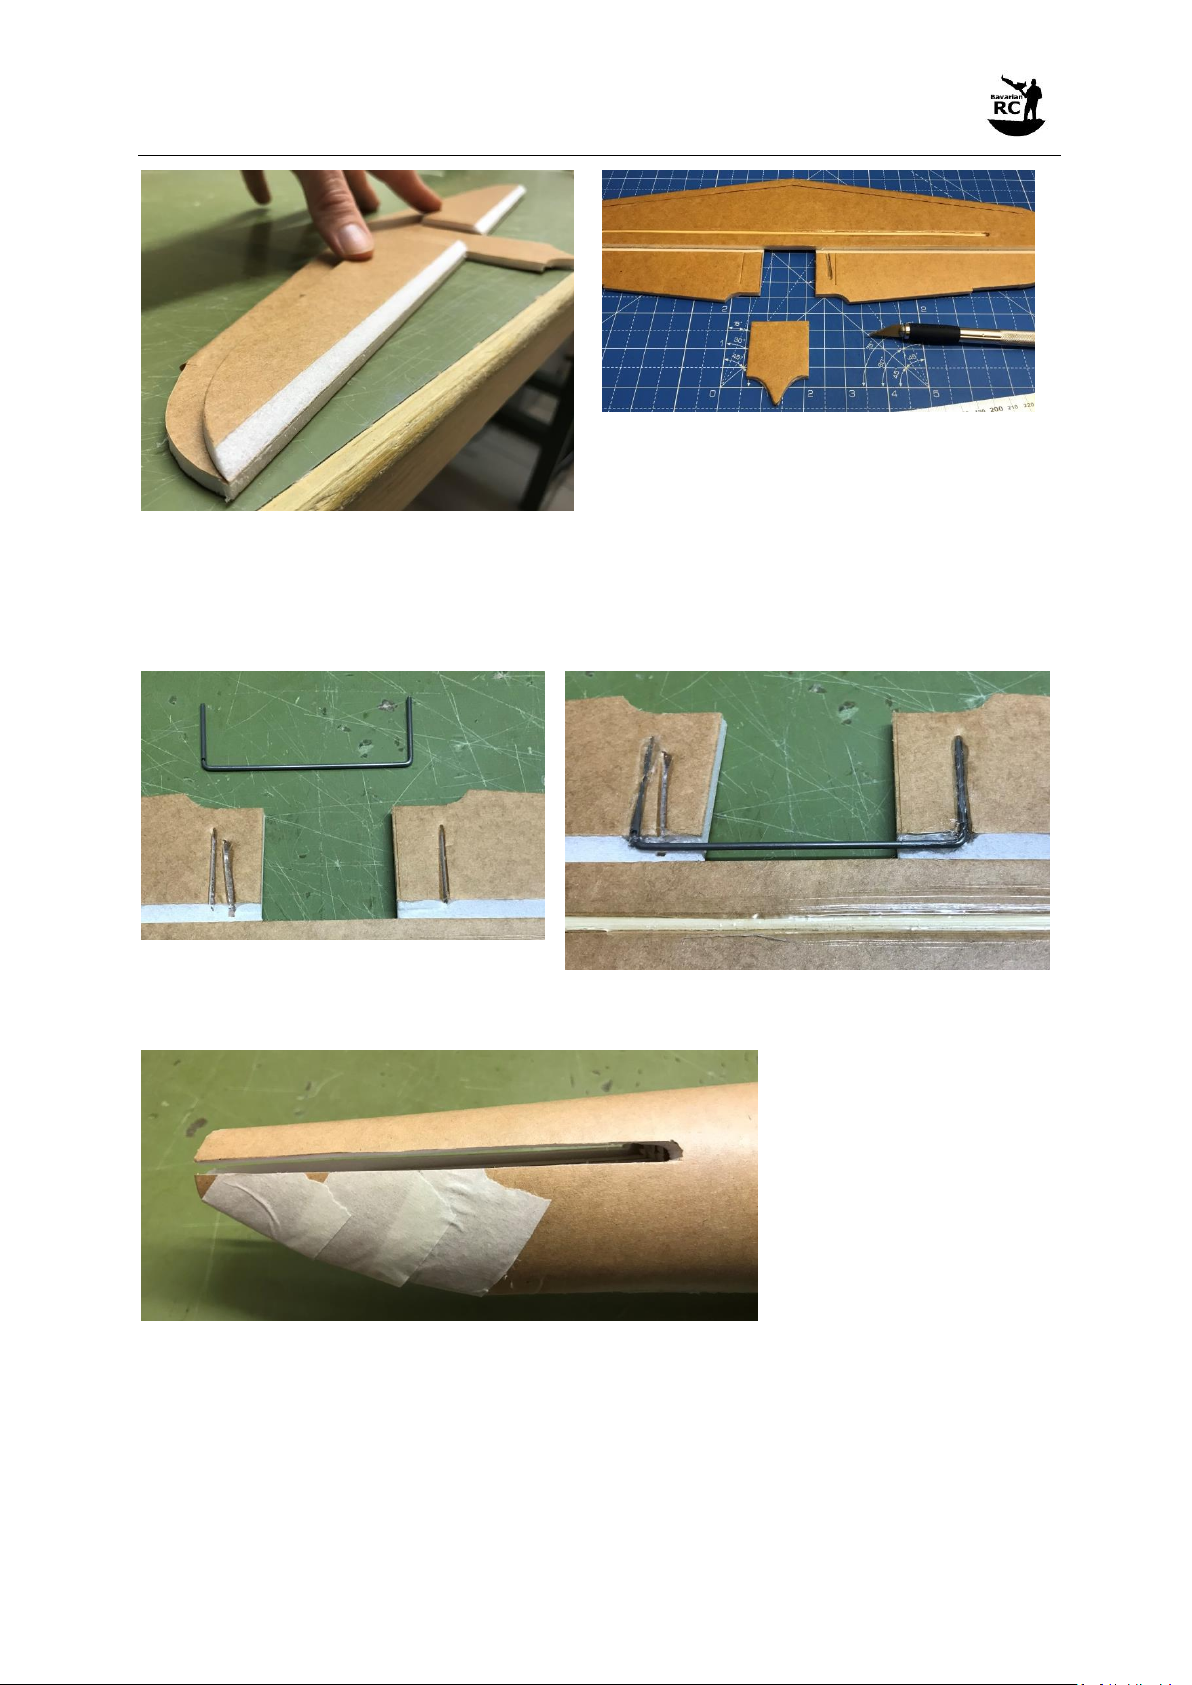
-Take the horizontal stabilizer and run BBQ skewer along the score cut. Make the cavity wide
enough to be able to insert a BBQ skewer without pressure.
-Apply hot glue to the cavity for the BBQ skewer and insert the BBQ skewer. Press the
horizontal stabilizer flat on the table and hold it until the glue has fully cooled down.
-Remove the foam at the leading edge.
-Run a BBQ skewer along the leading edge
-Take 2 BBQ skewers and glue them to the leading edge of the horizontal stabilizer.
-Apply hot glue to the inside of the paper and wrap it around the leading edge.
-Fold the elevators to the upper side and cut off the little pointed part in the middle.
-Cut a single bevel on both elevators and reinforce the hinge line with hot glue.
-Run a BBQ skewer along the score cuts for the control horn and the U-shape steel wire.
Bavarian RC Messerschmitt Me-410
© 2021 BAVARIAN RC. Plans and instructions provided free of charge. Copies allowed for personal use only. Not for commercial use.
-8 - Version Beta 1.0
-Take a 1.5mm steel wire and make a U-shape wire (see marking on plan).
-Test fit the U-wire.
-Glue the U-wire into the cavity while pressing the horizontal stabilizer and the elevators flat
on the table. Wait until the glue has fully cooled down.
-Make the cut-out for the horizontal stabilizer on the fuselage tail along the score cuts.

Bavarian RC Messerschmitt Me-410
© 2021 BAVARIAN RC. Plans and instructions provided free of charge. Copies allowed for personal use only. Not for commercial use.
-9 - Version Beta 1.0
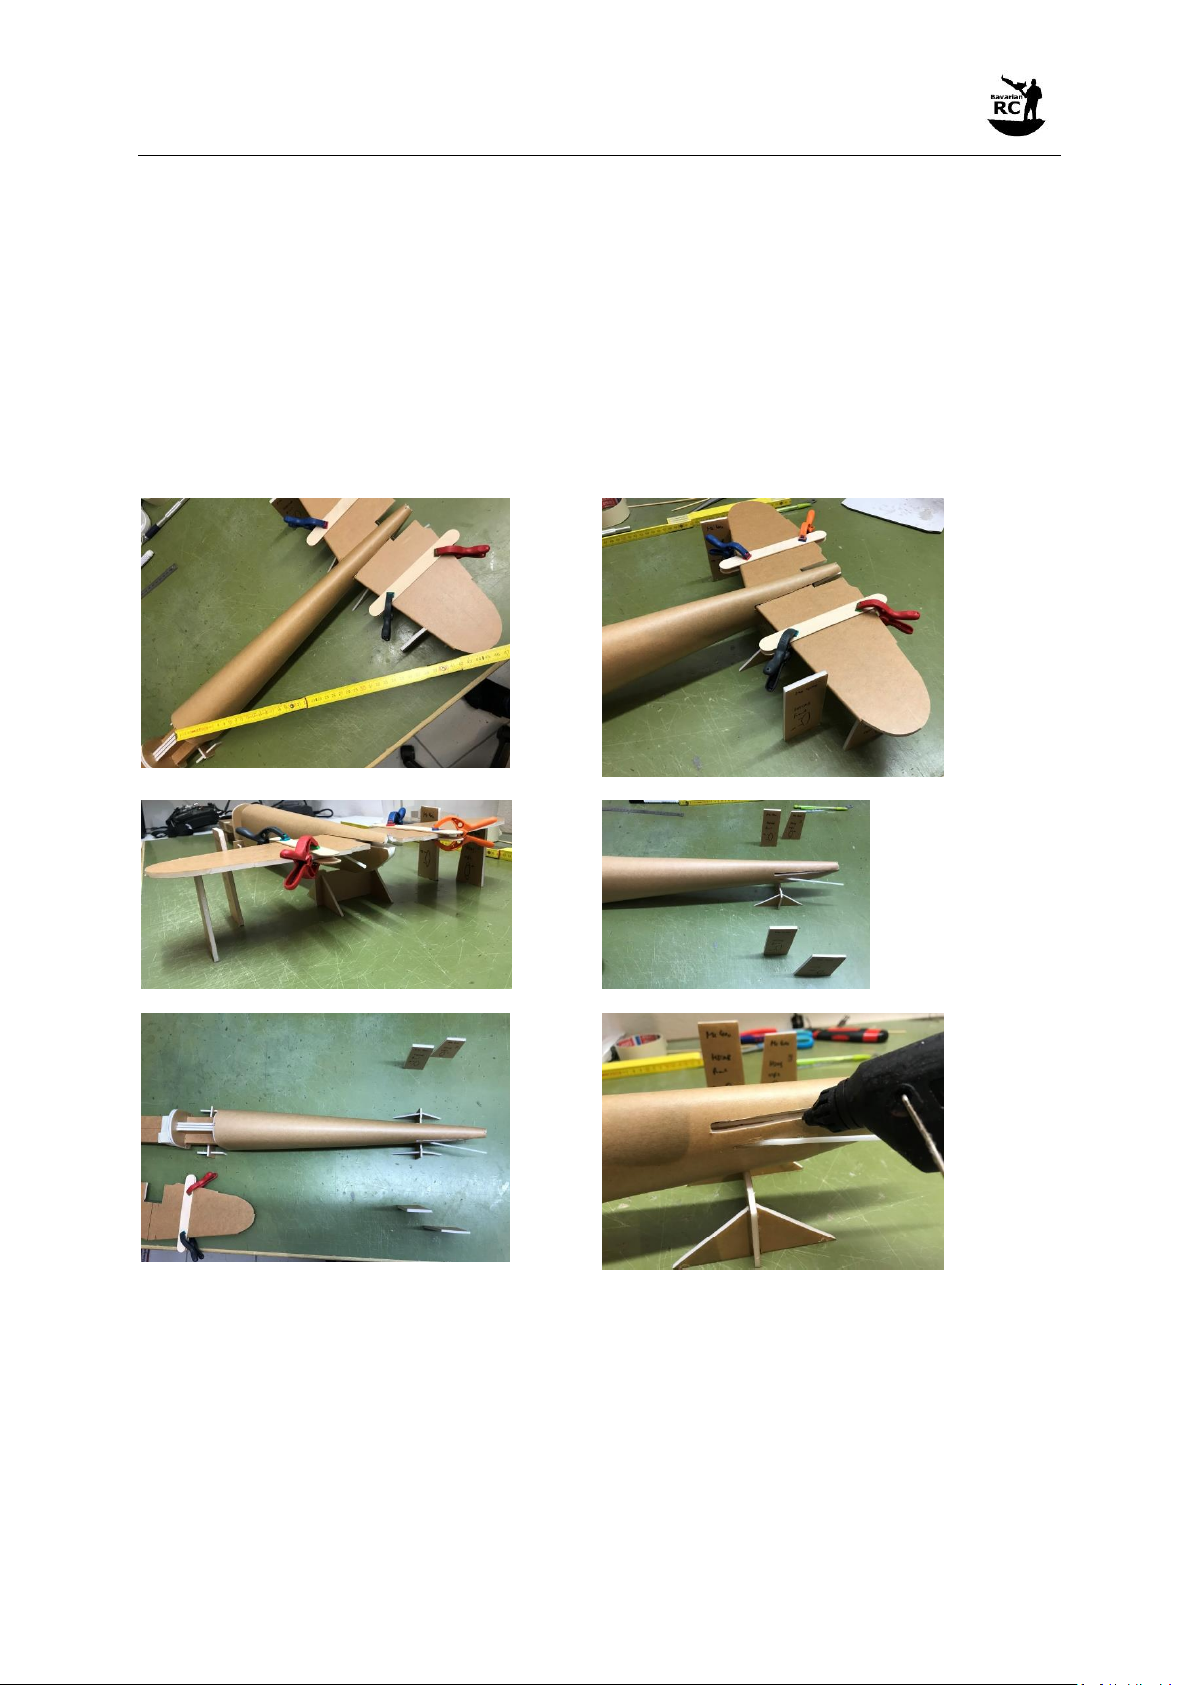
-Test fit the horizontal stabilizer on the fuselage.
-For the alignment of the horizontal stabilizer I recommend the usage of small supports made
from scrap pieces of foam.
-Align the fuselage on the table until the lower deck is perfectly level.
-Glue the supports to the table with a drop of hot glue.
-Also fix the lower deck on the support with a small drop of hot glue.
-Fix the elevators with popsicle sticks and small clamps.
Bavarian RC Messerschmitt Me-410
© 2021 BAVARIAN RC. Plans and instructions provided free of charge. Copies allowed for personal use only. Not for commercial use.
-10 - Version Beta 1.0
-Cut 2 pieces of foam board with the same height (upper and lower edge have to be parallel)
that are fitting under the horizontal stabilizer. Make sure that the horizontal stabilizer is in
contact with the upper edge of both plates and the leading edge and trailing edge have the
same distance to the table. Adjust the cut-out in the fuselage tail skin if needed. Glue the
foam board pieces to the table with a drop of hot glue.
-Then measure the distance between the outer edge of the elevator hinge and the center line
of the fuselage on the fwd edge of the tail skin on both sides and adjust the horizontal
stabilizer to make these distances even.
-Cut another 2 pieces of foam board (higher than the horizontal stabilizer) and fix them on the
table just in front of the horizontal stabilizer.
-Make a last check to ensure that the horizontal stabilizer is well positioned.
-Remove the horizontal stabilizer.
-Apply glue to the lower edge of the cut-out on both sides and slide the horizontal stabilizer in
its position using the support plates glued to the table as a jig.
-Again check all dimensions to ensure proper positioning.
-Let the glue cool down. Wait at least 1,5 minutes.
-Apply glue to the upper seam between the horizontal stabilizer and the fuselage and remove
the excess glue with a scrap piece of foam.

Bavarian RC Messerschmitt Me-410
© 2021 BAVARIAN RC. Plans and instructions provided free of charge. Copies allowed for personal use only. Not for commercial use.
-11 - Version Beta 1.0
-Glue the small piece that you cut off the horizontal stabilizer in its place. Be careful not to get
any hot glue to the U-wire connecting the elevators. Also check that the elevator can be
freely moved up and down.
-Trim the push rod sleeve.
-Take a 1mm steel wire and make a z-bend on one side.
-Connect the z-bend to the control horn and make a test fit.
-Glue the control horn to the elevator (with the control rod connected to the control horn).
-Again fix the elevator with popsicle sticks and clamps in a neutral position.
-Test fit the servo between frame F2 and H1 and make a z-bend.
-Insert the z-bend into the control horn of the servo (2nd hole from the middle).
-Glue the servo in place.
-Glue Frame F1 to the fwd face of Frame F2.
-Remove the paper from the backside of Fuselage skin 4.
-Mold Fuselage skin 4 to get a round shape.
-Glue together the edges of Fuselage skin 4 to get a cylindrical piece.
-Slide Fuselage skin 4 onto the fuselage and make a test fit.
-The skin should fit without a gap on the rear edge towards the tail skin and be flush with
Former F2. Former F1 should be free.
-Glue the Fuselage skin 4 to the fuselage.

Bavarian RC Messerschmitt Me-410
© 2021 BAVARIAN RC. Plans and instructions provided free of charge. Copies allowed for personal use only. Not for commercial use.
-12 - Version Beta 1.0
Note: Former F1 is not installed in this picture and the skin is not flush with the former F2 as it should. I had to correct this
during my prototype build.
-Glue together the three formers D, the two formers B and the two formers A2 (upper).
-Glue formers D, B and A2 to the lower deck at the marked position. Make sure that they are
at a 90 degree angle towards the lower deck and perfectly aligned with the marks.
Note: The markings on the lower deck shown in this picture are not reflecting the final ones included in the plan. Also
former F1 is not visible in this picture.

Bavarian RC Messerschmitt Me-410
© 2021 BAVARIAN RC. Plans and instructions provided free of charge. Copies allowed for personal use only. Not for commercial use.
-13 - Version Beta 1.0
-Take 2 BBW skewers and glue them to the underside of the Access frame to reinforce the
opening. You will have to slightly bend the BBQ skewers to follow the shape of the opening.
Hold them until the glue has fully cooled.
Note: This picture shows 4 pieces which I did on my prototype. This design left a weak spot in the middle. That’s why I
changed the design to 2 long BBQ skewers. Also the Doubler for the hatch lower lock is not shown here.
-Attach the Doubler for the hatch lower lock to the underside of the access frame (check the
plan for the correct position).
-Make a test fit of the access frame on the fuselage. Make sure the access frame is fully
straight and even otherwise you will later have a gap between the frame and the canopy
hatch.
-Glue the access frame onto the frames F1, D, B and A2. Make sure the access frame is
properly centered.
Note: This picture doesn’t show frame F1 as it was taken during my prototype build. The rear end of the access frame will
sit on the Frame F1. That makes it a lot easier to get it straight and even
-Make a bevel cut along the LH and RH edge of the access frame.
Bavarian RC Messerschmitt Me-410
© 2021 BAVARIAN RC. Plans and instructions provided free of charge. Copies allowed for personal use only. Not for commercial use.
-14 - Version Beta 1.0
-Remove the paper from one side of Fuselage skin 3 LH.
-Mold the skin to fit to the curvature of the fuselage.
-The skin lower edge should be aligned with the cut-out of the Fuselage skin 4 on the bottom.
-The upper skin of Fuselage skin 3 LH will overlap the access frame. This will be trimmed off in
a later step.
-The forward edge of Fuselage skin 3 LH should be aligned with the forward edge of the rear
Former D. The other two Formers D have to stay free.
-Apply glue to Former F1, along the edge of the access frame and on the rear Former D.
-Attach the skin and secure it with tape towards skin 4 and hold the rest firmly against the
fuselage.
-Repeat this step for the Fuselage skin 3 RH.
-Take a box cutter and trim of the Fuselage skin 3 to be flush with the access frame.
-Remove the paper from one side of Fuselage skin 2.
-Mold the skin to fit to the curvature of the fuselage.
-Glue together the bottom edges of Fuselage skin 2 and secure it with tape.
-Slide Fuselage skin 2 onto the fuselage. It should perfectly fit the forward edge of Fuselage
skin 3 and be aligned with the rear Former B. The fwd Former B has to stay free.
-Remove Fuselage skin 2.
Bavarian RC Messerschmitt Me-410
© 2021 BAVARIAN RC. Plans and instructions provided free of charge. Copies allowed for personal use only. Not for commercial use.
-15 - Version Beta 1.0
-Apply glue to Formers D, along the access frame and on the rear Former B.
-Slide Fuselage skin 2 onto the fuselage, align it and secure it with tape at the rear edge. Press
the rest firmly towards the fuselage and let the glue cool down.
-Use a box cutter to trim the upper edge of Fuselage skin 2 to be flush with the access frame.
-Glue together the two Frame A2 (lower).
-Glue Frames A2 (lower) to the forward edge of the lower deck.
Note: Frame A2 (lower) is wrongly labeled A3 in these pictures

Bavarian RC Messerschmitt Me-410
© 2021 BAVARIAN RC. Plans and instructions provided free of charge. Copies allowed for personal use only. Not for commercial use.
-16 - Version Beta 1.0
-Remove the paper from one side of Fuselage skin 1.
-Mold the skin to fit to the curvature of the fuselage. Make sure that the seam of Fuselage
skin 1 is on the top.
-Fuselage skin 1 will overlap the access frame on the upper edge and Frames A2 on the fwd
edge. We’ll trim that after glueing.
-Apply glue to the underside of the Former B and Formers A2 (lower) and attach the Fuselage
skin 1. Secure it with tape.
-Apply glue to one side of Former B, Formers A2 (upper and lower) and the access frame and
attach Fuselage skin 1. Secure it with tape.
-Repeat this step for the other side.
-Trim off the overlap at the upper edge to make the Fuselage skin 1 flush with the access
frame.
-Trim off the overlap at the Formers A2 to make the Fuselage skin 1 flush with Formers A2.

Bavarian RC Messerschmitt Me-410
© 2021 BAVARIAN RC. Plans and instructions provided free of charge. Copies allowed for personal use only. Not for commercial use.
-17 - Version Beta 1.0
-The build of the nose will be a bit tricky, take your time and slowly adjust the skins to make
them fit.
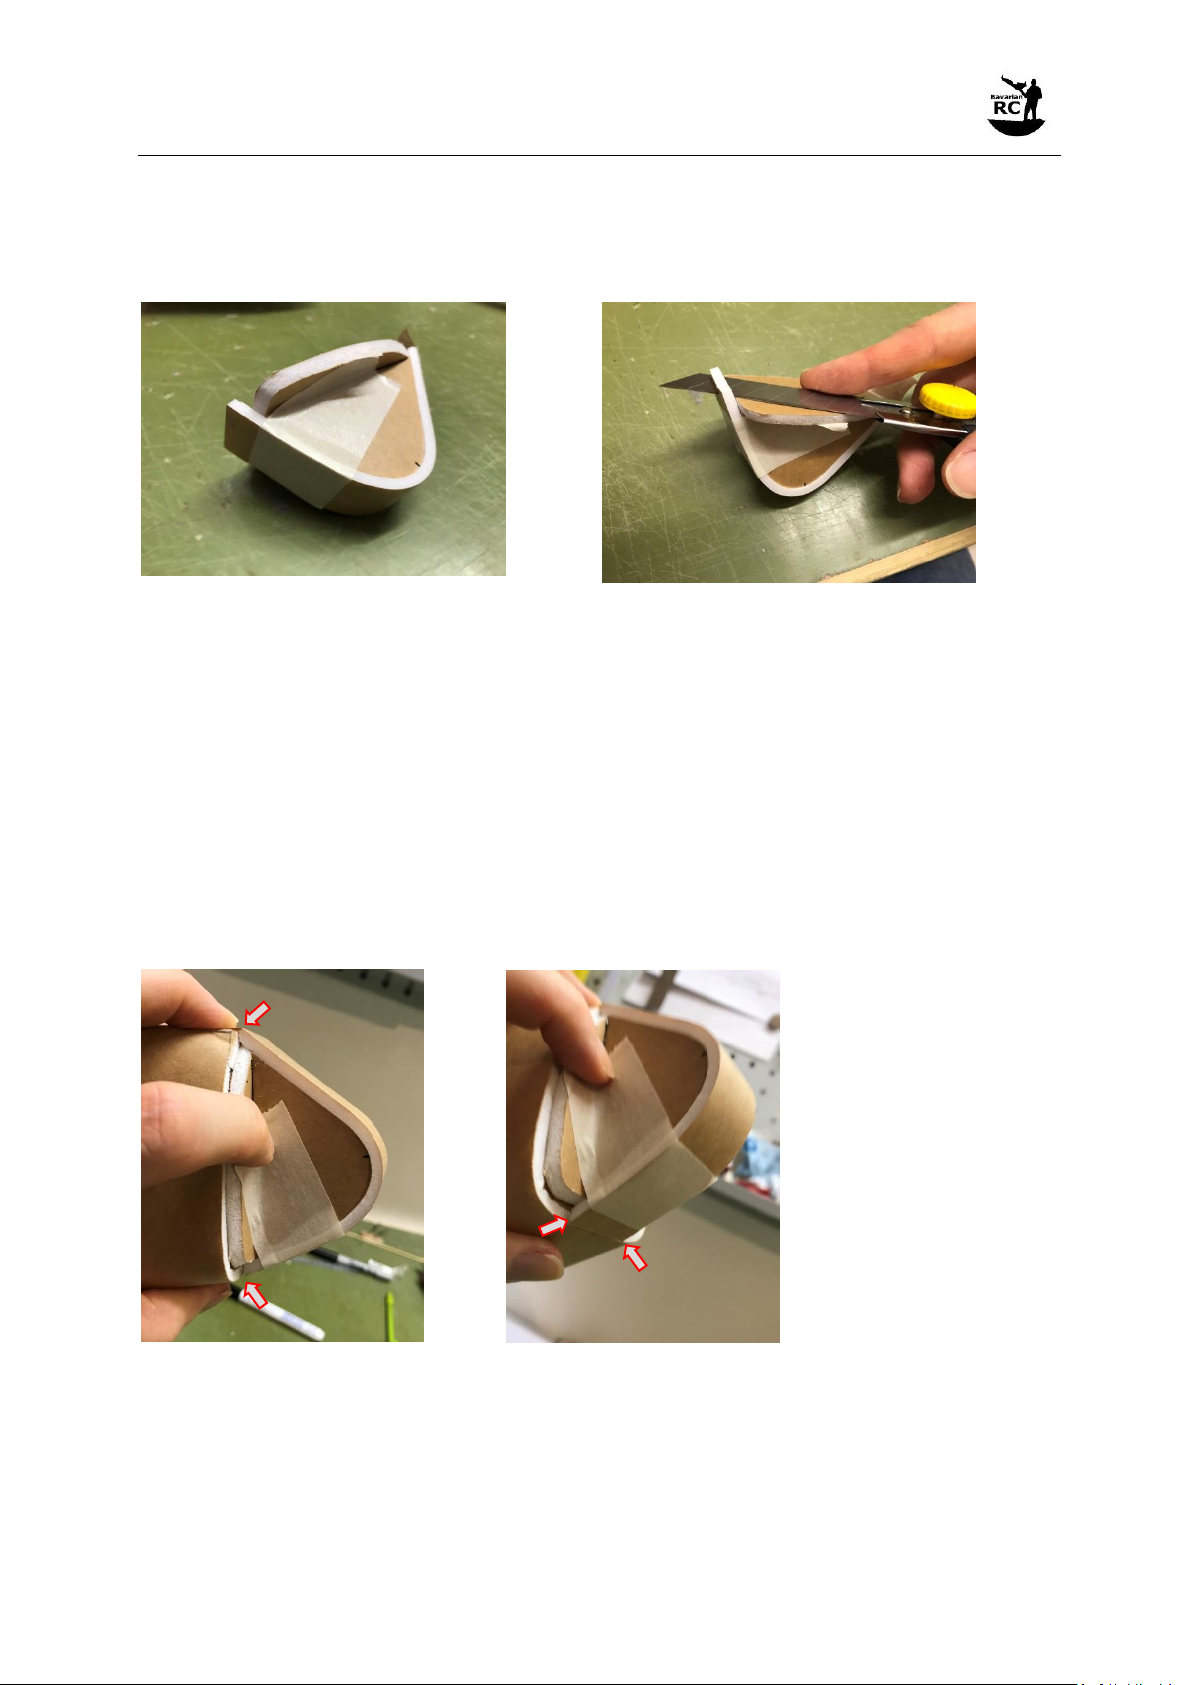
-Glue together Former A1 and the two Nose formers.
-Make a bevel cut around Former A1.
-Remove the paper from the back of Nose skin 1 and carefully mold it to fit around the Nose
formers.
-Test fit the Nose skin 1. Make sure that the bottom edge (with the triangle parts) is
overlapping enough (but not more) to be able to properly trim it to be flush with the rear
face of Former A1.
-Then glue Nose skin 1 to the Nose formers from the nose tip along the upper edge.
Note: A prototype version of Nose skin 1 (without triangle part) is shown in these pictures
-Trim off the foam (without cutting the paper on the back) on the upper edge.
Bavarian RC Messerschmitt Me-410
© 2021 BAVARIAN RC. Plans and instructions provided free of charge. Copies allowed for personal use only. Not for commercial use.
-18 - Version Beta 1.0
-Dry fit the bottom part of Nose skin 1 and secure it with tape (don’t apply hot glue yet).
-Use a box cutter to trim off the bottom edge of Nose skin 1.
Note: A prototype version of Nose skin 1 (without triangle part) is shown in these pictures
-Leave the lower part of Nose skin 1 still secured with tape.
-Now test fit the nose on the fuselage. Align the upper edge of Nose skin 1 with the access
frame and hold the nose in this position.
-Check the bottom edge of Nose skin 1 to be flush with Fuselage skin 1.
-If needed either trim off the Nose formers or glue a thin slice of foam to the Nose formers
(depending on the fit) to make the Nose skin 1 perfectly match Fuselage skin 1.
-If everything fits, remove the tape and glue the Nose skin 1 to the Nose formers and the
bottom edge of Former A1.
Note: A prototype version of Nose skin 1 (without triangle part) is shown in these pictures

Bavarian RC Messerschmitt Me-410
© 2021 BAVARIAN RC. Plans and instructions provided free of charge. Copies allowed for personal use only. Not for commercial use.
-19 - Version Beta 1.0
-Take the Nose skin 2 RH and remove the paper from the inside.
-Mold the Nose skin 2 RH to fit to the curvature of the nose.
-Cut a bevel around the circumference of the Nose skin 2 RH (take care to have the correct
angle).
-The Nose skin 2 RH has a bit of oversize along the edge towards Nose skin 1. Most of this can
be trimmed off after glueing.
-Adjust the Nose skin 2 RH until you get a perfect fit. Make yourself small reference marks at
the rear edge and at the nose tip to be sure that you always position the skin in the same
way when adjusting and test fitting.
-This is a tricky process that will require some time.
-Also trim the Nose skin 2 RH at the edge towards the triangle part of Nose skin 1 to have a
good fit.
-Then glue in place the Nose skin 2 RH starting from the top, but only glue the upper half in
the first step. Secure it with tape.
-Then again check the fit of the remaining part and if everything is OK apply hot glue and
attach it. Secure it with tape.
Note: A prototype version of Nose skin 1 (without triangle part) is shown in these pictures

Bavarian RC Messerschmitt Me-410
© 2021 BAVARIAN RC. Plans and instructions provided free of charge. Copies allowed for personal use only. Not for commercial use.
-20 - Version Beta 1.0
-Repeat the same process for Nose skin 2 LH.
-Apply glue to the paper tab that is located on the upper edge of Nose skin 1 and fold it
around the upper edge of the skin onto the access frame.
Note: In the RH picture you can see the added triangle elements which were afterwards included in the shape of the Nose
skin 1 as contained in the plan
-Your fuselage should now look like this:
Popular Toy manuals by other brands


Horizon Hobby
Horizon Hobby E-flite BNF UMX HYPER TAXI instruction manual

THUNDER TIGER
THUNDER TIGER OLYMPIAN Assembly manual

Eduard
Eduard P-38L Lightning quick start guide

LEGO
LEGO 7115 StarWars GunGan Patrol Assembly guide

Opitec
Opitec Rattle Snake manual

FEBER
FEBER My friendly Dino 12V Use and care instructions


