BayNexus BN-HH-G02 User manual

BayNexus Inc
I
BN-HH-G02 User Manual
FCC ID:2ABHWBN-HH-G02
TableofContent
1.DeviceDescription...............................................................................1
2.Parameters..........................................................................................2
3.Deviceinstallation...............................................................................3
3.1.Unpack.......................................................................................3
3.2.RearCoverOpenorClose..........................................................3
3.3.InstallaMemorySDCard...........................................................3
3.4.InstallaBattery..........................................................................4
3.5.ChargingNotice..........................................................................5
4.BN_DEMOOperationGuide................................................................5
4.1.BN_DEMO_UHF(900MHz).........................................................5
5.RFIDNotice..........................................................................................7
FCCRegulations:.......................................................................................8
BayNexus Inc
1
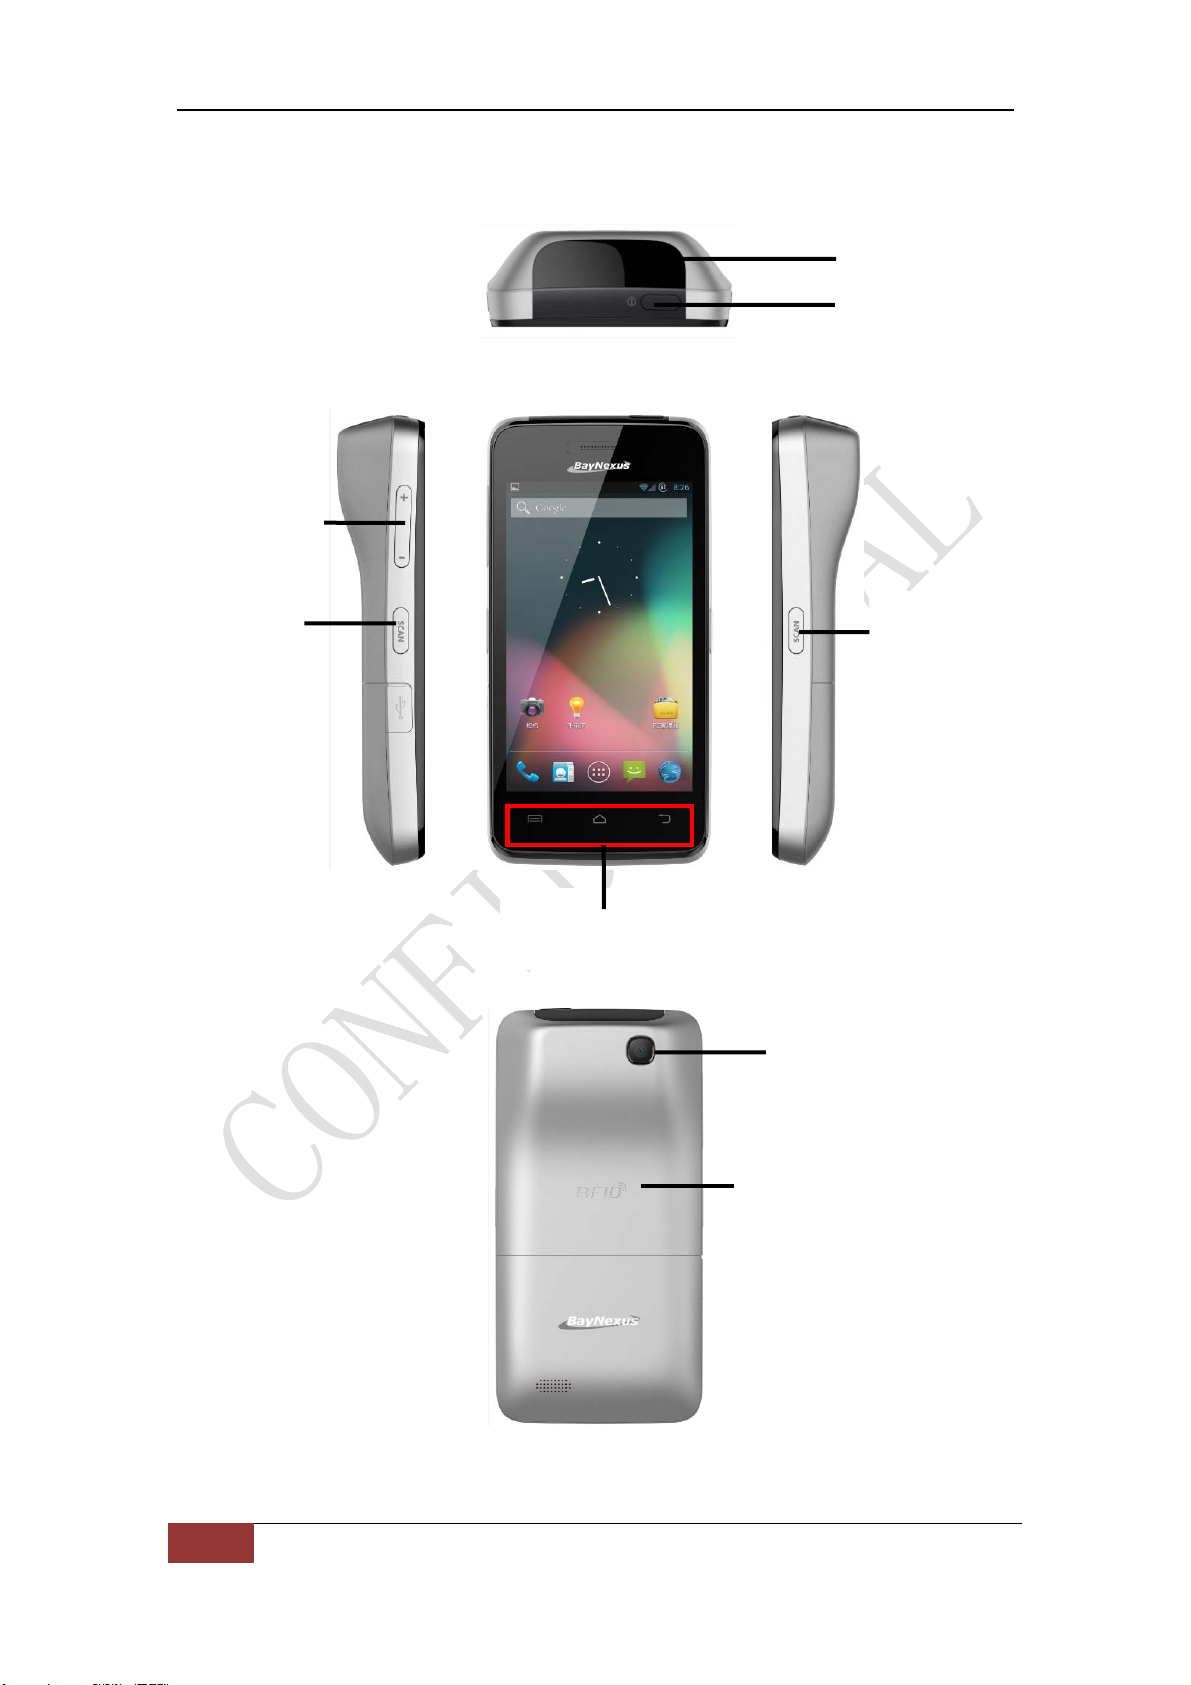
1.Device Description
Barcode
Main screen
Volume
Left scan
Power
Right Scan
Camera
RFID

2
2.Parameters
Common parameters
CPU 1.2GHz dual-core
Operating system Android 4.0
Inner module RFID Reader, Barcode Reader
Dimension 137*68*20(28)mm
Weight 245g (with battery)
Camera 5M pixel,automatic focusing
GPS positioning Yes
Display screen
Type TFT capacitance multi touch screen
Dimension 800*480 pixel,4.3 inch screen
Volume
Ring Various rings and vibration
Inner speaker Yes
Inner microphone Yes
Memory
Memory
expansion
Micro SD,maximum 32G
Internal memory RAM 512MB
UHF ISO 18000-6C,EPC Gen2
Barcode reader
Reader type CCD Image Reader
Barcode type
One dimensional barcode and all
typological two dimensional barcode e.g.:
PDF417,Datamatrix,Maxicode,Code 16k,
Code 49,QR code,Code one etc.
Battery
Type 3.7V,Li-Ion 1800(2800) mAh battery
Stand-by time* Maximum 48 hours
Work time** Maximum 8 hours
SDK
Operating system Android 4.0
Language Java(JDK 16)
Development
Environment
Java SE Development Kit
Eclipse,Android SDK r18
ADT Plugin for Eclipse
*Standbycondition:screenoff,barcodeandRFIDoff
**Operationcondition:screenon,barcodeandRFIDon
3
3.Device installation
3.1. Unpack
Check your product box for the following items:
handheld device
Battery(two)
Travel charger
User manual
Product quality card
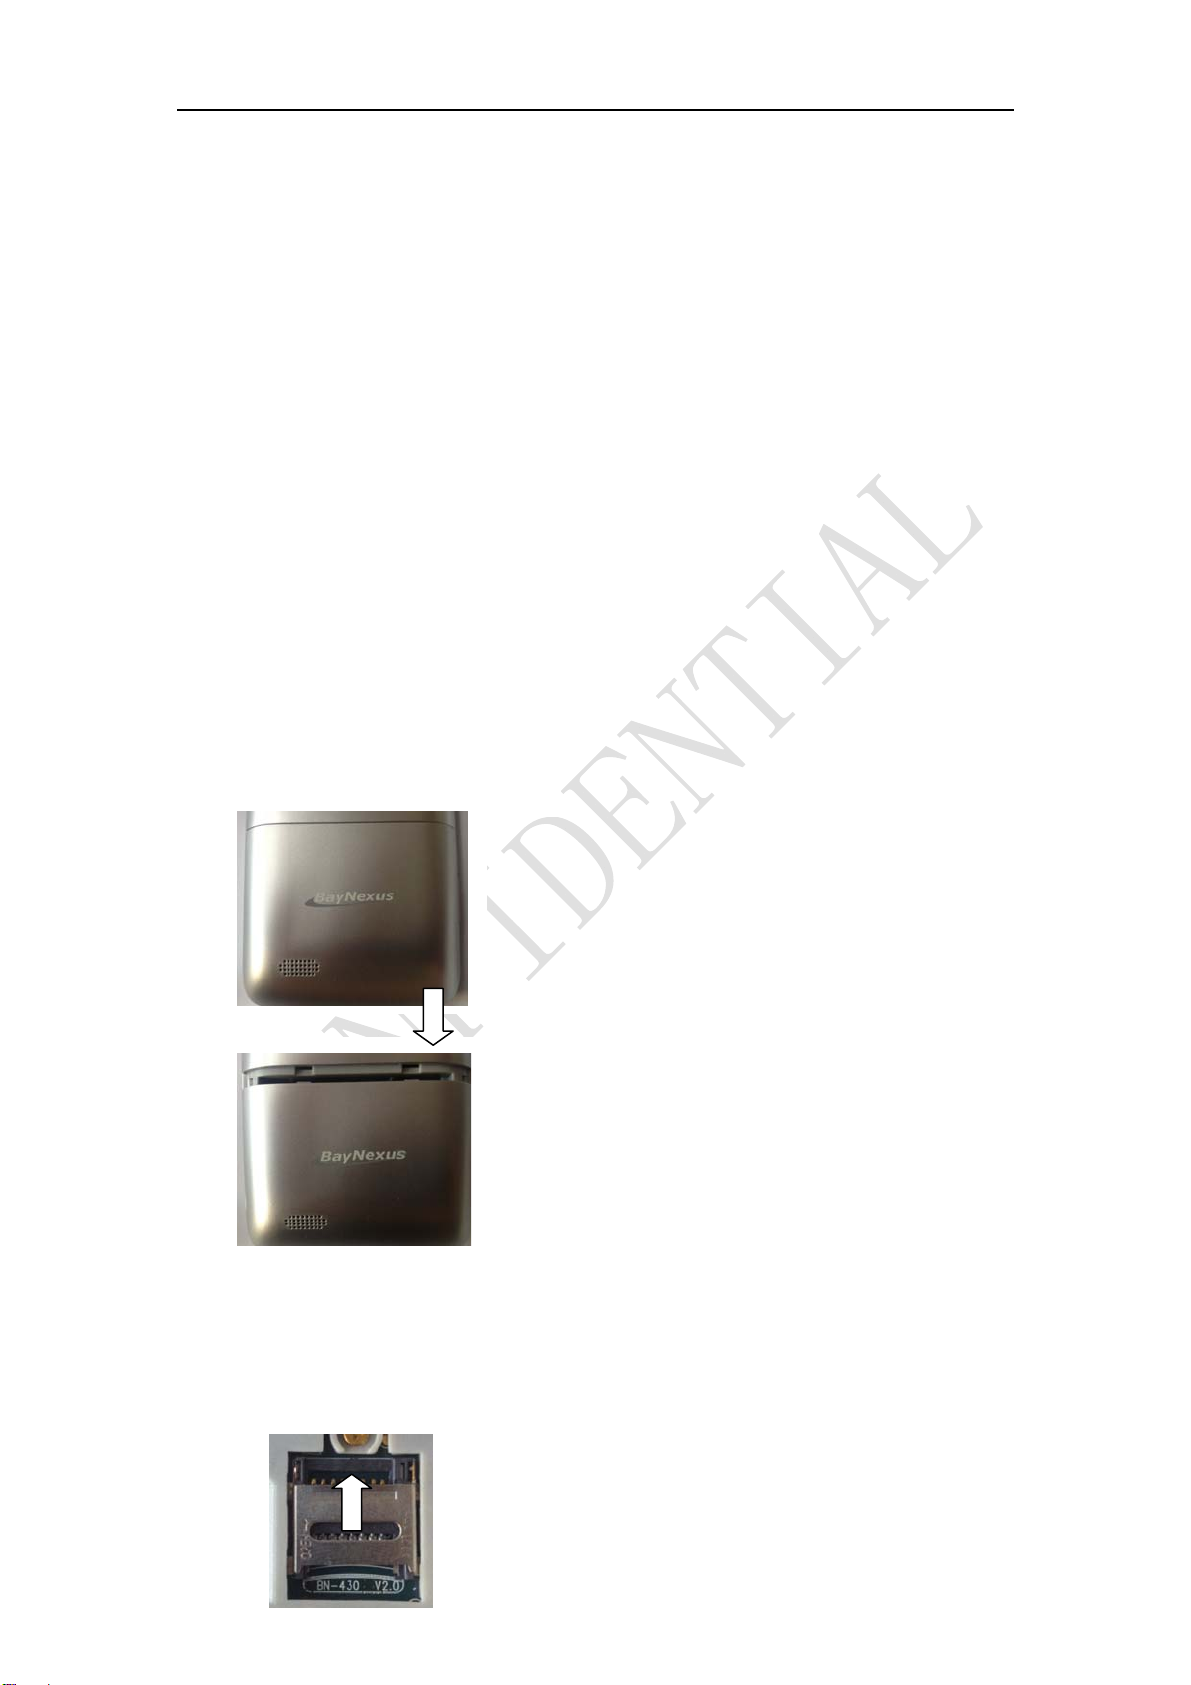
3.2. Rear Cover Open or Close
①Poking at the back cover along the
direction of the arrow
②Then directly remove the back cover
3.3. Install a Memory SD Card
①Push the cover along the direction of the

4
arrow.
②Insert the memory card into the slot
according the picture.
③Lock the cover along the direction of the
arrow.
3.4. Install a Battery
①Embed the battery along the direction of
the arrow.
②Press the battery.
4.
3.5.
C
Please ch
a
***Only
u
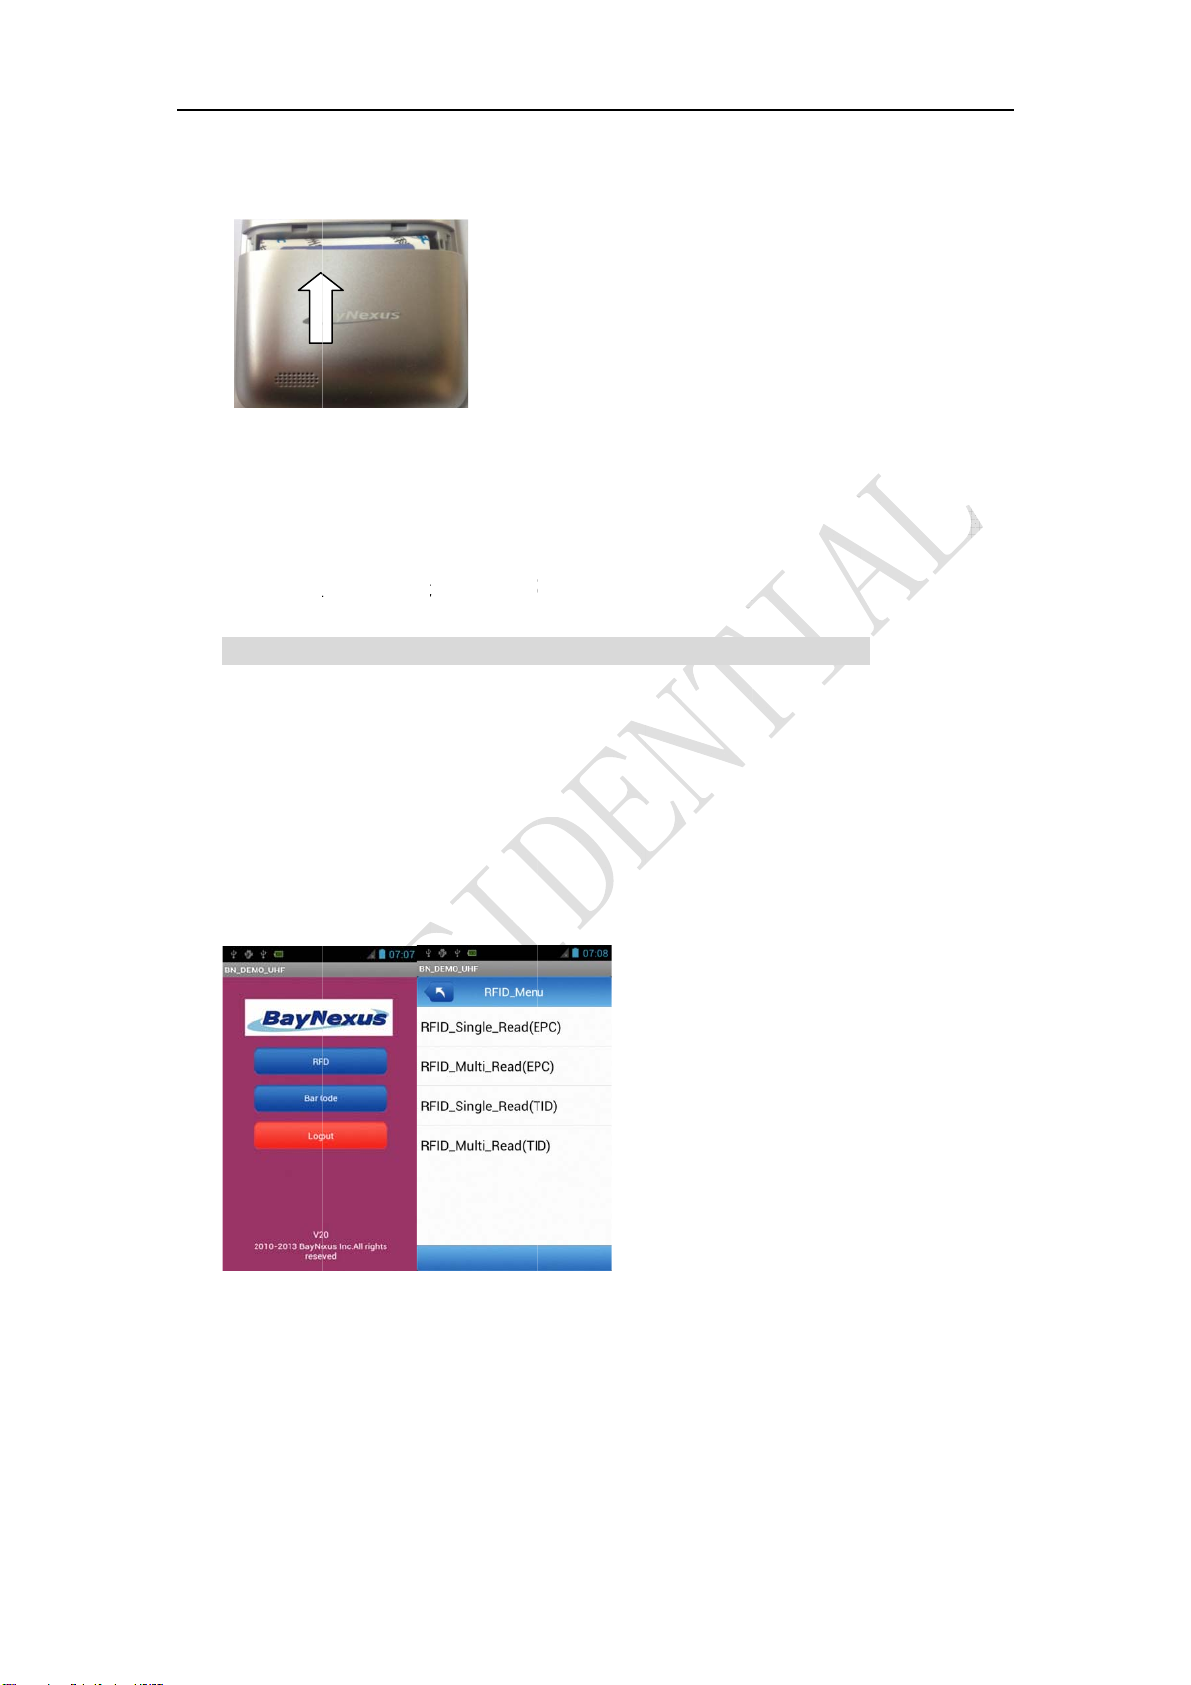
BN_D
E
4.1.
B
Graph1:
M
Graph2:S
C
hargin
g
a
rge the bat
t
u
se the prov
E
MO
O
B
N_DE
M
M
enuSelecti
o
ingleRFIDR
e
g
Notice
t
ery full
b
e
fo
ided charg
e
O
perati
o
M
O_UH
F
o
n
e
adScreen
③Clos
e
direc
t
fo
re the firs
t
e
r for batter
y
o
n Gui
F
(900M
e
the cov
e
t
ion of the
t
-time use.
y
charging
p
de
Hz)
e
r and cla
arrow.
p
urpose!**
*
mp along
*
5
the

Graph3:
M
Graph4:
B
To enter
B
BN-HH-
G
the icon.
U
are three
bu
User e
n
“RFID_Si
n
M
ultipleRFID
B
arcodeScan
n
B
N_DEMO
_
G
02’s Andr
o
U
ser will b
e
u
ttons for u
s
n
ters sin
g
n
gle_Rea
d
(
ReadScreen
n
ingScreen
_
UHF app
l
o
id Home S
c
e
presente
d
s
er to choo
s
g
le RFI
D
(
EPC)”or“
R
l
ication, lo
c
c
reen or A
p
d
with the i
n
s
e which m
o
D
read
R
FID_Singl
e
c
ate the B
N
p
plication
S
n
terface sh
o
o
de to ente
r
mode
b
e
_Rea
d
(TI
D
N
_DEMO_
U
S
creen, the
n
o
wn in [G
r
r
.
b
y single
D
)”
b
utto
n
U
HFicon o
n
n
single-clic
r
aph 1].
T
-clicking
n
. The s
i
6
n
the
k on
T
here
the
i
ngle

7
RFID read mode interface is shown in [Graph 2].When in this mode, user can
single-click “Read” button or press the physical ‘scan’ button on the right side of
the BN-HH-G02 to start the single RFID read operation. The single RFID read
operation ends with either a successful read of a single RFID or a time-out event.
User enters multiple RFID read mode by single-clicking
“RFID_Multi_Read(EPC)” or “RFID_Multi_Read(TID)”button in [Graph 1].
The multiple RFID read mode interface is shown in [Graph 3]. When in this
mode, user can single-click the “Read” button or press the physical “scan” button
to start the multiple RFID read operation. User stops the multiple RFID read
operation by single-clicking the “Stop” button. Please make sure to stop the
“RFID_Multi_Read” function when not using this function; otherwise, the
battery power will drain fast!
User enters bar code scanning mode by single-clicking the “BarCode” button in
[Graph 1]. The barcode scanning mode interface is shown in [Graph 4]. User
can single-click the “Read” button or press the physical “scan” button on the left
side of the BN-HH-G02 to start the barcode scanning operation. The barcode
scanning operation ends with a successful read of a barcode or a time-out event.
5. RFID Notice
When you use the RFID function, do not cover the RFID antenna area on the rear
of the device. Suggest to holdboth sides of the device, and to read the tag as
shown below.

8
FCCRegulations:
Thisdevicecomplieswithpart15oftheFCCRules.Operationissubjecttothe
followingtwoconditions:(1)Thisdevicemaynotcauseharmfulinterference,
and(2)thisdevicemustacceptanyinterferencereceived,includinginterference
thatmaycauseundesiredoperation.
NOTE:Thisequipmenthasbeentestedandfoundtocomplywiththelimitsfora
ClassBdigitaldevice,pursuanttopart15oftheFCCRules.Theselimitsare
designedtoprovidereasonableprotectionagainstharmfulinterferenceina
residentialinstallation.Thisequipmentgenerates,usesandcanradiateradio
frequencyenergyand,ifnotinstalledandusedinaccordancewiththe
instructions,maycauseharmfulinterferencetoradiocommunications.However,
thereisnoguaranteethatinterferencewillnotoccurinaparticularinstallation.
Ifthisequipmentdoescauseharmfulinterferencetoradioortelevision
reception,whichcanbedeterminedbyturningtheequipmentoffandon,the
userisencouragedtotrytocorrecttheinterferencebyoneormoreofthe
followingmeasures:
—Reorientorrelocatethereceivingantenna.
—Increasetheseparationbetweentheequipmentandreceiver.
—Connecttheequipmentintoanoutletonacircuitdifferentfromthattowhich
thereceiverisconnected.
—Consultthedealeroranexperiencedradio/TVtechnicianforhelp.
Changesormodificationsnotexpresslyapprovedbythemanufacturercould
voidtheuser’sauthoritytooperatetheequipment.
SARInformation
Yourdevicehasbeendesignedtocomplywithapplicablesafetyrequirementsfor
exposuretoradiowaves.Theserequirementsarebasedonscientificorganizations
throughperiodicandthoroughevaluationofscientificstudies.Theseguidelines
includesafetymarginsdesignedtoassurethesafetyofallpersons,regardlessofage
andhealth.

9
SARdatainformationforresidentsincountries/regionsthathaveadoptedtheSAR
limitrecommendedbytheInstituteofElectricalandElectronicsEngineers(IEEE),
whichis1.6W/kgaveragedoverone(1)gramoftissue.
TestsforSARareconductedusingstandardoperatingpositionswiththedevice
transmittingatitshighestcertifiedpowerlevelinalltestedfrequencybands.
ThehighestSARvaluereportedtotheFCCis0.545W/kg.
Forbodywornoperation,thisdevicehasbeentestedandmeetsFCCRFexposure
guidelineswhenusedwhitanaccessorythatcontainsnometalandthatpositions
thehandsetaminimumof0cmfromthebody.Useofotheraccessoriesmaynot
ensurecompliancewithFCCRFexposureguidelines.
Table of contents
Other BayNexus Handheld manuals

Popular Handheld manuals by other brands


SHENZHEN SUNGWORLD ELECTRONICS
SHENZHEN SUNGWORLD ELECTRONICS Pluto A1 user manual

Symbol
Symbol SPT 1700 Series Product reference guide

NEC
NEC SuperScript 750C user guide

Honeywell
Honeywell DOLPHIN 6100 quick start guide

HP Compaq
HP Compaq H3600 user manual

Kinpo Electronics
Kinpo Electronics iDo S600 user manual


