10
operation
Operation
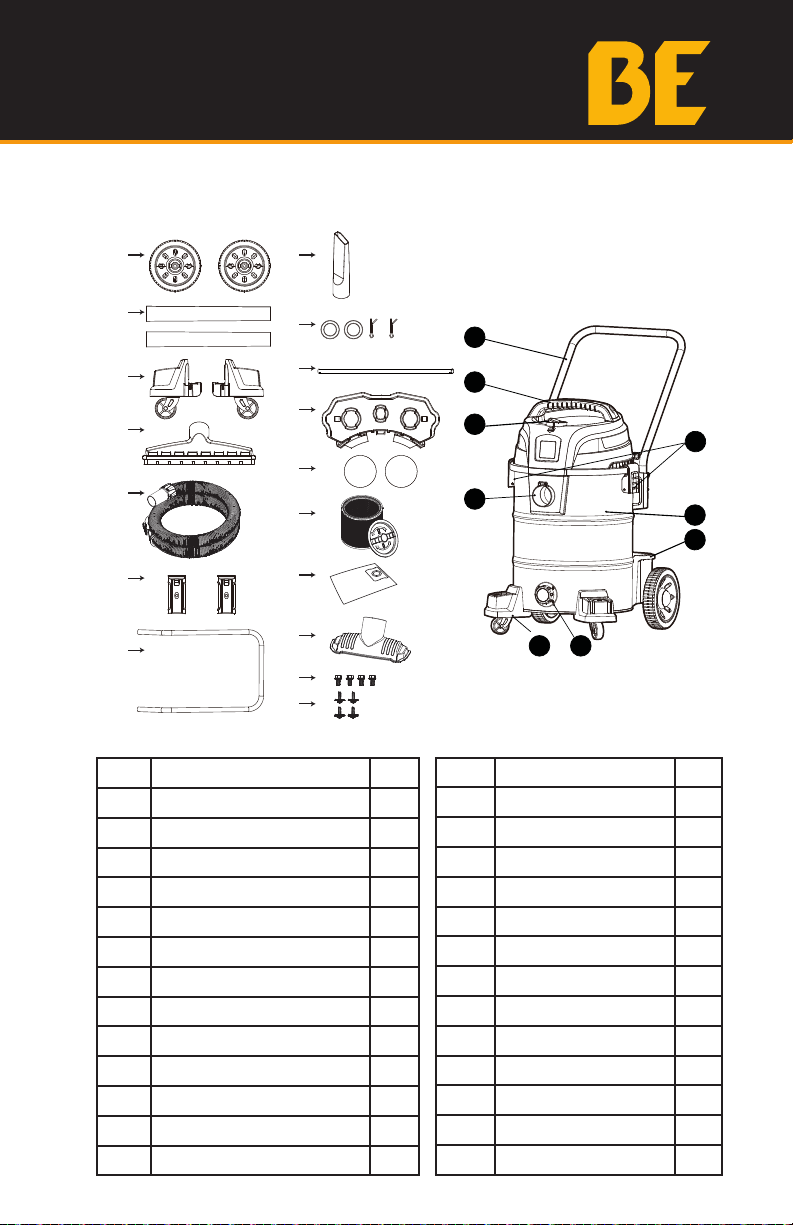
WHEEL DOLLY & STORAGE BOX ASSEMBLY
1. Take all the accessories out of the tank and place the tank upside
down.
2. Place and press the caster bracket aligh the tank hole position, and
then lock the screw until tight. (Fig 1)
3. Install the storage box on the other side of the tank and then lock two
screws until tight. (Fig 2)
4. Install the axle through the storage box and rear wheels, then attach
with the washers on each side of the wheel, put the pin through the
hole and bend it at the end of the axle to fix the wheels, lastly place the
end cap on the wheel. (Fig 3)
5. Complete the installation of the wheel dolly and storage box. (Fig 4)
TRANSPORT HANDLE ASSEMBLY
1. Attach side tank handles to tank with screws provided (Fig 5).
2. Insert transport handle into side tank handles (Fig 6).
CAUTION
• To reduce risk of hearing damage, wear ear protectors when using the
vac for extended hours or when using it in a noisy area.
• This 10-gallon wet/dry vac is assembled at the factory and ready
for use when you remove it from the carton. The unit is ready for dry
vacuuming or blowing. After you plug the power cord into the wall
receptacle, turn the unit “ON” by pushing the switch from position
“O” to position “I”. The “O” is the “OFF” position and the “I” is the
“ON” position.
6
OPERATING INSTRUCTIONS
To reduce the risk of fire or explosion, do not operate this vac in areas with flammable gases,
vapors or explosive dust in the air. Flammable gases or vapors include but are not limited to:
lighter fluid, solvent-type cleaners, oil-based paints, gasoline, alcohol or aerosol sprays. Explosive
dusts include but are not limited to: coal, magnesium, aluminum, and grain or gun powder. Do not
vacuum explosive dust, flammable or combustible liquids or hot ashes. Do not use this vac as a
sprayer for any flammable or combustible liquid. To reduce the risk of health hazards from vapors
or dusts, do not vacuum toxic materials.
WARNING:
The operation of any utility vac can result in foreign objects being blown into the eyes, which can
result in severe eye damage. Always wear safety eyewear complying with ANSI Z87.1 (or in
Canada, CSA Z94.3) before starting operation.
WARNING:
To reduce risk of hearing damage, wear ear protectors when using the vac for extended hours or
when using it in a noisy area.
This 10-gallon wet/dry vac is assembled at the factory and ready for use when you remove it from the
carton. The unit is ready for dry vacuuming or blowing. After you plug the power cord into the wall
receptacle, turn the unit “ON” by pushing the switch from position “O” to position “I”. The “O” is
the “OFF” position and the “I” is the “ON” position.
CAUTION:
WHEEL DOLLY & STORAGE BOX ASSEMBLY
1. Take all the accessories out of the tank and place the tank upside down.
2. Place and press the caster bracket aligh the tank hole position, and then lock the screw until
tight.(Figure 1)
3. Install the storage box on the other side of the tank and then lock two screws until tight. (Figure 2)
4. Install the axle through the storage box and rear wheels, then attach with the washers on each
side of the wheel, put the pin through the hole and bend it at the end of the axle to fix the wheels,
lastly place the end cap on the wheel. (Figure 3)
5. Complete the installation of the wheel dolly and storage box. (Figure 4)
O = OFF I = ON
4
23
1
DRY PICK-UP OPERATION -
NOTE:
INSTALLING THE CARTRIDGE FILTER & DISPOSABLE FIL TER BAG
If foam filter is in position over lid cage, it must be removed before installing cartridga filter.
The cartridge filter can be used for wet or dry pick up; installation is the same for both. When picking up
large quantities of liquid plrase refer to the Wet Pick Up Operation section in this manual. Use the
cartridge filter in position over the lid cage for most general dry material pick up.
1. With the power head in an upside down position, slide the cartridge filter down over the lid cage,
push the filter seals against the power hrad (Figure 7).
2. Place filter retainer into the top of the carrtridge filter hold the powe head with one hand, turn the
handle on the filter retianer clockwise to tighten, locking the filter into place (Figure 8).
3. To remove the filter for cleaning, again hold the power head and turn the filter retainer
counter-clockwise to loosen and remove, slide the carrtridge filter off the lid cage (Figure 8).
4. To clean the carrtridge fliter shake or brush off excess dirt or rinse (from the inside of the filter) with
water, dry completely (approximately 24 hours) and re-install. for wet pick up, it must be cleaned
and dried befor using for dry pick up.
5. Slide collat of filter bag into retainer guides.(Figure 9).
6. Reinsert hose and tighten locking-ring (Figure 10).
7. When secured in place, expand bag and position around the inside of the tank.
OPERATING INSTRUCTIONS
TRANSPORT HANDLEASSEMBLY
1. Attach side tank handles to tank with screws provided (Figure 5).
2. Insert transport handle into side tank handles (Figure 6).
7
5 6
Metal washer
Rubber washer
10
8
Unlock
counter-clockwise
Lock
clockwise
79