Beckman Coulter Biomek 3000 User manual

Beckman Coulter, Inc
4300 N. Harbor Boulevard, Fullerton, CA 92834-3100
Copyright © 2004 Beckman Coulter, Inc. Printed in U.S.A.
Biomek®3000 Laboratory
Automation Workstation
Quick-Start Guide
Beckman Coulter PN 987837
Revision AB
September 2004

ii
Beckman Coulter, Inc.
Except as provided in writing signed by an officer to Beckman Coulter, Inc., this system and any related
documentation are provided “as is” without warranty of any kind, expressed or implied, including that the system is
“error free.” This information is presented in good faith, but Beckman Coulter, Inc. does not warrant, guarantee, or
make any representations regarding the use or the results of the use of this system and related documentation in terms
of correctness, accuracy, reliability, currentness, omissions, or otherwise. The entire risk as to the use, results, and
performance of this system and related documentation is assumed by the user.
Except as expressly provided herein, Beckman Coulter, Inc. makes no other warranty, whether oral or written,
expressed or implied, as to any matter whatsoever, including but not limited to those concerning merchantability and
fitness for a particular purpose, nor is freedom from any patent owned by Beckman Coulter, Inc. or by others to be
inferred.
LIMITATIONS OF LIABILITY
Beckman Coulter, Inc. shall not be liable, to any extent whatsoever, for any damages resulting from or arising out of
the use or performance of this system and related documentation or the procedures specified in this manual,
regardless of foreseeability or the form of action, whether in contract, tort (including negligence), breach of warranty,
strict liability or otherwise, and including but not limited to damages resulting from loss of data, loss of anticipated
profits, or any special, indirect, incidental or consequential damages. In no event shall Beckman Coulter, Inc.’s
liability to the user exceed the amount paid by the user to Beckman Coulter, Inc. hereunder. The user assumes full
responsibility for the results obtained from the use of this system and related documentation and for application of
such results.
Beckman Coulter, SAGIAN Operations
Indianapolis, Indiana
www.beckmancoulter.com
Biomek, Beckman Coulter, and the Beckman Coulter logo are registered trademarks of Beckman Coulter, Inc.
Microsoft and MS-DOS are registered trademarks and Windows is a trademark of Microsoft Corporation. All other
trademarks appearing in this manual are owned by their respective companies.
Copyright 2004 by Beckman Coulter, Inc. All rights reserved. No part of this publication may be reproduced,
distributed, or transmitted in any form or by any means, electronic, mechanical, photocopying, recording, or
otherwise, or stored in a database or retrieval system, without the prior written permission of Beckman Coulter, Inc.

iii
Biomek® 3000 Laboratory Automation Workstation Quick-Start Guide
Warranty and Returned Goods Requirements
All standard Beckman Coulter, Inc. policies governing returned goods apply to this
product. Subject to the exceptions and upon the conditions stated below, the Company
warrants that the products sold under this sales agreement shall be free from defects in
workmanship and materials for one year after delivery of the products to the original
Purchaser by the Company, and if any such product should prove to be defective
within such one year period, the Company agrees, at its option, either (1) to correct by
repair or at the Company’s election by replacement, any such defective product
provided that investigation and factory inspection discloses that such defect
developed under normal and proper use, or (2) to refund the purchase price. The
exceptions and conditions mentioned above are as follows:
a. Components or accessories manufactured by the Company which by their
nature are not intended to and will not function for one year are warranted
only to reasonable service for a reasonable time. What constitutes a
reasonable time and a reasonable service shall be determined solely by the
Company. A complete list of such components and accessories is maintained
at the factory.
b. The Company makes no warranty with respect to components or accessories
not manufactured by it. In the event of defect in any such component or
accessory, the Company will give reasonable assistance to Purchaser in
obtaining from the manufacturer’s own warranty.
c. Any product claimed to be defective must, if required by the Company, be
returned to the factory, transportation charges prepaid, and will be returned
to Purchaser with transportation charges collect unless the product is found
to be defective, in which case the product must be properly decontaminated
of any chemical, biological, or radioactive hazardous material.
d. The Company shall be released from all obligations under all warranties,
either expressed or implied, if any product covered hereby is repaired or
modified by persons other than its own authorized service personnel, unless
such repair by others is made with the written consent of the Company.
e. If the product is a reagent or the like, it is warranted only to conform to the
quantity and content and for the period (but not in excess of one year) stated
on the label at the time of delivery.
It is expressly agreed that the above warranty shall be in lieu of all warranties of
fitness and of the warranty of merchantability, and that the company shall have no
liability for special or consequential damages of any kind or from any cause
whatsoever arising out of the manufacture, use, sale, handling, repair, maintenance, or
replacement of any of the products sold under the sales agreement.
Representatives and warranties made by any person, including dealers and
representatives of the Company, which are consistent or in conflict with the terms of
this warranty, shall not be binding upon the Company unless reduced in writing and
approved by an expressly authorized officer of the Company.
Parts replaced during the warranty period are warranted to the end of the instrument
warranty.
Note: Performance characteristics and specifications are only warranted when
Beckman Coulter replacement parts are used.


Biomek® 3000 Laboratory Automation Workstation Quick-Start Guide
v
Table of Contents
Warranty and Returned Goods Requirements . . . . . . . . . . . . . . . . . . . . . . . . . . . . . . . . . . . iii
Table of Contents . . . . . . . . . . . . . . . . . . . . . . . . . . . . . . . . . . . . . . . . . . . v
1 Introducing the Biomek® 3000 Laboratory Automation Workstation
1.1 Introduction . . . . . . . . . . . . . . . . . . . . . . . . . . . . . . . . . . . . . . . . . . . . . . . . . . . . . . 1-1
1.1.1 How to Use This Quick-Start Guide. . . . . . . . . . . . . . . . . . . . . . . . . . . . 1-2
1.2 Biomek® 3000 Laboratory Automation Workstation . . . . . . . . . . . . . . . . . . . . . . 1-3
1.2.1 Bridge . . . . . . . . . . . . . . . . . . . . . . . . . . . . . . . . . . . . . . . . . . . . . . . . . . . 1-3
1.2.2 Head Assembly . . . . . . . . . . . . . . . . . . . . . . . . . . . . . . . . . . . . . . . . . . . . 1-4
1.2.3 Tools . . . . . . . . . . . . . . . . . . . . . . . . . . . . . . . . . . . . . . . . . . . . . . . . . . . . 1-4
1.2.4 Labware Positioners . . . . . . . . . . . . . . . . . . . . . . . . . . . . . . . . . . . . . . . . 1-4
1.2.5 Tool Racks . . . . . . . . . . . . . . . . . . . . . . . . . . . . . . . . . . . . . . . . . . . . . . . 1-4
1.2.6 Optional Devices. . . . . . . . . . . . . . . . . . . . . . . . . . . . . . . . . . . . . . . . . . . 1-5
1.3 Biomek Software . . . . . . . . . . . . . . . . . . . . . . . . . . . . . . . . . . . . . . . . . . . . . . . . . . 1-6
1.4 Starting the Biomek® 3000 . . . . . . . . . . . . . . . . . . . . . . . . . . . . . . . . . . . . . . . . . . 1-7
1.4.1 Turning On the Biomek 3000 . . . . . . . . . . . . . . . . . . . . . . . . . . . . . . . . . 1-7
1.4.2 Launching the Software . . . . . . . . . . . . . . . . . . . . . . . . . . . . . . . . . . . . . 1-7
1.4.3 Homing All Axes of the Biomek® 3000 Pod. . . . . . . . . . . . . . . . . . . . . 1-8
2 Learning to Create Methods for the Biomek® 3000
2.1 Overview . . . . . . . . . . . . . . . . . . . . . . . . . . . . . . . . . . . . . . . . . . . . . . . . . . . . . . . . 2-1
2.2 Creating a New Method. . . . . . . . . . . . . . . . . . . . . . . . . . . . . . . . . . . . . . . . . . . . . 2-2
2.3 Configuring the Instrument Setup Step . . . . . . . . . . . . . . . . . . . . . . . . . . . . . . . . . 2-4
2.4 Configuring a Transfer Step . . . . . . . . . . . . . . . . . . . . . . . . . . . . . . . . . . . . . . . . . 2-9
2.4.1 Inserting a Transfer Step. . . . . . . . . . . . . . . . . . . . . . . . . . . . . . . . . . . . . 2-9
2.4.2 Configuring Tip Handling . . . . . . . . . . . . . . . . . . . . . . . . . . . . . . . . . . 2-10
2.4.3 Configuring Source Labware . . . . . . . . . . . . . . . . . . . . . . . . . . . . . . . . 2-11
2.4.4 Configuring Destination Labware . . . . . . . . . . . . . . . . . . . . . . . . . . . . 2-12
2.5 Configuring a Move Labware Step . . . . . . . . . . . . . . . . . . . . . . . . . . . . . . . . . . . 2-14

vi Table of Contents
Beckman Coulter, Inc.
2.6 Using the Finish Step. . . . . . . . . . . . . . . . . . . . . . . . . . . . . . . . . . . . . . . . . . . . . . 2-15
2.6.1 Handling Configuration Errors . . . . . . . . . . . . . . . . . . . . . . . . . . . . . . . 2-15
2.7 Saving a Method . . . . . . . . . . . . . . . . . . . . . . . . . . . . . . . . . . . . . . . . . . . . . . . . . 2-16
2.8 Running a Method . . . . . . . . . . . . . . . . . . . . . . . . . . . . . . . . . . . . . . . . . . . . . . . . 2-17
3 Using the Editors While Creating Methods
3.1 Overview . . . . . . . . . . . . . . . . . . . . . . . . . . . . . . . . . . . . . . . . . . . . . . . . . . . . . . . . 3-1
3.2 General Description of Editors . . . . . . . . . . . . . . . . . . . . . . . . . . . . . . . . . . . . . . . 3-2
3.2.1 Project Menu. . . . . . . . . . . . . . . . . . . . . . . . . . . . . . . . . . . . . . . . . . . . . . 3-3
3.2.2 Instrument Menu. . . . . . . . . . . . . . . . . . . . . . . . . . . . . . . . . . . . . . . . . . . 3-3
3.3 Creating New Labware in the Labware Type Editor. . . . . . . . . . . . . . . . . . . . . . . 3-5
3.4 Creating a New Pattern . . . . . . . . . . . . . . . . . . . . . . . . . . . . . . . . . . . . . . . . . . . . . 3-8
3.5 Checking In a Method and Project File . . . . . . . . . . . . . . . . . . . . . . . . . . . . . . . . 3-12
3.6 Using Hardware Setup . . . . . . . . . . . . . . . . . . . . . . . . . . . . . . . . . . . . . . . . . . . . . 3-13
3.7 Creating a New Deck. . . . . . . . . . . . . . . . . . . . . . . . . . . . . . . . . . . . . . . . . . . . . . 3-15
3.8 Manually Controlling the Pod . . . . . . . . . . . . . . . . . . . . . . . . . . . . . . . . . . . . . . . 3-17
3.9 Quick-Start Guide Summary . . . . . . . . . . . . . . . . . . . . . . . . . . . . . . . . . . . . . . . . 3-19

Biomek® 3000 Laboratory Automation Workstation Quick-Start Guide
1-1
1Introducing the Biomek®3000
Laboratory Automation
Workstation
1.1 Introduction
Welcome to the Biomek®3000 Laboratory Automation Workstation. This quick-start
guide is designed to help you learn to use the Biomek Software with your Biomek
3000 instrument. This quick-start guide includes:
•Getting to Know the Biomek®3000 Laboratory Automation Workstation
(this chapter) — a general hardware overview on the Biomek 3000
Automated Laboratory Workstation and introduction to the Biomek
Software.
•Learning to Create Methods for the Biomek®3000 (Chapter 2) — an
introduction to creating methods for the Biomek 3000 instrument using the
Biomek Software. This chapter gives instructions on creating, saving,
running, checking in, and opening a small method.
•Using the Editors While Creating Methods (Chapter 3) — an introduction to
using the editors in the Biomek Software. This chapter helps you to explore
the depth of the software by giving instructions on accessing and learning
more about the editors.

1-2 Introducing the Biomek® 3000 Laboratory Automation Workstation
Beckman Coulter, Inc.
1.1.1 How to Use This Quick-Start Guide
Read through the quick-start guide while using the links to the specific sections in the
Biomek® 3000 Laboratory Automation Workstation User’s Manual and Biomek
Software User’s Manual to further investigate topics that are particularly relevant to
you. Moving back and forth between this guide and the user’s manuals you will be
able to begin to learn about the Biomek 3000 instrument and software and also
become familiar with the manuals and how chapters are arranged.
This quick-start guide can also be used as a tutorial since you’ll be given instructions
on creating a small method (refer to Chapter 2, Learning to Create Methods for the
Biomek®3000) and utilizing the editors (refer to Chapter 3, Using the Editors While
Creating Methods). Some of the items you’ll create in Chapter 3 may be viewed in the
method you created in Chapter 2.
In addition to the explanations, graphics, and links to other sources, you will see other
useful information in the following forms:
Definition
These boxes contain
brief definitions of
material that may be
specific to the Biomek
3000, or generally
unfamiliar.
Important Concept
These boxes emphasize
important concepts
relevant to the Biomek
3000 instrument and the
Biomek Software. Refer
to the links in this quick-
start guide or the
Biomek® 3000
Laboratory Automation
Workstation User’s
Manual or the Biomek
Software User’s Manual
for more information on
these important concepts.
Introducing the Biomek® 3000 Laboratory Automation Workstation 1-3
Biomek® 3000 Laboratory Automation Workstation Quick-Start Guide
1.2 Biomek®3000 Laboratory Automation
Workstation
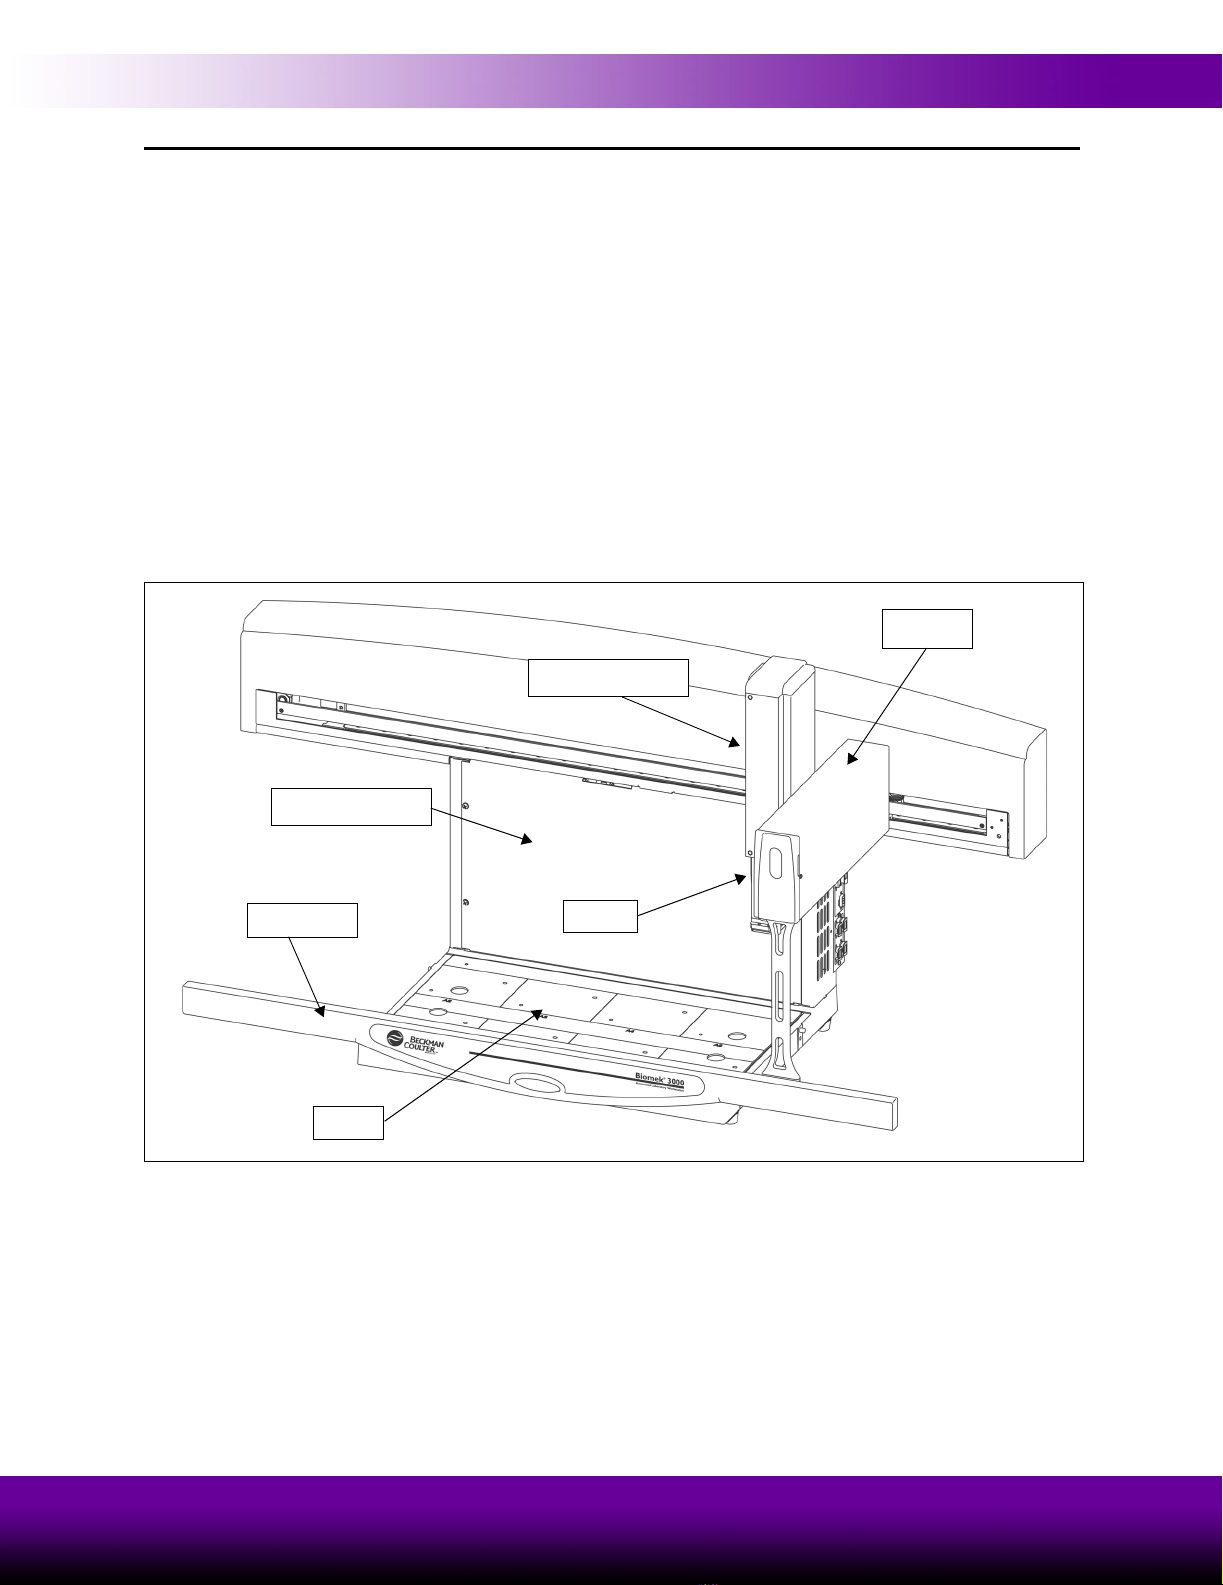
Your Biomek 3000 Laboratory Automation Workstation (Figure 1-1) is a multiaxis
liquid-handling instrument sized to fit in a laminar flow or fume hood for sterile or
hazardous operations. The open architecture design, along with the extensible
operating software, provides a foundation for integrating current and future specific-
use components.
The Biomek 3000 is a single head instrument with a series of interchangeable tools.
Different tools provide options for performing a variety of functions, including liquid
transfer and plate washing operations and moving labware around the deck. The
modular design of the Biomek 3000 allows expansion of the instrument capabilities to
include additional operations such as filtration, plate shaking, photometric
measurement, and high-capacity operation. Regardless of the tool configuration or
operating components, your Biomek 3000 workstation is controlled through the
powerful Biomek Software.
Figure 1-1. Biomek 3000 Laboratory Automation Workstation
1.2.1 Bridge
The bridge is the structure that moves in the X-axis along the tower and front rail. The
bridge holds the head assembly and enables movement of the head assembly in the Y-
(front to back) and Z-axes (up and down). Built into the bridge is an indicator light
that displays the current operational status of Biomek 3000 workstation. The Biomek
3000 workstation supports only one bridge.
Bridge
Tool
Back Support
Head Assembly
Deck
Front Rail

1-4 Introducing the Biomek® 3000 Laboratory Automation Workstation
Beckman Coulter, Inc.
1.2.2 Head Assembly
The head assembly is supported and positioned by the bridge and moves in the Y- and
Z-axes. The head assembly may hold various interchangeable tools, such as the
P200L Single-Tip Tool or MP200 Multi-Tip Pipette Tool, that perform liquid-
handling and other operations. The capabilities of the Biomek 3000 instrument
change with the tool.
1.2.3 Tools
The Biomek 3000 uses interchangeable tools to perform various operations, such as
aspirating and dispensing, washing, or moving labware around the deck.
Tools are stored on the deck in a tool rack when not in use and can be installed or
removed from the head assembly automatically as part of an automated method. This
allows multiple tool types to provide different functionality to the instrument within a
method.
Tool types available for the Biomek 3000 head include:
• pipetting tools — single-channel and eight-channel tools used to aspirate and
dispense liquid (refer to the Biomek® 3000 Laboratory Automation
Workstation User’s Manual, Chapter 2, Pipetting Tools).
• gripper tool — tool to grasp and move labware around the Biomek 3000
deck (refer to the Biomek® 3000 Laboratory Automation Workstation User’s
Manual, Chapter 3, Gripper Tool).
• wash system — the wash system includes single-channel and eight-channel
tools used to perform washing and bulk dispense operations (refer to the
Biomek® 3000 Laboratory Automation Workstation User’s Manual, Chapter
4, Wash System).
• high density replication (HDR) tools — tools used to perform low-volume
liquid transfer operations by liquid adhesion using stainless steel pins. Pin
plates are available in 96-pin and 384-pin capacities (refer to the Biomek®
3000 Laboratory Automation Workstation User’s Manual, Chapter 5, High
Density Replication System).
Note: HDR tools require at least two tool racks, one for the HDR tool and
one for the fan unit to dry pins after sterilization
1.2.4 Labware Positioners
Labware positioners are used to hold microplates, tube racks, reservoirs, or tip racks
on the Biomek 3000 deck. The gripper tool can move labware to and from these
labware positioners to other labware positioners or devices integrated on the left or
right side of the Biomek 3000 workstation.
1.2.5 Tool Racks
The tool rack is a special labware positioner used to hold up to five interchangeable
tools in a single deck position during a method.
Note: The gripper tool requires a special tool rack that accommodates the gripper
tool and up to two additional tools.

Introducing the Biomek® 3000 Laboratory Automation Workstation 1-5
Biomek® 3000 Laboratory Automation Workstation Quick-Start Guide
1.2.6 Optional Devices
The following optional devices can be added to the Biomek 3000 workstation to
accommodate specific operations, such as tip and labware disposal, plate heating and
cooling, microplate filtration, photometric measurement, and high-capacity operation:
• Disposal Accessory — provides a waste receptacle for disposing of tips and
labware from the deck using the gripper tool. Tip boxes or other labware
may be deposited directly into the disposal accessory, eliminating the need to
manually dispose of waste (refer to the Biomek® 3000 Laboratory
Automation Workstation User’s Manual, Chapter 6.7, Disposal Accessory).
• Circulating Reservoir — continually cycles a reagent between off-deck
reagent bottles and wells of a four-well reservoir positioned on the Biomek
3000 deck (refer to the Biomek® 3000 Laboratory Automation Workstation
User’s Manual, Chapter 8, Biomek 3000 Circulating Reservoir).
• Thermal Exchange Unit — heats or cools a reservoir or microplate on the
Biomek 3000 deck. The temperature is controlled by a user-supplied
circulating bath (refer to the Biomek® 3000 Laboratory Automation
Workstation User’s Manual, Chapter 9, Thermal Exchange Unit).
• Filtration System — includes a vacuum valve unit that is connected to the
Biomek 3000 workstation via RS-485 communication, and a manifold
system with interchangeable collars to allow collection of filtrates to
microplates or waste. The filtration system is used to run screening assays
which require filtration, such as receptor binding and cell-based assays, and
plasmid DNA purification applications on the Biomek 3000 workstation
(refer to the Biomek® 3000 Laboratory Automation Workstation User’s
Manual, Chapter 10, Filtration System).
• Stacker Carousel — provides additional labware capacity for microplates
and tip boxes to the Biomek 3000 workstation. It includes up to four stacks
and a shuttle for transporting labware between the Biomek 3000 deck and
the Stacker Carousel. A Stacker Carousel may be installed on either the left
side, right side, or both sides (refer to the Biomek® 3000 Laboratory
Automation Workstation User’s Manual, Appendix B:, Using a Stacker
Carousel).
• Device Integrations — Several third-party devices, including microplate
readers and shakers, may be integrated into the Biomek 3000 deck and used
in an automated method in conjunction with the Biomek 3000 workstation
(refer to the Biomek® 3000 Laboratory Automation Workstation User’s
Manual, Appendix C:, DPC MicroMix Shaker).

1-6 Introducing the Biomek® 3000 Laboratory Automation Workstation
Beckman Coulter, Inc.
1.3 Biomek Software
The Biomek Software is designed to:
• Do a substantial amount of the method-building work for you.
• Allow you to take as much direct and precise control over the method-
building process as you want.
Note: A method is a series of steps controlling the operations of your Biomek 3000.
The main editor that appears when the software is launched (Figure 1-2) is used to
build and configure methods:
• Each step is dragged and dropped from a Step
Palette into the Method View (refer to Chapter
2, Learning to Create Methods for the Biomek®
3000).
• When a step in the Method View is highlighted,
the corresponding configuration options appear
in the Step Configuration Area (refer to Chapter
2, Learning to Create Methods for the Biomek®
3000).
• The method is customized to the desired level of
precise control via the editors accessed from the
Project and Instrument menus (refer to
Chapter 3, Using the Editors While Creating
Methods).
Step Palettes
Step Palettes are panes
in the Biomek main
editor showing steps
available for insertion in
a method. They are
located on the left of the
main editor. Use the
Step Palette Builder to
add other step palettes.
Refer to the Biomek
Software User’s Manual,
Chapter 29.5, Using the
Step Palette Builder for
more information.

Introducing the Biomek® 3000 Laboratory Automation Workstation 1-7
Biomek® 3000 Laboratory Automation Workstation Quick-Start Guide
1.4 Starting the Biomek®3000
To start the Biomek 3000, you will follow the instructions in this chapter to turn on
the instrument, launch Biomek Software, and home all axes.
1.4.1 Turning On the Biomek 3000
To turn on the Biomek 3000 instrument:
1. Locate the power switch on the right side of the instrument (Figure 1-2).
2. Flip the switch to the On position. The indicator light comes on in solid green.
1.4.2 Launching the Software
To launch Biomek Software:
1. Choose Start>All Programs>Beckman Coulter>Biomek Software.
2. If Accounts & Permissions is enabled (see sidebar), a dialogue box appears
requesting you to log in using the user name and password assigned to you by
your system administrator. Enter the required information. Your account must
have Develop Methods,Develop Projects, and Setup Instrument
permissions to complete all parts of this quick-start guide. The Biomek Software
main editor appears (Figure 1-2).
Note: If you are logging into Biomek Software for the first time, you must enter
a new password. Remember your new password; you will need to enter it each
time you access Biomek Software.
Figure 1-2. Biomek Software main editor
Accounts &
Permissions
When enabled, Accounts
& Permissions is an
integrated set of features
built into the software to
assist users in complying
with electronic signature
requirements for closed
systems. The
functionality for
Accounts & Permissions
is included in the Biomek
Software installation and
provides control over
who can create and run
methods, and who may
only run validated
methods. Refer to the
Biomek Software User’s
Manual, Chapter 2,
Using Accounts &
Permissions.
Method View
The method is built step
by step in this area.
Step Configuration Area
When a step is highlighted in the
Method View, the corresponding
configuration appears in this area.
Current Deck Display
Displays the status of the deck upon
completion of the previous step.
Other editors are available from the
Project and Instrument menus.
Biomek 3000 Step Palette
Displays the special steps
available for Biomek 3000,
including those to load, unload,
and change tools.
Basic Step Palette
Displays the steps that provide
essential functionality,
including instrument setup and
labware manipulation.

1-8 Introducing the Biomek® 3000 Laboratory Automation Workstation
Beckman Coulter, Inc.
1.4.3 Homing All Axes of the Biomek®3000 Pod
Every time the Biomek 3000 is turned on, you’ll have to Home All Axes. This
automatic process initiates the pod and defines the home position from which all
subsequent moves are determined.
To home all axes:
1. From the Instrument menu, choose Home All Axes. A Warning appears.
2. Make sure that all warnings are addressed and choose OK. The pod is homed and
the instrument is now ready for use.
Proceed through this quick-start guide while using the links to the user’s manuals to
learn more about the Biomek 3000 liquid-handling system.
Home All Axes gives
the instrument a point of
reference from which to
make subsequent moves.
The home position is to
the left and back of the
Biomek 3000 deck.
Home All Axes

Biomek® 3000 Laboratory Automation Workstation Quick-Start Guide
2-1
2Learning to Create Methods for
the Biomek®3000
2.1 Overview
In this chapter you will be given information and instructions for building a small
method using Biomek Software. A method is a series of steps that control the
operation of your Biomek 3000.
The method you complete in this chapter represents basic operations and is intended
simply to familiarize you with the Biomek 3000, and to create a basic understanding
of method-building opportunities.
Read the information in this chapter and complete the tutorial steps provided. After
you have completed the instructions, or if you need additional information along the
way, use the links provided to access the suite of user’s manuals provided during
installation. These manuals include Biomek Software User’s Manual and Biomek®
3000 Laboratory Automation Workstation User’s Manual. Each manual contains
comprehensive information about the possibilities designed into the Biomek 3000.
In this chapter, you’ll learn:
•Creating a New Method (Section 2.2)
•Configuring the Instrument Setup Step (Section 2.3)
•Configuring a Transfer Step (Section 2.4)
•Configuring a Move Labware Step (Section 2.5)
•Using the Finish Step (Section 2.6)
•Saving a Method (Section 2.7)
•Running a Method (Section 2.8)

2-2 Learning to Create Methods for the Biomek® 3000
Beckman Coulter, Inc.
2.2 Creating a New Method
In this chapter, you will build a simple method that transfers liquid between labware.
In building this method, you will:
• Populate the deck with labware using the Instrument Setup step.
• Transfer liquid with an MP200 Multi-Tip Pipette Tool using a Transfer step.
• Move labware with the Gripper Tool using a Move Labware step.
Note: A gripper tool rack must be installed on the Biomek 3000 deck to
store a gripper tool when not in use.
When you create a new method by dragging a step into the Method View, the Start
and Finish steps appear automatically. You will use an Instrument Setup Step to tell
Biomek Software where you have physically placed labware on your deck.
Before proceeding with this quick-start method, make sure that:
•anMP200 Multi-Tip Pipette Tool and Gripper Tool are added in Hardware
Setup (refer to Section 3.6, Using Hardware Setup).
• the deck layout in the Deck Editor contains at least one GripperToolRack,
one ManualLatch, and four Biomek3000Positions (refer to Section 3.7,
Creating a New Deck).
Note: If your instrument configuration does not have a gripper tool, a
standard To o l R ac k position can be used instead of the GripperToolRack.
• the deck is framed (refer to the Biomek® 3000 Laboratory Automation
Workstation User’s Manual, Chapter 13, Framing the Biomek® 3000).
If using Accounts &
Permissions . . .
You must have Develop
Methods permission to
create methods. Refer to
the Biomek Software
User’s Manual, Chapter 2,
Using Accounts &
Permissions, for more
information.

Learning to Create Methods for the Biomek® 3000 2-3
Biomek® 3000 Laboratory Automation Workstation Quick-Start Guide
You launched Biomek Software in Chapter 1, you are now going to create a small
method:
1. Drag and drop an Instrument Setup into the Method View. A new method is
created and assigned the default name Method1 [New] (Figure 2-1).
Figure 2-1. Biomek Software main editor for a Biomek 3000 instrument
Note: Your deck layout may differ slightly from the deck shown in Figure 2-1,
depending on how your Biomek 3000 instrument is physically set up.
As you can see, two steps automatically appear in every method created and executed
by the Biomek Software:
•Start — the first step in a method; allows
creation of global variables that are applicable
to the entire method. Refer to the Biomek
Software User’s Manual, Chapter 12.2.1,
Configuring the Start Step, for information on
creating variables in the Start step.
•Finish — the final step in a method; provides
options to clear the Biomek 3000 deck, clear the
devices on the deck, unload tips from the pod,
and clear all global variables. Refer to the
Biomek Software User’s Manual, Chapter
12.2.2, Configuring the Finish Step, for
information on configuring other options for the Finish step.
Proceed to Section 2.3, Configuring the Instrument Setup Step to learn how to
configure the Instrument Setup step you just inserted into the method view.
Method View
The method is built
step by step in this
area.
Step Configuration Area
When a step is highlighted in the
Method View, the corresponding
configuration appears in this area.
Current Deck Display
A dynamically updated
representation of the devices
and labware positioned on the
Biomek 3000 deck.
Basic Step Palette
Displays the steps
available for insertion
into a method.
Additional steps are
available through other
step palettes.
Variables
A variable is a value that
has been assigned a
name that may be
referenced repeatedly
during a method. Refer
to the Biomek Software
User’s Manual, Chapter
13, Using Variables and
Expressions in a Method
for more information.

2-4 Learning to Create Methods for the Biomek® 3000
Beckman Coulter, Inc.
2.3 Configuring the Instrument Setup Step
CAUTION: An inaccurate Instrument Setup may result in pod and
labware collisions, or in inappropriate pipetting.
When creating Biomek methods, it is important to use the Instrument Setup step,
along with the Deck Editor, to tell the software what labware and devices are on the
deck for obstacle avoidance (see sidebar). You’ll learn more about the Deck Editor in
the next chapter (refer to Section 3.7, Creating a New Deck).
Figure 2-2. Instrument Setup step in the Method View
When building a method,
you must ALWAYS use
the Deck Editor and
Instrument Setup step
to tell the software what
labware and ALPs are on
the deck and the position
each occupies. If this is
not done, the pod could
collide into these objects
as it moves around the
deck during a method
run.
Obstacle
Avoidance

Learning to Create Methods for the Biomek® 3000 2-5
Biomek® 3000 Laboratory Automation Workstation Quick-Start Guide
To configure the Instrument Setup step for your new method:
1. In Deck, make sure the default deck layout (Deck1) is selected. The Instrument
Setup step uses a deck layout as a map for the placement of labware on the deck
and external hardware devices, such as stacker carousels.
2. Drag and drop the following labware on the Deck Layout Display:
•anAP96_200uL to ML1 or AL1.
Note: Tip boxes must be placed in either a manual latch (ML1) or
auto-latching (AL1) tip rack holder to precisely position tip racks so that
pipetting tools can accurately load and unload tips. Make sure that the
latch is securely holding the tip rack in position.
•aReservoir to P3.
•aBCFlat96 to P4. Your screen should look similar to Figure 2-3.
Note: To remove unwanted labware from the Deck Layout Display during
setup, drag and drop the labware to the Clear (trash) icon.
Figure 2-3. Instrument Setup step with labware added
If you want to use a
labware type that does
not appear in the
available labware list, use
the Labware Type
Editor to create a new
labware type. In Section
3.3, Creating New
Labware in the Labware
Type Editor, you will
create a new labware type
in the Labware Type
Editor.
Creating Labware
Drag the desired
labware graphic to
the desired position
on the Deck Layout
Display.
Deck Layout
Display
From the Deck Layout
Display, double-click
the labware graphic to
display Labware
Properties.
AP96_200uL
on ML1
BCFlat96
on P4
Tool rack Reservoir
on P3
2-6 Learning to Create Methods for the Biomek® 3000
Beckman Coulter, Inc.
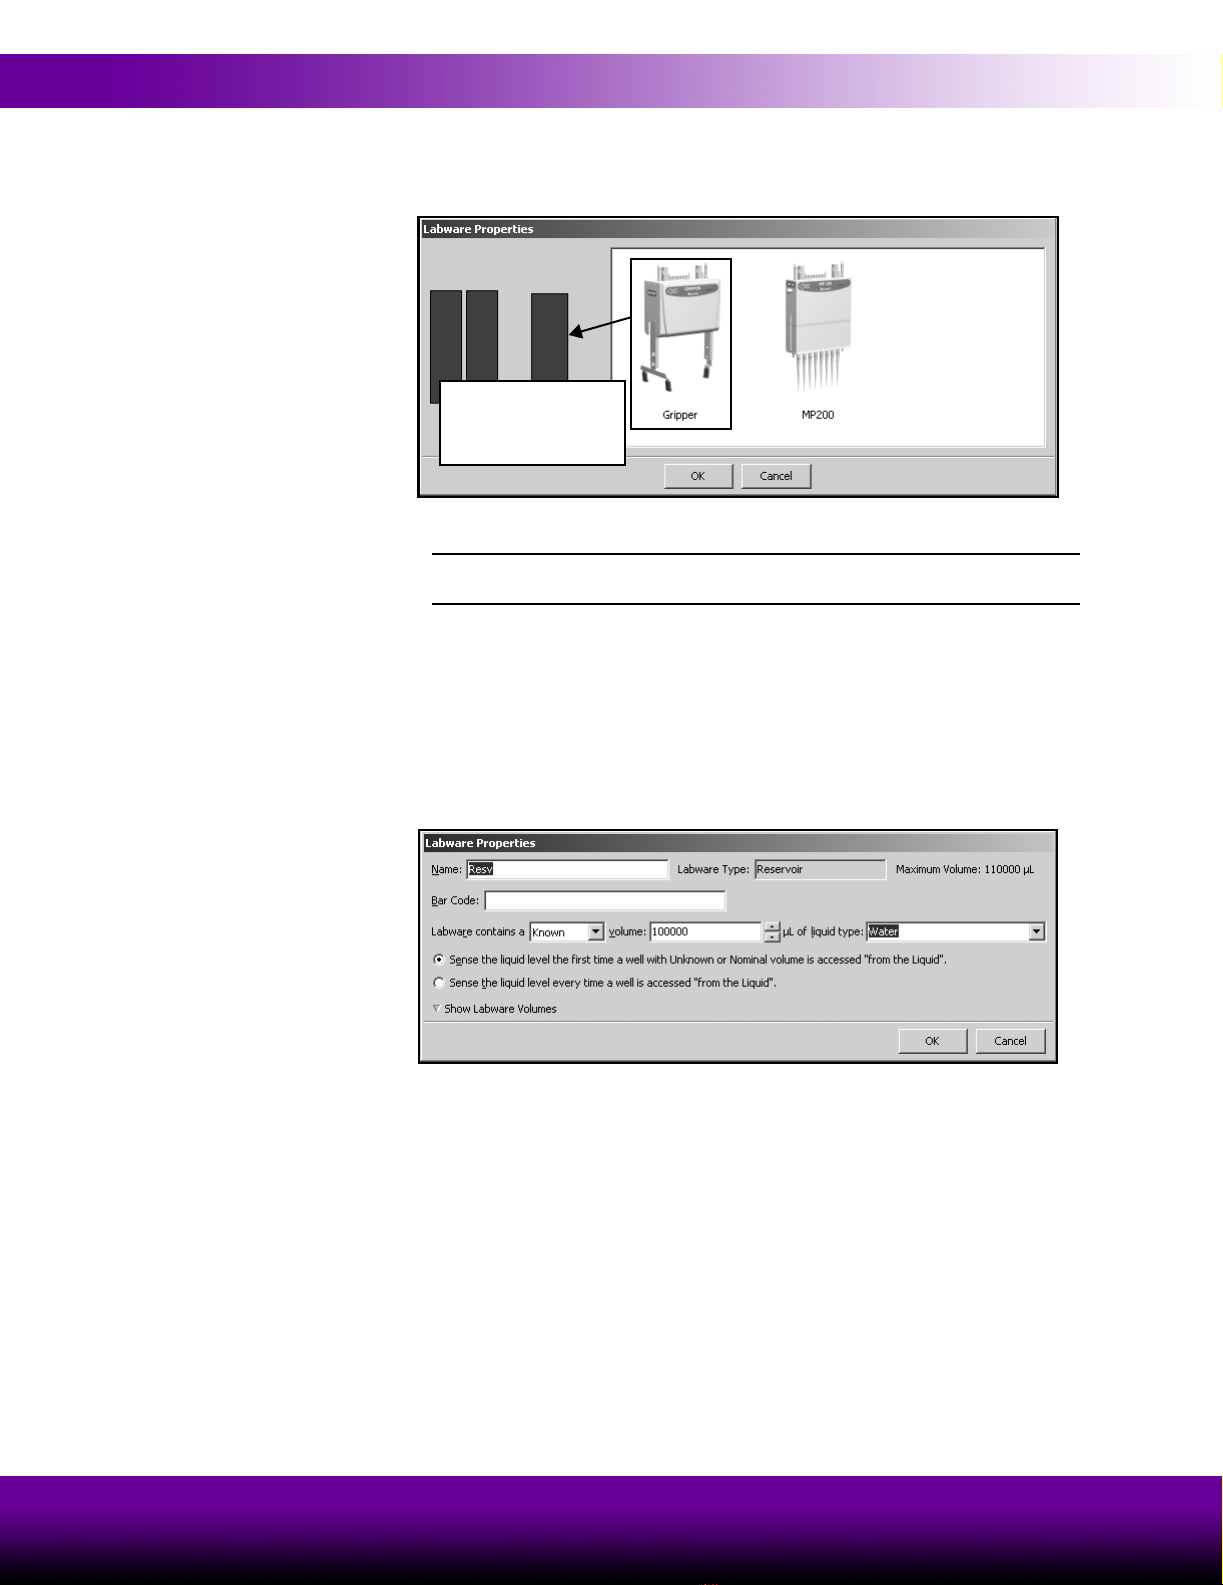
3. From the Deck Layout Display, double-click the tool rack to display Labware
Properties (Figure 2-4).
Figure 2-4. Labware Properties for tool rack
Note: Your Labware Properties for the tool rack may contain more tools on
the right side, depending on your instrument configuration.
4. Drag the Gripper tool to the gripper tool position on the tool rack (the larger
position on the right).
5. Drag the MP200 tool to either of the two remaining tool positions.
6. Choose OK to close Labware Properties.
7. From the Deck Layout Display, double-click the reservoir on P3 to display
Labware Properties (Figure 2-5).
Figure 2-5. Labware Properties for Reservoir on P3
Drag the Gripper tool
to the gripper position
on the tool rack.
Table of contents
Other Beckman Coulter Desktop manuals


