Beco EFW6000WS User manual

Tower Fan
User Manual
EFW6000WS
EN

Please read this user manual rst!
Dear Customer,
Thank you for preferring a Beko product. We hope that you get the best results
from your product which has been manufactured with high quality and state-of-
the-art technology. Therefore, please read this entire user manual and all other
accompanying documents carefully before using the product and keep it as a
reference for future use. If you handover the product to someone else, give the user
manual as well. Follow all warnings and information in the user manual.
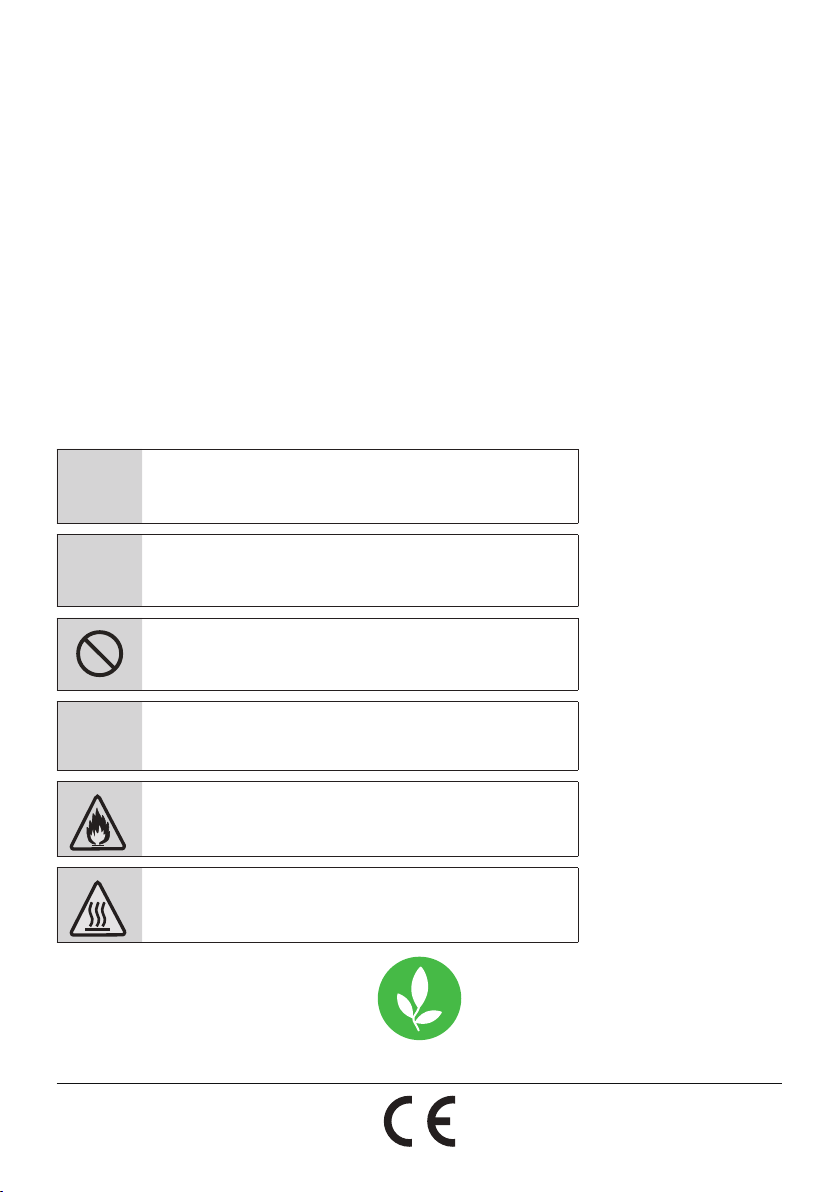
Meanings of the symbols
Following symbols are used in the various section of this manual:
C
Important information or
useful hints about usage.
A
Warning for hazardous
situations with regard to life
and property.
Warning to actions that must
never perform.
B
Warning for electric shock.
Warning for danger of fire.
Warning for hot surfaces.
This product has been produced in environmentally friendly, modern facilities
Complies with the WEEE Regulation.

Tower Fan / User Manual 3 / 12 EN
1 Safety nstructons 4
2 Part fgure 6
3 Assembly nstructons 7
4 Operaton nstructons 8
4.1 Remote controller (Fig. 4). . . . . . . . . . . . . . . . . . . . . . . . . . . . . . . . . . . . . . . . . . . . . . . . . . . . . . . . . . . . . . . . . . . . . . . . . . .8
4.2 Buttons on fan body/panel indication (Fig. 6) . . . . . . . . . . . . . . . . . . . . . . . . . . . . . . . . . . . . . . . . . . . . . . . . . . . . . .9
5 Other 10
5.1 Maintenance instructions. . . . . . . . . . . . . . . . . . . . . . . . . . . . . . . . . . . . . . . . . . . . . . . . . . . . . . . . . . . . . . . . . . . . . . . . . 10
5.2 Cleaning. . . . . . . . . . . . . . . . . . . . . . . . . . . . . . . . . . . . . . . . . . . . . . . . . . . . . . . . . . . . . . . . . . . . . . . . . . . . . . . . . . . . . . . . . . . 10
5.3 Technical data . . . . . . . . . . . . . . . . . . . . . . . . . . . . . . . . . . . . . . . . . . . . . . . . . . . . . . . . . . . . . . . . . . . . . . . . . . . . . . . . . . . . 10
6 Dsposal 11
CONTENTS

4 / 12 EN Tower Fan / User Manual
1 Safety nstructons
Warning
Read rules for safe operation and instructions carefully.
•
If the supply cord is damaged, it must be replaced by manufacturer
or its service agent or a similarly qualified person in order to avoid a
hazard.
•
To protect against the risk of electrical shock, do not immerse the
unit, cord or plug in water or other liquid.
•
When the appliance is not in use and before cleaning, unplug the
appliance from the outlet.
•
Keep electrical appliances out of reach from Children or infirm
persons. Do not let them use the appliances without supervision.
•
When the fan was assembled, the rotor blade guard shall not be
taken off anymore.
-
Prior cleaning unplug the fan.
-
The rotor guard shall not be dissembled/opened to clean the rotor
blades.
-
Wipe the fan enclosure and rotor blade guard with a slightly damp
cloth.
•
This appliance can be used by children aged from 8 years and
above and persons with reduced physical, sensory or mental
capabilities or lack of experience and knowledge if they have been
given supervision or instruction concerning use of the appliance in
a safe way and understand the hazards involved. Children shall not
play with the appliance. Cleaning and user maintenance shall not
be made by children without supervision.Young children should be
supervised to ensure that they do not play with the appliance.

Tower Fan / User Manual 5 / 12 EN
1 Safety nstructons
Rules for safe operation
•
Never insert fingers, pencils, or any other object through the grille
when fan is running.
•
Disconnect fan when moving from one location to another.
•
Be sure fan is on a stable surface when operating to avoid
overturning.
•
Do not use fan in window, rain may create electrical hazard.
•
Household use only.

6 / 12 EN Tower Fan / User Manual
1
2
3
5
4
1. Body
2. Front base
3. Rear base
4. Plastic nut
5. Power cord
C
Note: All the pictures in this manual are for explanation purpose only. Any discrepancy
between the real object and the illustration in the drawing shall be subject to the real
subject.
2 Part fgure
Tower Fan / User Manual 7 / 12 EN
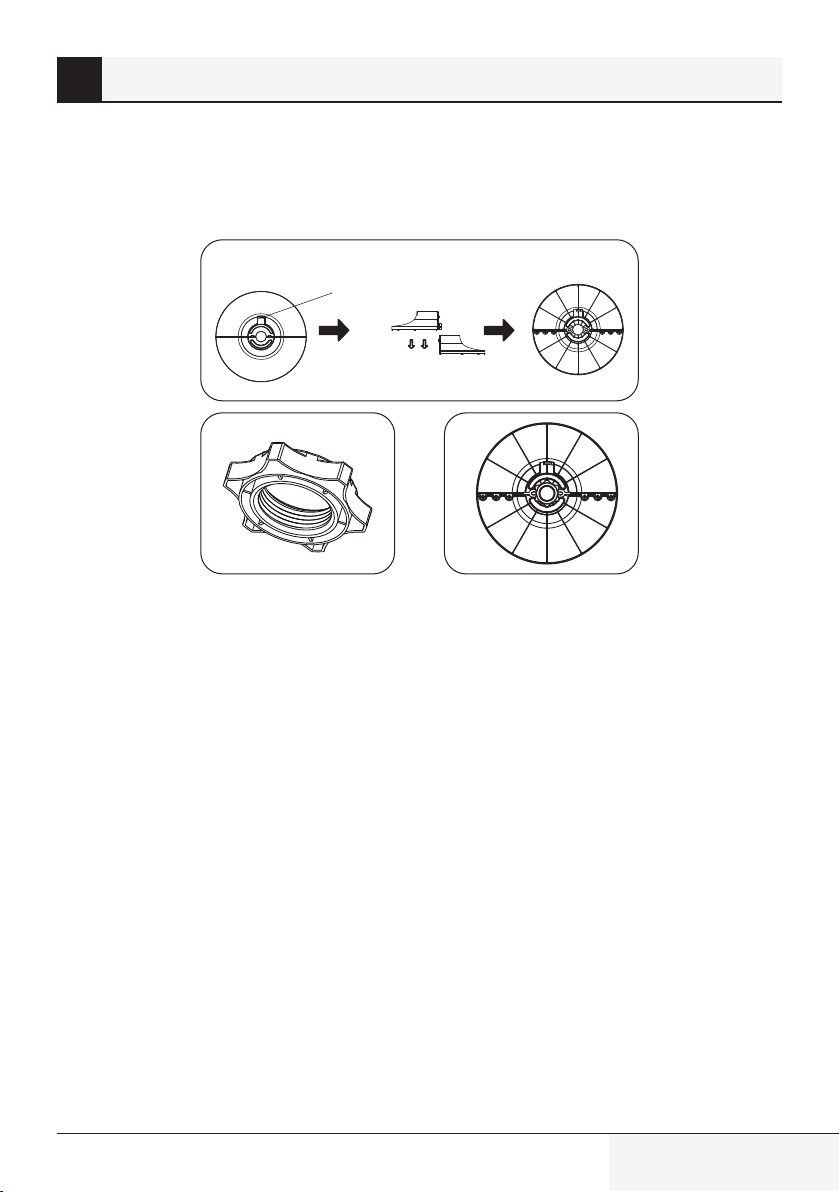
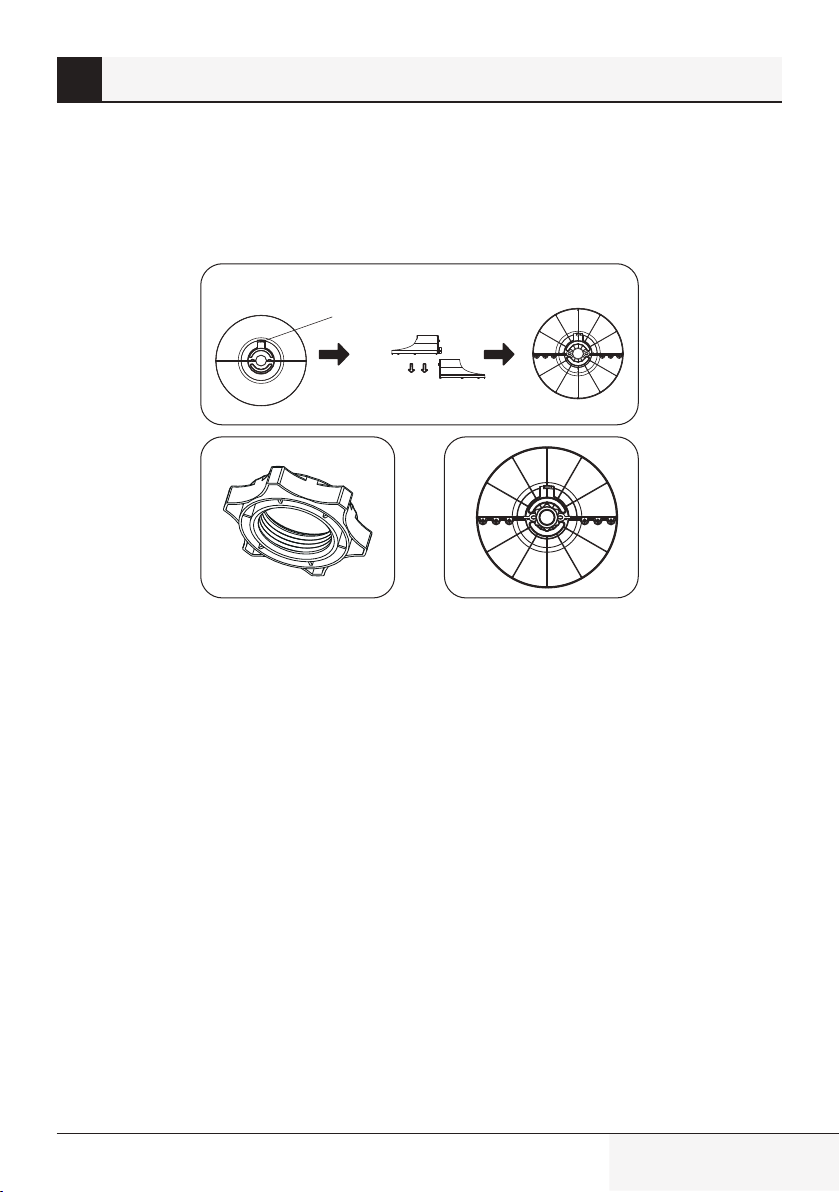
1. Take out the fan body and the spare parts from the box. Put the front base onto rear base and join
them together. (See Fig. 1)
2. Pass the power cord through the flute, then insert the fan body into the base. (See Fig. 3)
3. Fix the fan body on the base with the plastic nut. (See Fig. 2)
The outlet trough
Fig. 1
Fig. 2 Fig. 3
3 Assembly nstructons

8 / 12 EN Tower Fan / User Manual
4.1 Remote controller (Fg. 4)
a. Key instructıon
1. “ ” On/Off key
The “On” key is for switching on the fan. The fan will be started at breeze step.
Press the “Off” key if the fan needs to switch off.
2. “ ” Speed key
When the fan started, press this key repeated, the fan will work with “1-2-3”
circulatory.
3. “ ” Mode key
Press this key to select mode. The sequence is normal, natural, and sleep when this
key being touched repeatedly or continuously. The light indicate mode state.
4. “ ” OSC/Louver key
After the fan has started, press this key to select oscillation mode. The lights on the display can
indicate fan oscillation mode.
5. “ ” Timing key
Press this timer key repeatedly to set the time for air delivery. Increase in increments up to "1-2-3-4-5-
6-7-8" hours.
b. Batteries
(battery not included in the packaging)
1. Slide the battery compartment cover.
2. Insert the batteries, and make sure that the batteries are placed as shown in the Fig. 5.
3. Slide back the battery cover.
C
Note: Use size “AAA” manganese or alkaline batteries. Do not use rechargeable
batteries.
Fig. 5 Remote controller
Battery Battery cover
4 Operaton nstructons
Fig. 4
Tower Fan / User Manual 9 / 12 EN
A
Battery warning as below
1. Do not dispose of batteries in fire, batteries may explode or leak.
2. Do not mix old and new batteries.
3. Do not mix alkaline, standard (carbon-zinc) or rechargeable (nickel-cadmium)
batteries.
c. Remote controller operation
Point the remote controller at the receptor on body of the fan and press the desired button. The
remote controller will work at distances of up to roughly five meters and the angle of 30 degree
included between right and left from the receptor.
The batteries must be removed from the remote controller before it is scrapped and that they are
disposed of safely.
d. Overheat protection of the motor
The windings of the motor have a thermal-fuse that burns out and the fan switches off and
temperature of the motor is no longer going up so that plastic parts of the fan don’t subject to
deformation so far so to be burned by the overheat if the motor is overheat for any unexpected
reason.
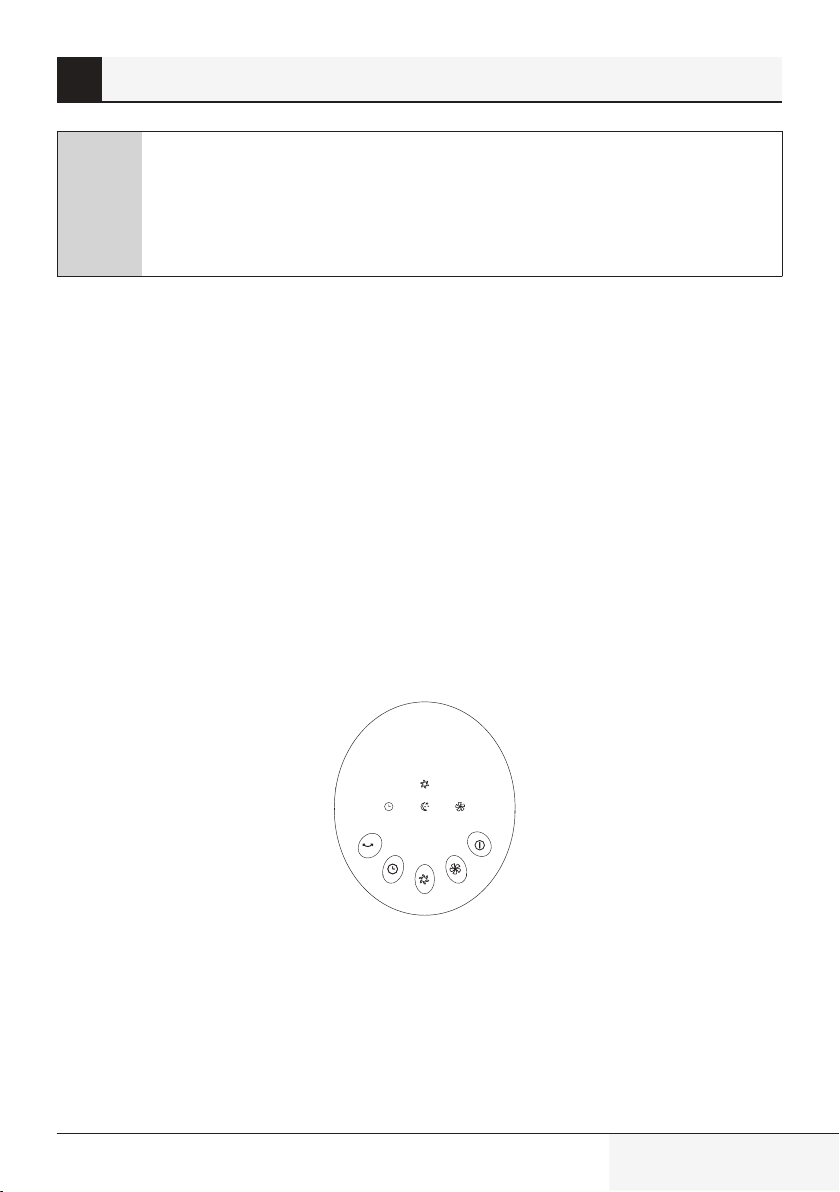
4.2 Buttons on fan body/panel ndcaton (Fg. 6)
The buttons on the body such as On/Off, Speed, Mode, Timer, Oscillation have the same functions as
those of the corresponding keys on the remote controller.
Fig. 6
4 Operaton nstructons

10 / 12 EN Tower Fan / User Manual
5 Other
5.1 Mantenance nstructons
The fan requires little maintenance. Do not try to fix it by yourself. Refer it to qualified service
personnel if service is needed.
1. Before cleaning and assembling, fan must be unplugged.
2. To ensure adequate air circulation to the motor, keep vents at the rear of the motor free of dust. Do
not disassemble the fan to remove dust.
3. Please wipe the exterior parts with a soft cloth soaking a mild detergent.
4. Do not use any abrasive detergent or solvents to avoid scratching the surface. Do not use any of the
following as a cleaner: gasoline, thinner, bending.
5. Do not allow water or any other liquid into the motor housing or interior parts.
5.2 Cleanng
1. Be sure to unplug from the electrical supply source before cleaning.
2. Plastic parts should be cleaned with a soft cloth moisten with mild soap. Thoroughly remove soap
film with dry cloth.
5.3 Techncal data
Power supply:
Technical and design modifications reserved.
220V-240V, 50Hz
Tower Fan / User Manual 11 / 12 EN
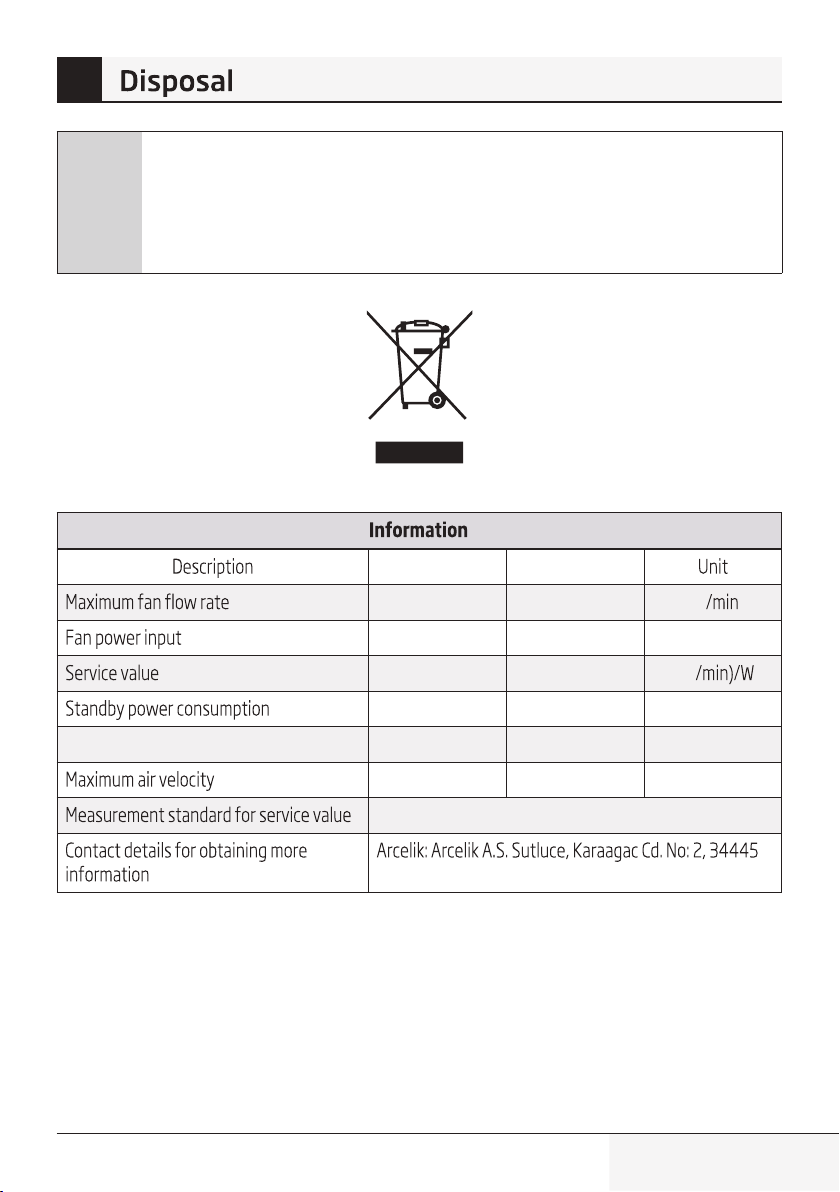
6
Symbol Value
F 21 m3
P 45 W
SV 0.47 (m3
PSB 0.5 W
Fan sound power level LWA 65 dB(A)
C 2.50 meters/sec
IEC 60879: 1986+ (corr. 1992)
Beyoglu Istanbul Turkey
C
Note: Do not dispose of electrical appliances as unsorted municipal waste, use separate
collection facilities. Contact your local government for information regarding the
collection systems available. If electrical appliances are disposed of in landfills or dumps,
hazardous substances can leak into the groundwater and get into the food chain,
damaging your health and well-being.

www.beko.com

Ventilateur colonne
Manuel de l’utilisateur
EFW6000WS
FR
Veuillez lire attentivement ce manuel de l’utilisateur
au préalable !
Cher clent,
Merc d’avor chos un produt Beko. Nous espérons que notre produt, fabrqué
avec une technologe de qualté supéreure et de dernère génératon, satsfera
vos attentes. Par conséquent, veullez lre attentvement ce manuel ans que tous
les autres documents y afférents avant l’utlsaton du produt. Veullez également
conserver ce manuel pour une consultaton ultéreure. S vous remettez le produt à
un autre utlsateur, remettez-le-lu avec le manuel de l’utlsateur. Veullez respecter
tous les avertssements et les nstructons contenus dans ce manuel de l’utlsateur.
Signication des symboles
Les symboles de sécurté c-après sont utlsés dans ce manuel :
C
Indque des nformatons mportantes ou des
consels utles relatfs à l’utlsaton du produt.
A
Indque un danger qu pourrat entraîner des
blessures, la mort ou des dégâts matérels.
Avertssement relatf aux actons à ne jamas
effectuer.
B
Avertssement : rsque d’électrocuton.
Avertssement : rsque d’ncende.
Avertssement : rsque de brûlure.
Ce produit a été fabriqué dans le respect de l’environnement et dans des installations modernes.
Ce produit est conforme à la
réglementation DEEE (Déchets
équipements électriques et
électroniques) en vigueur.
Ventlateur colonne/Manuel de l’utlsateur 3 / 12 FR
1 Consgnes de sécurté 4
2 Schéma des pèces 6
3 Instructons de montage 7
4 Instructons d’utlsaton 8
4.1 Télécommande (Fg. 4) . . . . . . . . . . . . . . . . . . . . . . . . . . . . . . . . . . . . . . . . . . . . . . . . . . . . . . . . . . . . . . . . . . . . . . . . . . . . .8
4.2 Sgnalétque des touches sur la colonne/le tableau du ventlateur (Fg. 6). . . . . . . . . . . . . . . . . . . . . . . . .9
5 Autres nstructons 10
5.1 Consgnes d’entreten. . . . . . . . . . . . . . . . . . . . . . . . . . . . . . . . . . . . . . . . . . . . . . . . . . . . . . . . . . . . . . . . . . . . . . . . . . . . . 10
5.2 Nettoyage. . . . . . . . . . . . . . . . . . . . . . . . . . . . . . . . . . . . . . . . . . . . . . . . . . . . . . . . . . . . . . . . . . . . . . . . . . . . . . . . . . . . . . . . . 10
5.3 Données technques . . . . . . . . . . . . . . . . . . . . . . . . . . . . . . . . . . . . . . . . . . . . . . . . . . . . . . . . . . . . . . . . . . . . . . . . . . . . . . 10
6 Mse au rebut 11
Tables des matères

4 / 12 FR Ventlateur colonne/Manuel de l’utlsateur
1 Consgnes de sécurté
Avertissement
Veullez lre attentvement les nstructons et consgnes de sécurté.
•
S le cordon d’almentaton est endommagé, l dot être remplacé
par le constructeur, une personne mandatée pour fare le SAV ou
toute autre personne qualfée afn d’évter toute mse en danger.
•
Ne jamas mmerger l’unté, le cordon ou la fche dans de l’eau n
dans tout autre lqude afn d’évter tout rsque d’électrocuton.
•
Débranchez l’apparel de la prse électrque lorsque vous ne
l’utlsez pas ou avant de le nettoyer.
•
Gardez les apparels électrques hors de la portée des enfants et
des personnes défcentes. Ne les lassez pas utlser les apparels
sans survellance.
•
Une fos le ventlateur monté, la grlle de protecton de l’hélce ne
dot plus être enlevée.
-
Débranchez le ventlateur avant de le nettoyer.
-
Il n’est pas nécessare de démonter/d’ouvrr la grlle de protecton
du rotor pour nettoyer l’hélce.
-
Essuyez la grlle de protecton de l’hélce ans que la surface du
ventlateur à l’ade d’un chffon légèrement humde.
•
Cet appareil peut être utilisé par des enfants âgés de 8
au moins ainsi que par des personnes ayant des capacités
physiques, sensorielles ou mentales restreintes ou manquant
de connaissances ou d’expérience si celles-ci sont surveillées ou
ont été informées quant à l’utilisation sûre de l’appareil et des
risques existants. Les enfants ne doivent pas jouer avec l’appareil.
Le nettoyage et l’entretien ne doivent pas être effectués par des
enfants sans surveillance. Les enfants en bas âge doivent être
surveillés afin de s’assurer qu’ils ne jouent pas avec l’appareil.

Ventlateur colonne/Manuel de l’utlsateur 5 / 12 FR
1 Consgnes de sécurté
Consignes de sécurité
•
Ne tentez jamas d’ntrodure vos dogts, un crayon ou tout autre
objet à travers la grlle lorsque le ventlateur est en marche.
•
Débranchez le ventlateur lorsque vous le déplacez d’un endrot à
un autre.
•
Assurez-vous que le ventlateur est placé sur une surface stable
lorsqu’l est en marche, afn d’évter qu’l ne se renverse.
•
Ne mettez pas le ventlateur en marche à proxmté d’une fenêtre
car la plue pourrat générer un danger électrque en s’nfltrant
dans l’apparel.
•
Cet apparel est unquement conçu pour un usage domestque.

6 / 12 FR Ventlateur colonne/Manuel de l’utlsateur
1
2
3
5
4
1. Colonne
2. Parte avant du socle
3. Parte arrère du socle
4. Écrou en plastque
5. Cordon d’almentaton
C
Remarque : Toutes les llustratons présentes dans ce manuel sont données
unquement à ttre d’exemple. En cas de dfférence entre l’objet réel et son llustraton,
la forme actuelle prévaut.
2 Schéma des pèces
Ventlateur colonne/Manuel de l’utlsateur 7 / 12 FR
1. Sortez la colonne de ventlaton et les pèces détachées de la boîte. Placez la parte avant du socle
sur la parte arrère, pus enclenchez-les pour les unr. (Vor Fg. 1)
2. Passez le cordon d’almentaton dans l’orfce, pus nsérez la colonne du ventlateur dans le socle.
(Vor Fg. 3)
3. Fxez la colonne du ventlateur dans le socle à l’ade de l’écrou en plastque. (Vor Fg. 2)
Orfce de sorte
Fg. 1
Fg. 2 Fg. 3
3 Instructons de montage

8 / 12 FR Ventlateur colonne/Manuel de l’utlsateur
4.1 Télécommande (Fg. 4)
a. Instructions relatives aux touches
1. « » Touche Marche/Arrêt
La touche « Marche » permet de mettre en marche le ventlateur. Le ventlateur se
met en marche sur la vtesse Brse.
Appuyez sur la touche « Arrêt » pour étendre le ventlateur.
2. « » Touche Vtesse
Une fos le ventlateur en marche, appuyez sur cette touche pluseurs fos de sute
pour modfer la vtesse du souffle selon l’ordre suvant : « 1-2-3 ».
3. « » Touche Mode
Appuyez sur cette touche pour sélectonner un mode. Lorsque vous appuyez sur
cette touche pluseurs fos de sute ou que vous la mantenez enfoncée, les modes déflent selon cet
ordre : Normal, Naturel et Nocturne. Le voyant lumneux ndque le mode sélectonné.
4. « » Touche OSC/Volet
Lorsque le ventlateur est en marche, appuyez sur cette touche pour sélectonner le mode Oscllaton.
Les voyants lumneux au nveau de l’affchage peuvent ndquer le mode d’oscllaton du ventlateur.
5. « » Touche Programmaton (Mnutere)
Appuyez sur la touche Programmaton pluseurs fos de sute pour défnr l’heure de mse en marche du
souffle d’ar. La mnutere augmente par ncréments de 1 heure jusqu’à 8 heures.
b. Piles
(piles non fournies)
1. Fates glsser le couvercle du compartments à ples pour l’ouvrr.
2. Installez les ples comme ndqué dans la Fg. 5.
3. Refermez le couvercle du compartment à ples.
C
Remarque : Utlsez des ples alcalnes ou au manganèse de talle « AAA ». N’utlsez
pas de ples rechargeables.
Fg. 5 Télécommande
Ple
Couvercle du
compartment
à ple
4 Instructons d’utlsaton
Fg. 4
Table of contents
Languages:
Other Beco Fan manuals

Popular Fan manuals by other brands

Ebmpapst
Ebmpapst R3G450-AQ25-68 operating instructions

Ebmpapst
Ebmpapst W4E300-ZB02-01 operating instructions

Ebmpapst
Ebmpapst K2E220-RB06-10 operating instructions

Americ Corporation
Americ Corporation VAF-1500 owner's manual

Oriental motor
Oriental motor MF Series operating manual

Ebmpapst
Ebmpapst A4D400-AP12-01 operating instructions

Gaggenau
Gaggenau AR 401 742 installation instructions

Ebmpapst
Ebmpapst AF1250-001 operating instructions

Universal Blue
Universal Blue UVP1002-20 instruction manual

Ebmpapst
Ebmpapst K3G280-RR05-N1 operating instructions

Faro Barcelona
Faro Barcelona Saona installation guide

Nicotra
Nicotra EC FAN FDP operating manual


