Beko WCC 8632 XW User manual

Document Number= 2302061116_EN/06-02-17.(10:15)
Washing Machine
User’s Manual
WCC 8632 XW
WCC 8632 XS
WCC 8632 XB
EN

This product was manufactured using the latest technology in environmentally friendly conditions.

3/ EN Washing Machine / User’s Manual
1 Important instructions for safety and environment
This section contains safety instructions that will help protect from risk of personal injury
or property damage. Failure to follow these instructions shall void any warranty.
1.1 General safety
•Thisproductcanbeusedbychildrenatandabove8yearsoldandbypersonswhose
physical, sensory or mental capabilities were not fully developed or who lack expe-
rience and knowledge provided that they are supervised or trained on the safe usage
of the product and the risks it brings out. Children must not play with the product.
Cleaning and maintenance works should not be performed by children unless they
are supervised by someone. Children of less than 3 years should be kept away unless
continuously supervised.
•Neverplacetheproductonacarpet-coveredfloor.Otherwise,lackofairflowbeneath
the machine will cause electrical parts to overheat. This will cause problems with your
product.
•Iftheproducthasafailure,itshouldnotbeoperatedunlessitisrepairedbythe
Authorized Service Agent. There is the risk of electric shock!
•Thisproductisdesignedtoresumeoperatingintheeventofpoweringonaftera
powerinterruption.Ifyouwishtocanceltheprogramme,see"Cancellingthepro-
gramme"section.
•Connecttheproducttoagroundedoutletprotectedbya16Afuse.Donotneglectto
havethegroundinginstallationmadebyaqualifiedelectrician.Ourcompanyshallnot
be liable for any damages that will arise when the product is used without grounding
in accordance with the local regulations.
•Thewatersupplyanddraininghosesmustbesecurelyfastenedandremainundama-
ged.Otherwise,thereistheriskofwaterleakage.
•Neveropentheloadingdoororremovethefilterwhilethereisstillwaterinthedrum.
Otherwise,riskoffloodingandinjuryfromhotwaterwilloccur.
•Donotforceopenthelockedloadingdoor.Theloadingdoorwillbereadytoopenjust
afewminutesafterthewashingcyclecomestoanend.Incaseofforcingtheloading
door to open, the door and the lock mechanism may get damaged.
•Unplugtheproductwhennotinuse.
•Neverwashtheproductbyspreadingorpouringwaterontoit!Thereistheriskof
electric shock!
•Nevertouchtheplugwithwethands!Neverunplugbypullingonthecable,always
pull out by grabbing the plug.
•Usedetergents,softenersandsupplementssuitableforautomaticwashingmachines
only.
•Followtheinstructionsonthetextiletagsandonthedetergentpackage.
•Theproductmustbeunpluggedduringinstallation,maintenance,cleaningandrepai-
ring procedures.
•AlwayshavetherepairingprocedurescarriedoutbytheAuthorizedServiceAgent.
Manufacturer shall not be held liable for damages that may arise from procedures ca-
rried out by unauthorized persons.

4/ EN Washing Machine / User’s Manual
•Ifthepowercableisdamaged,itmustbereplacedbythemanufacturer,aftersales
service or a similarly qualified person (preferably an electrician) or someone designa-
ted by the importer in order to avoid possible risks.
•Placetheproductonarigid,flatandlevelsurface.
•Donotplaceitonalong-pilerugorsimilarsurfaces.
•Donotplacetheproductonahighplatformorneartheedgeonacascadedsurface.
•Donotplacetheproductonthepowercable.
•Neverusespongeorscrubmaterials.Thesewilldamagethepainted,chromeplated
and plastic surfaces.
1.2 Intended use
•Thisproducthasbeendesignedfordomesticuse.Itisnotsuitableforcommercial
use and it must not be used out of its intended use.
•Theproductmustonlybeusedforwashingandrinsingoflaundrythataremarked
accordingly.
•Themanufacturerwaivesanyresponsibilityarisenfromincorrectusageortransporta-
tion.
1.3 Children's safety
•Packagingmaterialsaredangeroustochildren.Keeppackagingmaterialsinasafe
place away from reach of the children.
•Electricalproductsaredangerousforthechildren.Keepchildrenawayfromthepro-
ductwhenitisinuse.Donotletthemtotamperwiththeproduct.Usechildlockto
prevent children from intervening with the product.
•Donotforgettoclosetheloadingdoorwhenleavingtheroomwheretheproductis
located.
•Storealldetergentsandadditivesinasafeplaceawayfromthereachofthechildren
by closing the cover of the detergent container or sealing the detergent package.
While washing the laundry at high temperatures, the loading door glass
becomes hot. Therefore, keep especially the children away from the
loading door of the machine while the washing operation is in progress.
1.4 Package information
•Packagingmaterialsoftheproductaremanufacturedfromrecyclablematerialsinac-
cordance with our National Environment Regulations. Do not dispose of the packaging
materials together with the domestic or other wastes. Take them to the packaging
material collection points designated by the local authorities.
1.5 Disposing of the waste product
•Thisproducthasbeenmanufacturedwithhighqualitypartsandmaterialswhichcan
be reused and are suitable for recycling. Therefore, do not dispose the product with
normal domestic waste at the end of its service life. Take it to a collection point for the
recyclingofelectricalandelectronicequipment.Pleaseconsultyourlocalauthorities
to learn the nearest collection point. Help protect the environment and natural resour-
ces by recycling used products. For children's safety, cut the power cable and break
the locking mechanism of the loading door so that it will be non-functional before dis-
posing of the product.

5/ EN Washing Machine / User’s Manual
1.6 Compliance with WEEE Directive
ThisproductcomplieswithEUWEEEDirective(2012/19/EU).Thisproduct
bears a classification symbol for waste electrical and electronic equipment
(WEEE).
This product has been manufactured with high quality parts and materials
which can be reused and are suitable for recycling. Do not dispose of the
waste product with normal domestic and other wastes at the end of its servi-
ce life. Take it to the collection center for the recycling of electrical and elec-
tronicequipment.Pleaseconsultyourlocalauthoritiestolearnaboutthese
collection centers.
Compliance with RoHS Directive:
TheproductyouhavepurchasedcomplieswithEURoHSDirective(2011/65/EU).It
does not contain harmful and prohibited materials specified in the Directive.
2 Installation
Refer to the nearest Authorised Service Agent for installation
of the product. To make the product ready for use, review
the information in the user manual and make sure that the
electricity, tap water supply and water drainage systems are
appropriatebeforecallingtheAuthorizedServiceAgent.If
they are not, call a qualified technician and plumber to have
any necessary arrangements carried out.
CPreparationofthelocationandelectrical,tapwaterand
waste water installations at the place of installation is
under customer's responsibility.
Make sure that the water inlet and discharge hoses
as well as the power cable are not folded, pinched or
crushed while pushing the product into its place after
installation or cleaning procedures.
BWARNING: Installationandelectricalconnections
of the product must be carried out by the Authorized
Service Agent. Manufacturer shall not be held liable for
damages that may arise from procedures carried out by
unauthorized persons.
AWARNING:Priortoinstallation,visuallycheckif
theproducthasanydefectsonit.Ifso,donothaveit
installed. Damaged products cause risks for your safety.
2.1 Appropriate installation location
• Placethemachineonarigidfloor.Donotplaceitona
long pile rug or similar surfaces.
• Totalweightofthewashingmachineandthedryer-with
full load- when they are placed on top of each other
reachestoapprox.180kilograms.Placetheproduct
on a solid and flat floor that has sufficient load carrying
capacity!
• Donotplacetheproductonthepowercable.
• Donotinstalltheproductatplaceswheretemperature
may fall below 0ºC.
• Placetheproductatleast1cmawayfromtheedgesof
other furniture.
2.2 Removing packaging reinforcement
Tilt the machine backwards to remove the packaging
reinforcement. Remove the packaging reinforcement by
pulling the ribbon.
2.3 Removing the transportation locks
AWARNING: Do not remove the transportation locks
before taking out the packaging reinforcement.
WARNING: Remove the transportation safety bolts
beforeoperatingthewashingmachine!Otherwise,the
product will be damaged.

6/ EN Washing Machine / User’s Manual
1. Loosen all the bolts with a suitable spanner until they
rotate freely (C).
2. Remove transportation safety bolts by turning them gently.
3.AttachtheplasticcoverssuppliedintheUserManualbag
into the holes on the rear panel. (P)
C
Keepthetransportationsafetyboltsinasafeplaceto
reuse when the washing machine needs to be moved
again in the future.
Never move the product without the transportation safety
bolts properly fixed in place!
2.4 Connecting water supply
CThe water supply pressure required to run the product is
between1to10bars(0.1–1MPa).Itisnecessaryto
have 10 – 80 liters of water flowing from the fully open
tap in one minute to have your machine run smoothly.
Attach a pressure reducing valve if water pressure is
higher.
AWARNING: Models with a single water inlet should not
beconnectedtothehotwatertap.Insuchacasethe
laundry will get damaged or the product will switch to
protection mode and will not operate.
WARNING: Do not use old or used water inlet hoses
onthenewproduct.Itmaycausestainsonyourlaundry.
1. Tighten all hose nuts by hand. Never use a tool when
tightening the nuts.
2.Openthetapscompletelyaftermakingthehose
connection to check for water leaks at the connection
points.Ifanyleaksoccur,turnoffthetapandremovethe
nut. Retighten the nut carefully after checking the seal. To
prevent water leakages and damages caused by them,
keep the taps closed when the machine is not in use.
2.5 Connecting to the drain
• Theendofthedrainhosemustbedirectlyconnectedto
the wastewater drain or to the washbasin.
AWARNING: Your house will be flooded if the hose
comes out of its housing during water discharge.
Moreover, there is risk of scalding due to high washing
temperatures! To prevent such situations and to ensure
smooth water intake and discharge of the machine, fix
the end of the discharge hose tightly so that it cannot
come out.
• Thehoseshouldbeattachedtoaheightofatleast40
cm, and 100 cm at most.
• Incasethehoseiselevatedafterlayingitonthefloor
level or close to the ground (less than 40 cm above the
ground), water discharge becomes more difficult and the
laundry may come out excessively wet. Therefore, follow
the heights described in the figure.
• Topreventflowingofdirtywaterbackintothemachine
and to allow for easy discharge, do not immerse the hose
end into the dirty water or do not drive it in the drain more
than15cm.Ifitistoolong,cutitshort.
• Theendofthehoseshouldnotbebent,itshouldnotbe
stepped on and the hose must not be pinched between
the drain and the machine.

7/ EN Washing Machine / User’s Manual
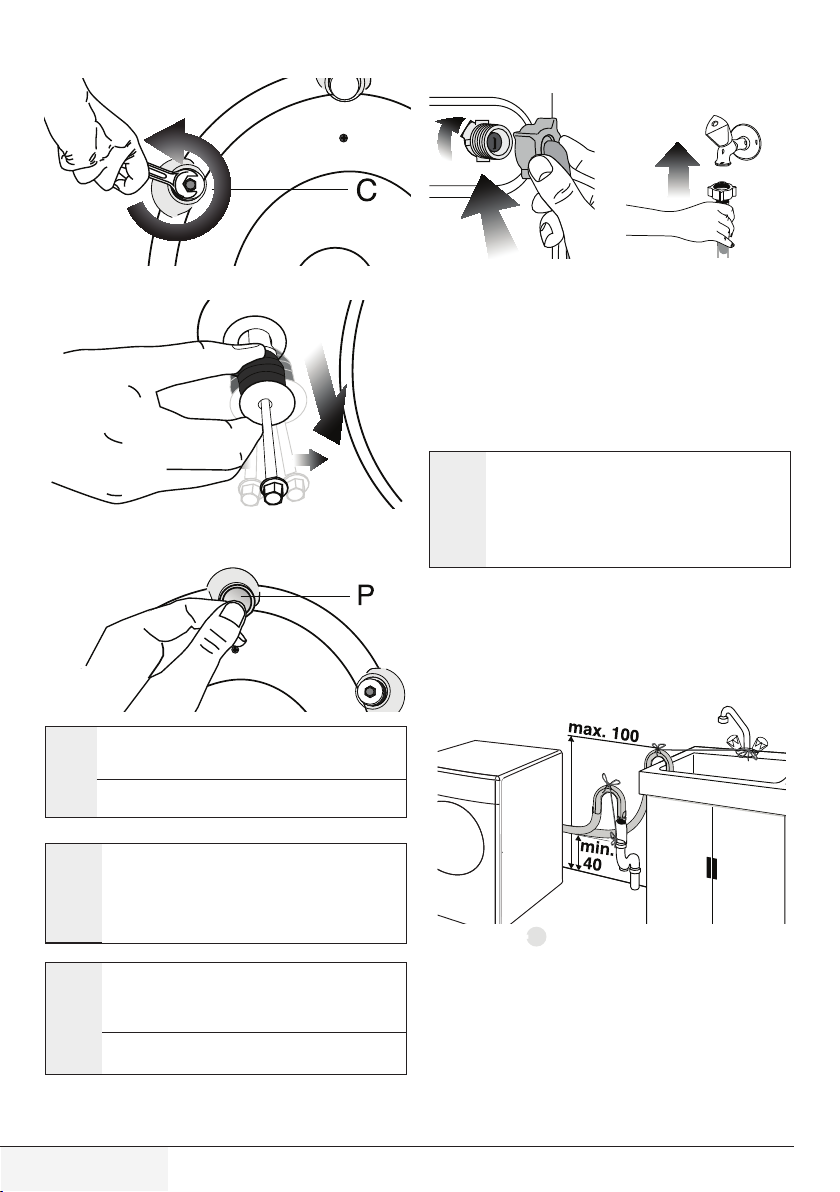
• Ifthelengthofthehoseistooshort,useitbyadding
an original extension hose. Length of the hose may
not be longer than 3.2 m. To avoid water leak failures,
the connection between the extension hose and the
drain hose of the product must be fitted well with an
appropriate clamp as not to come off and leak.
2.6 Adjusting the feet
AWARNING: Inordertoensurethattheproduct
operates more silently and vibration-free, it must stand
level and balanced on its feet. Balance the machine
byadjustingthefeet.Otherwise,theproductmay
move from its place and cause crushing and vibration
problems.
1. Loosen the lock nuts on the feet by hand.
2. Adjust the feet until the product stands level and
balanced.
3. Tighten all lock nuts again by hand.
AWARNING: Do not use any tools to loosen the lock
nuts.Otherwise,theywillgetdamaged.
2.7 Electrical connection
Connect the product to a grounded outlet protected by a 16
Afuse.Ourcompanyshallnotbeliableforanydamages
that will arise when the product is used without grounding in
accordance with the local regulations.
• Connectionmustcomplywithnationalregulations.
• Powercableplugmustbewithineasyreachafter
installation.
• Ifthecurrentvalueofthefuseorbreakerinthehouseis
less than 16 Amps, have a qualified electrician install a
16 Amp fuse.
• Thevoltagespecifiedinthe"Technicalspecifications"
section must be equal to your mains voltage.
• Donotmakeconnectionsviaextensioncablesormulti-
plugs.
BWARNING: Damaged power cables must be
replaced by the Authorized Service Agents.
Transportation of the product
1.Unplugtheproductbeforetransportingit.
2. Remove water drain and water supply connections.
3. Drain all water that has remained in the product.
4.Installtransportationsafetyboltsinthereverseorderof
removal procedure;
CNever move the product without the transportation
safety bolts properly fixed in place!
AWARNING: Packagingmaterialsaredangerousto
children.Keeppackagingmaterialsinasafeplace
away from reach of the children.
3 Preparation
3.1 Sorting the laundry
• Sortlaundryaccordingtotypeoffabric,colour,and
degree of soiling and allowable water temperature.
• Alwaysobeytheinstructionsgivenonthegarmenttags.
3.2 Preparing laundry for washing
• Laundryitemswithmetalattachmentssuchas,
underwired bras, belt buckles or metal buttons will
damage the machine. Remove the metal pieces or wash
the clothes by putting them in a laundry bag or pillow
case.
•Takeoutallsubstancesinthepocketssuchascoins,
pens and paper clips, and turn pockets inside out and
brush. Such objects may damage the product or cause
noise problem.
• Putsmallsizeclothessuchasinfant'ssocksandnylon
stockings in a laundry bag or pillow case.
• Placecurtainsinwithoutcompressingthem.Remove
curtain attachment items.
• Fastenzippers,sewloosebuttonsandmendripsand
tears.
• Wash“machinewashable”or“handwashable”labeled
products only with an appropriate programme.
• Donotwashcoloursandwhitestogether.New,dark
coloured cottons release a lot of dye. Wash them
separately.
• Toughstainsmustbetreatedproperlybeforewashing.If
unsure, check with a dry cleaner.
• Useonlydyes/colourchangersandlimescaleremovers
suitable for machine wash. Always follow the instructions
on the package.
• Washtrousersanddelicatelaundryturnedinsideout.
• KeeplaundryitemsmadeofAngorawoolinthefreezer
for a few hours before washing. This will reduce pilling.
• Laundrythataresubjectedtomaterialssuchasflour,
lime dust, milk powder, etc. intensely must be shaken off
before placing into the machine. Such dusts and powders
on the laundry may build up on the inner parts of the
machine in time and can cause damage.
3.3 Things to be done for energy saving
Following information will help you use the product in an
ecological and energy-efficient manner.
• Operatetheproductinthehighestcapacityallowedby
the programme you have selected, but do not overload;
see,"Programmeandconsumptiontable".
• Alwaysfollowtheinstructionsonthedetergent
packaging.
• Washslightlysoiledlaundryatlowtemperatures.
• Usefasterprogrammesforsmallquantitiesoflightly
soiled laundry.
• Donotuseprewashandhightemperaturesforlaundry
that is not heavily soiled or stained.
• Ifyouplantodryyourlaundryinadryer,selectthe
highest spin speed recommended during washing
process.
• Donotusedetergentinexcessoftheamount
recommended on the detergent package.

8/ EN Washing Machine / User’s Manual
Detergent Drawer
The detergent drawer is composed of three compartments:
– (1) for prewash
– (2) for main wash
– (3) for softener
– (*) in addition, there is siphon piece in the softener
compartment.
1
3
2
Detergent, softener and other cleaning agents
• Adddetergentandsoftenerbeforestartingthewashing
programme.
• Neverleavethedetergentdraweropenwhilethewashing
programme is running!
• Whenusingaprogrammewithoutprewash,donot
put any detergent into the prewash compartment
(compartmentnr."1").
• Inaprogrammewithprewash,donotputliquiddetergent
intotheprewashcompartment(compartmentnr."1").
• Donotselectaprogrammewithprewashifyouareusing
adetergentbagordispensingball.Placethedetergent
bag or the dispensing ball directly among the laundry in
the machine.
• Ifyouareusingliquiddetergent,donotforgettoplace
the liquid detergent cup into the main wash compartment
(compartmentnr."2").
Choosing the detergent type
The type of detergent to be used depends on the type and
colour of the fabric.
• Usedifferentdetergentsforcolouredandwhitelaundry.
• Washyourdelicateclothesonlywithspecialdetergents
(liquid detergent, wool shampoo, etc.) used solely for
delicate clothes.
• Whenwashingdarkcolouredclothesandquilts,itis
recommended to use liquid detergent.
• Washwoolenswithspecialdetergentmadespecifically
for woolens.
Awarning: Useonlydetergentsmanufacturedspecifically
for washing machines.
warning: DonotusePowderedSoap.
3.4 Initial use
Before starting to use the product, make sure that all
preparations are made in accordance with the instructions in
sections“Importantsafetyinstructions”and“Installation”.
To prepare the product for washing laundry, perform first
operationinDrumCleaningprogramme.Ifyourproduct
is not equipped with Drum Cleaning programme, perform
theInitialUseprocedureinaccordancewiththemethods
describedunder“5.2Cleaningtheloadingdoorandthe
drum”sectionoftheusermanual.
CUseananti-limescalesuitableforthewashingmachines.
Some water might have remained in the product due to
thequalitycontrolprocessesintheproduction.Itisnot
harmful for the product.
3.5 Correct load capacity
The maximum load capacity depends on the type of laundry,
the degree of soiling and the washing programme desired.
The machine automatically adjusts the amount of water
according to the weight of the loaded laundry.
Awarning: Followtheinformationinthe“Programme
andconsumptiontable”.Whenoverloaded,machine's
washing performance will drop. Moreover, noise and
vibration problems may occur.
3.6 Loading the laundry
1.Opentheloadingdoor.
2.Placelaundryitemslooselyintothemachine.
3.Pushtheloadingdoortocloseuntilyouhearalocking
sound. Ensure that no items are caught in the door.
CThe loading door is locked while a programme is running.
The door can only be opened a while after the programme
comes to an end.
Awarning: Incaseofmisplacingthelaundry,noiseand
vibration problems may occur in the machine.
3.7 Using detergent and softener
CWhen using detergent, softener, starch, fabric dye, bleach
or limescale remover read the manufacturer's instructions
on the package carefully and follow the suggested dosage
values.Usemeasuringcupifavailable.

9/ EN Washing Machine / User’s Manual
Adjusting detergent amount
The amount of washing detergent to be used depends
on the amount of laundry, the degree of soiling and water
hardness.
• Donotuseamountsexceedingthedosagequantities
recommended on the detergent package to avoid
problems of excessive foam, poor rinsing, financial
savings and finally, environmental protection.
• Uselesserdetergentforsmallamountsorlightlysoiled
clothes.
Using softeners
Pourthesoftenerintothesoftenercompartmentofthe
detergent drawer.
•Donotexceedthe(>max<)levelmarkinginthesoftener
compartment.
•Ifthesoftenerhaslostitsfluidity,diluteitwithwater
before putting it in the detergent drawer.
Using liquid detergents
If the product contains a liquid detergent cup:
• Makesurethatyouhaveplacedtheliquiddetergentcup
incompartmentnr."2".
•Iftheliquiddetergenthaslostitsfluidity,diluteitwith
water before putting in the detergent cup.
If the product does not contain a liquid detergent
cup:
• Donotuseliquiddetergentfortheprewashina
programme with prewash.
• Liquiddetergentstainsyourclotheswhenusedwith
DelayedStartfunction.IfyouaregoingtousetheDelayed
Start function, do not use liquid detergent.
Using gel and tablet detergent
Apply the following instructions when using tablet, gel and
similar detergents.
• Ifthegeldetergentthicknessisfluidalandyourmachine
does not contain a special liquid detergent cup, put the
gel detergent into the main wash detergent compartment
duringfirstwaterintake.Ifyourmachinecontainsaliquid
detergent cup, fill the detergent into this cup before
starting the programme.
• Ifthegeldetergentthicknessisnotfluidalorintheshape
of capsule liquid tablet, put it directly into the drum before
washing.
• Puttabletdetergentsintothemainwashcompartment
(compartmentnr.“2”)ordirectlyintothedrumbefore
washing.
CTablet detergents may leave residues in the detergent
compartment.Ifyouencountersuchacase,placethe
tablet detergent between the laundry, close to the lower
part of the drum in future washings.
Usethetabletorgeldetergentwithoutselectingthe
prewash function.
Using starch
• Addliquidstarch,powderstarchorthefabricdyeintothe
softener compartment.
• Donotusesoftenerandstarchtogetherinawashing
cycle.
• Wipetheinsideofthemachinewithadampandclean
cloth after using starch.
Using bleaches
• Selectaprogrammewithprewashandaddthebleaching
agent at the beginning of the prewash. Do not put
detergent in the prewash compartment. As an alternative
application, select a programme with extra rinse and add
the bleaching agent while the machine is taking water
from the detergent compartment during first rinsing step.
• Donotusebleachingagentanddetergentbymixing
them.
• Usejustalittleamount(approx.50ml)ofbleachingagent
and rinse the clothes very well as it causes skin irritation.
Do not pour the bleaching agent onto the clothes and do
not use it for coloured clothes.
• Whenusingoxygenbasedbleaches,selectaprogramme
that washes at a lower temperature.
• Oxygenbasedbleachescanbeusedtogetherwith
detergents; however, if its thickness is not the same
with the detergent, put the detergent first into the
compartmentnr.“2”inthedetergentdrawerandwait
until the detergent flows while the machine is taking
in water. Add the bleaching agent from the same
compartment while the machine is still taking in water.
Using limescale remover
•Whenrequired,uselimescaleremoversmanufactured
specifically for washing machines only.

10 / EN Washing Machine / User’s Manual
3.8 Tips for efficient washing
Clothes
Light colours and whites
(Recommended temperature range based
on soiling level: 40-90 °C)
Soiling Level
Heavily Soiled
(difficult stains
such as grass,
coffee, fruits and
blood.)
Itmaybenecessarytopre-treatthestains
orperformprewash.Powderandliquid
detergents recommended for whites can be
used at dosages recommended for heavily
soiledclothes.Itisrecommendedtouse
powder detergents to clean clay and soil
stains and the stains that are sensitive to
bleaches.
Normally Soiled
(For example,
stains caused by
body on collars
and cuffs)
Powderandliquiddetergentsrecommended
for whites can be used at dosages
recommended for normally soiled clothes.
Lightly Soiled
(No visible stains
exist.)
Powderandliquiddetergentsrecommended
for whites can be used at dosages
recommended for lightly soiled clothes.
Colours
(Recommended temperature range based
on soiling level: cold -40 °C)
Soiling Level
Heavily Soiled
Powderandliquiddetergentsrecommended
for colours can be used at dosages
recommendedforheavilysoiledclothes.Itis
recommended to use powder detergents to
clean clay and soil stains and the stains that
aresensitivetobleaches.Usedetergents
without bleach.
Normally Soiled
Powderandliquiddetergentsrecommended
for colours can be used at dosages
recommended for normally soiled clothes.
Usedetergentswithoutbleach.
Lightly Soiled
Powderandliquiddetergentsrecommended
for colours can be used at dosages
recommendedforlightlysoiledclothes.Use
detergents without bleach.
Clothes
Dark colours
(Recommended temperature range based
on soiling level: cold -40 °C)
Soiling Level
Heavily Soiled
Liquid detergents suitable for colours
and dark colours can be used at dosages
recommended for heavily soiled clothes.
Normally Soiled
Liquid detergents suitable for colours
and dark colours can be used at dosages
recommended for normally soiled clothes.
Lightly Soiled
Liquid detergents suitable for colours
and dark colours can be used at dosages
recommended for lightly soiled clothes.
Delicates/Woollens/Silks
(Recommended temperature range based
on soiling level: cold -30 °C)
Soiling Level
Heavily Soiled
Preferliquiddetergentsproducedfor
delicate clothes. Woollen and silk clothes
must be washed with special woollen
detergents.
Normally Soiled
Preferliquiddetergentsproducedfor
delicate clothes. Woollen and silk clothes
must be washed with special woollen
detergents.
Lightly Soiled
Preferliquiddetergentsproducedfor
delicate clothes. Woollen and silk clothes
must be washed with special woollen
detergents.

11 / EN Washing Machine / User’s Manual
4 Operating the product
4.1 Control panel
1-ProgrammeSelectionknob(UppermostpositionOn/Off)
2 - Display
3-DelayedStartIndicator
4-ProgrammeFollow-upindicator
5-Start/Pausebutton
6 - Auxiliary Function buttons
7 - Spin Speed Adjustment button
8 - Temperature Adjustment button
1 2 3
4
5678
4.2 Preparing the machine
1.Make sure that the hoses are connected tightly.
2.Pluginyourmachine.
3.Turn the tap on completely.
4.Placethelaundryinthemachine.
5.Add detergent and fabric softener.
4.3 Programme selection and tips for efficient
washing
1. Select the programme suitable for the type, quantity
and soiling degree of the laundry in accordance with
the"Programmeandconsumptiontable"andthe
temperature table below.
2.SelectthedesiredprogrammewiththeProgramme
Selection button.
4.4 Main programmes
Depending on the type of fabric, use the following main
programmes.
• Cottons
Usethisprogrammeforyourcottonlaundry(suchasbed
sheets, duvet and pillowcase sets, towels, bathrobes,
underwear, etc.). Your laundry will be washed with vigorous
washing action for a longer washing cycle.
• Synthetics
Usethisprogrammetowashyoursyntheticclothes(shirts,
blouses,synthetic/cottonblends,etc.).Itwasheswitha
gentle action and has a shorter washing cycle compared to
the Cotton programme.
For curtains and tulle, use the Synthetic 40°C programme
with prewash and anti-creasing functions selected. As their
meshed texture causes excessive foaming, wash the veils/
tulle by putting little amount of detergent into the main
wash compartment. Do not put detergent in the prewash
compartment.
• Woollens
Usethisprogrammetowashyourwoolenclothes.Select
the appropriate temperature complying with the tags of your
clothes.Useappropriatedetergentsforwoollens.
“Thewoolwashcycleofthismachinehasbeen
approved by The Woolmark Company for the washing
of machine washable wool products provided that the
products are washed according to the instructions
on the garment label and those issued by the
manufacturer of this washing machine. M1546”
“InUK,Eire,HongKongandIndiatheWoolmarktrade
markisaCertificationtrademark.”
4.5 Additional programmes
For special cases, additional programmes are available in
the machine.
CAdditional programmes may differ according to the model
of the machine.
• Cotton Economic
By washing normally soiled cotton and linen laundry
in this programme, you can ensure higher energy and
water efficiency than other cotton programmes do. Actual
water temperature may be different from the stated wash
temperature. While doing the laundry at lesser amounts (e.g.
half capacity or less) duration of the program may reduce
automaticallyatthelaterstagesoftheprogram.Inthis
case, energy and water consumption will reduce for a more
economic wash. This feature is provided in the models with
the remaining time indicator.
• BabyProtect
This is a long lasting programme which you may use for
your laundry for which you require an anti-allergic and
hygienic washing at high temperature with intensive and
long washing cycle.

12 / EN Washing Machine / User’s Manual
• Delicate 20°
You can wash your delicate clothes in this programme.
Itwasheswithagentleractionwithoutanyinterimspins
comparedtotheSyntheticsprogramme.Itshouldbeused
for clothes for which delicate washing is recommended.
• Hand wash
Usethisprogrammetowashyourwoolen/delicateclothes
thatbear“notmachine-washable”tagsandforwhichhand
washisrecommended.Itwasheslaundrywithaverygentle
washing action to not to damage clothes.
• Daily express
Usethisprogrammetowashyourlightlysoiledcotton
clothes in a short time.
• Super short express
Usethisprogrammetowashyourlittleamountoflightly
soiled cotton clothes in a short time. Your clothes will be
washed at 30 °C in a short time like 14 minutes.
• Darkcare
Usethisprogrammetowashyourdarkcolouredlaundry
or the laundry that you do not want it get faded. Washing
is performed with little mechanic action and at low
temperatures.Itisrecommendedtouseliquiddetergentor
woolen shampoo for dark coloured laundry.
• Mixed 40 (Mix 40)
Usethisprogrammetowashyourcottonandsynthetic
clothes together without sorting them.
• Shirts
Usethisprogrammetowashtheshirtsmadeofcotton,
synthetic and synthetic blended fabrics together.
• Hygiene 20°
Usethisprogrammeforyourlaundryforwhichyourequire
washing at lower temperature with intensive and long
washingcycle.Usethisprogrammeforyourlaundryfor
which you require hygienic washing at lower temperature.
4.6 Special programmes
For specific applications, select any of the following
programmes.
• Rinse
Usethisprogrammewhenyouwanttorinseorstarch
separately.
• Spin + Drain
Usethisprogrammetoapplyanadditionalspincyclefor
your laundry or to drain the water in the machine.
Before selecting this programme, select the desired spin
speedandpressStart/Pausebutton.First,themachinewill
drain the water inside of it. Then, it will spin the laundry with
the set spin speed and drain the water coming out of them.
Ifyouwishtodrainonlythewaterwithoutspinningyour
laundry,selectthePump+Spinprogrammeandthenselect
the No Spin function with the help of Spin Speed Adjustment
button.PressStart/Pausebutton.
CUselowerspinspeedsfordelicatelaundries.
4.7 Temperature selection
Whenever a new programme is selected, the maximum
temperature for the selected programme appears on the
temperature indicator.
To decrease the temperature, press the Temperature
Adjustment button. Temperature will decrease gradually.
CIftheprogrammehasnotreachedtheheatingstepyet,
you can change the temperature without switching the
machinetoPausemode.
4.8 Speed selection
Whenever a new programme is selected, the recommended
spin speed of the selected programme is displayed on the
spin speed indicator.
To decrease the spin speed, press the Spin Speed
Adjustment button. Spin speed decreases gradually. Then,
dependingonthemodeloftheproduct,"RinseHold"and
"NoSpin"optionsappearonthedisplay.See"Auxiliary
functionselection"sectionforexplanationsoftheseoptions.
CIftheprogrammehasnotreachedthespinningstep
yet, you can change the speed without switching the
machinetoPausemode.

12 / EN Washing Machine / User’s Manual
•: Selectable
* : Automatically selected, not cancellable.
** : Energy Label programme (EN 60456 Ed.3)
*** : If maximum spin speed of the machine is lower then this value, you can only select up to the maximum spin speed.
- : See the programme description for maximum load.
** “Cotton eco 40°C and Cotton eco 60°C are standard programmes.” These programmes are known as '40°C cotton
standard programme' and '60°C cotton standard programme' and shown on the panel
with symbols.
Water and power consumption may vary subject to the changes in water pressure, water hardness and temperature, ambient
temperature, type and amount of laundry, selection of auxiliary functions and spin speed, and changes in electric voltage.
You can see the washing time of the programme you have selected on the display of the machine. It is normal that small
differences may occur between the time shown on the display and the real washing time.
The auxiliary functions in the table may vary according to the model of your machine.
“Selectability of auxiliary functions might be changed by the manufacturer. New selectabilities might be added or existing ones
might be removed.”
“The spin speed of your machine may vary among the programmes, however this speed cannot exceed the max. spin speed
of your machine.”
4.9 Programme and consumption table
EN Auxiliary functions
Programme
Max. Load (kg)
Water Consumption (l)
Energy Consumption (kWh)
Max. Speed***
Prewash
Quick Wash
Extra rinse
Selectable
temperature range
°C
Cotton Eco
60** 8 53 1.07 1600 40-60
60** 4 48 0.695 1600 40-60
40** 4 48 0.68 1600 40-60
Cottons
90 8 80 2.60 1600 Cold-90
60 8 80 1.80 1600 Cold-90
40 8 80 0.90 1600 Cold-90
Synthetics 60 4 60 1.00 800 Cold-60
40 4 60 0.58 800 Cold-60
Daily express
90 8 70 2.20 1400 Cold-90
60 8 70 1.13 1400 Cold-90
30 8 70 0.31 1400 Cold-90
Super short express 30 2 50 0.11 1400 Cold-30
Darkcare 40 4 75 0.63 800 Cold-40
Mix40 40 4 60 0.70 800 Cold-40
Hand wash 20 1.5 35 0.18 600 20
Woollens 40 2 54 0.35 600 Cold-40
Shirts 60 4 85 1.29 600 Cold-60
BabyProtect 90 8 100 2.60 1600 •30-90
Hygiene 20° 20 4 98 0.42 1600 20
Delicate 20° 20 4 45 0.15 600 20

14 / EN Washing Machine / User’s Manual
4.10 Auxiliary function selection
Select the required auxiliary functions before starting
the program. Furthermore, you may also select or
cancel auxiliary functions that are suitable to the running
programmewithoutpressingtheStart/Pausebuttonwhen
the machine is operating. For this, the machine must be in
a step before the auxiliary function you are going to select
or cancel.
Iftheauxiliaryfunctioncannotbeselectedorcanceled,light
of the relevant auxiliary function will blink 3 times to warn
the user.
CSome functions cannot be selected together. For example,
PrewashandQuickWash.
Ifasecondauxiliaryfunctionconflictingwiththefirst
one is selected before starting the machine, the function
selected first will be cancelled and the second auxiliary
function selection will remain active. For example, if you
want to select Quick Wash after you have selected the
Prewash,PrewashwillbecancelledandQuickWashwill
remain active.
Auxiliary function that is not compatible with the program
cannotbeselected.(See"Programmeandconsumption
table")
Auxiliary Function buttons may vary according to the
model of the machine.
• Prewash
APrewashisonlyworthwhileforheavilysoiledlaundry.Not
usingthePrewashwillsaveenergy,water,detergentand
time.
CPrewashwithoutdetergentisrecommendedfortulle
and curtains.
• Quick Wash
This function can be used in Cottons and Synthetics
programmes.Itdecreasesthewashingtimesforlightly
soiled laundries and also the number of rinsing steps.
CWhen you select this function, load your machine
with half of the maximum laundry specified in the
programme table.
• Rinse Plus
This function enables the machine to make another rinsing
in addition to the one already made after the main wash.
Thus, the risk for sensitive skins (babies, allergic skins, etc.)
to be effected by the minimal detergent remnants on the
laundry can be reduced.
• Anti-Creasing
This function creases the clothes lesser when they are being
washed. Drum movement is reduced and spin speed is
limitedtopreventcreasing.Inaddition,washingisdonewith
a higher water level.
• Rinse Hold
Ifyouarenotgoingtounloadyourclothesimmediatelyafter
the programme completes, you can use rinse hold function
to keep your laundry in the final rinsing water in order to
prevent them from getting wrinkled when there is no water
inthemachine.PressStart/Pausebuttonafterthisprocess
if you want to drain the water without spinning your laundry.
Programmewillresumeandcompleteafterdrainingthe
water.
Ifyouwanttospinthelaundryheldinwater,adjusttheSpin
SpeedandpressStart/Pausebutton.
Programresumes.Waterisdrained,laundryisspunandthe
programme is completed.
• Pet hair removal
This function helps to remove pet hair that remain on your
garments more effectively.
Whenyouselectthisfunction,PrewashandExtraRinse
steps are added to the normal programme. Thus, washing
is performed with more water (30%) and the pet hair is
removed more effectively.
AWARNING: Never wash your pets in the washing
machine.
Delayed Start
With the Delayed Start function the startup of the
programme may be delayed up to 19 hours. Delayed start
time can be increased by increments of 1 hour.
CDo not use liquid detergents when you set Delayed
Start! There is the risk of staining of the clothes.
1.Opentheloadingdoor,placethelaundryandput
detergent, etc.
2. Select the washing programme, temperature, spin speed
and, if required, the auxiliary functions.
3. Set the desired time by pressing the Delayed Start button.
4.PressStart/Pausebutton.Thedelayedstarttimeyou
havesetisdisplayed.Delayedstartcountdownstarts.“_”
symbol next to the delayed start time moves up and down
on the display.
CAdditional laundry may be loaded during the delayed
start period.
5. At the end of the countdown, duration of the selected
programmewillbedisplayed.“_”symbolwilldisappear
and the selected programme will start.
Changing the Delayed Start period
Ifyouwanttochangethetimeduringcountdown:
1.PressDelayedStartbutton.Timewillincreaseby1hour
each time you press the button.
2.Ifyouwanttodecreasethedelayedstarttime,press
Delayed Start button repeatedly until the desired delayed
start time appears on the display.
Canceling the Delayed Start function
Ifyouwanttocancelthedelayedstartcountdownandstart
the programme immediately:
1. Set the Delayed Start period to zero or turn the
ProgrammeSelectionknobtoanyprogramme.Thus,
Delayed Start function will be canceled. The End/Cancel
light flashes continuously.
2. Then, select the programme you want to run again.
3.PressStart/Pausebuttontostarttheprogramme.

15 / EN Washing Machine / User’s Manual
4.11 Starting the programme
1.PressStart/Pausebuttontostarttheprogramme.
2.Programmefollow-uplightshowingthestartupofthe
programme will turn on.
CIfnoprogrammeisstartedornobuttonispressedwithin
1 minute during programme selection process, the
machinewillswitchtoPausemodeandtheillumination
level of the temperature, speed and loading door indicator
lightswilldim.Otherindicatorlightsandindicatorswill
turnoff.OncetheProgrammeSelectionknobisrotatedor
any button is pressed, indicator lights and indicators will
turn on again.
4.12 Child Lock
UseChildLockfunctiontopreventchildrenfromtampering
with the machine. Thus you can avoid any changes in a
running programme.
CIftheProgrammeSelectionknobisturnedwhentheChild
Lockisactive,"Con"appearsonthedisplay.TheChild
Lock does not allow any change in the programmes and
the selected temperature, speed and auxiliary functions.
Even if another programme is selected with the
ProgrammeSelectionknobwhiletheChildLockisactive,
previously selected programme will continue running.
To activate the Child Lock:
1. and 2. Auxiliary Function buttons are pressed and held for
3 seconds. The lights on the 1st and 2nd Auxiliary Function
buttonswillflash,and"C03","C02","C01"willappearon
the display respectively while you keep the buttons pressed
for3seconds.Then,"Con"willappearonthedisplay
indicatingthattheChildLockisactivated.Ifyoupressany
buttonorturntheProgrammeSelectionknobwhentheChild
Lock is active, same phrase will appear on the display. The
lights on the 1st and 2nd auxiliary function buttons that are
used to deactivate the Child Lock will blink 3 times.
To deactivate the Child Lock:
Pressandhold1st and 2nd auxiliary function buttons for 3
seconds while any programme is running. The lights on the
1st and 2ndAuxiliaryFunctionbuttonswillflash,and"C03",
"C02","C01"willappearonthedisplayrespectivelywhile
youkeepthebuttonspressedfor3seconds.Then,"COFF"
will appear on the display indicating that the Child Lock is
deactivated.
C
Inadditiontothemethodabove,todeactivatetheChild
Lock,switchtheProgrammeSelectionknobtoOn/
Offpositionwhennoprogrammeisrunning,andselect
another programme.
Child Lock is not deactivated after power failures or
when the machine is unplugged.
4.13 Progress of programme
Progressofarunningprogrammecanbefollowedfromthe
ProgrammeFollow-upindicator.Atthebeginningofevery
programme step, the relevant indicator light will turn on and
light of the completed step will turn off.
You can change the auxiliary functions, speed and
temperature settings without stopping the programme flow
while the programme is running. To do this, the change
you are going to make must be in a step after the running
programmestep.Ifthechangeisnotcompatible,relevant
lights will flash for 3 times.
CIfthemachinedoesnotpasstothespinningstep,Rinse
Hold function might be active or the automatic unbalanced
load detection system might be activated due to the
unbalanced distribution of the laundry in the machine.
4.14 Loading door lock
There is a locking system on the loading door of the
machine that prevents opening of the door in cases when
the water level is unsuitable.
Loading door light will start flashing when the machine
isswitchedtoPausemode.Machinechecksthelevelof
thewaterinside.Ifthelevelissuitable,LoadingDoorlight
illuminates steadily within 1-2 minutes and the loading door
can be opened.
Ifthelevelisunsuitable,LoadingDoorlightturnsoffandthe
loadingdoorcannotbeopened.Ifyouareobligedtoopen
the Loading Door while the Loading Door light is off, you
havetocancelthecurrentprogramme;see"Cancelingthe
programme".
4.15 Changing the selections after programme
has started
Switching the machine to pause mode
PresstheStart/Pausebuttontoswitchthemachineto
pause mode while a programme is running. The light of
the step which the machine is in starts flashing in the
ProgrammeFollow-upindicatortoshowthatthemachine
has been switched to the pause mode.
Also, when the loading door is ready to be opened, Loading
Door light will also illuminate continuously in addition to the
programme step light.
Changing the auxiliary function, speed and
temperature
Depending on the step the programme has reached, you
cancanceloractivatetheauxiliaryfunctions;see,"Auxiliary
functionselection".
You may also change the speed and temperature settings;
see,"Spinspeedselection"and"Temperatureselection".
CIfnochangeisallowed,therelevantlightwillflashfor3
times.
Adding or taking out laundry
1.PressStart/Pausebuttontoswitchthemachineto
pause mode. The programme follow-up light of the
relevant step during which the machine was switched into
the pause mode will flash.
2. Wait until the Loading Door can be opened.
3.OpentheLoadingDoorandaddortakeoutthelaundry.
4. Close the Loading Door.
5. Make changes in auxiliary functions, temperature and
speed settings if necessary.
6.PressStart/Pausebuttontostartthemachine.
4.16 Cancelling the programme
Tocanceltheprogramme,turntheProgrammeSelection
knobtoselectanotherprogramme.Previousprogramme
will be cancelled. End / Cancel light will flash continuously to
notify that the programme has been canceled.
Pumpfunctionisactivatedfor1-2minutesregardlessofthe
programme step, and whether there is water in the machine
or not. After this period, your machine will be ready to start
with the first step of the new programme.

16 / EN Washing Machine / User’s Manual
CDepending on the step where the programme was
canceled in, you may have to put detergent and softener
again for the programme you have selected anew.
4.17 End of programme
“End”appearsonthedisplayattheendoftheprogramme.
1. Wait until the loading door light illuminates steadily.
2.PressOn/Offbuttontoswitchoffthemachine.
3. Take out your laundry and close the loading door. Your
machine is ready for the next washing cycle.
4.18 Your machine is equipped with a
"Standby Mode"
Incaseofnotstartinganyprogrammeorwaitingwithout
making any other operation when the machine is turned
onbyOn/Offbuttonandwhileitisinselectionsteporif
no other operation is performed approximately 2 minutes
after the programme you selected has come to an end,
your machine will automatically switch to energy saving
mode. Brightness of indicator lights will decrease. Also,
if your product is equipped with a display showing the
programmeduration,thisdisplaywillcompletelyturnoff.In
caseofrotatingtheProgrammeSelectionknoborpressing
any button, lights and display will restore to their previous
condition. Your selections made while exiting the energy
saving mode may change. Check the appropriateness of
your selections before starting the programme. Readjust if
necessary.This is not a fault.
3 After cleaning, replace the siphon back to its seating and
push its front section downwards to make sure that the
locking tab engages.
5.2 Cleaning the loading door and the drum
For products with drum cleaning programme, please see
Operatingtheproduct-Programmes.
For products without drum cleaning, follow the below steps
to clean the drum:
Select Additional Water or Extra Rinse auxiliary
functions.UseaCottonsprogramme without pre-wash.
Set the temperature to the level recommended on the
drum cleaning agent which can be provided from
authorized services. Apply this procedure without any
laundry in the product. Before starting the programme,
put 1 pouch of special drum cleaning agent (if the special
agent could not be supplied, put max. 100 g of powder
anti-limescale) into the main wash detergent compartment
(compartmentno.“2”).Iftheanti-limescaleisintabletform,
putonlyonetabletintothemainwashcompartmentno.“2”.
Dry the inside of the bellow with a clean piece of cloth after
the programme has come to an end.
CRepeat Drum Cleaning process in every 2 months.
Useananti-limescalesuitableforthewashing
machines.
After every washing check that no foreign substance is left
in the drum.
Iftheholesonthebellowshowninthefigureisblocked,
open the holes using a toothpick.
CForeign metal substances will cause rust stains in the
drum. Clean the stains on the drum surface by using
cleaning agents for stainless steel. Never use steel wool
or wire wool.
AWARNING: Never use sponge or scrub materials.
These will damage the painted and plastic surfaces.
5.3 Cleaning the body and control panel
Wipe the body of the machine with soapy water or non-
corrosive mild gel detergents as necessary, and dry with a
soft cloth.
Useonlyasoftanddampclothtocleanthecontrolpanel.
5 Maintenance and cleaning
Service life of the product extends and frequently faced
problems decrease if cleaned at regular intervals.
5.1 Cleaning the detergent drawer
Clean the detergent drawer at regular intervals (every
4-5 washing cycles) as shown below in order to prevent
accumulation of powder detergent in time.
Lift the rear part of the siphon to remove it as illustrated.
C
Ifmorethannormalamountofwaterandsoftener
mixture starts to gather in the softener compartment,
clean the siphon.
2 Wash the detergent drawer and the siphon with plenty of
lukewarm water in a washbasin. Wear protective gloves
or use an appropriate brush to avoid touching of the
residues in the drawer with your skin when cleaning.

17 / EN Washing Machine / User’s Manual
5.4 Cleaning the water intake filters
There is a filter at the end of each water intake valve at the
rear of the machine and also at the end of each water intake
hose where they are connected to the tap. These filters
prevent foreign substances and dirt in the water to enter the
washing machine. Filters should be cleaned as they do get
dirty.
1 Close the taps.
2 Remove the nuts of the water intake hoses to access
the filters on the water intake valves. Clean them with an
appropriatebrush.Ifthefiltersaretoodirty,takethemout
by means of pliers and clean them.
3 Take out the filters on the flat ends of the water intake
hoses together with the gaskets and clean thoroughly
under running water.
4 Replace the gaskets and filters carefully in their places
and tighten the hose nuts by hand.
5.5 Draining remaining water and cleaning the
pump filter
The filter system in your machine prevents solid items
such as buttons, coins and fabric fibers clogging the pump
impeller during discharge of washing water. Thus, the water
will be discharged without any problem and the service life
of the pump will extend.
Ifthemachinefailstodrainwater,thepumpfilterisclogged.
Filter must be cleaned whenever it is clogged or in every 3
months. Water must be drained off first to clean the pump
filter.
Inaddition,priortotransportingthemachine(e.g.,when
moving to another house) and in case of freezing of the
water, water may have to be drained completely.
AWARNING: Foreign substances left in the pump
filter may damage your machine or may cause noise
problem.
WARNING: Iftheproductisnotinuse,turnthetap
off, detach the supply hose and drain the water inside
the machine against any freezing possibility in the
region of installation.
WARNING: After each use close the supply hose tap
of the product.
In order to clean the dirty filter and discharge the
water:
1 Unplugthemachinetocutoffthesupplypower.
AWARNING: Temperature of the water inside the
machine may rise up to 90 ºC. To avoid burning risk,
clean the filter after the water in the machine cools
down.
2 Openthefiltercap.
3 Some of our products have emergency draining hose and
some does not have. Follow the steps below to discharge
the water.
Discharging the water when the product does not
have an emergency draining hose:
a Placealargecontainerinfrontofthefiltertocatchwater
from the filter.
b Loosen pump filter (anticlockwise) until water starts to
flow. Fill the flowing water into the container you have
placed in front of the filter. Always keep a piece of cloth
handy to absorb any spilled water.
c When the water inside the machine is finished, take out
the filter completely by turning it.
4 Clean any residues inside the filter as well as fibers, if
any, around the pump impeller region.
5 Installthefilter.
6 Ifthefiltercapiscomposedoftwopieces,closethefilter
capbypressingonthetab.Ifitisonepiece,seatthetabs
in the lower part into their places first, and then press the
upper part to close.

18 / EN Washing Machine / User’s Manual
6 Technical specifications
Complying Commission Delegated Regulation (EU) No 1061/2010
Supplier name or trademark
Model name
Rated capacity (kg)
Energy efficiencyclass/ScalefromA+++(HighestEfficiency)toD(LowestEfficiency)
Annual Energy Consumption (kWh) (1)
Energy consumption ofthestandard60°Ccottonprogrammeatfullload(kWh)
Energyconsumptionofthestandard60°Ccottonprogramme at partial load (kWh)
Energy consumption of the standard 40°Ccottonprogrammeatpartialload(kWh)
Powerconsumption in ‘off-mode’ (W)
Powerconsumptionin‘left-onmode’ (W)
Annual Water Consumption (l) (2)
Spin-drying efficiency class / Scale from A (Highest Efficiency) to G (Lowest Efficiency)
Maximum spin speed (rpm)
Remaining moisture Content (%)
Standard cotton programme (3)
Programmetimeofthestandard60°Ccottonprogrammeat full load (min)
Programmetimeofthestandard60°C cotton programme at partial load (min)
Programmetimeofthestandard40°Ccottonprogrammeatpartialload(min)
Duration of the left-on mode (min)
Airborne acoustical noise emissions washing/spinning (dB)
Built-in
Rated capacity (kg)
Height (cm)
Width (cm)
Depth (cm)
Net weight (±4 kg.)
Beko
WCC 8632 XW/ WCC 8632 XS/ WCC 8632 XB
8
A+++
192
1.070
0.695
0.680
0.250
1.000
11000
B
1200
53
CottonEco60°Cand40°C
194
173
173
N/A
56/72
No
8
84
60
56.5
74
Single Water inlet / Double Water inlet •/-
•Available
Electrical input (V/Hz) 220-240 V~/ 50Hz
Total current (A) 10
Total power (W) 2000-2350
Main model code 9211
(1)EnergyConsumptionbasedon220standardwashingcyclesforcottonprogrammesat60°Cand40°Catfullandpartialload,andtheconsumptionof
the low-power modes. Actual energy consumption will depend on how the appliance is used.
(2)Waterconsumptionbasedon220standardwashingcyclesforcottonprogrammesat60°Cand40°Catfullandpartialload.Actualwaterconsumption
will depend on how the appliance is used.
(3)“Standard60°Ccottonprogramme”andthe“standard40°Ccottonprogramme”arethestandardwashingprogrammestowhichtheinformationinthe
label and the fiche relates and these programmes are suitable to clean normally soiled cotton laundry and that they are the most efficient programmes in
terms of combined energy and water consumption.
Technical specifications may be changed without prior notice to improve the quality of the product.

19 / EN Washing Machine / User’s Manual
7 Troubleshooting
Program does not start after closing the door.
•Start/Pause/Cancelbuttonwasnotpressed.>>>*Press the Start / Pause / Cancel button.
Programme cannot be started or selected.
•Washingmachinehasswitchedtoselfprotectionmodeduetoasupplyproblem(linevoltage,waterpressure,etc.).>>>To cancel the
programme, turn the Programme Selection knob to select another programme. Previous programme will be cancelled. (See “Canceling
the programme”)
Water in the machine.
•Somewatermighthaveremainedintheproductduetothequalitycontrolprocessesintheproduction.>>>This is not a failure; water is
not harmful to the machine.
Machine vibrates or makes noise.
•Machinemightbestandingunbalanced.>>>Adjust the feet to level the machine.
•Ahardsubstancemighthaveenteredintothepumpfilter.>>>Clean the pump filter.
•Transportationsafetyboltsarenotremoved.>>>Remove the transportation safety bolts.
•Laundryquantityinthemachinemightbetoolittle.>>>Add more laundry to the machine.
•Machinemightbeoverloadedwithlaundry.>>>Take out some of the laundry from the machine or distribute the load by hand to
balance it homogenously in the machine.
•Machinemightbeleaningonarigiditem.>>>Make sure that the machine is not leaning on anything.
Machine stopped shortly after the programme started.
•Machinemighthavestoppedtemporarilyduetolowvoltage.>>>It will resume running when the voltage restores to the normal level.
Programme time does not countdown. (On models with display)
•Timermaystopduringwaterintake.>>>Timer indicator will not countdown until the machine takes in adequate amount of water. The
machine will wait until there is sufficient amount of water to avoid poor washing results due to lack of water. Timer indicator will resume
countdown after this.
•Timermaystopduringheatingstep.>>>Timer indicator will not countdown until the machine reaches the selected temperature.
•Timermaystopduringspinningstep.>>>Automatic unbalanced load detection system might be activated due to the unbalanced
distribution of the laundry in the drum.
•Machinedoesnotswitchtospinningstepwhenthelaundryisnotevenlydistributedinthedrumtopreventanydamagetothemachineand
to its surrounding environment. Laundry should be rearranged and re-spun.
Foam is overflowing from the detergent drawer.
•Toomuchdetergentisused.>>>Mix 1 tablespoonful softener and ½ l water and pour into the main wash compartment of the
detergent drawer.
•Putdetergentintothemachinesuitablefortheprogrammesandmaximumloadsindicatedinthe“Programmeandconsumptiontable”.
When you use additional chemicals (stain removers, bleachs and etc), reduce the amount of detergent.
Laundry remains wet at the end of the programme
•Excessivefoammighthaveoccurredandautomaticfoamabsorptionsystemmighthavebeenactivatedduetotoomuchdetergentusage.
>>>Use recommended amount of detergent.
•Machinedoesnotswitchtospinningstepwhenthelaundryisnotevenlydistributedinthedrumtopreventanydamagetothemachineand
to its surrounding environment. Laundry should be rearranged and re-spun.
Awarning: Ifyoucannoteliminatetheproblemalthoughyoufollowtheinstructionsinthissection,consultyourdealerorthe
Authorized Service Agent. Never try to repair a nonfunctional product yourself.

20 / EN Washing Machine / User’s Manual
Dark wash
(Darkcare)
Dark wash
(Darkcare)
Cottons Pre-wash Main
wash
Rinse Wash Spin
Drain
(Pump)
Anti-
creasing
Duvet
(Bedding)
Child-
proof lock
Hand
Wash
BabyProtect Cotton
Eco
Woollens
Delicate Pet hair
removal
Daily
Lingerie
expres 14
Super short
express
Daily
express
Rinse hold Start/
Pause
No spin Quick
wash
Finished Cold Self
Clean
Temperature
Super 40 Extra rinse
(Rinse Plus)
Freshen
up
Jeans Time delay Intensive Fasihon
care
Mixed 40
(Mix40)
Shirts Sport
mini 30
Eco Clean
Anti-
allergic
On/Off
Door Ready
PHR + Hygiene 20
BabyProtect +
Synthetics
Woollens
Indicative values for Synthetics programmes (EN)
Load (kg)
Water
Consumption (l)
Energy
Consumption
(kWh)
Programme
Duration (min) *
Remaining Moisture
Content (%) **
Remaining Moisture
Content (%) **
≤ 1000 rpm > 1000 rpm
Synthetics 60 460 1.00 01:50 45 40
Synthetics 40 460 0.58 01:40 45 40
* You can see the washing time of the programme you have selected on the display of the machine. It is normal that small
differences may occur between the time shown on the display and the real washing time.
** Remaining moisture content values may differ according to the selected spin speed.
This manual suits for next models
2
Table of contents
Other Beko Washer manuals

Beko
Beko WTV6712BC1 User manual

Beko
Beko WTV 9612 XS User manual

Beko
Beko WTL94121W User manual

Beko
Beko WITC 7612 B0W User manual

Beko
Beko WTV71483CSB1 User manual

Beko
Beko WTL104151W User manual

Beko
Beko WI1573 User manual

Beko
Beko WMB 50601 Y+ User manual

Beko
Beko EV6600 User manual

Beko
Beko WMB 814431 DLA User manual

Beko
Beko WTV9636XS0S User manual

Beko
Beko WTK72041B User manual

Beko
Beko WTE 6511 BW User manual

Beko
Beko WTL 8519 PGS+ User manual

Beko
Beko WM 6111 W Operating instructions

Beko
Beko WX 943440B User manual

Beko
Beko WTV6611BC1 User manual

Beko
Beko WMB 71443 LA User manual

Beko
Beko WTE 7512 B0B User manual

Beko
Beko WUE6511BS User manual