Bell&Howell Fun Flix DV30HD User manual

1
INSTRUCTION MANUAL

2
Precautions……………………………………………………...4
Disclaimer………………………………………………………5
PREPARING FOR USE….……….…………………………………….6
Parts of the Camera…..……………………………………… 7-8
Inserting the Battery and SD Card…………………………..9-10
BASIC OPERATION……..……………………………………………11
Powering the Camcorder On and Off……………………….....11
Setting the Date and Time……………………………………..11
Formatting the SD Card……………………………………….12
Changing Modes………………………………………………13
Screen Icons Explanation……………………………………..15
MENU…………………………………………………………………..19
Setup Menu……………………………………………………19
Video Mode Menu……………………………………………..20
Photo Capture Mode Menu……………………………………………...21
Playback Mode Menu……………………………………….…………..22
VIDEO RECORDING………………………………………..………..24
SHOOTIGA PHOTO………………………………………..………...24
PLAYBACK………………………………………..…………………...25
Video Clips………………………………………...…………..26

3
Photos………………………………………………………….26
CONNECTING TO HDTV……………………………………………27
DOWNLOADING FILES TO COMPUTER………………………...27
PC CAMERA…………………………………………………………..28
SOFTWARE INSTALLATION……………………………………….28
CAMCORDER SPECIFICATIONS………………………………….30

4
Please read these operating instructions carefully in order to use
the camera correctly. Keep the instructions in a safe place after
reading so that you can refer to them later.
Precautions
Before using the camera, please ensure that you read and
understand the safety precautions described below. Always
ensure that the camera is operated correctly.
Do not point the camera directly into the sun or other intense
light sources which could damage your eyesight.
Do not try to open the case of the camera or attempt to modify
the camera in any way. Maintenance and repairs should be
carried out only by authorized service providers.
Keep the camera and its accessories out of the reach of
children and animals to prevent accidents or damage to the
camera.
If you notice smoke or a strange odor emitting from the camera,
turn the power off immediately. Take the camera to the nearest
authorized service center for repair. Do not attempt to repair
the camera on your own.

5
Use only the recommended power accessories. Use of power
sources not expressly recommended for this equipment may
lead to overheating, distortion of the equipment, fire, electrical
shock or other hazards.
Disclaimer
We assume no responsibility for damages suffered by the user or
third parties as a result of inappropriate handling of the product or
its accessories, or by their operational failure and by their use. We
reserve the right to make changes to this product and its
accessories without prior notice.

6
Factory Default Settings
To return to the factory default settings:
1) Press the OK/MENU button to enter the menu.
2) Use the Right button to enter the Setup menu.
3) Use the Down button to choose “Default Setting” and press the
OK/MENU button. ‘
4) Choose “Cancel” to cancel the request or choose “OK” to return
to the factory settings.
7
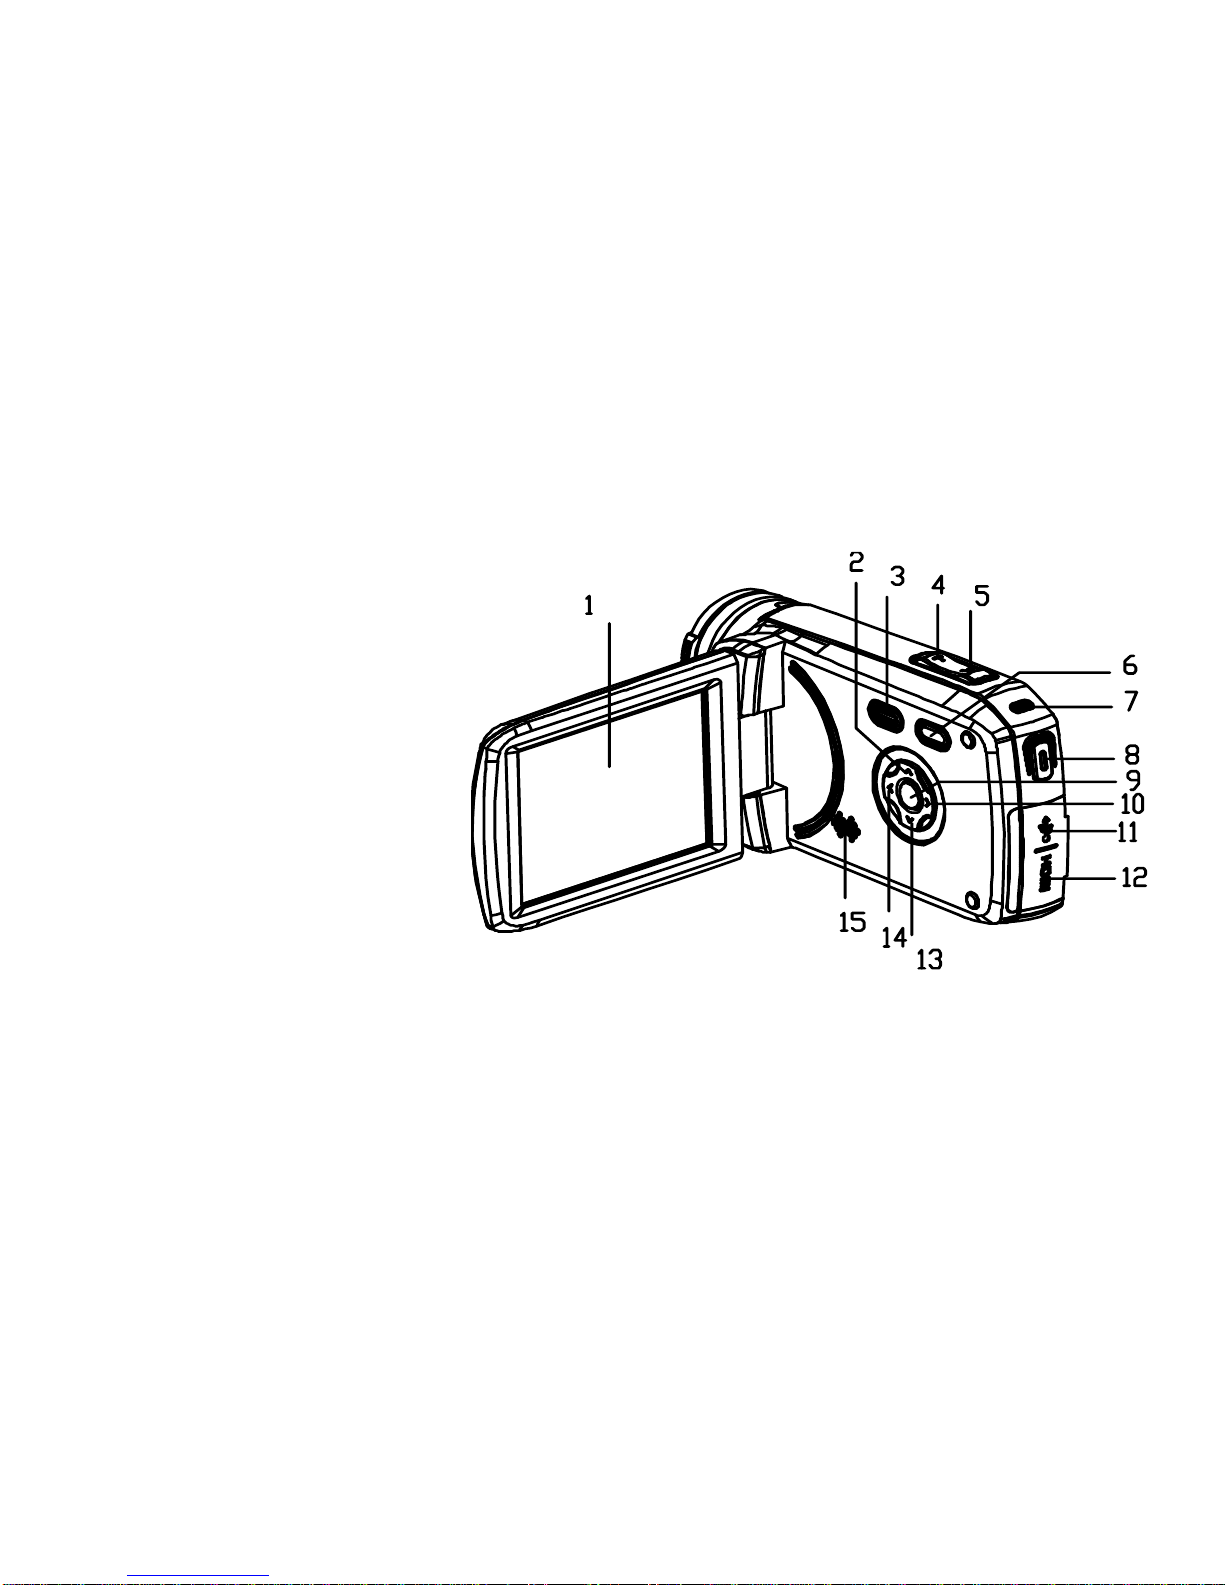
Preparation
Introduction
1) LCD Touch Screen
2) Up/Playback Button
3) Power Button
4) T/Zoom In Button
5) W/Zoom Out Button
6) Mode Button
7) Charging LED
8) Shutter Button
9) OK/MENU Button
10) Right/LED Lamp Button
11) USB Port
12) HDMI Port
13) Down/Delete Button
14) Left
15) Built-in Speaker

8
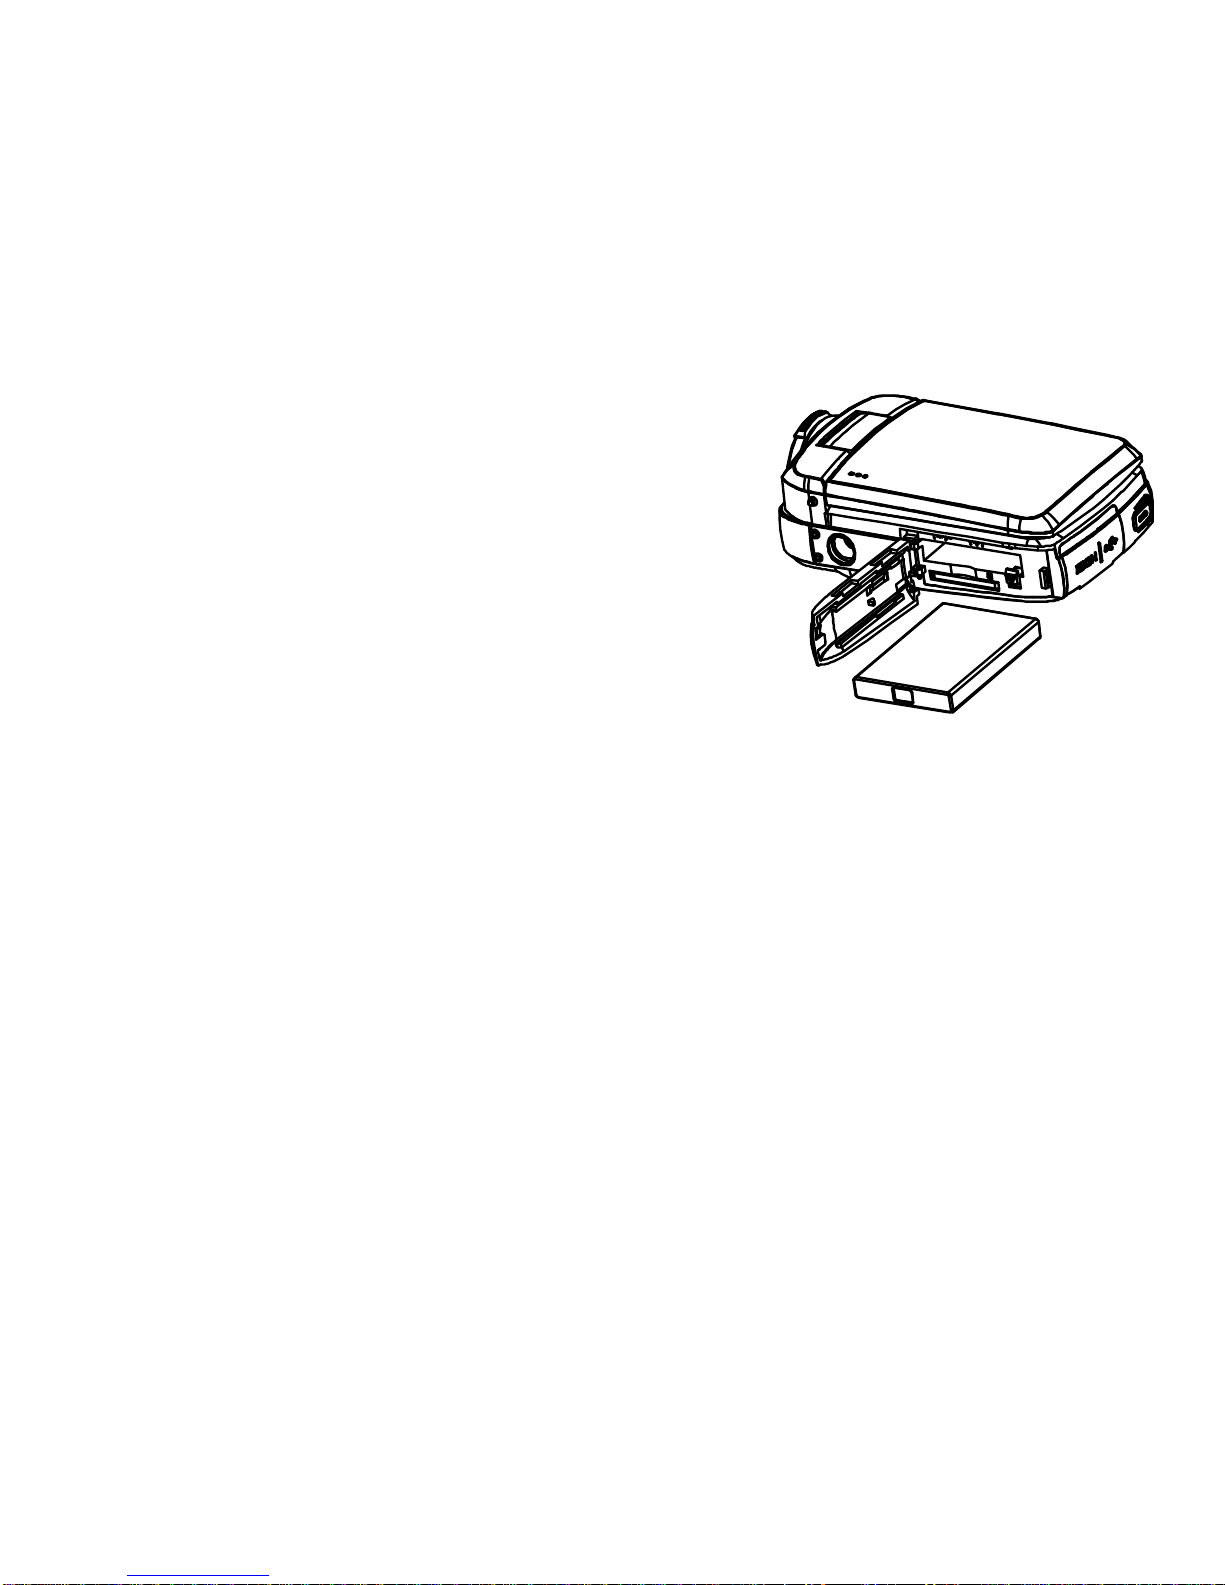
16) Lens
17) Built-in microphone
18) Self-timer LED
19) LED lamp
20) Wrist strap eyelet
21) Tripod slot
22) Battery compartment
23) Memory card slot
24) Battery/memory card cover
9
Inserting the Battery
1) Slide-open the battery/memory card
cover.
2) Insert the battery by the correct
direction until the battery latch locks
up the battery.
3) To remove the battery, slide the
battery latch and the battery will pop
out from the battery compartment.
Note:
(a) To charge the battery, when the battery is placed in the camera,
connect the DV with the computer via the USB cable. The
charging LED will illuminate in red color when charging and it
will extinguish when charging is completed. Please note that
the battery charging will only begin once the camera is powered
off.
(b) Please charge the battery for at least 6 hours on first use.
(c) It is normal for the temperature of the camcorder and battery to

10
increase after the battery has been used in a long period of
time.
Inserting an SD Card
1) Slide-open the battery/memory card cover.
2) Insert the memory card in the correct direction and press it
all the way through until a click sound is heard.
3) To remove the memory card, press down the memory card
again and the memory card will pop out from the memory
card slot.

11
Basic Operation
Powering the Camcorder On and Off
There are two ways to power the camcorder on and off.
1) The camcorder can be powered on by either flip-opening the
LCD screen or pressing the power button.
2) The camcorder can be powered off by either flip-closing the
LCD screen or pressing the power button.
Setting the Date and Time
1) Power the camcorder on.
2) Press the OK/MENU button to enter the main menu.
3) Use the Right button to enter the Setup menu and use the
Down
Button to move the indication bar on “Date” and
press the OK/MENU button to enter the setting .

12
There are three options to select from:
(a) On: To activate the date/time imprint.
(b) Off: To deactivate the date/time imprint.
(c) Set Date: To set the date and time.
--Use the Right and Left buttons to move to the preferred item.
--Use the Up and Down buttons to change the value.
--Press the OK/MENU button to confirm the setting.
Note:
You can directly press on the “Setup ” icon, “Date”, “On”, “No”
and “Set time” on the screen to access the same adjustments.
Formatting the SD Card
It is important to format the memory card for first time use. Please
note that all the data stored on the memory card will be deleted
including protected files, so please be sure to download or transfer
those files to your computer before the SD card is formatted.

13
1) Power the camcorder on.
2) Press the OK/MENU button to enter the main menu.
3) Use the Right button to enter the Setup menu and use the
Down
Button to move the indication bar to “Format” and
press the OK/MENU button to enter the setting .
4) Select “OK” to proceed with formatting or select “Cancel” to
cancel formatting.
Note:
You can directly press on the “Setup ” icon, “Format”, “OK”,
and “Cancel” on the screen to access the same adjustments.

14
Photo / Video / Playback Modes
Press the Mode button to switch between the modes (directly press
on the on the screen to access the same
adjustments).
Display
Title
Description
Photo Capture mode
For shooting photos
Video Capture mode
For recording video
Playback mode
For playback of media
15
Icons Explanation
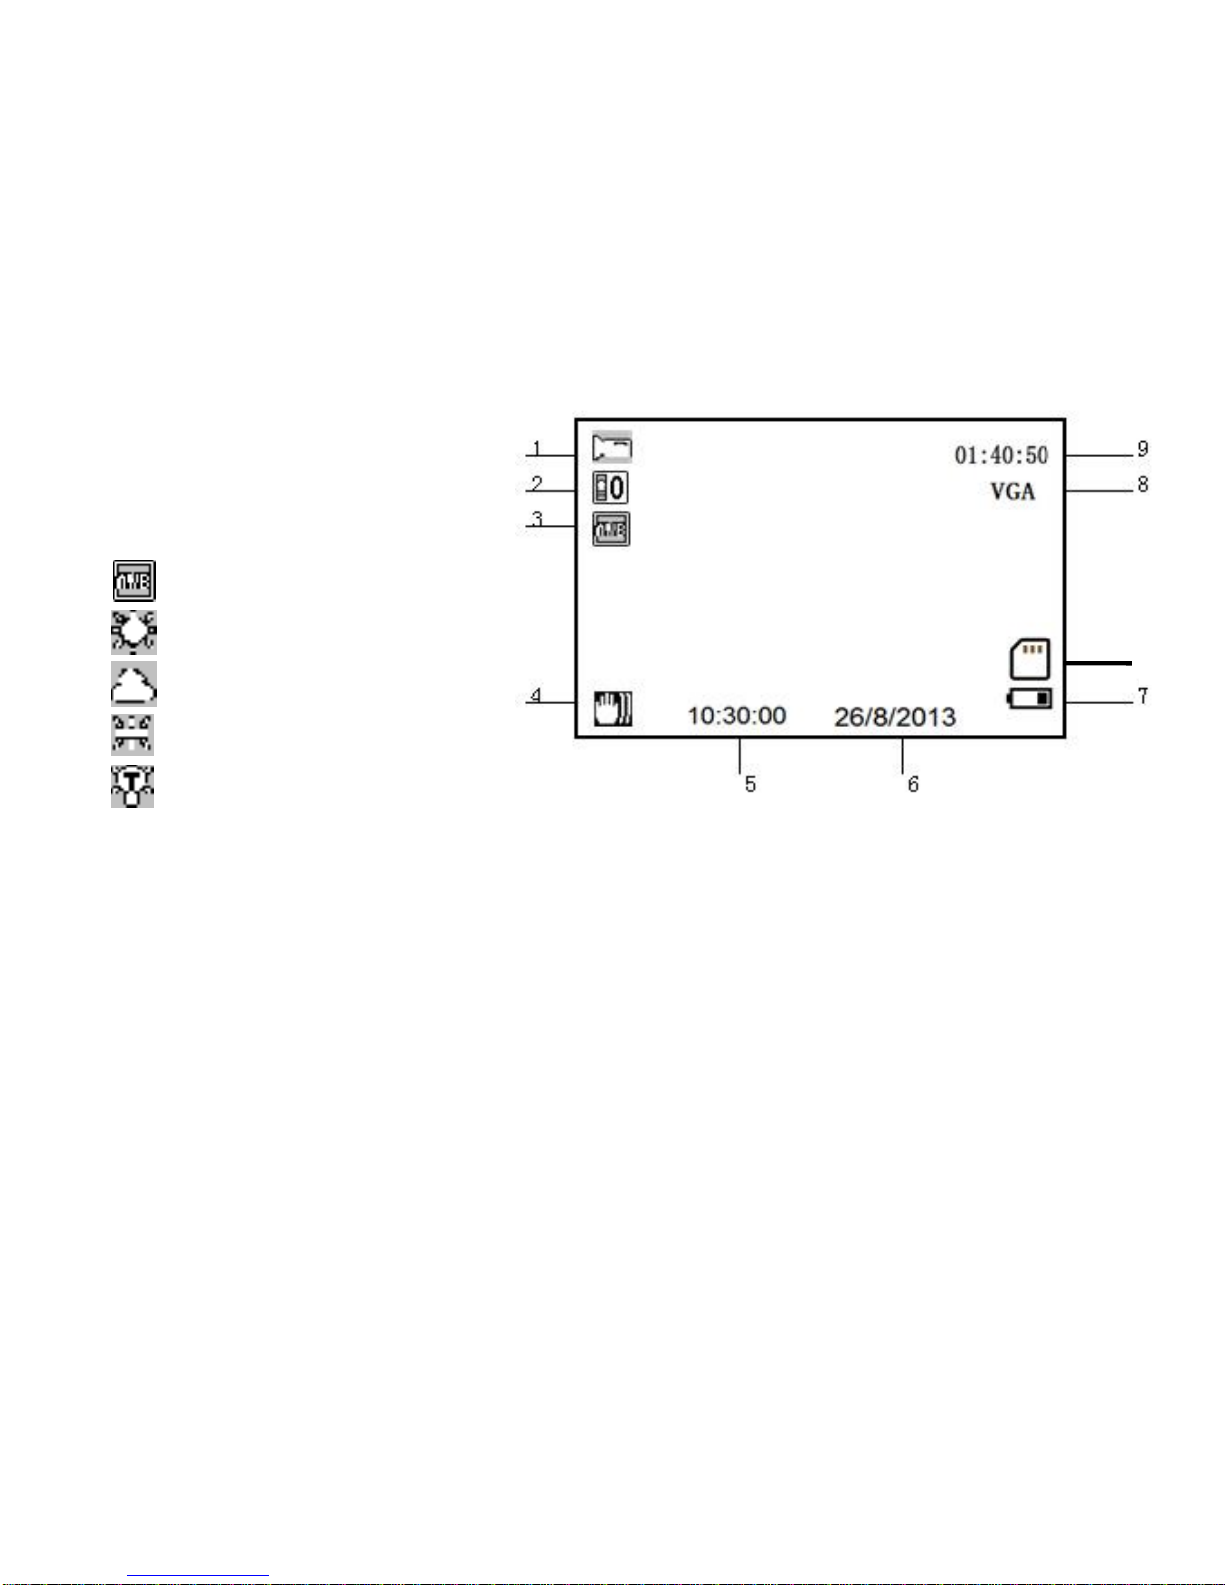
Video Mode
1) Video Mode Icon
2) Exposure Value
3) White Balance
Auto
Daylight
Cloudy
Fluorescent
Incandescent
4) Anti-Shake Image Stabilization Icon
5) Time
6) Date
7) Battery Power Level
8) Video Size
9) Estimated Available Video Recording Time
10) Memory Card Status
10
16
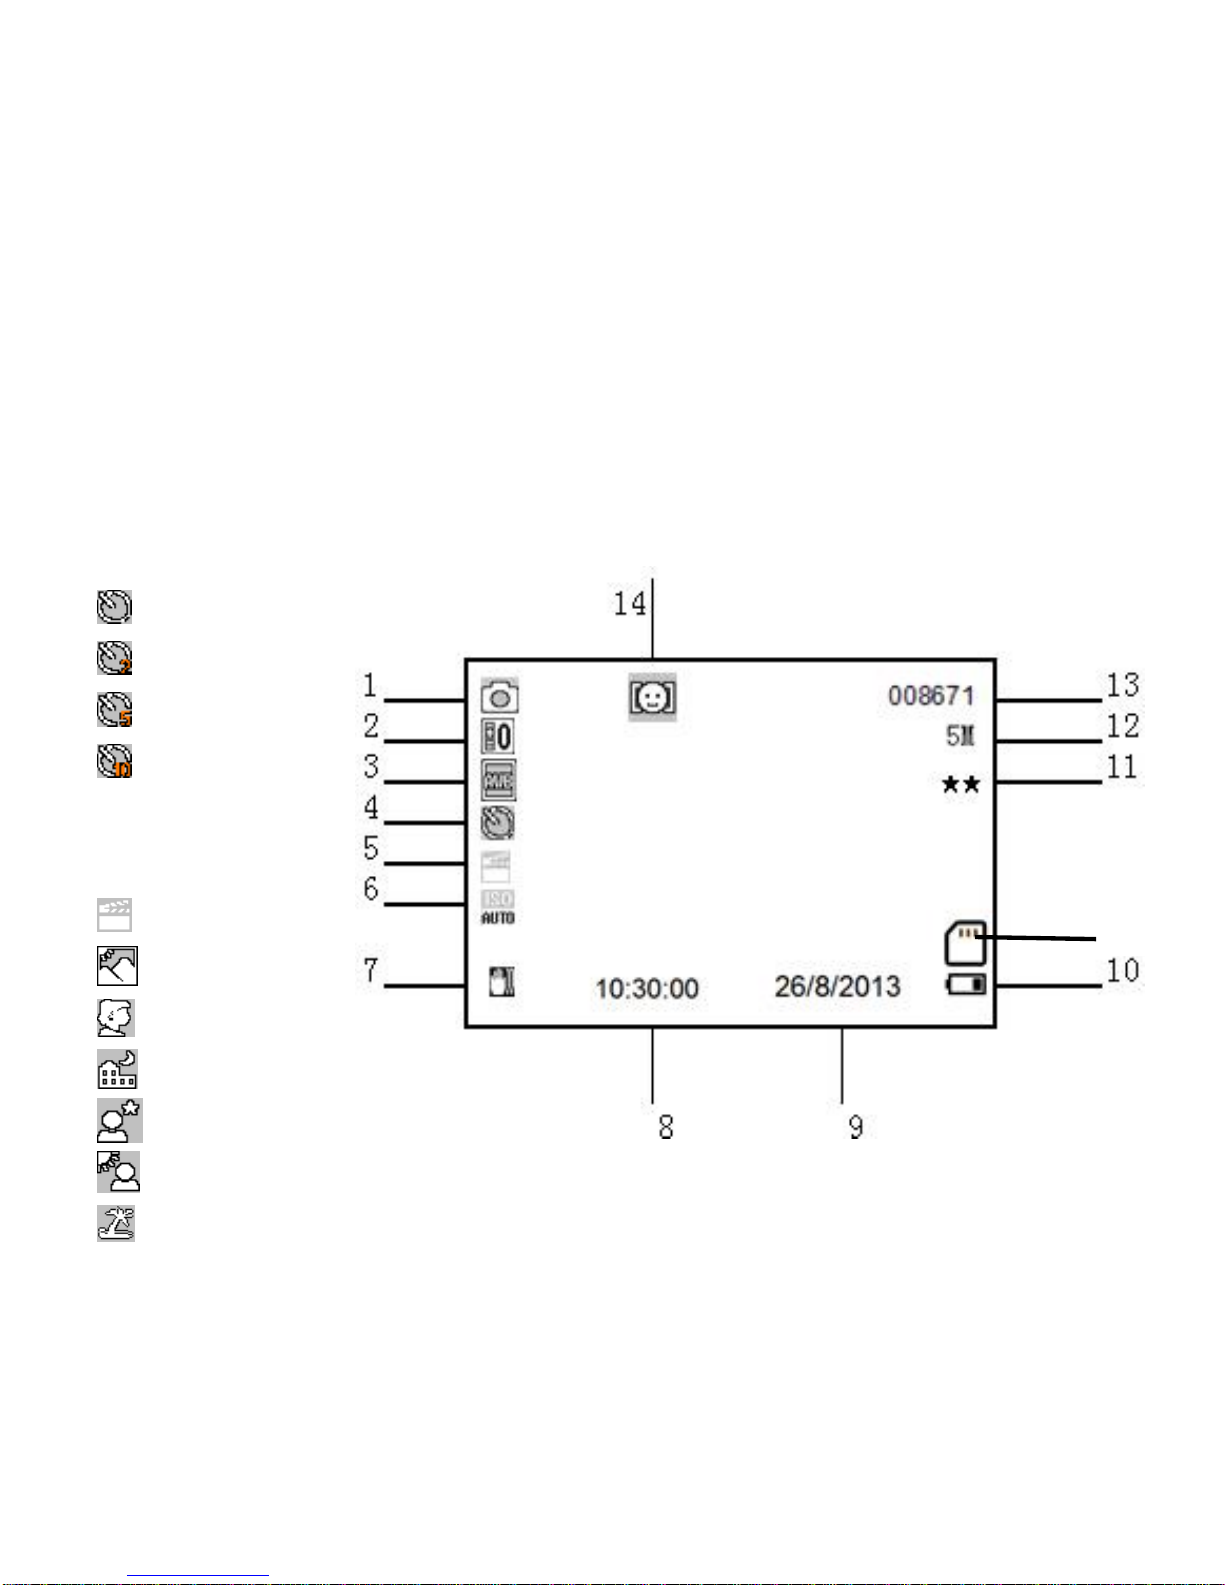
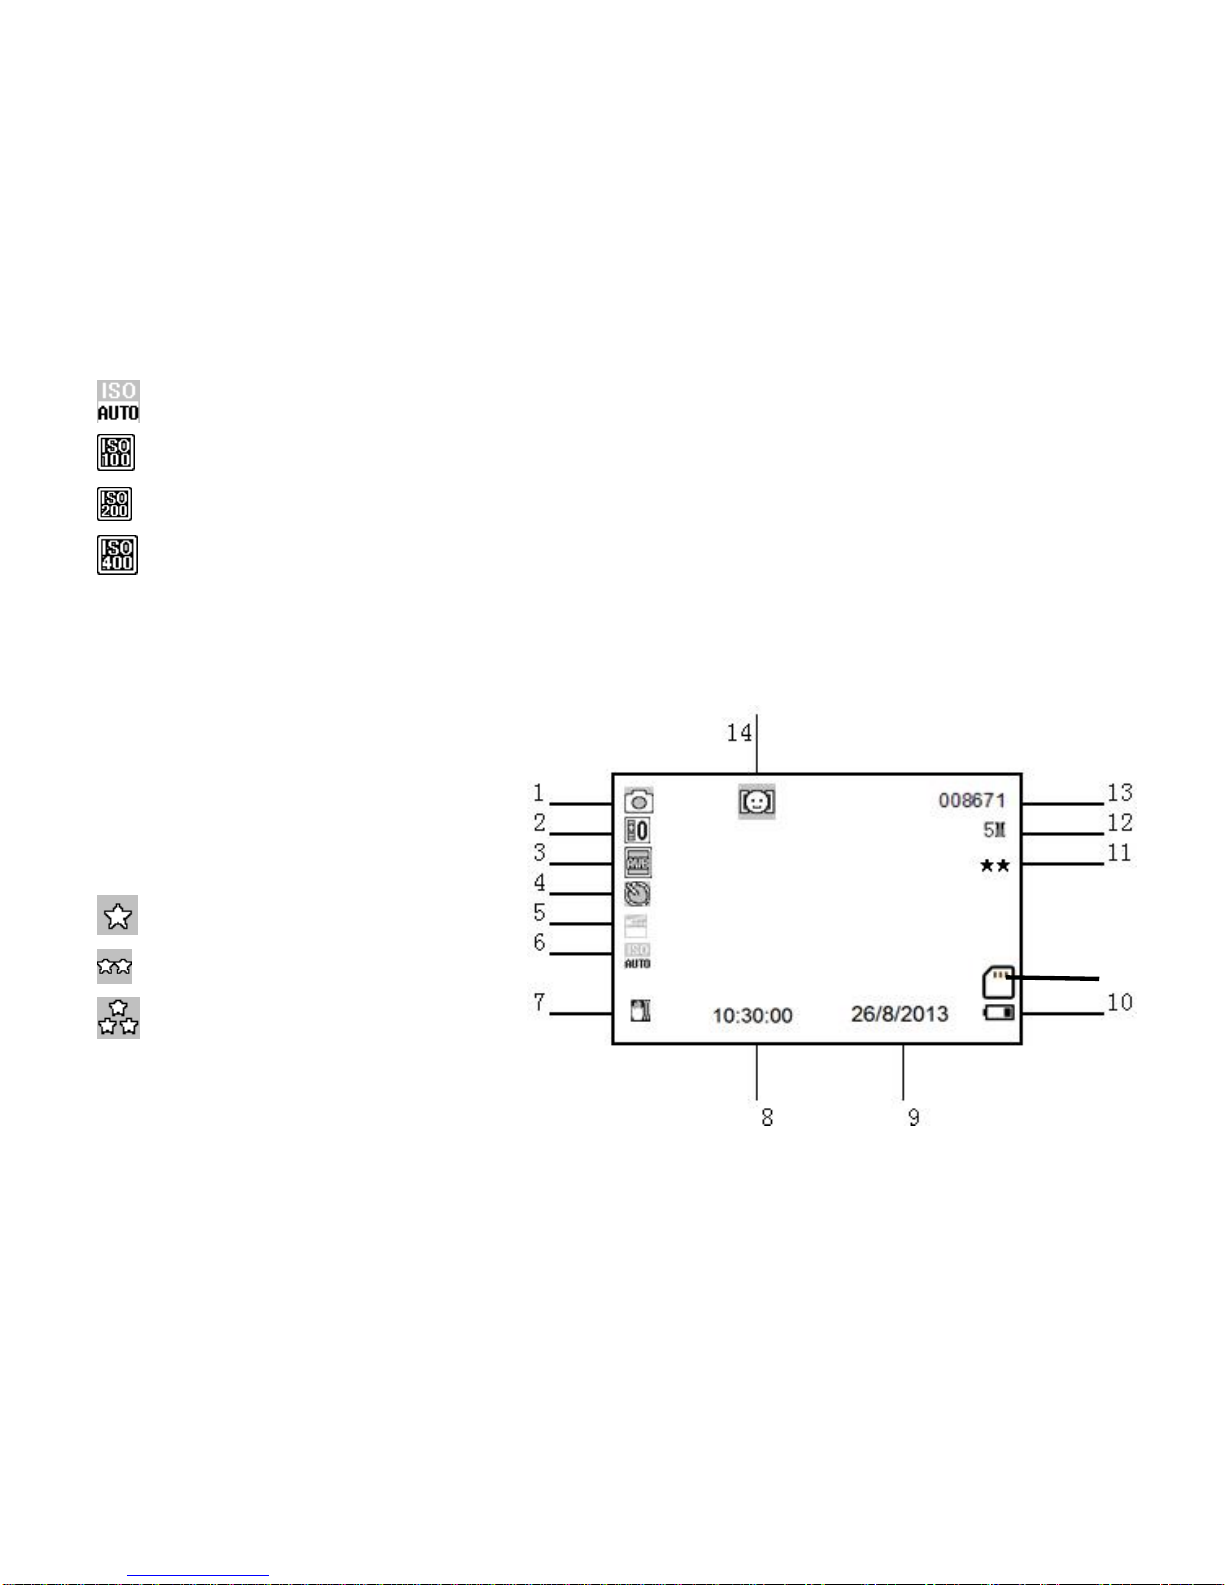
Photo Capture Mode
1) Photo Capture Mode Icon
2) Exposure Value
3) White Balance
4) Self-timer
Single
2s timer
5s timer
10s timer
5) Scene
Auto
Scenery
Portrait
Night Scenery
Night Portrait
High Sensitivity
Beach
15
17
6) ISO Value
Auto
ISO 100
ISO 200
ISO 400
7) Anti-Shake Image Stabilization Icon
8) Time
9) Date
10) Battery Power Level
11) Photo Quality
Normal
Fine
Super fine
12) Photo Resolution
13) Estimated Available Quantity of Photos
14) Face Detection Icon
15) Memory Card Inserted
15
18
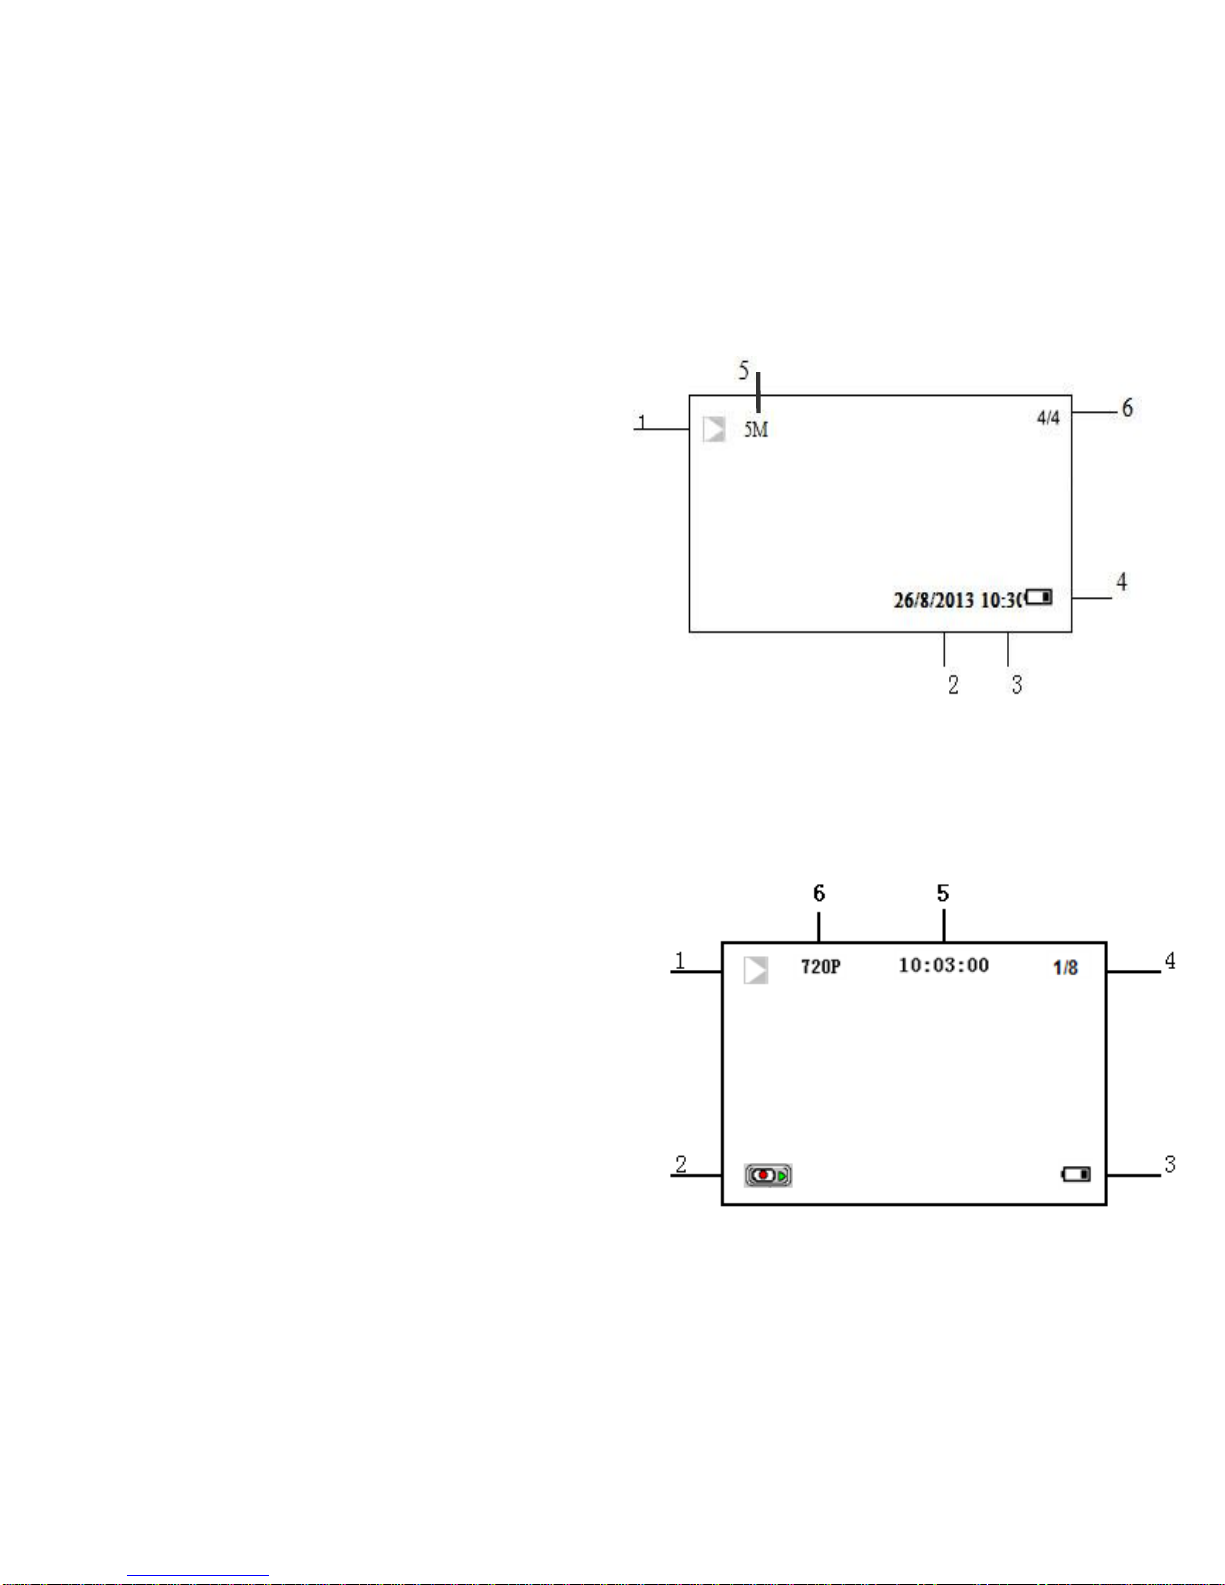
Playback Mode
For Photo
1) Playback Mode Icon
2) Date
3) Time
4) Battery Power Level
5) Photo Resolution
6) File Sequence Number/Total File Number
For Video
1) Playback Mode Icon
2) Video Clip Symbol
3) Battery Power Level
4) File Sequence Number/Total
File Number
5) Time
6) Video Resolution

19
Menu
Setup Menu
1) Press the OK/MENU button to enter the Setup menu.
2) Use the UP and DOWN buttons to select the preferred item and
press the OK/MENU button again to enter and exit the settings
menu.
Date (date / time / imprint)
(a) On: To enable date/time imprint
(b) Off: To disable the date/time import
(c) Set Date: To set the date/time
Auto Power Off
(a) 1 Minutes: Auto power off after 1 minute
(b) 3 Minutes: Auto power off after 3 minutes
(c) 5 Minutes: Auto power off after 5 minutes
(d) Off: Auto power off disabled
Beep Sound
(a) On: To enable keypress beep sound
(b) Off: To disable keypress beep sound
Language
English / French / Spanish / Portuguese / German /

20
Dutch / Italian
Frequency
50Hz / 60Hz
Format
(a) Cancel: Cancel the request to format the
memory card
(b) OK: Format the memory card
Default Setting
(a) Cancel: Cancel the request to return to factory
default settings
(b) OK: Return all settings to factory default settings
Video Mode Menu
Press the MODE button repeatedly or press on the mode icon
repeatedly to enter the video mode. Press the OK/MENU button to
enter the menu.
Table of contents


