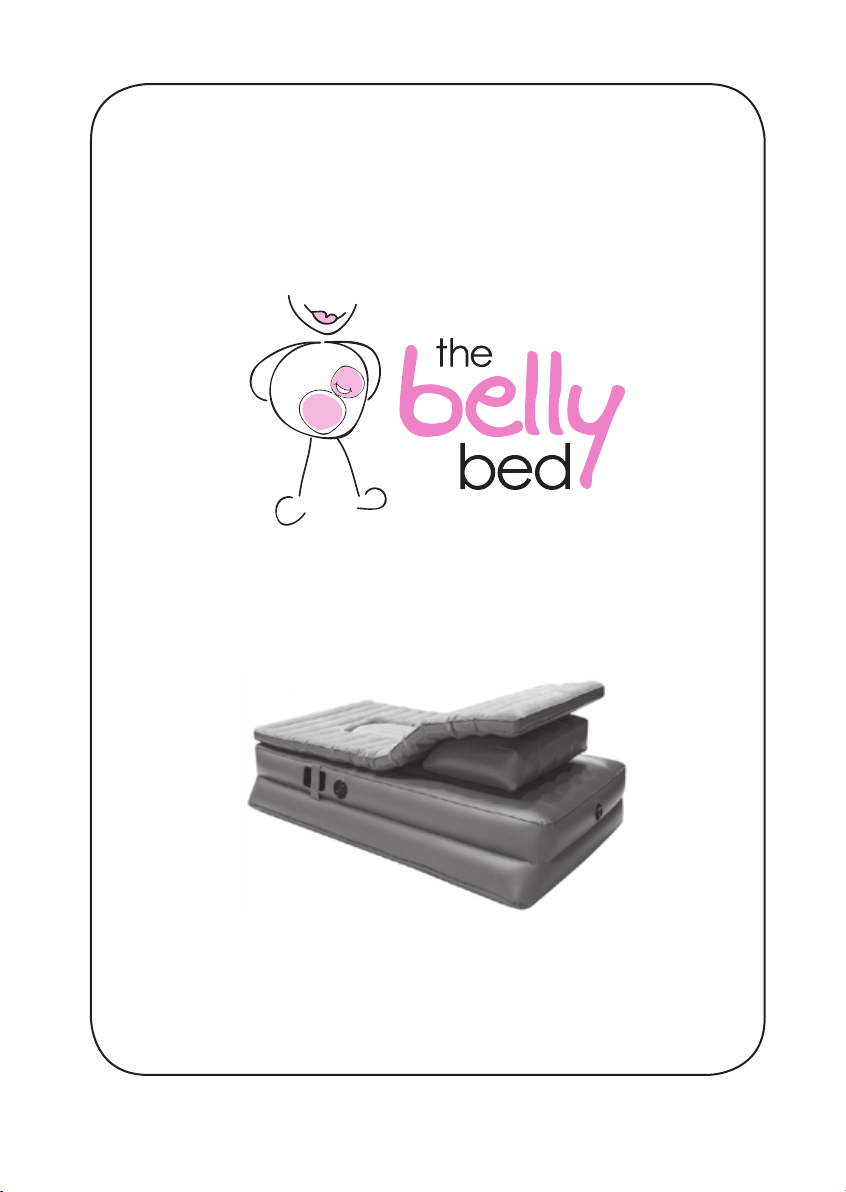
Belly Bed Snuggle Body Pillow User manual
The Belly Bed Pty Ltd.
ABN 91 127 885 474
PO Box 714 Rose Bay NSW 2030
Phone 1300 961 110
Fax (02) 93375822
Made in China
Instruction Manual

Page 13
Limited Warranty
The Belly Bed Pty. Ltd. warrants to the original purchaser
only when the Belly Bed is used for normal indoor sleeping
purposes, that the air bed will be fully guaranteed against
defects in material and workmanship for a period of one (1)
year from the date of purchase, provided further that the Belly
Bed has been operated according to the provided instructions.
(Included in your purchase is a repair kit with instructions.)
The air pump (exclusive of the hand held remote) will be
guaranteed to the original purchaser against defects in
materials and workmanship for a period of one (1) year from
the date of purchase provided the motor has been operated
according to the instructions. Our obligation under this
warranty shall be limited to the repair or exchange of any part
or parts which may prove defective under the conditions and
during the periods described above. Our obligation under this
warranty shall not apply if our inspection shows:
1. Any product or part that has been damaged by alteration.
2. Any product or part that has been subject to accident,
misuse, abuse or has been operated contrary to The Belly
Bed Pty. Ltd.’s instructions for the product.
All purchasers must obtain an authorisation from The Belly
Bed Pty. Ltd. before returning a defective product. The product
should be carefully packaged and despatched with postage or
delivery charges prepaid. The customer shall be responsible
for all damages incurred in shipping.
Your Belly Bed
Thank you for purchasing this premium Belly Bed product.
This product was invented by a Mum of five and has been
meticulously designed and manufactured to make your life
easier during your pregnancy.
In designing this product, we have taken great care to
ensure your safety and the safety of your baby, however,
it is very important that you read and follow the safety,
care and maintenance instructions in this booklet. Please
store this booklet in a safe place and always instruct and
supervise others on the proper use of this bed.
We hope you enjoy the peaceful rest and sleep that comes
with owning a Belly Bed.
If you have any questions, please visit our website at
www.thebellybed.com.au, call us on
1800 992 082 or email us at [email protected].
Page 2

Page 3
IMPORTANT SAFETY NOTICES
• This inatable device is not intended for use on or near
water. Such use could result in electrical shock.
• Always unplug the pump from the electrical outlet when
the bed is not in use.
• Do not allow children to jump or play on the bed.
• Never breastfeed on the bed or place a child in the
abdominal cavity for any reason.
• Do not allow infants, the elderly or anyone with poor
mobility to use the bed. They could roll off the bed and
be trapped between the bed and a wall.
• This bed has not been tested for ammability or the
ability to resist re from cigarette ignition. Do not
smoke on this bed or leave near naked ame or any
heat source.
• This bed may puncture. Do not use on rough surfaces
and protect from sharp objects.
• If the abdominal cavity is too small for your belly,
do not attempt to squeeze into it and cease using
the bed immediately.
• Please read and comply with all instructions included
with this bed.
Page 12
Repair Instructions
1. Carefully clean the area to be repaired.
2. Remove one patch and cut accordingly to cover the
damaged area, allowing an extra ½ inch on all sides.
3. Spread a light layer of glue on both the patch and the
area to be repaired. Spread an extra ½ inch of glue
around the damaged area to allow for a complete seal.
4. Press down firmly with a smooth, heavy item.
5. Keep pressure applied for 24 hours before reinating.
6. Since the use of this material is beyond our control, we
make no warranty expressed or implied as to its results.
Warning
Vapour is harmful and ammable, contains toluene.
Do not use near heat, spark or open ame. If swallowed,
do not induce vomiting, call physician immediately.
Avoid prolonged or repeated breathing of vapours.
Use with adequate ventilation. Avoid contact with skin or
eyes. In case of eye contact ush with plenty of water and
call physician.
Page 11
Troubleshooting
Your Belly Bed has been designed and manufactured to the highest
standards but in the unlikely event that you experience problems please
consult this manual.
If your Belly Bed fails to inate or inates slowly, please use the
following check list:
First, make sure the Air Release Valve at the foot of the bed is closed
properly. It is easy to forget to close this valve after a previous use.
If the valve is open, close it by turning it clockwise all the way.
If your Belly Bed still does not inate, listen and look for tears or rips.
Inspect the area around the air outlet valve and the pump enclosure.
Minor tears should be repaired using the puncture repair kit supplied.
If your pump does not appear to be working, ensure that it is correctly
plugged into the electrical socket and that the socket is turned on. Also
ensure that the pump is correctly positioned and seated tightly within its
enclosure. DO NOT attempt to open the pump casing as there are no
serviceable parts inside and doing so could result in electrocution.
If problems persist, please phone our
Customer Service center between 9am and 5pm AEST
Monday to Friday on 1300 961 110.
Page 4
Care and Cleaning
• Walk around and inspect your Belly Bed before
each use.
• Keep your Belly Bed away from any sharp objects.
Large cuts or tears may not be repairable and will not
be covered under your warranty.
• If your Belly Bed will not be used for extended periods
of time, deate it and store in it’s carry bag in a clean,
dry place out of extreme temperatures.
• The Belly Bed should be at or close to room
temperature prior to inating. Do not inate if the
plastic feels warm or cold to touch.
• Do not store your Belly Bed inated or outside as this
can void your warranty.
• Where minor damage has occurred to the surface of
your bed, a repair kit has been included. Please follow
repair instructions carefully.
• There are no serviceable parts in the pump. Do not
attempt to disassemble or repair. Contact Customer
Care if your pump is not working.
• Clean your Belly Bed using a mild dishwashing
detergent. Never use products containing harsh
chemicals. Allow the bed to dry naturally before use
or storage.
• To clean your Cavity Pillow we recommend following
the cleaning instruction label on the pillow.
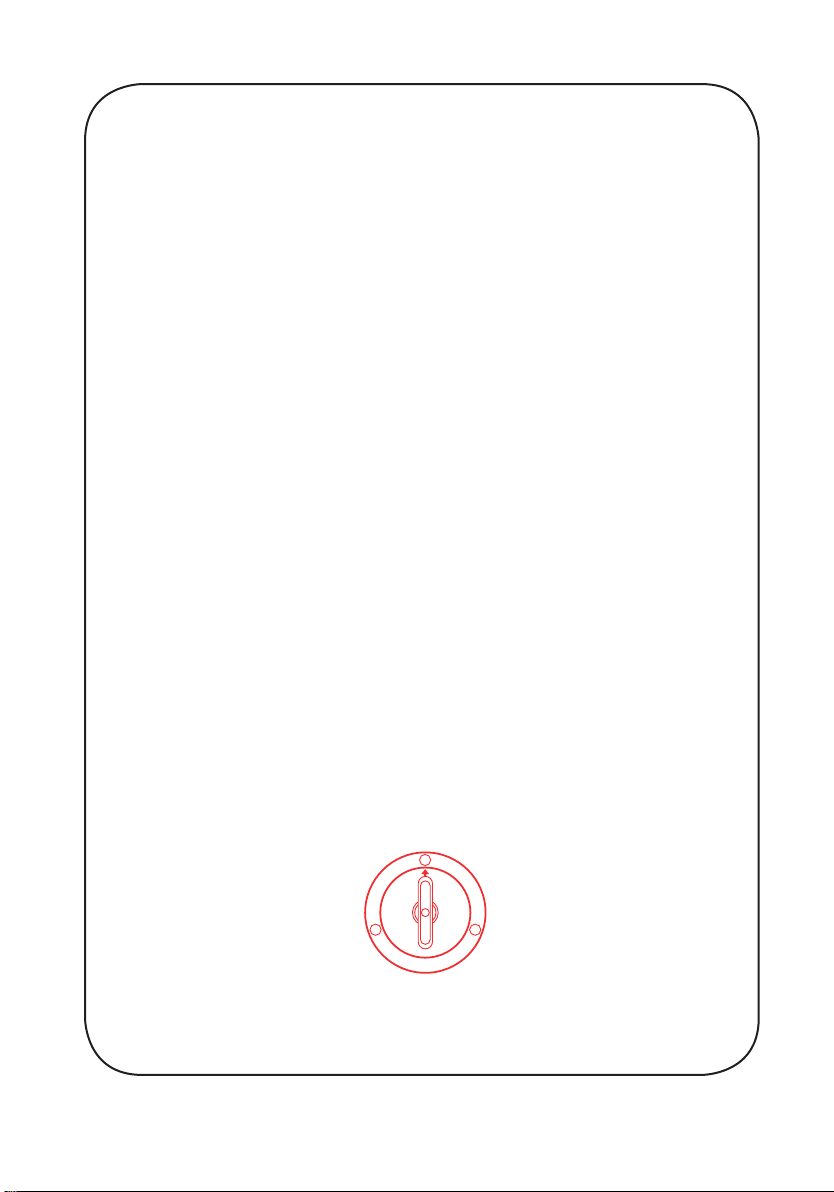
Understanding the Pump &
Dial Settings
This bed has been designed with a 3-way valve pump
system allowing you to pump air into each compartment
separately.
The dial has 3 settings. Position 1 inates/deates the
main chamber. Position 2 inates/deates the abdominal
cavity cushion and Position 3 inates/deates the leg
rest.
Position 1 operates the main chamber and is also the
main air valve used to close off the other compartments.
Position 2 and 3 on the dial is only to be used when
adjusting the cavity cushion or leg rest. If the dial is left
on Position 2 or 3, the main air valve is not closed off
and may result in the air dispersing, causing ination
and deation to other compartments.
Once you have finished adjusting the cavity cushion or
leg rest, ensure the dial is retuned to Position 1 at all
times.
1
2 3
1
2 3
1
2 3
DOWN
UP
Page 5
Frequently asked Questions Cont.
Can I use a sheet on the bed?
We recommend that you always use a bed sheet as this allows you
to move more comfortably when changing positions on the bed. We
recommend the belly bed sheet which has been designed for maximum
comfort.
How do I clean and take care of my Cavity Pillow?
We recommend that you air your Cavity pillow out in the sunshine every
now and then. To clean, follow cleaning instructions on pillow label.
What is the best way to deflate and pack the bed away?
Firstly remove comfort pillow and deate all air from the cavity cushion
and leg rest using the hand held remote. Secondly release the air valve
to deate the air from the main compartment. Once all air is deated,
fold one side of the bed into the middle, do the same to the other side.
Fold both ends into the middle and fold in together one more time. Pack
bed into Belly Bed carry bag (included) for storage.
Page 10
Page 9
Frequently asked Questions
What compartment should I inflate first?
Always inate the main compartment of the bed rst (Position 1 on the
dial) before the cavity cushion or leg rest.
Why is my bed not inflating?
Always check that the air outlet valve is closed (turned clockwise) before
inating the bed. Secondly, check the pump is pushed correctly into the
pump housing case. Make sure the dial is on Position 1.
How will I know when the bed is fully inflated?
The sides of the bed should be rm to touch (to the point where you nd
it hard to pinch the vinyl material). The bed should be firm to lie on, if
in doubt cease inating the bed and test bed out before inating with
more air. (Avoid overination).
Can I leave the dial on any setting while sleeping?
No, you must always leave the dial on Position 1 when sleeping.
Never leave on Position 2 or 3. (The Position 2 setting is to be used
for inating/deating the abdominal cavity and the Position 3 setting
is only to be used when inating/deating the leg rest). Once the
compartment(s) have been adjusted to the required height, the dial is to
be turned back to the Position 1 when resting or sleeping).
I feel the leg rest has not deflated enough when lying
down on my belly.
Deate any remaining air that might be left in the leg rest. Ensure that
the dial is then returned to Position 1.
I feel a strain on my back when lying down on my belly.
This could be one of two reasons, primarily the cavity cushion has not
been inated high enough, causing back discomfort, if so, inate more
air into the cavity cushion until strain is relieved. Or secondly you need
to ensure that the leg rest is totally deated. If the leg rest is slightly
elevated (when lying on your belly) this may cause slight strain on your
back. Once adjusted always check the dial is then turned to Position 1
when resting.
Page 6
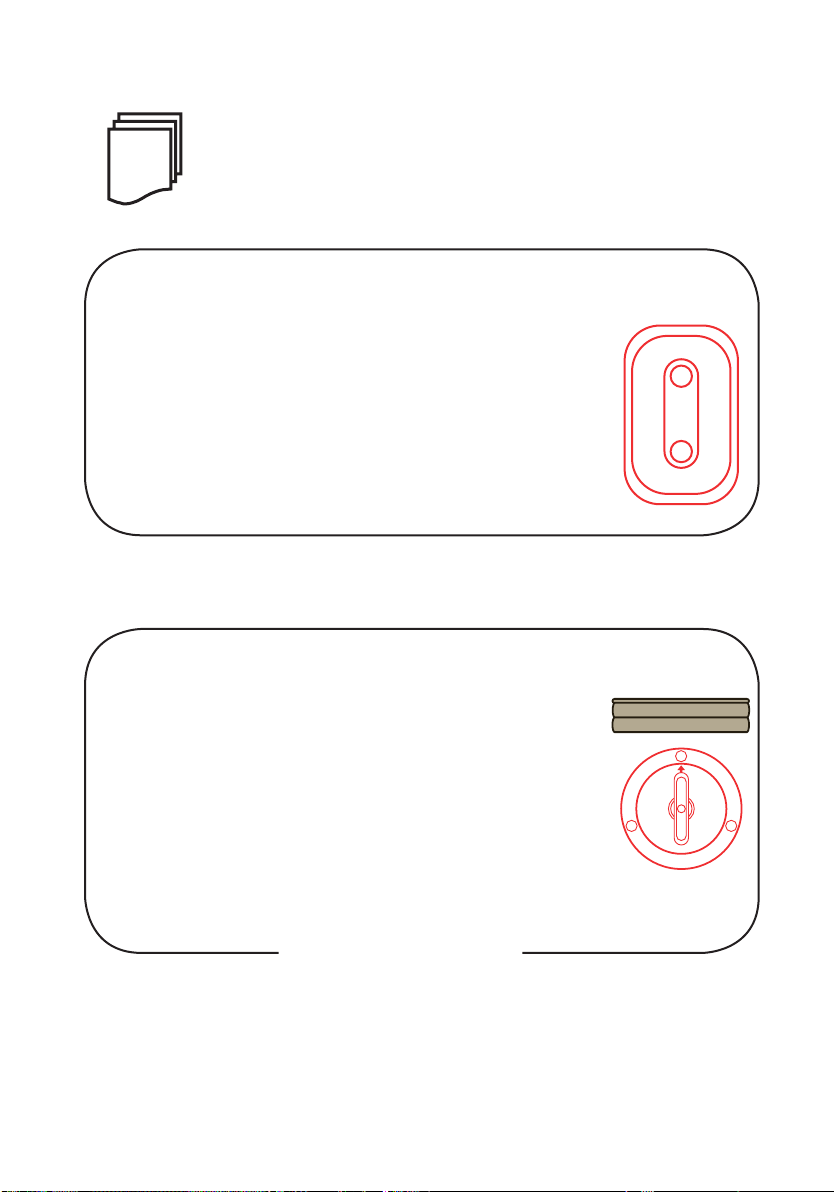
Getting Started
1. Roll out your Belly Bed so that it is lying at on the
oor with the abdominal cavity facing upwards.
2. Check to ensure that there are no sharp objects
underneath or around the bed.
3. Check that the quick air release valve at the foot
end of the bed is fully closed otherwise your bed
will not inate properly.
4. Check that the dial is set on Position 1.
5. You are now ready to connect the air pump and
inate your bed.
Connecting the Air Pump
It is important to ensure that the air pump is correctly
inserted into the pump socket in the bed. Connect
the outlet port of the pump into the socket as shown.
You should feel and hear the pump click into the bed.
Use the strap provided to hold the pump in place.
Page 7
Operating Instructions
using your hand-held remote
• The hand-held remote is used to control the amount
of air in your bed.
• Depressing the UP button will inate the bed. The
DOWN button will deate the bed.
• Tapping the buttons momentarily will allow ne
control of air pressure ensuring you get exactly the
air pressure you require.
inflating your belly bed
• Insert the pump into socket and fasten with strap.
• Ensure the pump is plugged in at the electrical outlet
• Select Position 1 on the dial.
• Ensure the air outlet valve (at the foot end of the
bed) is closed.
• Hold down the UP button on the hand-held remote.
• Your Belly Bed will fully inate in a few minutes.
1
2 3
1
2 3
1
2 3
DOWN
UP
1
2 3
1
2 3
1
2 3
DOWN
UP
Page 8
Operating Instructions cont.
inflating the abdominal cavity
• Select Position 2 on the dial.
• Place Cavity Pillow on deated cavity cushion.
(Larger end should sit at foot end of hole).
• Partially inate the cavity cushion. Tuck in sides of
pillow to secure if needed.
• Place sheet on bed.
• Lie down on the bed with your belly in the abdominal
cavity.
• Using the UP and DOWN button on the hand-held
remote, adjust the air in the cavity gradually until the
desired height and support has been achieved.
• Adjust the dial back to Position 1
when resting or sleeping.
inflating the leg rest
• Fully inate the abdominal cavity so that your
back is supported.
• Select Position 3 on the dial and lie on your back.
• Using the UP and DOWN buttons on the hand-
held remote, adjust the air in the leg rest until the
desired height and support has been achieved.
• Adjust the dial back to Position 1 when
resting or sleeping.
1
2 3
1
2 3
1
2 3
DOWN
UP
1
2 3
1
2 3
1
2 3
DOWN
UP

Page 9
Frequently asked Questions
What compartment should I inflate first?
Always inate the main compartment of the bed rst (Position 1 on the
dial) before the cavity cushion or leg rest.
Why is my bed not inflating?
Always check that the air outlet valve is closed (turned clockwise) before
inating the bed. Secondly, check the pump is pushed correctly into the
pump housing case. Make sure the dial is on Position 1.
How will I know when the bed is fully inflated?
The sides of the bed should be rm to touch (to the point where you nd
it hard to pinch the vinyl material). The bed should be firm to lie on, if
in doubt cease inating the bed and test bed out before inating with
more air. (Avoid overination).
Can I leave the dial on any setting while sleeping?
No, you must always leave the dial on Position 1 when sleeping.
Never leave on Position 2 or 3. (The Position 2 setting is to be used
for inating/deating the abdominal cavity and the Position 3 setting
is only to be used when inating/deating the leg rest). Once the
compartment(s) have been adjusted to the required height, the dial is to
be turned back to the Position 1 when resting or sleeping).
I feel the leg rest has not deflated enough when lying
down on my belly.
Deate any remaining air that might be left in the leg rest. Ensure that
the dial is then returned to Position 1.
I feel a strain on my back when lying down on my belly.
This could be one of two reasons, primarily the cavity cushion has not
been inated high enough, causing back discomfort, if so, inate more
air into the cavity cushion until strain is relieved. Or secondly you need
to ensure that the leg rest is totally deated. If the leg rest is slightly
elevated (when lying on your belly) this may cause slight strain on your
back. Once adjusted always check the dial is then turned to Position 1
when resting.
Page 6
Getting Started
1. Roll out your Belly Bed so that it is lying at on the
oor with the abdominal cavity facing upwards.
2. Check to ensure that there are no sharp objects
underneath or around the bed.
3. Check that the quick air release valve at the foot
end of the bed is fully closed otherwise your bed
will not inate properly.
4. Check that the dial is set on Position 1.
5. You are now ready to connect the air pump and
inate your bed.
Connecting the Air Pump
It is important to ensure that the air pump is correctly
inserted into the pump socket in the bed. Connect
the outlet port of the pump into the socket as shown.
You should feel and hear the pump click into the bed.
Use the strap provided to hold the pump in place.

Understanding the Pump &
Dial Settings
This bed has been designed with a 3-way valve pump
system allowing you to pump air into each compartment
separately.
The dial has 3 settings. Position 1 inates/deates the
main chamber. Position 2 inates/deates the abdominal
cavity cushion and Position 3 inates/deates the leg
rest.
Position 1 operates the main chamber and is also the
main air valve used to close off the other compartments.
Position 2 and 3 on the dial is only to be used when
adjusting the cavity cushion or leg rest. If the dial is left
on Position 2 or 3, the main air valve is not closed off
and may result in the air dispersing, causing ination
and deation to other compartments.
Once you have finished adjusting the cavity cushion or
leg rest, ensure the dial is retuned to Position 1 at all
times.
1
2 3
1
2 3
1
2 3
DOWN
UP
Page 5
Frequently asked Questions Cont.
Can I use a sheet on the bed?
We recommend that you always use a bed sheet as this allows you
to move more comfortably when changing positions on the bed. We
recommend the belly bed sheet which has been designed for maximum
comfort.
How do I clean and take care of my Cavity Pillow?
We recommend that you air your Cavity pillow out in the sunshine every
now and then. To clean, follow cleaning instructions on pillow label.
What is the best way to deflate and pack the bed away?
Firstly remove comfort pillow and deate all air from the cavity cushion
and leg rest using the hand held remote. Secondly release the air valve
to deate the air from the main compartment. Once all air is deated,
fold one side of the bed into the middle, do the same to the other side.
Fold both ends into the middle and fold in together one more time. Pack
bed into Belly Bed carry bag (included) for storage.
Page 10

Page 11
Troubleshooting
Your Belly Bed has been designed and manufactured to the highest
standards but in the unlikely event that you experience problems please
consult this manual.
If your Belly Bed fails to inate or inates slowly, please use the
following check list:
First, make sure the Air Release Valve at the foot of the bed is closed
properly. It is easy to forget to close this valve after a previous use.
If the valve is open, close it by turning it clockwise all the way.
If your Belly Bed still does not inate, listen and look for tears or rips.
Inspect the area around the air outlet valve and the pump enclosure.
Minor tears should be repaired using the puncture repair kit supplied.
If your pump does not appear to be working, ensure that it is correctly
plugged into the electrical socket and that the socket is turned on. Also
ensure that the pump is correctly positioned and seated tightly within its
enclosure. DO NOT attempt to open the pump casing as there are no
serviceable parts inside and doing so could result in electrocution.
If problems persist, please phone our
Customer Service center between 9am and 5pm AEST
Monday to Friday on 1300 961 110.
Page 4
Care and Cleaning
• Walk around and inspect your Belly Bed before
each use.
• Keep your Belly Bed away from any sharp objects.
Large cuts or tears may not be repairable and will not
be covered under your warranty.
• If your Belly Bed will not be used for extended periods
of time, deate it and store in it’s carry bag in a clean,
dry place out of extreme temperatures.
• The Belly Bed should be at or close to room
temperature prior to inating. Do not inate if the
plastic feels warm or cold to touch.
• Do not store your Belly Bed inated or outside as this
can void your warranty.
• Where minor damage has occurred to the surface of
your bed, a repair kit has been included. Please follow
repair instructions carefully.
• There are no serviceable parts in the pump. Do not
attempt to disassemble or repair. Contact Customer
Care if your pump is not working.
• Clean your Belly Bed using a mild dishwashing
detergent. Never use products containing harsh
chemicals. Allow the bed to dry naturally before use
or storage.
• To clean your Cavity Pillow we recommend following
the cleaning instruction label on the pillow.

Page 3
IMPORTANT SAFETY NOTICES
• This inatable device is not intended for use on or near
water. Such use could result in electrical shock.
• Always unplug the pump from the electrical outlet when
the bed is not in use.
• Do not allow children to jump or play on the bed.
• Never breastfeed on the bed or place a child in the
abdominal cavity for any reason.
• Do not allow infants, the elderly or anyone with poor
mobility to use the bed. They could roll off the bed and
be trapped between the bed and a wall.
• This bed has not been tested for ammability or the
ability to resist re from cigarette ignition. Do not
smoke on this bed or leave near naked ame or any
heat source.
• This bed may puncture. Do not use on rough surfaces
and protect from sharp objects.
• If the abdominal cavity is too small for your belly,
do not attempt to squeeze into it and cease using
the bed immediately.
• Please read and comply with all instructions included
with this bed.
Page 12
Repair Instructions
1. Carefully clean the area to be repaired.
2. Remove one patch and cut accordingly to cover the
damaged area, allowing an extra ½ inch on all sides.
3. Spread a light layer of glue on both the patch and the
area to be repaired. Spread an extra ½ inch of glue
around the damaged area to allow for a complete seal.
4. Press down firmly with a smooth, heavy item.
5. Keep pressure applied for 24 hours before reinating.
6. Since the use of this material is beyond our control, we
make no warranty expressed or implied as to its results.
Warning
Vapour is harmful and ammable, contains toluene.
Do not use near heat, spark or open ame. If swallowed,
do not induce vomiting, call physician immediately.
Avoid prolonged or repeated breathing of vapours.
Use with adequate ventilation. Avoid contact with skin or
eyes. In case of eye contact ush with plenty of water and
call physician.

Page 13
Limited Warranty
The Belly Bed Pty. Ltd. warrants to the original purchaser
only when the Belly Bed is used for normal indoor sleeping
purposes, that the air bed will be fully guaranteed against
defects in material and workmanship for a period of one (1)
year from the date of purchase, provided further that the Belly
Bed has been operated according to the provided instructions.
(Included in your purchase is a repair kit with instructions.)
The air pump (exclusive of the hand held remote) will be
guaranteed to the original purchaser against defects in
materials and workmanship for a period of one (1) year from
the date of purchase provided the motor has been operated
according to the instructions. Our obligation under this
warranty shall be limited to the repair or exchange of any part
or parts which may prove defective under the conditions and
during the periods described above. Our obligation under this
warranty shall not apply if our inspection shows:
1. Any product or part that has been damaged by alteration.
2. Any product or part that has been subject to accident,
misuse, abuse or has been operated contrary to The Belly
Bed Pty. Ltd.’s instructions for the product.
All purchasers must obtain an authorisation from The Belly
Bed Pty. Ltd. before returning a defective product. The product
should be carefully packaged and despatched with postage or
delivery charges prepaid. The customer shall be responsible
for all damages incurred in shipping.
Page 2
Your Belly Bed
Thank you for purchasing this premium Belly Bed product.
This product was invented by a Mum of five and has been
meticulously designed and manufactured to make your life
easier during your pregnancy.
In designing this product, we have taken great care to
ensure your safety and the safety of your baby, however,
it is very important that you read and follow the safety,
care and maintenance instructions in this booklet. Please
store this booklet in a safe place and always instruct and
supervise others on the proper use of this bed.
We hope you enjoy the peaceful rest and sleep that comes
with owning a Belly Bed.
If you have any questions, please visit our website at
www.thebellybed.com.au, call us on

Warranty Disclaimer
EXCEPT FOR THE EXPRESS LIMITED WARRANTY SET FORTH ABOVE, THE
BELLY BED PTY LTD MAKES NO EXPRESS OR IMPLIED WARRANTIES IN
THIS AGREEMENT OR OTHERWISE. TO THE FULLEST EXTENT PERMITTED
BY LAW, THE BELLY BED PTY LTD. DISCLAIMS ALL WARRANTIES,
WRITTEN, EXPRESSED OR IMPLIED, INCLUDING ALL WARRANTIES OF
MERCHANTABILITY AND/OR FITNESS FOR A PARTICULAR PURPOSE.
THE BELLY BED PTY LTD EXPRESSLY DISCLAIMS ANY AND ALL LIABILITY
TO PURCHASER FOR ANY CONSEQUENTIAL DAMAGES, DAMAGES
FOR LOSS OF USE, LOSS OF PROFITS, PROPERTY DAMAGE, OR ANY
OTHER INCIDENTAL, CONSEQUENTIAL OR SPECIAL DAMAGES ARISING
OUT OF THIS AGREEMENT OR THEIR OPERATION, FUNCTION OR
CHARACTERISTICS OF THE PRODUCTS PURCHASED HEREUNDER.
IT IS EXPRESSLY UNDERSTOOD THAT THE LIMITED WARRANTY SET
FORTH ABOVE IS THE SOLE AND EXCLUSIVE REMEDY OF PURCHASER.
NOTWITHSTANDING THE TERMS OF ANY LIMITED WARRANTY, AND/
OR IN THE EVENT ANY LIMITED WARRANTY PROVIDED TO THE
PURCHASER FAILS OF ITS ESSENTIAL PURPOSE, IN NO EVENT WILL
THE BELLY BED PTY LTD. ENTIRE LIABILITY TO PURCHASE EXCEED THE
PURCHASE PRICE ACTUALLY PAID BY PURCHASER FOR THE PRODUCTS
HEREUNDER, OR ANY DEFECTIVE PORTION THEREOF, WHICHEVER IS
THE LESS AMOUNT.
THE BELLY BED PTY LTD. neither assumes nor authorises any representative
or other person to assume any obligation or liability other than those
expressly set forth herein.
© 2010 THE BELLY BED PTY LTD All rights reserved.
Page 14

The Belly Bed Pty Ltd.
ABN 91 127 885 474
PO Box 714 Rose Bay NSW 2030
Phone 1300 961 110
Fax (02) 93375822
Made in China
Instruction Manual
This manual suits for next models
2
Table of contents
Popular Indoor Furnishing manuals by other brands

EXPEDO
EXPEDO KWADRAT BRINICA 215093 Assembly instruction

Interior Solutions
Interior Solutions BRW3230 Assembly instructions

BLACK RED WHITE
BLACK RED WHITE DOORS HKOM2s 4/6 Assembly manual

fantastic furniture
fantastic furniture Oasis manual

Schildmeyer
Schildmeyer 552400 Assembly instructions

IKEA
IKEA STORJORM instruction manual


