Belnick FLASH MOUNT RA-MP003-GG User manual

Model/Modelo: RA-MP003-GG / https://vimeo.com/490961962
Customer Service Email: [email protected] | Phone: 866-552-2810

- To reduce the risk of electrical shock:
ê
!


10mm
Socket Wrench
Llave de tubo

Both Knob of both arms should be fully tight while
attaching to the back of the tv as per required angle
Ambas perilla de ambos brazos deben estar
completamente apretada mientras se sujetan a la parte
posterior del televisor segun el angulo requerido
*

2A
5
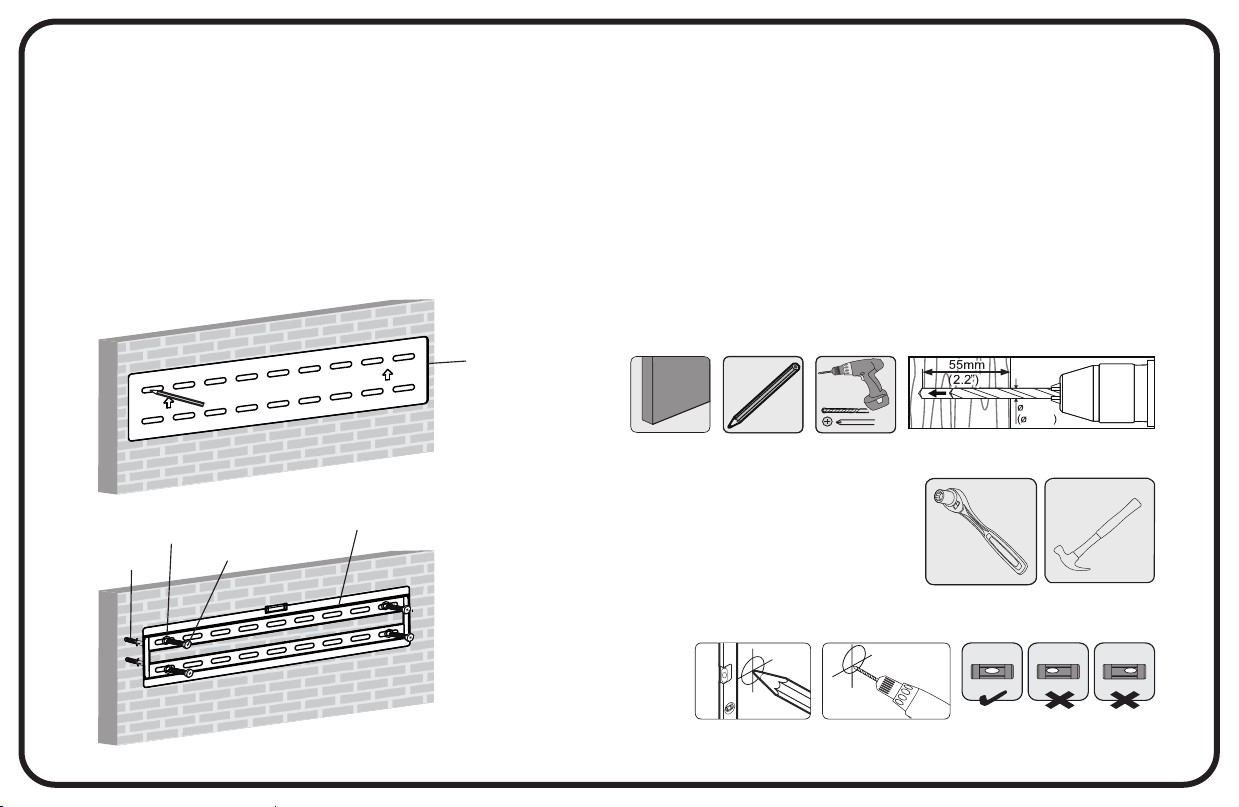
Wood Stud installation requires a minimum 2x4
inch wood stud with 3/8 inch thick dry wall. Locate
studs with a stud finder. Hold the paper template
(D) against the wall to mark four holes. Check
level with the bubble level and drill holes with a
3/16" (4.5mm) drill bit to a depth of 2.2" (55mm).
Attach wall plate (A) with four bolts (W-A) and
washers (W-C) using a socket wrench.
La instalación de postes de madera requiere una
viga de madera de 2x4 pulgadas como mínimo con
una pared seca de 3/8 de pulgada de espesor
Localice las vigas con un detector de vigas. Sostén el.
plantilla de pape (D) contra la pared para marcar
cuatro agujeros. Comprobar el nivel con el nivel de
burbuja y taladrar los agujeros con una broca de
3/16" (4.5mm) a una profundidad de 2.2 (55mm).
Fijar la placa de pared (A) con cuatro tornillos (W-A) y
a r a n d e l a s ( W - C ) c o n u n l l a v e d e t u b o .
AW-C W-A
D
16" (406.4mm)
2B
6
D
W-B
W-C W-A A
12
10mm
3/8"
Concrete wall installation requires a minimum
of 8 inch thick solid concrete. Hold the paper
template (D) against the wall to mark four holes
according to actual TV VESA. Check level with
the bubble level and drill holes with a 3/8"
(10 mm ) drill bit to a depth of 2.2" (55 mm) tap
four wall anchors (W-B) into the wall using a
hammer. Attach wall plate (A) with four bolts
(W-A) and washer (W-C) using a socket wrench.
La instalacion de un muro de hormigon requiere
concreto solido de espesor minimo de 8 pulgadas.
Sostenga la plantilla de papel (D) contra
la pared para marcar cuatro agujeros de acuerdo
a la TV actual VESA. Compruebe el nivel con
nivel de burbuja y taladar agujeros con
una barca de 3/8" (10 mm) a una profundidad
de 2.2" (55 mm) Top cuatro anclajes de pared
(W-B) en la pared. Con un martillo. Fije la
placa de pared (A) con cuatro pernos
(W-A) y lavadora (W-C) usando un llave de tubo.

3
Wall
Wall
7
0
+10
0
-10
Knob
Wall
TWO PEOPLE must hang the TV with the TV
bracket (B and C) on the wall plate (A).
The latch shown below will click when
the TV is properly locked into place.
DOS PERSONAS deben colgar el televisor con el televisor
soporte (B y C) en la placa de pared (A).
El pestillo que se muestra a continuación hará clic cuando
El televisor está correctamente bloqueado en su lugar.
Use the knob on both the TV bracket to
loosen or tighten to set the degree to tilt.
Use la perilla en el soporte del televisor para
aflojar o apretar para establecer el grado de inclinación.
The pendents have a magnetic button on the
end so that you can stick them to the bracket to
keep them out of sight.
Los pendientes tienen un botón magnético en el
fin para que pueda pegarlos al soporte
mantenlos fuera de la vista.
Latch
Pestillo

8
Latch
Pestillo
4
TWO PEOPLE are needed to remove your TV
from the wall. While one person holds the TV, the
second person pull down on both release straps,
unlocking the
TV. TWO PEOPLE must hold and
then remove the TV from the wall by first lifting up.
Se necesitan DOS PERSONAS para quitar su televisor
de la pared. Mientras una persona sostiene el televisor,
la segunda persona tira de ambas correas de liberación
y desbloquea el televisor. DOS PERSONAS deben
sostener y luego quitar el televisor de la pared
levantando primero.
Popular TV Mount manuals by other brands


Multibrackets
Multibrackets M Universal manual

FONESTAR
FONESTAR STV-667N instruction manual

Multibrackets
Multibrackets M Universal Flexarm Pro 60kg Sound & Camera installation manual

SANUS VuePoint
SANUS VuePoint FLF424KIT instruction manual

ERARD
ERARD WILL 1050L manual

Hama
Hama H-118102 operating instructions