Benchmark 5554-514 User manual

22" CORDLESS SNOW BLOWER
READ ALL INSTRUCTIONS BEFORE FIRST USE.
KEEP THIS MANUAL FOR FUTURE REFERENCE.
KEEP AWAY FROM CHILDREN.
Maximum initial battery voltage (measured without a load)
is 60 volts. Normal voltage is 54 volts.
WEAR CSA APPROVED
EYE PROTECTION
WEAR EAR
PROTECTION
WEAR A
FACE MASK
5 Year Limited Warranty on tool
3 Year on battery and charger

1
PRODUCT SPECIFICATIONS
22" CORDLESS SNOW BLOWER
Motor Brushless
Battery Voltage Max* 60V D.C.
Battery Capacity 4.0 Ah
Battery Runtime Max Working time up to 30 mins.
No-load running time up to 45 mins.
Charger Input 100-240V, 50/60Hz
Charger Output 63V D.C. 4A
Charge Time Max 1 hour
No Load Speed 2500 RPM
Impeller Size 8 in. (20cm)
Clearing Width 22 in. (56cm)
Clearing Depth 10 in. (25cm)
Discharge Distance Max 30ft (9m)
Plowing Capacity Max 25 Tons Per Hour
Stages Single Stage
Type of Snow Medium Usage
Directional Control 180oAdjustable Chute
LED Light 3 W
Tire size 7 in. (18cm)
Net Weight 41 lb (18.6kg)
NEED ASSISTANCE?
Call us on our toll-free customer support line:
1-833-818-4111
• Technical questions
• Replacement parts
• Parts missing from package
YF60VRX HAND-HELD TOOL HAS A 2-STEP BATTERY LATCH
INSTALLATION: The battery latch has 2 positions. Press down firmly
until battery is fully inserted. If the battery is not fully inserted and
secured in the deepest position #2 the tool will not run.
REMOVAL: Press the release button
once, the battery will release from the
first latch position. Then hold the battery firmly, press the release
button again and pull battery out.
Latch
#2
Latch
#1

2
5554-514
TABLE OF CONTENTS
Product Specifications................................................................................... 1
YF60vRX Hand-held Tool has a 2-Step Battery Latch...................................... 1
Table of Contents .......................................................................................... 2
General Safety Instructions ........................................................................... 3
Battery & Charger Safety Instructions ............................................................ 4
Information about the battery ........................................................................ 6
Information about the charger and the charging process ................................ 7
Protection from environmental influences ..................................................... 8
Additional Safety Instructions ........................................................................ 9
Safety Instructions for Walk-Behind Snow Blowers ......................................... 9
Clearing a Clogged Discharge Chute ............................................................ 10
Electrical Safety .......................................................................................... 10
Safety Symbols ........................................................................................... 11
Know Your Cordless Snow Blower................................................................. 12
Functions .................................................................................................... 12
Getting Started ........................................................................................... 13
Assembling the Handle ............................................................................... 13
Discharge Chute Assembly .......................................................................... 14
Chute Crank Assembly ................................................................................ 15
Charging the Battery Pack ........................................................................... 16
Power Indicator ........................................................................................... 16
Starting and Stopping ................................................................................. 17
Powering on and O .................................................................................... 17
Moving the Machine & Plowing the Snow...................................................... 18
Changing Throw Direction and Throw Height ............................................... 19
Maintenance and Storage ........................................................................... 20
Servicing ..................................................................................................... 20
Storage ....................................................................................................... 20
Lifetime Lubrication (Motor and Paddle) ...................................................... 21
General Maintenance Tips ........................................................................... 21
Replacing the Rubber Plates ....................................................................... 21
Replacing the Scraper Bar ........................................................................... 22
Replacing the Belt and Pulley ...................................................................... 23
Automatic Reset ......................................................................................... 24
Troubleshooting........................................................................................... 24
Warranty...................................................................................................... 24
22" CORDLESS SNOW BLOWER

3
GENERAL SAFETY INSTRUCTIONS
Notice the personal safety alert symbol used in this manual to draw your attention
to a WARNING given along with the particular operating instruction. This means
that the operation requires special ATTENTION, CAUTION, and AWARENESS.
• Keep work area clean and well lit – Cluttered, dark areas invite accidents.
• Keep bystanders away – All bystanders and pets should be kept a safe distance
away from the work area.
• Dress properly – Do not wear loose clothing or jewelry. They can get caught in
moving parts. Protective rubber gloves and non-slip footwear are recommended
when working outdoors.
• Use the right product – Do not use this machine for any job except that for which
it is intended.
• CAUTION! – Exercise caution to avoid slipping or falling. Wear protective footwear
that will protect your feet and improve your footing on slippery surfaces.
• Use safety glasses – Also use safety footwear, snug-fitting clothing, protective
gloves, hearing and head protection.
• Do not force the snow blower – Use the snow blower at the rate for which it was
designed to ensure optimal performance and safe operation.
• Stay alert – Watch what you are doing. Use common sense. Do not operate the
snow blower when you are tired or under the influence of alcohol or drugs.
• Do not overreach – Keep proper footing and balance at all times.
• Store indoors – When not in use, the snow blower should be kept dry and stored
out of the reach of children in a high or locked place.
• Maintain snow blower with care – Follow instructions for lubricating and changing
accessories.
WARNING: Always disengage the switch lever and remove the battery pack
before making any adjustments, inspecting, servicing, changing accessories,
cleaning the snow blower, or when any other dangerous conditions are present.
Any such operation should be performed after revolving parts inside the snow
blower stop completely. Such preventive safety measures reduce the risk of starting
the power tool accidentally.
WARNING: When replacing any parts, you must strictly observe the
instructions and procedures described in this user manual. Special care should
be paid to any rubber parts, since these parts may increase the motor load and
decrease its mechanical power if damaged.
WARNING: If you notice that the snow blower is not running properly or hear
abnormal sounds from the motor when it is in use, immediately stop the machine,
disconnect the battery, and contact your service centre.
• Surfaces – This snow blower is intended for use on paved surfaces. Do not use on
gravel, stone or other unpaved surfaces. unless the snow blower is adjusted for
such surfaces according to the instructions given in the operator’s manual.

4
• Moving parts present risks – Keep your face, hair, clothing, hands and feet away
from moving parts. All guards and safety attachments must be installed properly
before using the unit. Shut o and disconnect the battery before touching any
parts other than the handles and switch.
• Avoid unintentional starting – Make sure the safety switch and the switch lever are
in the o position before inserting the battery in the unit. Do not carry the snow
blower with the safety switch and the switch lever engaged.
• Do not overreach – Maintain proper footing and balance at all times. Place heels
firmly on the ground and tightly grasp the handle bar. Watch for uneven surfaces
and do not overreach. In case you fall or collide with the snow blower, inspect the
unit for any damages or cracks. When stepping backwards, be careful to avoid
obstacles beneath your feet or behind you to avoid falling.
WARNING: If the snow blower strikes any object, follow these steps: i) Stop the
snow blower. Remove the battery. ii) Inspect for damage. iii) Repair any damage
before restarting and operating the snow blower.
BATTERY & CHARGER SAFETY INSTRUCTIONS
We pay a great deal of attention to the design of every battery pack to ensure that
we supply you with batteries that are safe, durable and have a high energy density.
The battery cells have a wide range of safety devices. Each individual cell is initially
formatted and its electrical characteristic curves are recorded. This data is then
used exclusively to be able to assemble the best possible battery packs.
Despite all the safety precautions, caution must be exercised when handling
batteries. The following points must be obeyed at all times to ensure safe use.
Safe use can only be guaranteed if undamaged cells are used. Incorrect handling
of the battery pack can cause cell damage.
IMPORTANT: Analyses confirm that incorrect use and poor care of high-
performance batteries are the main factors responsible for personal and/or
product damage.
WARNING: Read all safety warnings and instructions. Failure to follow the
warnings and instructions may result in electric shock, fire and/or serious injury.
WARNING: Use only approved replacement batteries; other batteries may
damage the snow blower and cause it to malfunction.
CAUTION: To reduce the risk of injury, charge the 60V lithium-ion battery packs
only in their designated 60V lithium-ion charger. Other types of chargers present
risk of fire, personal injury and damage. Do not wire a battery pack to a power
supply plug or car cigarette lighter. Such misuse will permanently disable or damage
the battery pack.
• Avoid dangerous environments – Do not charge the battery pack in rain, snow or
in damp or wet locations. Do not use the battery pack or charger in the presence
of explosive atmospheres (gaseous fumes, dust or flammable materials) because
sparks may be generated when inserting or removing the battery pack, which
could lead to a fire.
5554-514
22" CORDLESS SNOW BLOWER

5
• Charge in a well-ventilated area – Do not block the charger vents. Keep them
clear to allow for proper ventilation. Do not allow smoking or open flames near a
charging battery pack. Vented gases may explode.
NOTE: The safe temperature range for the battery is -4oF – 113oF (-20oC – 45oC).
Do not charge the battery outside in freezing weather; charge it at room
temperature.
• Maintain charger cord – When unplugging the charger, pull the plug, not the cord,
from the receptacle to reduce the risk of damage to the electrical plug and cord.
Never carry the charger by its cord or yank it by the cord to disconnect it from the
receptacle. Keep the cord away from heat, oil and sharp edges. Make sure the
cord will not be stepped on, tripped over or subjected to damage or stress when
the charger is in use. Do not use the charger with a damaged cord or plug.
Replace a damaged charger immediately.
• Do not use an extension cord unless it is absolutely necessary – Using the wrong,
damages or improperly wired extension cord poses a risk of fire and electric shock.
If an extension cord must be used, plug the charger into a properly wired 16 gauge
or larger extension cord with the female plug matching the male plug on the
charger. Make sure that the extension cord is in good electrical condition.
• Charger is rated for 120 volt AC only – The charger must be plugged into an
appropriate receptacle.
• Use only recommended attachments – Use of an attachment not recommended
or sold by the battery charger or battery pack manufacturer may result in risk
of fire, electric shock or personal injury.
• Unplug charger when not in use – Make sure to remove battery packs from
unplugged chargers.
WARNING: To reduce the risk of electric shock, always unplug the charger
before performing any cleaning or maintenance. Do not allow water to flow into the
charger. use a Ground Fault Circuit Interrupter (GFCI) to reduce shock hazards.
• Do not burn or incinerate battery packs – Battery packs may explode, causing
personal injury or damage. Toxic fumes and materials are created when battery
packs are burned.
• Do not crush, drop or damage battery packs – Do not use the battery pack or
charger if they have sustained a sharp blow, been dropped, run over or have been
damaged in any way (i.e. pierced with a nail, hit with a hammer, stepped on, etc.).
• Disconnect the battery pack from the tool before making any adjustments,
changing accessories, or storing tool – Such preventive safety measures reduce
the risk of starting the tool accidentally.
• Avoid unintentional starting – Make sure the safety switch and the switch lever
are in the o position before inserting the battery in the unit. Do not carry the
snow blower with the safety switch and the ON/OFF trigger engaged.
• When battery pack is not in use, keep it away from other metal objects – like
paper clips, coins, keys, nails, screws or other small metal objects that can make
a connection from one terminal to another. Shorting the battery terminals together
may cause burns or a fire.

6
• Under abusive conditions, liquid may be ejected from the battery; avoid contact –
If contact accidentally occurs, flush with water. If liquid contacts eyes, additionally
seek medical help. Liquid ejected from the battery may cause irritation or burns.
• Do not use a battery pack or tool that is damaged or modified – Damaged or
modified batteries may exhibit unpredictable behaviour resulting in fire, explosion
or risk of injury.
• Do not expose a battery pack or tool to fire or excessive temperature – Exposure
to fire or temperature above 130oC (265oF) may cause explosion.
• Follow all charging instructions and do not charge the battery pack or tool outside
of the temperature reange specified in the instructions – Charging improperly
or at temperatures outside of the specified range may damage the battery and
increase the risk of fire.
• Have servicing performed by a qualified repair person using only identical
replacement parts – This will ensure that the safety of the product is maintained.
• Do not modify or attempt to repair the tool or the battery pack – (as applicable)
except as indicated in the instructions for use and care.
• Do not disassemble – Incorrect reassembly may pose a serious risk of electric
shock, fire or exposure to toxic battery chemicals. If the battery or charger are
damaged, please contact customer service center at 1-833-818-4111.
• Battery chemicals cause serious burns – Never let a damaged battery pack
contact the skin, eyes or mouth. If a damaged battery pack leaks battery
chemicals, use rubber or neoprene gloves to safely dispose of it. If skin is
exposed to battery fluids, wash the aected area with soap and water and rinse
with vinegar. If eyes are exposed to battery chemicals, immediately flush with
water for 20 minutes and seek medical attention. Remove and dispose of contam-
inated clothing.
• Store your battery pack and charger in a cool, dry place – Do not store the battery
pack or charger where temperatures may exceed 104oF (40oC), such as in direct
sunlight or inside a vehicle or metal building during the summer.
INFORMATION ABOUT THE BATTERY
1. The battery packs supplied with your cordless snow blower are only partially
charged. The battery packs have to be charged completely before you use the
tool for the first time.
2. For optimum battery performance, avoid low discharge cycles by charging the
battery pack frequently.
3. Store the battery pack in a cool place, ideally at 59oF (15oC) and charged fully.
4. Lithium-ion batteries are subject to a natural aging process. The battery pack
must be replaced at the latest when its capacity falls to just 80% of its capacity
when new. Weakened cells in an aged battery pack are no longer capable of
meeting the high power requirements needed for the proper operation of your
snow blower, and therefore pose a safety risk.
5. Do not throw battery packs into an open fire as this poses a risk of explosion.
6. Do not ignite the battery pack or expose it to fire.
5554-514
22" CORDLESS SNOW BLOWER

7
7. Do not exhaustively discharge batteries. Exhaustive discharge will damage
the battery cells. The most common cause of exhaustive discharge is lengthy
storage or non-use of partially discharged batteries. Stop working as soon as the
performance of the battery falls noticeably or the electronic protection system
triggers. Place the battery pack in storage only after it has been fully charged.
8. Protect the battery and the tool from overloads. Overloads will quickly result in
overheating and cell damage inside the battery housing even if this overheating
is not apparent externally.
9. Avoid damage and shocks. Immediately replace batteries that have been
dropped from a height of more than one meter or those that have been
exposed to violent shocks, even if the housing of the battery pack appears to
be undamaged. The battery cells inside the battery may have suered serious
damage. In such instances, please read the waste disposal information for
proper battery disposal.
10. If the battery pack suers overloading and overheating, the integrated
protective cuto will switch o the equipment for safety reasons. If this
situation happens, stop the tool and let the battery cool down for a few
minutes before restarting.
IMPORTANT! Do not press the ON/OFF trigger any more if the protective
cut-o has been activated. This may damage the battery pack.
11. Use only original battery packs. The use of other batteries poses a fire risk
and may result in injuries or an explosion.
INFORMATION ABOUT THE CHARGER AND THE CHARGING PROCESS
1. Please check the data marked on the rating plate of the battery charger.
Be sure to connect the battery charger to a power supply with the voltage
marked on the rating plate. Never connect it to a dierent mains voltage.
2. Protect the battery charger and its cord from damage. Keep the charger and
its cord away from heat, oil and sharp edges. Have damaged cords repaired
without delay by a qualified technician or call the customer service center at
1-833-818-4111.
3. Electrical plugs must match the outlet. Never modify the plug in any way.
Do not use any adapter plugs with grounded tools. unmodified plugs and
matching outlets will reduce the risk of electric shock.
4. Keep the battery charger, battery pack(s) and the cordless tool out of the
reach of children.
5. Do not use the supplied battery charger to charge other cordless tools.
6. During periods of heavy use, the battery pack will become warm. Allow the
battery pack to cool to room temperature before inserting it into the charger
to recharge.
7. Do not overcharge batteries. Do not exceed the maximum charging times.
These charging times only apply to discharged batteries. Frequent insertion
of a charged or partially charged battery pack will result in overcharging and
cell damage. Do not leave batteries in the charger for days on end.

8
8. Never use or charge batteries if you suspect that it has been more than
12 months since the last time they were charged. There is a high probability
that the battery pack has already suered dangerous damage (exhaustive
discharge).
9. Charging batteries at a temperature below 41oF (5oC) will cause chemical
damage to the cells and may cause a fire.
10. Do not use batteries that have been exposed to heat during the charging
process, as the battery cells may have suered dangerous damage.
11. Do not use batteries that have suered curvature or deformation during the
charging process or those that exhibit other atypical symptoms (gassing,
hissing, cracking, etc.)
12. Never fully discharge the battery pack (maximum recommended depth of
discharge is 80%) A complete discharge of the battery pack will lead to
premature aging of the battery cells.
PROTECTION FROM ENVIRONMENTAL INFLUENCES
1. Wear suitable work clothes. Wear safety goggles.
2. Protect your cordless tool and the battery charger from moisture and rain.
Moisture and rain can cause dangerous cell damage.
3. Do not use the cordless tool or the battery charger near vapors and
flammable liquids.
4. Use the battery charger and cordless tools only in dry conditions and at an
ambient temperature of 50oF - 104oF (10oC - 40oC).
5. Do not keep the battery charger in places where the temperature is liable to
reach over 105oF (40.5oC). In particular, do not leave the battery charger in
a car that is parked in the sunshine.
6. Protect batteries from overheating. Overloads, overcharging and exposure
to direct sunlight will result in overheating and cell damage. Never charge or
work with batteries that have been overheated – replace them immediately,
if possible.
7. Store the charger and your cordless tool only in dry locations with an ambient
temperature of 50oF - 104oF (10oC - 40oC). Store your lithium-ion battery pack
in a cool, dry place at a temperature of 50oF - 68oF (10oC - 20oF). Protect the
battery pack, charger and cordless tool from humidity and direct sunlight.
Only place fully charged batteries in storage.
8. Prevent the lithium-ion battery pack from freezing. Battery packs that were
stored below 32oF (0oC) for more than 60 minutes must be discarded.
9. When handling batteries, be wary of electrostatic charge. Electrostatic
discharges can damage the electronic protection system and the battery
cells. Avoid electrostatic charging and never touch the battery poles.
5554-514
22" CORDLESS SNOW BLOWER

9
ADDITIONAL SAFETY INSTRUCTIONS
SAFETY INSTRUCTIONS FOR WALK-BEHIND SNOW BLOWERS
• Read the operator’s manual carefully – Learn your snow blower’s applications
and limitations as well as the specific potential hazards related to this machine.
Do not use this machine for any purpose other than the one for which it was
designed. Failure to adhere to these precautions may cause mechanical defaults,
serious damage, or personal injury.
• Preliminary unit inspection – Thoroughly inspect the unit before use. Make sure
all the parts are secure and installed correctly. If you notice any abnormalities, do
not use the machine until it has been properly repaired. Always perform a test run
the first time you use the snow blower or after replacing parts to ensure that the
unit is functioning properly.
• Preliminary area inspection – Clear the area to be plowed before each use.
Remove all objects such as rocks, broken glass, nails, wire, or string, which can
be thrown by or become entangled in the snow blower. Keep the area of operation
clear of all people, children, and pets.
• Excessive force – The snow blower was designed to respond at a certain rate for
various snow conditions for optimal safety and performance. Do not force it; keep
the applied pressure constant throughout its operation.
• Malfunctioning switch – Do not use the snow blower if the switch does not turn
it on and o. Any tool that cannot be controlled by the switch is not safe to use
and must be repaired.
• Hitting an object – If the snow blower accidentally strikes an object, first stop the
snow blower and remove the battery; next, inspect for damage; finally repair or
replace any damaged part before restarting and operating the snow blower.
• Discharge chute safety – Never direct the snow discharge chute at the operator,
at bystanders, at vehicles, or at windows. The discharged snow, which may
contain foreign objects accidentally picked up by the snow blower, can cause
serious damage and personal injury. Do not use your hands to unclog the
discharge chute. Stop the motor before removing debris.
• Hand-held operating position – Operation of the snow blower in the hand-held
position is unsafe.
• Abnormal operation – If you find that the snow blower is not running properly or
hear abnormal sounds or feel abnormal vibrations from the motor, immediately
stop the machine, remove the battery, and contact the customer service center
at 1-833-818-4111 for assistance.
• Noise control – When using the snow blower, respect the local laws and
regulations regarding noise control and environmental protection. To avoid
noise disturbance, you should carefully decide upon an appropriate operation
time and consider the surrounding conditions.
• When work is completed – Remove the battery pack from the snow blower
when not in use, when changing accessories, and before performing any
maintenance task.

10
• Store safely – Store the snow blower indoors in a dry area between uses. Keep
in a locked area, where children and unauthorized users cannot gain access.
Never store the snow blower with the battery pack installed. It may cause damage
and injury.
• Maintain for safety and longevity – Check for misalignment or binding of moving
parts, breakage of parts, and any other conditions that may aect the unit’s
operation. If damaged, repair or replace the damaged part before use. Use only
those replacement parts made for your model. When replacing any parts, you
must strictly observe the instructions and procedures described in this manual.
Special care should be paid to any rubber parts, since these parts may increase
the motor load and decrease its mechanical power if damaged.
• Rotating parts – Do not put hands or feet near or under rotating parts. Keep clear
of the discharge opening at all times.
• Hidden hazards – Exercise extreme caution when operating on or crossing gravel
drives, walks or roads. Stay alert for hidden hazards or trac.
• Exercise extreme caution when operating on slopes. Never operate the machine
at high transport speeds on slippery surfaces. Look behind and use care when
operating in reverse.
• Never operate the snow thrower without good visibility or light. Always be sure
of your footing, and keep a firm hold on the handles. Walk; never run.
• Do not overload the machine capacity by attempting to clear snow at too
fast a rate.
• Never allow children to operate the equipment. Never allow adults to operate
the equipment without proper instruction.
• Adjust the collector housing height to clear gravel or crushed rock surface.
• Always wear safety glasses or eye shields during operation or while performing
an adjustment or repair to protect eyes from foreign objects that may be thrown
from the machine.
CLEARING A CLOGGED DISCHARGE CHUTE
Hand contact with the rotating impeller inside the discharge chute is the most
common cause of injury associated with snow throwers. Never use your hand to
clean out the discharge chute.
TO CLEAR THE CHUTE: i) SHUT THE MOTOR OFF! ii) Wait 10 seconds to be
sure the impeller blades have stopped rotating. iii) Always use a clean-out tool,
not your hands.
ELECTRICAL SAFETY
Avoid accidental starting – Make sure the safety switch and the ON/OFF trigger
is in the OFF position before inserting the battery pack into the unit. Do not carry
the snow blower with the safety switch and ON/OFF trigger engaged.
5554-514
22" CORDLESS SNOW BLOWER
11
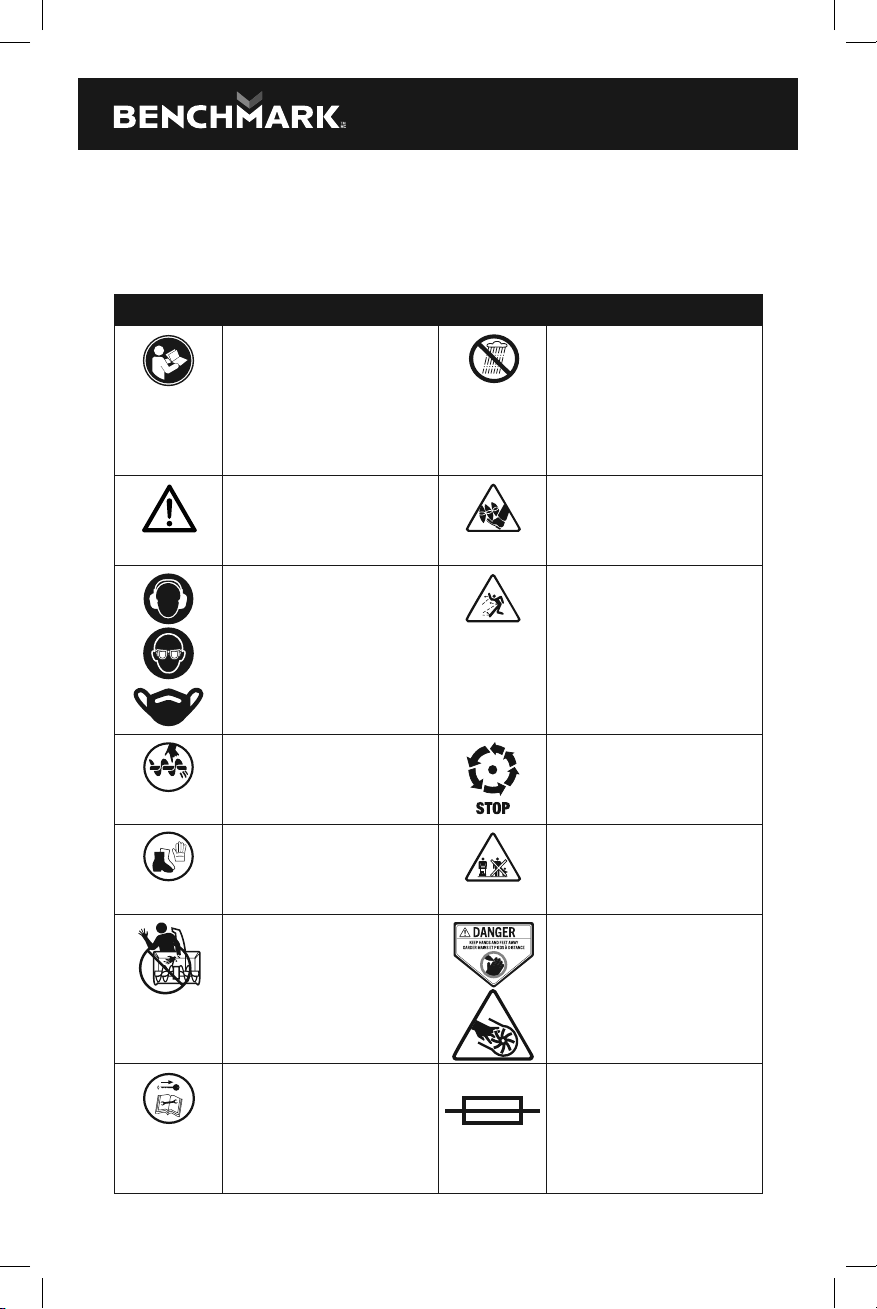
SAFETY SYMBOLS
The following table depicts and describes safety symbols that may appear on
this product. Read, understand and follow all instructions on the machine before
attempting to assemble and operate.
SYMBOL DESCRIPTION SYMBOL DESCRIPTION
READ THE OPERATOR’S
MANUAL(S) – Read,
understand and follow
all instructions in the
user manual(s) before
attempting to assemble
and operate.
WARNING! Do not expose
the unit to rain or wet
conditions. Keep dry.
SAFETY ALERT –
Indicates a precaution,
a warning or a danger.
DANGER! Cutting/
dismemberment hazard -
Keep feet away from the
rotating auger.
Wear hearing protection.
Wear eye protection.
Wear breathing
protection.
CAUTION! Beware of
stones and other foreign
objects that could be
thrown from the tool.
Keep hands, feet and
clothing away from the
rotating auger to avoid
injury.
The rotating part will
continuously run for
several seconds after you
turn o the machine.
Wear protective gloves
and non-slip footwear
when using the machine
and handling debris.
Keep bystanders and
children a safe distance
(at least 33 ft/10 m) away
from the work area.
Do not use hands to
unclog chute.
DANGER! Cutting/
dismemberment hazard
– Keep hands away from
the rotating auger. Do
not use hands to unclog
rotor housing. Stop motor
before removing debris.
WARNING! Always
turn the machine OFF
and remove the safety
key before conducting
inspection, cleaning and
maintenance.
T5A Protective 5A limited

12
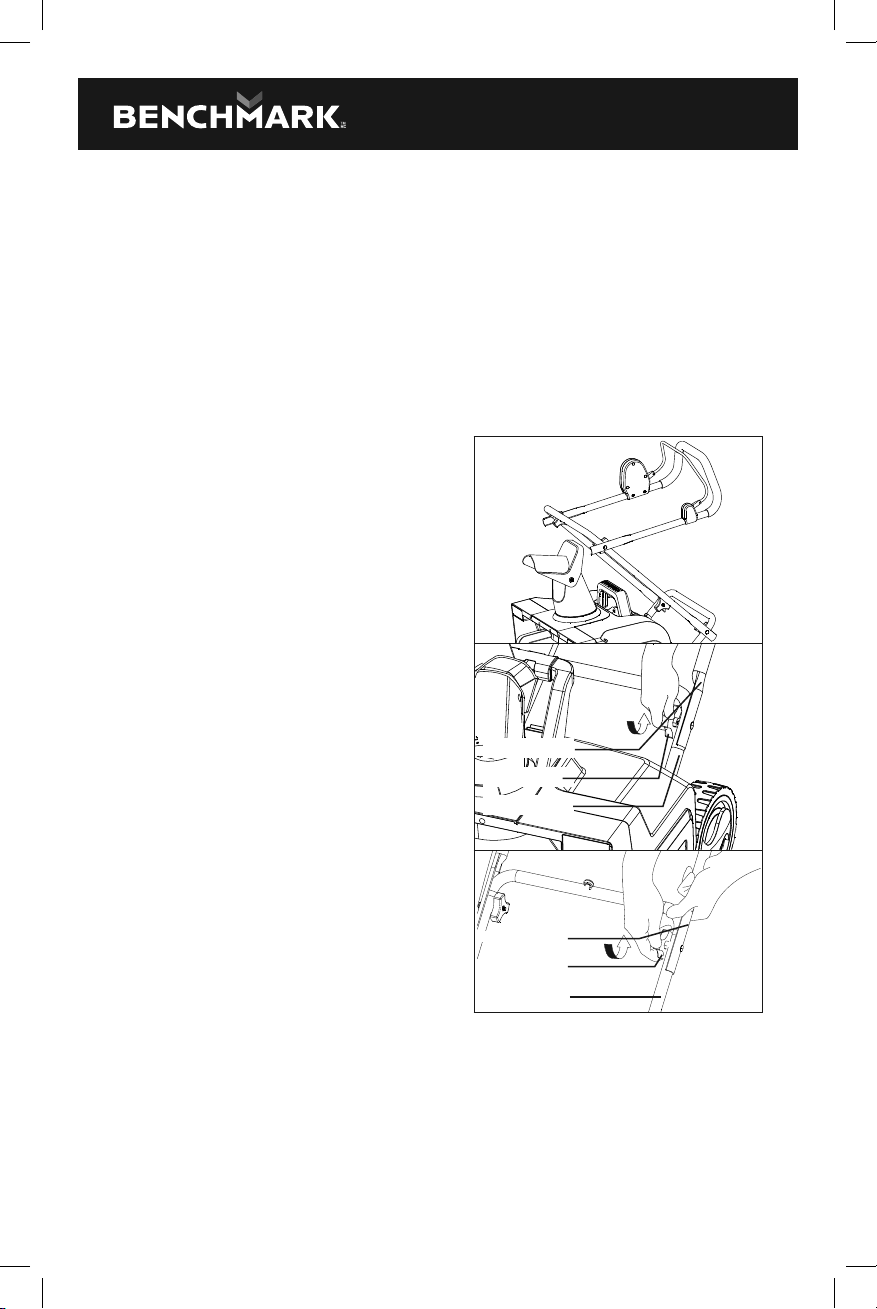
KNOW YOUR CORDLESS SNOW BLOWER
Read the owner’s manual and safety rules carefully before operating your cordless
snow blower. Compare the illustration below the actual unit in order to familiarize
yourself with the location of the various controls and adjustments. Save this manual
for future reference.
FUNCTIONS
1. Handle Bar
2. Bail Lever
3. Safety Switch Button
4. Joint Fixing Bolt &
Knob (4 Pieces)
5. Carrying / Lifting Handle
(For Transport Only)
6. Battery Housing Cover
7. Lower Frame
8. Wheel
9. Scraper Bar
10. Paddle
11. Main Cover
12. Led Light
13. Lower Chute Crank
14. Discharge Chute
15. Chute Clean-Out Tool
16. Upper Chute Crank
17. Middle Frame
18. Battery
19. Battery Release Button
16 17 19
9 10 11
1
2
3
4
5
6
7
8
15
14
13
12
18
5554-514
22" CORDLESS SNOW BLOWER
13
GETTING STARTED
1. Remove the snowblower and all other items from the box.
2. Determine the left and right hand side of the snowblower by standing in the
normal operating position.
3. Check all items for shipping damage. If damage is found or suspected or if any of
the parts are missing, do not assemble. Instead, promptly inform the dealer where
you bought the snowblower or contact at 1-833-818-4111 for assistance.
4. Check to make sure the upper chute crank is included.
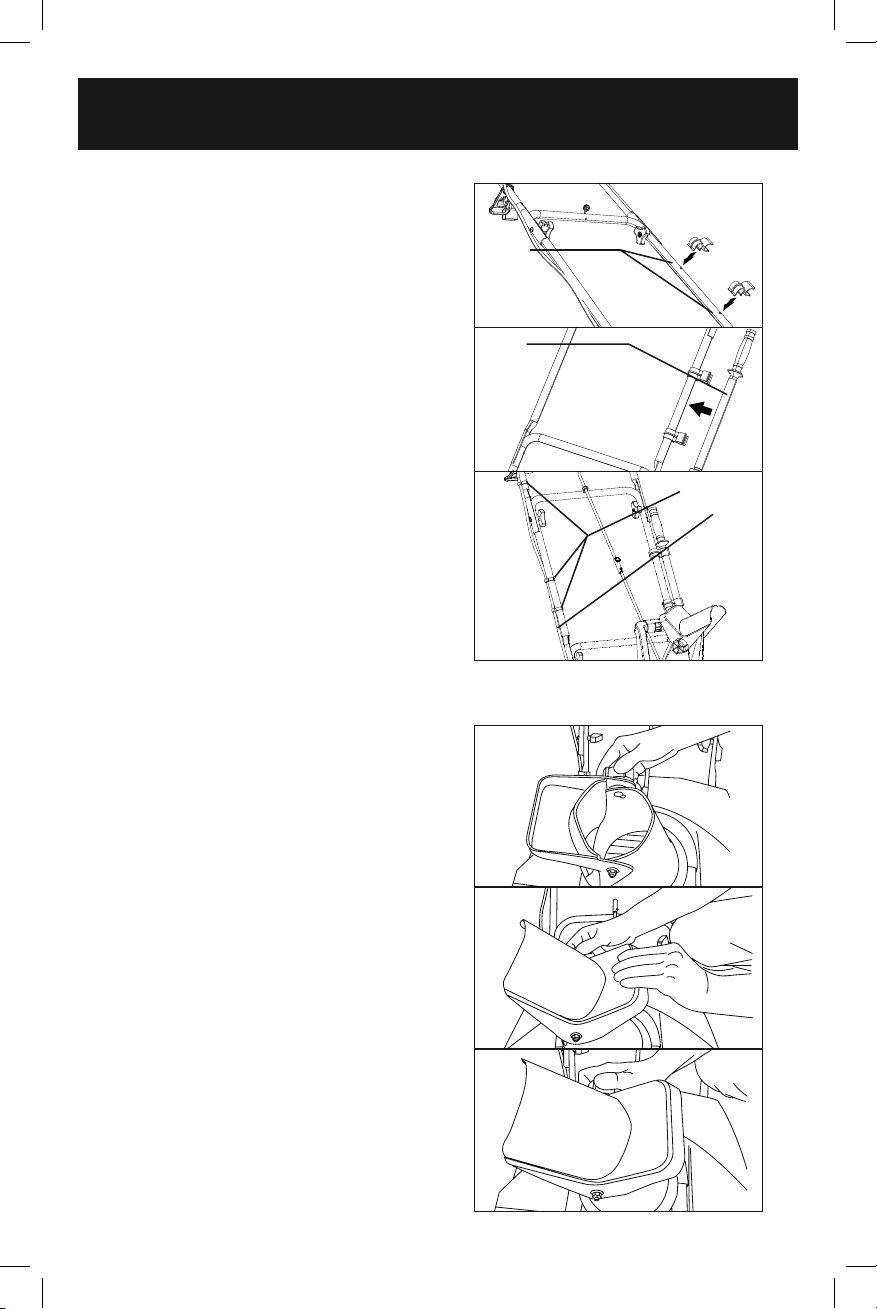
ASSEMBLING THE HANDLE
1. For easy assembly, the unit comes
complete with most parts already con-
nected. To complete the handle assembly,
simply pull the middle frame back and
pull the upper frame up (Fig. 1).
2. Secure the connection of the lower frame
to the middle frame by and knobs on each
fastening the first set of joint fixing T-bolts
and knobs on each side (Fig. 2).
3. Secure the connection of the upper frame
to the middle frame by fastening the
second set knobs and bolts on each side
(Fig. 3).
Middle Frame
Knob + Bolt
Knob + T-bolt
Lower Frame
Upper Frame
Middle Frame
Fig. 2
Fig. 1
Fig. 3
14
4. Clip the 2 chute clean-out tool clips on the
side of the middle frame, and insert the
chute clean-out tool in the clips (Figs. 4-5).
5. Clip on the 2 cable clips on the frame,
and insert the cable inside of the cable
clips (Figs. 6).
Cable clips
Cable
Chute
Clean-Out
Tool
Chute
Clean-Out
Tool Clips
DISCHARGE CHUTE ASSEMBLY
1. Loosen the knob to lift the chute
deflector (Fig.7).
2. Left the chute deflector and lock it
securely onto the discharge chute (Fig.8).
3. Raise or lower the chute deflector
to the desired height of the snow
stream and tighten the knob (Fig.9).
NOTE! Do not overtighten the knob.
5554-514
22" CORDLESS SNOW BLOWER
Fig. 4
Fig. 6
Fig. 7
Fig. 8
Fig. 9
Fig. 5
15
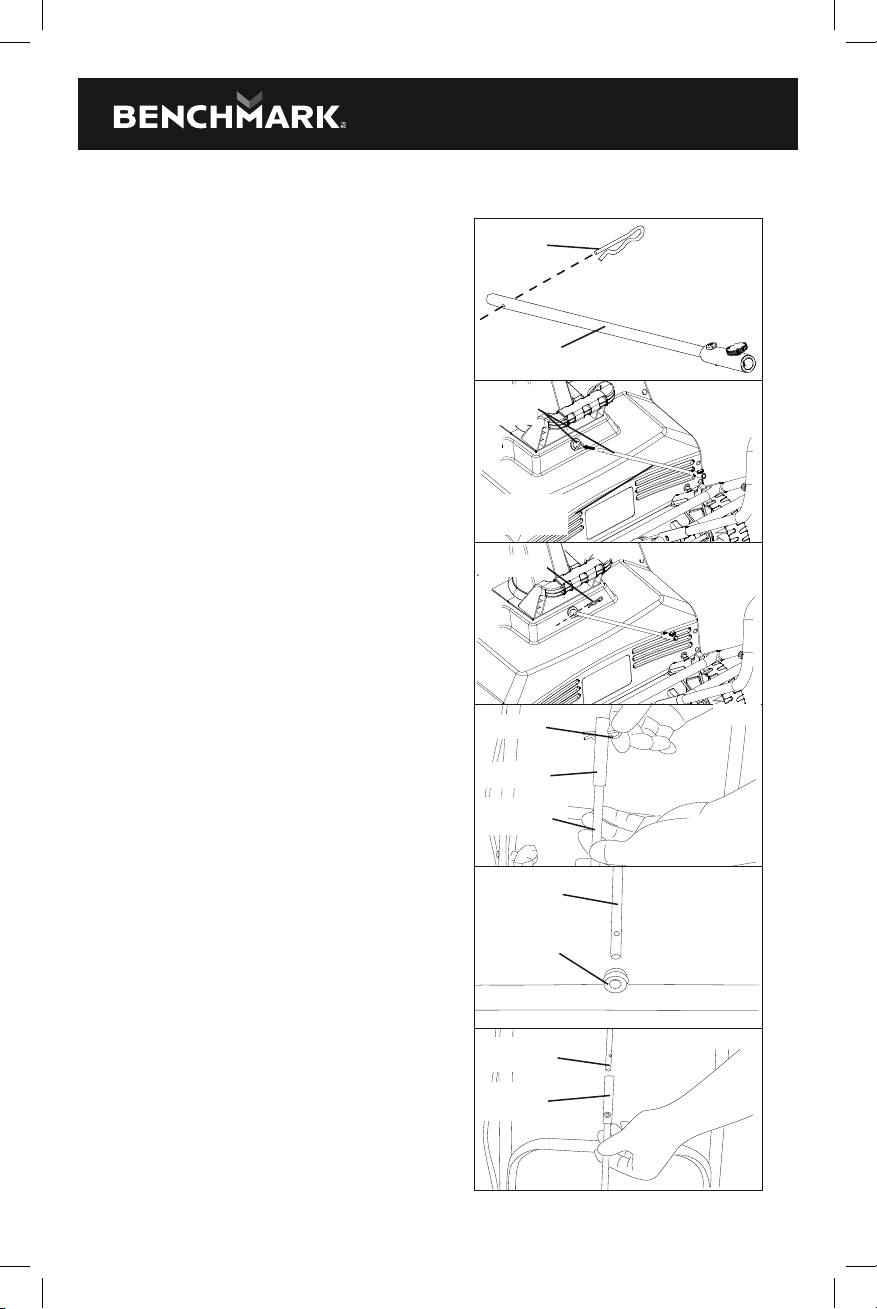
CHUTE CRANK ASSEMBLY
1. Remove the cotter pin from the lower
chute crank (Fig.10).
2. Install the lower crank rod by inserting it
into the opening at the back of the housing
with holes aligned (Fig.11).
3. Secure the lower chute crank in place
with the cotter pin (Fig.12).
4. Remove the cotter pin on the crank rod
connector by hand (Fig.13).
5. Slide the upper chute crank through the
rubber ring located on the middle frame
(Fig.14).
6. Slide the upper chute crank into the
crank rod connector (Fig.15).
Upper Chute
Crank
Upper Chute
Crank
Crank Rod
Connector
Rubber Ring
Cotter Pin
Cotter Pin
Cotter Pin
Align the
holes
Lower Chute
Crank
Lower Chute
Crank
Crank Rod
Lower Chute
Crank
Fig. 10
Fig. 11
Fig. 12
Fig. 14
Fig. 15
Fig. 13
16
7. Align the holes and insert the cotter pin
by hand (Fig.16).
Cotter Pin
NOTE: Before using this machine, make sure that the power source you will use
complies with the specifications detailed in this manual. Before inserting the battery
to start, verify that the snowblower’s roll shaft and rubber plates are firmly secured
with screws, and that the rubber plates are facing the correct direction. Perform a
test run to ensure that the motor turns freely.
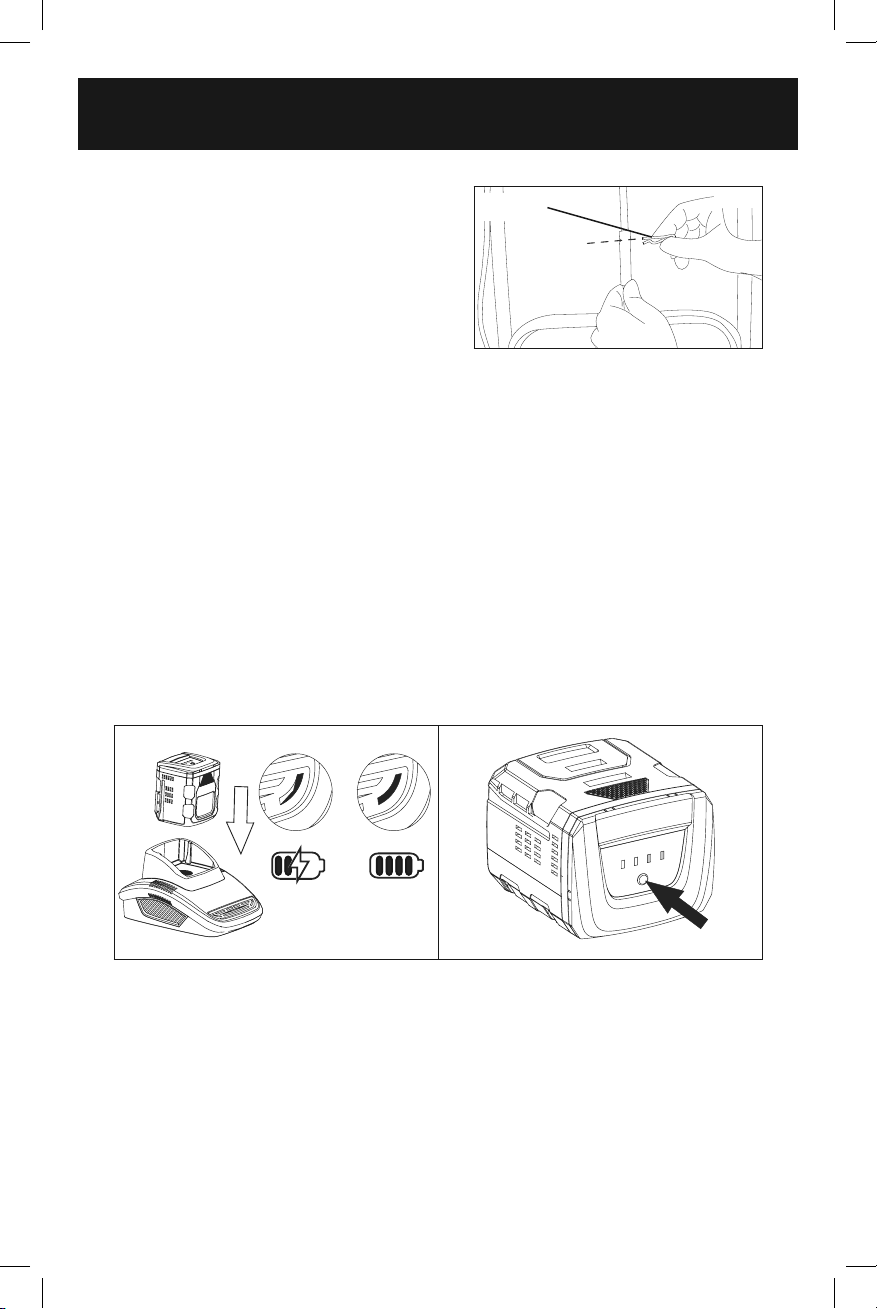
CHARGING THE BATTERY PACK
NOTE: Remove the battery pack from the charger after it has been fully charged.
NOTE: Battery should be fully charged before first use.
NOTE: Make sure the mains voltage is the same as the rating label which is located
on the charger.
1. Connect the charger to a power supply. The red LED will light up.
2. To insert the battery pack into the charger, align the raised ribs of the battery
pack with the grooves of the charger then push it in (Fig.17).
3. The green LED light of the charger will flash continuously during normal charging.
4. After charging is complete, the charger light will turn to a solid green light.
POWER INDICATOR (Fig.18)
This Li-Ion battery pack is equipped with a power indicator which is used to show
the battery packs remaining charge. Press the power indicator button to check
battery charge. The LEDs will stay lit for approximately 4 seconds.
5554-514
22" CORDLESS SNOW BLOWER
Fig. 16
Fig. 17 Fig. 18

17
To obtain the best life from the battery
NOTE:
1. Never allow the battery to completely discharge before recharging. The battery
pack should be placed on the charger whenever the battery pack is noticeably
running down or the tool no longer performs a task as it previously performed.
2. Avoid conducting short charges. Make sure that the battery is fully charged
each time by allowing the charger to complete its full charging cycle.
3. Avoid allowing loose items like screws or nails etc. to be stored with battery
packs as these or similar items can short battery packs’ life and cause a fire
or explosion.
4. Always unplug the charger when not in use and store in a dry and secure place.
5. Avoid charging or storing your battery in temperatures below 5°C and above 45°C.
6. After use, allow the battery pack to cool down for approximately 30 minutes
before attempting to recharge.
STARTING AND STOPPING
1. Open the battery housing cover and slide battery down until it clicks to lock it into
position, then close the battery housing cover (Fig.19).
POWERING ON AND OFF
1. To power on, depress and hold the safety switch button found alongside the
switch housing (Fig. 20).
Battery
Fig. 19
Fig. 21Fig. 20

18
2. While depressing the safety switch button, pull the ON/OFF switch bail toward
you. Once the machine powers on, release the safety switch button and begin
operation (Fig. 21). The machine can only be started by depressing the safety
switch button first, followed by squeezing the ON/OFF switch bail; reverse
operation will not start the machine.
3. To power o, release your grip on the ON/OFF switch bail.
4. The LED light can be used to illuminate the surface in front in the dark. When
the battery pack located in the battery housing well, the LED light will light after
the machine gets started. The LED light will delay 30 seconds to turn o after the
machine get power o.
MOVING THE MACHINE & PLOWING THE SNOW
WARNING: Foreign objects, such as rocks, broken glass, nails, wire, or string,
can be picked up and thrown by the snowblower, causing serious personal injury.
Remove all foreign objects from the area to be plowed before operating the
snowblower.
1. Keep the area of operation free of foreign objects that can become thrown
by the rotating paddle. Perform a thorough inspection of the area since some
objects may be hidden from view by surrounding snow. If the snowblower hits
an obstruction or picks up a foreign object during use, stop the snowblower,
disconnect the extension cord, remove the obstruction, and inspect the unit
for damage. Repair or replace any damaged part before restarting and
operating the unit.
2. Keep children, pets, and bystanders away from the area of operation. Be aware
that the normal noise of the machine when turned on may make it dicult for
you to hear approaching people.
3. When moving the snowblower, use the wheels on one side as the pivot point.
Slightly tilt the snowblower on this pivot point to move it forward or backward.
4. Start your clearing path near the electrical outlet and work outward, throwing
snow in a back and forth motion. To clear in the opposite direction, step over
the cord and pivot the snowblower on its wheels. Make sure to overlap clearing
paths.
5554-514
22" CORDLESS SNOW BLOWER

19
5. Note the wind direction. If possible, move in the same direction as the wind so
that the snow is not thrown against the wind (and then back into your face and
onto the just cleared path).
6. While moving the snowblower, do not drag the power c able violently or roughly.
The s now thrower should move within the range that the cable can reach.
7. Do not push the snowblower with excessive force. You should push the machine
gently and evenly in accordance with the unit’s throw rate.
8. Do not apply additional man-made load to the engine since this may cause
engine damage.
9. Some parts of the snowblower may freeze under extreme temperature
conditions. Do not attempt to operate the snowblower with frozen parts. If the
parts freeze while the snowblower is in use, stop the snowblower, unplug the
extension cord, and inspect for frozen parts. Free all parts before restarting
or operating the snowblower. Never force controls that have frozen.
10. When working on pebbles, gravel, or unpaved surfaces, avoid throwing loose
surface material along with the snow by pushing down on the handle to raise
the scraper bar at the base of the unit above the pebbles or gravel.
CHANGING THROW DIRECTION AND THROW HEIGHT
1. The discharge chute can be adjusted 180 degrees by rotating the chute crank.
Rotate the chute control crank clockwise to move the discharge chute to the left
(Fig. 22) and counter-clockwise to move the chute to the right (Fig. 23).
NOTE: A little lubricant, such as WD- 40, will provide a smoother operation of the
chute (spray at points A and B as indicated in Fig. 22).
2. The chute deflector on the top of the discharge chute controls the height of the
snow stream. Loosen the knob to raise or lower desired height of snow you wish
to throw. Tighten the knob to secure the detector (Fig. 24).
A
B
Fig. 22 Fig. 23
Table of contents
Other Benchmark Snow Blower manuals


