Beyond Acoustic CSU-100R User manual


CAUTION: READ THIS BEFORE OPERATING YOUR UNIT
1. To ensure the best performance, please read this
manual carefully. Keep it in a safe place for future
reference.
2. Install your unit in a cool, dry, clean, dust-free
environment - away from windows and sources of moisture,
cold, vibration, or devices which may induce hum such as
transformers or electric motors. To prevent fire or electrical
shock, do not expose the unit to rain or water.
3. Do not operate the unit upside-down.
4. Never open the cabinet. If a foreign object drops into the
unit, contact your dealer.
5. Place the unit in a location with adequate air circulation.
Do not interfere with its proper ventilation; this will cause
the internal temperature to rise and may result in a failure.
6. Do not apply excessive force to switches, knobs or
cords/cables. Before moving the unit, always turn off the
power and carefully disconnect the power plug and the
cords connecting to other equipment. Always hold the plug,
never pull the cord itself.
7. Do not attempt to clean the unit with chemical solvents:
this might damage the finish. Use only a clean, dry cloth.
8. Be sure to read the "Troubleshooting" section on
common operating errors before concluding that your unit
is faulty.
9. This unit consumes power even when the power switch
is turned off. We recommend that you unplug the power
cord from the wall outlet if the unit is not going to be used
for a long time. This will save electricity and help prevent a
fire hazard. To disconnect the cord, pull it out by grasping
the plug, never pull the cord itself.
10. To prevent lightning damage, pull out the power cord
and where applicable, remove the antenna cable during an
electrical storm.
11. Digital signals may cause interference to other
equipment such as tuners or receivers. The CSU-100R
should be moved away from such equipment if
interference is observed.
NOTE:
Please check the copyright laws in your country before
recording from records, compact discs, radio, etc.
Recording of copyrighted material may infringe copyright
laws.
CAUTION
The apparatus is not disconnected from the AC power
source so long as it is connected to the wall outlet, even if
the apparatus itself is turned off. To fully ensure that the
apparatus is indeed fully void of residual power, leave unit
disconnected from the AC outlet for at least fifteen
seconds.

Safety Instructions
1. Read Instructions - All the safety and operating
instructions should be read before the appliance is
operated.
2. Retain Instructions - The safety and operating
instructions should be retained for future reference.
3. Heed Warnings - All warnings on the appliance and in
the operating instructions should be adhered to.
4. Follow Instructions - All operating and use instructions
should be followed.
5. Attachments - Only use attachments/accessories
specified or provided by the manufacturer (such as the
exclusive supply adapter, battery etc.)
6. Water and Moisture - Do not use this unit near water.
For example, near a bathtub or in a wet basement and the
like.
7. Carts and Stands - Use only with the cart, stand, tripod,
bracket, or table specified by the manufacturer, or sold
with the apparatus. When a cart or rack is used, use
caution when moving the cart/apparatus combination to
avoid injury from tip-over.
7 A. An appliance and cart combination should be moved
with care. Quick stops, excessive force, and uneven
surfaces may cause an overturn.
8. Ventilation - The appliance should be situated so its
location does not interfere with its proper ventilation. For
example, the appliance should not be situated on a bed,
sofa, rug, or similar surface that may block the ventilation
slots.
9. Heat - The appliance should be situated away from heat
sources such as radiators, heat registers, stoves, or other
appliances (including amplifiers) that produce heat.
10. Power Sources - The appliance should be connected
to a power supply only of the type described in the
operating instructions or as marked on the appliance.
11. Power-Cord Protection - Power-supply cords should
be routed so that they are not likely to be walked on or
pinched by items placed upon or against them, paying
particular attention to cords at plugs, convenience
receptacles, and the point where they exit from the
appliance.
12. Cleaning - Unplug this unit from the wall outlet before
cleaning. Do not use liquid cleaners or aerosol cleaners.
Use a dry cloth for cleaning.
13. Power lines - An outdoor antenna should be located
away from power lines.
14. Non-use Periods - The power cord of the appliance
should be unplugged from the outlet when left unused for a
long period of time.
15. Object and Liquid Entry - Care should be taken so
that objects do not fall and liquids are not spilled into the
enclosure through openings.
16. Damage Requiring Service - The appliance should be
serviced by qualified service personnel when:
A. The power supply cord or plug has been damaged; or
B. Objects have fallen into the appliance; or
C. The appliance has been exposed to rain; or
D. The appliance does not appear to operate normally or
exhibits a marked change in performance; or
E. The appliance has been dropped, or the enclosure
damaged.
17. Servicing - The user should not attempt to service the
appliance beyond that described in the operating
instructions. All other servicing should be referred to
qualified service personnel.
18. Manufacturer declarations –In compliance with the
following requirements: RoHS Directive (2002/95/EU) and
WEEE Directive (2002/96/EU) if this product is ever no
longer functional please take it a recycling plaint for
environmental friendly disposal
19. CE declaration of conformity - EMC Directive
(2004/108/EC), Low Voltage Directive (2006/95/EC)

Before Getting Started
Introduction
Thank you for purchasing the CSU-100R CD Player SD/USB Digital Audio Recorder. The CSU-100R offers
convenient real-time digital audio recording to both SD cards and USB drives. Its user-friendly operation makes it
an ideal recording platform for DJ mixes, band rehearsals, sermons, board meetings, and more. With a full set of
CD Player playback controls, the CSU-100R can also function as a MP3 SD/USB player with separate and mixed
audio outputs. Its slim rack-mountable construction will fit neatly into standard rack cases.
Features
Fast loading, slot-in CD Player, MP3 compatible
Electronic anti-shock capability 40 seconds
Supports removable USB Flash Drive up to 32GB
Pitch Control continue adjustable +/- 16%
Looping capability and Cueing playback
Shuffle/Repeat/Single playback / Program modes
Display text for ID3 tags and folder names for easy navigation
LCD display for excellent visibility in any lighting scenario
Records 192 kbps audio files to SD/SDHC card / USB drive via RCA jacks
Record level controls and 1/4” headphone jack with volume control
Delete recorded files directly from recorder
Full-featured playback with single and repeat playback modes
RCA Stereo audio output
Backlit buttons for use in low-light areas
Slim 1RU chassis
110V-240V compatible and detachable IEC AC inlet
Specifications
Channels ………………………………….... 2 (Stereo)
CD Playback ……………………………….. CDDA and MP3
Recording Format ………………………… MP3 : 192kbps
Recording Media …………………………. SD (64MB-2GB) SDHC (4GB-32GB)
USB (up to 32GB) Support FAT16/32)
USB compatibility ………………………… USB 1.0, 1.1, 2.0
Sampling Rate …………………………….. 44.1KHz / 48KHz 16 BIT
Dynamic Range ……………………………. >75dB
THD+N ……………………………………….. 1%
Frequency Response ………………………. 20Hz - 18KHz
Input Impedance …………………………… 10K ohm
Output Impedance …………………………. 32 - 64 ohm Stereo
Maximum Output …………………………… Line (10k ohm) : 0.7V RMS (-3dBV)
Notes regarding storage media
1. The use of good quality SD cards is recommended (those with a high “Group” number).
2. It is best to keep USB/SD devices dedicated to audio files only (do not mix with videos, photos or
documents)
3. Ensure that there is enough space on your card or drive to complete your recording(s)
4. The use of partitioned USB/SD devices for recording is not recommended.

Getting Started
Unpacking
This CSU-100R has been inspected and tested prior to being shipped. During unpacking, carefully check that you have
received all the required components. This is also the time to check the main unit for damage. If any damage is noticed,
promptly report this to your shipping carrier. Save the shipping boxes and all packaging materials in case the unit needs
to be shipped for service.
Box Contents
CSU-100R Main Unit
AC Power Cable
Features
Front Panel
CD Player
1. EJECT BUTTON - Press to load or eject disk. Each press will open or close the disk tray.
NOTE: Disc holder will not open unless stop or pause button has been pushed first.
2. PLAY/PAUSE BUTTON - Press the PLAY/PAUSE button, the operation changes from play to pause, vice versa.
3. CUE BUTTON – Return and stop at the start point of playing music file
4. CD/USB BUTTON – Choose CD / USB mode while USB Flash Drive inserted and CD on tray.
5. TIME BUTTON - Choose the time mode; Elapsed time, remaining time or total remaining time.

6. REPEAT BUTTON - To repeat one track or all the tracks of the CD.
7. RELOOP BUTTON - To recall the last saved loop and to finish the loop.
8. IN BUTTON – Use this button sets the beginning of the loop. The Loop indicator on the display flashes.
9. OUT BUTTON – Press this button to set the end point of the loop and you start the loop. To
finish the loop, press again this button.
10. CONT. / SINGLE BUTTON - Press this button to switch between the SINGLE and CONTINUOUS play mode.
11. PROG BUTTON - In STOP mode, you can program several tracks (20 tracks max):
Press the STOP button to enter in the stop mode
Press the PROG button to enter in the program mode
Press SKIP button to select the desire track then press the PROG button to enter your choice.
Repeat the operation to select all the tracks to be program
Press the play/pause button to start the playback
12. +10 BUTTON - Use this button to jump of 10 tracks in one press.
13. SKIP BUTTON – Press and hold the button to carry out fast backward searching, press once to skip backward
14. SKIP BUTTON – Press and hold the button to carry out fast forward searching, press once to Skip forward
15. FOLDER BUTTON - To navigate through folders similarly in either USB or CD mode.
16. BUTTON – Press this button to carry out random play.
17. PITCH BEND-BUTTON – The speed control, press this button to decrease the speed 0~16%
18. PITCH BEND+BUTTON – The speed control, press this button to increase the speed 0~16%
19. USB PORT - Support USB Flash Drive up to 32GB, FAT16/32, USB version 1.0, 1.1, 2.0
20. Dot Matrix LCD DISPLAY
21. DISC-TRAY – Slot in Compact Disc, support CDDA and MP3
MP3 Player/Recorder
22. DELETE BUTTON - Delete Music Track on the SD Card or USB Flash Drive.
23. SD CARD SLOT - Inserting SD card (support up to 2GB) or SDHC card (support up to 32GB)
24. FOLDER - Allows you to navigate through folders or tracks similarly in either USB or SD mode.
25. USB PORT – Support USB Flash Drive up to 32GB, FAT16/32, USB version 1.0, 1.1 and 2.0
26. +10 BUTTON - Use this button to jump of 10 tracks in one press.
27. LCD DISPLAY
28. MONITOR GAIN – Use this control to increase/decrease the volume of connected headphone.
29. REPEAT BUTTON REP /ALL /F – Indicates repeat mode:
REP – repeat one
REP ALL – repeat all tracks on the SD/USB
REP F – repeat all tracks within a folder
30. CONT. / SINGLE BUTTON - Press this button to switch between the SINGLE and CONTINUOUS play mode.
31. SD/USB BUTTON - Press this button to choose SD or USB mode while USB connect and the SD in the tray.
32. SKIP BUTTON - Press and hold the button to carry out fast backward searching, press once to skip backward
33. SKIP BUTTON – Press and hold the button to carry out fast forward searching, press once to Skip forward
34. RECORD BUTTON - To enter record mode and start recording. During recording, it can be used to pause the recording.
35. STOP BUTTON – Use this button to stop the Recording/Playback
36. PLAY/PAUSE BUTTON – Use this button to start and pause the playback
37. REC GAIN - To adjust the record level.
38. HEADPHONE JACK – Connect stereo Headphone jack (1/4”)
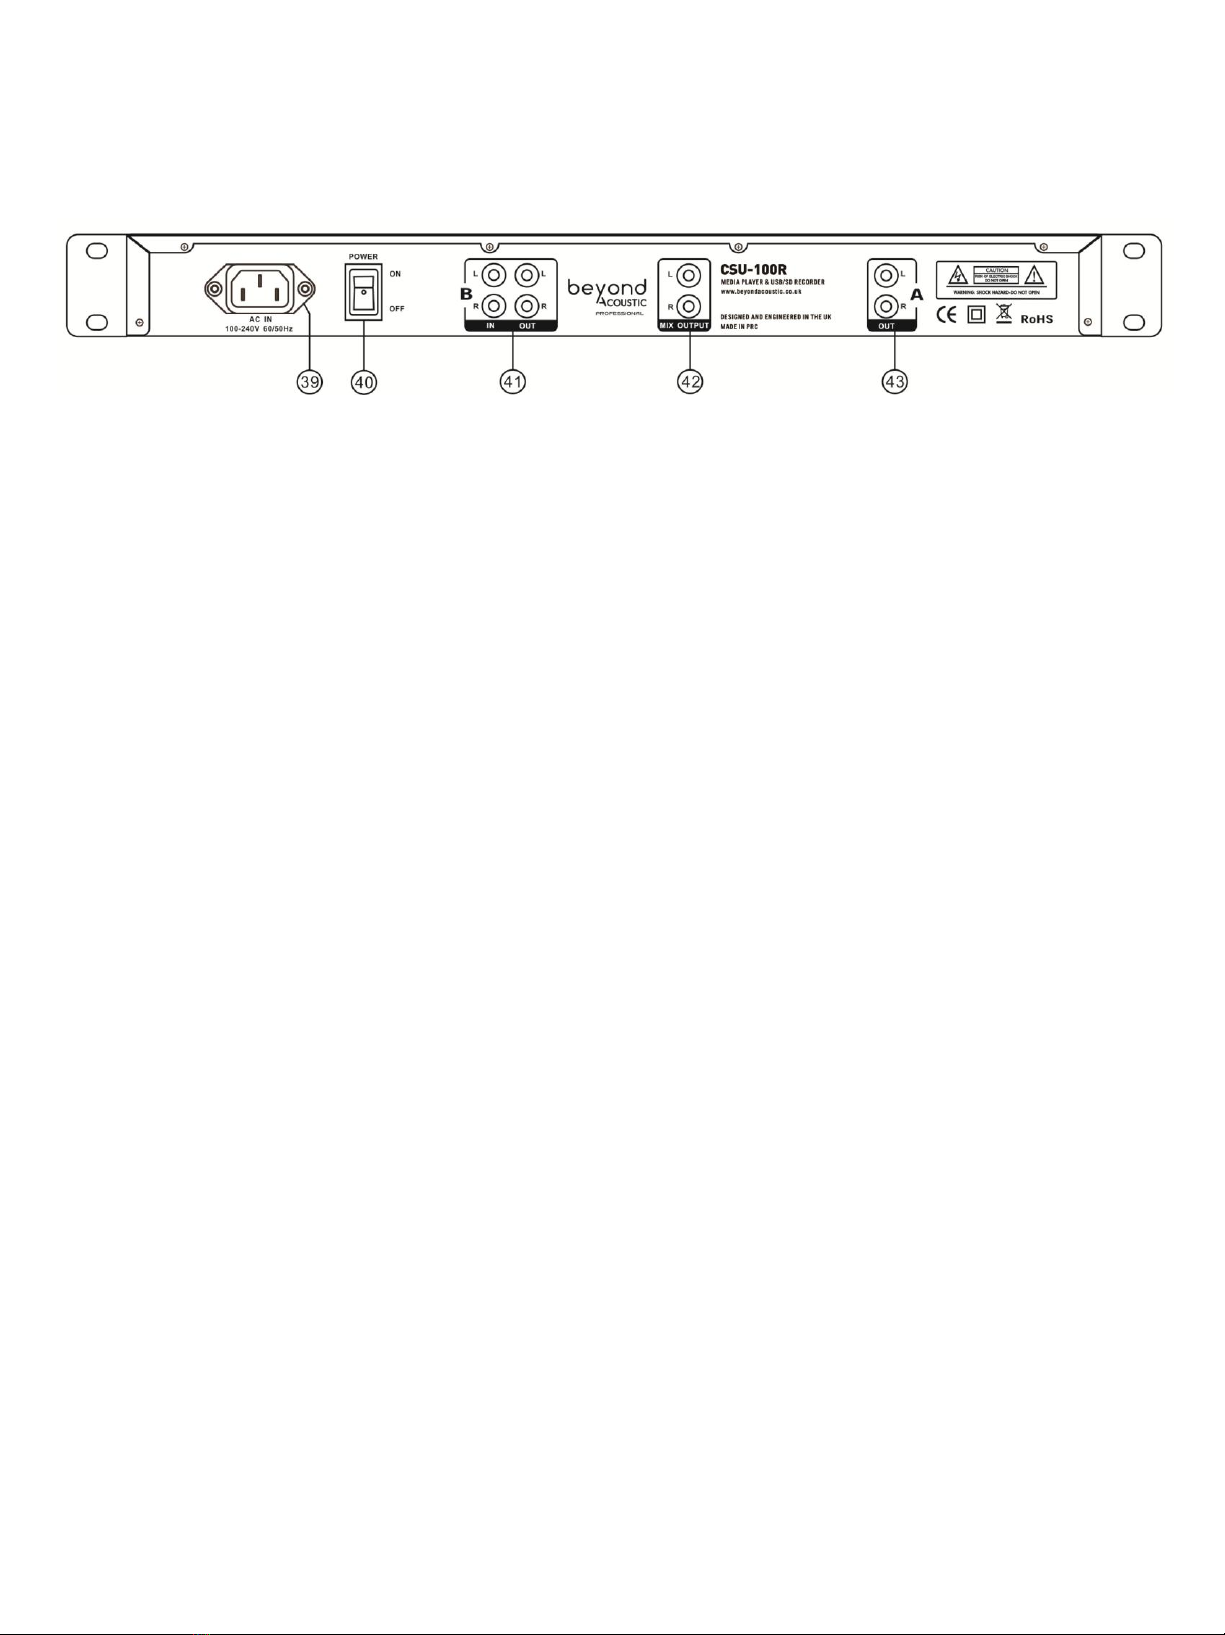
Rear Panel
39. IEC AC power socket, insert provided IEC AC power Cable to connect the AC main.
40. POWER SWITCH – Use this switch to turn the unit ON/OFF.
41. LINE IN/OUT (B) – Input terminal for recording sound source
Output terminal for USB Player at Recorder Section,
42. MIX OUT – A mix output to both CD Player and USB/SD Media Player
43. LINE OUT (A) – CD Player output terminal.
Troubleshooting
CD LCD indicate NO DISC
Check if the slot in CD reversed
Check if the CD is a traditional CDDA CD or if the music file format is in MP3
Files are being recorded but there is no sound
Check your input devices and connections.
Check the recording level.
Recording level is either too high or low
Re-adjust the recording level.
Check the playback level of your source device.
The sound is distorted
Check the incoming signal from the source device. If this is a mixer, check the outputs and make sure they are
not too high.
Check the recording level.
No audio output from the CSU-100R
Check the output connections on the back of the CSU-100R and connected devices.
Check to make sure the output toggle selector is set correctly.
Files are not recording to SD card/USB drive
Check the SD card or USB device on a computer to ensure it is working correctly.
Ensure that there is sufficient space on the SD card or USB device.
Warranty:
The warranty on Beyond Acoustic products is valid only in the country of
purchase. In the unlikely event of a product fault, please contact your
supplying dealer. Please retain your proof of purchase to obtain warranty
service.

Table of contents


