BioFridge BF-60-MIL-UPSD User manual

625 VENTURE STREET, SUITE A, ESCONDIDO CA 92029
TEL (760) 233-8847 * FAX (760) 233-8874
1
BioFridge®
Your Cold-Chain Partner®
SECTION TITLE PAGES
1Introduction and Basic Operation 2-3
2Cleaning & Storing 4
3Basic Troubleshooting 5-8
4Programming the Thermostat 9-11
5DBBS Operation/Procedures 12-15
6Table of Alarms 16
7Individual Model Specifications 17
Revised: November 10, 2017
PLEASE READ ENTIRE INSTRUCTION MANUAL BEFORE USING THE BIOFRIDGE UNIT
INSTRUCTION MANUAL
Portable Medical Refrigerator Units
MODEL BF-60-MIL-UPSD
Including the
Detachable Battery Backup System (DBBS)

625 VENTURE STREET, SUITE A, ESCONDIDO CA 92029
TEL (760) 233-8847 * FAX (760) 233-8874
2
The BF-60-MIL-UPSD has been designed to provide more flexibility, and
therefore more options, for those who work within the requirements
and protocol of cold-chain transport.
The Units can be used in the following manner and will run 24/7:
In any mode of transportation, including vehicles,
planes, boats, etc., Units can be plugged into a 12VDC to
28VDC supply (for example, vehicle’s cigarette lighter).
In a clinical setting, including temporary clinics or
established hospitals, Units can be plugged into a 110VAC
60 Hz/240 VAC 50 Hz supply (a standard wall outlet).
In any setting, when the Unit is connected to the
Detachable Battery Backup System (DBBS) and the
primary power source becomes lost, the Unit will
automatically draw from the DBBS 12VDC supply. (DBBS
must be pre-connected to the Unit.)
See SECTION 5 for more information on the DBBS.
Basic Operation
WARNING
BioFridge portable refrigerators and freezers are powered by
electric current; not taking proper steps to ensure safety can
potentially injure or kill. ANY installation, cleaning, or
troubleshooting must be conducted with the electrical power
source disconnected from the BioFridge Unit. (110VAC, 12VDC)
▪After receiving the BioFridge unit from the shipper, please wait 24
hours before turning it on. The oil in the compressor needs time to
settle. Ensure unit is upright and out of the box.
SECTION 1
Introduction

625 VENTURE STREET, SUITE A, ESCONDIDO CA 92029
TEL (760) 233-8847 * FAX (760) 233-8874
3
▪Never operate the BioFridge unit at a tilt exceeding 30 degrees for an
extended period of time. The oil reservoir will not lubricate the
compressor motor properly at angles above 30 degrees and damage
may result to the compressor.
▪When the BioFridge is plugged into the Detachable Battery Backup
System (DBBS) and running on the DBBS’s 12VDC system, the Unit will
operate for up to 18 hours as a portable refrigerator, and for up to 9
hours as a portable freezer.
▪Whenever possible, pre-cool the refrigerator and its contents in
advance using a 110-Volt AC power source (a typical wall outlet in the
USA and Canada) before taking it off the AC power grid (unplugging it
from the wall outlet).
▪BioFridge units are equipped with a GREEN light indicator located on
the control panel. The compressor is running when this light is
illuminated.
▪At least 4 inches of ventilation space around a BioFridge unit is
recommended in order to properly dissipate heat. Keeping the unit
well-ventilated will improve performance.
▪Whenever possible, avoid operating the BioFridge unit in direct
sunlight; doing so will decrease the unit's efficiency.
▪Many factors can affect the efficiency of the Unit. Factors include:
· the ambient temperature outside the Unit
· the ventilation area around the Unit
· the number of items inside the unit
· the starting temperature of the items put in the unit.
Placing warm items inside the unit in hot ambient temperatures, and
leaving the lid open, will negatively affect the performance.
▪Using the Unit is the best way to learn its capabilities.

625 VENTURE STREET, SUITE A, ESCONDIDO CA 92029
TEL (760) 233-8847 * FAX (760) 233-8874
4
▪The recommended way to clean the BioFridge is with a container of
warm water, a sponge, and a bottle of all-purpose cleaner. Never
submerge a BioFridge unit in water.
▪If the BioFridge is used as a freezer for long periods of time
(approximately 2-3 months) the Unit should be periodically defrosted
with its contents removed.
▪Never empty water out of the Unit by turning it upside down. Doing so
can cause water to collect in the top of the cowl. Remove excess water
with a sponge.
Storing
To store the Unit:
1. Ensure DBBS is plugged into the 110VAC (or wall outlet).
2. To ensure battery voltage does not drop to an excessively low
voltage, leave the DBBS plugged into the 110VAC, whenever
possible. If not available, power up once every 1 to 2 weeks.
3. Unplug the umbilical cord (between the BioFridge and DBBS).
4. Open the lid to defrost and vent the Unit.
5. Once defrosted, remove excess water with a sponge.
6. Store Unit with the lid slightly open.
WARNING
BioFridge portable refrigerators and freezers are powered by
electric current; not taking proper steps to ensure safety can
potentially injure or kill. ANY installation, cleaning, or
troubleshooting must be conducted with the electrical power
source disconnected from the BioFridge Unit. (110VAC, 12VDC)
SECTION 2
Cleaning

625 VENTURE STREET, SUITE A, ESCONDIDO CA 92029
TEL (760) 233-8847 * FAX (760) 233-8874
5
Observation
Probable Cause
(Work Down the List)
Remedy
Part
Description &
Number
AC power does not
work
1. No Power from 110-volt AC outlet
(standard wall outlet)
Confirm that the main
Room switch is on, the
110-volt outlet has power,
and that AC input is
plugged in
DC power does not
work
Blue connector not secured properly
Twist blue plug clockwise
until it snaps into place
2. 12-volt DC supply has low voltage
Fix DC voltage to 12.0
volts or higher by
changing batteries.
3. Blown fuse in DBBS DC circuit (in DBBS
enclosure)
Replace inline fuse
ATC-15 amps E-123
4. Blown internal fuse in DC circuit inside
fridge (inside compressor compartment)
Replace internal fuse
ATC 15 amps E-123
5. Loose connections at battery
terminals in DBBS
Tighten all terminals
Internal Fan not on
1. Fan only turns on when compressor is
on
Normal Operations
2. Fan Blocked with debris
Clean Fan
3. Fan connections loose (inside
compressor compartment)
Replace crimp connectors
(inside compressor
compartment)
12v internal fan E193
SECTION 3
Basic Troubleshooting
625 VENTURE STREET, SUITE A, ESCONDIDO CA 92029
TEL (760) 233-8847 * FAX (760) 233-8874
6
Observation
Probable Cause
(Work Down the List)
Remedy
Part
Description &
Number
Refrigerator not
getting cold
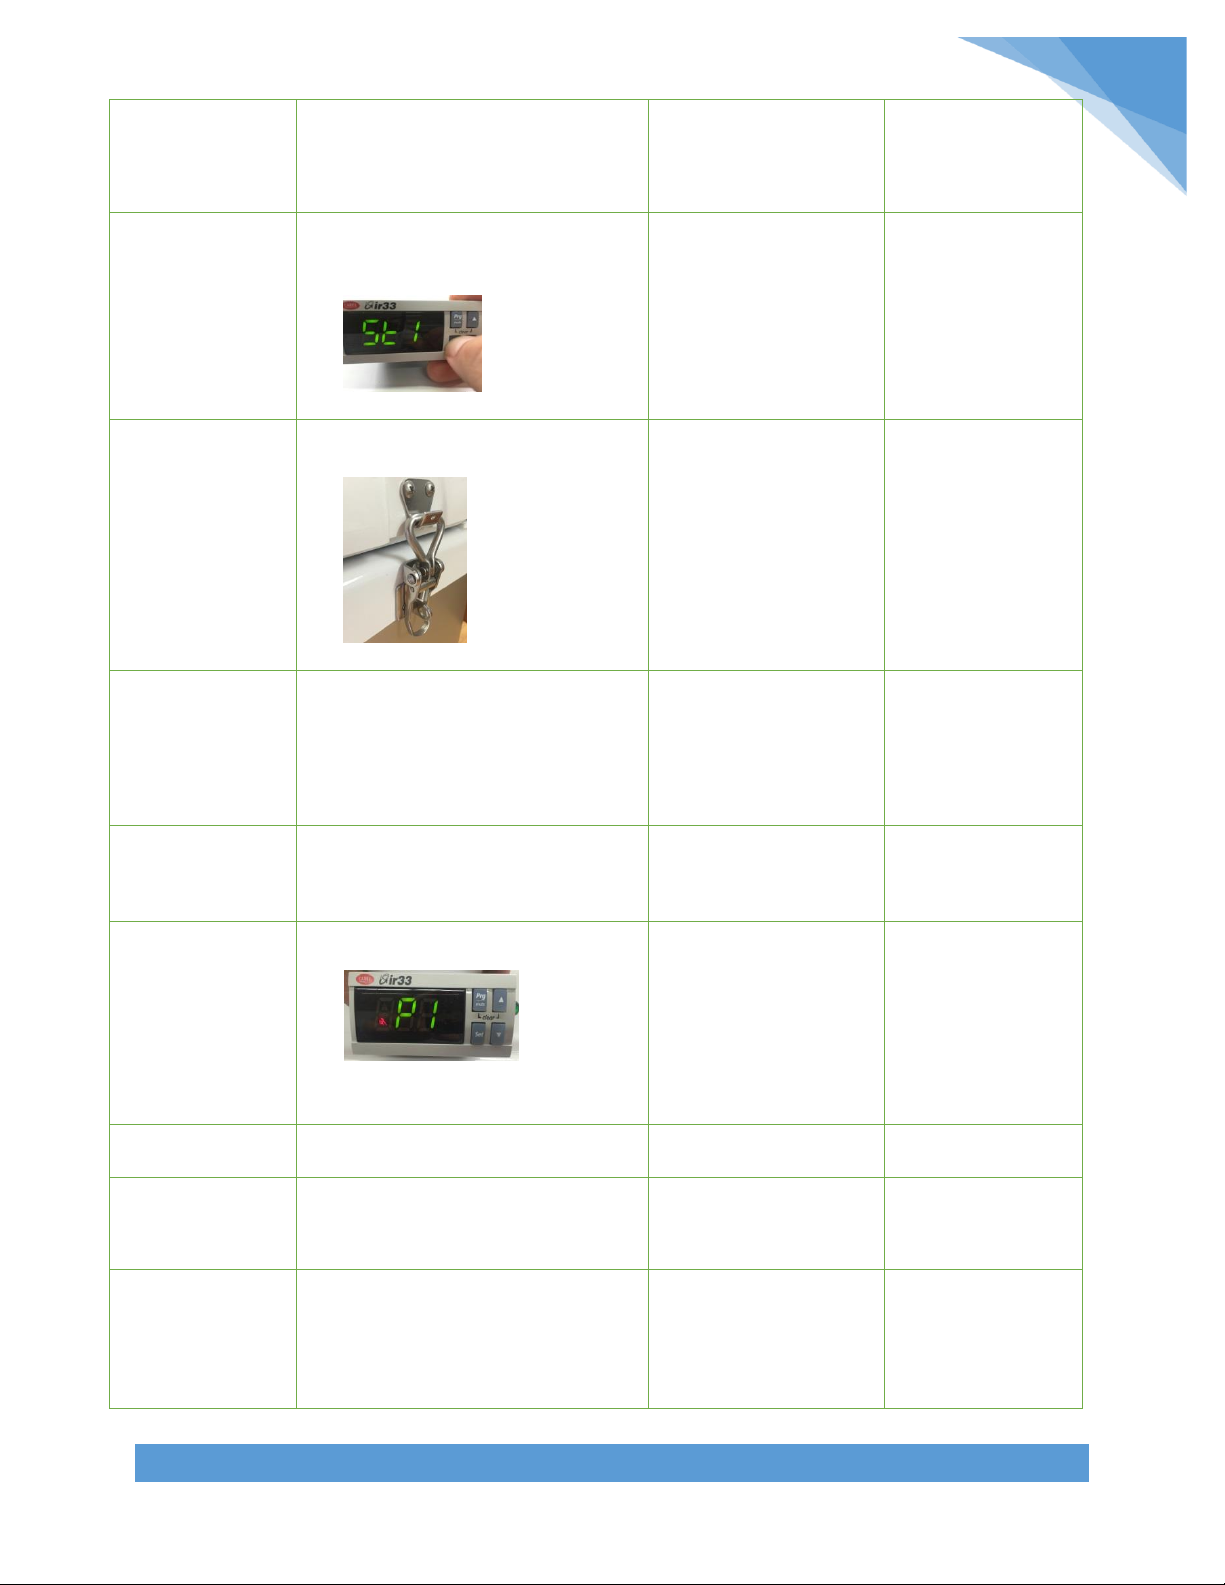
1. lncorrect thermostat set-point
setting St 1
Reprogram St 1
(see Section 4)
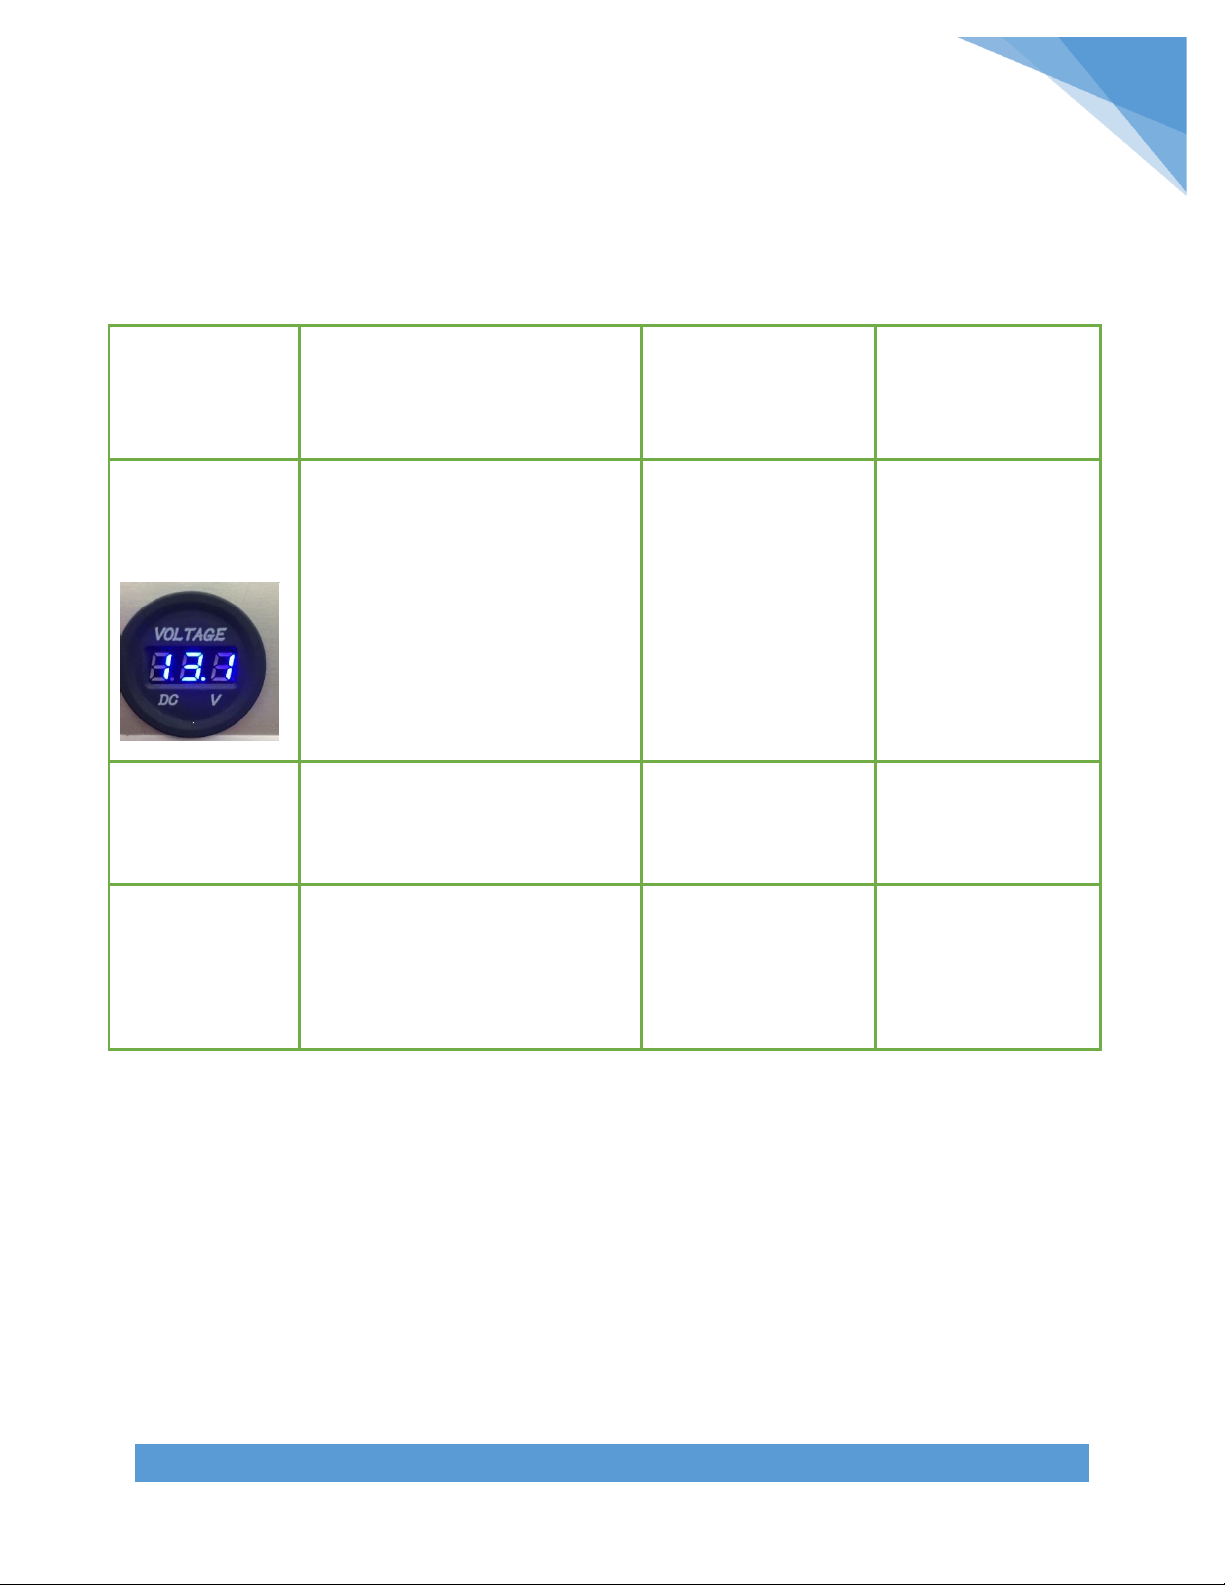
2. Latch not secured completely
secure
3. Ambient temperature too high
Move Unit to lower
ambient
temperatures, and
away from direct
sunlight.
4. DC power source low voltage
Recharge DBBS
5. Differential (P1) set too high
P1=2
6.Worn lid seal
Replace lid seal
Seal G-107
7.Refrigerant Leak
Factory Repair:
Call (760) 233-8847
Refrigerator
getting too cold
1. Incorrect thermostat set-point
setting St 1
Reprogram St 1
(see Section 4)

625 VENTURE STREET, SUITE A, ESCONDIDO CA 92029
TEL (760) 233-8847 * FAX (760) 233-8874
7
Observation
Probable Cause
(Work Down the List)
Remedy
Part
Description &
Number
Refrigerator getting
too cold (cont’d)
2. Very little load inside
Put in 1 to 2 water
bottles to help buffer
cycling interval
3. Differential (PI) too high
P1=2
4. Calibrate thermostat
Factory Support:
Call (760) 233-8847
E04 Message:
High Temp
Alarm
1. Door is not shut completely
Latch down and secure
door
2. Using Unit as a refrigerator with
alarm set for a freezer
Correct Alarm Settings
(see Section 6)
3. Temperature set-point St 1 is set
above high alarm (P 26) settings
Adjust set-point or high
alarm setting
(see Section 6)
4. If probable cause 1, 2, or 3 is not the
issue, relocate the vaccines and call
BioFridge
Factory Support:
Call (760) 233-8847
E05 Message:
Low Temp
Alarm
1. Using unit as freezer with alarm set
for a refrigerator
Correct Alarm settings
(see Section 6)
2. Temperature set-point ST 1 is set
below low alarm (P 25) settings
Adjust set-point or low
alarm settings
3. If probable cause 1 or 2 is not the
issue, relocate the vaccines and call
BioFridge
Factory Support:
Call (760) 233-8847
Other Display
Messages
Display is stuck on input readings:
b1:Probe 1
b2:Probe 2
di1:digital input 1
di2:digital input 2
St1:set point 1
St2:set point 2
no: NO Access
To escape input readings:
Scroll down to b1. Hold
down the SET button until
the blinking b1
disappears. When b1
disappears, the
thermostat will display
the current internal
temperature reading
625 VENTURE STREET, SUITE A, ESCONDIDO CA 92029
TEL (760) 233-8847 * FAX (760) 233-8874
8
Observation
Probable Cause
(Work Down the List)
Remedy
Part Description
& Number
On Board Power
Supply Capacity
Status Volt Meter is
NOT illuminated.
1) DBBS voltage is less than 11.6 volts.
1) Plug DBBS into
110VAC/240VAC to
recharge, low voltage
disconnect is open
circuit
Part: ATC-15A, E-123
Charging status LEDs
not on when plugged
into 110VAC
1) No 110VAC power
1) Check power
2) Call factory:
(760) 233-8847
DBBS not running
BioFridge for a
minimum of 8 hours
1) DBBS not fully charged prior to
plugging in BioFridge
2) High ambient temperature
3) Compressor speed is on HIGH
1) Charge DBBS
2) Remove Unit from high
ambient temperature
3) Change compressor
speed to LOW (certain
models)
Basic Troubleshooting Continued
DETACHABLE BATTERY BACKUP SYSTEM (DBBS)

625 VENTURE STREET, SUITE A, ESCONDIDO CA 92029
TEL (760) 233-8847 * FAX (760) 233-8874
9
SECTION 4
Programming the Thermostat
Setting the Temperature Set-Point (St1):
1. Press and hold the Set button until the display shows “St1.”
2. Release the Set button and the present thermostat set-point will flash.
3. Press the up or down arrows to reach the desired thermostat set-
point temperature.
4. Press the Set button to confirm. The display will show the present interior
temperature.
RECOMMENDED SET-POINT FOR REFRIGERATION IS 3.5C TO 5C
RECOMMENDED SET-POINT FOR FREEZER IS -16C TO -18C
Setting Parameters and Alarms in Celsius Description:
Initiate the Programming Mode by holding down Set and PRG together
until 0 appears. Scroll up to “77” and press Set. The “c0” Parameter
will appear. (To view the “c0” value, press Set again.) To reach the next
desired Parameter, navigate using the up and down arrows.
Press Set. Change the setting with the arrows and press Set again. Refer
to Table 1 below (Page 10) for Parameters. Once all programming is
done, hold down the PRG button for at least 5 seconds to confirm. To
silence an alarm, press PRG.
625 VENTURE STREET, SUITE A, ESCONDIDO CA 92029
TEL (760) 233-8847 * FAX (760) 233-8874
10
Table 1
Parameter
Description
Value
CO
Relay Designation
1
C-18
Unit of Measure
0=Celsius
1=Fahrenheit
P1
Differential of Temperature Set-Point
1
P25 (E05)
Low Temperature Alarm*
Customer Set
P26 (E04)
High Temperature Alarm*
Customer Set
P27
Alarm Differential
0
P28
Alarm Time Offset in Minutes
Customer Set
*Low and High Temperature Alarms should be set to Customer’s required
temperature range.
If there is an error in the programming, or if the programming
has been tampered with, reset the thermostat and reinitiate
programming again.
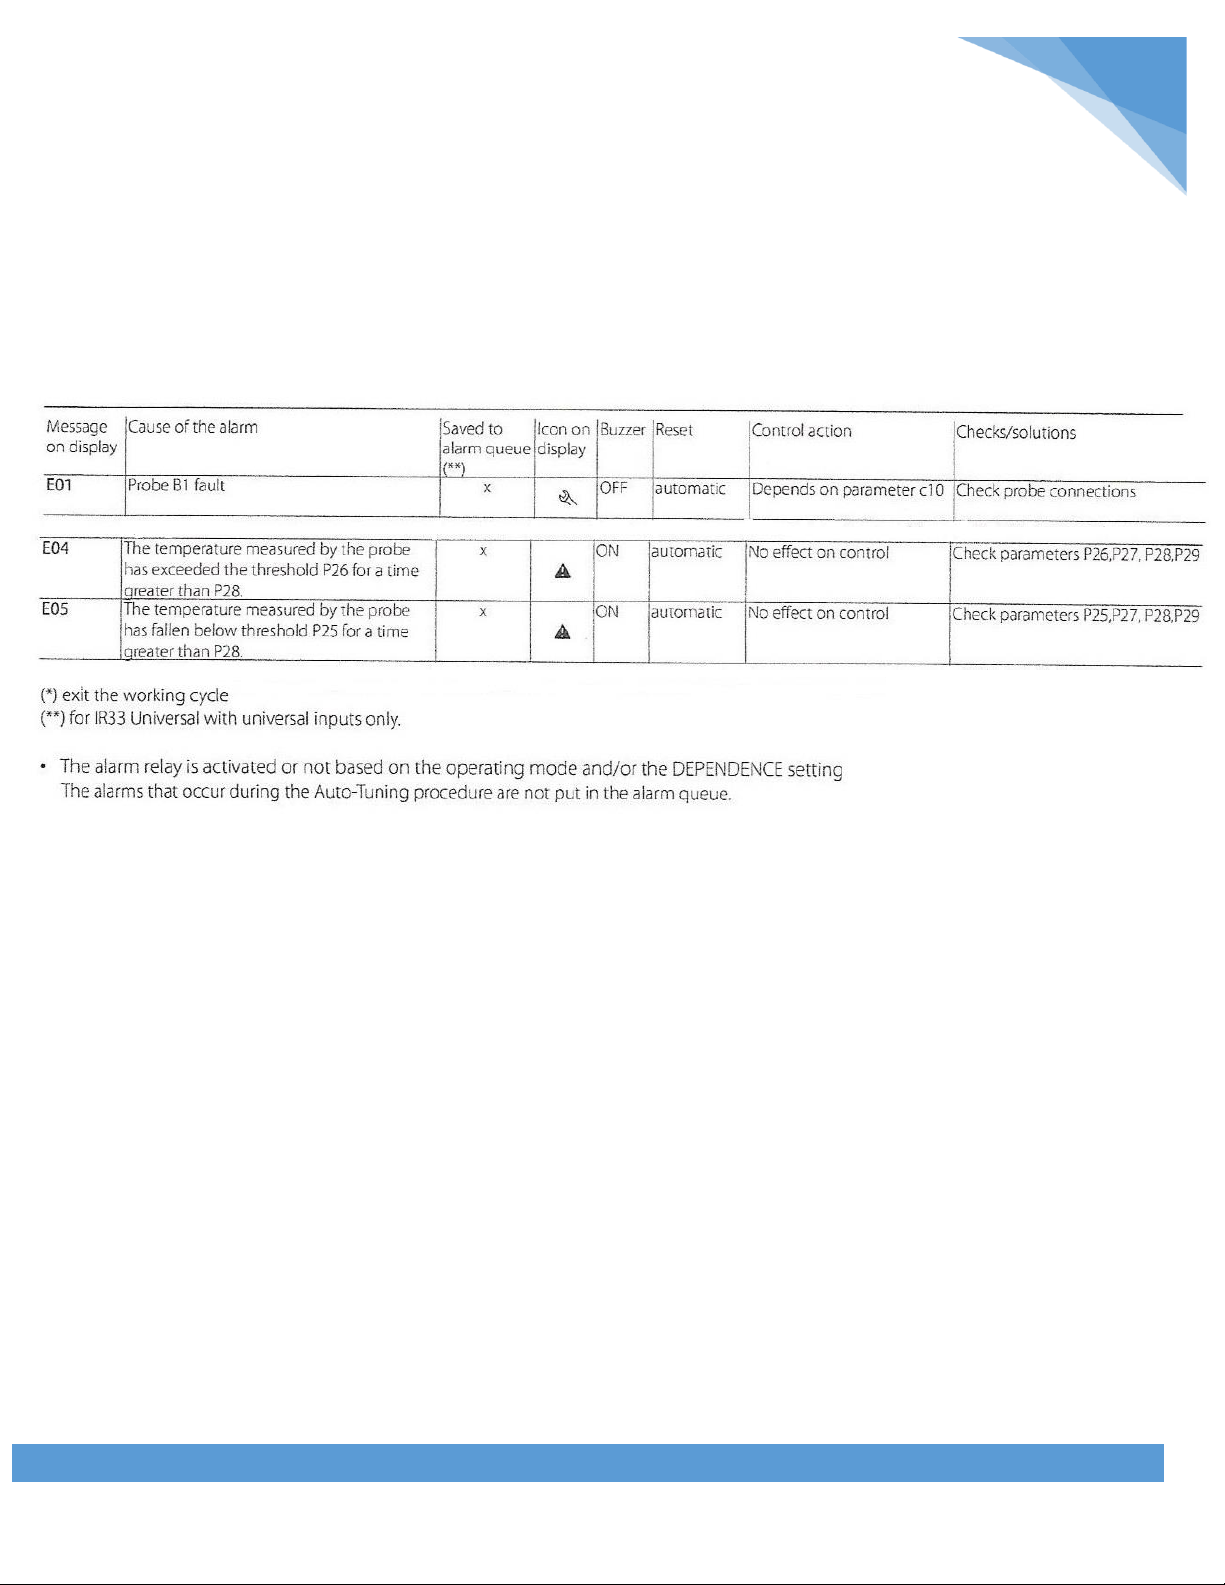
To Reset the Digital Thermostat
1. Unplug the BioFridge unit from all power sources.
2. Hold down the PRG button. Then, power up the unit while still holding
the PRG button down.
3. Release the PRG button when “Std” appears on the display.
4. If “Std” does not appear, try again.

625 VENTURE STREET, SUITE A, ESCONDIDO CA 92029
TEL (760) 233-8847 * FAX (760) 233-8874
11
5. Initiate the Programming Mode by holding down Set and PRG together
until 0 appears. Scroll up to “77” and press Set. The “c0” Parameter
will appear. (To view the “c0” value, press Set again.) To reach the next
desired Parameter, navigate using the up and down arrows. Press
Set. Change the setting with the arrows and press Set again. Refer to
Table 2 below for Parameters. Once all programming is done, hold down
the PRG button for at least 5 seconds to confirm. To silence an alarm,
press PRG.
Set Values According to Table 2 Below:
Table 2
Parameter
Refrigerator Value
Freezer Value
Function
CO
1
1
Relay
Designation
P1
2
2
C21
-12
-20
C22
10
10
P25
Customer Set
Customer Set
Low Temp Alarm
P26
Customer Set
Customer Set
High Temp
Alarm
P27
0
0
Alarm Temp
Offset
P28
Customer Set
Customer Set
Alarm Delay
Minutes
After Thermostat is Reset:
After the Thermostat is reset, ensure the Set-Point is reset to the St1 value. Once
the St1 value has been set and the Unit is reading the internal temperature,
power cycle the Unit. Unplug from all power sources and plug back in.

625 VENTURE STREET, SUITE A, ESCONDIDO CA 92029
TEL (760) 233-8847 * FAX (760) 233-8874
12
SECTION 5
Detachable Battery Backup System (DBBS)
When the DBBS and BioFridge are connected to each other and each is
connected to the 110VAC (wall outlet), the BioFridge has two power sources
to draw from. The primary source will be the 110-Volt AC from the wall
outlet. The secondary source will be the 12-Volt DC from the DBBS System.
The BioFridge will run exclusively on 110-Volt AC until the power is
interrupted (for example, by black or brown outs). When AC power is
interrupted, the BioFridge will automatically switch to draw from the DBBS.
DBBS Capacity:
12 VDC
40 Amp Hours
Output:
11.5 VDC
13.8 VDC
Input:
110V 60Hz
240V 50Hz
Ambient Temperature Range: -18Celsius to 55Celsius
Note: The capacity of the DBBS may be reduced in extreme low ambient
temperatures. For example, -18Celsius ambient DBBS capacity will be
reduced by 40%.
Service Life of DBBS = 2 years
Preventative Maintenance
DBBS to be changed out every 2-3 years;
Thermostat and Probe to be changed out every 5-6 years.

625 VENTURE STREET, SUITE A, ESCONDIDO CA 92029
TEL (760) 233-8847 * FAX (760) 233-8874
13
Charging the DBBS
1) To charge the DBBS, insert 110VAC cord into input AC receptacle
(standard wall outlet.)
2) Note: LED battery charge status RED, GREEN,or both LED’s will
illuminate.
RED = Bulk Charge Rate
RED/GREEN = Absorb Charge Rate
GREEN = Float Charge Rate
2) From a full discharge, 11.5 VDC, the Unit will take approximately 6
hours to recharge.
4) Once the battery charge status GREEN LED is illuminated, the
DBBS is fully charged.
Connection of the DBBS to the BioFridge
1) Place the BioFridge on top of the DBBS. (Note: the control end of
the BioFridge must be in the same orientation as the control end
of the DBBS.)
2) Fasten all 3 over-center latches from DBBS to BioFridge. Ensure
latches are tight (adjust if necessary).
3) Using the 12VDC umbilical cord, connect one end to the input DC
receptacle on DBBS. Connect the other end of the umbilical to the
input DC on the BioFridge.
4) BioFridge is now powered by DBBS.

625 VENTURE STREET, SUITE A, ESCONDIDO CA 92029
TEL (760) 233-8847 * FAX (760) 233-8874
14
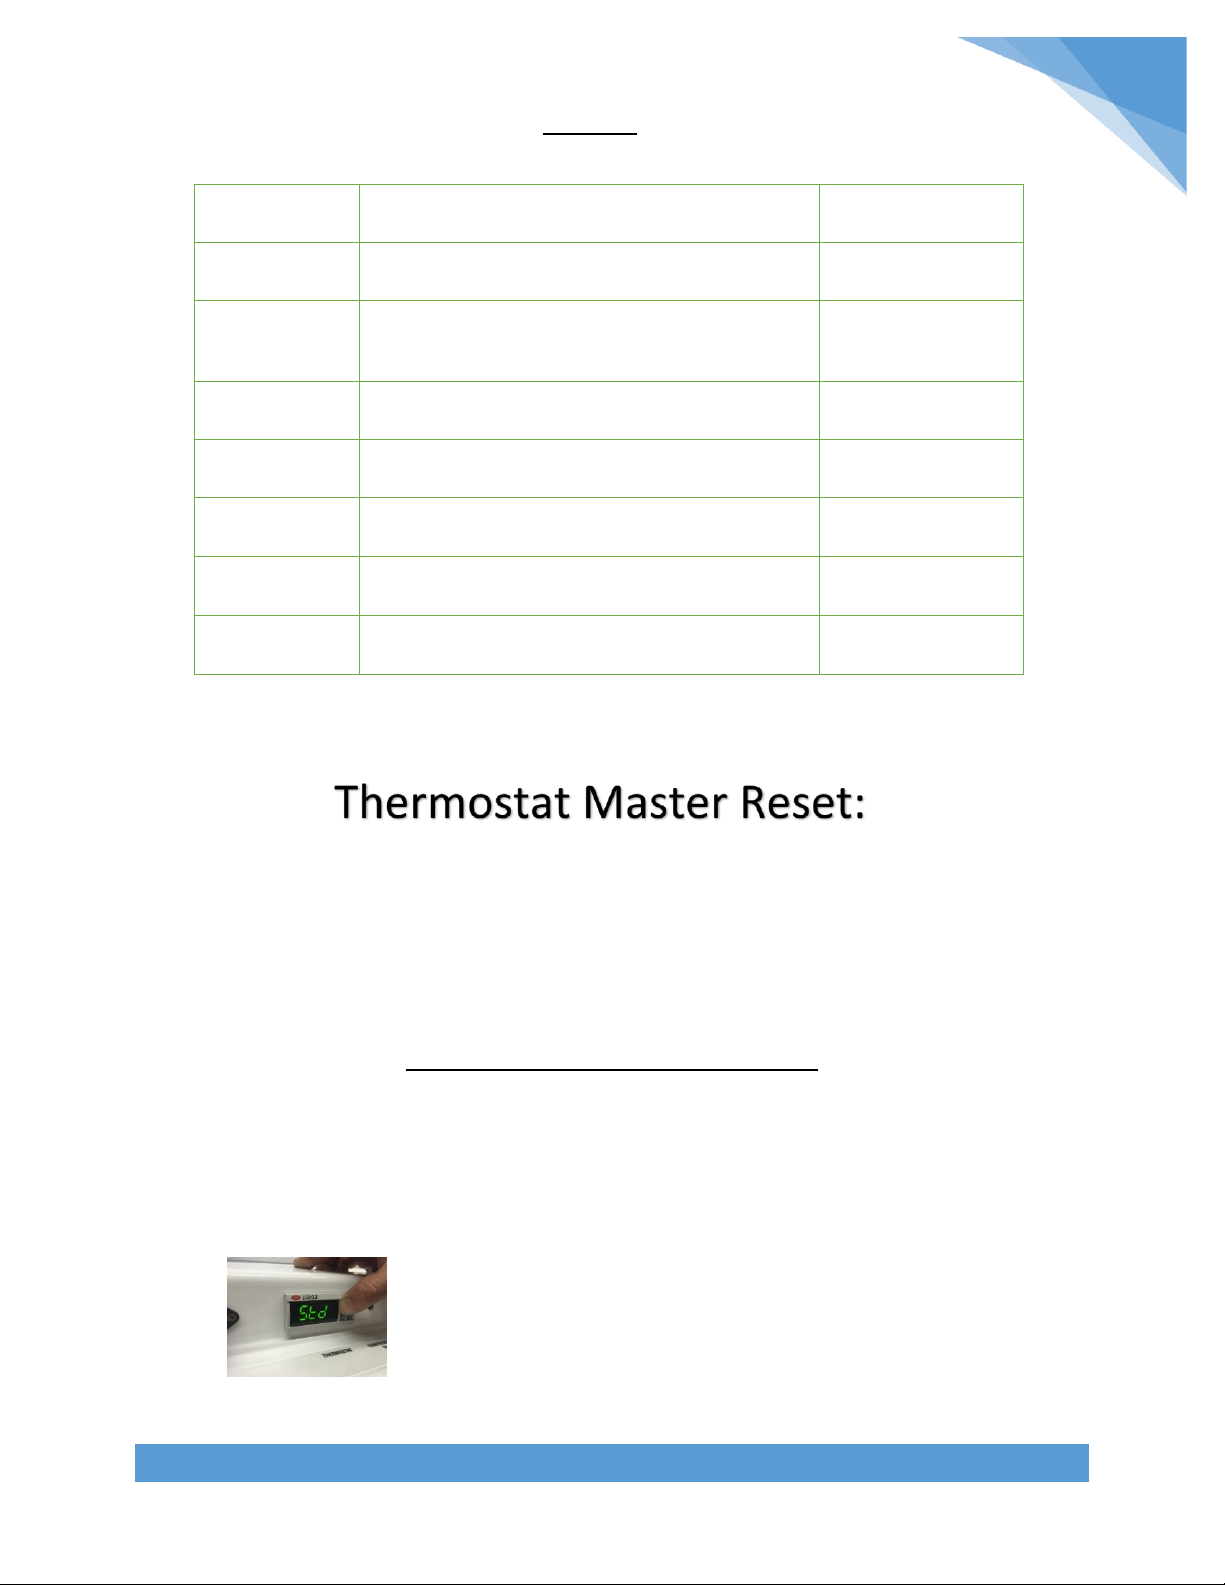
5) On Board Power Supply Capacity Status:
Voltmeter indicates the voltage of the DBBS (DC Volts)
13.2V –12.1V = 100% - 35% capacity
12.1V –11.8V = 35% - 10% capacity
11.8V –11.6V = 10% - 0% capacity (Plug into AC power supply)
RUN TIME*
Refrigerator: 18 hours; -12to 10Celsius
Freezer: 9 hours; -18Celsius
*This run time is calculated in an ambient temperature of 75Fahrenheit. Run time may be
less in higher ambient temperatures.
Using the BioFridge DBBS as a secondary power supply
1) Attach the BioFridge to the DBBS
2) Connect the 12VDC umbilical cord from DBBS into BioFridge
3) Connect one 110VAC cord to AC input receptacle on BioFridge
4) Connect one 110VAC cord to AC input receptacle on DBBS
5) The BioFridge will run off the 110VAC supply (wall outlet)

625 VENTURE STREET, SUITE A, ESCONDIDO CA 92029
TEL (760) 233-8847 * FAX (760) 233-8874
15
6) The DBBS will charge from the 110VAC supply and remain at 100%
charge
7) If the AC power source is lost (for example in a black or brown
out), the BioFridge will automatically switch to the 12VDC supply
from the Detachable Battery Backup System.
8) Once 110VAC supply has been restored, the BioFridge will
automatically switch back to drawing from the 110VAC supply.
9) No disconnection of AC or DC cords is required. AC and DC cords
can stay connected to the BioFridge and DBBS.
RUN TIME*
Refrigerator: 18 hours; -12to 10Celsius
Freezer: 9 hours; -18Celsius
*This run time is calculated in an ambient temperature of 75Fahrenheit. Run time may be
less in higher ambient temperatures.
625 VENTURE STREET, SUITE A, ESCONDIDO CA 92029
TEL (760) 233-8847 * FAX (760) 233-8874
16
SECTION 6
Table of Alarms
(E04 –High Temperature Alarm / E05 –Low Temperature Alarm)

625 VENTURE STREET, SUITE A, ESCONDIDO CA 92029
TEL (760) 233-8847 * FAX (760) 233-8874
17
Refrigerator Model
BF-60-MIL-UPSD
Primary Electrical Input (AC)
110 Volt AC 60Hz/240 VAC 50 Hz
Secondary Electrical Input (DC)
12 VDC / 24-28 VDC
With connection to the DBBS:
Runtime at 4C Set-Point (Refrigerator)
Runtime at -18C Set-Point (Fridge)
Approximately 18 Hrs. (Pre-Cooled)
Approximately 9 Hrs. (Pre-Cooled)
Power Consumption
40 Watts Maximum
Payload Capacity
60 Liters
Payload Temperature Range
(Programmable)
10C to -12C Refrigerator Mode
10C to -20C Freezer Mode
Max. Operating Ambient Temperature
40C (or 104F) Refrigerator Mode
32C (or 90F) Freezer Mode
Dimensions of Storage Space
19”Lx13”Wx15”H
Dimensions of Refrigerator
35”Lx19”Wx22”H
Dimensions of Refrigerator + DBBS
35”Lx19”Wx29”H
DBBS SPECIFICATIONS:
Charger Model
208106
Electrical Input (AC)
90.VAC -250.VAC 50/60 1-13
Output AMPS
6 Amps 12.VDC
Battery Model
AGM-1240 T
Battery Capacity
40 Amp Hour
Voltage Output
11.5 v-13.2V
Max. Voltage Cut-ln
13.2VDC
Min. Voltage Cut-Out
11.5VDC
SECTION 7
Individual Model Specifications
BioFridge BF-60-MIL-UPSD
Table of contents


