BioSure PROFESSIONAL EOS7190-P User manual
1.Introduction
2.Important Safety Instructions
3.Introduction of Main
Components
4.Product Functions and
Features
5.Preparation Before Use
6.How to Use
7.Maintenance
8.Troubleshooting
9.Specifications
Warranty Description
・・・・・・・・・・・・・・・・・P2
・・・P3〜P5
・・・・・・・・・P6〜P7
・・・・・・・・・・P8
・・・・・・
・・・・・・・・・・
・・・・・・・・・・
P8〜P9
P10〜P11
P12〜P14
P15
・・・・・・・・・・・・・・・P1
P16
Table of Contents
Space Sanitizer System Plus
【EOS7190-P】
Owner’s Manual
EOS7190-P
・・・・・・・・・・・
Antibacterial
Space Sanitizer
System Plus
Deodorizer
Virus Removal
・・・・・・・・・・・・
6

EOS7190-PV2.1EN

After receiving the product, please check whether it contains the following contents ① to ⑥.
PACKAGE CONTENTS
① Main Device
④ Wall Mount
Expansion Screws x 2
⑤Hook Screws x 2
Thank you for purchasing BioSure Space Sanitizer System Plus (Model: EOS7190-P).
To ensure the correct use of the product, please read all safety warnings, precautions
and instructions before use.
1.INTRODUCTION
⑥ Product Manual
● Due to product upgrades, the appearance, specifications or content of the text are subject to change
without notice.
Disclaimer (For more information about the warranty, please refer to the warranty document.)
This warranty may be invalid in the following cases:
1. Failure caused by improper installation, storage, or improper handling before the product is put into use.
2. Damage caused by unauthorized service organizations or unauthorized personnel trying to repair or install.
3. The labor costs derived from the normal maintenance, calibration, or general adjustment specified in
this manual.
4. Maintenance or damage caused by alteration, abuse, fire, flood, or natural disasters.
5. Damage caused by failure to follow the instructions for maintenance or repair.
6. Removal, alteration, or damage to the serial number and/or label on the product will not be guaranteed.
7. Mechanical damage.
8. Damage caused by the use of water quality outside the product specifications.
② Power Adapter③ HEPA Filter
Please note, BES accepts no liability for misuse of its products. BES makes no warranty of any kind with respect to
this information. BES SPECIFICALLY DISCLAIMS THE IMPLIED WARRANTY OF MERCHANTABILITY AND
FITNESS FOR A PARTICULAR PURPOSE. Please consult local regulations and/or trusted professional when using
ozone product for any applicaiton. BES shall not be liable for any direct, indirect, incidental, consequential, or
other damage alleged in connection with the furnishing or use of this information.
2
2.IMPORTANT SAFETY INSTRUCTIONS
Special Exceptions/In Case Of Problem
Stop using this product immediately and unplug it from the power outlet.
If the product emits smoke, peculiar smells, strange noises, or foreign objects enter the product,
please stop using it immediately and disconnect the connection to the power adapter. In these
events, continued use may cause fire, electric shock or personal injury.
Main Device / Power Adapter
Do not repair, modify or disassemble.
Failure to do so will invalidate your warranty and may result in fire or electric shock.
Avoid getting the device wet.
Do not immerse the product in or splash water with water, as this may cause damage to the
product or electric shock.
WARNING
WARNING
*1 Serious injuries: blindness, injury, burns (high temperature / low temperature / chemicals), etc., will require hospitalization or long-term
hospitalization.
*2 Minor injuries: injuries, burns, electric shocks, etc., without hospitalization or long-term hospitalization.
*3 Property damage: extensive damage to houses, household goods, pets, etc.
To avoid personal injury or property damage to the user or others, please follow the following
safety instructions
WARNING
CAUTION
Indicates "what you must do" when operating the product.
Indicates "what you can't do" when operating the product.
WARNING indicates a dangerous situation, which may cause death or serious injury
if not avoided.*1
CAUTION indicates a dangerous situation that may cause personal injury*2or property
damage*3 if not avoided.
CAUTION indicates a dangerous situation that may cause personal injury*2or property
damage*3 if not avoided.
Do not use this product in places where there is no ventilation.
Estimate the size of the room you want to use to plan the time setting for using this product.
Misuse of this product may cause harm to people and pets.
The continued accumulation of ozone may damage your property.
Please use and store this product out of reach of children to avoid electric shock or injury.
Please be careful when using in an environment with pets and plants.
Please be aware that rusty items and natural rubber are prone to deterioration when exposed to ozone.
If you feel uncomfortable with the smell of ozone, or feel any changes in your physical condition during use
(for example, headache), please stop using, ventilate immediately, and consult your doctor.
If you have a history of asthma, please consult your doctor before use.
Do not place any objects in the area 0.8-1.5 m in front of the ozone outlet and no more than 0.5 m on the left
and right sides.
Please pay attention to ventilation when using it continuously for a long time in a closed room.
Avoid blowing directly on pets and plants.
When using this product in a room with a baby for a long time, please pay attention to ventilation and avoid
blowing it directly on the baby.
If the product is dropped and damaged, please stop using it immediately.
Continued use may cause overheating, fire, electric shock, and injury.
Please use and store it out of the reach of children.
Otherwise, it may cause electric shock or injury.
3
:
About installation and use
Do not use this product in places where there is no ventilation.
Do not operate this product for a long time in a small room.
Do not place any objects in the area 0.8-1.5 m in front of the air outlet and no more
than 0.5 m on the left and right sides.
Misuse of this product may cause injury to people or pets or damage to property.
Main Device / Power Adapter
Do not place the device near heated or high temperature surfaces.
Do not throw it into a fire or heat, as this may cause a fire, explosion or injury.
Do not put this device in the refrigerator.
This will be the cause of product failure.
Do not plug or unplug the power cord when your hands are wet.
Otherwise, it may cause electric shock or personal injury.
Main Device
Except for the dedicated power adapter, do not use other power sources.
Using other power sources may cause overheating, fire, malfunction or injury.
Do not throw water, soot, or flammable materials on the air outlet or air inlet.
It may cause electric shock or fire.
Power Adapter
Please use the specified power supply voltage.
Otherwise, it may cause electric shock, fire and damage the product. The input power of the power
adapter of this product is AC100-240V.
Do not use loose sockets.
Otherwise, it may cause fire, electric shock or short circuit.
Do not use a damaged power cord or power plug to operate the machine.
Otherwise, it may cause electric shock or fire.
Be sure to firmly insert the power adapter connection terminal into the power jack.
If it is not fully inserted and used, it may cause electric shock or fire.
This device is only suitable for indoor use, please do not use it outdoors.
Avoid using it in places where it may be exposed to water.
Maintenance
When performing maintenance, be sure to turn off the power and disconnect the power adapter.
Otherwise, it may cause electric shock or fire.
When installing the wall mount, please be careful not to let your fingers be caught by metal fittings.
Make sure that the wall to be installed is strong enough.
If the product falls during installation, it may cause damage to the product.
Do not modify or change the installation parts, otherwise it may cause personal injury or
property damage.
Clean the dust on the power adapter regularly.
Moisture can cause poor insulation and cause a fire.
When not in use for a long time, be sure to disconnect the power adapter.
If you do not use this product for a long time, please unplug the power.
Otherwise, it may cause electric shock or fire.
4

ATTENTION
Do not place it in a place exposed to direct sunlight or abnormally high temperature.
In addition to deteriorating the surface and parts of the equipment, it may also cause fire.
Do not place it in a closed car, under direct sunlight or near heaters such as stoves.
Place the device on a flat and solid surface or on a solid wall.
Do not install the device in an unstable place, such as on a rocking table or inclined plane.
It may fall and cause injury or product failure.
When moving or transporting, do not put the main device on its side.
Do not use chemicals to clean.
Do not wipe the main device with gasoline, paint thinner, alcohol, etc. In addition, please do not use
electrical (electronic contact) cleaners, in addition to damaging to the appearance these
chemicals may also melt the parts.
Do not rinse the main device with water.
If the main unit is dirty, please clean it with a cloth soaked in neutral detergent or water,
and then wipe it with a soft cloth.
Maintenance
Use the correct water source.
This machine does not have a filtering function. Do not use well water or similar untreated
water sources.
Please use pure water or distilled water (TDS <1ppm or EC <2μS/cm) for humidification.
Make sure to use pure water or distilled water (TDS <1ppm or EC <2μS/cm) to generate ozone.
Keep the inside of the humidification water tank clean and add pure water from time to
time.
If you do not use the product for 3 days or longer, please discard the water in the
humidification water tank and empty the humidification water tank.
5

3
.INTRODUCTION OF MAIN COMPONENTS
Ozone Outlet Humidification Outlet
[Front]
WATER
LOW
ON
REFILL
TANK
REPLACE
FILTER
REPLACE
CELL
SERVICE
STANDBY
24 Hr
12 Hr
2 Hr
HIGH
MID
LOW
BOOST
COMFORT REFILLING
SMART SENSOR
TIMER FAN SPEED LEVEL HUMIDIFIER GENERATOR
Ozone Outlet Humidification Outlet
/ Operation Indicator
Operation
Panel
Control
Buttons
[Top]
WATER
LOW
ON
REFILL
TANK
REPLACE
FILTER
REPLACE
CELL
SERVICE
STANDBY
24 Hr
12 Hr
2 Hr
HIGH
MID
LOW
BOOST
COMFORT REFILLING
SMART SENSOR
12 911 101
3 4 5 6 7
2
8
FAN SPEED HUMIDIFIER GENERATOR
TIMER LEVEL
Mode Humidification
Start / Stop / Timing Air Volume Water Replenishment
Captions
4
1
Fault indicator
2
Standby indicator
Timing indicator
(24/12/2 hours)
(In order from top to bottom)
3
Air volume indicator
(high/medium/low)
(In order from top to bottom)
9
Replace ozone generator
indicator
10
Person(s) sensing indicator
11
Person(s) sensing device
12
Replace filter indicator
6
Humidifying indicator
7
Pure water tank
replenishment indicator
8
Water shortage warning
(humidify water/pure water)
(from left to right)
5
Mode indicator
(boost/comfort)
Operation
Panel
Control
Buttons
6
POWER
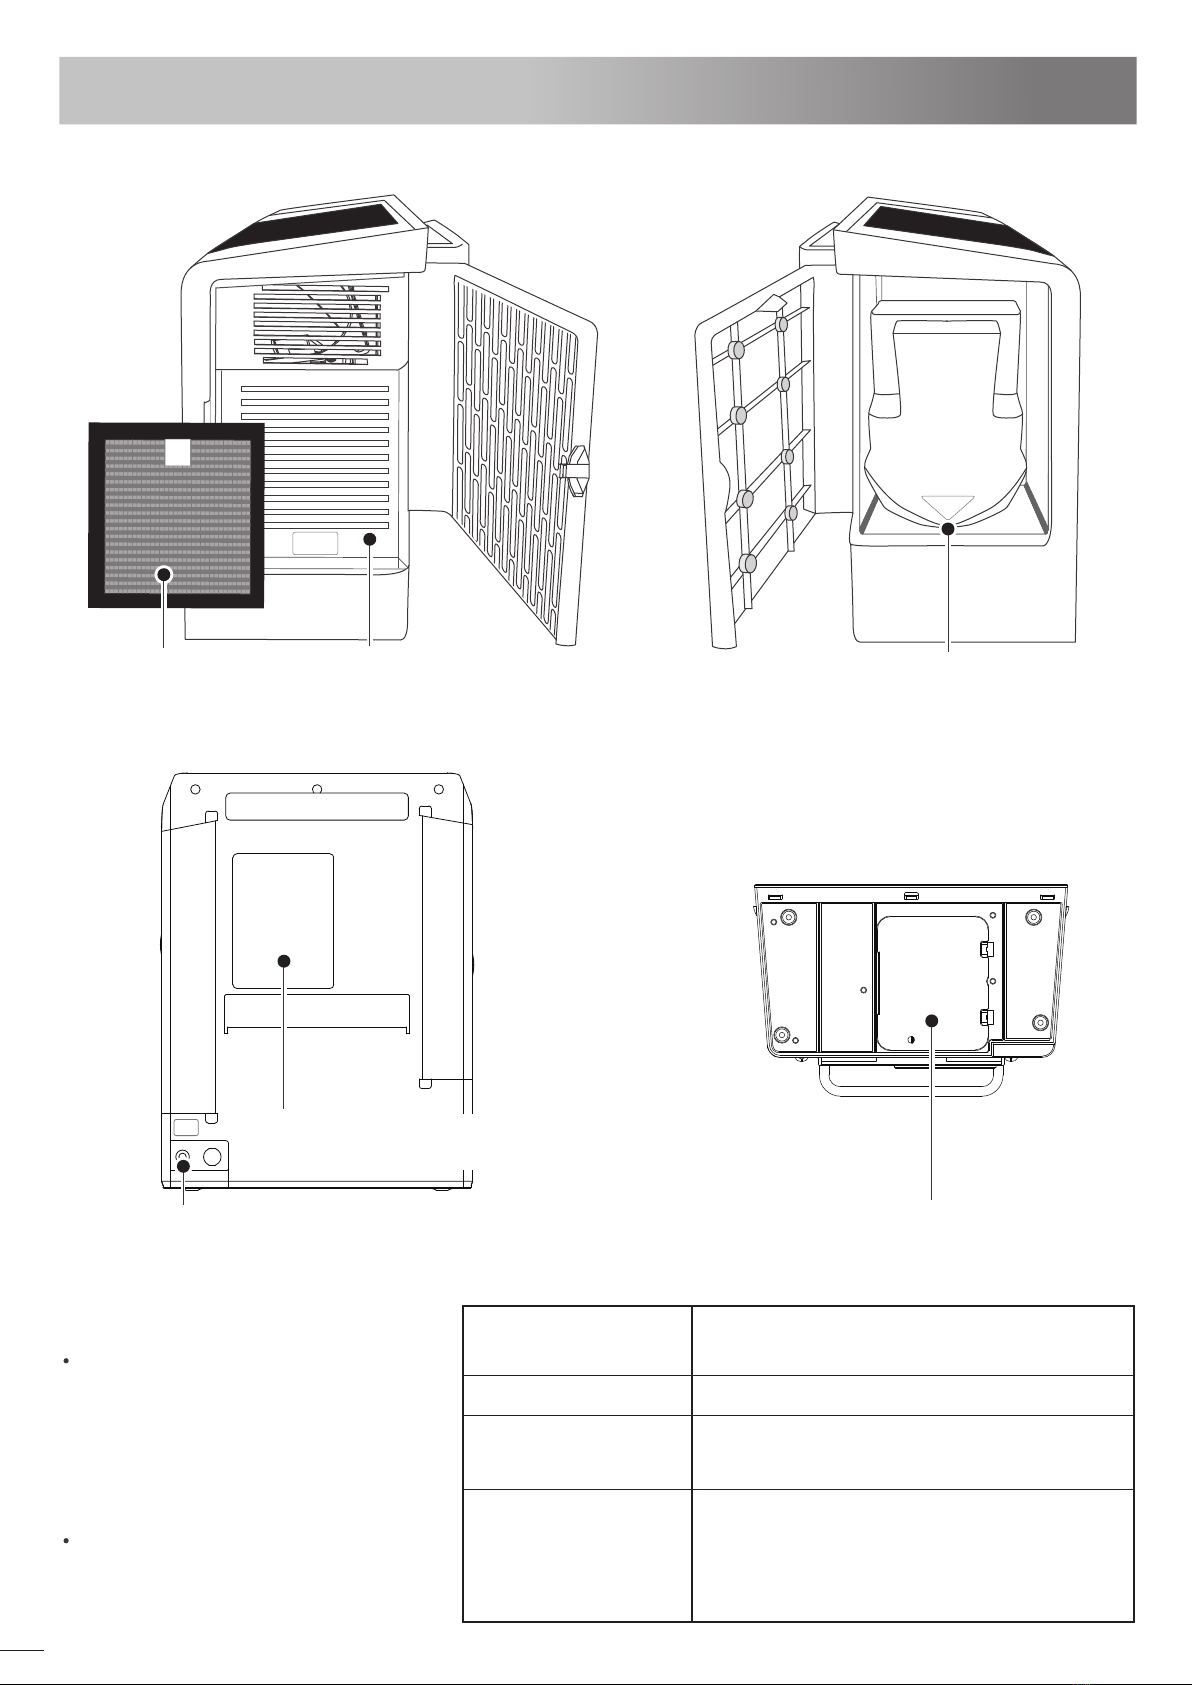
Accessories -
HEPA filter
HEPA filter slot
Humidification water tank
Power jack Drain the humidified water and pure water /
replace the electrolytic ozone generator (EOG)
[Side]
HEPA Filter side [Side]
Humidification Water Tank side
[Bottom]
[Back]
HEPA FILTER SLOT
3
.INTRODUCTION OF MAIN COMPONENTS
Precautions for use
Olfactory perception of ozone odor
To ensure your personal safety and avoid
product damage, please read this manual
carefully.
According to the Food and Drug
Administration, FDA.
According the Occupational Safety and
Health Administration, OSHA, the concentration
standard for continuous exposure to ozone is
limited to exposure for 8 hours.
Very low ozone concentration (0.01-0.02 ppm)
can be sensed by human.The machine will
give off a mild ozone smell it is normal and
can be expected. If you feel negative
physical conditions, any sudden changes,
such as headaches during use, please stop
using and ventilate immediately.
Affects
Ozone Concentration
(ppm)
0.1
< 0.06
0.01 - 0.02
HUMIDIFIER
WATER TANK
Supplement pure water
for the generator
Replenish the pure water
used by the generator
7

You can choose different modes according to the conditions of use and environment.
For safety in use, please hang the product on the wall or place it on a firm and flat table or shelf.
5.PREPARATION BEFORE USE
①
②
Take out the machine from the packing box,
open the door on the left and take out the
cushioning material that fixes the humidification
water tank.
When the product is turned on for the first time after purchase, the product will undergo
a 30-minute preparation process. This is a standard protection procedure.
ATTENTION ※ The final factory inspection of product production will use water for functional confirmation. We will dry it before
transportation, but in some cases, water droplets may remain in the pipeline inside the main device.
④
③
Install the HEPA filter on the right side of the device.
Prepare 200ml-250ml pure water or distilled water.
(TDS <1ppm or EC< 2μS/cm)
Insert the plug of the power adapter into the
power jack.
The label is on the front
and needs to face outwards.
WATER
LOW
ON
REFILL
TANK
REPLACE
FILTER
REPLACE
CELL
SERVI CE
STANDBY
24 Hr
12 Hr
2Hr
HIGH
MID
LOW
BOOST
COMFORT REFILLING
SMART SENSOR
Confirm the front an
back of the HEPA filter,
correctly fit, and fix the
filter.
※ For safety using, please hang the product on the wall or place it on a firm and flat table or shelf. When ozone is generated, the blue operation indicator on
the top of the unit will be lit. This light cannot be turned off manually.
4
.PRODUCT FUNCTIONS AND FEATURES
※ If you enter the room and smell a strong ozone smell after the operation is stopped, please open the windows and
doors for ventilation and leave the room immediately.
Perform low-concentration operations within a safe range to eliminate bacteria.
Ozone controlled within a safe concentration range.
Disinfection and Deodorization after
room personnel are cleared
Disinfection and Deodorization
with people in the room COMFORT MODE
(Used when person(s) is present)
(Used when no person is present)
Space Sterilization / Deodorization
Humidification
BOOST MODE
Space Sterilization / Deodorization
Humidification Higher concentration ozone.
Perform high-concentration air and space treatment. When the operation time expires, the ozone
concentration will fall within the safety standard.
Only when there is no one present in the room, and no one will enter, may the Boost mode be
used. Please evaluate for safety and only operate this mode during the time period when the
room is not used.
When the power is turned on for the
first time, the WATER LOW, REFILL TANK,
SMART SENSOR, STANDBY indicators
will light up and the unit enters the
standby state with one beep.
8

Supplement the pure water used in the EOG (Prepare 200-250ml of pure water or distilled water.)
When the RIFILL TANK indicator lights up, it means that the electrolytic ozone generator (EOG) is short of water. At this time,
the EOG stops working and needs to be supplemented with pure water before it can operate normally.
⑤
Pour about 1200ml of pure water into the
humidification water tank on the left. When
the unit detects there is water in the
water tank, the WATER LOW indicator goes
out and the humidifying function can be used
normally.
Replenish humidification water
⑥Lift up slightly to remove
the water tank. Turn off
the water tank cover to
replenish water.
5.PREPARATION BEFORE USE
WATER STOPPER
OPENING
Open the back cover for
replenishing pure water.
1. Remove the black plug at the bottom.
2. Remove the water shut-off valve.
Back Cover
3. Store the water shut-off valve on
the storage clip.
4. Put the black plug back in place.
5. Take out the suction pipe,
remove the pipe cap, and
put the pipe into pure water
bottle.
1
4
3
2
Stroage Clip
Water shut-off
valve
Plug
6. Press the "GENERATOR" button to
start the water pump. The device will
beep to start replenishing
pure water. At this time,
the REFILLING indicator
will light up.
7. After the water replenishment
is completed, the unit will
beep again and the
REFILL TANK indicator
will go out.
8. Replace the suction pipe cap,
return the pipe to its original
position and close the back
cover.
GENERATOR
Beep
5
WATER STOPPER
OPENING
※ You can press and hold the GENERATOR key for 5 seconds in the standby mode to force
the start of the water replenishment. The water pump will continue to operate until you
release the button. If the water supply exceeds the pure water tank, water may overflow
the unit. Please operate this function carefully.
Please use "pure water" or "distilled water".If you use this
device for 8 hours a day, you need to refill it about once a
month.
The water shut-off valve is stored on the storage
clip. When transporting or moving the device,
please reinstall the shut-off valve and remember
to put the black plug back.
Please use pure water as humidification water.
The humidification function needs to be
replenished after about 8 hours of operation.
WATER STOPPER
OPENING
HUMIDIFIER
WATER TANK
HUMIDIFIER
WATER TANK
9

FAN SPEED
TIMER
6.HOW TO USE
Select the
timing setting
Select the
air volume
Eliminate bacteria within a safe range concentration of ozone.
When the air volume is selected as 24Hr, the system will continue to operate
until the pure water of the EOG is exhausted. In consideration of safety,
the device sets the touch response time of the buttons to be slightly longer
to prevent children from starting and operating easily. The timer will be
recalculated when user adjust the setting during system operation.
WATER
LOW
ON
REFILL
TANK
REPLACE
FILTER
REPLACE
CELL
SERVIC E
STANDBY
24 Hr
12 Hr
2Hr
HIGH
MID
LOW
BOOST
COMFORT REFILLING
SMART SENSOR
TIMER FAN SPEED LEVEL HUMIDIFIER GENERATOR
Beep
24 Hr
12 Hr
2 Hr
HIGH
MID
LOW
The ozone concentration range of this mode is safe, but if you smell a strong ozone smell,
please stop using it and open windows for ventilation.
During operation, keep pressing the TIMER button for 2 seconds,
the system will beep ~ twice.The STANDBY indicator lights up
and the device stops working.
Stop Operation
After pressing the TIMER button to start running, the system will first run with the default value of
low air volume for 2 hours. At this time, the operation indicator on the top of the unit will be on.
COMFORT Mode
HUMIDIFIER
Please refer to
Sec. 5-6 for
replenishing water
for the humidification
water tank.
If there is no water
in the humidification
water tank, the
WATER LOW
indicator will
light up to inform
you to add water.
HUMIDIFIER
Press the HUMIDIFIER
button again and
humidification
function can be
stopped.
Stop humidification function
Beep
Beep
WATER
LOW
ON
HUMIDIFIER
WATER
LOW
ON
If you need further humidification after
starting the operation, please press
HUMIDIFIER button.
Humidification Function
Activate the
humidification
function
Notification of
Humidification
Water Shortage
You can change the air volume
or timing setting at any time,
please follow the figure below.
Beep~Beep~2 seconds
BeepBeep
10
The humidification function cannot
be performed alone.
When humidification water is used
up, the humidification function will
stop, but the ozone generation will
continue to operate.

operate. If the unit senses a person's movement during operation, the red indicator on the panel
will change from steady light on to slow flashing, the unit stops running, and the STANDBY
indicator turns on. To start again, press the TIMER key.
Boost is a more powerful mode for use only when no person(s) is present.
BOOST Mode
1. Press the TIMER key to start the unit, use the TIMER key to select the running time:
2 / 12 / or 24 hours continuous operation.
2. Press and hold the LEVEL button for at least 3 seconds to activate the Boost mode.
3. The device emits 3 beeps, the BOOST indicator will light up and start to run in the Boost mode.
※ You can press the LEVEL button again to return to the comfort mode.
The unit will configure the air volume according to the time setting first,
and user can change it later.
6.HOW TO USE
Be sure to use the mode without anyone around.
FAN SPEED
After selecting the running time, the unit
will automatically configure the air volume.
User can adjust it by FAN SPEED key. Check
the table on the right for reference.
WATER
LOW
ON
REFILL
TANK
REPLACE
FILTER
REPLACE
CELL
SERVICE
STANDBY
24 Hr
12 Hr
2 Hr
HIGH
MID
LOW
BOOST
COMFORT REFILLING
SMART SENSOR
TIMER FAN SPEED LEVEL HUMIDIFIER GENERATOR
Be sure to confirm that there is no one in the room, and choose the operating time
carefully to prevent someone from entering by mistake.
SMART SENSOR
LEVEL
FAN SPEED
Beep x3
TIMER
Beep
Press again TIMER
button
Turn off the SMART SENSOR
Restart the system
4. If you choose the Boost mode, for safety reasons, the device will beep every 10 minutes.
This warning sound cannot be cancelled.
※ Switch the setting during system operation, the running time will be recalculated.
※ When the system is in standby (the ozone function is not running), the SMART SENSOR function sleeps.
※By default, the SMART SENSOR function in Comfort mode
is turned off and turned on in Boost mode.
5. The unit produces ozone in the first half of each cycle during operation, and air circulation in the second half.
When the time expires, the ozone concentration will fall within the safety standard.
At the end of the operation time, the ozone concentration will drop to the safe allowable range, but if you feel a strong
ozone smell when you enter the room, please open the window for ventilation.
m
Air Volume
(FAN SPEED)
150
100
50
ft
1600
1060
530S
M
L
When you activate the Boost mode, please leave the room immediately.For safety reasons, the smart sensor will be
triggered and stop the unit automatically if you enter the room. To restart, press the TIMER key.
Beep x3
LEVEL
3 sec.
Beep
Press and hold the FAN
SPEED and LEVEL buttons
for 3 sec.. The SMART
SENSOR is turned off when
you hear three beeps.The
SMART SENSOR indicator
goes out in the mean time.
11
2 2
Space Area
*The max area of recommendation
Person(s) sensing function (SMART SENSOR) will be activated 5 minutes after the device starts to

7-
①.MAINTENANCE - Replace DI water filter / HEPA filter
※ Please make sure to replace the DI water filter and HEPA filter at the same time.
※ For purchasing consumables and related inquiries, please contact your BioSure distributor.
When the indicator lights up, stop using the device and replace the HEPA filter immediately.
Open the side panel and pull out the filter, replace with a new HEPA filter.
■ Replace the HEPA filter
The label on the top of
the HEPA filter is the
outer side.
Make sure the unit is powered on.
Press and hold the LEVEL key for 10 sec till the unit
beeps and the "REPLACE FILTER" flashes 6 times.
The timer reset operation has been completed when
you see the REPLACE FILTER indicator lights off.
LEVEL
10 sec.
Beep
After replacing the
"DI water filter" and the
"HEPA filter", you need to
reset the timer.
When the REPLACE FILTER indicator lights up, stop the operation and replace the DI water filter
and HEPA filter at the same time.
Click~
It must be replaced regularly to maintain the performance of the equipment.
When the indicator light is on, please stop using the device and replace the filter immediately.
1. Lift and remove the humidification
water tank. Replace the
DI water filter at the back.
2. Tilt the filter slightly outward.
Anticlockwise rotation filter to the
straight line mark on the filter bottle
align with the mark on the top,
and then remove the filter element.
■ Replace the DI water filter
Parts that need to
be replaced
DI water filter
Align the mark
3. Align the upper and
lower marks to install
the new filter.
4. Rotate clockwise to the right.
5. When you restore the filter to its
original position, you will hear a click.
6. Replace the water tank
and close the side panel.
A mandatory for maintaining the unit performance.
A mandatory for maintaining the unit performance.
HUMIDIFIER
WATER TANK
12
HUMIDIFIER
WATER TANK

7-②.MAINTENANCE - Draining of humidified water and pure water
Use a cloth dipped in neutral detergent or water to clean the main device, the top air outlet and
the sides, and then wipe it with a soft dry cloth. Do not use alcohol or thinner.
■ Main Device Body
■ The air outlet can be disassembled
When cleaning the machine by draining
humidified water and pure water, be sure to
stop the operation and disconnect the power.
TIMER
2sec.
Stop
operating
1. Stop the operation of the
equipment and remove the
humidification water tank.
Press down the two tabs at
the bottom, and then remove
the bottom cover.
4. Reinstall the bottom cover:
Hook the bottom cover hook to
the main device, then close the two
tabs and replace the bottom cover.
3. Remove the cover to
drain water.
The pure water will be
discharged immediately
after removing the cap.
Please prepare a container
in advance.
2.Be sure to remove the
humidification water tank
before draining water. Remove
the silicone cover. Please
prepare a container in advance.
The humidifying water will be
drained immediately after
removing the silicone cover.
■ Discharge the humidification water and the pure water
of the EOG
■ Drain
humidification water
■ Drain
pure water
2
3
1
Inside of the bottom
※ The discharge points of pure water and humidified water are different, please refer to the figure below when you discharge the operation.
If the main device is turned upside down,
it may leak water and cause malfunctions.
The lower
left corner of the
inner side of the
back cover
保護ピン
WATER STOPPER
OPENING
1
2
3
Protection of the EOG after draining the pure water
After the pure water is drained, remove the back cover
of the main device.
Remove the black plug at the bottom left of the back cover of
the main device, and use a dropper to inject about 20ml of pure water.
Insert the water shutoff valve.
3. Replace the black plug, and then replace the back cover.
1.
2.
During transportation, long-term non-use and replacement of the EOG, the humidification
water and the pure water used by the EOG must be drained.
※ During transportation, long-term non-use and replacement of the electrolytic ozone generator, the humidifica-
tion water and the pure water used by the electrolytic ozone generator must be drained.
13
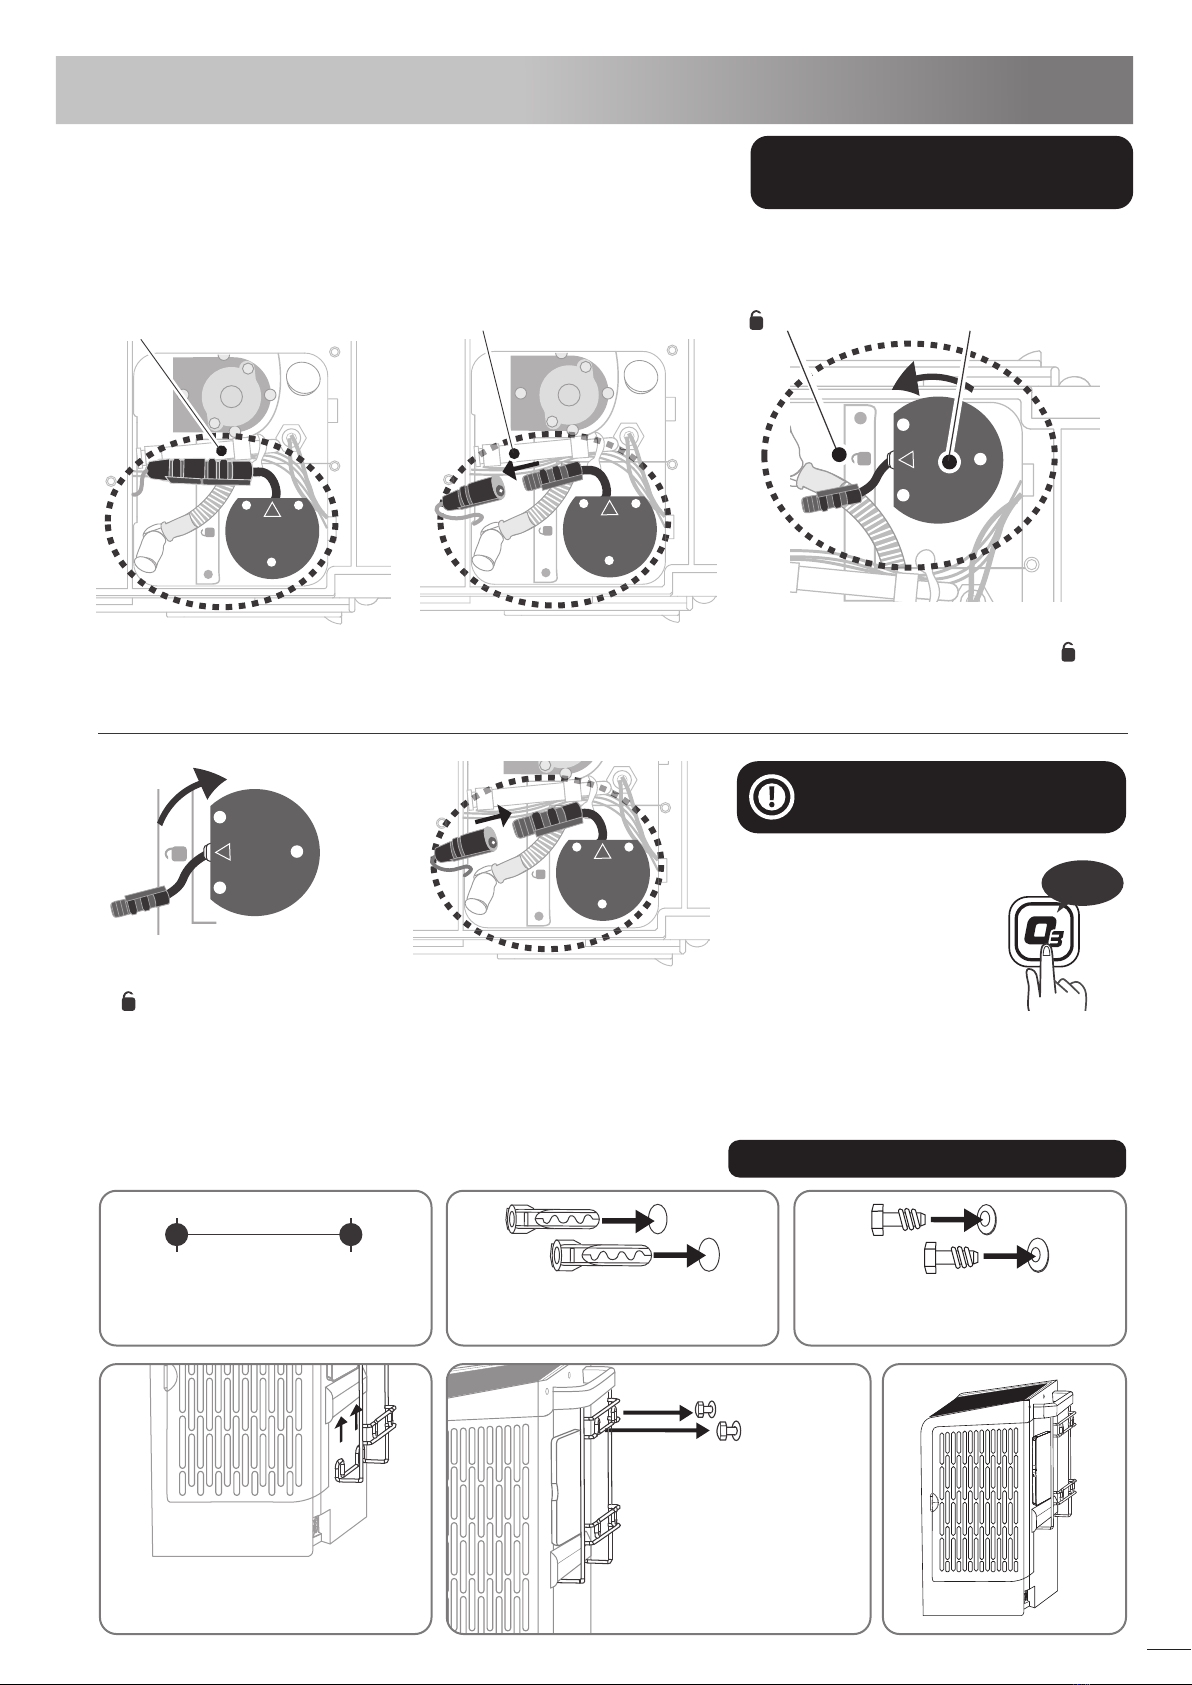
7-③.MAINTENANCE -Install Wall Mount / EOG
Install a new EOG. Align the
△ mark on the EOG with the
mark on the main unit.
Turn the EOG tight clockwise.
4.
※ The service life of the electrolytic ozone generator is about 9,000 hours. The actual time depends on how often the device is used.
※ For purchasing consumables and related inquiries, please contact your BioSure distributor.
When the electrolytic ozone generator (EOG) reaches its end of life,
the REPLACE CELL Indicator will light up. Please stop the unit and replace it.
■ Replace the EOG When REPLACE CELL indicator lights
on, please perform replacement
6. Replace the bottom cover:
Hook the bottom cover hook to the main device, then close the two tabs and replace the bottom cover.
※When replacing the EOG, please replace the "DI water filter" and the "HEPA filter" at the same time.
LEVEL
20sec.
1. Press down the two tabs at the
bottom, and then remove the
bottom cover.
2. Separate the terminals of
EOG and the main unit.
5. Connect the terminals.
Inside the bottom cover
Connection terminal Mark EOG
3. Rotate the EOG counterclockwise, align
the △ mark on the EOG with the mark
on the unit, and then pull the EOG up to
remove it.
After replacing the EOG, a
system reset is required.
5. Fix the hook holes at
the upper end of the
wall mount to the
screw on the wall.
1. Drill two holes with a diameter
of 6 mm and a center distance
of 6 cm in the wall.
4. Align the hook under the wall
mount with the wall-hanging slot
of the unit and pull it up to fix it.
2. Hammer the expansion screws
into the holes. 3. Lock the hook screws into
the expansion screws.
■ Install Wall Mount Affixing unit to wall
6cm
6mm6mm
Replace the EOG
Keep the power supply on.
Press and hold the LEVEL key for
20 seconds, the REPLACE FILTER
indicator will flash once. Keep on
pressing it and the indicator will
flash 6 times. The REPLACE CELL
indicator turns off when reset is
complete.
14

Water Leaking.The unit is tilt.
※ If the above solutions do not solve the problems, please contact BioSure distributor.
8
.TROUBLESHOOTING
Power is not connected.Device doesn't work.
Use the power adapter attached in the product package.
Make sure the terminal of the power adapter is inserted
into the power jack of the device.
If the main device is placed at an angle, the
humidification water may leak out.
The REPLACE FILTER indicator
lights up.
The life of DI water filter and
HEPA filter have expired.
Please follow the instructions in section 7-1 to replace the
DI water filter and HEPA filter.
The life of the EOG has expired.Please follow the instructions in section 7-3 to replace
the EOG.
Insufficient of humidification
water.
The WATER LOW indicator
lights up.
The REPLACE CELL indicator
lights up.
Control button(s) doesn't work.Accurately touch the center of the operation button.
Did not touch the center of the
operation button.
Replenish pure water or distilled water in accordance with
the instructions in Section 5-5. If the indicator warning still
cannot be removed, please contact your service agent.
Insufficient pure water for the
EOG.
The REFILL TANK indicator
lights up.
The system can work normally. If you want to turn off the
light, please power it up again.
When replenishing the pure
water for the EOG, the user
stops replenishing before the
tank is filled.
The REFILL TANK indicator
blinks.
The design of this product has fully considered safety,
but some people may still feel a strong smell.
This is the smell of ozone.
I smell a strange smell at the
ozone outlet.
Please contact your service agent.
The EOG fails. The unit stops
running.
The SERVICE indicator lights up.
Replenish pure water to the humidification water tank
according to the instructions in section 5-6.
Water quality: TDS <1ppm or EC <2μS/cm
15
Use the following guide to self-check your problems before requesting repairs.If you come into a conclusion that problem has
occurred, do NOT attempt to disassemble and repair the product yourself, but contact BioSure or your dealer for support.
Sometimes suspected problem is remedied by disconnecting the power plug and then re-connecting it.
Symptom Possible Cause Recommended Solution
BioSure Professional is a division of Biotek Environmental Science Ltd. (BES). BES is a global leading electrolytic product
manufacturer with pioneering ozone application technology and currently holds many exclusive patents for its
electrolytic ozone generators and products worldwide.
WARRANTY DESCRIPTION
Equipment manufactured by Biotek Environmental Science Ltd. has been constructed of the finest materials available and
manufactured to high quality standards. When installed in accordance with manufacturer's recommendations, and under
normal use and service, new BioSure products are warranted to be free of defects due to poor materials or workmanship for the
period of time listed below (following the date of purchase):
- Main Device:
2 Years Parts Only Replacement (excluding wear and consumable parts)
- Consumable Parts:
If the product fails during the warranty period, please show your proof of purchase to your dealer and ask for repairs. If the
product is not in the place of purchase for on-site maintenance or the product needs to be shipped, the actual costs incurred,
such as transportation fees, may be charged.
Exclusions: Certain BES parts that are expendable by nature and that need to be replaced frequently may not be covered.
BES is not liable under these warranties for repairs or damages due to improper operation, attempted repairs or installation
by unauthorized persons, alterations, abuse, fire, flood,
or acts of nature. Additionally, this warranty may be voided in the case of:
- Failure to follow BES (and BioSure Professional) instructions for use, care, or maintenance
- Removal, alteration, or defacing of the BES-affixed serial number and other labels
- Mechanical damage
- Use of fluids other than clean, potable water
This warranty is conditional upon BES receiving notice of any defect subject to this warranty within thirty (30) days of its original
discovery by the Buyer. For service or warranty questions, contact the BES service department or BES authorized dealer nearby.
16
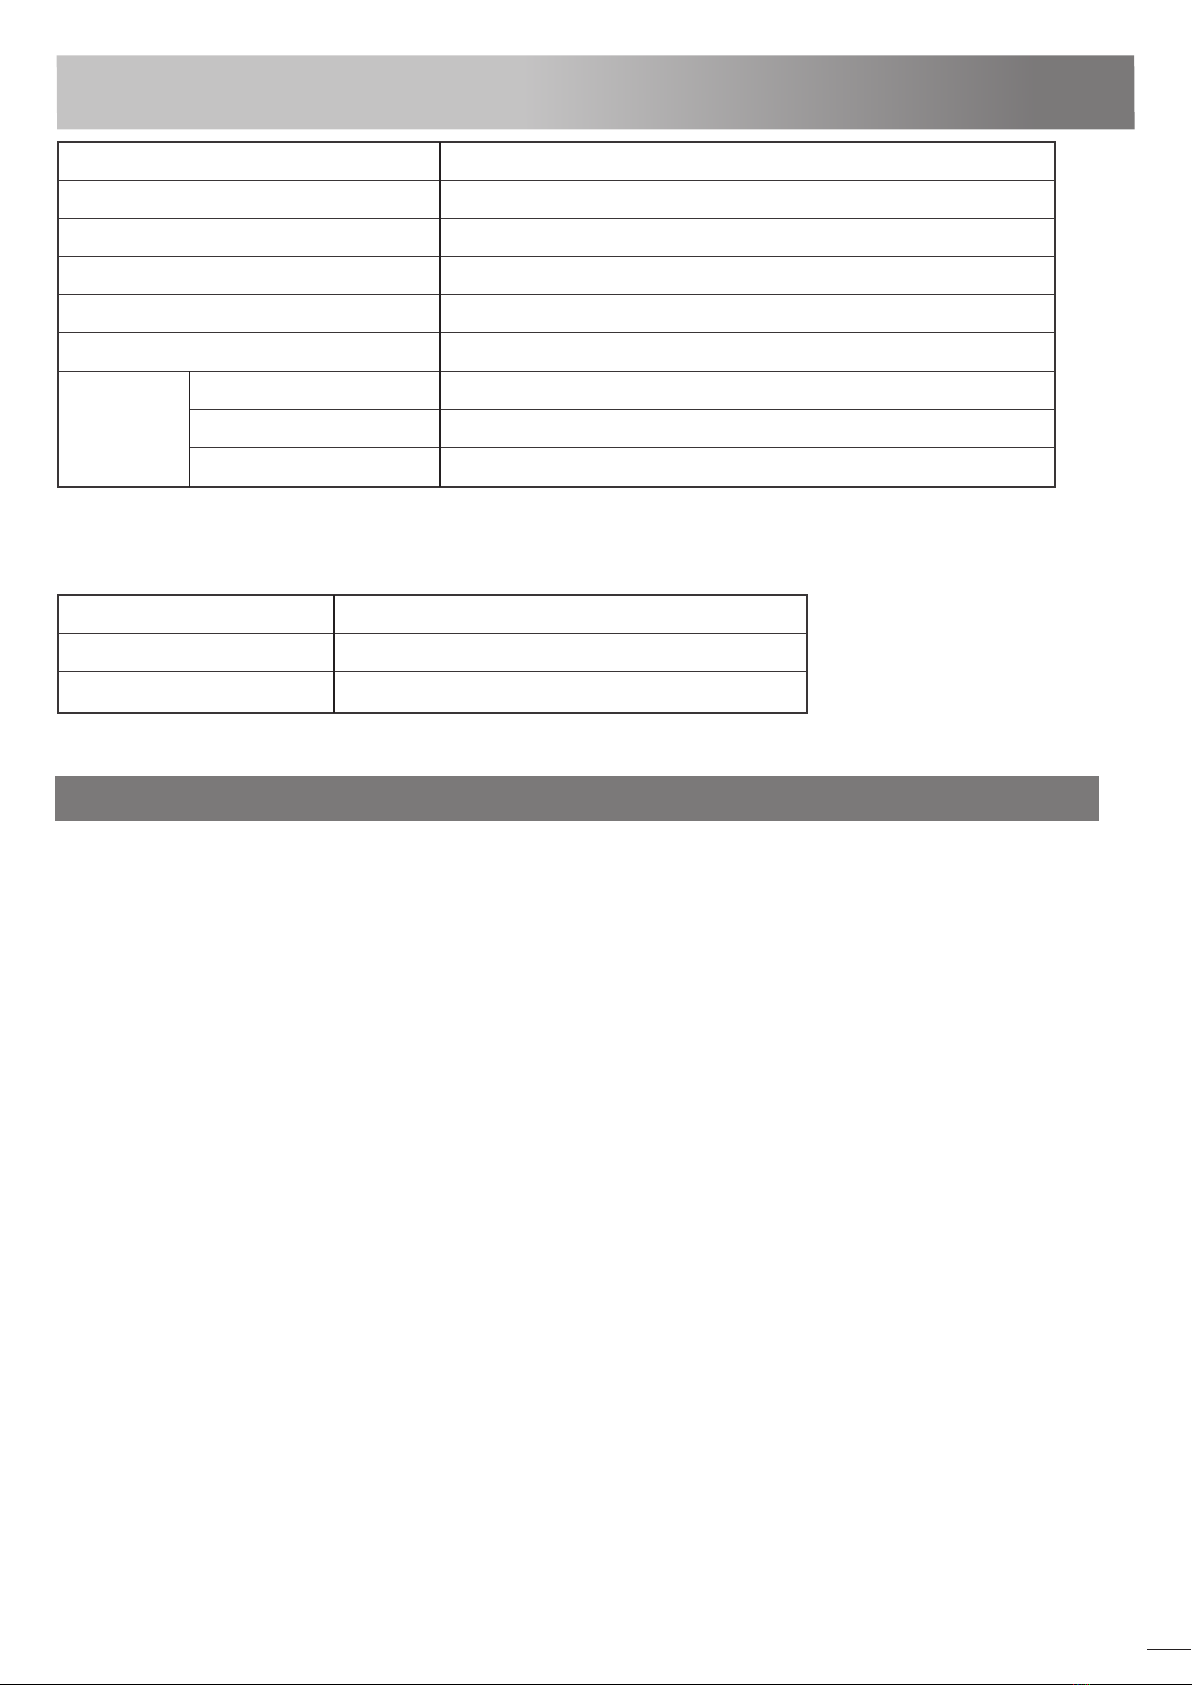
9.SPECIFICATIONS
Product Name
Model
Water Supply for Humidification
Water Supply for the EOG
Power
Ambient Temp
Space Sanitizer System Plus
EOS7190-P
Pure water or distilled water (TDS < 1ppm or EC < 2μS/cm)
Pure water or distilled water (TDS < 1ppm or EC < 2μS/cm)
AC 100 - 240V, 50 - 60Hz, 33W
Room temperature 5 - 35℃
W230 x D127 x H300(mm)
For use on a hard, level, and stable surface or wall mount only
2.5kg(Unfilled)
Dimensions
and Weight
Dimensions
Location Requirements
Weight
【Waste Disposal】
When disposing of this product, follow the instructions of the local government (local regulations) for disposal.
【Consumable Parts】 The models of consumables are as follows.
※ For purchasing consumables and related inquiries, please contact your BioSure distributor.
C12011000303-80 Electrolytic Ozone Generator (EOG)
A71902007041 HEPA Filter
B71902007010 DI Water Filter
hour usage life-span monitored by the unit, or 1 year from the date of installation,
the date of installation, whichever comes first. Parts only. The limited warranty of BES only covers ozone generators that
fail due to manufacturing defects, but not those are depleted due to normal use.
2. DI water filter & HEPA filter - Except for goods due to manufacturing defects or poor quality, it's not guaranteed or returned
after unpacking or use.
1. Electrolytic ozone generator - within the

Memo


Table of contents
Popular Accessories manuals by other brands


Schwaiger
Schwaiger ZHS10 manual

Johnson Controls
Johnson Controls NS Series installation instructions

Texecom
Texecom Premier Elite Impaq Plus-W quick start guide

American Standard
American Standard Champion Slow Close Toilet Seat 5325.010 installation instructions

TP-Link
TP-Link TL-PBG6700 Quick install guide

Clearaudio
Clearaudio Unify user manual