bishel BL-RC-011 User manual


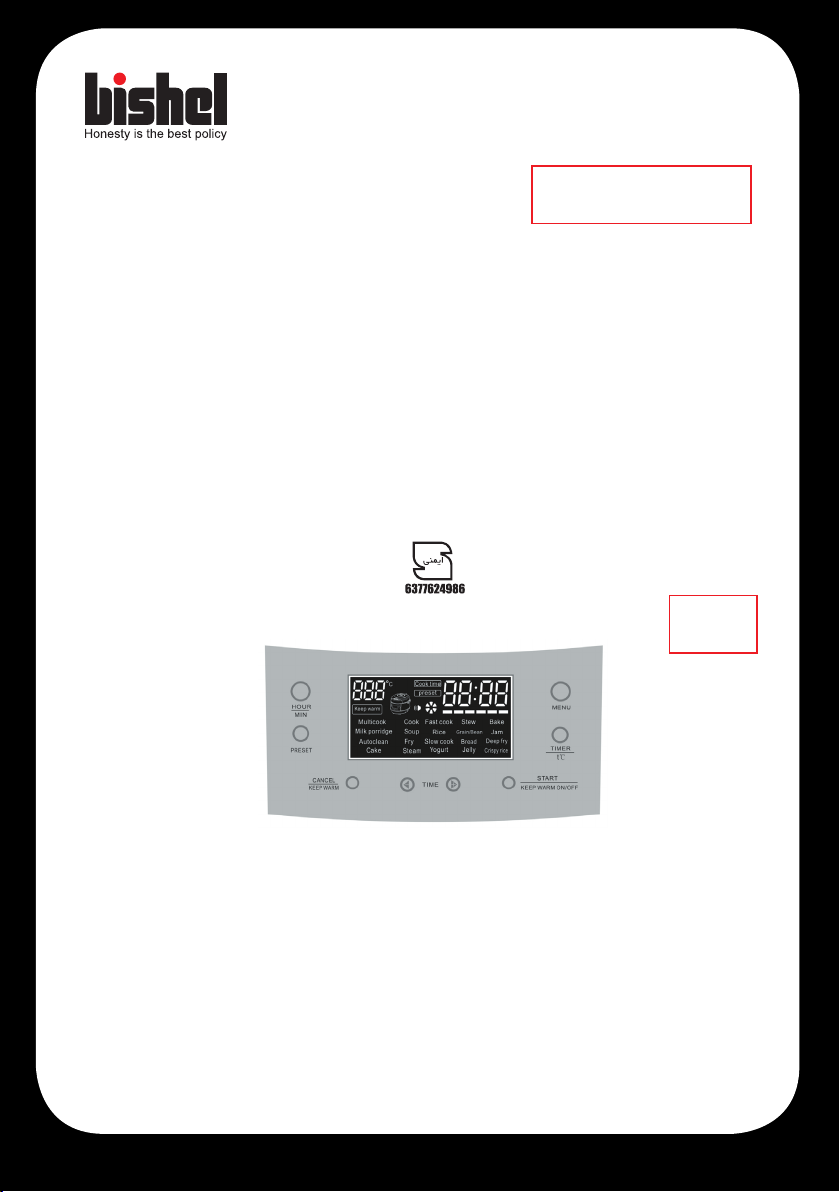
LED
START
TIME
KEEPCANCEL
WARM
PRESET
HOURMIN
TIMERtc
MENU

MENU
MULTICOOK
TIMERTEMPRATURE
TIMERTEMPRATURE
START
KEEPWARM

CrispryriceMENU
LED
TIMER
START
KEEP
WARM
MENU
PRESET
LEDSTART
START
-
~
-
-
-
-
- -
-
-
-
-
-
-
-
-
-
-
-
-
-
-
-
-
-
-
-
-
-
-
-
-
-
-
Jam
-
-
-
-
-
-
-
-
-
-
-
-
-
~
-
-
-
-
-
-
-
-
-
-
-
-
-
-
-
-
~
-
-
-
-
- -
-
-
-
-
-
-
-
-
-
-
-
-
-
-
-
-
-
-
-
-
-
-
-
-
-
-
Jam
-
-
-
-
-
-
-
-
-
-
-
-
-
~
-
-
-
-
-
-
-
-
-
-
-
-
-
-
-

10

11
Guarantee information
Proper disposal of this device
Bishel Company present a 24-month guarantee from the date of
manufacture of the product.
Note that the guarantee does not cover misuse or use in the
commercial environment. (This device is for home usage)
Repairs under guarantee are provided by authorized after-sales
service center, and if you refer to unauthorized after-sales service
centers, the device will be out of guarantee.
Note that when referring to the authorized after-sales service, bring
the product guarantee card and the sales invoice with you.
This sign means that this device should not be disposed of in the
rubbish bin in accordance to law. To avoid possible dangers and
harms of disposing of this device to the environment and human
health through improper and unsupervised disposal, please use
the municipal recycling syem or collection and recycling centers
whenever you decide to dispose of this device.

12
Cleaning and maintenance of the the device
1- Take out the inner container and wash it with dishwashing liquid
and dry it with a soft cloth.
2. The eam outlet should be washed after use to prevent it from
malfunctioning.
3- Thoroughly clean the body of the device and keep it in a dry place.
Water vapor location
There is a small amount of eam in this place that should be used.
Clean it with a soft cloth.
Device sensor
Note any changes in the performance of the sensors aects the
baking results after each use so clean it.
Steam output
Clean the eam outlet after each use.

13
Cleaning and maintenance of the the device
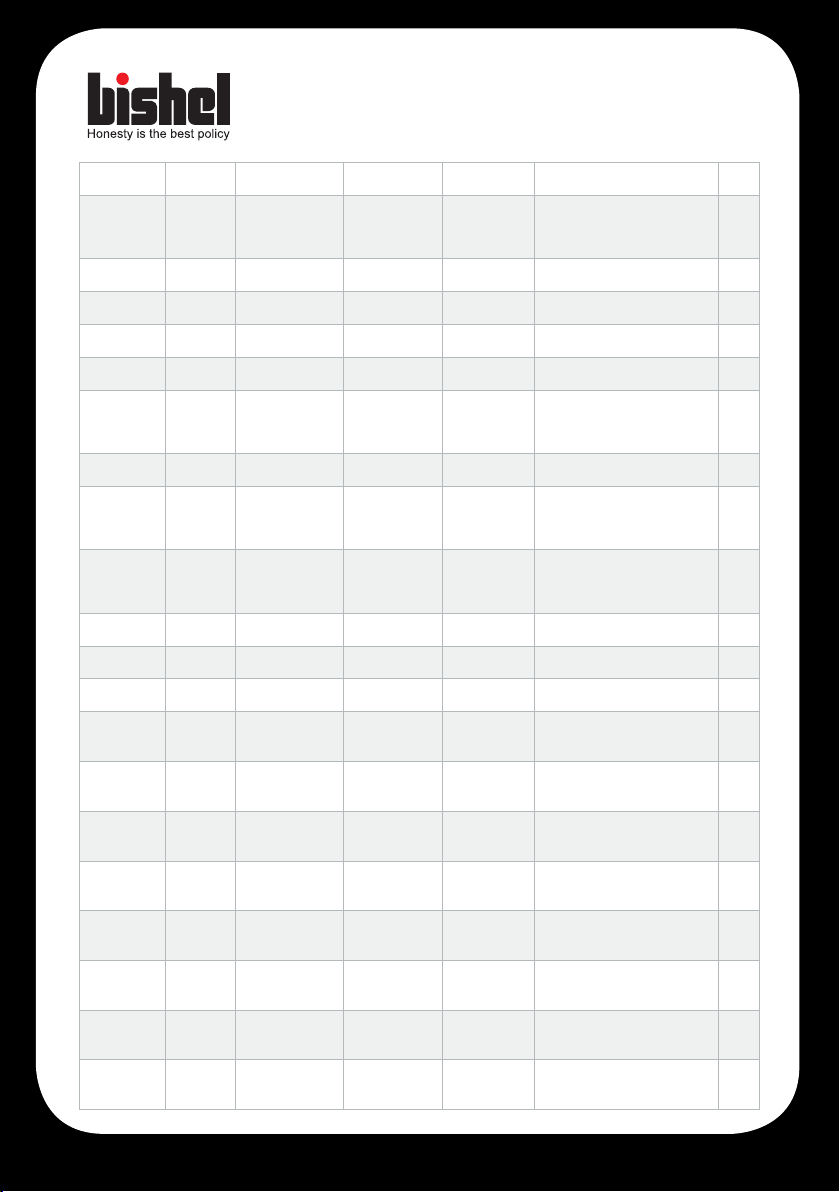
Automatic
warm keeper
Delayed
cooking Stop time setled Time adjustment
eciency
Setled cooking
time FUNCTION LINE
Yes hours 24
1 minute over
1 hour
5 minutes in more
than an hour
° C 5
15: 00-00: 02
35 ~ 100
C
30 minutes
° C 100 Multi cook
1
Yes hours 24 5 minutes
00:05-08:00
-
40 minutes
Cook
2
No No - - -15 minutes Fast cook 3
Yes hours 24 5 minutes
00:10-12:00
-
at 1 o’clock Bake 4
No hours 24 5 minutes
00:30-08:00
-
-at 1 o’clock Deep fry 5
Yes hours 24
1 minute over
1 hour
minutes in more 5
than an hour
00:05-04:00
-
35 minutes fereni 6
Yes hours 24 5 minutes
00:10-08:00
-
at 1 o’clock Soup 7
Yes hours 24
1 minute over
1 hour
5 minutes in more
than an hour
00:05-04:00
-
minutes 25 Rice 8
Yes hours 24
1 minute over
1 hour
5 minutes in more
-than an hour
00:05-04:00
-
minutes 40 Grain / Bean 9
Yes hours 24 5 minutes
00:05-02:00
-
minutes 35
Jam
10
Yes hours 24 5 minutes
00:05-02:00
-
minutes 30 Auto clean 11
Yes No 1 minute
00:05-02:00
-
minutes 30 Fry 12
Yes hours 24 10 minutes
00:05-08:00
-
hours 5
Slow cook
13
Yes hours 24 -5 minutes
00:10-06:00
-
hours 2
Bread
14

14
1. Put the necessary ingredients in the rice cooker.
2. Press the MENU or + / - button to select the Crispy rice option in
the menu. In this case, after selecting the default time, it will be visible
on the LED and will art ashing.
3. Press the TIMER button and then press the +/- keys, , the default
time is 1 hour and 30 minutes, you can set the time between 1 to 2
hours.
4. Press the START button to art the program.
5. When cooking is completed, the machine automatically enters
KEEP WARM mode.
How to use the reset item?
1. Select the MENU option or +/- to select the inructions you want.
2. Press PRESET or +/- to set the time.
3- The time setting range is between 5 minutes to 24 hours
4. Hold down the START button for 2 seconds to display the time
setting LED.
CRISPY LEYER

15
VARIOUS COOKING
1. Press the MENU button and then select the MULTI COOK button
on the screen by pressing the + and - buttons. (The specied baking
time is 30 minutes and the baking temperature is 100 ° C)
2. Press the TIMER / TEMPERATURE button by pressing the + and -
buttons to set the cooking time between 2 minutes to 15 hours.
3. Press the TIMER / TEMPERATURE key and then press the + or -
key as well, the baking temperature is in the range of 5 degrees, 35
degrees and 180 degrees Celsius.
4. Hold down the START key for 3 seconds to art the cooking
program.
5. When cooking is complete, the machine is automatically placed in
KEEP WARM mode or so-called food heat retention.

16
Device specications
Device specications:
Capacity: 5 liters
20 cooking program
A 24-hour delay cooking
Equipped with an aluminum lid and a eam outlet
220 volts, 50 Hz, 900 watts
LED display and touch panel
high density aluminum plate
Has the power to keep food warm after cooking automatically
Made in iran, the andard code number: 6377624986
automatically
1. Press the START button to turn on and art working with the device.
2. TIME button and the – and + button beside it are for increase or decrease the
temperature, time and select the desired option on the menu.
3. The CANCEL button is for canceling and opping the device and activating it
again, the KEEP WARM option is to keep food warm inside the device boiler. (Note
that the maximum temperature for keeping food warm is in andby mode for 24
hours)
4. The PRESET button is related to the device reset function.
5. HOUR / MIN button, by pressing this button before cooking, you can set the
desired time.
6. TIMER / tc button to set the time and temperature of the device.
7. The MENU button is for accessing the device menu.
Menu

17
13.Before and after using the device, clean all its accessories.
14.When working with the device, do not shake the internal container
and note that any movement of the internal boiler will cause it to
malfunction.
15.Do not clean the inner container of the device with hard tools to
prevent damage to the Teon parts of the device.
16.Never heat the inner pot with other heating devices, and do not
use other utensils inead of the main one.
17.Never turn on this device without water and food.
18.If the power cord is damaged, never replace it with another power
cord, and please contact its authorized after-sales service center to
receive the appropriate cord.
19.It is recommended to read the information in the manual
completely before using the device.
20.This device should not be opened or repaired by untrained people,
and if any repair is needed, please contact the authorized Bishel after-
sales service center.
21- The product should not be used in places without earth wire.
Menu
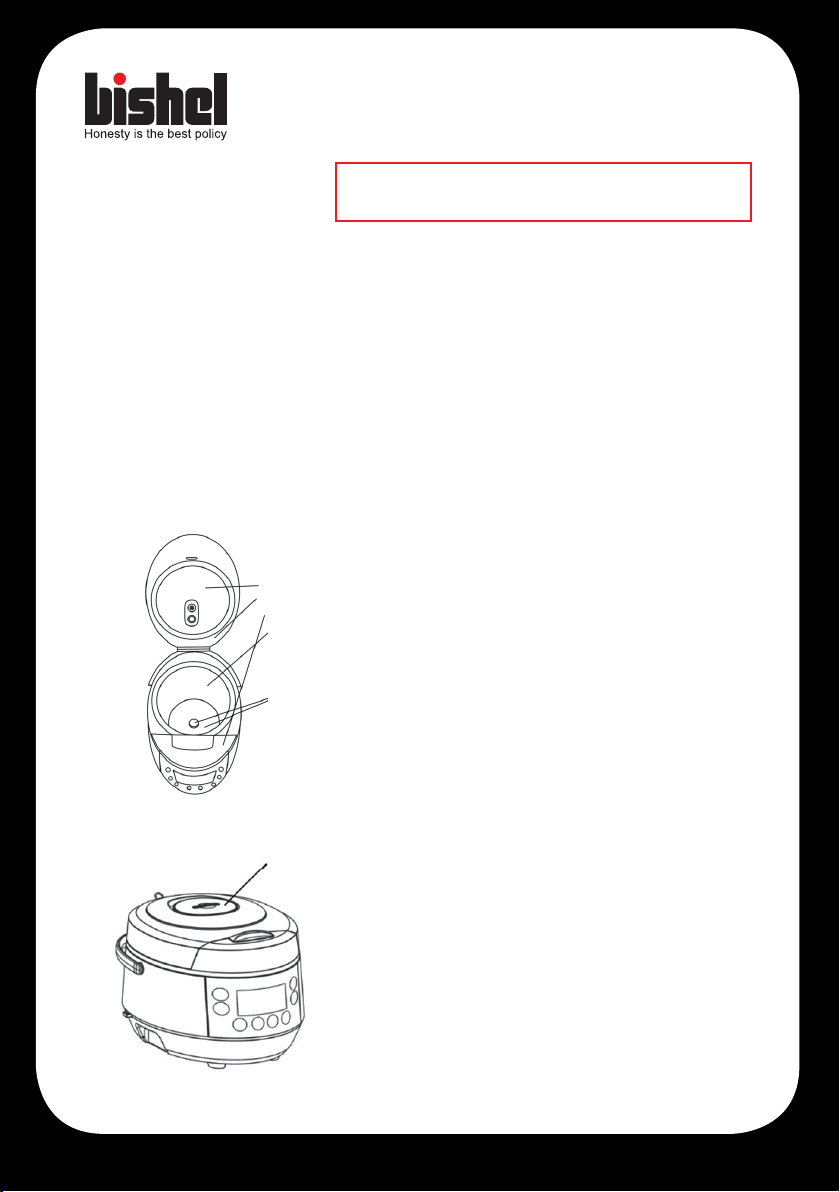
PIECES AND PARTS NAMES

18
Important points
1.This device is designed for home use, so it should not be used in
ores, shopping malls and outdoors
2. This device is not for children and people with disabilities. Keep the
device out of the reach of children and never leave it unattended for
these people.
3Never wash this device directly in water to prevent electric shock
4.Never touch the plug with a wet hand to prevent electric shock.
5.Do not place any metal object near the plug of the device to prevent
electric shock.
6.To prevent the risk of re, do not place the power cord next to the
heating devices and pull the two plugs of the device after using the
electricity.
7.Keep the metal parts and body of the device clean.
8.Before plug in, make sure that the input voltage matches the voltage
of this device.
9. To prevent burns, keep your hands and face away from the eam
outlet and never cover the water outlet with a cloth, otherwise the
cover of the device may lose its shape and deform due to excessive
heat
10.To prevent burns, do not touch the cover or metal parts while the
device is on.
11.This device should not be used on unable surfaces or other
objects that cannot withand high temperatures, to avoid the risk of
re.
12.Do not expose this device to ame.

19
IMPORTANT POINTS……………………….……….………………………….18
PIECES AND PARTS NAMES…………………….……………………………17
DEVICE FEATURES………………………..……………………………..…….16
MENU…………………………………….………………………….……………16
VARIOUS COOKING………………………………………………..…………..15
THE CHART…………………………………………………………..….………15
CRISPY LEYER……………………………………………….…………………14
HOW TO USE RESET ITEM……………………………………………………14
CLEANING AND KEEPING SAFE…………..……………………...………….12
STEAM PLACE…………………………………………………………..………12
DIVICE SENSOR………………………..……………………………….………12
STEAM OUTPUT……………………….…………………………….…….……12
WARANTY INFORMATION…………………….…………………….....………11
Please read all the contents of the manual carefully before using the device
CONTENTS

www.bishel.ir
Table of contents
Languages:


