Black Corporation ISE-NIN User manual

!"
#

!"#$%&'(")!*&)+&,!!!!!!!!!!!!!!!!!!!!!!!!!!!!!!!!!!!!!!!!!!!!!!!!!!!!!!!!!!!!!!!!!!!!!!!!!!!!!!!!!!!!!!!!!!!!!!!! イセーニン
OPERATION MANUAL
イセーニン
8 VOICE POLYPHONIC SYNTHESIZER!
BY BLACK CORPORATION"
2

!"#$%&'(")!*&)+&,!!!!!!!!!!!!!!!!!!!!!!!!!!!!!!!!!!!!!!!!!!!!!!!!!!!!!!!!!!!!!!!!!!!!!!!!!!!!!!!!!!!!!!!!!!!!!!!! イセーニン
FCC COMPLIANCE STATEMENT
This device complies with part 15 of the FCC rules. Operation is subject to the following two
conditions: (1) This device may not cause harmful interference, and (2) this device must accept
any interference received, including interference that may cause undesired operation."
EUROPEAN UNION REGULATION COMPLIANCE STATEMENT
This product complies with the Low Voltage Directive 2006/95/EC and the Electromagnetic
Compatibility Directive 2004/108/EC. The product meets the requirements of RoHS 2 Directive
2011/65/EU. "
This product must be disposed of properly according to local laws and regulations."
IMPORTANT SAFETY INSTRUCTIONS
1. Read these instructions."
2. Keep these instructions."
3. Heed all warnings."
4. Follow all instructions."
5. Do not use this apparatus near water."
6. Clean only with dry cloth."
7. Do not block any ventilation openings. Install in accordance with the manufacturer’s
instructions."
8. Do not install near any heat sources such as radiators, heat registers, stoves, or other
apparatus (including amplifiers) that produce heat."
9. Do not defeat the safety purpose of a polarized or grounding-type plug. A polarized plug has
two blades with one wider than the other. A grounding type plug has two blades and a third
grounding prong. The wide blade or the third prong are provided for your safety. If the provided
plug does not fit into your outlet, consult an electrician for replacement of the obsolete outlet."
10. Protect the power cord from being walked on or pinched particularly at plugs, convenience
receptacles, and the point where they exit from the apparatus."
11. Only use attachments/accessories specified by the manufacturer."
12. Use only with the cart, stand, tripod, bracket, or table specified by the manufacturer, or
sold with the apparatus. When a cart is used, use caution when moving the cart/apparatus
combination to avoid injury from tip-over."
13. Unplug this apparatus during lightning storms or when unused for long periods of time."
14. Refer all servicing to qualified service personnel. Servicing is required when the apparatus
has been damaged in any way, such as power-supply cord or plug is damaged, liquid has been
spilled or objects have fallen into the apparatus, the apparatus has been exposed to rain or
moisture, does not operate normally, or has been dropped."
3

!"#$%&'(")!*&)+&,!!!!!!!!!!!!!!!!!!!!!!!!!!!!!!!!!!!!!!!!!!!!!!!!!!!!!!!!!!!!!!!!!!!!!!!!!!!!!!!!!!!!!!!!!!!!!!!! イセーニン
TABLE OF CONTENTS
INTRODUCTION!5"
FEATURES AND SPECIFICATIONS !6"
SETUP & CONNECTIONS!7!
BANKS & PRESET SELECTION!8"
PATCH PROGRAMMING!11"
ARCHITECTURE & PANEL !12"
MASTER!13"
ARPEGGIO!15"
VOLTAGE CONTROLLED OSCILLATORS (VCO)!16"
VCO MODULATOR!19"
LFO!20"
SOURCE MIXER!21"
FILTER SECTION!22"
VOLTAGE CONTROLLED OSCILLATOR!24"
ENVELOPES!25"
SETTINGS MENU!27"
RETUNE!27"
MIDI SETTINGS!28"
VOICE SETTINGS!32"
LFO!32"
TIME!33"
ARPEGGIATOR !34"
MICROTUNING!35"
ODDSOUND!35"
CALIBRATION!36"
DRIFT!38"
LED BRIGHTNESS!10"
SCREENSAVER!38"
RESET SETTINGS!38"
ABOUT!38"
UPDATING FIRMWARE!39"
MIDI CC CHART!42"
4

!"#$%&'(")!*&)+&,!!!!!!!!!!!!!!!!!!!!!!!!!!!!!!!!!!!!!!!!!!!!!!!!!!!!!!!!!!!!!!!!!!!!!!!!!!!!!!!!!!!!!!!!!!!!!!!! イセーニン
INTRODUCTION
As a convention, イセーニン will be written as ISE-NIN for the rest of this manual."
Thank you for purchasing ISE-NIN, 8-voice, 16 oscillator analogue polyphonic synthesizer! The
architecture and programmability of ISE-NIN is one that welcomes experimentation resulting in
a wide range of sounds from beautiful to strangely alien. In addition, classic performance
functions in addition to assignable VELOCITY and POLYPHONIC AFTERTOUCH help push
sonic boundaries even further. We hope you have as much fun with ISE-NIN as we have had
developing it."
PACKAGE CONTENTS
When unpacking your ISE-NIN, check to make sure all of the following contents are present,
and nothing has been lost or damaged in shipping. It may be helpful to save the packaging to
protect the unit when transporting it. If you have any questions, feel free to contact us at
The following applies to pre-built ISE-NIN units only. DIY ISE-NIN builders will obtain or
assemble all of the following items from the most recent bill of materials (BOM) which can be
found at https://www.dsl-man.de/"
ISE-NIN ships with the following items:$"
ISE-NIN Desktop Analogue Synthesizer"
12.0V 2.5A 30W wall wart power supply with US/JP, UK, EU, and AU local adapters."
Rack Ears and Mounting Screws (Caution: Use the screws provided in the bag or you could
damage your unit!)"
4 Self-Adhesive Felt Pads"
Black Corporation Logo Stickers"
It is a good idea to hold on to your packaging if you would like to transport ISE-NIN safely."
5

!"#$%&'(")!*&)+&,!!!!!!!!!!!!!!!!!!!!!!!!!!!!!!!!!!!!!!!!!!!!!!!!!!!!!!!!!!!!!!!!!!!!!!!!!!!!!!!!!!!!!!!!!!!!!!!! イセーニン
FEATURES AND SPECIFICATIONS
#-./01-2/3
4!5-6789
"976..:;-<93
=>!?@!08<!5-678A
"976..:;-<!'/083
B-.;:C8!7-2;<-..8D!:2:.-C!-976..:;-<9
"976..:;-<!E<8FG827/!%:2C83
=HIJ!;-!=@KLMIJ
"976..:;-<!N:58O-<P93
'<6:2C.8Q!%:P0Q!RFG:<8Q!)-698!:2D!:DSG9;:T.8!#G.98
"976..:;-<!U-2;<-.93
"7;:58!?@VW=>VAQ!'<:290-98Q!#G.98!N6D;1Q!B-.GP8
"976..:;-<!*-DG.:X-293
#G.98!N6D;1!?#N*AQ!U<-99!*-DQ!I:<D!R/27
,-Y!E<8FG827/!"976..:;-<9!?,E"A3
*(Z(!9/27:T.8Q!62D8082D82;!,E"!08<!.:/8<
,E"!N:58O-<P93
R628Q!R:YQ!RFG:<8Q!%:2D-P
,E"!Z89X2:X-293
"97!=[@!06;71Q!&P0.6\8<Q!E6.;8<Q!#G.98!N6D;1!=[@
,E"!U-2;<-.93
Z80;1Q!Z8.:/Q!E<8FG827/!?-<!*G.X0.68<A
E6.;8<3
=!\.;8<!08<!5-678
E6.;8<!"0X-293
@][=@!DT[-7;!,-Y!#:99!:2D!I6C1!#:99
E6.;8<!*-DG.:X-293
,E"!=!:2D!@Q!B8.-76;/Q!&^8<;-G71Q!$258.-08Q!_8/T-:<D!;<:7M62C
#<898;!*8P-</3
LL4!'-;:.!#<898;9!`!@L>!62!@!E:7;-</!a:2M9Q!]>!62!B62;:C8!a:2MQ!:2D!
@!+98<!a:2M9!-O!=@4!#:;7189!8:71Q!LHH!962C.8!,:/8<9
_8/T-:<D!'-G71!%890-2983!
U-2287X-293
B8.-76;/Q!&^8<;-G71!?U1:228.!:2D!#-./01-267AQ!*#$!
*(Z(!()["+'['I%+Q!&+Z("!+b,Q!+Ra!?69-.:;8DAQ!I8:D01-289
#-Y8<3
b=@BZUQ!@KL&
Z6P8296-293
]>H!NQ!=cL!IQ!LH!Z!?PPA!?N--D!0:28.9!:d:718DA
N86C1;3
@Ke!_C[!LKHc!.T9
6

!"#$%&'(")!*&)+&,!!!!!!!!!!!!!!!!!!!!!!!!!!!!!!!!!!!!!!!!!!!!!!!!!!!!!!!!!!!!!!!!!!!!!!!!!!!!!!!!!!!!!!!!!!!!!!!! イセーニン
SETUP & CONNECTIONS
POWER
Connect the given plug tip for your region to the power supply. Insert the barrel end of the
power supply into the input labeled 12VDC/2A POWER on the back of the unit. Plug the other
end of the power supply into an AC outlet. Note that it may take a few minutes for the
oscillators to reach stable tuning.$"
AUDIO/HEADPHONES OUTPUT
ISE-NIN has two balanced audio output jacks. One for the LOWER layer, one for the UPPER.
Turn the VOLUME knob to minimum (fully counter-clockwise) before connecting an audio
cable. Insert one end of a 1/4” instrument cable into each of the jacks labeled BALANCED
AUDIO OUT (LOWER, UPPER) on the back of the unit, and the other end into a powered
amplifier or the input of an audio mixer. Carefully adjust the volume to a comfortable level by
turning the OUT knob clockwise. "
NOTE: By default all Presets are set to MIXED mode, which sends the mixed audio of
the Upper and Lower layers to both outputs. To engage the individual outputs, in the
Settings menu, select Voice, and change the setting to Split mode. "
The HEADPHONES output is a stereo output that either separates the LOWER and UPPER
sections to the left and right channels or mixes them as two, depending on the Mixed or Split
setting. Like the AUDIO OUT jack, the HEADPHONES output is controlled by the VOLUME
knob. Turn the VOLUME knob to minimum before inserting a headphone cable, then adjust
volume to a pleasing level. "
MIDI CONNECTIONS
Because ISE-NIN does not have an onboard keyboard or sequencer, an external MIDI
controller, DAW or hardware sequencer must be used to control the unit. ISE-NIN can be
controlled with standard MIDI controllers, or for more expressivity, a polyphonic aftertouch
controller, or MIDI Polyphonic Expression (MPE) controller."
"
DIN MIDI
To control ISE-NIN with a controller that uses a DIN5 MIDI output, connect a MIDI cable from
the output of the controller to the jack labeled MIDI IN on the back of the unit. If desired, MIDI
signals can be passed through the unit to another device by connecting a MIDI cable to the
jack labeled MIDI THRU on the back of the unit to the MIDI input of another device. MIDI OUT
can also be connected to send Sysex data to a computer or directly to another device. "
USB MIDI
To send MIDI to and from ISE-NIN directly with a computer, USB-B cable connected to ISE-
NIN and appropriate (USB-A or C) connector to the computer."
7

!"#$%&'(")!*&)+&,!!!!!!!!!!!!!!!!!!!!!!!!!!!!!!!!!!!!!!!!!!!!!!!!!!!!!!!!!!!!!!!!!!!!!!!!!!!!!!!!!!!!!!!!!!!!!!!! イセーニン
BANKS & PRESET SELECTION
When first exploring ISE-NIN, it may be helpful to experiment with the factory presets to
understand the capabilities of the synthesizer. ISE-NIN’s factory patches have been designed
to demonstrate the vast range of capabilities and expressivity the synthesizer is capable of. "
To enable the maximum amount of expressivity from ISE-NIN, make sure the MIDI MODE
settings are configured to match the connected MIDI controller type. To make sure ISE-NIN is
configured correctly for the connected controller type, see the SETTINGS section of this
manual: "
For most MIDI controllers, select the PAT (POLY AFTERTOUCH) setting. "
For MIDI Polyphonic Expression (MPE) controllers such as ASM Hydrasynth, Expressive
Osmose, Roli Seaboard, Roger Linn Linnstrument, or Haken Continuum, select the MPE
setting. "
PATCH BANK OVERVIEW
ISE-NIN has 5 available patch banks, including 3 Factory preset banks and 2 User Banks. The
FACTORY patch banks are not editable, but factory patches can be edited and saved to User
Bank 1 or User Bank 2."
M. STEIN: 128 factory presets programmed by composer and music producer Michael Stein."
BENEDEK: 128 factory presets programmed by musical artist and Black Corporation
associate Nicky Benedek."
VINTAGE: The first 8 patches in this bank are faithful recreations of the original JP-8 Patch
Presets, which include Dual and Split mode settings. The rest of the 64 patches in this bank are
Dual and Split patches built from original JP-8 sounds from the ISE-NIN Vintage Layer Bank
that stay true to its planetary heritage. %
User Banks 1 and 2 (labeled BNK1 and 2): These patch banks each provide 128 user-editable
patch slots."
LAYERS
ISE-NIN’s patch creation is built around Layers, individual sounds which can be used
individually or layered or split across the keyboard in DUAL and SPLIT modes, just as on the
original JP-8. "
From the main screen, press BACK. You will be taken to the LOAD LAYER screen. Scroll
through to the Layer you want to load and press ENTER. To switch between the LAYER and
VINTAGE LAYER banks, press SHIFT. "
A Layer has now been loaded into the Upper Layer slot. In Whole mode this will be the sole
Layer and play all 8 voices of ISE-NIN. "
From the main screen, by pressing SHIFT and ENTER, these Layer banks can be accessed and
scrolled through in the same way as the Preset Banks. However, in order to save Global
settings for these sounds, they must be loaded into a Preset. "
ISE-NIN includes 2 banks of Layers:"
VINTAGE LAYERS: Faithful recreations of all 64 original JP-8 factory patches. "
LAYERS: A blank bank of 500 slots for the user saved layers."
8

!"#$%&'(")!*&)+&,!!!!!!!!!!!!!!!!!!!!!!!!!!!!!!!!!!!!!!!!!!!!!!!!!!!!!!!!!!!!!!!!!!!!!!!!!!!!!!!!!!!!!!!!!!!!!!!! イセーニン
SELECTING BANKS
While holding SHIFT, press ENTER (FACTORY) to switch between patch banks.$"
To switch ISE-NIN back to the parameters currently set by the sliders in realtime, simply click
the main data encoder while in the bank selection mode. NOTE: If you have edited a preset
patch or layer which you would like to save, please do so before as the changes you have
made will not be saved after switching back to Panel mode. "
Note: ISE-NIN responds to standard Program Change and Bank Change MIDI messages.
Make sure that CC Receive is turned ON in the MIDI menu. Bank change uses MIDI CC
message 0, with the values 0 = User Bank 1, 1 = User Bank 2, and 2 = Factory Bank."
SELECTING PATCH PRESETS
When navigating to a new bank, patch preset 1 will be selected.$"
Scroll between patches using the encoder. "
Some MIDI controllers and DAWs are capable of sending Program Change messages. ISE-NIN
will respond to Program Change messages, allowing for selection of the next, previous, or
specific patch numbers from the current bank, or from a different bank entirely. "
SAVING PATCH PRESETS
ISE-NIN has 256 user writable presets total, and 500 User Layer slots. Patches can be saved in
the banks labeled Bank 1 and Bank 2. Each Preset Bank has 128 writable slots."
When editing and saving FACTORY PRESETS and LAYERS, you must save to Bank 1, Bank 2
or Layers. FACTORY PRESETS can not be overwritten. "
Saved PRESETS store the following values:"
All front panel slider and switch positions."
DUAL, SPLIT, or Single settings"
UPPER LAYER and LOWER LAYER (in SINGLE mode, Only UPPER is active)"
All non-global MIDI settings:"
To save/overwrite a Preset or Layer in the current preset memory location:
Press ENTER (SAVE). The Active Voices display will be replaced by the option to select
PRESET or LAYER. If LAYER is selected, only the currently selected Upper or Lower Layer will
be saved. Check to make sure the intended Layer is currently selected. "
Press ENTER (SAVE) again. The patch has been saved to the current location, overwriting the
previous values of that PRESET or LAYER location.%
To save/overwrite a Preset or Layer in a new Preset memory location of the current bank:"
Press ENTER (SAVE) and select either PRESET or LAYER. "
Use the encoder to navigate to the desired preset memory location. Be certain to save the
patch in the correct location, as the previous values will be overwritten when the save process
is complete."
9

!"#$%&'(")!*&)+&,!!!!!!!!!!!!!!!!!!!!!!!!!!!!!!!!!!!!!!!!!!!!!!!!!!!!!!!!!!!!!!!!!!!!!!!!!!!!!!!!!!!!!!!!!!!!!!!! イセーニン
Press ENTER (SAVE) a second time. The patch has been saved, overwriting the previous
values of that preset location."
To save/overwrite a Preset or Layer in a different bank:
Hold the SHIFT Button and select the desired bank by scrolling using the encoder. "
Press ENTER (SAVE) and select PRESET or LAYER."
Use the encoder to navigate to the memory location to be saved. Be certain to save the patch
in the correct location, as the previous values will be overwritten when the save process is
complete."
Press ENTER (SAVE) a second time. The patch has been saved, overwriting the previous
values of that PRESET or LAYER location.%
10

!"#$%&'(")!*&)+&,!!!!!!!!!!!!!!!!!!!!!!!!!!!!!!!!!!!!!!!!!!!!!!!!!!!!!!!!!!!!!!!!!!!!!!!!!!!!!!!!!!!!!!!!!!!!!!!! イセーニン
PATCH PROGRAMMING
Once a patch has been saved to Bank 1 or 2, it can be edited at any time by recalling it and
adjusting the buttons and knobs or patch-specific settings until the desired sound is reached. "
Once adjustments have been made, save the preset to the bank and preset slot."
BACKING UP PATCH PRESETS
Importing and exporting of ISE-NIN preset banks is done via SysEx. Connect ISE-NIN to your
computer via USB or via DIN MIDI and MIDI interface, then set your SysEx program (such as
SysEx Librarian or MidiOX) to listen to incoming SysEx. "
Send entire selected Preset Bank / Layer Bank:"
Hold the VCO-1 RANGE, VCO-1 WAVEFORM and SYNC buttons and press the Encoder
button. This will send a SysEx burst via MIDI containing all of the bank’s patch data. "
Send single Preset / Layer:"
Hold the VCO-1 RANGE and VCO-1 WAVEFORM buttons and press the Encoder knob. This
will send a SysEx burst via MIDI containing all of the bank’s patch data."
PANEL MODE
Panel mode is available to bypass all presets and create patches based on the current
positions of all knobs and switches on the front panel. While ISE-NIN can not initialize patches
to a default state, panel mode can create patches from panel settings, which can be saved to
any non-factory location."
To place ISE-NIN in panel mode, press the encoder. "
To exit panel mode, press the encoder again, or BACK (LOAD) to navigate to a saved patch.$"
11
!"#$%&'(")!*&)+&,!!!!!!!!!!!!!!!!!!!!!!!!!!!!!!!!!!!!!!!!!!!!!!!!!!!!!!!!!!!!!!!!!!!!!!!!!!!!!!!!!!!!!!!!!!!!!!!! イセーニン
ARCHITECTURE & PANEL
In order to make ISE-NIN’s architecture easier to follow, we will start from the MASTER section
and move left towards the LFO section, then down to the MIXER and move right to the OUT
section. "
ISE-NIN can save LAYERS and PRESETS. LAYERS are individually saved patches which are
able to recall all of the settings of VCO-1 and VCO-2, Modulators, LFOs, Filters, VCA, and
Envelopes, but not ARPEGGIATOR and MASTER. PRESETS store combinations of UPPER and
LOWER LAYERS and/or PANEL settings as well as ARPEGGIATOR and MASTER settings."
•MASTER: The MASTER section manages overall functions of ISE-NIN."
●OLED DISPLAY: Displays status and knob value, allows access to patch memory, settings,
and additional parameters."
•ARPEGGIO: Arpeggio function repeatedly plays individual notes or a chord sequentially.
•VCO 1 and 2: Selects the frequencies, waveforms, modulations."
•VCO MODULATION: This control alters the sound by changing the frequency of the
Voltage-Controlled Oscillator (VCO) through modulation.
•LFO: Generates low-frequency signals that can be routed to various destinations.
•SOURCE MIXER: Controls the overall level of the sound between VCO-1 and 2."
•HPF: Allows high-frequency sounds to pass through while filtering out low-frequency
sounds.
•VCF: The Voltage-Controlled Filter (VCF) section on the ISE-NIN allows you to shape the
timbre of the sound by filtering out certain frequencies, with adjustable cutofffrequency
and resonance parameters.
•VCA: The VCA (Voltage Controlled Amplifier) section controls the amplitude of the audio
signal, controlled by the envelope generator and LFO.
•ENV 1 and 2: Controls attack, decay, sustain, and release parameters for the VCA, VCA
and VCF envelope.
•OUT: Contains the master volume control, headphones output, and power switch. $
12

!"#$%&'(")!*&)+&,!!!!!!!!!!!!!!!!!!!!!!!!!!!!!!!!!!!!!!!!!!!!!!!!!!!!!!!!!!!!!!!!!!!!!!!!!!!!!!!!!!!!!!!!!!!!!!!! イセーニン
MASTER
The DISPLAY along with the ENTER, BACK, SHIFT buttons and ENCODER knob navigate
through the SETTINGS menu. ENTER selects a menu item or executes the selected function.
BACK exits a menu or cancels a function. SHIFT accesses secondary functions as well as
allows for some alternative adjustments of the sliders and knobs. The ENCODER is used to
select presets, saved layers, and menu items. It can also be pressed to act like the ENTER
button or switch between PRESET and PANEL modes. "
SHIFT BUTTON
Aside from allowing for secondary functions, the SHIFT button
has two other very important uses.
PORTAMENTO
Slider sets the time it takes for notes to slide to the next note
when this function is on. Portamento button toggles OFF,
PORTAMENTO, and GLISSANDO (chromatically stepped
portamento).
MASTER TUNE
Adjusts tuning up and down half a semitone.
13

!"#$%&'(")!*&)+&,!!!!!!!!!!!!!!!!!!!!!!!!!!!!!!!!!!!!!!!!!!!!!!!!!!!!!!!!!!!!!!!!!!!!!!!!!!!!!!!!!!!!!!!!!!!!!!!! イセーニン
KEY MODE BUTTON
Selects DUAL, SPLIT, or WHOLE modes. ISE-NIN can be used
in three different play modes. When the unit is in Whole mode,
the Upper layer plays a single preset or panel configuration as a
standard 8 voice synthesizer. ISE-NIN behaves in the familiar
way of an analogue polyphonic synthesizer. "
The next two modes get a bit more interesting. SPLIT mode
allows UPPER and LOWER layers to be played individually on
the higher and lower range of the keyboard respectively allowing
for two LAYERS or panel configurations to be played individually
on different sides of the keyboard as two individual 4 voice
synthesizers."
Finally, DUAL mode will play two selected LAYERS or
programmed panel configurations (UPPER and LOWER) layered
on one another acting as a 4 voice synthesizer with up to 4
oscillators per voice.
ASSIGN MODE BUTTON
Selects how ISE-NIN applies the 8 voices, each acting as a two
oscillator synthesizer, to notes played/sent. SOLO, UNISON, P1,
and P2 can be selected. "
P1 (POLY-1) behaves in what would be considered the normal
manner a synthesizer is expected to behave in which each note
plays two VCOs which will play through their full natural
envelope cycle. "
P1, along with P2 and UNISON Modes all give first note priority
meaning up to 8 notes can be played, but new notes can not be
played until one of the original notes is released. As notes are
released, new notes will replace the original notes even if their
envelope cycle is incomplete. "
P2 (POLY-2) behaves similarly to P1 with the only difference
being the last note or notes played determine the natural release
and previous notes release immediately. As a result, selecting P2
is useful to reduce notes played with longer release times from
overcrowding.
BALANCE KNOB
Controls the levels of the Lower and Upper Layers in a Dual or
Split patch. In the center both layers are at 100%. Turn towards
L to reduce the level of the Upper Layer, and towards U to
reduce the level of the Lower Layer.
14

!"#$%&'(")!*&)+&,!!!!!!!!!!!!!!!!!!!!!!!!!!!!!!!!!!!!!!!!!!!!!!!!!!!!!!!!!!!!!!!!!!!!!!!!!!!!!!!!!!!!!!!!!!!!!!!! イセーニン
ARPEGGIO
ISE-NIN’s arpeggiator section allows for automatically playing and shifting notes harmonically
in real time. This can be useful for improvising during a performance or for inspiring ideas while
composing."
EXT/INT BUTTON
Selects whether ARPEGGIATOR is Externally Clocked (This
ONLY works when ISE-NIN is receiving a clock signal over
MIDI), Internally Clocked, or OFF."
ARPEGGIO RATE SLIDER
Controls the rate of the Arpeggiated notes. When in EXT mode,
the value is indicated by divisions or multiples of the incoming
clock from 1/16 to 16X. When in INT mode, the rate is
indicated in Frequency from 0.10HZ to 20.0Hz.
RANGE BUTTON
Selects the Octave range of the notes played. When 2, 3, or 4
are selected, the notes played will be repeated and transposed
the selected number of octaves. This order is determined with
the MODE selector button
MODE BUTTON
Selects the direction of the octave transpositions. Up, Down,
Up & Down. When RND (RANDOM) is selected, all notes are
played in random order.
15
!"#$%&'(")!*&)+&,!!!!!!!!!!!!!!!!!!!!!!!!!!!!!!!!!!!!!!!!!!!!!!!!!!!!!!!!!!!!!!!!!!!!!!!!!!!!!!!!!!!!!!!!!!!!!!!! イセーニン
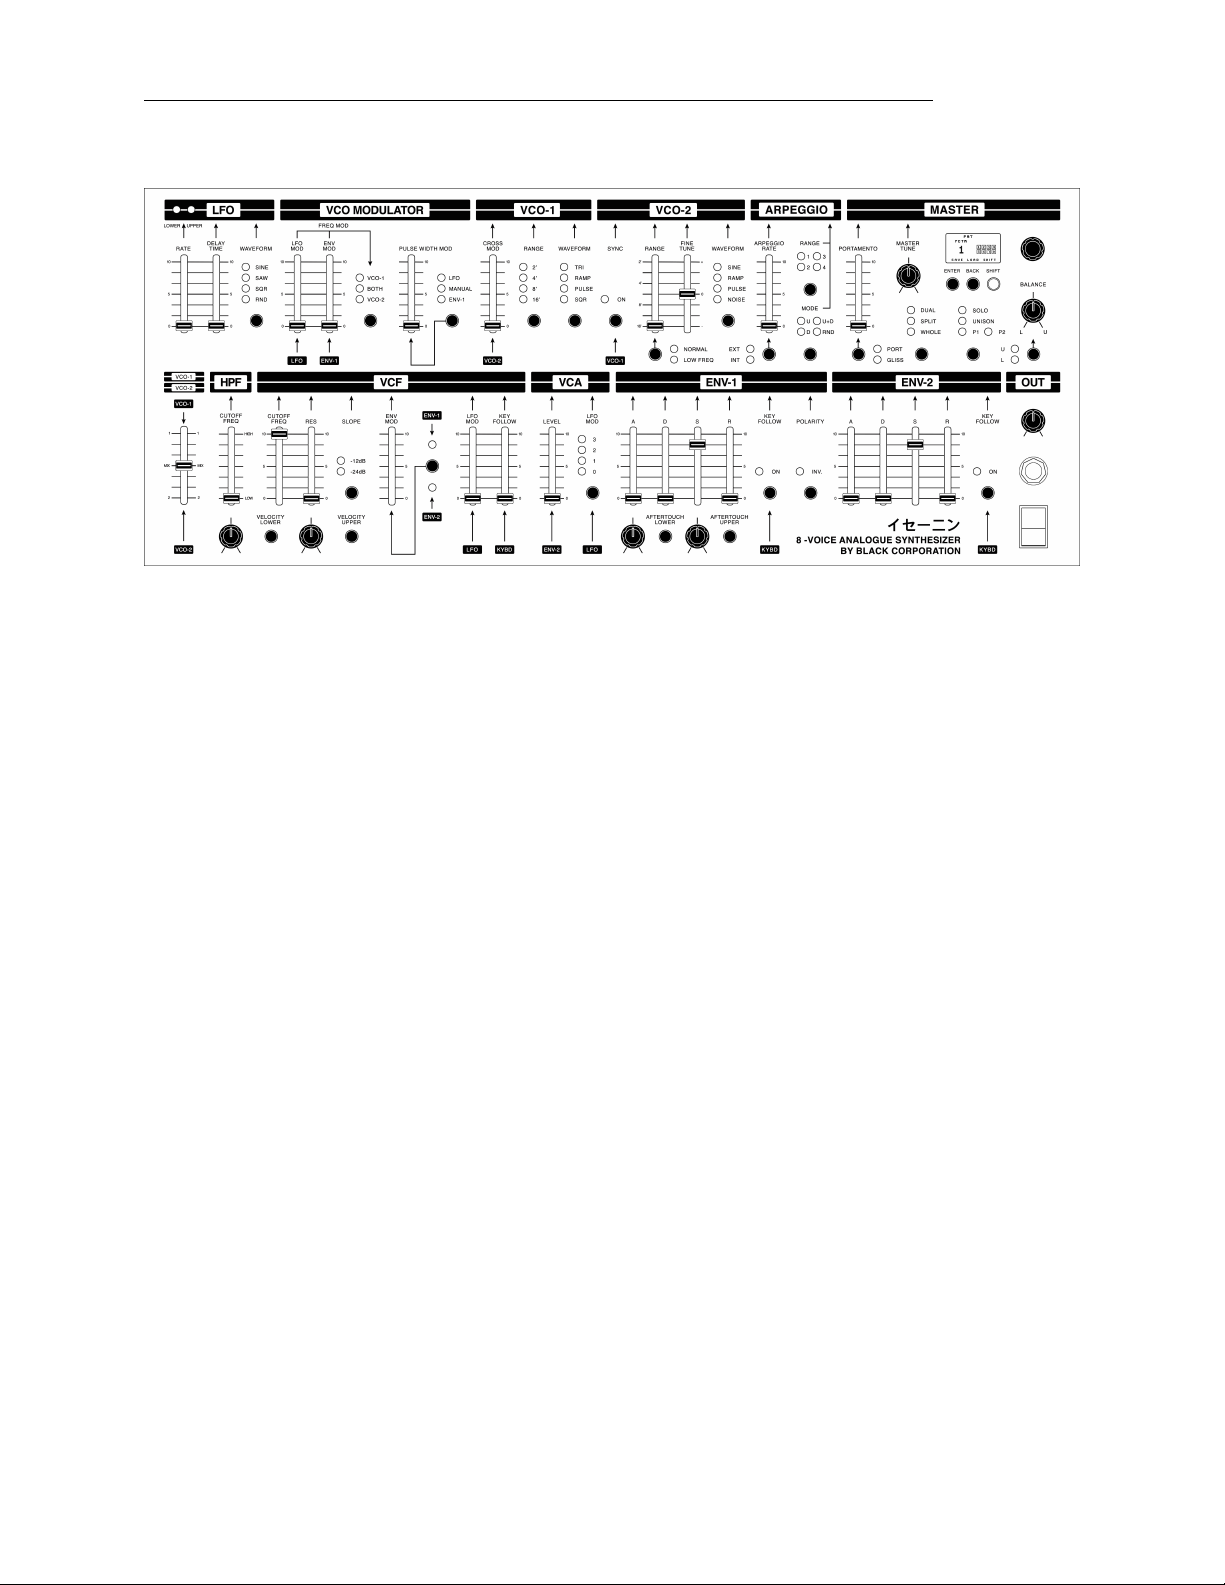
VOLTAGE CONTROLLED OSCILLATORS (VCO)
\ISE-NIN has two independent Voltage Controlled Oscillators (VCOs) per voice which are the
main sound source of the synthesizer. They can be used together to create a wide range of
tones and timbres. "
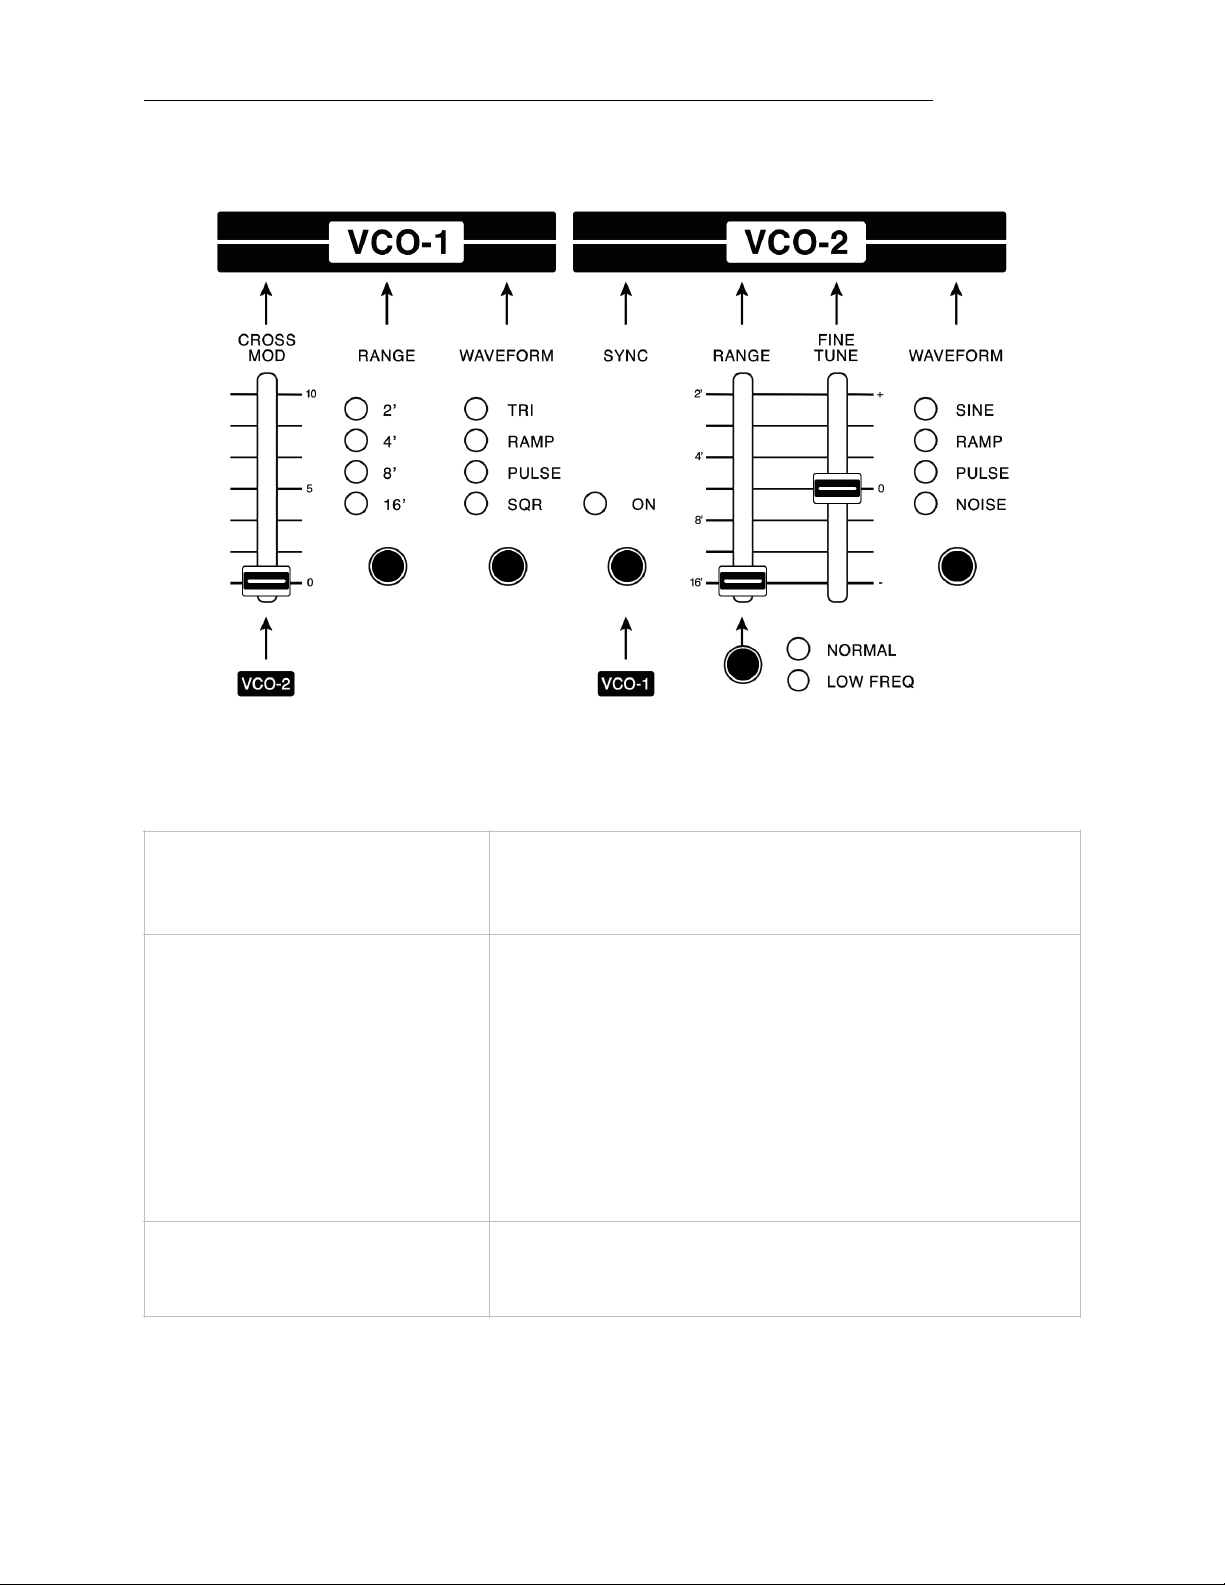
VCO-1
Controls the parameters of the first VCO. "
CROSS MOD
An additional control over the pitch of VCO-1 modulated
by VCO-2. This slider controls the amount of modulation
introduced from VCO-2 and depending on the shape and
frequency of VCO-2, will produce a variety of effects from
an LFO like vibrato at low frequencies to a ring modulation
type metallic sound at high frequencies. This parameter
can be used to introduce interesting harmonics, make
strange FX, and make bell like timbres reminiscent of FM
synthesis. "
RANGE
Selects an octave range from 16’, 8’, 4’, and 2’ similar to
the convention used in organs."
16

!"#$%&'(")!*&)+&,!!!!!!!!!!!!!!!!!!!!!!!!!!!!!!!!!!!!!!!!!!!!!!!!!!!!!!!!!!!!!!!!!!!!!!!!!!!!!!!!!!!!!!!!!!!!!!!! イセーニン
Gives control over the color of the tone of VCO-1 by
selecting the shape of the waveform of the signal. These
waveforms include "
•TRIANGLE
•RAMP
•PULSE
•SQUARE
VCO-2
Is a second, independent sound source. Controls for the
parameters of VCO-2, work slightly differently from
VCO-1."
NORMAL / LOW FREQUENCY
Button
In Normal mode, pitch is just like VCO-1. When Low
Frequency is engaged, VCO-2 essentially functions as an
LFO. This is a more advanced parameter which can be
useful when using VCO-2 to cross modulating VCO-1 to
create strange effects. One additional function of this
button is when VCO-2 is set to noise, it toggles between
WHITE noise and PINK noise. "
SYNC
Forces the pitch of VCO-2 to synchronize itself to that of
VCO-1. This is useful to prevent “beating” of the two
oscillators when they are slightly out of tune and can also
be used to create a harmonically rich effect when VCO-2
is pitched higher than VCO-1. When the pitch envelope or
LFO is set to modulate VCO-2 this can create a classic
effect used in many classic polyphonic synthesizer
patches. "
WAVEFORM
17
!"#$%&'(")!*&)+&,!!!!!!!!!!!!!!!!!!!!!!!!!!!!!!!!!!!!!!!!!!!!!!!!!!!!!!!!!!!!!!!!!!!!!!!!!!!!!!!!!!!!!!!!!!!!!!!! イセーニン
VCO-2 RANGE
Covers the same pitch range as VCO-1, but is quantized,
so the pitch changes in half steps as the slider is moved
up. "
VCO-2 FINE TUNE
Adds control between the discrete half steps selected by
VCO-2’s RANGE control.%
Similarly to the controls of VCO-1, the waveform of VCO-2
can be selected. These options are "
•SINE
•RAMP
•PULSE
•NOISE
a random mix of all frequencies useful to achieve various
tones and modulation options when cross modulating
VCO-1.
VCO-2 WAVEFORM
18

!"#$%&'(")!*&)+&,!!!!!!!!!!!!!!!!!!!!!!!!!!!!!!!!!!!!!!!!!!!!!!!!!!!!!!!!!!!!!!!!!!!!!!!!!!!!!!!!!!!!!!!!!!!!!!!! イセーニン
VCO MODULATOR
This section sets the amounts which the various modulation sources are applied to the pitch of
VCOs 1 and 2: This section also controls modulator amounts to vary the width of PULSE when
selected in either or both VCOs. "
LFO MOD
Controls the amount the low frequency operator (LFO) modulates the
pitch of VCO-1, VCO-2, or BOTH."
ENV MOD
Controls the amount Envelope 1 (ENV-1) affects the pitch of VCO-1,
VCO-2, or BOTH.
FREQ MOD
Destination Button
Selects the destination frequency to be affected by the LFO and/or
ENV-1. Options are VCO-1, VCO-2, or BOTH.
PULSE WIDTH MOD
Controls the amount the selected source modulates the width of the
PULSE if selected in VCO-1, VCO-2, or both.
PULSE WIDTH MOD
Source
Selects the sources of Pulse Width Modulation. LFO, Manual, or
ENV-1 can be selected.
19

!"#$%&'(")!*&)+&,!!!!!!!!!!!!!!!!!!!!!!!!!!!!!!!!!!!!!!!!!!!!!!!!!!!!!!!!!!!!!!!!!!!!!!!!!!!!!!!!!!!!!!!!!!!!!!!! イセーニン
LFO (LOW FREQUENCY OSCILLATOR)
ISE-NIN has a very simple main Low Frequency Oscillator (LFO), however it can produce some
advanced tones when routed separately to LOWER and UPPER sections in a Preset. LFO
works identically for LOWER and UPPER sections. "
RATE
Adjusts the frequency of the LFO. "
DELAY TIME
Adjusts the delay before the onset of the
LFO. As the slider is moved up, the amplitude
of the LFO gradually increases to maximum
at a slower rate."
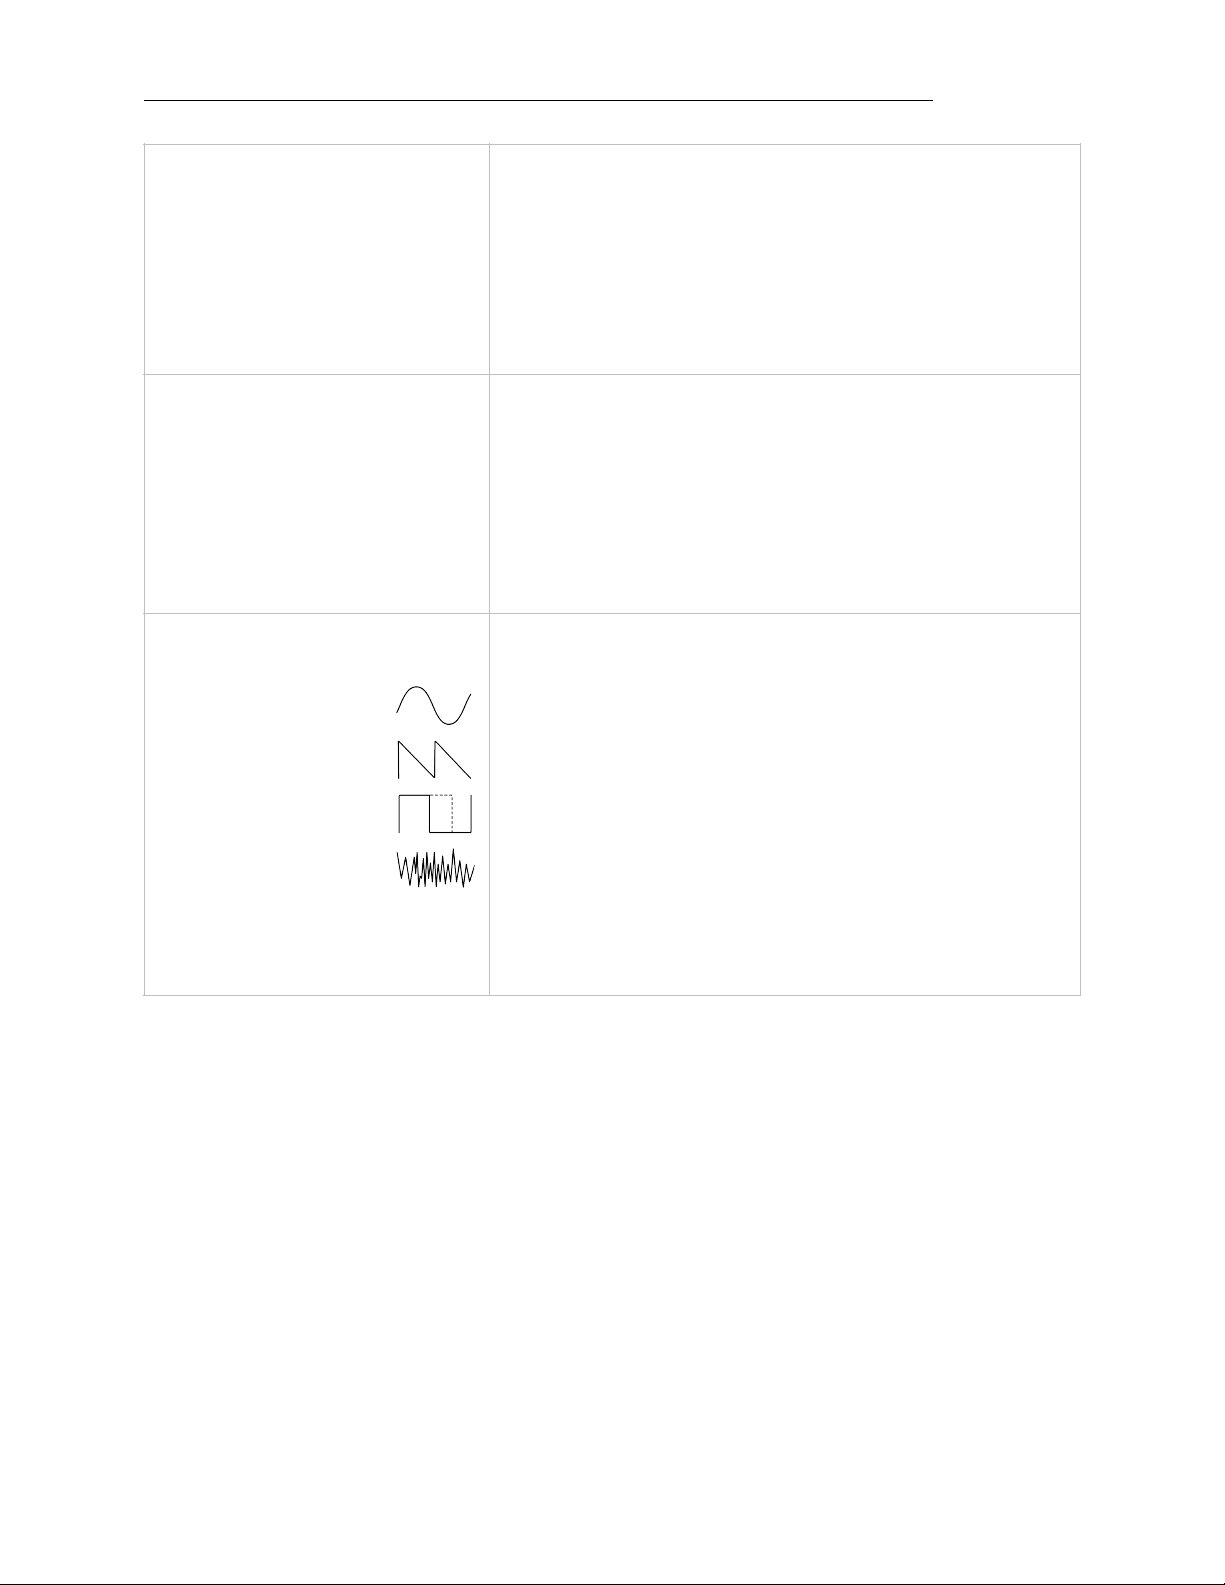
Selects the shape of the LFO. Options are "
•SINE
•SAW
•SQR (SQUARE)
•RND (RANDOM)
WAVEFORM Select Button:
"
20
Table of contents
Other Black Corporation Synthesizer manuals


