Blackmagicdesign DeckLink Series User manual

-~
ARTISAN
®
~I
TECHNOLOGY
GROUP
Your definitive source
for
quality
pre-owned
equipment.
Artisan Technology
Group
Full-service,
independent
repair
center
with
experienced
engineers
and
technicians
on staff.
We
buy
your
excess,
underutilized,
and
idle
equipment
along
with
credit
for
buybacks
and
trade-ins
.
Custom
engineering
so
your
equipment
works
exactly as
you
specify.
•
Critical
and
expedited
services
•
Leasing
/
Rentals/
Demos
• In
stock/
Ready-to-ship
•
!TAR-certified
secure
asset
solutions
Expert
team
ITrust
guarantee
I
100%
satisfaction
All
tr
ademarks,
br
a
nd
names, a
nd
br
a
nd
s a
pp
earing here
in
are
th
e property of
th
e
ir
r
es
pecti
ve
ow
ner
s.
Visit our website - Click HERE


Contents
Current DeckLink Cards
How to Install
Installing a DeckLink PCIe card in a Mac Pro 6
Installing a DeckLink HDMI bracket 8
Installing DeckLink Optical Fiber 9
Installing Desktop Video Software 10
Software
Blackmagic Software 12
Setting Blackmagic Preferences 12
Using Blackmagic Media Express 19
Blackmagic Disk Speed Test 31
Apple Xserve RAID disk arrays 31
Third Party Applications 32
Apple Final Cut Pro 32
Adobe Premiere Pro 37
Adobe After Effects 40
Adobe Photoshop 41
Supported File Formats 42
Troubleshooting Video Capture and Playback 43
05
11
Connection Diagrams
Betacam SP analog deck 45
SDI digital deck 46
Sony HDCAM SR deck in 4:2:2 47
Sony HDCAM SR deck in 4:4:4 48
Sony HDCAM SR deck in 3D 49
NTSC/PAL monitor 50
Connecting to S-Video 51
YUV component monitor 52
Connecting to an HDTV 53
HDMI Workflow 54
2K Monitoring with HDLink Pro 55
Product Diagrams
DeckLink Duo 57
DeckLink HD Extreme 3D+ 58
DeckLink Quad 59
DeckLink SDI 60
DeckLink Studio 2 61
Developer Information
Blackmagic 2K Format – Overview 63
Blackmagic 2K Format – Vertical Timing Reference 64
Blackmagic 2K Format – Data Stream Format 65
44
62
56

Contents
Previous DeckLink Cards
Installation & Setup
Installing a DeckLink PCIe card in a Power Mac G5 67
Installing a DeckLink PCI or PCI-X card in a
PowerMac G5 with PCI-X slots 69
Lookup Tables (LUTs) in DeckLink HD Extreme 2 71
Connection Diagrams
Betacam SP analog deck 74
SDI digital deck 75
Sony HDCAM SR deck in 4:2:2 (DeckLink HD Extreme 2) 76
Sony HDCAM SR deck in 4:2:2 (DeckLink HD Pro PCIe) 77
Sony HDCAM SR deck in 4:4:4 78
NTSC/PAL monitor 79
Connecting to S-Video DeckLink HD Extreme 2 80
Connecting to S-Video DeckLink HD Extreme 81
YUV component monitor 82
Connecting to an HDTV 83
HDMI Workflow 84
2K Monitoring with HDLink Pro 85
66 Product Diagrams
DeckLink 87
DeckLink Extreme 88
DeckLink Extreme PCIe 89
DeckLink HD 90
DeckLink HD Extreme and Professional Breakout Cable 91
DeckLink HD Extreme and Consumer Breakout Cable 92
DeckLink HD Extreme 2 and Professional Breakout Cable 93
DeckLink HD Extreme 2 and Consumer Breakout Cable 94
DeckLink HD Extreme 3 95
DeckLink HD Extreme 3D 96
DeckLink HD Plus 97
DeckLink HD Pro 4:2:2 PCI-X 98
DeckLink HD Pro 4:4:4 PCI-X 99
DeckLink HD Pro PCIe 100
DeckLink HD Studio 101
DeckLink Optical Fiber 102
DeckLink Plus 103
DeckLink Pro 104
DeckLink SP 105
DeckLink SP PCIe 106
DeckLink Studio 107
Warranty
Warranty Terms and Conditions 109
86
108
73
Welcome
4
Welcome to DeckLink.
We hope you share our dream for the television industry to become a truly creative industry by allowing
anyone to have access to the highest quality video.
Previously high end television and post production required investment in millions of dollars of hardware,
however with DeckLink cards, even 10 bit uncompressed is now easily affordable. We hope you get years
of use from your new DeckLink card and have fun working with some of the world’s hottest television and
design software!
This instruction manual should contain all the information you’ll need on installing your DeckLink capture
card, although it’s always a good idea to ask a technical assistant for help if you have not installed hardware
cards into computers before. As DeckLink uses uncompressed video and the data rates are quite high,
you’ll need fast disk storage and a high-end Mac.
We think it should take you approximately 10 minutes to complete installation. Before you install DeckLink,
please check our website at www.blackmagic-design.com and click the support page to download the
latest updates to this manual and DeckLink driver software. Lastly, please register your DeckLink when
downloading software updates. We would love to keep you updated on new software updates and new
features for your DeckLink. Perhaps you can even send us your latest show reel of work completed on
your DeckLink and any suggestions for improvements to the software. We are constantly working on new
features and improvements, so we would love to hear from you!
Grant Petty
CEO Blackmagic Design

How to Install
5
Installation
6
Installing a DeckLink PCIe card in a Mac Pro
PCI slots and DeckLink cards
The PCI slots found in many modern computers allow users to add hardware such as DeckLink cards.
Computers have become faster over time and so too have the types of PCI slots used in computers.
DeckLink cards have been made for computers with PCI, PCI-X and PCI Express (PCIe) slots.
Mac Pro with PCI Express (PCIe) slots
The first generation of Mac Pro computers introduced the Intel processor and used PCIe slots. DeckLink
PCIe cards are fully compatible with the Intel-based Mac Pro’s and with PCIe slots. We recommend that the
top slot, slot 4, be used with DeckLink PCIe cards for maximum reliability. The number of PCI Express lanes
available to each PCIe slot is configurable using Apple’s Expansion Slot Utility which should automatically
appear upon startup after a PCIe card has been installed. The second PCI Express Profile should be chosen
in the Expansion Slot Utility for use with DeckLink cards, ie:
x16 Lane Graphics Slot + Two x4 Lane and One x1 Lane Slots
The Early 2008 generation of Mac Pro computers introduced PCI Express 2.0 slots as well as retaining the
original PCI Express slots. DeckLink PCIe cards should be used in slots 3 or 4 (the top two slots) of these
Macs. Slots 1 and 2 are PCI Express 2.0 slots which are usually reserved for graphics cards and should not
be used with DeckLink PCIe cards. The Expansion Slot Utility does not apply to the Early 2008 generation
of Mac Pro’s as the number of lanes is permanently set for each slot. If you attempt to open the Expansion
Slot Utility on this generation of Mac Pro, an error message will appear stating, “Expansion Slot Utility is not
intended to run on this system”. You can confirm your model of Mac Pro online by copying & pasting your
Mac Pro serial number, from the Hardware Overview information in System Profiler, in to the “Find by Serial
Number” field at http://support.apple.com/specs.
Regardless of which generation of Mac Pro you have, slot 4 can always be used with DeckLink PCIe cards.
Expansion Slot Utility

Installation
7
Installing a DeckLink PCIe card in a Mac Pro
Please review the section in your Mac Pro user manual entitled “Adding PCI Express Cards” for information
on how to safely install PCI Express cards, including your DeckLink card.
1. Remove the power plug from the back of your Mac. This is a safety precaution before opening
your computer. Ensure that you are statically discharged by using a static strap.
2. Remove the side cover of your Mac to gain access to the PCIe slots.
3. Remove your DeckLink PCIe card from the protective static bag making sure you don’t touch the
gold connectors on the base of the card. These precautions should be taken when handling any
PCI card.
4. Remove the metal port access cover and screw from the back of your Mac.
5. Slot 4 is the recommended slot for DeckLink cards in the first generation of Mac Pro’s. Slot 3 or 4
(the top two slots) are the recommended slots for using a DeckLink PCIe card in an Early 2008 or
later model of Mac Pro. Insert your DeckLink PCIe card and ensure that it clicks firmly into place.
6. Secure the card by the screw.
7. The procedure for installing a RAID controller card is similar to the above.
8. Now replace the side cover of your Mac. Reconnect the power and start up the computer.
After installing your DeckLink PCIe card and closing the door on your Mac Pro, attach the supplied DeckLink
breakout cable to to the external multi-pin connector on your DeckLink card. Some card models ship with
both professional and consumer breakout cables for connecting to different video hardware. Attach the
appropriate breakout cable for your needs.
Install any model of DeckLink PCIe card in a spare slot as shown
in the above picture. The DeckLink HD Extreme 3D+ also has an
HDMI bracket, which installs in any spare port, and connects to
the rear of the card with the supplied HDMI cables.

Installation
8
Installing a DeckLink HDMI bracket
The DeckLinkHD Extreme3D+ includesan HDMIbracket.After installingthe DeckLinkHD Extreme 3D+card,
you will need a spare slot to install the HDMI bracket. The Mac Pro has a double-width graphics slot in slot 1.
If you have a regular-width graphics card in slot 1, you can install the HDMI bracket in the spare port which
would have been used by a double-width graphics card. If that port is already occupied by a double-width
graphics card, use a spare slot to install the HDMI bracket. If you don’t need HDMI input and output, there
is no necessity to install the HDMI bracket.
The Mac Pro includes a PCI bracket with two captive screws which is designed to secure all PCI Express
cards. The Mac Pro PCI bracket does not seem to firmly secure the HDMI bracket and so we have included
6 screws with your DeckLink HD Extreme 3D+. Use these screws, in place of the Mac Pro PCI bracket, to
firmly secure all your PCI Express cards, port access covers and the HDMI bracket belonging to DeckLink
HD Extreme 3D+.
After installing and securing the HDMI bracket, loop the included HDMI cables around any other installed
cards and plug them into the rear of the DeckLink HD Extreme 3D+ card. HDMI input is the lower connector
and HDMI output is the upper connector. You may wish to secure any excess cable length by using a cable
tie to neatly hold it in place.
Installing DeckLink Optical Fiber
DeckLink Optical Fiber installs in to your computer in just the same way as any other DeckLink card. However
the fiber optic module must be temporarily removed from the card before attempting to install the card
in a PCI Express slot. This is because the location of the protruding fiber optic module makes it awkward
to install the card in the PCI ports of many computer cases. Temporarily removing the fiber optic module
overcomes this obstacle to installation. The fiber optic module is a standard SFP transceiver module which
includes an LC connector port for attaching fiber optic cables. While other kinds of optical connectors exist,
the SMPTE standard for Optical Fiber SDI specifies that LC type optical fiber connectors be used and this
makes it easy for all compliant optical equipment to connect together.
Attach the supplied DeckLink breakout cable to the DeckLink card.
The DeckLink HD Extreme 3D+ card also includes a HDMI bracket
as pictured above.
Installation
9
Remove the power plug from the back of your Mac. This is a safety precaution before opening your computer.
Ensure that you are statically discharged by using a static strap.
Remove the side cover of your Mac to gain access to the PCIe slots.
Remove your DeckLink PCIe card from the protective static bag making sure you don’t touch the gold connectors
on the base of the card. These precautions should be taken when handling any PCI card. Ensure that the correct
PCIe slot is selected.
Remove the metal port access cover and screw from the back of your Mac.
Remove the protective cap from the LC connector port of the fiber optic module. Don’t throw it away as the protective
cap will be needed to prevent dust if the LC connector port is exposed when no fiber optic cables are connected.
Pull the wire tab outward to an angle of 90° to release the SFP module latch.
Grip the main portion of the SFP module, between your thumb and forefinger, and pull it from the SFP module port.
Do not pull the wire tab as it might break and prevent the SFP module from being removed.
Install DeckLink Optical Fiber in a suitable PCI Express slot in your computer, ensure that it clicks firmly into place
and secure the card with a screw.
Replace the SFP module and push the wire tab back to its original position.
If you are not ready to connect fiber optic cables to the LC connector port, replace the protective cap.
The procedure for installing a RAID controller card is similar to the above.
Now replace the side cover of your Mac. Reconnect the power and start up the computer.
Installing DeckLink Optical Fiber
4
12
11
12
11
43
3
Windows
Mac OS X
Installation
10
Installing Desktop Video software
Contents
The Desktop Video software installer will install the following components:
Blackmagic Desktop Video drivers
Blackmagic Design system preference
Blackmagic Media Express application
Blackmagic QuickTime™codecs
Blackmagic Disk Speed Test
Adobe®presets and plug-ins
Apple Final Cut Pro™Easy Setups, presets and enablers
Note: Before installing any software or hardware you will need administrator privileges.
Desktop Video software
1. The CD supplied with the DeckLink card contains the Desktop Video software. Before you install,
ensure you have the very latest driver. Visit www.blackmagic-design.com/support
2. Open the “Desktop Video Installer” folder and launch the “Desktop Video Installer” application.
3. Click Continue,Agree and Install buttons and the drivers will be installed on your system.
4. Now restart your machine to enable the new software drivers.
Automatic firmware updating
After your Mac has restarted, the software will check the DeckLink hardware to see what firmware the card
contains. If the firmware version does not match the software version, Desktop Video will offer to update
the firmware. This is automatic and all you need to do is click OK to start the update. After the firmware has
updated, restart your Mac to complete the process.
Programmable firmware can provide new features, compatibility with new hardware and support for
new formats.
Follow install prompts.
Select Destination.

Software
11
Blackmagic Software
12
System Preferences.
Blackmagic preferences.
Settings
Input and Output connections
NTSC Setup
4:4:4 color mode
Single Link/Dual Link switch
1080p/1080PsF switch
Black reference output during capture
Field Jitter
Output black/last played frame switch
HDMI 3D display
Reference Output Timing (Genlock)
Processing
Down conversion
Up conversion
Lookup Table
VITC Reader A Frame -
3:2 Pulldown Removal
VANC input
Video Levels
Calibrate Analog Video In
Calibrate Analog Video Out
Betacam/SMPTE level switch
Audio Levels
HiFi/Professional Audio Levels
Analog Audio Input Levels
Analog Audio Output Levels
AES/EBU Input Reference Level
AES/EBU Output Reference Level
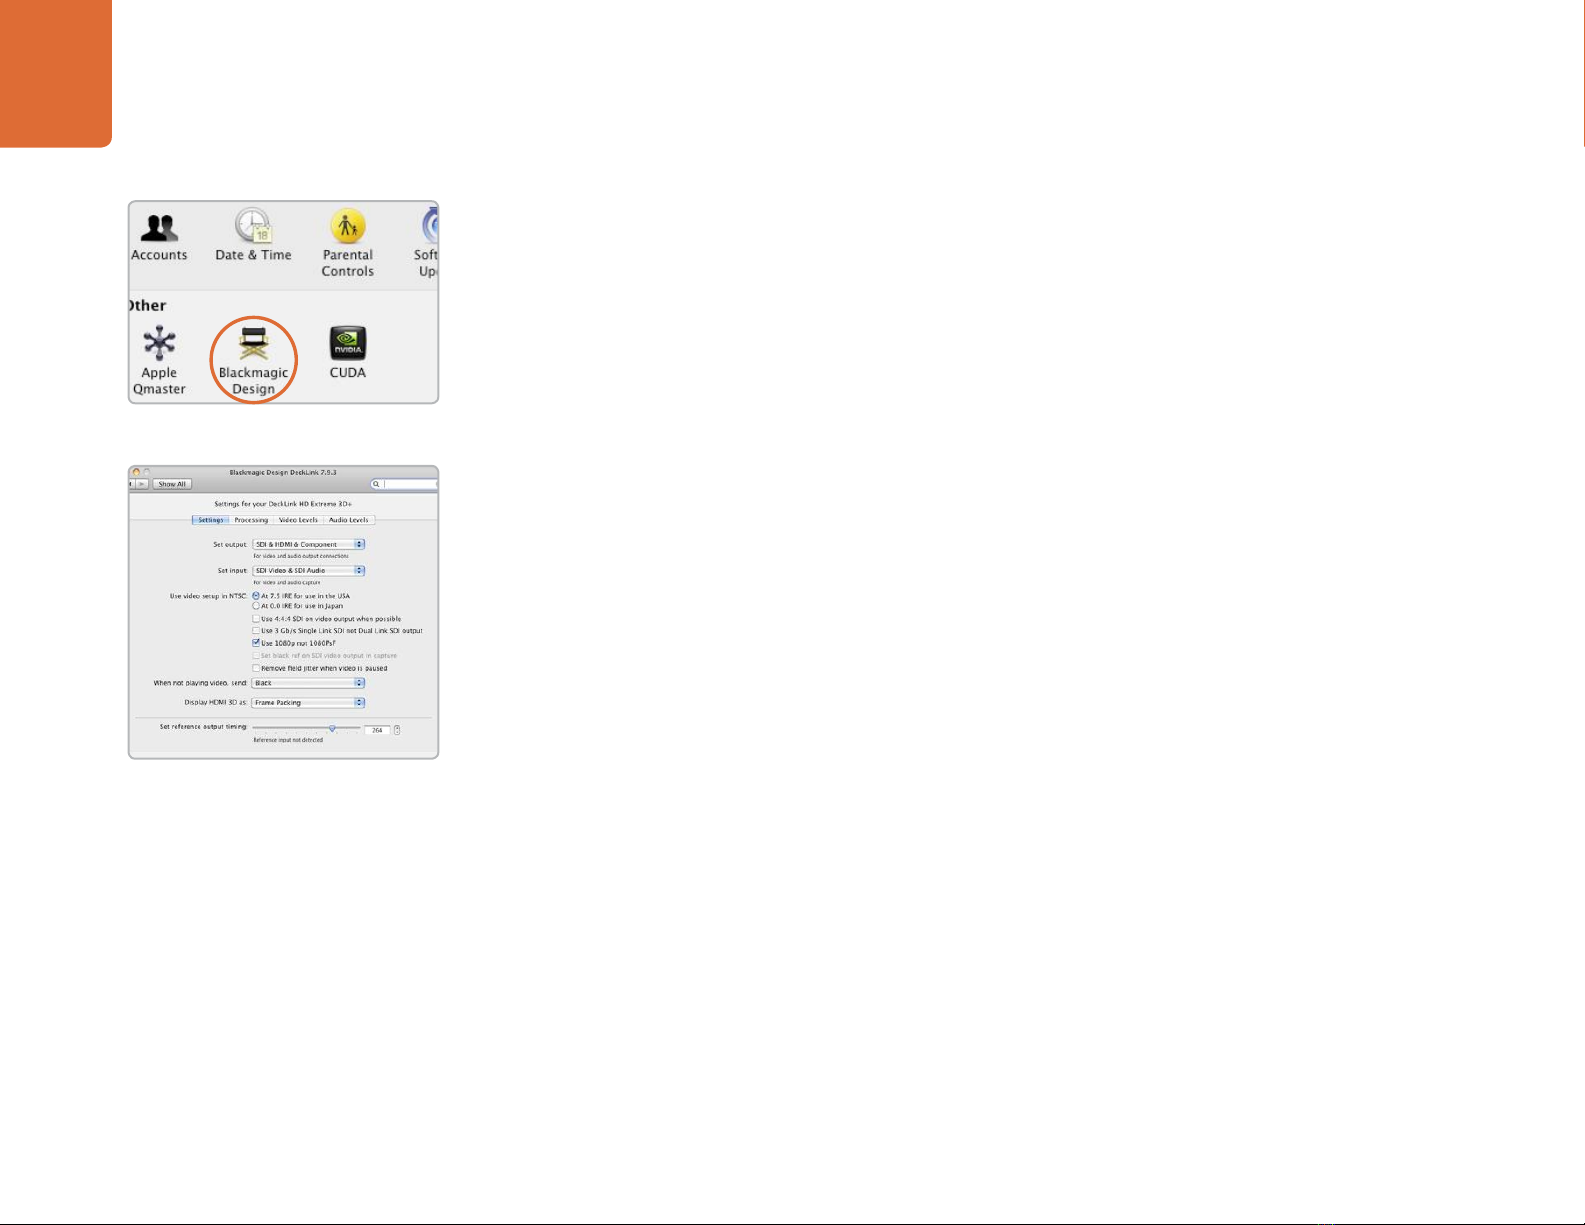
Setting Blackmagic Preferences
Blackmagic preferences are located in your Mac’s System Preferences in the “Other” category. Different
DeckLink models have some different features. Any preferences not available to your DeckLink card will be
grayed out and unavailable. The following preferences contain options for setting up your DeckLink.

Blackmagic Software
13
Setting Blackmagic Preferences
DeckLink video and audio output connections
All of the video and audio outputs of DeckLink cards are active all of the time and the only choice you need
to make on some models is between component (Y,R-Y,B-Y) analog video, S-Video or composite NTSC/
PAL analog video as they use shared connectors.
The SDI, Optical Fiber SDI, HDMI and component (Y,R-Y,B-Y) analog video outputs support HD and SD
video. S-Video and composite analog video do not support high definition video and so you will not see
video on these outputs when working with HD video.
S-video is supported on some HD models of DeckLink cards and may require the use of an inexpensive
S-video adapter cable. See the connection diagrams for S-video towards the end of this manual.
DeckLink Studio switchable audio output
The DeckLink Studio has switchable audio outputs. You can choose to output:
4 analog and 2 AES/EBU audio channels, or
2 analog and 6 AES/EBU audio channels
DeckLink video and audio input connections
Your DeckLink model may support some or all of the following combinations:
Video and Audio output connections.
Video and Audio input connections.
SDI Video & SDI Audio
SDI Video & AES/EBU Audio
SDI Video & Analog XLR Audio
Optical SDI Video & Optical SDI Audio
HDMI Video & HDMI Audio
HDMI Video & AES/EBU Audio
HDMI Video & Analog XLR Audio
Y, R-Y, B-Y Video & AES/EBU Audio
Y, R-Y, B-Y Video & Analog XLR Audio
NTSC/PAL (Y In) & AES/EBU Audio
NTSC/PAL (Y In) & Analog XLR Audio
S-Video & AES/EBU Audio
S-Video & Analog XLR Audio
Blackmagic Software
14
Setting Blackmagic Preferences
NTSC setup
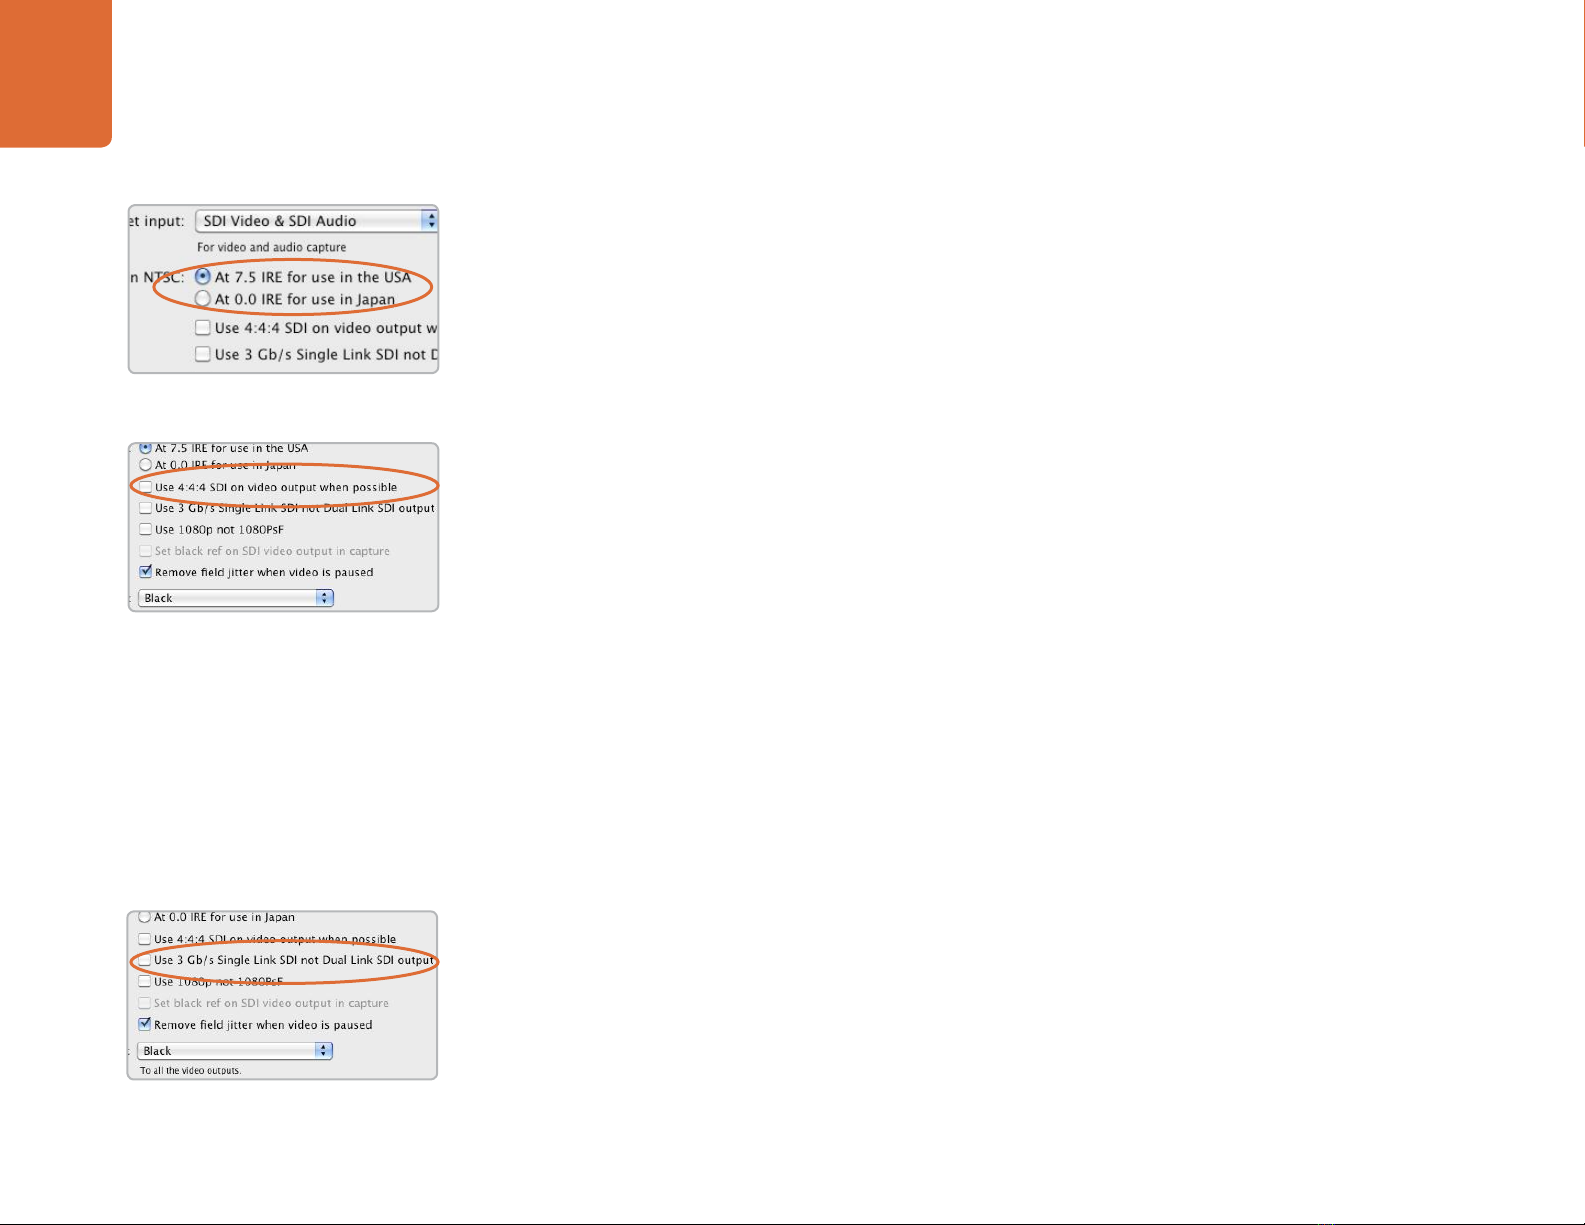
The NTSC composite video used in the USA, and some other countries uses 7.5% setup. However setup
is only used in composite video, but is never used in SDI video. Your DeckLink will handle adding and
removing setup from NTSC video automatically for you. The USA and countries that use 7.5% setup should
enable this setting; if you’re working in Japan and countries that don’t use this setup, leave this set to 0 IRE
setup. The PAL and high definition standards do not use this setup.
Output 4:4:4 color mode
While most users work with 4:2:2 video, you will need to Select 4:4:4 on video output if you wish to
play out 4:4:4 video, such as when using a HDCAM SR deck in 4:4:4 color mode. This feature will only be
available if 4:4:4 video output is a feature of your Blackmagic capture device.
The choice of color mode may be overridden in some cases. For example, if 4:4:4 output was enabled for
use with 1080p50/60 video, DeckLink HD Extreme 3D+ would ouput 4:2:2 video as there is not enough
capacity in dual-link HD-SDI or 3 Gb/s SDI connections to support this video mode.
If you enable Select 4:4:4 on video output, the default setting is to use dual link 4:4:4 output.
Traditional dual link 4:4:4 requires two SDI cables which is more complicated and doubles the cabling
cost. However if your Blackmagic capture device includes 3 Gb/s SDI, you will also have available the
option to Use 3 Gb/s Single Link SDI not Dual Link SDI output with one SDI cable.
Choosing to Select 4:4:4 on video output will automatically disable the following features which
are present in some Blackmagic models:
• simultaneous HD and down converted SD video output
• down converted analog video output.
• set black reference on SDI video output during capture
Single Link/Dual Link switch
When working with video formats which require more bandwidth than a single HD-SDI connection will
provide, this option determines whether a dual-link HD-SDI, or a single-link 3 Gb/s SDI connection will
be used. This feature will only be available if dual-link HD-SDI and 3Gb/s SDI output are features of your
Blackmagic capture device.
NTSC Setup.
Output 4:4:4 color mode
Single Link/Dual Link switch

Blackmagic Software
15
Setting Blackmagic Preferences
Progressive HD1080 video
By default, progressive HD1080 video frame rates are treated as progressive segmented frame, ie 23.98PsF,
24PsF and 25PsF. If you enable Use 1080p not 1080PsF progressive HD1080 video frame rates will be
treated as true progressive, ie 23.98p, 24p and 25p.
Black Video Output
This setting allows some models of DeckLink cards to output a stable black signal on one video output,
while outputting video on the other output. Black Video Output is used for video referencing an SDI deck
when you don’t have a sync generator available. This allows the stable black video output to connect to
the deck, and then by setting the deck to “input reference” you can operate without a sync generator.
If you’re not an SDI deck, or you’re not using this mode, disable this setting to enable audio monitoring
during capture.
Remove Filter Jitter
“Remove field jitter when video is paused” allows DeckLink to display only a single field when paused,
while turning this mode off will display a complete frame in pause. Single field is similar to how Betacam SP
decks work when paused, eliminating field flicker from paused images.
If you’re doing work without interlaced video, such as animation, then you can turn this mode off
so you can see both fields in full resolution for best quality. Regardless of this setting, you always get the
correct full frame dual field output when in playback mode, as this setting only effects paused video.
Output black/last played frame switch
If you have switched out of a video application and so video is not being played, this setting determines
whether your DeckLink card will output black or the last played frame of video.
If you are adjusting LUT’s on some DeckLink models, set this option to Last Played Frame so you can
observe the effect of any adjustment to LUT’s.
HDMI monitoring formats in 3D mode
When monitoring 3D stereoscopic video, select a format which is supported by your HDMI display:
Frame Packing, Side by Side, Line by Line, Top and Bottom, Left Eye or Right Eye.
1080p/1080PsF switch
Video Output Behavior.
Blackmagic Software
16
Setting Blackmagic Preferences
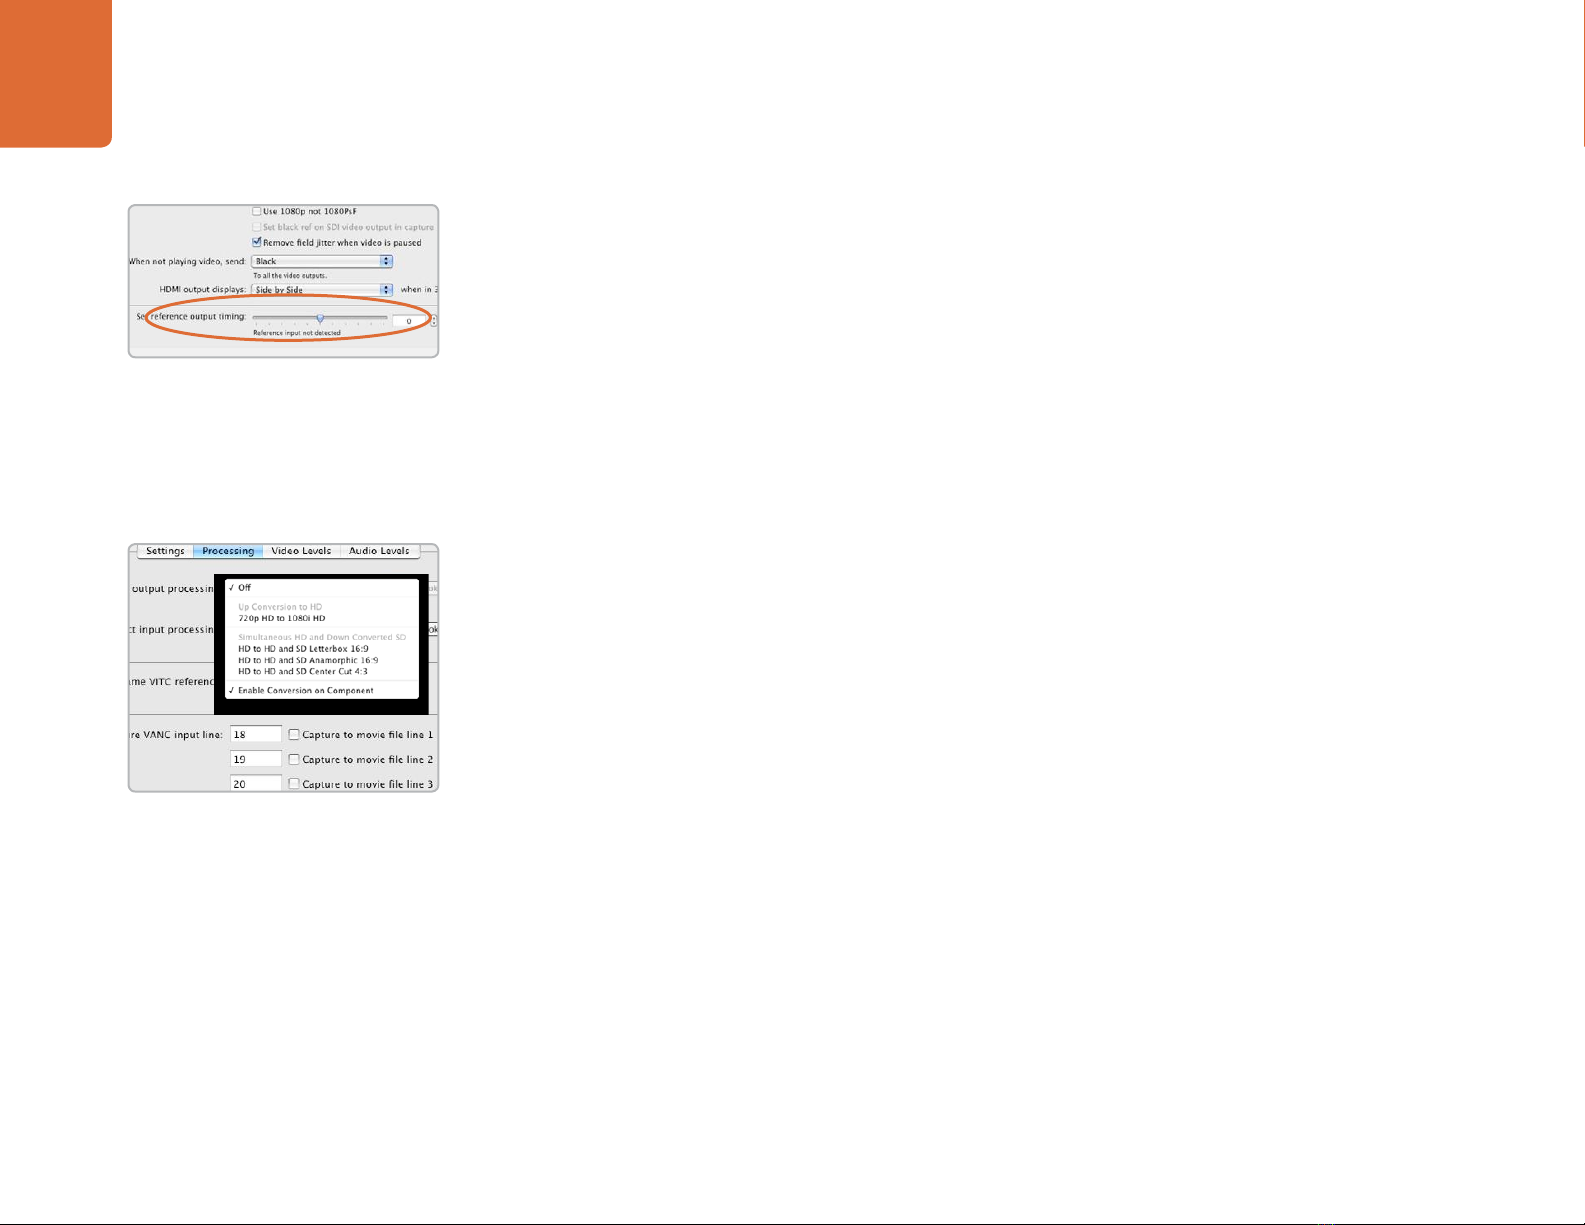
Reference Output Timing
Genlock, also known as black burst, reference or house sync is used to lock various equipment in your
facility to the same timing point. When two or more video devices are connected to the same sync signal,
their video signals can be switched without jumping or rolling. This is critical when connecting equipment
in large post production facilities and broadcast stations.
To change video to reference timing:
1. Go to the Mac’s System Preferences and click the Blackmagic Design icon.
2. Select the Settings tab and adjust the Set reference output timing for timed output
until the picture locks and is no longer rolling on the display.
HDTV Up/Down Conversion
The software drivers included with DeckLink, can be used to downconvert high definition to NTSC or
PAL video in real time during capture or playback. They also provide upconversion on capture. Select the
desired option from the output or input processing menus under the Processing tab.
Output Processing
HD to SD Letterbox 16:9
HD to SD Anamorphic 16:9
720p HD to 1080i HD
Output Processing for DeckLink cards with simultaneous downconversion.
HD to HD and SD Letterbox 16:9
HD to HD and SD Anamorphic 16:9
HD to HD and SD Center Cut 4:3
Note: Simultaneous down conversion introduces a 2 frame delay on the SD-SDI output. To ensure accuracy,
adjust the playback/timecode offset options when performing an insert or assemble edit to tape with
Final Cut Pro, Premiere Pro or Blackmagic Deck Control.
Analog video outputs are also down converted so you can always see video on an S-Video or composite
analog monitor. Component analog video can be switched between HD or SD output. Choose to
Enable Conversion on Component, if you wish to view component analog standard definition video
output, when simultaneous down conversion is enabled.
Genlock timing adjustment.
HDTV Up/Down Converter
output processing.
Blackmagic Software
17
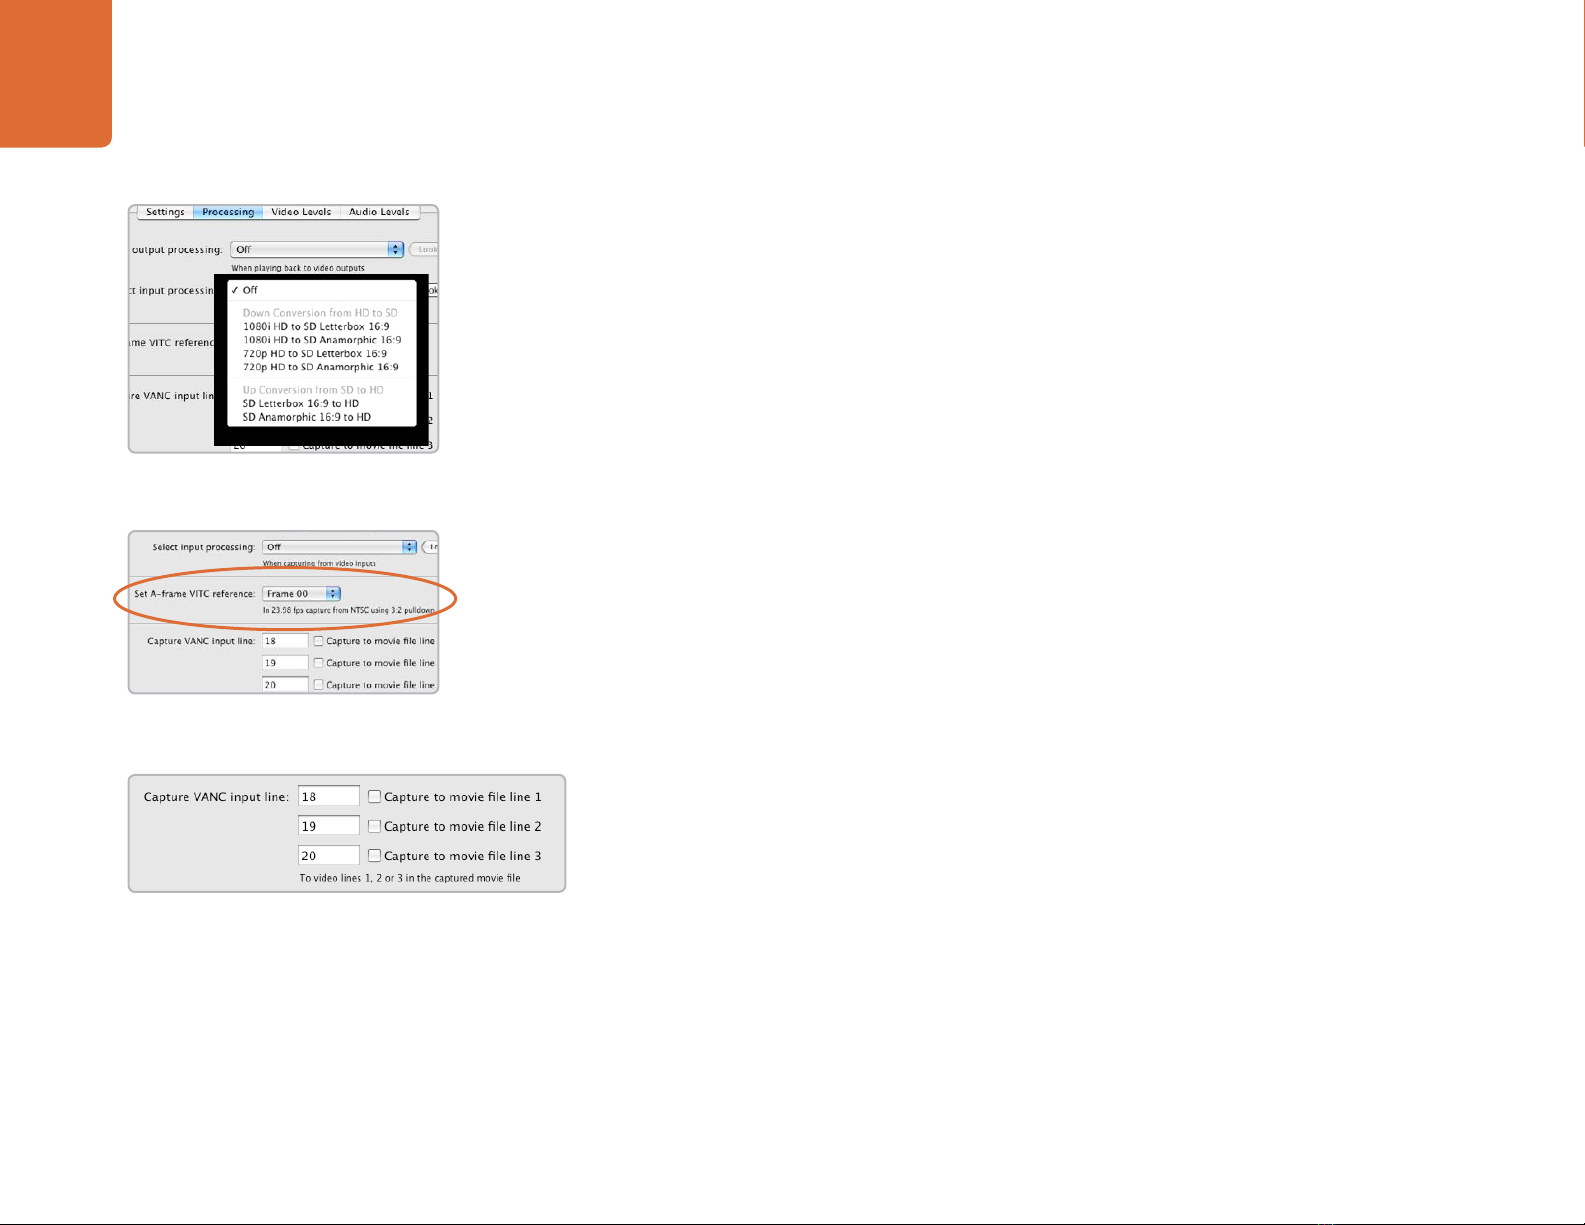
Input Processing
1080i HD to SD Letterbox 16:9
1080i HD to SD Anamorphic 16:9
720p HD to SD Letterbox 16:9
720p HD to SD Anamorphic 16:9
SD Letterbox 16:9 to HD
SD Anamorphic 16:9 to HD
VITC Reader A Frame - 3:2 Pulldown Removal
Set A-frame VITC reference (to) Frame ## in 23.98 fps capture from NTSC using
3:2 pulldown
This option decodes the VITC and uses it to correctly locate the A-frame when performing 3:2 pulldown
while capturing video at 23.98fps. Carefully set the correct A-frame VITC reference to match the timecode
on tape. Selecting the wrong A-frame will generate incorrect presentation of fields and frames.
Preserving Blanking Data or VANC
This feature lets you use up to 3 video lines at the top of a captured QuickTime
™movie file to store any 3
lines from vertical blanking. This allows 3 line timecode, VITC (vertical interval test signals) subtitle info or
any other VANC data to be preserved during capture. These lines are then inserted back into the video
blanking when the file is played back.
To preserve VANC data:
1. Go to the Mac’s System Preferences and click the Blackmagic Design icon.
2. Select the VANC and 3:2 Pulldown tab and tick the On check box for video line 1, 2 or 3
depending on how many blanking lines you want to capture.
Note: Video file line 1 needs to be enabled for lines 2 and 3 to work.
Because these lines can be passed to the application, a developer could write software to read the VANC
data and use it for various purposes, e.g. 3-line timecode and audio chasing, or other uses.
An example of VANC data is 3-line timecode, which uses lines 18, 19, and 20 in NTSC or lines 19, 20 and
21 in PAL. 3-line timecode, as used in AATON™equipped telecine suites, featuring audio timecode and
keycode information along with the normal timecode numbers.
Set the A-Frame VITC Reference when
performing 3:2 pulldown.
VANC preferences.
Setting Blackmagic Preferences
HDTV Up/Down Converter
input processing.
Blackmagic Software
18
Setting Blackmagic Preferences
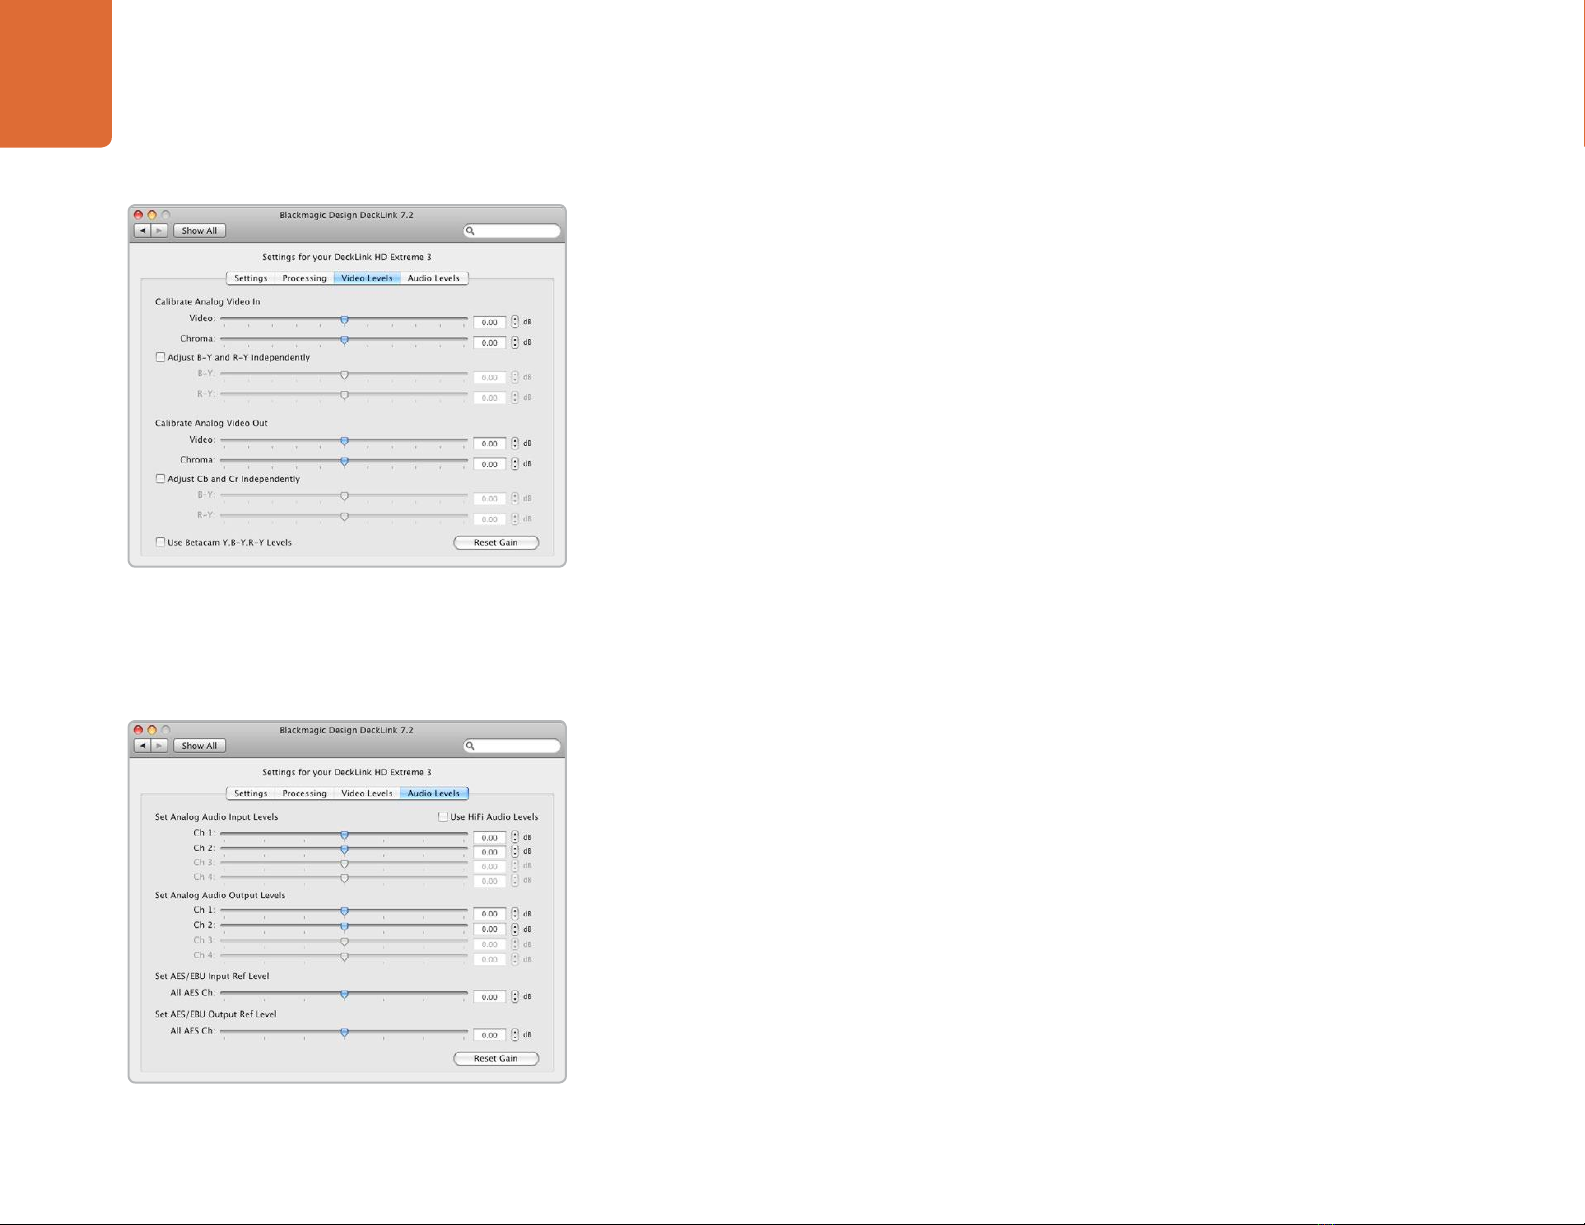
Video Levels
A video processing amplifier (Video Proc Amp) is provided for use with analog video and chroma levels
and ideally should always be used in conjunction with a waveform monitor. By contrast to digital video,
analog video can suffer from inconsistencies even between identical analog devices such as two analog
tape decks. The video level controls can be used to correct inconsistencies in analog video input and
output. The option to Calibrate Analog Video In will only be available if the Set Input option in
the Settings are set to an analog video option. If a digital input is being used, such as SDI or HDMI, or if
your Blackmagic capture device does not include analog input, the option to Calibrate Analog Video
In will remain grayed out and unavailable. The Reset Gain button resets the video levels back to their
original settings.
By default, Blackmagic products use SMPTE component analog levels as almost all analog video monitors
and modern video equipment use SMPTE levels. Sony Betacam SP decks can use Betacam levels and you
may need to enable the checkbox Use Betacam Y,B-Y,R-Y Levels with these analog decks. Sony CRT
monitors support Betacam and SMPTE levels to allow direct monitoring from a Betacam SP deck. These
monitors include a switch so you can choose between Betacam and SMPTE and you also need to choose
the corresponding SMPTE/Betacam setting in the Blackmagic Video Levels. If in doubt, try a test capture
and you should see a very noticeable brightness shift if you choose the wrong levels.
Audio Levels
An audio processing amplifier (Audio Proc Amp) is provided for use with analog audio. It can be used to raise
or lower an audio signal. By contrast to digital audio, analog audio can suffer from inconsistencies between
audio channels and so analog audio channels can be adjusted independently from each other. AES/EBU
audio is digital and does not suffer from level inconsistencies between audio channels. Accordingly all AES/
EBU audio channels are raised or lowered together. The Reset Gain button resets the audio levels back
to their original settings.
Professional analog audio levels and XLR audio connectors are standard on DeckLink and Multibridge
products. If you need to connect to consumer audio equipment with analog RCA inputs, enable the option
to Use HiFi Audio Levels and use an inexpensive XLR to RCA adapter for each audio connection.
Video levels
Audio levels

Welcome
19 Blackmagic Media Express
19
Welcome to Media Express 2
Blackmagic Media Express 2 is a sophistocated software application which enables UltraStudio, DeckLink,
Multibridge and Intensity users to capture, play back and preview video and audio via Blackmagic capture
hardware. DeckLink and Multibridge users can also master to tape, using insert or assemble edit, with frame
accurate RS-422 device control.
Media Express 2 replaces all previous versions of Blackmagic Deck Control and Blackmagic Media Express. We
hope you love the new interface and features.
Media Express has an intuitive interface and requires a 1920 x 1200 pixel computer display, or larger, to compliment
its uncluttered appearance. The capture, playback and master views are color-coded so you will know at a glance
which mode is being used.
Media Express uses many of the same keyboard shortcuts which are standard in the video industry so there is
little to learn. Use j, k, l to shuttle backwards, pause and shuttle forwards, or use i and oto mark in and
out points when batch capturing or mastering to tape. Hold down the control and shift keys to reveal a jog wheel
and then use your mouse, with the jog wheel, for precision control of your tape deck.
VITC timecode is supported via RS-422 and RP188 timecode is supported via SDI.
DeckLink and Multibridge users can use the Media List feature to log multiple clips for batch capture or to
seamlessly play back multiple clips from a playlist and master them to tape.
Media Express can directly capture to, and play back from, DPX files or movie files.
Use the Grab Frame feature to capture still images during capture, playback or when mastering to tape.
Frame grabs are saved in the targa (.tga) graphic file format.
Blackmagic Media Express 2 is not NLE software and does not have a timeline. It is a great tool when you don’t
need the complexity of NLE software but simply want to capture, play back and output clips to tape, especially
when working with video compositing software.
Other manuals for DeckLink Series
6
Table of contents
Other Blackmagicdesign Video Card manuals

Popular Video Card manuals by other brands


3Dlabs
3Dlabs The Wildcat 4110 PRO user guide

Gigabyte
Gigabyte GV-N550D5-1GI user manual

Gigabyte
Gigabyte GV-RX30HM128D user manual

Gigabyte
Gigabyte GV-N62-512L user manual

Baikal Miner
Baikal Miner Giant X10 Quick setup guide

ATI Technologies
ATI Technologies V3700 - Firepro 100-505551 256 MB PCIE Graphics... Specifications


