Blackstar Amplification AMPED 2 User manual
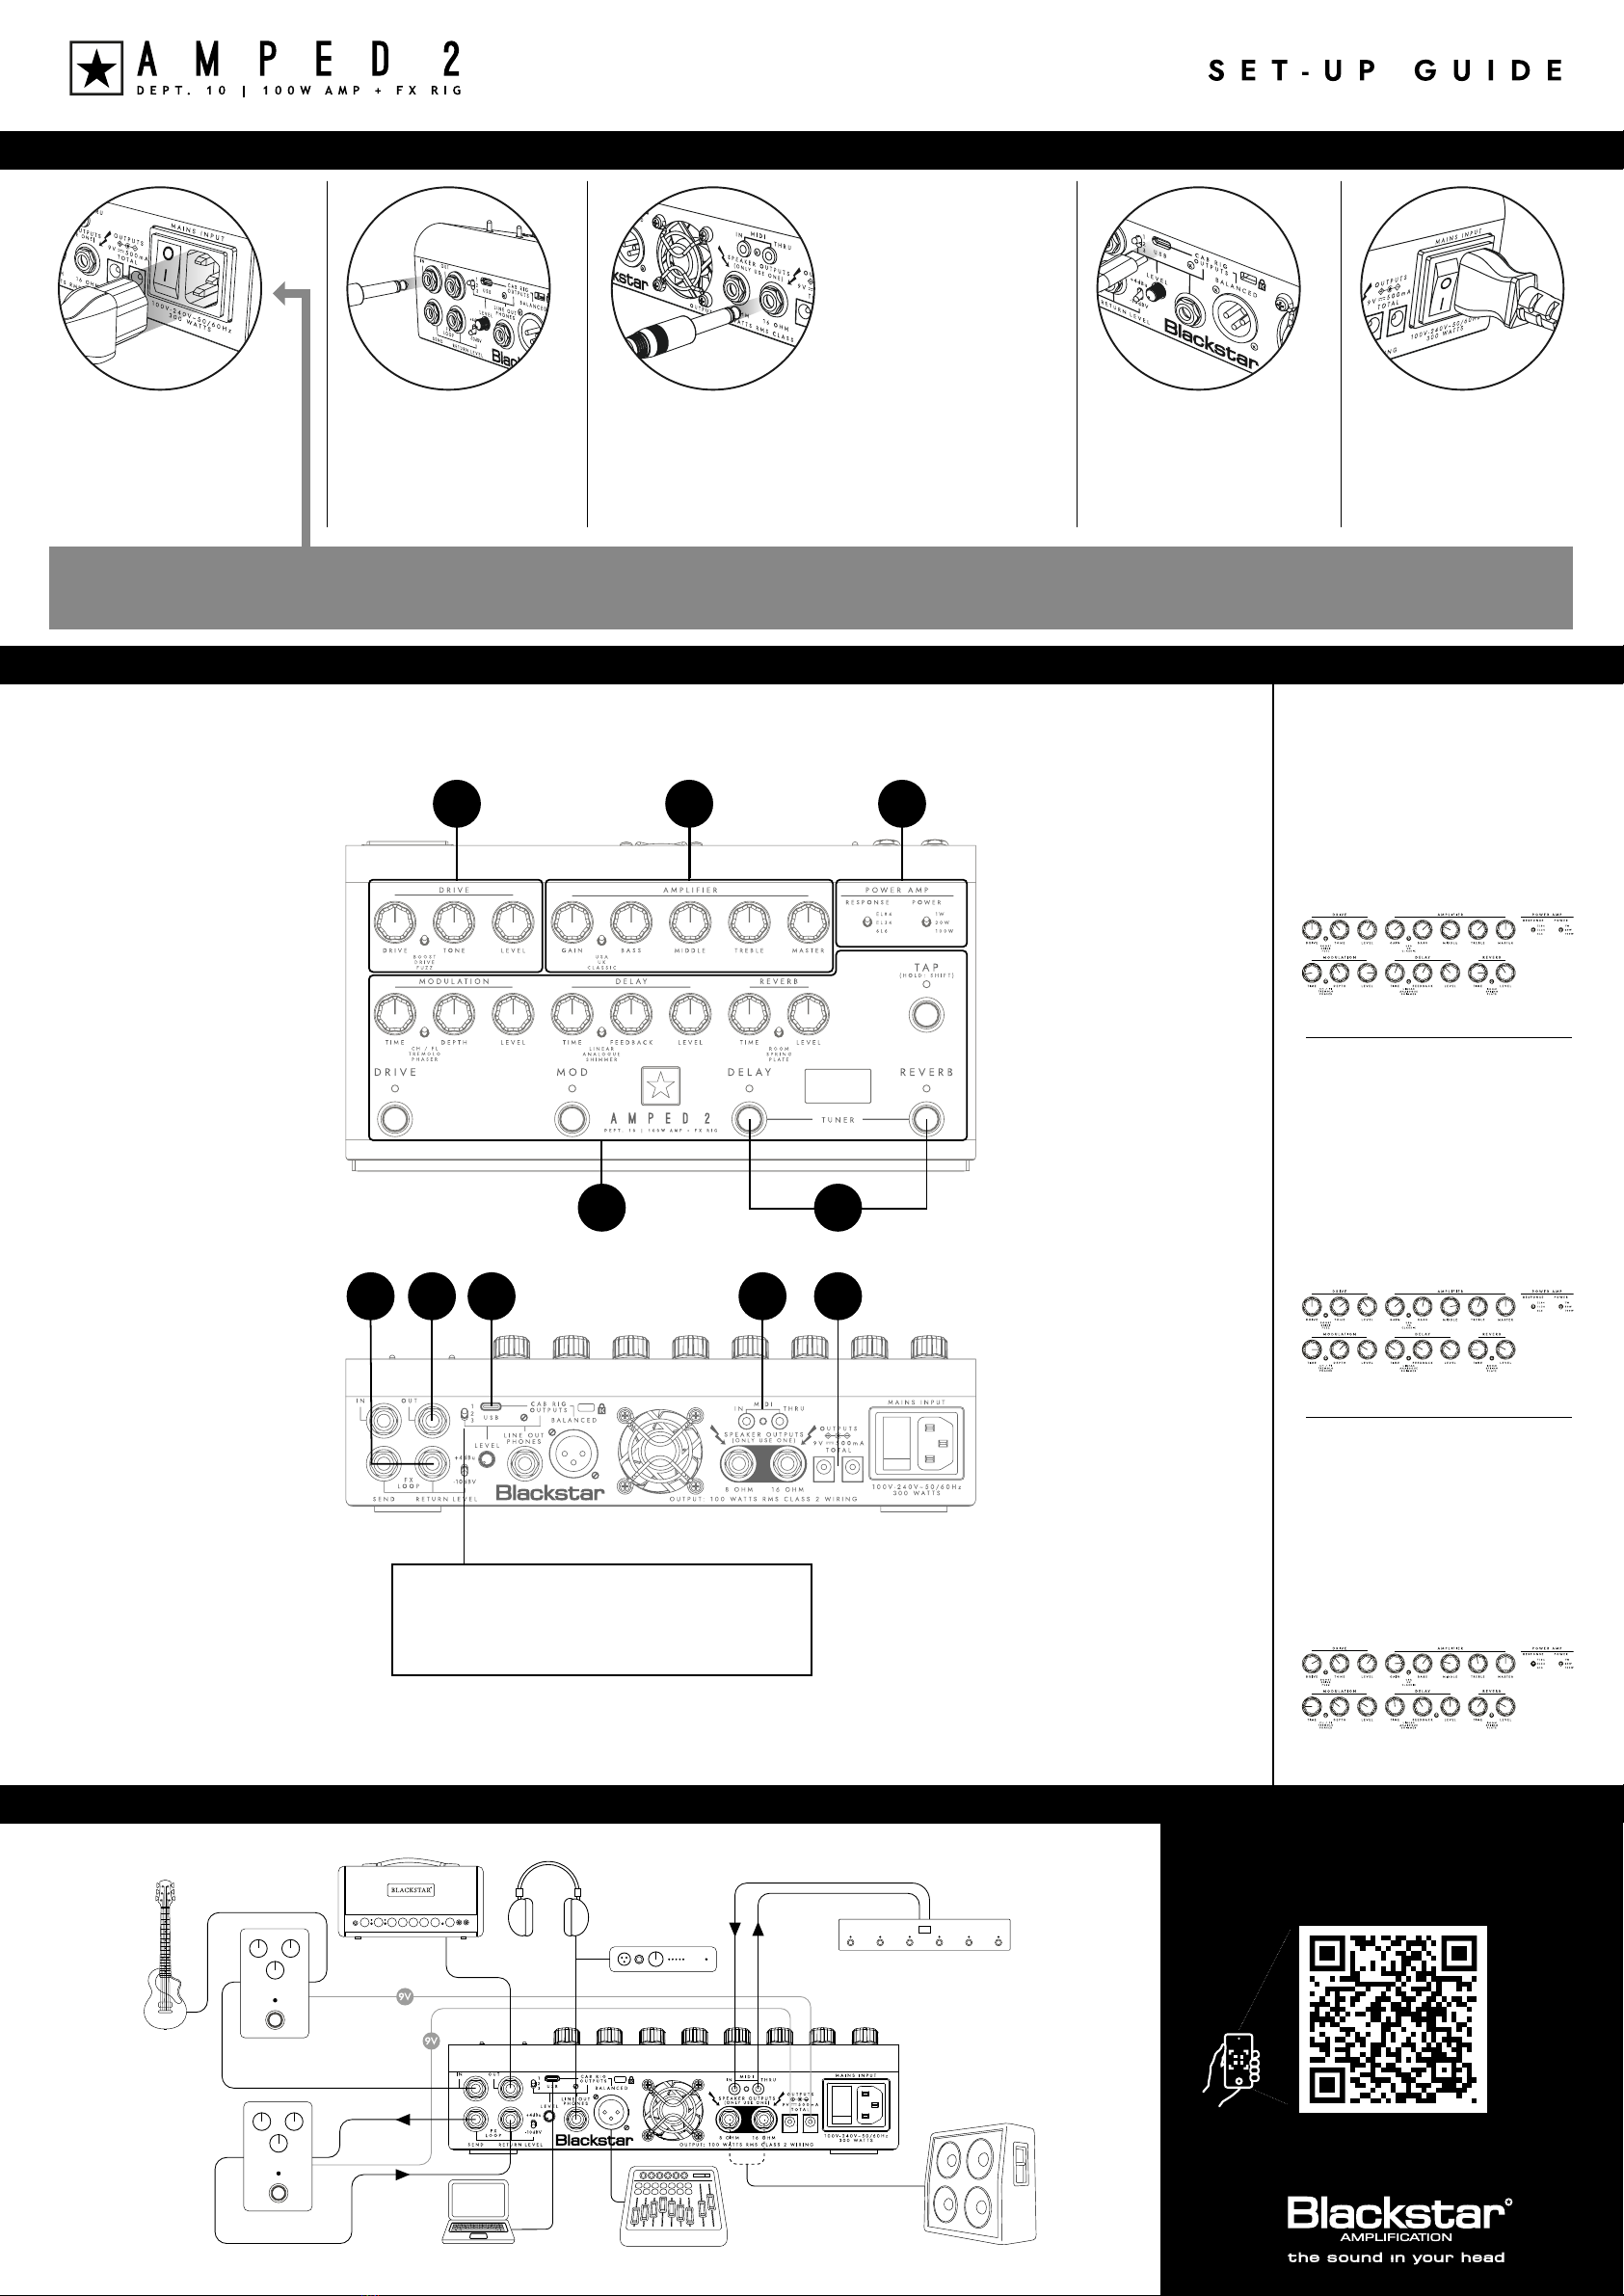
1. DRIVE
The DRIVE pedal is placed before the AMPLIFIER
section in the signal chain. Select from BOOST,
DRIVE, or FUZZ and engage with the footswitch.
La pédale DRIVE est placée avant la section
AMPLIFIER dans la chaîne du signal. Sélectionnez
BOOST, DRIVE ou FUZZ et activez avec le
commutateur au pied.
2. AMPLIFIER
Choose a preamp voice from one of 3 options,
then adjust the controls to shape your tone. A
good place to start is with all of the controls at
12 o’clock.
Choisissez une voix de préampli parmi l'une
des 3 options, puis ajustez les commandes pour
façonner votre son. Un bon point de départ est
avec toutes les commandes à midi.
3. POWER AMP
Choose your power amp RESPONSE and output
POWER rating, then set your MASTER volume
level. These controls affect your speaker output.
Choisissez la RÉPONSE de votre ampli de
puissance et la puissance nominale de sortie,
puis réglez votre niveau de volume MASTER.
Ces commandes affectent la sortie de votre
haut-parleur.
4. FX CONTROLS
Turn on the MODULATION, DELAY and REVERB
effects using the footswitches. Fine tune your
sound using the MODULATION, DELAY and
REVERB control sections. Use the TAP footswitch
to set the rate/time of the DELAY effect. Press and
hold these footswitches for a freeze/swell effect.
Activez les effets MODULATION, DELAY et
REVERB à l'aide des commutateurs au pied.
Affinez votre son à l'aide des sections de contrôle
MODULATION, DELAY et REVERB. Utilisez le
commutateur au pied TAP pour régler la vitesse/
durée de l'effet DELAY. Appuyez et maintenez
ces commutateurs au pied pour un effet de gel/
sustain.
5. CHROMATIC
TUNER
Activate the chromatic TUNER on the integrated
OLED display by pressing both the DELAY and
REVERB footswitches simultaneously. Press any
footswitch to deactivate the tuner. The output will
be muted while the tuner is active.
Activez l'accordeur chromatique sur l'écran OLED
intégré en appuyant simultanément sur les pédales
DELAY et REVERB. Appuyez sur n'importe quel
commutateur au pied pour désactiver l'accordeur.
La sortie son sera coupée pendant que le tuner
est actif.
6. FX LOOP
Use the return level to switch FX LOOP level
between +4dBu or -10dBV. Set your FX LOOP
routing to series or parallel and pre or post the
onboard effects using Architect.
Utilisez le niveau de retour pour commuter
le niveau FX LOOP entre +4dBu ou -10dBV.
Réglez votre routage FX LOOP en série ou en
parallèle et pré ou post les effets intégrés à
l'aide d'Architect.
7. OUT
Use the OUT socket to connect your AMPED 2
to the input of a guitar amp. The signal is taken
after the master volume control.
Utilisez la prise OUT pour connecter votre
AMPED 2 à l'entrée d'un guitare ampli. Le signal
est pris après le contrôle du volume principal.
8. USB AND
ARCHITECT
Connect your AMPED 2 to a PC or Mac and use
our free Architect software to manage multiple
presets and deep edit our state-of-the-art Cab
Rig emulator DSP. Architect is also used to
program the 3 quick access Cab Rig presets
using the 3-way toggle switch. Use the USB-C
Cab Rig output to record high quality tones
straight into your computer without the need for
a separate audio interface.
Connectez votre AMPED 2 à un PC ou un
Mac et utilisez notre logiciel gratuit Architect
pour gérer plusieurs préréglages et éditer
en profondeur notre émulateur DSP Cab Rig
à la pointe de la technologie. Architect est
également utilisé pour programmer les 3
préréglages d'accès rapide Cab Rig à l'aide de
l'interrupteur à bascule à 3 positions. Utilisez
la sortie USB-C Cab Rig pour enregistrer des
sons de haute qualité directement dans votre
ordinateur sans avoir besoin d'une interface
audio séparée.
9. MIDI
Use the supplied TRS MIDI to 5 pin MIDI
adaptor to control features via MIDI. The MIDI
channel will default to 1 and can be set via
Architect.
Utilisez l'adaptateur TRS MIDI vers MIDI 5
broches fourni pour contrôler les fonctions via
MIDI. Le canal MIDI sera par défaut sur 1 et peut
être défini via Architect.
10. DC OUTPUT
Use the 9V DC outputs to power any compatible
pedals up to a maximum of 500mA. Do not
exceed a combined total of 500mA from the
two outputs.
Utilisez les sorties 9V DC pour alimenter toutes
les pédales compatibles jusqu'à un maximum de
500mA. Ne dépassez pas un total combiné de
500mA des deux sorties.
Use the Cab Rig switch
to select from 3 different
customisable options.
Deep edit and store your
favourite settings using our
free Architect software.
Utilisez le commutateur Cab Rig
pour choisir parmi 3 options
personnalisables différentes.
Modifiez et stockez en profondeur
vos paramètres préférés à l'aide de
notre logiciel gratuit, Architect.
2
1 3
4 5
87 10
69
1 2 543
CONGRATULATIONS ON BUYING THIS
DEPT. 10 AMPED 2 AMPLIFIER PEDAL
Your new AMPED 2 gives you unparalleled versatility and the power to fill any venue, in an all-in-one package
that fits in your backpack. Dial in the sound in your head, with a wide range of voices and effects at your feet.
Effortlessly craft your tone with built in drive, modulation, delay and reverb.
GETTING STARTED
SETTING UP VOICES
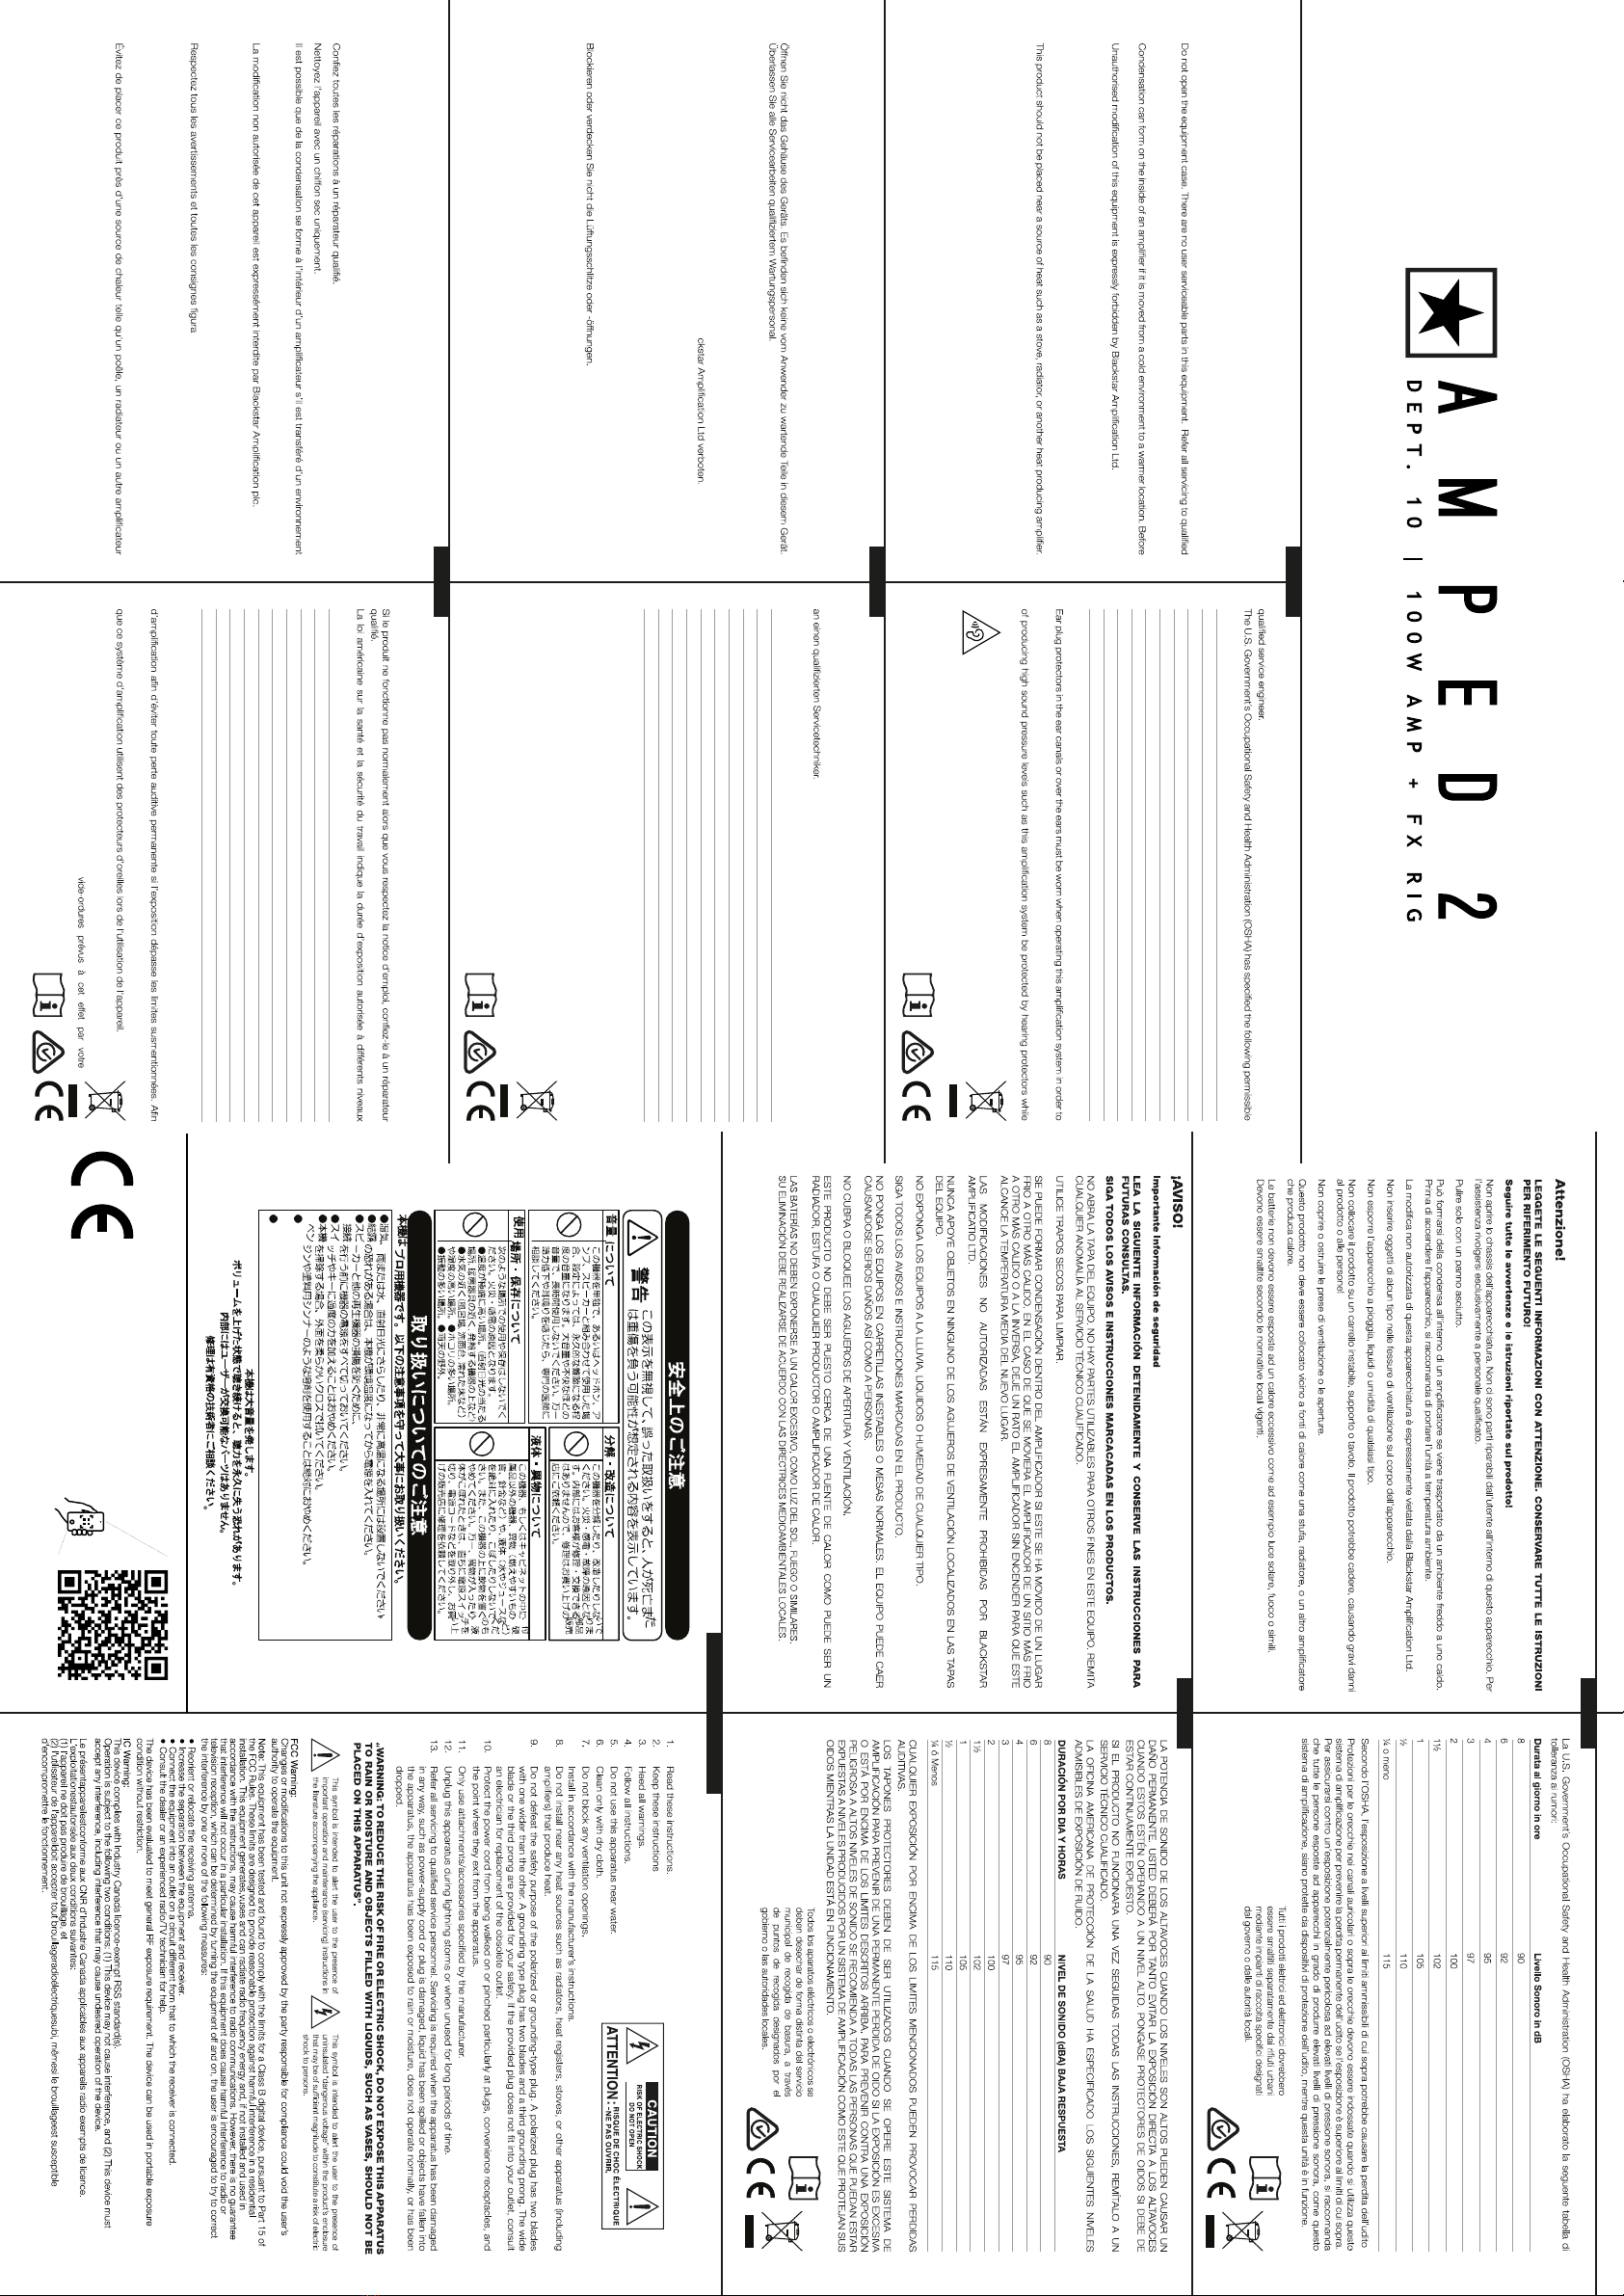
CONNECTION GUIDE
Welcome to AMPED 2
Let's get you started
www.blackstaramps.com/amped2-welcome
PEDAL
PEDAL
CAB
GUITAR
DESK
HEADPHONES
INTERFACE
WARNING: USE ONLY ONE SPEAKER OUTPUT
AMP
COMPUTER
MIDI DEVICE
WARNING:
The power lead should only be connected to a power outlet that is compatible with the voltage, power and frequency requirements stated on the rear panel. If in doubt get advice from a qualified technician.
AVERTISSEMENT : Le câble d'alimentation doit être connecté uniquement à une prise de courant compatible avec les exigences de tension, de puissance et de fréquence indiquées sur le panneau arrière. En cas de doute,
demandez conseil à un technicien qualifié
Connect the mains lead to the amplifier
MAINS INPUT.
Connectez le cordon d'alimentation
à l'entrée MAINS INPUT de
l'amplificateur.
Plug your guitar into the IN socket. Always
use a good quality screened guitar lead.
Branchez votre guitare dans la prise IN.
Utilisez toujours un câble de guitare
blindé de bonne qualité.
Connect to a computer or full range active
speaker using the Cab Rig outputs.
Connectez-vous à une l'ordinateur ou à
un haut-parleur actif à l'aide des sorties
Cab Rig.
Switch your amplifier on using the
Power Switch.
Allumez votre amplificateur à l'aide de
l'interrupteur d'alimentation.
Connect a suitable guitar speaker cabinet
to the matching impedance SPEAKER
OUTPUT: either 8 Ohms or 16 Ohms.
Always use a good quality speaker cable
for speaker outputs.
WARNING: Do not use both speaker
outputs at the same time, doing so will
damage your amplifier. Connect the
speaker cable to your cabinet first, then
your AMPED pedal.
Connectez un haut-parleur de guitare
approprié à la sortie SPEAKER OUTPUT
d'impédance correspondante : soit 8
Ohms, soit 16 Ohms. Utilisez toujours
un câble de haut-parleur de bonne
qualité pour les sorties des haut-parleurs.
AVERTISSEMENT : N'utilisez pas les
deux sorties haut-parleurs en même
temps, cela endommagerait votre
amplificateur. Connectez d'abord le
câble du haut-parleur à votre baffle,
puis à votre pédale AMPED.
USA VOICE
A clean, high-headroom classic American style
channel perfect for using with effects. Tip: Hold
DELAY footswitch down for an ambient ‘freeze’
effect.
Un canal de style américain classique propre
et à marge élevée, parfait pour une utilisation
avec des effets. Astuce : Maintenez enfoncé le
commutateur au pied DELAY pour un effet de «
gel » ambiant.
Suggested setting - Ambient Clean
UK VOICE
Built around a vintage tone stack and gain
structure, producing a shimmering top-end and
a great crunch sound when used with higher
gain settings. Use with a low gain DRIVE pedal
for a solo boost.
Construit autour d'une pile de tonalités vintage
et d'une structure de gain, produisant un
haut de gamme scintillant et un excellent son
crunch lorsqu'il est utilisé avec des réglages
de gain plus élevés. À utiliser avec une pédale
d'entraînement à faible gain pour un boost solo.
Suggested setting - Pushed Crunch
CLASSIC VOICE
Perfect for big chords and crunchy rhythm
playing with clear note separation. Boost the
input with the DRIVE pedal and add some delay
and reverb for lead breaks.
Parfait pour les gros accords et les rythmes
croustillants avec une séparation claire des notes.
Boostez l'entrée avec la pédale DRIVE et ajoutez
du retard et de la réverbération pour les sauts
de piste.
Suggested setting - Boosted Classic
XXXXXXXX
03/21
kontinuierlich hohen Pegeln ausgesetzt sind.
Wenn das Produkt nicht normal funktioniert, während die Betriebsanleitung befolgt wird, übergeben Sie das Produkt
Die Verwaltung zur Gesundheit und Sicherheit am Arbeitsplatz der US-Regierung (OSHA) hat die folgenden zulässigen
Lärmpegelbelastungen festgelegt:
Dauer pro Tag in Stunden Lärmpegel dBA, Langsame Reaktion
8 90
6 92
4 95
3 97
2 100
1½ 102
1 105
½ 110
¼ oder weniger 115
Laut der OSHA kann jede Belastung oberhalb der oben genannten zulässigen Grenzwerte zu gewissen Hörverlusten
führen.
Wenn dieses Verstärkersystem betrieben wird, müssen Ohrschützer im Ohrkanal oder über den Ohren getragen
werden, um permanenten Hörverlust zu vermeiden, wenn die Belastung oberhalb der oben festgelegten Grenzwerte
liegt. Um sich gegen potenziell gefährliche Belastungen durch hohe Schalldruckpegel zu schützen, wird empfohlen,
dass alle Personen, die Geräten wie diesem Verstärkersystem ausgesetzt sind, die in der Lage sind, hohe
Schalldruckpegel zu entwickeln, während des Betriebs dieses Geräts durch Ohrschützer geschützt werden.
de rester à proximité des enceintes lorsque le volume est élevé. Portez des protecteurs d’oreilles en cas d’exposition
continue à des niveaux sonores élevés.
sonores :
Durée par jour en heures Niveau sonore (dBA), réponse lente
8 90
6 92
4 95
3 97
2 100
1½ 102
1 105
½ 110
¼ ou moins de 115
D’après cette loi, toute exposition d’une durée supérieure aux limites autorisées ci-dessus peut entraîner une perte
auditive.
Des protecteurs d’oreilles doivent être portés dans le canal auditif ou sur l’oreille lors de l’utilisation de ce système
d’éviter toute exposition potentiellement dangereuse à des niveaux de pression acoustique élevés, il est conseillé que
toutes les personnes exposées à des appareils capables de produire des niveaux de pression acoustique élevés tels
Warning!
Important safety information!
READ THE FOLLOWING INFORMATION CAREFULLY. SAVE ALL INSTRUCTIONS FOR FUTURE
REFERENCE!
Follow all warnings and instructions marked on the product!
service personnel.
Clean only with a dry cloth.
switching the unit on, it is recommended that the unit be allowed to reach room temperature.
Never push objects of any kind into ventilation slots on the equipment casing.
Do not expose this apparatus to rain, liquids or moisture of any type.
Do not place this product on an unstable trolley, stand or table. The product may fall, causing serious damage to the
product or to persons!
Batteries shall not be exposed to excessive heat such as sunshine, fire or similar. They must be disposed of according
to local environmental guidelines.
Do not place the equipment in a confined space such as book case or similar unit. Don’t cover the ventilation openings
items such as newspapers, table cloths, curtains etc.
Das Gerät muss bei einer Umgebungstemperatur von maximal 35 ° C verwendet werden
Wichtige Informationen zur Sicherheit!
LESEN SIE DIE FOLGENDEN INFORMATIONEN SORGFÄLTIG DURCH. BEWAHREN SIE ALLE
ANLEITUNGEN FÜR DIE ZUKÜNFTIGE BEZUGNAHME AUF
Befolgen Sie alle auf dem Produkt ausgewiesenen Warnungen und Anleitungen!
Nur mit einem trockenen Lappen reinigen
Auf der Innenseite eines Verstärkers kann sich Kondensationsnässe bilden, wenn er von einer kalten Umgebung an
einen wärmeren Ort bewegt wird. Es wird empfohlen, dass das Gerät vor dem Einschalten Zimmertemperatur erreicht.
Unerlaubte Änderungen an diesem Gerät sind ausdrücklich von Bla
Stecken Sie niemals Objekte jeglicher Art in die Lüftungsschlitze des Gehäuses.
Setzen Sie dieses Gerät nicht Regen, Flüssigkeiten oder Feuchtigkeit jeglicher Art aus.
Befolgen Sie alle auf dem Produkt ausgewiesenen Warnungen und Anleitungen!
Platzieren Sie dieses Produkt nicht auf einem instabilen Rollwagen, Ständer oder Tisch. Das Produkt kann
herunterfallen und dem Produkt oder Personen ernsthaften Schaden zufügen!
If the product does not operate normally when the operating instructions are followed, then refer the product to a
noise level exposures:
Duration Per Day In Hours Sound Level dBA, Slow Response
8 90
6 92
4 95
3 97
2 100
1½ 102
1 105
½ 110
¼ or less 115
According to OSHA, any exposure in excess of the above permissible limits could result in some hearing loss.
prevent a permanent hearing loss if exposure is in excess of the limits as set forth above. To ensure against potentially
dangerous exposure to high sound pressure levels, it is recommended that all persons exposed to equipment capable
this unit is in operation.
English
All electrical and electronic products should be
disposed of separately from the municipal waste stream
via designated collection facilities appointed by the
government or the local authorities.
Deutsch
Français
Alle Elektro- und Elektronik-Altgeräte müssen
getrennt vom Hausmüll über dafür staatlich
vorgesehenen Stelen entsorgt werden.
Les éléments électriques et électroniques
doivent être jetés séparément, dans les
municipalité.
IMPORTANT SAFETY INSTRUCTIONS
Español
Italiano
Japanese USA/Canada
Consignes de sécurité importantes !
LISEZ LES INFORMATIONS SUIVANTES ATTENTIVEMENT. CONSERVEZ TOUTES LES CONSIGNES
POUR RÉFÉRENCE ULTÉRIEURE !
Respectez tous les avertissements et toutes les consignes figurant sur le produit !
N’introduisez jamais d’objets dans les fentes de ventilation du boîtier de l’appareil.
N’exposez pas cet appareil à la pluie, à des liquides ni à aucune forme d’humidité.
nt sur le produit !
Ne placez pas ce produit sur un chariot, un guéridon ou une table instable. Il pourrait tomber et ce faisant
sérieusement s’endommager ou causer des blessures !
Ne couvrez pas les fentes de ventilation ni les ouvertures et ne les obstruez pas non plus.
produisant de la chaleur.
L'équipement doit être utilisé à une température ambiante maximale de 35 ° C
Les piles ne doivent pas être exposées à une chaleur excessive comme le soleil, le feu ou toute autre source de chaleur.
Elles doivent être jetées selon les règles environnementales locales.
電池は日光に当たる場所や火器の近くのような過度に温度の高い場所にさらさないでくだ さい。
装置は、最大35℃の周囲温度で使用する必要があります。
電池を廃棄する際には、お住まいの地区のゴミ捨てルールに従って廃棄してくだ さい。
Only use at an altitude not exceeding 2000m. Only use in non-tropical climate regions.
No naked flame sources, such as lighted candles, should be placed on the apparatus.
The equipment shall be used at maximum 35 degree C ambient temperature.
To prevent possible hearing damage,
do not listen at high volume levels for
long periods.
L'apparecchiatura deve essere utilizzata a una temperatura ambiente massima di 35 gradi C.
EL EQUIPO DEBE USARSE A UNA TEMPERATURA AMBIENTE MÁXIMA DE 35 GRADOS C
Verwenden Sie ausschließlich ein von Blackstar zugelassenes Gleichstrom-Netzteil.
Trennen Sie das Netzteil vom Stromnetz, wenn Sie das Gerät nicht verwenden.
Bitte entfernen Sie den Blackstar Netzadapter und das Netzanschlusskabel vom Stromnetz, wenn Sie das Gerät
nicht nutzen. Batterien dürfen nicht hoher Wärme, wie z.B. direkter Sonnenstrahlung, Feuer o.ä. ausgesetzt werden.
Batterien dürfen nur nach den lokalen Umweltgesetzen entsorgt werden.
froid à un endroit plus chaud. Il est conseillé d’attendre que l’appareil ait atteint la température ambiante avant de
l’allumer.
N’ouvrez pas le boîtier de l’appareil. Cet appareil ne possède aucune pièce sur laquelle l’utilisateur puisse intervenir.
À
Hohe Lautsprecherpegel können permanente Hörschäden verursachen. Sie sollten daher die direkte Nähe zu
Lautsprechern, die auf hohen Pegeln betrieben werden, vermeiden. Tragen Sie einen Hörschutz, wenn Sie
des niveaux élevés, le volume des enceintes peut causer des pertes auditives définitives. Par conséquent, évitez
129402M-VA-2 08/22
https://www.blackstaramps.com/declaration-of-conformity
Please download the CE declaration
of conformity for your Blackstar
product at this address:
Other Blackstar Amplification Music Pedal manuals


