Blackstar Amplification Carry-on FOLDING PIANO 49 User manual

Owner’s Manual
DESIGNED IN PARTNERSHIP
WITH BLACKSTAR AMPLIFICATION UK

45
English
English
Introduction
Congratulations on buying this Carry-on Folding Piano 49.
Your Folding Piano 49 is compact, portable and unfolds into a 49-note
piano allowing you the freedom to play anywhere.
The folding piano is easy to use and is an ideal tool for beginners, music
educators and travelling musicians. In order to utilise the many functions of
the Folding Piano, please read this manual carefully before use and keep
it safe for future reference.
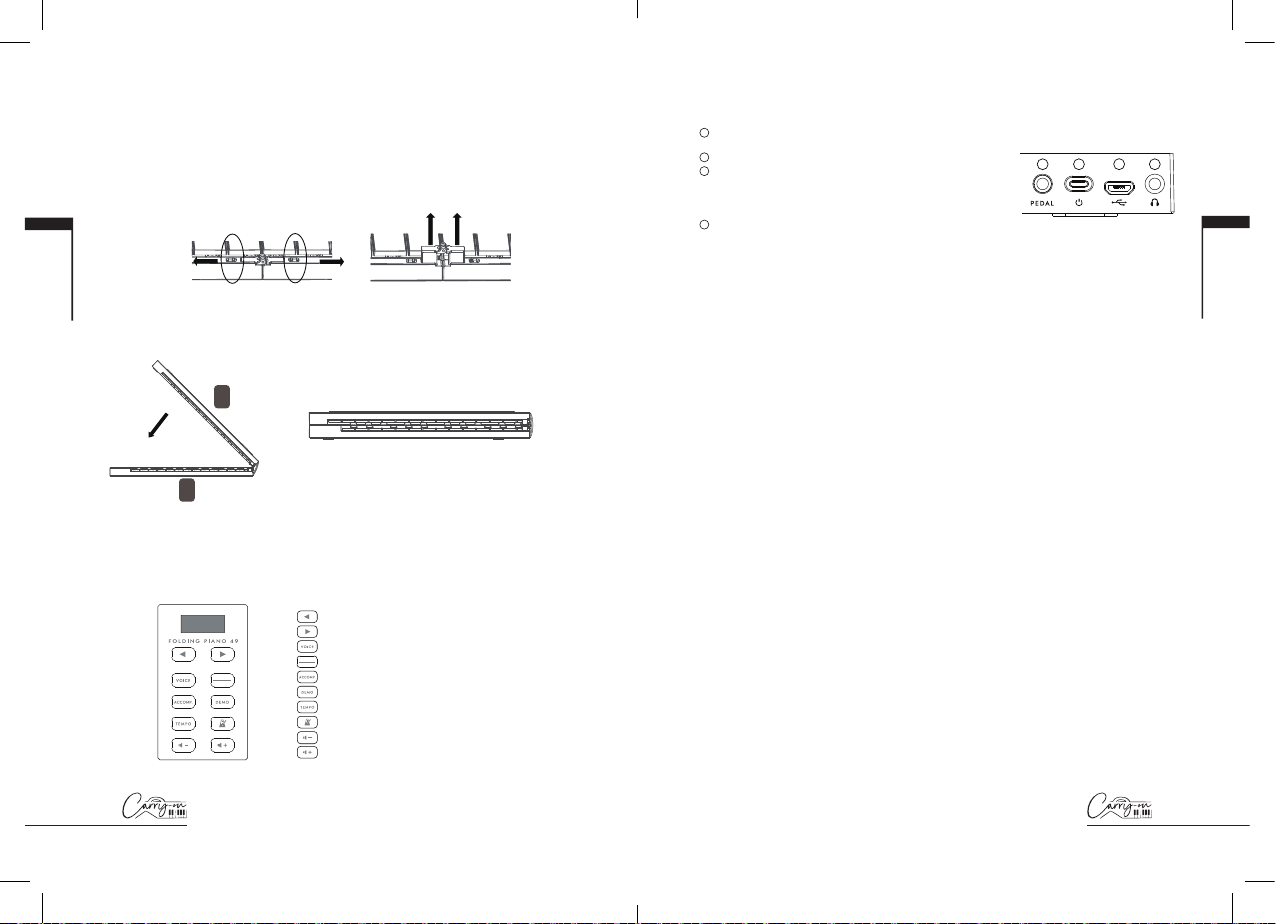
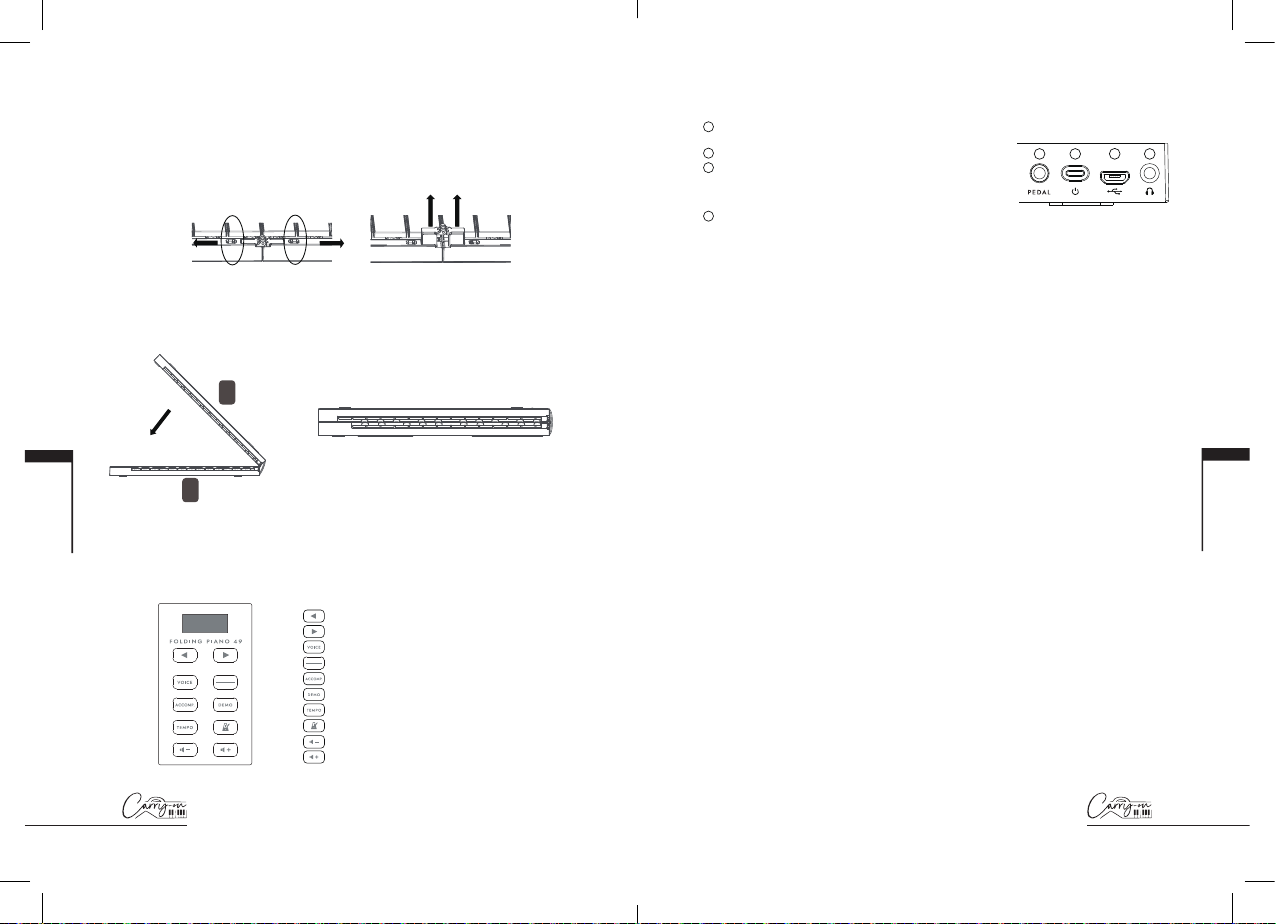
Unfolding and folding instructions
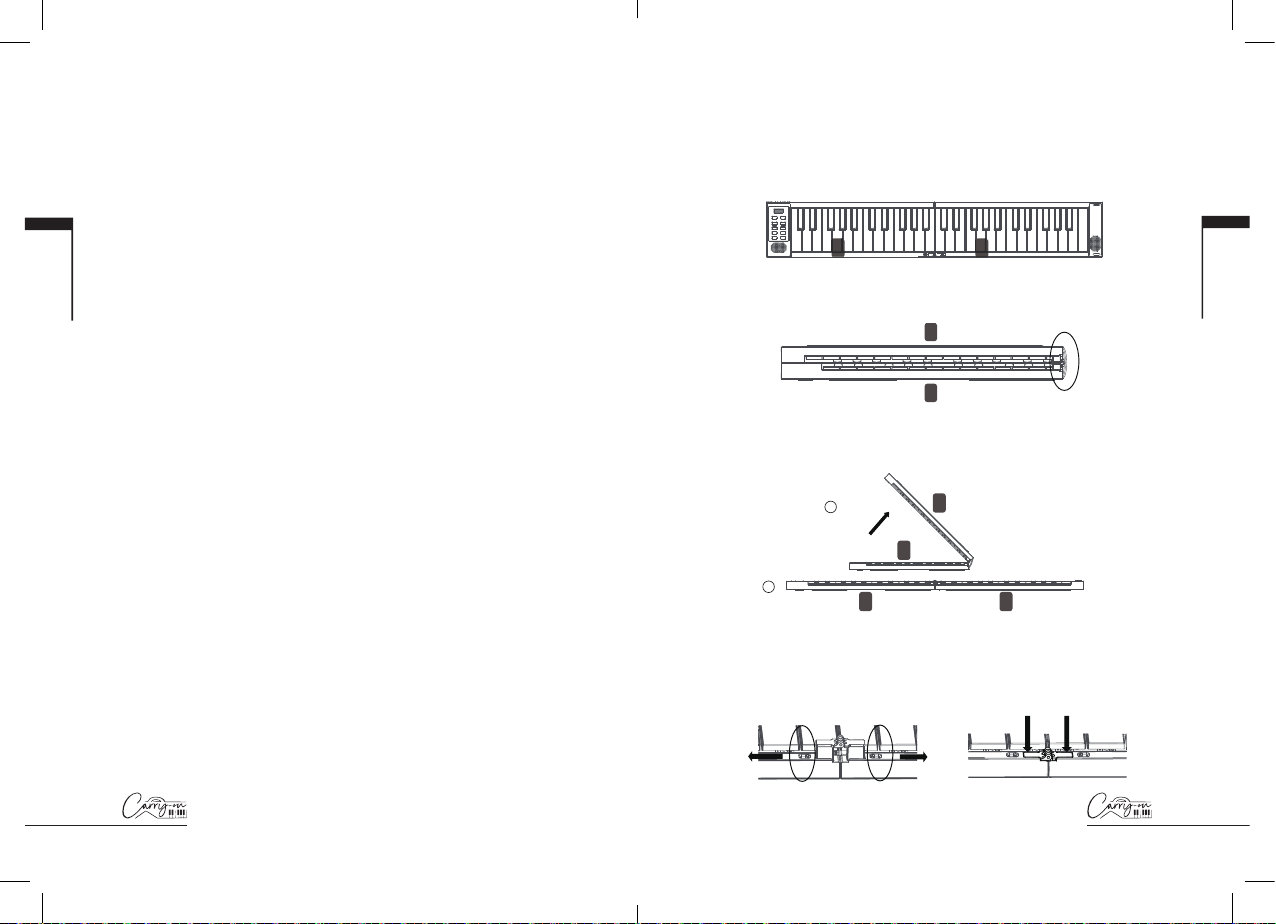
How to unfold your Carry-on Folding Piano 49:
Important: Lay the piano on a flat surface before unfolding. To prevent
damage, Do not unfold the Piano on an uneven surface.
STEP 1:
Place the Folding Piano to the left of your flat playing surface, with the keys
facing towards you and the wiring connector on the right side.
STEP 2:
Lift up part B and move it towards the right and lay it flat as shown below.
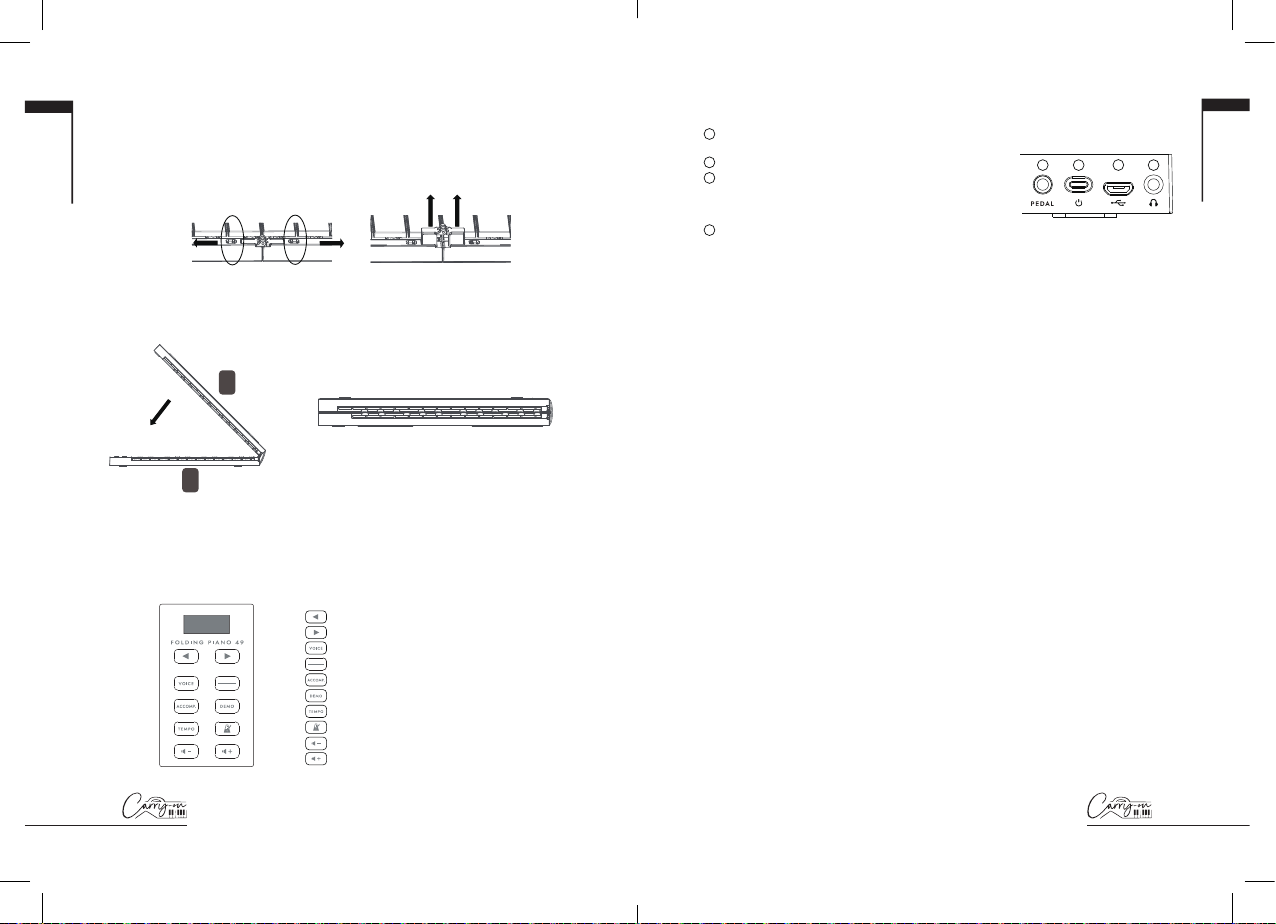
STEP 3:
After unfolding the piano, to secure the folding piano fully, you will need to
lock the hinge down in place. Locate the two small white switches on each
side of the hinge. Pull both switches outwards at the same time, push the
hinge down into place and release the switches.
Your piano is now ready for use.
A
A
A
A
B
1
2
B
B
B
wiring
A
A
A
A
B
1
2
B
B
B
wiring
A
A
A
A
B
1
2
B
B
B
wiring
A
A
A
A
B
1
2
B
B
B
wiring
A
A
A
A
B
1
2
B
B
B
wiring
67
English
English
How to fold your Carry-on Folding Piano 49:
STEP 1:
Before folding the piano, pull the locks on both sides of the hinge outwards
at the same time to release it (as pictured below).
STEP 2:
Lift part B and fold on top of part A as shown.
Your piano is now safely folded for transport or storage.
Front panel buttons
Rear panel
Volume increase button
Volume decrease button
Metronome select button
Next select button
Previous select button
Tempo button
Demo select button
Accompaniment select button
Voice select button
Octave / Transpose setting button
A
B
TRANSP.
OCTAVE
TRANSP.
OCTAVE
1 2
3
4
1
2
3
4
Sustain pedal socket: Used for connecting
the supplied sustain pedal.
Power switch: Turn the Piano On/Off.
Micro USB port: Connect the supplied USB
charging cable to power and charge the device.
Connect to a USB port on your computer to use
as a MIDI controller.
Headphone: Connect headphones or a speaker
with a quality screened cable (not supplied).
wiring
Instructions
1. Power On/Off
Press [⏻] button for 0.5s to turn on the power, long press [⏻] button to
turn off the power.
2. Voice selection
Press the VOICE button to enter the Voice selection menu.
Use the arrow buttons (1 and 2) to select the voice (see Voice table at
end of Manual).
3. Octave / Transpose
To select the Octave settings, press the OCTAVE TRANSP. button until
‘oct’ is displayed on the screen. Press < or > to set the octave range of
the piano. Range: -2 to +2.
To select the Transpose settings, press the OCTAVE TRANSP. button
until ‘tP’ is displayed on the screen. Press < or > to transpose up or down.
Range: -6 to +6 semitones.
4. Play Accompaniment (automatic accompaniment)
Press the ACCOMP. button to play the current selected rhythm. Use the
arrow buttons (1 and 2) to select the rhythm, then press any piano key
from C2-F#3 to synchronise the automatic accompaniment to the style.
Press the ACCOMP. button again to stop the rhythm playing. Range:
1-128.
5. Adjust the tempo of Accompaniment (automatic
accompaniment) and Metronome
Press the TEMPO button to enter the tempo adjustment menu.
Use the arrow buttons (1 and 2) to adjust the tempo of the automatic
accompaniment and demo songs. Range: 1-16 (30-180 BPM).
Volume increase button
Volume decrease button
Metronome select button
Next select button
Previous select button
Tempo button
Demo select button
Accompaniment select button
Voice select button
Octave / Transpose setting button
A
B
TRANSP.
OCTAVE
TRANSP.
OCTAVE
1 2
3
4
1
2
3
4
Sustain pedal socket: Used for connecting
the supplied sustain pedal.
Power switch: Turn the Piano On/Off.
Micro USB port: Connect the supplied USB
charging cable to power and charge the device.
Connect to a USB port on your computer to use
as a MIDI controller.
Headphone: Connect headphones or a speaker
with a quality screened cable (not supplied).
wiring

89
English
English
6. Play demo song
Press the DEMO button to play the current selected demo song. Use the
arrow buttons (1 and 2) to select the demo song. Press the DEMO button
again to stop the demo song playing. Range: 1-30.
7. Metronome
Press the METRONOME button to turn on the metronome. Use the
arrow buttons (1 and 2) to adjust the accent of the Metronome. Press the
METRONOME button again to turn off the metronome.
1 No accent
2 2/4
3 3/4
4 4/4
5 5/4
6 6/4
8. Adjust volume
Press the VOLUME DOWN button to turn down the volume. Press the
VOLUME UP button to turn up the volume. Range: 0-10.
9. Restore factory Settings
Press the POWER button when it is turned on, then press the POWER
button again when the word “rE5” is flashing on the screen to confirm the
restore factory settings.
Charging instructions
The Carry-on Folding Piano 49’s built-in rechargeable lithium battery
can provide up to 8 hours of normal performance when fully charged.
The Carry-on Folding Piano 49 is powered and charged via the Micro
USB port and a suitable 5V connected power supply.
When the battery power is low, the screen will blink once per
second, and will then turn off after 3 minutes (unless a power supply
is connected).
Continual use of the Carry-on Folding Piano 49 while the battery
power is low may impair its performance and can decrease the life-
span of the battery. Please connect and charge the piano with a
suitable power supply immediately.
While the Carry-on Folding Piano 49 is charging, three flashing
indicators will appear at the bottom of the screen. The three
indicators will stop flashing once the piano is fully charged.
To save power, the Carry-on Folding Piano 49 will automatically turn
off after 30 minutes of no operation.
Unplug the charging cable when the Carry-on Folding Piano 49 will
not be used for a long period of time or during a thunderstorm.
10 11
WARNING!
In order to avoid electric shock, short circuit, accidents, fire,
or other hazards, please pay attention to the following important
information:
Please do not open the Carry-on Folding Piano 49, disassemble its parts
or make any changes to the internal components. This product has no
parts that can be repaired or altered by users themselves (the Carry-on
Folding Piano 49 has its own tuning stability system, which never needs
tuning).
If you notice abnormal behaviour in your Carry-on Folding Piano 49’s
functions, please contact an official service centre.
Please keep your Carry-on Folding Piano 49 away from rain, water, or any
other wet environment.
Do not place containers of liquids on top of your Carry-on Folding Piano
49 as accidental spillage may cause damage.
If the charging cable or plug is worn or damaged, if there is a sudden
power failure during use, or if there is an abnormal smell or smoke from
your Carry-on Folding Piano 49, you should turn off the power and unplug
the charging cable immediately.
Before cleaning your Carry-on Folding Piano 49, turn off the power and
unplug it. Do not clean your Carry-on Folding Piano 49 with a corrosive
solvent.
Ensure that the internal battery pack is not exposed to excessive heat.
Keep away from fire, hot surfaces, direct sunlight or other ignition sources.
Precautions
The following, but not limited to, precautions should always be observed
at all times to avoid possible injury to the user or others, as well as possible
damage to the Carry-on Folding Piano 49 or other external equipment:
1. Do not over bend the charging cable, do not place heavy objects on
the charging cable, do not place the charging cable in a place where
people can pass, and do not wrap the charging cable around other
objects to avoid damaging the charging cable.
English
English
2. When unplugging the charging cable, hold the plug itself instead of
pulling the wire.
3. The charging cable should be removed when the Carry-on Folding
Piano 49 is not in use for a long time, or during thunder storms.
4. Do not place the Carry-on Folding Piano 49 in dusty, vibrating, cold
or hot conditions (such as direct sunlight or transportation in the sun)
to avoid damage to the appearance and internal components of the
Carry-on Folding Piano 49.
5. Before moving the Carry-on Folding Piano 49, unplug the charging
cable and all cables from it to other equipment.
6. When cleaning the Carry-on Folding Piano 49, wipe it with a soft and
dry fabric. Do not use a cloth soaked in paint thinners, organic
solvents, cleaning agents, or other corrosive chemicals to wipe the
Carry-on Folding Piano 49, to avoid fading the panel or keyboard.
7. When turning on the instrument, rst set the volume to the minimum
and then gradually increase the volume until it is suitable.
8. Do not place the Carry-on Folding Piano 49 near other electrical
appliances, such as a TV, radio, etc. Placing the piano near other
electrical appliances may cause mutual interference between them.
9. Do not put the Carry-on Folding Piano 49 on an unstable surface, so
as not to cause damage.
10. Do not place heavy objects on the Carry-on Folding Piano 49 or use
excessive force to press keys or toggle control switches.
11. If you use an unreasonably high volume for a long time, it may cause
hearing damage or damage to the speakers.
12. Avoid strong collisions and shaking of the Carry-on Folding Piano 49,
as they may cause damage to the Carry-on Folding Piano 49 and
cause personal injury.
13. Avoid use in areas where the piano is uneven, to avoid damage.
14. Before using a charger to power this product, check the charger
carefully for breakage, tearing, stripped wires, and any
other damage.
15. Children under 3 years old should not use this product.
12 13
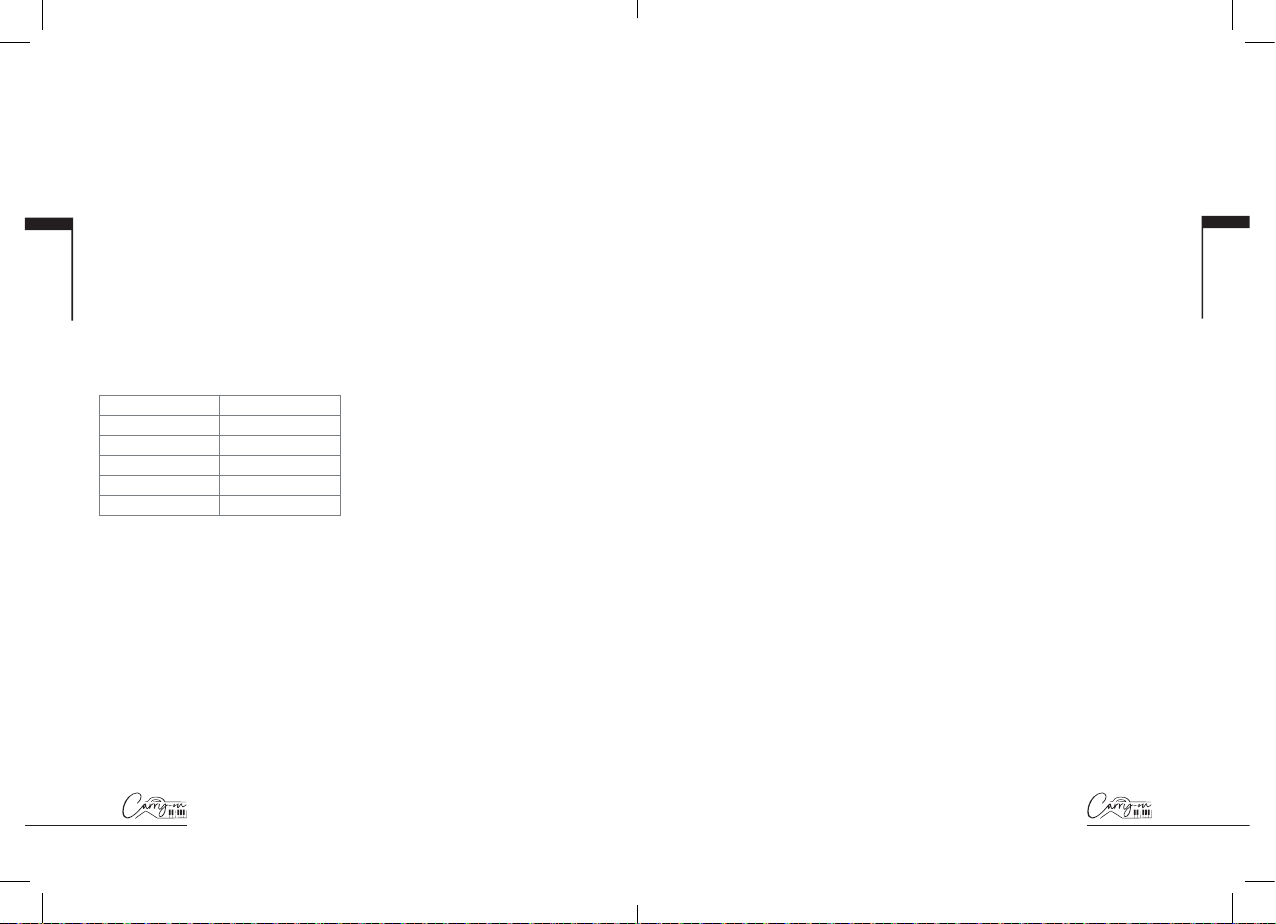
Specifications
Keyboard: 49 note standard keyboard
Voice: 128
Accompaniments: 128
Octave: -2, +2
Transpose: -6, +6 semitones
Demo songs: 30
Tempo adjustment: 1-16
Metronome: 1-6
Volume adjustment: 0-10
Display: digital display
Speakers: 2 x 2W (stereo)
Power: Built-in rechargeable battery (1000 mAh) can provide up
to 8 hours of normal use when fully charged
Connections: Micro USB, 3.5mm headphone output,
sustain pedal input
Dimensions: 390mm x 126mm x 48mm (Folded), 775mm x 126mm x
24mm (Expanded)
Net weight: 1.01kg
English
English
What’s in the box
Carry-on Folding Piano 49
Owner’s Manual
Micro USB charging cable
Sustain pedal
14 15
Einleitung
Herzlichen Glückwunsch zum Kauf des Carry-on Folding Piano 49.
Ihr Folding Piano 49 ist kompakt, tragbar und lässt sich zu einer Klaviatur
mit 49 Tasten aufklappen – so können Sie praktisch überall spielen.
Das Folding Piano ist einfach
zu bedienen und ein ideales Werkzeug
für Anfänger, Musiklehrer und Musiker, die viel unterwegs sind. Um die
vielen Funktionen des
Folding Piano
s kennenzu
lernen und nutzen zu
können, lesen Sie bitte diese Bedienungsanleitung vor dem Gebrauch
sorgfältig durch und bewahren Sie sie zum späteren Nachschlagen an
einem sicheren Ort auf.
Anleitung zum Auf- und Zusammenklappen
So klappen Sie Ihr Carry-on Folding Piano 49 auf:
Wichtig:
Legen Sie das Piano vor dem Aufklappen auf eine ebene Fläche.
Bei unebenen Flächen kann es zu Schäden kommen.
SCHRITT 1:
Platzieren Sie das Klapp-Piano links vor Ihnen, so dass die Tasten Ihnen
zugewandt sind und der Kabelanschluss auf der rechten Seite liegt.
SCHRITT 2:
Heben Sie die Teil B an, klappen Sie ihn nach rechts und legen Sie ihn,
wie unten dargestellt, flach ab.
SCHRITT 3:
Nach dem Aufklappen des Pianos müssen Sie das Scharnier arretieren,
um das gesamte Klapp-Piano durchgehend zu sichern. Suchen Sie die
zwei kleinen weißen Schalter auf beiden Seiten jedes Scharniers. Schieben
Sie die beiden Schalter gleichzeitig nach außen, drücken Sie das Scharnier
nach unten und lassen Sie die Schalter los.
Ihr Piano ist nun einsatzbereit.
A
A
A
A
B
1
2
B
B
B
wiring
A
A
A
A
B
C
1
2
B
B
zugewandt sind und der Kabelanschluss auf der rechten Seite liegt.
B
Kabelanschluss
A
A
A
A
B
1
2
B
B
B
wiring
A
A
A
A
B
1
2
B
B
B
wiring
A
A
A
A
B
1
2
B
B
B
wiring
Deutsch
Deutsch
16 17
Rückseite
Anleitungen
1. Ein-/Ausschalten
Drücken Sie die Taste [⏻] kurz (für 0,5 s), um das Gerät einzuschalten.
Drücken Sie die Taste [⏻] lang, um das Gerät auszuschalten.
2. Voice-Auswahl
Drücken Sie die Taste VOICE, um das Voice-Auswahlmenü aufzurufen.
Wählen Sie die gewünschte Voice mit Hilfe der Pfeiltasten (1 und 2)
(die Tabelle mit allen Voices finden Sie am Ende dieses Handbuchs).
3. Octave / Transpose
Um eine Oktavierung zu aktivieren, drücken Sie die Taste OCTAVE
TRANSP., bis „oct“ im Display erscheint. Drücken Sie nun < oder >, um
den Oktavbereich des Pianos einzustellen. Bereich: -2 bis +2.
Um eine Transposition einzurichten, drücken Sie die Taste OCTAVE
TRANSP., bis „tP“ im Display erscheint. Drücken Sie nun < oder >, um
eine Transposition nach oben oder unten einzurichten. Bereich: -6 bis +6
Halbtöne.
4. Spielbegleitung (Begleitautomatik)
Drücken Sie die Taste ACCOMP., um die aktuell gewählte Rhythmus-
begleitung wiederzugeben. Wählen Sie das Rhythmus-Pattern mit Hilfe
der Pfeiltasten (1 und 2) und drücken Sie anschließend eine beliebige
Taste im Bereich von C2 bis F#3, um die Begleitautomatik wiederzugeben.
Drücken Sie die Taste ACCOMP. erneut, um die Rhythmuswiedergabe
zu beenden. Bereich: 1 bis 128.
Taste zum Anheben der Lautstärke
Taste zum Absenken der Lautstärke
Wahltaste Metronom
Taste für nächste Auswahl
Taste für vorherige Auswahl
Tempo-Taste
Wahltaste für Demo
Wahltaste für Begleitung
Wahltaste Voice
Taste für die Einstellung Octave / Transpose
A
B
TRANSP.
O C TAV E
TRANSP.
O C TA V E
1 2
3
4
Kabelanschluss
1
2
3
4
Sustainpedal-Buchse: Dient zum Anschluss des
mitgelieferten Sustainpedals.
Power-Schalter: Dient zum Ein-/Ausschalten des Pianos.
Micro USB-Port: Dient zum Anschluss des
mitgelieferten USB-Ladekabels zur Stromversorgung
bzw. zum Laden des Geräts.
Für den Einsatz als MIDI-Controller verbinden Sie es mit
einem USB-Port an Ihrem Computer.
Kopfhörer: Dient zum Anschluss eines Kopfhörers
oder Lautsprechers mit einem hochwertigen
geschirmten Kabel (nicht im Lieferumfang enthalten).
How to fold your Carry-on Folding Piano 49:
SCHRITT 1:
Bevor Sie das Klavier zusammenfalten, ziehen Sie die Verriegelungen
auf beiden Seiten des Scharniers gleichzeitig nach außen, um sie zu
lösen (siehe Darstellung unten).
SCHRITT 2:
Heben Sie Teil B an und klappen Sie ihn wie abgebildet auf Teil A.
Ihr Piano ist nun sicher für den Transport oder zur Lagerung
zusammengeklappt.
Front panel buttons
Volume increase button
Volume decrease button
Metronome select button
Next select button
Previous select button
Tempo button
Demo select button
Accompaniment select button
Voice select button
Octave / Transpose setting button
A
B
TRANSP.
OCTAVE
TRANSP.
OCTAVE
1 2
3
4
1
2
3
4
Sustain pedal socket: Used for connecting
the supplied sustain pedal.
Power switch: Turn the Piano On/Off.
Micro USB port: Connect the supplied USB
charging cable to power and charge the device.
Connect to a USB port on your computer to use
as a MIDI controller.
Headphone: Connect headphones or a speaker
with a quality screened cable (not supplied).
wiring
Taste zum Anheben der Lautstärke
Taste zum Absenken der Lautstärke
Wahltaste Metronom
Taste für nächste Auswahl
Taste für vorherige Auswahl
Tempo-Taste
Wahltaste für Demo
Wahltaste für Begleitung
Wahltaste Voice
Taste für die Einstellung Octave / Transpose
A
B
TRANSP.
O C TAV E
TRANSP.
O C TA V E
1 2
3
4
Kabelanschluss
1
2
3
4
Sustainpedal-Buchse: Dient zum Anschluss des
mitgelieferten Sustainpedals.
Power-Schalter: Dient zum Ein-/Ausschalten des Pianos.
Micro USB-Port: Dient zum Anschluss des
mitgelieferten USB-Ladekabels zur Stromversorgung
bzw. zum Laden des Geräts.
Für den Einsatz als MIDI-Controller verbinden Sie es mit
einem USB-Port an Ihrem Computer.
Kopfhörer: Dient zum Anschluss eines Kopfhörers
oder Lautsprechers mit einem hochwertigen
geschirmten Kabel (nicht im Lieferumfang enthalten).
Deutsch
Deutsch
18 19
Anleitung zum Aufladen
Der integrierte, wiederaufladbare Lithium-Akku des Carry-on
Folding Piano 49 kann bei voller Ladung einen normalen Betrieb
von bis zu 8 Stunden ermöglichen.
Das Carry-on Folding Piano 49 wird über den Micro-USB-Port und
ein geeignetes 5 V Netzteil mit Strom versorgt und aufgeladen.
Bei niedrigem Batteriestand blinkt das Display einmal pro
Sekunde und schaltet sich dann nach 3 Minuten ab (sofern keine
Stromversorgung angeschlossen wird).
Ein fortlaufender Betrieb des Carry-on Folding Piano 49 bei
niedriger Kapazität kann seine Leistung beeinträchtigen und die
Lebensdauer des Akkus verkürzen. Bitte schließen Sie das Piano
sofort an eine geeignete Stromversorgung an und laden Sie es auf.
Während des Ladevorgangs erscheinen unten im Display des
Carry-on Folding Piano 49 drei blinkende Anzeigen. Wenn das
Piano voll aufgeladen ist, hören die drei Anzeigen auf zu blinken.
Um Strom zu sparen, schaltet sich das Carry-on Folding Piano 49
nach 30 Minuten ohne Bedienung automatisch ab.
Ziehen Sie den Stecker des Ladekabels ab, wenn das Carry-on
Folding Piano 49 über einen längeren Zeitraum oder während
eines Gewitters nicht benutzt wird.
5. Anpassen des Tempos für die Begleitung und das Metronom
Drücken Sie die Taste TEMPO, um das Tempo-Einstellmenü aufzurufen.
Mit Hilfe der beiden Pfeiltasten (1 und 2) stellen Sie das Tempo für die
Begleitautomatik und die Demo-Songs ein. Bereich: 1 bis 16 (30 bis
180 BPM).
6. Wiedergabe des Demo-Songs
Drücken Sie die Taste DEMO, um den aktuell gewählten Demo-Song
wiederzugeben. Mit Hilfe der beiden Pfeiltasten (1 und 2) wählen Sie
den Demo-Song aus. Drücken Sie die Taste DEMO erneut, um die
Wiedergabe des Demo-Songs zu beenden. Bereich: 1 bis 30.
7. Metronom
Drücken Sie die Taste METRONOME, um das Metronom einzuschalten.
Mit Hilfe der beiden Pfeiltasten (1 und 2) stellen Sie die Betonung des
Metronoms ein. Durch erneutes Drücken der Taste METRONOME
schalten Sie das Metronom aus.
1 Keine Betonung
2 2/4
3 3/4
4 4/4
5 5/4
6 6/4
8. Einstellen der Lautstärke
Drücken Sie die Taste VOLUME DOWN, um die Lautstärke abzusenken.
Drücken Sie die Taste VOLUME UP, um die Lautstärke anzuheben.
Bereich: 0 bis 10.
9. Wiederherstellen der Werkseinstellungen
Drücken Sie während des Einschaltens die Taste POWER: Wenn die
Meldung „E5“ im Display blinkt, drücken Sie die Taste POWER erneut,
um die Initialisierung der Werkseinstellungen zu bestätigen.
Deutsch
Deutsch
20 21
2. Wenn Sie das Ladekabel abziehen, halten Sie den Stecker selbst anstatt
am Kabel zu ziehen.
3. Wenn Sie das Carry-on Folding Piano 49 längere Zeit nicht nutzen oder
bei Gewitter sollte das Ladekabel abgezogen werden.
4. Verwenden Sie das Carry-on Folding Piano 49 nicht unter staubigen,
vibrierenden, kalten oder besonders warmen Umgebungsbedingungen (wie
bei der Aufstellung oder dem Transport bei direkter Sonneneinstrahlung),
um Beschädigungen des äußeren Gehäuses und der inneren Bauteile des
Carry-on Folding Piano 49 zu vermeiden.
5. Bevor Sie das Carry-on Folding Piano 49 bewegen, ziehen Sie das
Ladekabel und alle weiteren Kabel vom Piano zu anderen Geräten ab.
6. Reinigen Sie das Carry-on Folding Piano 49 mit einem weichen und
trockenen Tuch. Verwenden Sie zum Abwischen des Carry-on Folding
Piano 49 in keinem Fall ein mit Farbverdünner, organischen Lösungsmitteln,
Reinigungsmitteln oder anderen ätzenden Chemikalien getränktes Tuch, um
ein Ausbleichen des Bedienfelds oder der Klaviatur zu vermeiden.
7. Regeln Sie die Lautstärke des Instruments vor dem Einschalten ganz
herunter und heben Sie sie dann allmählich auf den gewünschten Pegel an.
8. Stellen Sie das Carry-on Folding Piano 49 nicht in die Nähe von anderen
elektrischen Geräten wie z. B. Fernseher, Radio usw. auf. Die Aufstellung
des Pianos in der Nähe anderer elektrischer Geräte kann zu gegenseitigen
Einstreuungen zwischen diesen Geräten führen.
9. Stellen Sie das Carry-on Folding Piano 49 nicht auf eine instabile
Oberäche, um Schäden zu vermeiden.
10. Legen Sie keine schweren Gegenstände auf das Carry-on Folding Piano
49 und bedienen Sie Tasten oder Schalter nicht mit übermäßiger Kraft.
11. Eine unangemessen hohe Lautstärke über einen längeren Zeitraum kann
zu Gehörschäden oder Schäden an den Lautsprechern führen.
12. Vermeiden Sie starke Zusammenstöße und Erschütterungen des
Carry-on Folding Piano 49, da diese Beschädigungen am Gerät und
Personenschäden verursachen können.
13. Vermeiden Sie den Betrieb in Bereichen, in denen sich das Piano nicht
absolut eben aufklappen lässt, um Schäden zu vermeiden.
14. Bevor Sie dieses Produkt mit einem Ladegerät betreiben, überprüfen Sie
das Ladegerät auf Brüche, Risse, abisolierte Drähte und andere Schäden.
15. Kinder unter 3 Jahren sollten dieses Produkt nicht verwenden.
WARNUNG!
Zum Schutz vor Stromschlag, Kurzschluss, Unfällen, Feuer oder anderen
Gefahren beachten Sie bitte die folgenden wichtigen Informationen:
Bitte öffnen Sie das Carry-on Folding Piano 49 in keinem Fall, demontieren
Sie seine Teile nicht und nehmen Sie keine Änderungen vor. Dieses Produkt
enthält keine Bauteile, die vom Anwender selbst repariert oder ausgetauscht
werden können (das Carry-on Folding Piano 49 verfügt über ein eigenes
System zur Stimmstabilisierung und muss daher niemals gestimmt werden).
Wenn Sie ein ungewöhnliches Verhalten Ihres Carry-on Folding Piano 49
feststellen, wenden Sie sich bitte an ein offizielles Servicezentrum.
Bitte halten Sie Ihr Carry-on Folding Piano 49 von Regen, Wasser oder anderen
feuchten Umgebungen fern.
Stellen Sie keine Behälter mit Flüssigkeiten auf Ihr Carry-on Folding Piano 49,
da versehentlich verschüttete Flüssigkeiten Schäden verursachen können.
Wenn das Ladekabel oder der Ladestecker abgenutzt oder beschädigt ist, es
im Betrieb zu einem plötzlichen Stromausfall kommt oder wenn Ihr Carry-on
Folding Piano 49 ungewöhnlich riecht oder Rauch entsteht, sollten Sie den
Strom sofort ausschalten und das Ladekabel abziehen.
Bevor Sie Ihr Carry-on Folding Piano 49 reinigen, schalten Sie das Gerät
aus und ziehen Sie den Ladestecker ab. Verwenden Sie zur Reinigung Ihres
Carry-on Folding Piano 49 in keinem Fall ätzende Lösungsmittel.
Stellen Sie sicher, dass der interne Akku-Pack nicht übermäßiger Hitze
ausgesetzt wird. Halten Sie Abstand zu Feuer, heißen Oberflächen oder
anderen Zündquellen und vermeiden Sie direkte Sonneneinstrahlung.
Vorsichtsmaßnahmen
Die folgenden, aber auch andere grundlegende Vorsichtsmaßnahmen sollten
stets beachtet werden, um mögliche Verletzungen des Anwenders oder
anderer Personen sowie mögliche Schäden am Carry-on Folding Piano 49
oder an anderen externen Geräten zu vermeiden:
1. Biegen Sie das Ladekabel nicht zu stark, stellen Sie keine schweren
Gegenstände auf das Ladekabel, legen Sie das Ladekabel nicht an einem
Ort mit Publikumsverkehr ab und wickeln Sie das Ladekabel nicht um andere
Gegenstände, um eine Beschädigung des Ladekabels zu vermeiden.
Deutsch
Deutsch
22 23
Lieferumfang
Carry-on Folding Piano 49
Benutzerhandbuch
Micro-USB-Ladekabel
Sustainpedal
Spezifikationen
Klaviatur: Standard-Klaviatur mit 49 Tasten
Voices: 128
Begleitrhythmen: 128
Oktave:-2, +2
Transposition: –6, +6 Halbtöne
Demo-Songs: 30
Tempo-Anpassung: 1 bis 16
Metronom: 1 bis 6
Lautstärke-Anpassung: 0 bis 10
Display: Digitaldisplay
Lautsprechers: 2x 2 W (stereo)
Stromversorgung: Interner wiederaufladbarer Akku (1.000 mAh) für
einen Normalbetrieb von bis zu 8 Stunden bei voller Ladung
Anschlüsse: Micro USB, 3,5 mm Kopfhörerausgang,
Eingang für Sustainpedal
Abmessungen: 390mm x 126mm x 48mm (zusammengeklappt),
775mm x 126mm x 24mm (aufgeklappt)
Nettogewicht: 1,01 kg
Deutsch
Deutsch

24 25
Introduction
Félicitations pour votre achat de ce Folding Piano 49, piano pliant de
Carry-on.
Votre Folding Piano 49 est compact, portable, et se déplie pour former
un piano complet de 49 notes qui vous permet de jouer partout en toute
liberté.
Le piano pliant est facile à utiliser et représente un outil idéal pour les
débutants, les professeurs de musique et les musiciens qui doivent
voyager. Afin d’utiliser les nombreuses fonctions du Folding Piano, veuillez
lire attentivement ce mode d’emploi avant toute utilisation et conservez-le
pour vous y référer ultérieurement.
Instructions de dépliage et de pliage
Comment déplier votre Folding Piano 49 Carry-on:
Important: posez le piano sur une surface plane avant de le déplier. Pour
éviter de l’endommager, ne dépliez pas le piano sur une surface irrégulière
ÉTAPE 1:
Placez le Folding Piano sur la gauche de votre surface plane de jeu avec les
touches en face de vous et le connecteur de branchement sur le côté droit.
ÉTAPE 2:
Soulevez la partie B et déplacez-la vers la droite et posez-la à plat comme
illustré ci-dessous.
ÉTAPE 3:
Après avoir déplié le piano, pour fixer complètement le piano pliant, vous
devrez verrouiller la charnière en place. Localisez les deux petits bloqueurs
blancs de chaque côté de la charnière. Tirez les deux bloqueurs vers l’extérieur
en même temps, poussez la charnière en place et relâchez les bloqueurs.
Votre piano est maintenant prêt à l’emploi.
A
A
A
A
B
1
2
B
B
B
wiring
A
A
A
A
B
C
1
2
B
B
B
Câblage
A
A
A
A
B
1
2
B
B
B
wiring
A
A
A
A
B
1
2
B
B
B
wiring
A
A
A
A
B
1
2
B
B
B
wiring
Français
Français

26 27
Face arrière
1. Mise sous/hors tension
Appuyez brièvement (pendant 0,5 s) sur le bouton [⏻] pour mettre sous
tension, appuyez longuement sur le bouton [⏻] pour mettre hors tension.
2. Sélection de son
Appuyez sur le bouton VOICE pour accéder au menu de sélection de son.
Utilisez les boutons flèches (1 et 2) pour sélectionner le son (voir la liste des
sons à la fin du mode d’emploi).
3. Octave / Transpose
Pour sélectionner les paramètres d’octave, appuyez sur la touche
OCTAVE TRANSP. jusqu’à ce que «oct» s’affiche à l’écran. Appuyez sur
<or> pour régler la plage d’octaves du piano. Plage: -2 à +2, par défaut: 0.
Pour sélectionner les paramètres de transposition, appuyez sur la touche
OCTAVE TRANSP. jusqu’à ce que «tP» s’affiche à l’écran. Appuyez sur
<or> pour transposer vers le haut ou vers le bas. Plage: -6 à +6 demi-tons.
4. Accompagnement de jeu (accompagnement automatique)
Appuyez sur le bouton ACCOMP. pour faire jouer le rythme actuellement
sélectionné. Utilisez les boutons flèches (1 et 2) pour sélectionner le
rythme, puis pressez n’importe quelle touche du piano de la0 à sol#2
pour faire jouer l’accompagnement automatique. Appuyez à nouveau sur
le bouton ACCOMP. pour arrêter le rythme. Plage: 1-128.
5. Réglage du tempo de l’accompagnement (accompagnement
automatique) et du métronome
Appuyez sur le bouton TEMPO pour accéder au menu de réglage du
tempo. Utilisez les boutons flèches (1 et 2) pour régler le tempo de
l’accompagnement automatique et des morceaux de démonstration.
Plage: 1-16 (30-180BPM).
Bouton d’augmentation de volume
Bouton de diminution de volume
Bouton de sélection de métronome
Bouton de sélection (Suivant)
Bouton de sélection (Précédent)
Bouton de tempo
Bouton de sélection de démonstration
Bouton de sélection d’accompagnement
Bouton de sélection de son
Bouton de réglage Octave / Transpose
A
B
TRANSP.
OCTAVE
TRANSP.
OCTAVE
1 2
3
4
Câblage
1
2
3
4
Prise pour pédale : sert à connecter la pédale
forte (sustain) fournie.
Interrupteur d’alimentation : allume/éteint le piano.
Port micro-USB : pour le câble USB fourni
servant à alimenter et charger l’instrument.
Connectez au port USB de votre ordinateur pour
l'utiliser comme contrôleur MIDI.
Casque : pour brancher un casque ou une
enceinte avec un câble blindé de qualité
(non fourni).
Comment plier votre Folding Piano 49 Carry-on:
ÉTAPE 1:
Avant de plier le piano, tirez en même temps les bloqueurs de part et
d’autre de la charnière vers l’extérieur pour débloquer celle-ci (comme
représenté ci-dessous). Répétez cela pour chaque charnière.
ÉTAPE 2:
Soulevez la partie B et repliez-la sur la partie A comme illustré.
Votre piano est maintenant plié en toute sécurité pour le transport ou
le stockage.
Front panel buttons
Volume increase button
Volume decrease button
Metronome select button
Next select button
Previous select button
Tempo button
Demo select button
Accompaniment select button
Voice select button
Octave / Transpose setting button
A
B
TRANSP.
OCTAVE
TRANSP.
OCTAVE
1 2
3
4
1
2
3
4
Sustain pedal socket: Used for connecting
the supplied sustain pedal.
Power switch: Turn the Piano On/Off.
Micro USB port: Connect the supplied USB
charging cable to power and charge the device.
Connect to a USB port on your computer to use
as a MIDI controller.
Headphone: Connect headphones or a speaker
with a quality screened cable (not supplied).
wiring
Bouton d’augmentation de volume
Bouton de diminution de volume
Bouton de sélection de métronome
Bouton de sélection (Suivant)
Bouton de sélection (Précédent)
Bouton de tempo
Bouton de sélection de démonstration
Bouton de sélection d’accompagnement
Bouton de sélection de son
Bouton de réglage Octave / Transpose
A
B
TRANSP.
OCTAVE
TRANSP.
OCTAVE
1 2
3
4
Câblage
1
2
3
4
Prise pour pédale : sert à connecter la pédale
forte (sustain) fournie.
Interrupteur d’alimentation : allume/éteint le piano.
Port micro-USB : pour le câble USB fourni
servant à alimenter et charger l’instrument.
Connectez au port USB de votre ordinateur pour
l'utiliser comme contrôleur MIDI.
Casque : pour brancher un casque ou une
enceinte avec un câble blindé de qualité
(non fourni).
Français
Français
28 29
Instructions pour la recharge
La batterie rechargeable au lithium intégrée au Folding Piano 49
Carry-on peut fournir jusqu’à 8heures de fonctionnement normal
lorsqu’elle est complètement chargée.
Le Folding Piano 49 Carry-on s’alimente et se charge au moyen du
port micro-USB et d’un adaptateur secteur 5V approprié.
Lorsque la charge de la batterie est faible, l’écran clignote une
fois par seconde, puis s’éteint au bout de 3minutes (sauf si une
alimentation électrique est connectée).
Une utilisation continue du Folding Piano 49 Carry-on alors que
la charge de la batterie est faible peut nuire à ses performances
et réduire la durée de vie de la batterie. Veuillez immédiatement
connecter une alimentation électrique appropriée pour charger le
piano.
Quand le Folding Piano 49 Carry-on est en charge, trois voyants
clignotants apparaissent en bas de l’écran. Les trois voyants cessent
de clignoter quand le piano est complètement chargé.
Pour économiser l’énergie, le Folding Piano 49 Carry-on s’éteint
automatiquement après 30minutes d’inactivité.
Débranchez le câble de charge si le Folding Piano 49 Carry-on doit
rester inutilisé pendant une longue période ou en cas d’orage.
6. Lecture d’un morceau de démonstration
Appuyez sur le bouton DEMO pour faire jouer le morceau de
démonstration actuellement sélectionné. Utilisez les boutons flèches (1 et
2) pour sélectionner le morceau de démonstration. Appuyez à nouveau
sur le bouton DEMO pour arrêter la lecture du morceau de démonstration.
Plage: 1-30.
7. Métronome
Appuyez sur le bouton METRONOME pour activer le métronome. Utilisez
les boutons flèches (1 et 2) pour régler l’accent du métronome. Appuyez
à nouveau sur le bouton METRONOME pour désactiver le métronome.
1 Pas d'accent
2 2/4
3 3/4
4 4/4
5 5/4
6 6/4
8. Réglage du volume
Appuyez sur le bouton VOLUME − pour baisser le volume. Appuyez sur
le bouton VOLUME + pour monter le volume. Plage: 0-10.
9. Restaurer les paramètres d’usine
Appuyez sur le bouton POWER lorsqu’il est allumé, puis appuyez sur le
bouton POWER à nouveau lorsque le mot «E5» clignote à l’écran pour
confirmer la restauration des paramètres d’usine.
Français
Français
30 31
2. Pour débrancher le câble de recharge, saisissez la fiche elle-même, ne
tirez pas sur le câble.
3. Le câble de recharge doit être retiré en cas de non utilisation prolongée
du Folding Piano 49 Carry-on, ou pendant les orages.
4. Ne placez pas le Folding Piano 49 Carry-on dans des milieux
poussiéreux, soumis à des vibrations, des températures froides ou
chaudes (comme en exposition directe au soleil ou un transport au soleil)
afin d’éviter d’endommager l’esthétique et les composants internes du
Folding Piano 49 Carry-on.
5. Avant de déplacer le Folding Piano 49 Carry-on, débranchez le câble de
recharge et tous les câbles le reliant à d’autres équipements.
6. Pour nettoyer le Folding Piano 49 Carry-on, essuyez-le avec un chiffon
doux et sec. N’utilisez pas de chiffon imbibé de diluants pour peinture,
de solvants organiques, de produits de nettoyage ou autres produits
chimiques corrosifs pour nettoyer le Folding Piano 49 Carry-on, au risque
de décolorer sa façade ou son clavier.
7. Lorsque vous allumez l’instrument, réglez d’abord le volume au
minimum, puis montez-le progressivement au niveau souhaité.
8. Ne placez pas le Folding Piano 49 Carry-on à proximité d’autres
appareils électriques tels qu’un téléviseur, un récepteur de radio, etc.
Placer le piano près d’autres appareils électriques peut provoquer des
interférences mutuelles entre eux.
9. Ne posez pas le Folding Piano 49 Carry-on sur une surface instable afin
de ne pas l’endommager.
10. Ne placez pas d’objets lourds sur le Folding Piano 49 Carry-on et
n’utilisez pas de force excessive pour appuyer sur les boutons ou les
touches.
11. Une utilisation prolongée à un volume sonore déraisonnablement
élevé peut causer des dommages auditifs ou des altérations des haut-
parleurs.
12. Évitez les chocs et les secousses au Folding Piano 49 Carry-on, car
elles peuvent l’endommager et causer des blessures corporelles.
13. Évitez d’utiliser le piano sur des surfaces inégales pour ne pas
l’endommager.
14. Avant d’utiliser un chargeur pour alimenter ce produit, contrôlez
soigneusement qu’il n’est pas cassé, fendu, que les fils ne sont pas
dénudés et qu’il n’y a aucun autre dommage.
15. Les enfants de moins de 3 ans ne doivent pas utiliser ce produit.
AVERTISSEMENT!
Afin d’éviter tout risque de choc électrique, de court-circuit, d’accident,
d’incendie ou autre, veuillez prêter attention aux informations importantes
suivantes:
Veuillez ne pas ouvrir le Folding Piano 49 Carry-on, ne pas démonter ses
pièces ni apporter de modifications à ses composants internes. Ce produit ne
comporte aucune pièce pouvant être réparée ou modifiée par les utilisateurs
eux-mêmes (le Folding Piano 49 Carry-on possède son propre système de
stabilisation d’accord, et n’a donc jamais besoin d’être accordé).
Si vous remarquez un comportement anormal des fonctions de votre
Folding
Piano 49 Carry-on
, veuillez contacter un centre de maintenance officiel.
Veuillez garder votre Folding Piano 49 Carry-on à l’abri de la pluie, de l’eau ou
de tout autre environnement humide.
Ne placez pas de récipients de liquides sur votre Folding Piano 49 Carry-on,
car un renversement accidentel pourrait l’endommager.
Si le câble ou la prise de recharge est usé ou endommagé, s’il y a une
panne de courant soudaine pendant l’utilisation, ou si une odeur anormale
ou de la fumée se dégage de votre Folding Piano 49 Carry-on, vous devez
immédiatement couper le courant et débrancher le câble de recharge.
Avant de nettoyer votre Folding Piano 49 Carry-on, coupez l’alimentation et
débranchez-la. Ne nettoyez pas votre Folding Piano 49 Carry-on avec un
solvant corrosif.
Assurez-vous que les batteries internes ne sont pas exposées à une chaleur
excessive. Tenir à l’écart du feu, des surfaces chaudes, de la lumière directe
du soleil et d’autres sources d’incendie.
Précautions
Les précautions suivantes, sans s’y limiter, doivent constamment être
observées pour éviter d’éventuelles blessures de l’utilisateur ou d’autres
personnes, ainsi que d’éventuels dommages au Folding Piano 49 Carry-on
ou à d’autres équipements externes:
1. Ne pliez pas excessivement le câble de recharge, ne posez pas d’objets
lourds dessus, ne le placez pas dans un lieu où des personnes peuvent
passer et ne l’enroulez pas autour d’autres objets pour éviter de
l’endommager.
Français
Français
32 33
Contenu de la boîte
Folding Piano 49 Carry-on
Mode d’emploi
Câble de recharge micro-USB
Pédale forte (sustain)
Caractéristiques techniques
Clavier: clavier standard de 49 notes
Sons: 128
Accompagnements: 128
Octave: -2, +2
Transposition: −6, +6 demi-tons
Morceaux de démonstration: 30
Réglage du tempo: 1-16
Métronome: 1-6
Réglage de volume: 0-10
Écran: affichage numérique
Haut-parleurs: 2 x 2W (stereo)
Alimentation électrique: la batterie rechargeable intégrée (1000mAh)
peut assurer jusqu’à 8heures d’utilisation normale lorsqu’elle est
complètement chargée
Connexions: micro-USB, sortie casque sur mini-jack 3,5mm, entrée
pour pédale forte (sustain)
Dimensions:
390mm x 126mm x 48mm (plié),
775mm x 126mm x 24mm (déplié)
Poids net : 1,01kg
Français
Français

34 35
Presentación
Enhorabuena por comprar este Carry-on Folding Piano 49.
Su Folding Piano 49 es compacto, portátil y se despliega en un completo
piano de 49 notas ofreciéndole al libertad de tocar en cualquier parte.
El piano plegable es muy sencillo de usar y es una herramienta ideal
para principiantes, profesores de música y músicos en ruta. Para utilizar
las muchas funciones del Folding Piano, por favor lea este manual
detenidamente antes de usarlo y guárdelo en un lugar seguro para futuras
referencias.
Instrucciones de plegado y despliegue
Cómo desplegar su Carry-on Folding Piano 49:
Importante: Ponga el piano en una superficie plana antes de desplegarlo.
Para evitar daños, no despliegue el piano en una superficie irregular.
PASO 1:
Coloque el piano plegable a la izquierda de la superficie plana donde vaya
a tocar, con las teclas orientadas hacia usted y el conector de cableado
en el lado derecho.
PASO 2:
Despliegue la parte B hacia la derecha y colóquela plana sobre la superficie
como se muestra abajo.
PASO 3:
Después de desplegar el piano y para fijarlo completamente, necesitará
fijar la bisagra correctamente. Para ello, localice los dos pequeños cierres
blancos a ambos lados de la bisagra. Presione ambos hacia fuera a la
vez y presione la bisagra hacia abajo. Una vez la bisagra está fijada en su
posición, libere los cierres a su posición normal.
Su piano ya está listo para usar.
A
A
A
A
B
1
2
B
B
B
wiring
A
A
A
A
B
C
1
2
B
B
B
cableado
A
A
A
A
B
1
2
B
B
B
wiring
A
A
A
A
B
1
2
B
B
B
wiring
A
A
A
A
B
1
2
B
B
B
wiring
Español
Español
36 37
Panel trasero
Instrucciones
1. Encendido y apagado
Mantenga pulsado el botón [⏻] durante 0.5 seg. para encenderlo,
presione el botón [⏻] para apagarlo.
2. Selección de voz
Pulse el botón VOICE para entrar en el menú de selección de voz.
Utilice los botones de flecha (1 y 2) para seleccionar la voz (véase la tabla
de voz al final del manual).
3. Octavador/Transportar
Para cambiar la octava del piano, presione el botón OCTAVE TRANSP
hasta que aparezca “oct” en la pantalla. Presione < o > para seleccionar
la octava del piano. Rango : -2 a 2.
Para transponer las teclas del piano, presione el botón OCTAVE TRANSP
hasta que aparezca “tP” en la pantalla. Presione < o > para transponer
arriba o abajo. Rango : -6 a 6 semitonos, Por defecto: 0.
4. Reproducir Acompañamiento (acompañamiento automático)
Pulse el botón ACCOMP. para reproducir el ritmo actual seleccionado.
Utilice los botones de flecha (1 y 2) para seleccionar el ritmo, luego
pulse cualquier tecla de piano desde C2 hasta F#3 para reproducir el
acompañamiento automático. Pulse el botón ACCOMP. de nuevo para
detener la reproducción del ritmo. Rango: 1-128.
5. Ajustar el tempo del Acompañamiento (automatic
accompaniment) y el Metrónomo
Pulse el botón TEMPO para entrar en el menú de ajustes del tempo. Use
los botones de flecha (1 y 2) para ajustar el tempo del acompañamiento
automático y las canciones de demostración. Rango: 1-16 (30-180 BPM),
por defecto.
Botón para subir el volumen
Botón para bajar el volumen
Botón para activar el metrónomo
Botón para seleccionar anterior
Botón para seleccionar siguiente
Botón de tempo
Botón para seleccionar demo
Botón para seleccionar acompañamiento
Botón para seleccionar voz
Botón para activar Octavador o transportar.
A
B
TRANSP.
OCTAVE
TRANSP.
OCTAVE
1 2
3
4
cableado
1
2
3
4
Conector para el pedal de sustain: Conecta el
pedal de sustain incluído.
Interruptor de encendido: Enciende o apaga el piano.
Conector Micro USB: Conecta el cable USB incluído
para alimentar y cargar el dispositivo.
Conéctelo a un puerto USB de su ordenador para
usarlo como controlador MIDI.
Auriculares: Conecta unos auriculares o un altavoz
con un cable apantallado de calidad (no incluído).
Cómo plegar el Carry-on Folding Piano 49.
PASO 1:
Antes de plegar el piano, tire de los cierres de ambos lados de la bisagra
hacia fuera al mismo tiempo para liberarla (como se muestra abajo).
PASO 2:
Levante la parte B y pliéguela encima de la parte A como se muestra
abajo.
Su piano ya está plegado y listo para guardar.
Front panel buttons
Volume increase button
Volume decrease button
Metronome select button
Next select button
Previous select button
Tempo button
Demo select button
Accompaniment select button
Voice select button
Octave / Transpose setting button
A
B
TRANSP.
OCTAVE
TRANSP.
OCTAVE
1 2
3
4
1
2
3
4
Sustain pedal socket: Used for connecting
the supplied sustain pedal.
Power switch: Turn the Piano On/Off.
Micro USB port: Connect the supplied USB
charging cable to power and charge the device.
Connect to a USB port on your computer to use
as a MIDI controller.
Headphone: Connect headphones or a speaker
with a quality screened cable (not supplied).
wiring
Botón para subir el volumen
Botón para bajar el volumen
Botón para activar el metrónomo
Botón para seleccionar anterior
Botón para seleccionar siguiente
Botón de tempo
Botón para seleccionar demo
Botón para seleccionar acompañamiento
Botón para seleccionar voz
Botón para activar Octavador o transportar.
A
B
TRANSP.
OCTAVE
TRANSP.
OCTAVE
1 2
3
4
cableado
1
2
3
4
Conector para el pedal de sustain: Conecta el
pedal de sustain incluído.
Interruptor de encendido: Enciende o apaga el piano.
Conector Micro USB: Conecta el cable USB incluído
para alimentar y cargar el dispositivo.
Conéctelo a un puerto USB de su ordenador para
usarlo como controlador MIDI.
Auriculares: Conecta unos auriculares o un altavoz
con un cable apantallado de calidad (no incluído).
Español
Español
38 39
Instrucciones de carga
La batería de litio recargable incorporada en el Carry-on Folding
Piano 49 puede proporcionar hasta 8 horas de funcionamiento normal
cuando está completamente cargada.
El Carry-on Folding Piano 49 se alimenta y carga a través del puerto
Micro USB y una fuente de alimentación adecuada de 5V conectada.
Cuando la energía de la batería está baja, la pantalla parpadeará una
vez por segundo, y luego se apagará después de 3 minutos (a menos
que se haya conectado una fuente de alimentación).
El uso continuo del Carry-on Folding Piano 49 mientras la batería
está baja puede perjudicar su rendimiento y puede disminuir la vida útil
de la batería. Por favor, conecte y cargue el piano con una fuente de
alimentación adecuada inmediatamente.
Mientras se carga el Carry-on Folding Piano 49, aparecerán tres
indicadores parpadeantes en la parte inferior de la pantalla. Los
tres indicadores dejarán de parpadear una vez que el piano esté
completamente cargado.
Para ahorrar energía, el Carry-on Folding Piano 49 se apagará
automáticamente después de 30 minutos sin funcionar.
Desenchufe el cable de carga cuando el Carry-on Folding Piano 49
no vaya a ser utilizado durante un largo período de tiempo o durante
una tormenta eléctrica.
6. Reproducir canción de demostración
Pulse el botón DEMO para reproducir la canción demo actual
seleccionada. Utilice los botones de flecha (1 y 2) para seleccionar
la canción demo. Presione el botón DEMO de nuevo para detener la
reproducción de la canción demo. Rango: 1-30.
7. Metrónomo
Pulse el botón METRONOME para activar el metrónomo. Utilice los
botones de flecha (1 y 2) para el acénto del Metrónomo. Pulse el botón
METRONOME de nuevo para desactivar el metrónomo.
1 Sin acento
2 2/4
3 3/4
4 4/4
5 5/4
6 6/4
8. Ajustar el volumen
Pulse el botón VOLUME DOWN para bajar el volumen. Pulse el botón
VOLUME UP para subir el volumen. Rango: 0-10
9. Restablecer ajustes de fábrica
Presione el botón de encendido mientras el piano está encendido,
presione el botón por cuando aparezca “rE5” en la pantalla para confirmar.
Español
Español

40 41
2. Cuando desenchufe el cable de carga, sujete el enchufe en lugar de
tirar del cable.
3. El cable de carga debe retirarse cuando el Carry-on Folding Piano 49
no se utilice durante mucho tiempo, o durante las tormentas eléctricas.
4. No coloque el Carry-on Folding Piano 49 en lugares con polvo,
vibración, frío o calor (como la luz solar directa o el transporte al sol)
para evitar que se dañe el aspecto y los componentes internos del
Carry-on Folding Piano 49.
5. Antes de trasladar el Carry-on Folding Piano 49, desenchufe el cable
de carga y todos los cables del mismo a otros equipos.
6. Cuando limpie el Carry-on Folding Piano 49, límpielo con una tela
suave y seca. No utilice un paño empapado en diluyentes de pintura,
disolventes orgánicos, agentes de limpieza u otros productos químicos
corrosivos para limpiar el Carry-on Folding Piano 49, para evitar que se
destiña el panel o el teclado.
7. Al encender el instrumento, primero ponga el volumen al mínimo y
luego aumente gradualmente el volumen hasta que sea adecuado.
8. No coloque el Carry-on Folding Piano 49 cerca de otros aparatos
eléctricos, como un televisor, radio, etc. Colocar el piano cerca de otros
aparatos eléctricos puede causar interferencias mutuas entre ellos.
9. No coloque el Carry-on Folding Piano 49 sobre una supercie
inestable, para no causar daños.
10. No coloque objetos pesados sobre el Carry-on Folding Piano 49
ni utilice una fuerza excesiva para pulsar las teclas o conmutar los
interruptores de control.
11. Si utiliza un volumen excesivamente alto durante mucho tiempo,
puede provocar daños en los oídos o en los altavoces.
12. Evite choques y sacudidas fuertes del Carry-on Folding Piano 49,
ya que pueden causar daños al Carry-on Folding Piano 49 y causar
lesiones personales.
13. Evite el uso en áreas donde el piano esté sobre una supercie
desigual, para evitar daños.
14. Antes de utilizar un cargador para alimentar este producto,
compruebe cuidadosamente que el cargador no esté roto, desgarrado,
con cables pelados y que no haya ningún otro daño.
15. Los niños menores de 3 años no deben usar este producto.
¡AVISO!
Para evitar descargas eléctricas, cortocircuitos, accidentes, incendios,
u otros peligros, por favor, preste atención a la siguiente información
importante:
Por favor, no abra el Carry-on Folding Piano 49, no desmonte sus partes ni
haga ningún cambio en los componentes internos. Este producto no tiene
piezas que puedan ser reparadas o alteradas por los propios usuarios
(el Carry-on Folding Piano 49 tiene su propio sistema de estabilidad de
afinación, que nunca necesita afinación).
Si observa un comportamiento anormal en las funciones de su Carry-on
Folding Piano 49, póngase en contacto con un centro de servicio oficial.
Por favor, mantenga su Carry-on Folding Piano 49 alejado de la lluvia, el
agua o cualquier otro entorno húmedo.
No coloque recipientes de líquidos sobre su Carry-on Folding Piano 49,
ya que un derrame accidental puede causar daños.
Si el cable de carga o el enchufe están desgastados o dañados, si se
produce un corte repentino de energía durante el uso o si hay un olor
anormal o humo proveniente de su Carry-on Folding Piano 49, debe
apagarlo y desenchufar el cable de carga inmediatamente.
Antes de limpiar su Carry-on Folding Piano 49, apague y desenchufe
la corriente. No limpie su Carry-on Folding Piano 49 con un disolvente
corrosivo.
Asegúrese de que el paquete de baterías internas no esté expuesto a un
calor excesivo. Manténgalo alejado del fuego, de superficies calientes, de
la luz solar directa o de otras fuentes de ignición.
Precauciones
Las siguientes precauciones, entre otras, deben observarse siempre en
todo momento para evitar posibles lesiones al usuario o a otras personas,
así como posibles daños al Carry-on Folding Piano 49 u otro equipo
externo:
1. No doble en exceso el cable de carga, no coloque objetos pesados
sobre el cable de carga, no coloque el cable de carga en un lugar por el
que puedan pasar personas y no envuelva el cable de carga alrededor
de otros objetos para evitar que se dañe el cable de carga.
Español
Español
Table of contents
Languages:


