BLEC CP Series Parts list manual

1
CULTI-PACK SEEDER
MODELS CP36 - CP42
INSTRUCTION & PARTS
MANUAL
IMPORTANT - PLEASE READ
BEFORE USE

2

3
BLEC CULTI-PACK SEEDER
MODELS CP36/CP42
CONTENTS:-
SECTION 1 DECLARATION OF CONFORMITY
SECTION 2 INTRODUCTION
SECTION 3 PRODUCT RECORD SHEET
SECTION 4 SAFETY NOTES
SECTION 5 DESCRIPTION
SECTION 6 CONTROLS
SECTION 7 PREPARING FOR USE
SECTION 8 OPERATING
SECTION 9 MAINTENANCE
SECTION 10 STORAGE
SECTION 11 MODIFICATIONS/ACCESSORIES
SECTION 12 NOTES
SECTION 13 PARTS LIST
SECTION 14 CONDITIONS OF WARRANTY
SECTION 15 REGISTRATION & WARRANTY CARD
To be completed and returned to
BLEC Thank You

4
SECTION 1 DECLARATION OF CONFORMITY
EEC MACHINERY DIRECTIVE - DECLARATION OF CONFORMITY
We hereby certify that the following machinery complies with all the relevant essential
Health and Safety Requirements of EEC Machinery Directive 89/392/EEC as amended
And the National Laws and Regulations adopting this directive.
Machine Description: CULTIPACK SEEDER Make: BLEC
Serial Number: Model Number
Made by:
BLEC (Global) Ltd,
Unit 5 Crease Drove Industrial Estate, Crowland, Peterborough PE6 0BN ENGLAND
A technical construction file for this machinery is retained at the following
Address (if different from above address)
Signed:
Date: 1st January 2010
Name: G Mumby
Position: Director
Being the responsible person appointed by the manufacturer or nominated representative
Of the manufacturer established in the EEC employed by:
BLEC (Global) Ltd
Unit 5 Crease Drove Industrial Estate Crowland Peterborough PE6 0BN ENGLAND

5
SECTION 2 - INTRODUCTION BLEC CULTIPACK SEEDER
MODELS CP36-CP42
We thank you for choosing a BLEC product. The reliability, efficiency and safe working of this product
depends on your care, so it is important to read this instruction book before use.
All BLEC equipment has been designed with careful attention directed to operators safety, therefore,
it is vital that all safety precautions are carried out when working and maintaining the machinery.
There are warning details placed on specific machines which should at all times be complied with,
also listed overleaf, are general safety notes which should always be followed.
Additional operator training can be supplied by BLEC Global Ltd on all BLEC machines, please
contact the office for further details.
Please find enclosed registration and guarantee card for your attention. Please complete the
necessary details required, and post the “tear off” section back to BLEC within 14 days of purchase
for our records. Thank you.

6
SECTION 3 PRODUCT RECORD SHEET BLEC CULTIPACK SEEDER
MODELS CP36 CP42
Machine Type: BLEC CULTI-PACK SEEDER
Serial Number:
Delivery Date:
Dealers Name & Address:
Tel no:
Owners Name & Address:
Tel no:

7
SECTION 4 SAFETY NOTES BLEC CULTIPACK SEEDER
MODELS CP36 CP42
SAFETY NOTES
DO NOT USE THIS MACHINE BEFORE READING THIS MANUAL
DO NOT ALLOW PERSONS UNDER THE AGE OF 16 TO OPERATE
THIS EQUIPMENT
DO NOT OPERATE WITHOUT SAFETY CLOTHING/FOOTWEAR
DO NOT ALLOW ANY PERSON OTHER THAN THE OPERATOR TO
STAND NEAR THE MACHINE WHEN WORKING
DO NOT ALLOW PEOPLE IN AND AROUND THE WORKING AREA
DO NOT STAND ON ANY GUARDS
DO NOT MAKE ANY ADJUSTMENTS WITH THE ENGINE RUNNING
DO NOT GO UNDERNEATH THE MACHINE WITHOUT SAFETY PROPS
DO MAKE SURE ALL GUARDS ARE IN PLACE
DO OBEY SAFETY DETAILS
DO MAKE SURE MACHINE IS SWITCHED OFF BEFORE
MAKING ANY ADJUSTMENTS.
DO MAKE SURE EQUIPMENT IS IN A SAFE CONDITION
DO MAKE SURE EQUIPMENT IS REGULARLY SERVICED

8
SECTION 5 - DESCRIPTION BLEC CULTIPACK SEEDER
MODELS CP36- CP42
Both models are designed to sow grass seed and incorporate into top soiled areas
Based on the following proven working principle. The twin front cast iron rollers
Have serrated rings which penetrate the soil, leaving a pattern of ridges and small
Indentations in the top 20mm (3/4”). A rear seeder unit equipped with a
Seed/fertiliser hopper, evenly spreads grass seed or fertiliser at ta required amount
Determined by the adjustable cam guage and lever fitted to the rear of the hopper,
The seed falls into and in between the small pockets in the soil. To complete the
process a rear ring roller splits the ridges and presses down the seedlings into the
Soil, leaving the seedlings incorporated in the top 20mm (3/4”) for ideal germination.
It is important slewing clutches are fitted on the tiller for ease of turning. A footplate
Mounted on the rear allows the operator to ride on for easier operation and less fatigue.
IIMPORTANT
DESCRIPTION
The BLEC range of CULTIPACK SEEDERS have been designed to mount onto
Standard type power tillers or two wheel tractors, as they are sometimes known.
Before fitting it is important you have the correct model seeder to suit your power
Tiller.
WORKING PRINCIPLE
Make sure only experienced workers over 16 use this seeder for safety reasons.

9
SECTION 6 CONTROLS BLEC CULTI PACK SEEDER
MODELS CP36 CP42
CONTROLS - (See Photo 6)
It is important to familiarise yourself with all of the controls.
Please read the enclosed power tiller instruction manual (supplied
With tiller).
The seeder has been designed for the operator to either
Stand on
Walk behind when working or transporting by the fitment of a footplate
Which can be hinged up on top of the roll. If the operator wishes to
Walk behind, (ie when travelling up slopes)

10
SECTION 6 - CONTROLS BLEC CULTI-PACK
MODELS: CP36 & CP42
PHOTO: 6
1. 2. 3.
4.
5.
6.
7. 8.
9.
1. HIGH/LOW GEAR RANGE LEVER
2. ON/OFF SWITCH
3. DRIVE CLUTCH ‘DEAD MANS’ SAFETY LEVERS
4. THROTTLE CONTROL LEVER
5. STEERING CLUTCH LEVER
6. SEED ON/OFF LEVER
7. HANDLE BAR HEIGHT ADJUSTING CLAMP
8. ‘FOLD UP’ FOOT-PLATE
9. GEAR LEVER
CONTROLS

11
SECTION 7 - PREPARING FOR USE
BLEC CULTI-PACK SEEDER
MODELS - CP36/CP42
ASSEMBLY
The BLEC CULTI-PACK SEEDER unit will be assembled, lubricated and ready for work if supplied
with a recommended power tiller equipped with safety devices.
However, if the seeder requires fitting to a power tiller, please follow the directions below:-
Step 1.
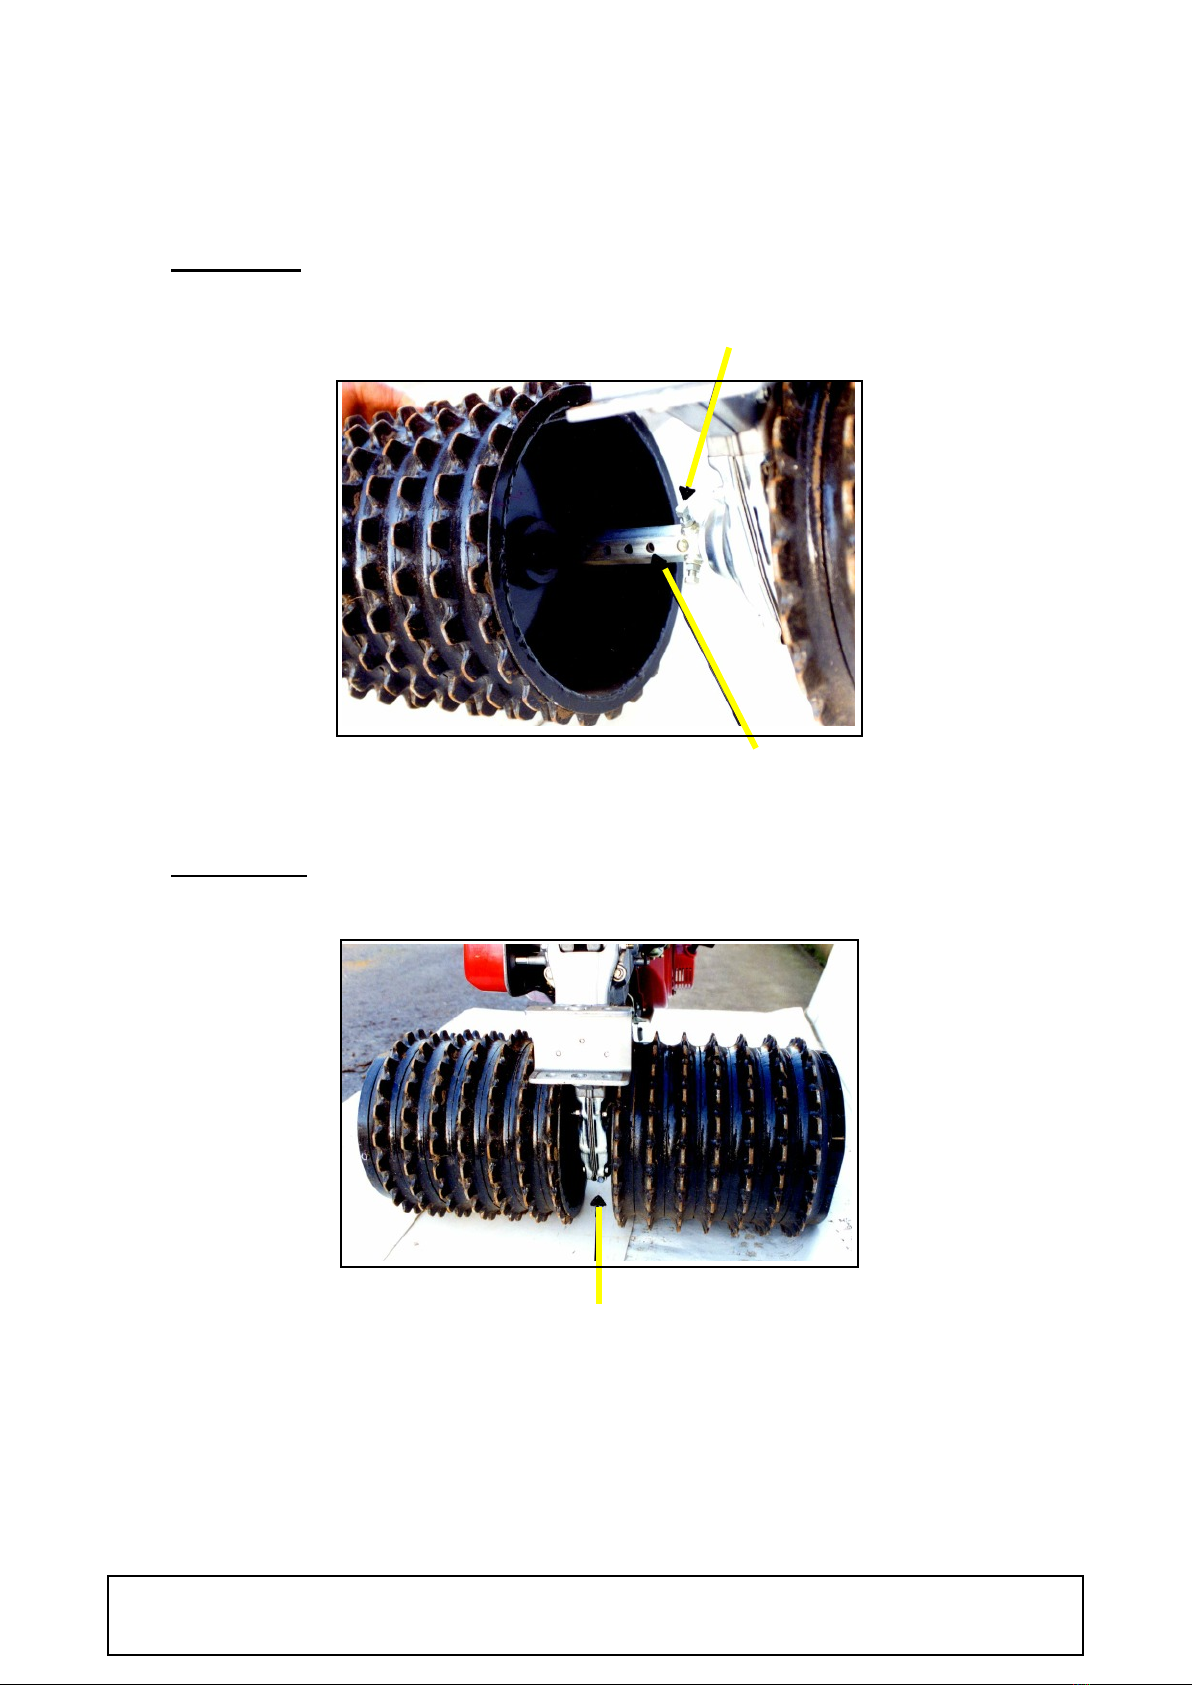
Fitment of cast ring roller drums to tiller axle. (See Photos 2A & 2B)
·This operation will require 2 people for safety.
·Please find level, hard surface. Stand the tiller on the wheels.
Remove the pin and clip on one side axle.
·Raise one side of the tiller to allow the wheel to be removed.
·(See Photo 2A).
·position the cast ring drums with welded lip side towards shaft.
·Rotate drum until the hole in the axle lines up with the hole in the drum.
·Then line up the axle with the tube and slide on until the edge of the drum is
close to the chain case and also to the nearest hole in the axle.
·Secure with the pin and clip.
·Repeat same process with opposite side drum.
12
SECTION 7 - PREPARING FOR USE BLEC CULTI-PACK SEEDER
MODEL: CP36 & CP42
PHOTO: 2A BEFORE FITTING THE DRUMS MAKE
SURE THE AXLE TUBE IS TIGHT.
ADJUST THE BOLTS IF NECESSARY.
LINE UP HOLE IN
AXLE TUBE WITH
CAST DRUM HOLE
PHOTO: 2B
APPROXIMATELY
75MM (3”) DISTANCE
BETWEEN THE DRUMS.

13
SECTION 7 - PREPARING FOR USE
BLEC CULTI-PACK SEDER
MODELS - CP36/CP42
Step 2.
Fitment of seeder unit to tiller.
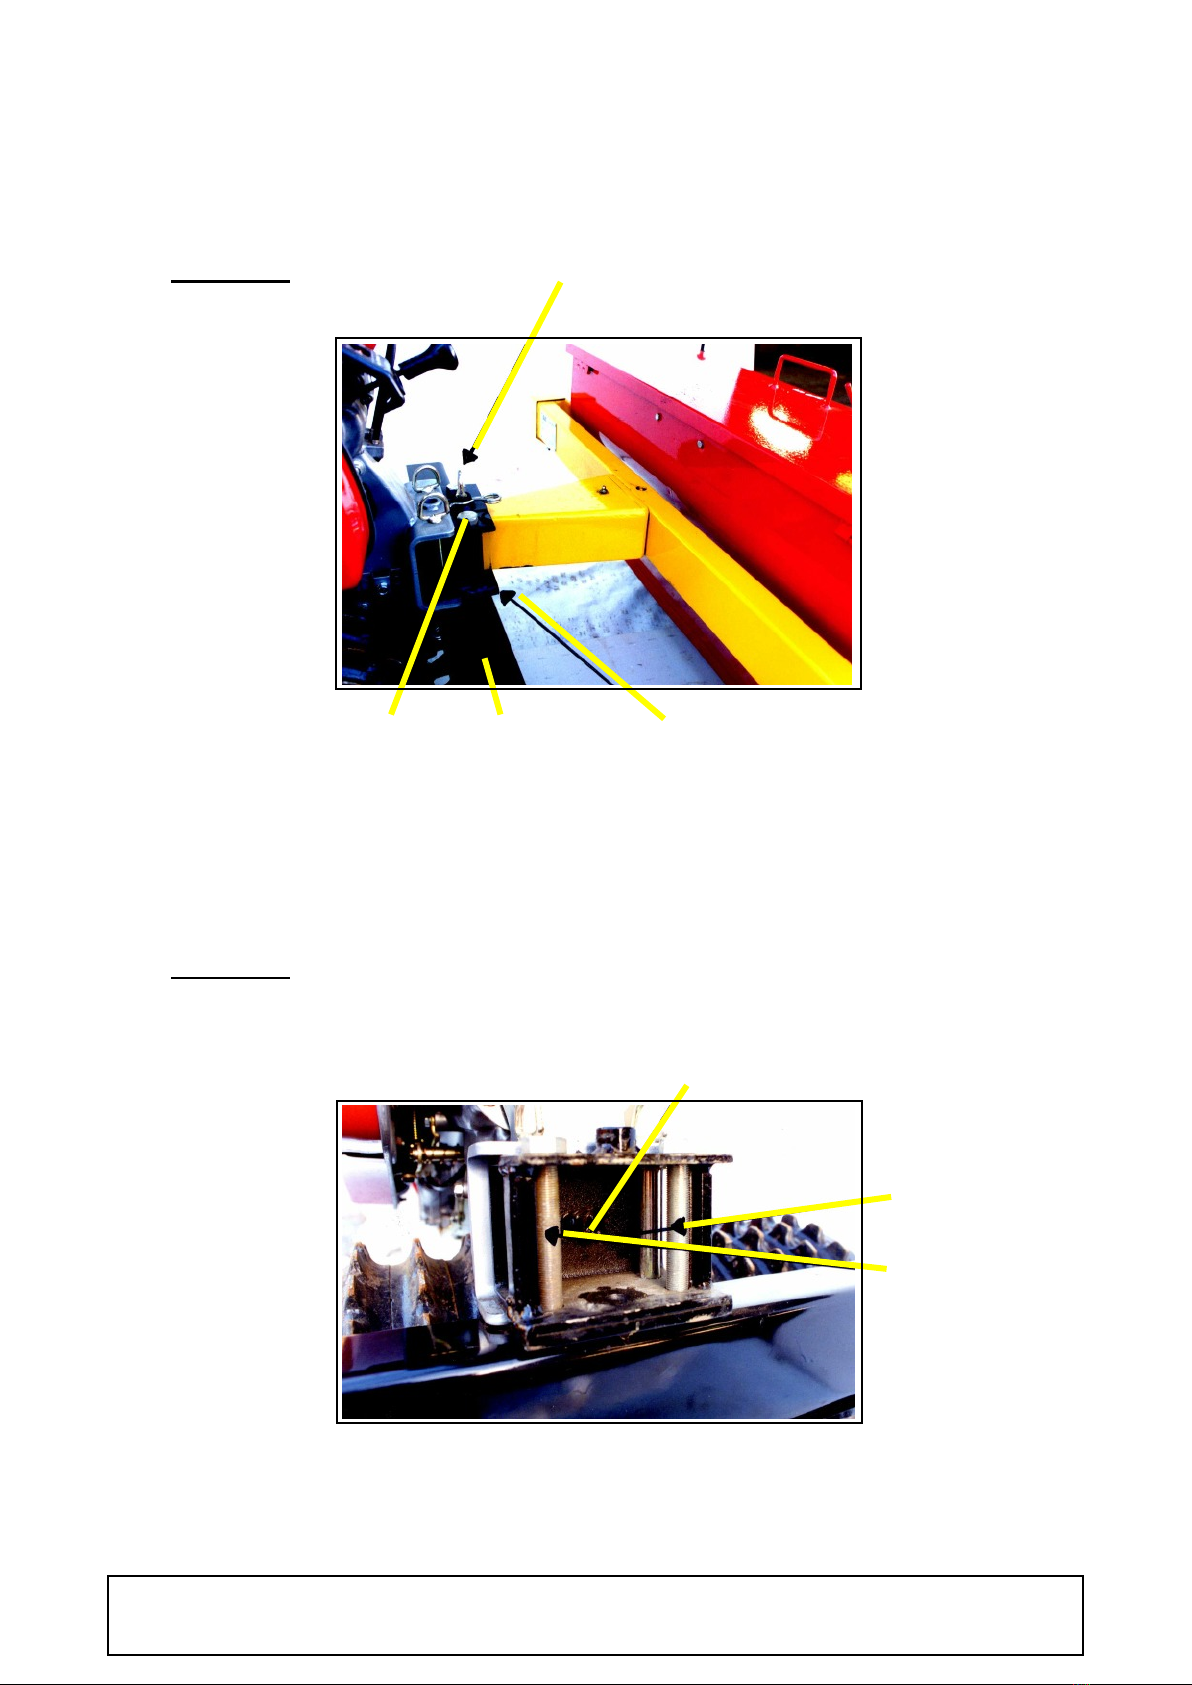
The seeder unit is attached to the jaw bracket on the tiller via a mounting bracket (black) which has a
scraper bar attached to it. (See Photo 3).
* disconnect the mounting bracket (1) from the drawbar of the seeder by
removing the middle pin and clip.
* slide the bracket into the jaw bracket of the tiller and secure with 2
pins and clips supplied.
* tighten locking bolt (See Photo 4), No. 3. This will keep the rackets
tight on the pins.
* the scraper bar is secured to the mounting bracket by 2 bolts and nuts
(See Photo 4).
* position and tighten.
* fitted to the scraper bar are 2 serrated scrapers which are adjustable for
width and length, via the nuts and bolts. It may be necessary to adjust the scrapers.
* when adjusting, make sure a gap of 6 - 10 mm is between the cast ring roll
and scraper to allow for movement. (See Photo 5).
* position the seeder drawbar (See Photo 3) into the mounting bracket and
secure with pin and clip. Lift up the support leg and secure with pin and clip.
The seeder and tiller are now assembled.
14
SECTION 7 - PREPARING FOR USE BLEC CULTI-PACK SEEDER
MODELS : CP36 & CP42
PHOTO: 3 DRAWBAR PIN/CLIP
BOLT SCRAPER MOUNTING
BAR BRACKET
PHOTO: 4
LOCKING
NUT
SCRAPER
BAR
SECURING
BOLTS

15
SECTION 7 - PREPARING FOR USE
BLEC CULTI-PACK SEEDER
MODELS - CP36/CP42
NOTES:

16
SCRAPER
BAR
LEAVE 6 - 10mm SERRATED
CLEARANCE SCRAPER
BETWEEN RINGS BOLT
ADJUSTER
SECTION 7 - PREPARING FOR USE BLEC CULTI-PACK SEEDER
MODELS: CP36 & CP42
PHOTO: 5

17
SECTION 7 - PREPARING FOR USE
BLEC CULTI-PACK SEEDER
MODELS - CP36/CP42
TYPE OF SEEDING SYSTEM
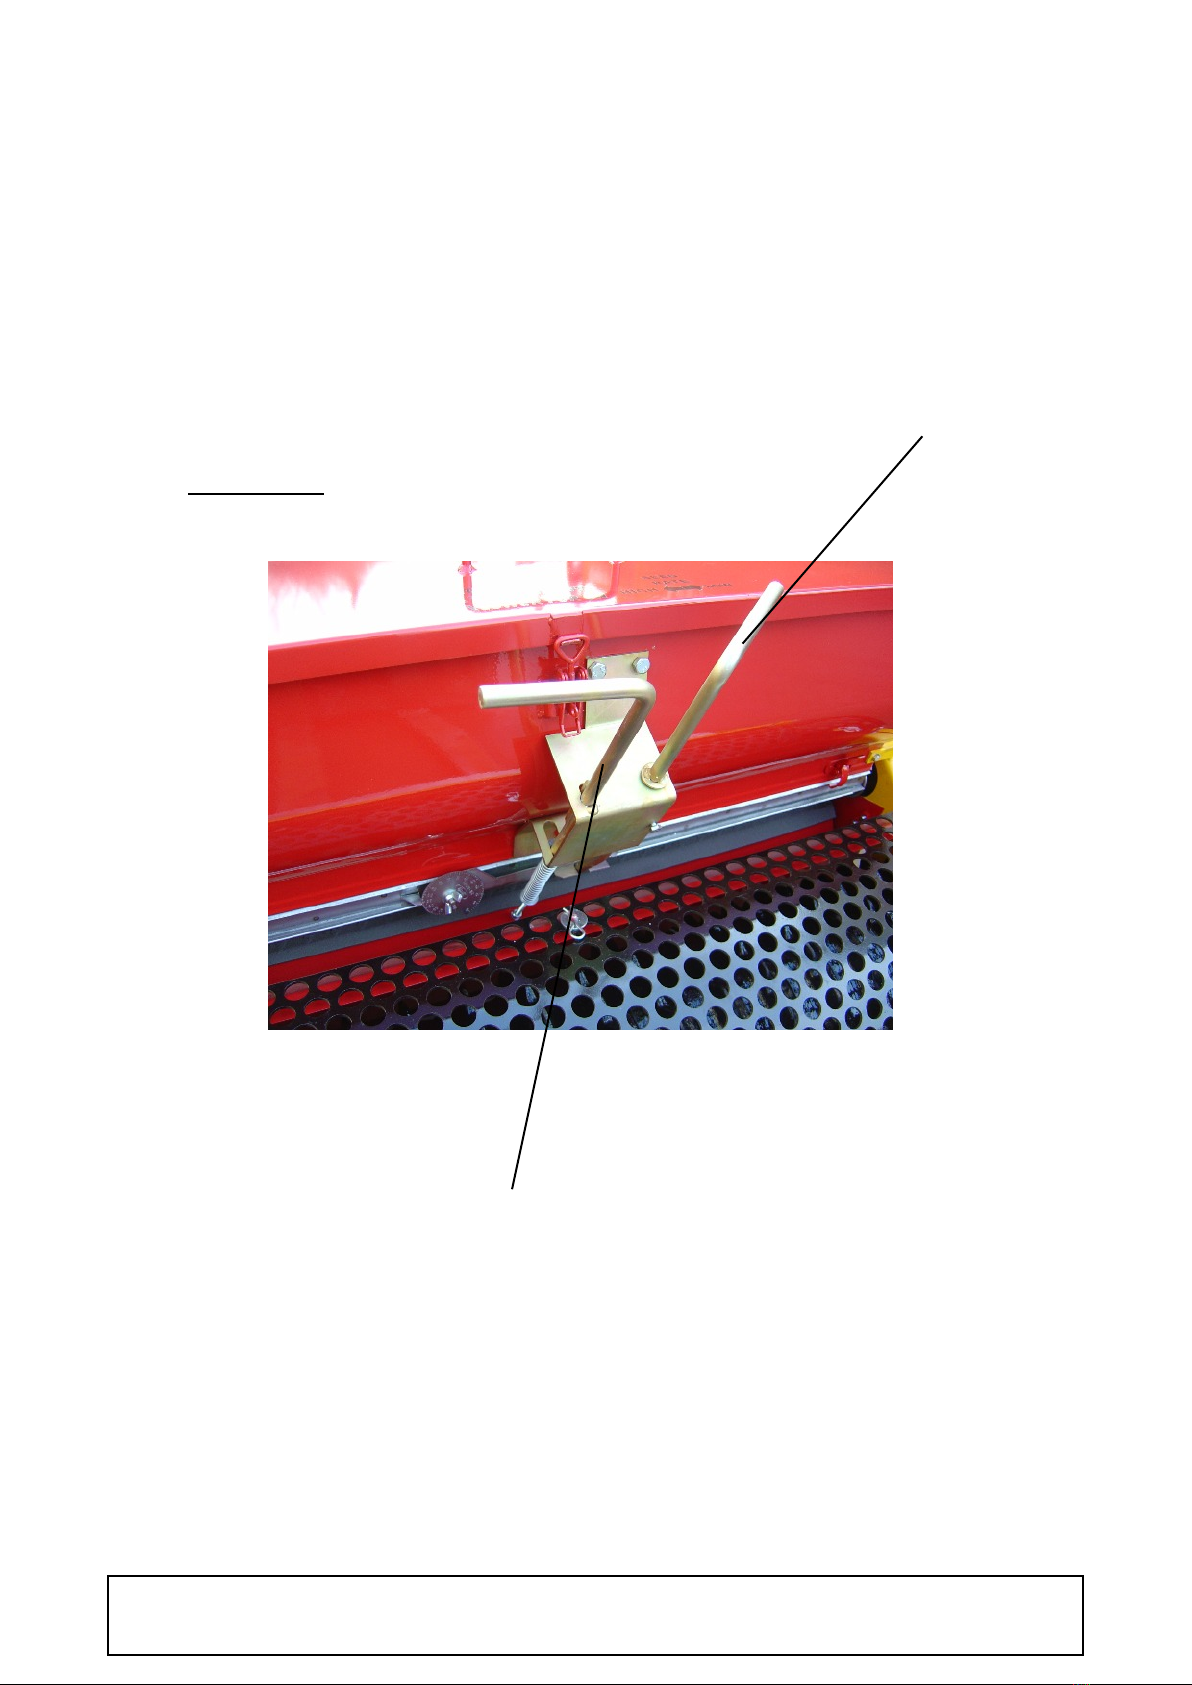
The Cultipack seed hopper is equipped with an accurate seeding mechanism, which
Consists of a stainless steel bottom with two sliding sections which have specially
Shaped apertures (holes) inserted in each part. To vary the amount of seed to be
Spread, you must slide the bottom section to either increase or decrease the hole
Size. This is achieved by twisting lever A (see Photo 5a) until the tab touches the
Side of the numbered cam gauge (see photo 7)
New 2006 onwards models are fitted with a shut off plate, which is operated by twisting
Lever B (see photo 5a) until the plate drops down, therefore allowing the grass seed to fall
Out. By lift lever B up, and then twisting to lock up plate, this stops the seed from falling out.
The numbers on the cam gauge DO NOT represent a specific amount of seed, it is only a
Scale to work from.
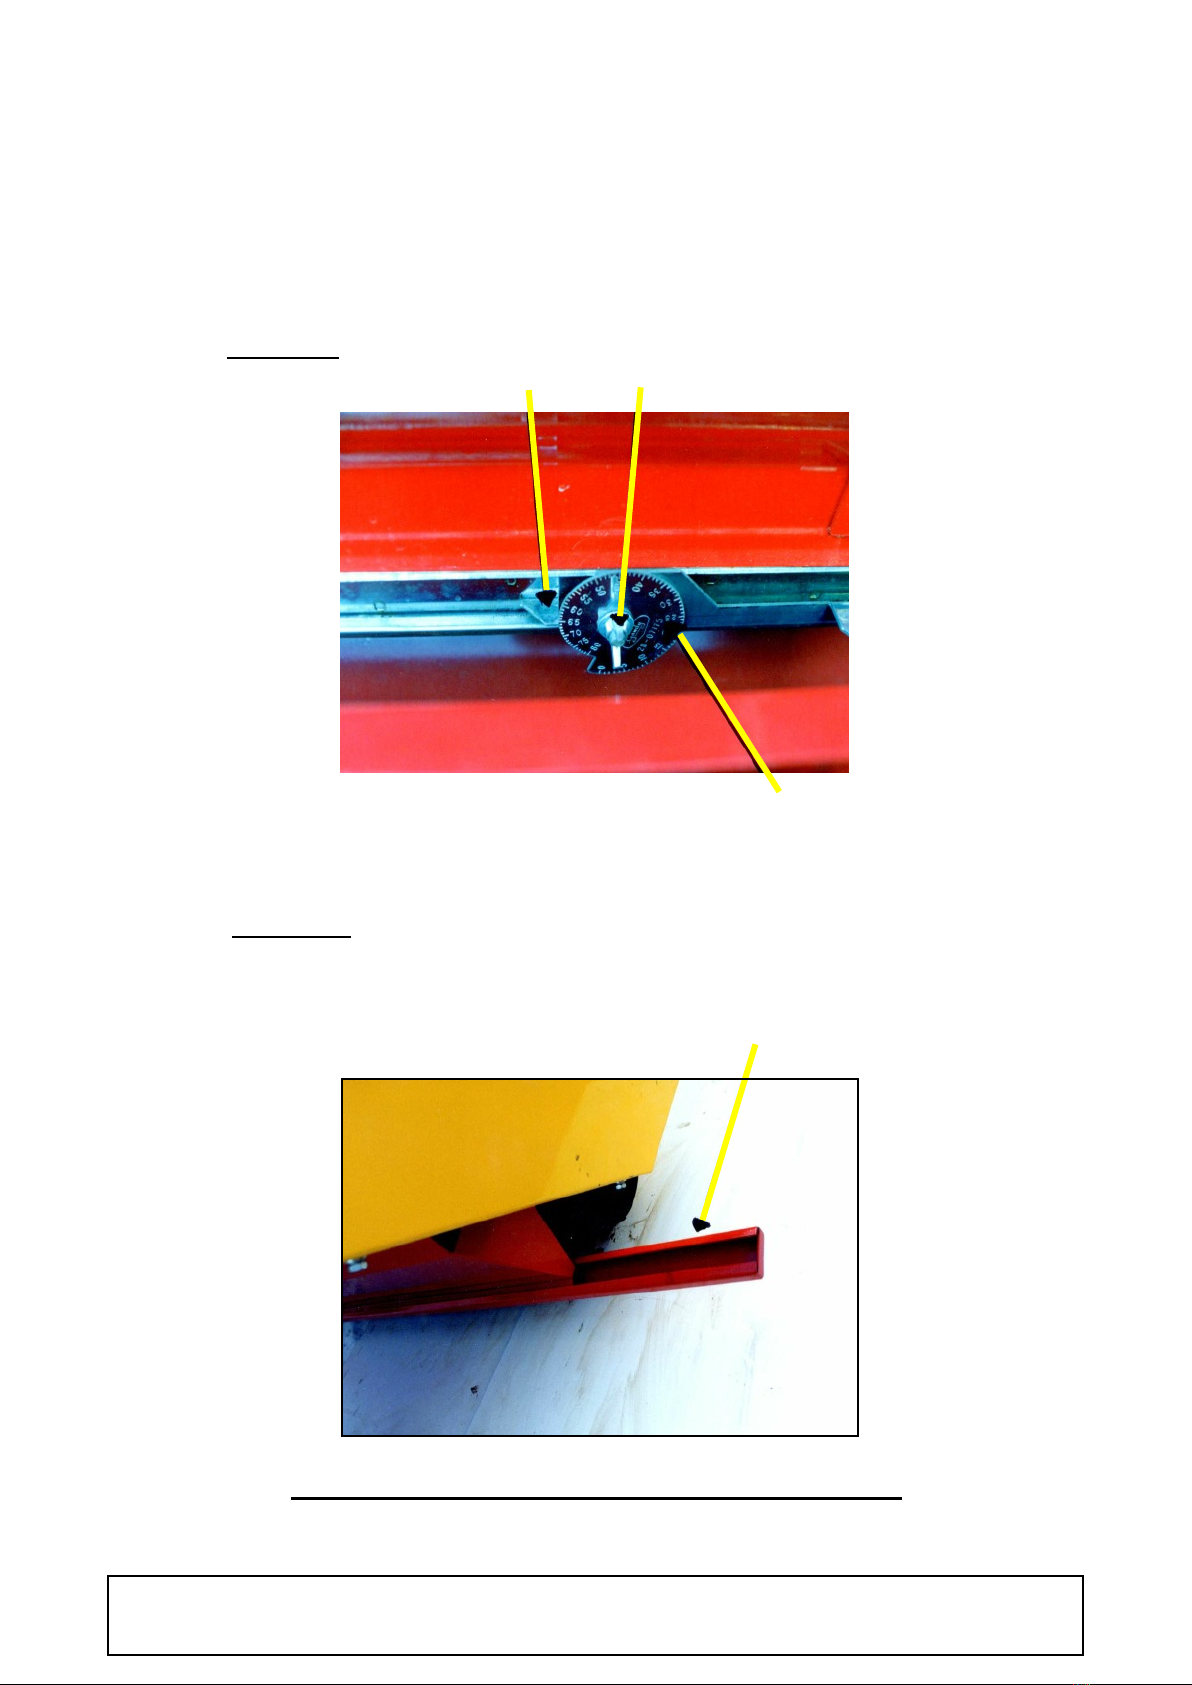
A blanking tray is provided which slides under the hopper chute, allowing seed to be collected
Ready for calibration (see photo 8)
For calibration procedures please see page 7.
18
SECTION 7 - PREPARING FOR USE BLEC CULTI-PACK SEEDER
MODELS: CP36 & CP42
PHOTO: 5A
LEVER A
LEVER B
19
SECTION 7 - PREPARING FOR USE BLEC CULTI-PACK SEEDER
MODELS: CP36 & CP42
TAB WING
NUT
NUMBERED
CAM GAUGE
PHOTO: 8
SLIDE IN
BLANKING
STRIP TO
CATCH SEED **
** REMEMBER: REMOVE AFTER CALIBRATION
PHOTO 7.

20
SECTION 7 - PREPARING FOR USE
BLEC CULTI-PACK SEEDER
MODELS - CP36/CP42
CALIBRATION PROCEDURE FOR CP36 & CP42
For accurate calibration you will require a set of scales and a small sheet. Proceed as follows:-
1. Find out your required seed rate. (Example - 35gms sq metre, 1 1/40ozs sq. yd.
2. Make sure the lever is in the OFF position.
3. Fill the hopper with a quantity of clean seed, approximately 1/3rd - 30% full.
4. Make sure the blanking strip is fitted to the bottom of the chute.
5. Measure out a distance of 20 metres - (22yds) in a straight line and mark ‘start’ &
‘finish’ with cane sticks.
6. Position the seeder at the ‘start’ point.
7. Select a number on the scale (i.e. 65) and rotate the cam gauge until this number lines
up with the tab - (See Photo 7), and turn the lever to ON position, until it stops
against the cam gauge.
8. Drive along for 20 metres - (22yds), then switch off.
9. Place a sheet under the chute and slide out the blanking strip, allow the seed to fall
on to the sheet.
10. Weigh the seed. This will be the amount spread for the following:-
CP36 - 18.5 metres square - (20 yards square)
CP42 - 21.5 metres square - (23 yards square)
11. If the amount of seed is too little or too much, select another number on the scale near
to which you think is appropriate and repeat the procedure until the correct rate has
been achieved.
IMPORTANT
The speed you calibrate your seed rates must be the same speed you will use to work
at. Otherwise differences will occur. The faster you travel, the less seed is spread.
This manual suits for next models
2
Table of contents


