Terrateck T.CG.PL5 User manual

SEMOIR MARAÎCHER MULTI-RANGS À RADIS ET ÉPINARD
SPINACH AND RADISH MULTI ROWS SEEDER
T.CG.PL5
MANUEL D’UTILISATION
INSTRUCTION MANUAL
www.terrateck.comTERRATECK SAS
600 rue Adam Grunewald
62136 LESTREM - FRANCE
+33 (0)3.74.05.10.10
contact@terrateck.com

Semoir maraîcher multi-rangs à radis et épinard
Spinach and radish multi rows seeder
Manuel d’utilisation /Instruction manual
Semoir maraîcher multi-rangs à radis et épinard
Spinach and radish multi rows seeder
Manuel d’utilisation /Instruction manual
www.terrateck.comwww.terrateck.com2 3
INTRODUCTION
INTRODUCTION
SOMMAIRE
SUMMARY
Nous vous remercions d’avoir acheté le semoir maraîcher multi-rangs Terrateck. Léger et maniable, nous espérons que cet appa-
reil vous apportera entière satisfaction grâce à sa simplicité d’utilisation et à son ergonomie.
Le semoir maraîcher multi-rangs Terrateck est conçu pour les exploitations maraichères en productions diversifiées. Il permet de
réaliser des semis de radis et épinards sur 12 rangs serrés sur une planche de 75cm ou 150cm en aller-retour.
Ce semoir multi-rangs mécanique est équipé d’un axe central rotatif qui entraine la semence vers une réglette percée permet-
tant de libérer les graines une à une. La densité de semis est proportionnelle à l’avancement et réglable par un jeu de pignons.
Le semoir est parfaitement adapté au semis de graines rondes (roquette, radis, épinard, mâche).
Facile d’utilisation, les réglages du semoir s’effectuent en quelques minutes. La profondeur de semis est réglable de façon géné-
rale pour l’ensemble des socles par un tablier monté sur ressort.
D’une largeur de 75cm, vous pourrez semer de un à douze rangs en fonction de vos besoins en interchangeant les réglettes
perforées. Les réglettes pourront être percées à différents diamètres en fonction du calibre de la graine ce qui vous permettra
d’assurer une qualité de semis optimale.
Avec son rouleau « cage » frontal, le semoir brisera les mottes, plantera vos semences puis tassera la terre sur le semis avec son
rouleau « plein » à l’arrière.
Ce manuel de l’utilisateur fournit les informations nécessaires pour utiliser et entretenir de manière sûre et correcte votre semoir.
Thank you for purchasing the Terrateck multi-row market gardener seeder. We hope that this lightweight and highly ma-
noeuvrable device will bring you complete satisfaction thanks to its user-friendly features and ergonomics.
The Terrateck multi-row seeder is designed for diversified market gardening. It can seed spinach and radish on 12 tightly
packed rows (75cm or 150cm strips) going backwards and forwards.
This multi-row mechanical seeder is equipped with a rotating central shaft that drives the seed to a perforated seeder plate
that releases the seeds one by one. The seeding density is proportional to the forward motion and adjustable with different
pinions.
This seeder is perfectly suited to sowing rond seeds as rocket, radishes, spinach, lamb’s lettuce, etc.
The seeder’s user-friendly adjustments can be done in just a few minutes. The sowing depth is adjustable in general for all the
base plates and planters using a spring-mounted apron.
With a strip width of 75cm, you can plant between one and 12 rows, as required, by changing the perforated seeding plates.
Holes of different sizes can be drilled into the plates according to the size of the seed in order to ensure optimal sowing per-
formance.
The seeder’s front «cage» roller breaks up the clods. It then plants your seeds and packs the soil on the seed with its «solid»
roller in the back.
This user manual provides the information you need to use and maintain your seeder safely and correctly.
• Gardez ce manuel d’utilisation à l’abri de
toutes dégradations, dans un endroit faci-
lement accessible pour vous y référer par la
suite au besoin.
• Si ce manuel est devenu inutilisable ou en cas
de perte, veuillez en acheter un nouveau au-
près de votre marchand-réparateur Terrateck.
• Keep this user manual in a place where it will
not get damaged and that is easily accessible
for future reference as needed.
• If this manual should become unusable or get
lost, please purchase a new one from your Ter-
rateck dealer-repairer.
REMARQUES
!COMMENTS
!
INTRODUCTION 3
INTRODUCTION
PRÉSENTATION 4
OVERVIEW
SÉCURITÉ 4
SAFETY
PRISE EN MAIN 5
GETTING STARTED
ÉCARTEMENT DES RANGS 6
ROW SPACING
PROFONDEUR DE SEMIS 6
SOWING DEPTH
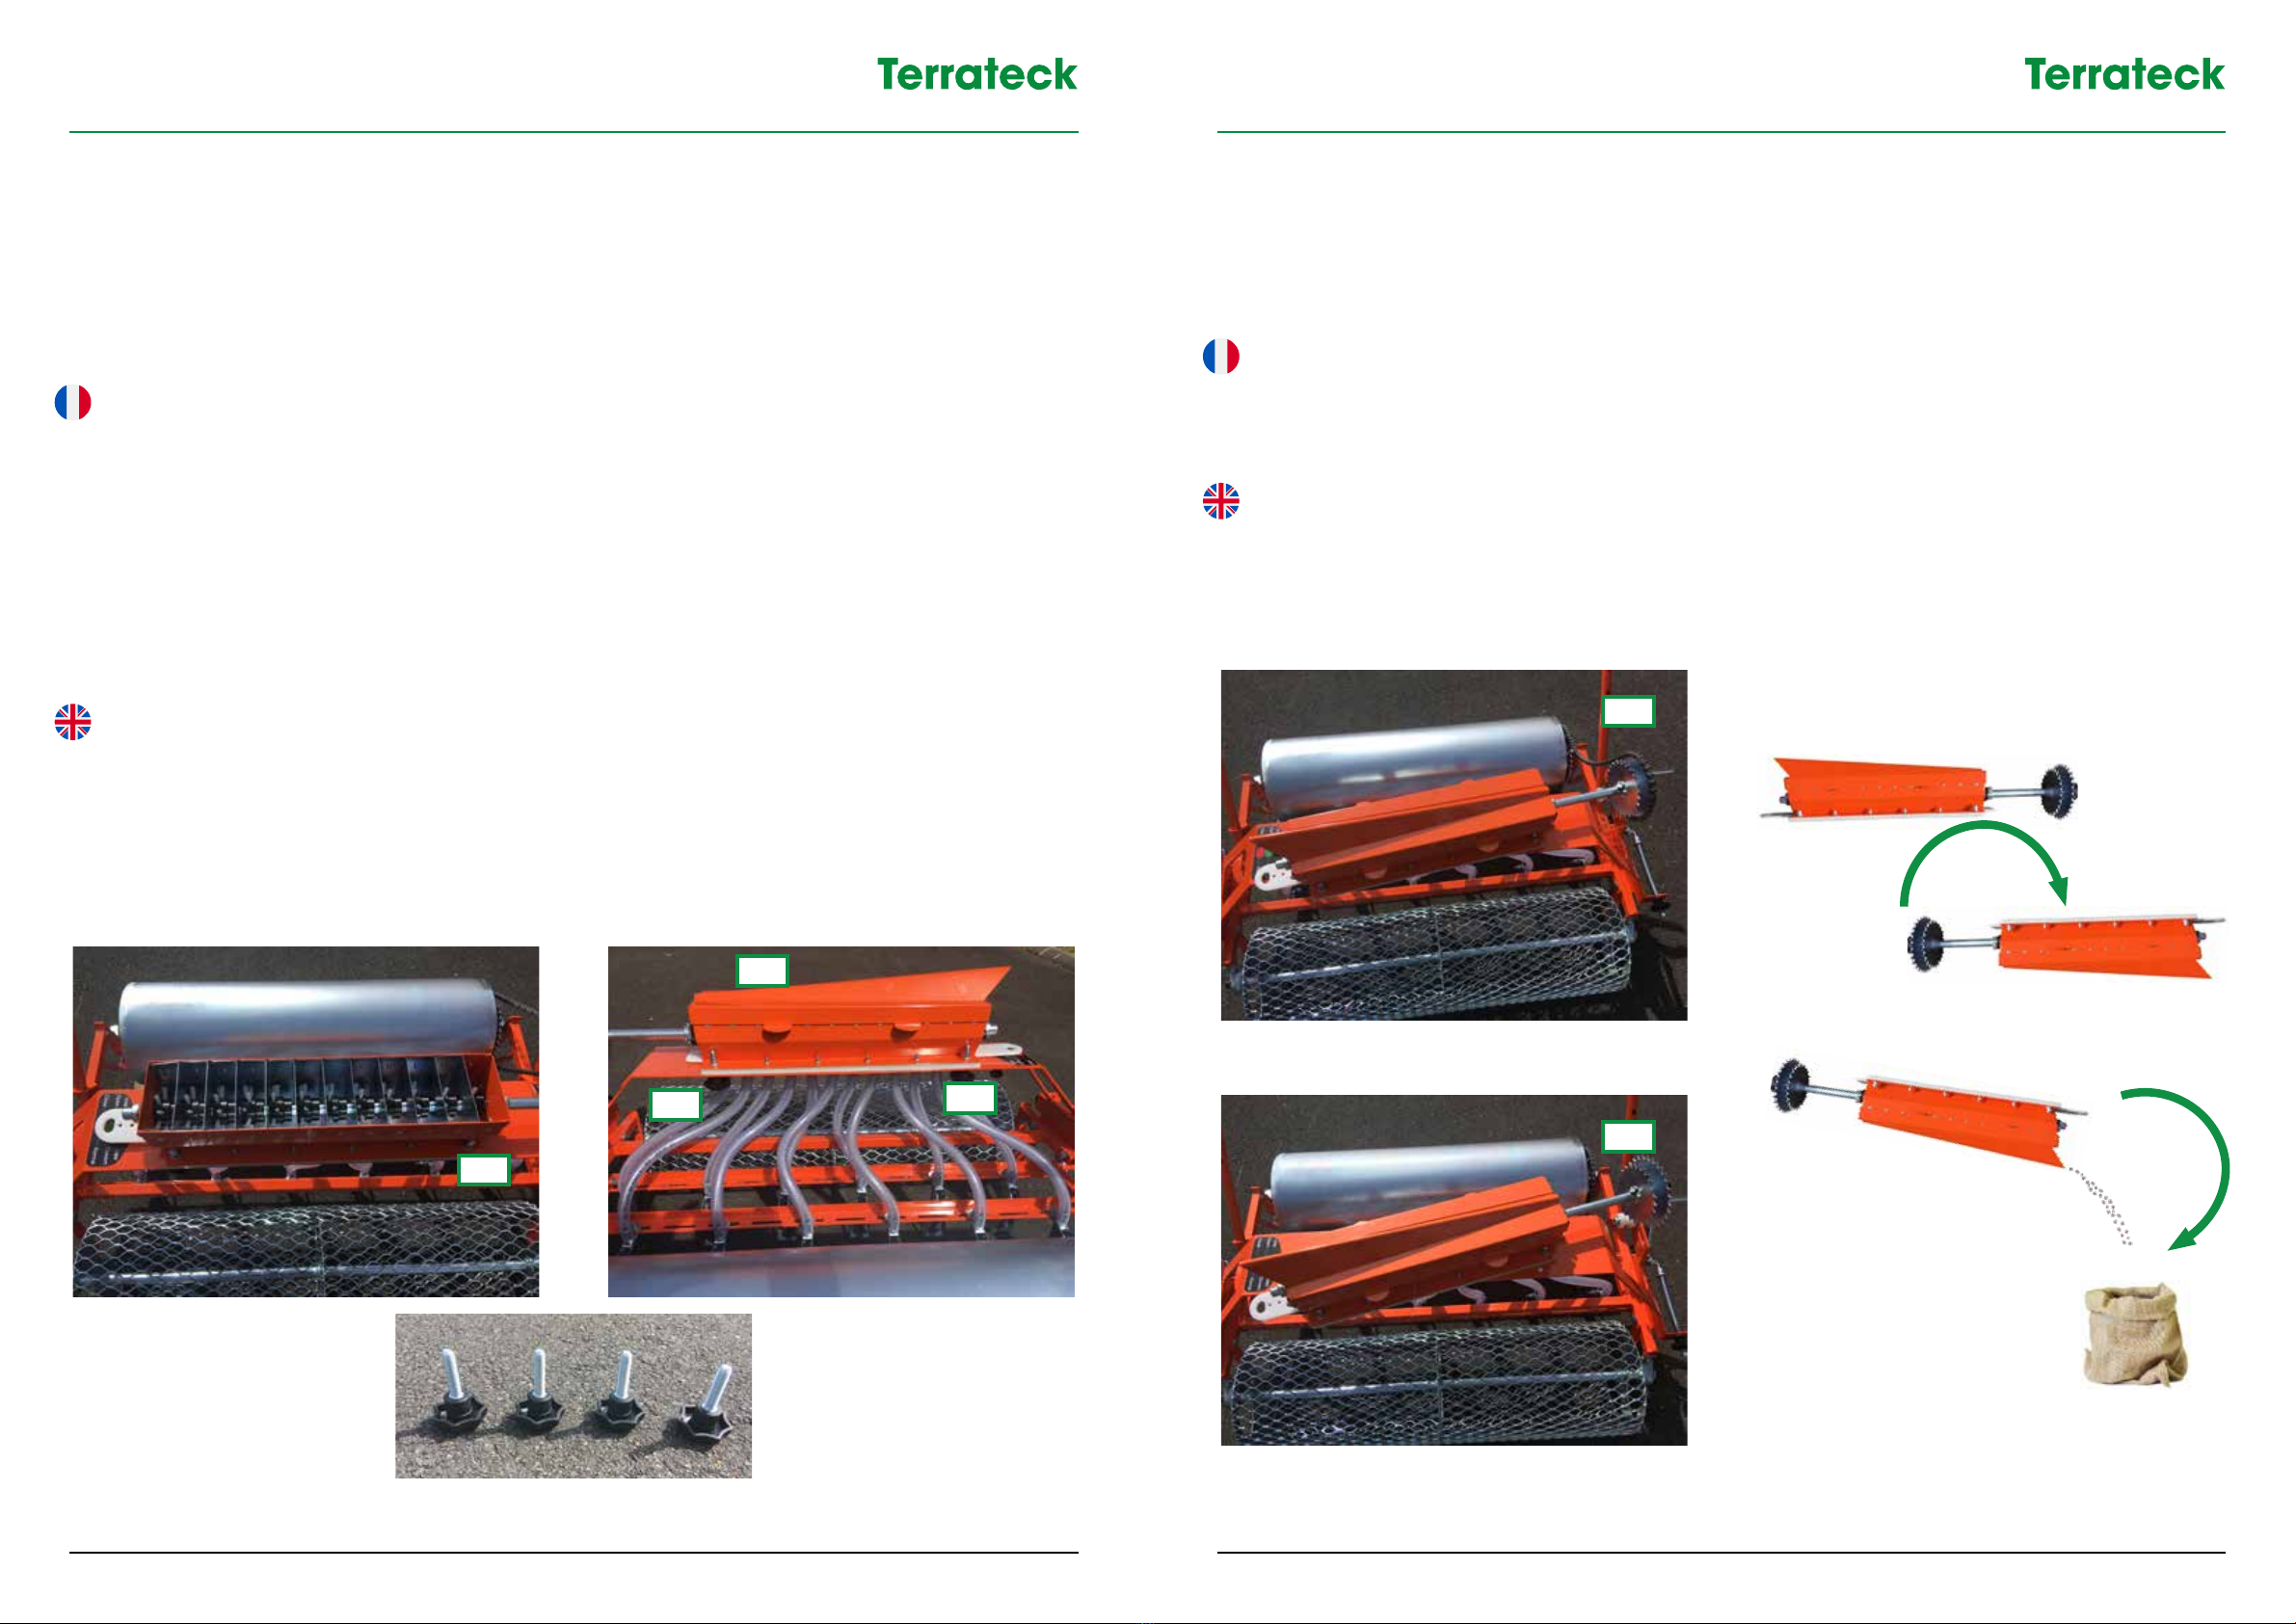
REMPLISSAGES / VIDANGE DU RÉSERVOIR 8
FILLING / EMPTYING THE SEED RESERVE
PERÇAGE DE LA RÉGLETTE PERFORÉE 10
MAKING HOLES IN THE PERFORATED SEEDING PLATE
CHANGEMENT DES PIGNONS 11
CHANGING THE SPROCKETS
POSITION DE SEMIS 12
POSITION

Semoir maraîcher multi-rangs à radis et épinard
Spinach and radish multi rows seeder
Manuel d’utilisation /Instruction manual
Semoir maraîcher multi-rangs à radis et épinard
Spinach and radish multi rows seeder
Manuel d’utilisation /Instruction manual
www.terrateck.comwww.terrateck.com4 5
PRÉSENTATION
OVERVIEW
SÉCURITÉ
SAFETY
Les manipulations à effectuer sur le semoir ma-
raîcher multi-rangs Terrateck et son utilisation
présentent peu de risques. Néanmoins vous
veillerez à vous protéger avec des équipements
de protection individuelle :
There are relatively few risks involved when
handling and using the Terrateck multi-row
seeder. However, it is necessary to wear perso-
nal protective equipment:
PRISE EN MAIN
GETTING STARTED
La barre de commande n°10 se règle en
hauteur en plaçant les vis n°11 dans l’un
des perçages des bras n°12.
Utiliser un jeu de clés plates de 13 mm.
Use a set of open-ended spanners 13 mm.
The height of the control bar no. 10 is ad-
justed by placing the screws no. 11 in one
of the holes of the arms no. 12.
10
11
12
12
Rouleau plein
Solid roller
Réservoir de
semence
Seed reserve
Rouleau cage
Cage roller
Arrière
Rear

Semoir maraîcher multi-rangs à radis et épinard
Spinach and radish multi rows seeder
Manuel d’utilisation /Instruction manual
Semoir maraîcher multi-rangs à radis et épinard
Spinach and radish multi rows seeder
Manuel d’utilisation /Instruction manual
www.terrateck.comwww.terrateck.com6 7
ÉCARTEMENT DES RANGS
ROW SPACING
PROFONDEUR DE SEMIS
SOWING DEPTH
L’écart entre les rangs se règle en déplaçant
les vis n°31 dans les trous oblongs du carter
(utiliser une clé plate de 10mm).
Le semoir est présenté ici en position « roulage
». Les plantoirs n°4 sont en position haute ; ils ne
touchent pas le sol. Les asques n°2 sont blo-
qués sur l’ergot du carter.
An de démarrer le semis, commencer par es-
camoter les asques n°2 en tirant la poignée n°3
vers l’avant. Forcer la sortie des asques en agis-
sant directement sur eux puis relâcher le tout.
Une fois les asques n°2 relâchés de chaque
côté, le tablier n°5 supportant les plantoirs peut
monter ou descendre en fonction de la position
de la vis n°1.
Le tablier n°5 est montré ci-dessus en position
haute. Cette position est atteinte quand les vis
n°1 sont vissées à fond.
Visser ou dévisser la vis étoile n°1.
Once the side plates no. 2 have been released
on each side, the apron no. 5 supporting the
planters can go up or down depending on the
position of the screw no.1. The apron no. 5 is
shown above in the up position. This is the posi-
tion reached when the screws no. 1 are screwed
in to the limit.
Screw or unscrew the star screw no.1.
Quand les vis n°1 sont totalement dévissés, le ta-
blier n°5 est poussé par les ressorts n°6 via les
poignées n°3 et se retrouve en position basse
soit la plus grande profondeur de semis.
Les ressorts n°6 jouent aussi un rôle d’amor-
tisseur, permettant de soulever le tablier n°5
quand les plantoirs rencontrent une motte de
terre dure.
The spacing between the rows is adjusted
by moving the screws no. 31 in the rectan-
gular holes in the housing (use a 10mm
open-ended spanner).
The seeder is shown here in the «rolling» posi-
tion. The planters no. 4 are in the high position;
they do not touch the ground. The side plates
no. 2 are locked on the pin of the housing.
Start by retracting the side plates no. 2 while
pulling the handle no. 3 forwards. Force the side
plates out by pulling on them and then let go of
everything.
When the screws no. 1 are totally unscrewed,
the apron no. 5 is pushed by springs no. 6 using
the handles no. 3 and is in a low position, which
is the deepest sowing depth.
The springs no. 6 also act as dampers in order to
raise the apron no. 5 when the planters come in
contact with a clod of hard soil.
31
3
3
6
2
6
2
4
5
5
1
1
1
Position de déplacement / Walking position Position de semis / Seeding position

Semoir maraîcher multi-rangs à radis et épinard
Spinach and radish multi rows seeder
Manuel d’utilisation /Instruction manual
Semoir maraîcher multi-rangs à radis et épinard
Spinach and radish multi rows seeder
Manuel d’utilisation /Instruction manual
www.terrateck.comwww.terrateck.com8 9
REMPLISSAGES / VIDANGE DU RÉSERVOIR
FILLING / EMPTYING THE HOOPER
7
20
21
8
Le réservoir n°7 est composé de 12 trémies indépendantes qui contiennent les semences.
Les trémies de numéro pair alimentent les plantoirs situés à l’arrière de la machine. Celles de numéro impair ali-
mentent les plantoirs situés à l’avant.
Pour vider les trémies, dans le cas d’une culture homogène, unique, il est possible de se servir du couvercle-verseur
n°8.
Dévisser les 4 vis de réservoir n°9.
En pivotant, le réservoir va détendre la chaîne n°20. Enlever la chaîne des pignons n°21 et récupérer le réservoir.
Lever le réservoir en tenant le couvercle, puis retourner-le, couvercle vers le bas. Verser les semences dans un sac
de récupération.
As it turns, the seed reserve will loosen the chain no.20. Remove the chain from the sprocket no.21 and recover the
seed reserve.
Lift the seed reserve by holding the lid, then turn it upside down with the lid pointing downwards. Pour the seeds
into a collecting bag.
The reserve no. 7 is composed of 12 independent hoppers that contain the seeds.
The even-numbered hoppers feed the planters at the rear of the machine. The odd-numbered ones feed the plan-
ters located at the front.
To empty the hoppers, if you are sowing a single crop, it is possible to use the pourer-lid no.8.
Unscrew the 4 seed reserve screws no. 9.
9
9

Semoir maraîcher multi-rangs à radis et épinard
Spinach and radish multi rows seeder
Manuel d’utilisation /Instruction manual
Semoir maraîcher multi-rangs à radis et épinard
Spinach and radish multi rows seeder
Manuel d’utilisation /Instruction manual
www.terrateck.comwww.terrateck.com10 11
PERÇAGE DE LA RÉGLETTE PERFORÉE
MAKING HOLES IN THE PERFORATED SEEDING PLATE CHANGEMENT DES PIGNONS
CHANGING THE SPROCKETS
A l’origine la réglette n°30 est livrée pré-percée.
Cela vous permet de percer les trous de passage de la graine en fonction de son calibre.
Dans le cas de cultures associées, vous pourrez percer des trous de diamètres différents en alternance.
Choisir une mèche de diamètre légèrement plus grand que la graine (± 1mm).
Percer en vous servant des trous pré-percés.
Prendre ensuite une mèche de diamètre plus grand
(+6mm) que le diamètre du trou an de réaliser un
chanfrein facilitant l’entrée de la graine.
Si la qualité de semis n’est pas bonne, le diamètre du per-
çage est trop petit
Choose a drill bit with a diameter that is slightly larger than the seed (± 1mm).
Use the pre-drilled holes to centre the drill bit
Choose a drill bit with a diameter that is slightly larger
than the seed (+6mm). Use the pre-drilled holes to centre
the drill bit
If the seeding density is not good, the hole diameter is too
small.
For intercropping purposes, you can alternate between different hole sizes.
The seeding plate no. 30 is delivered with holes already made in it.
This is so that you can make holes, through which the seeds can pass, according to the seed size.
• L’inversion des pignons permet d’augmenter ou diminuer la densité de semis. Celle-ci est indépendante de la
vitesse d’avance. Elle est directement liée à la taille du pignon utilisé :
• Grand pignon = petite densité
• Petit pignon = grande densité
• Démonter le réservoir (voir page 7sur 11).
• Sortir la chaîne du pignon utilisé (voir page 8sur 11).
• Dévisser la vis n°22 et sortir la paire de pignons n°21.
• Tourner les pignons pour inverser le montage.
• Remonter l’ensemble puis revisser la vis n°22.
• Replacer le réservoir sur la machine puis la chaîne sur le pignon. C’est toujours le pignon extérieur qui est utilisé
par la chaîne car c’est lui qui est placé dans le plan de travail de la chaîne.
• Ajuster la tension de la chaîne en déplaçant le galet tendeur n°23 (utiliser une paire de clés plates de 13mm).
• By swapping the sprockets around, you can increase or decrease the sowing density. This is independent of the
self-propulsion speed. It is directly related to the size of the sprocket used:
• Large sprocket = small density
• Small sprocket = high density
• Remove the seed reserve (see page 7out of 11)
• L oosen the screw no. 22 and remove the pair of sprockets no. 21.
• Switch the sprockets to reverse the assembly.
• Put the assembly back together again and re-tighten screw no.22.
• Replace the seed reserve on the machine and put the chain back on the sprocket. It is always the outer sprocket
that is used by the chain because this is the one aligned with the path of the chain.
• Adjust the tension of the chain by moving the idler pulley no.23 (use a pair of 13mm open-ended spanners).
!
!
30
21
22
23
Chanfrein
1,5mm

Semoir maraîcher multi-rangs à radis et épinard
Spinach and radish multi rows seeder
Manuel d’utilisation /Instruction manual
Semoir maraîcher multi-rangs à radis et épinard
Spinach and radish multi rows seeder
Manuel d’utilisation /Instruction manual
www.terrateck.comwww.terrateck.com12 13
POSITION DE SEMIS
POSITION
Pour commencer à semer, positionner la réglette sur « Ouvert » (position vert).
Pour bloquer les semences, positionner la réglette sur « Fermé » (position rouge).
To start sowing, set the seeding plate to «Open» (green position).
To block the seeds, set the seeding plate to «Closed» (red position).

Semoir maraîcher multi-rangs à radis et épinard
Spinach and radish multi rows seeder
Manuel d’utilisation /Instruction manual
Semoir maraîcher multi-rangs à radis et épinard
Spinach and radish multi rows seeder
Manuel d’utilisation /Instruction manual
www.terrateck.comwww.terrateck.com14 15

CONTACTEZ-NOUS
Tel : +33(0) 3 74 05 10 10
Mail : contact@terrateck.com
www.terrateck.com
600 rue Adam Grunewald
62136 Lestrem, France
Manuel rédigé par NEWFLY DESIGN
Version 1 - Février 2019
Table of contents
Popular Seeder manuals by other brands

Sulky
Sulky CULTLINE VR 300 Series Original instructions

Landoll
Landoll Brillion SSB Operator's manual

Finn
Finn HydroSeeder T280 Operator Instructions And Parts Manual

Husqvarna
Husqvarna DT18BF Operator's manual

Seederman
Seederman GS2 Owners Manual and Operating Guide

SKY Agriculture
SKY Agriculture Maxi Drill 6000 Original instructions

GREAT PLAINS
GREAT PLAINS Turbo Max 2400TM Assembly manual

GREAT PLAINS
GREAT PLAINS 2020P Operator's manual

ASA Electronics
ASA Electronics 8000 Operator's manual

GREAT PLAINS
GREAT PLAINS 2SNG24 Original instructions

GREAT PLAINS
GREAT PLAINS YP-40 Series Operator's manual

Earth Way
Earth Way 1001-B Assembly instructions