Blu Stream NPA70DA User manual
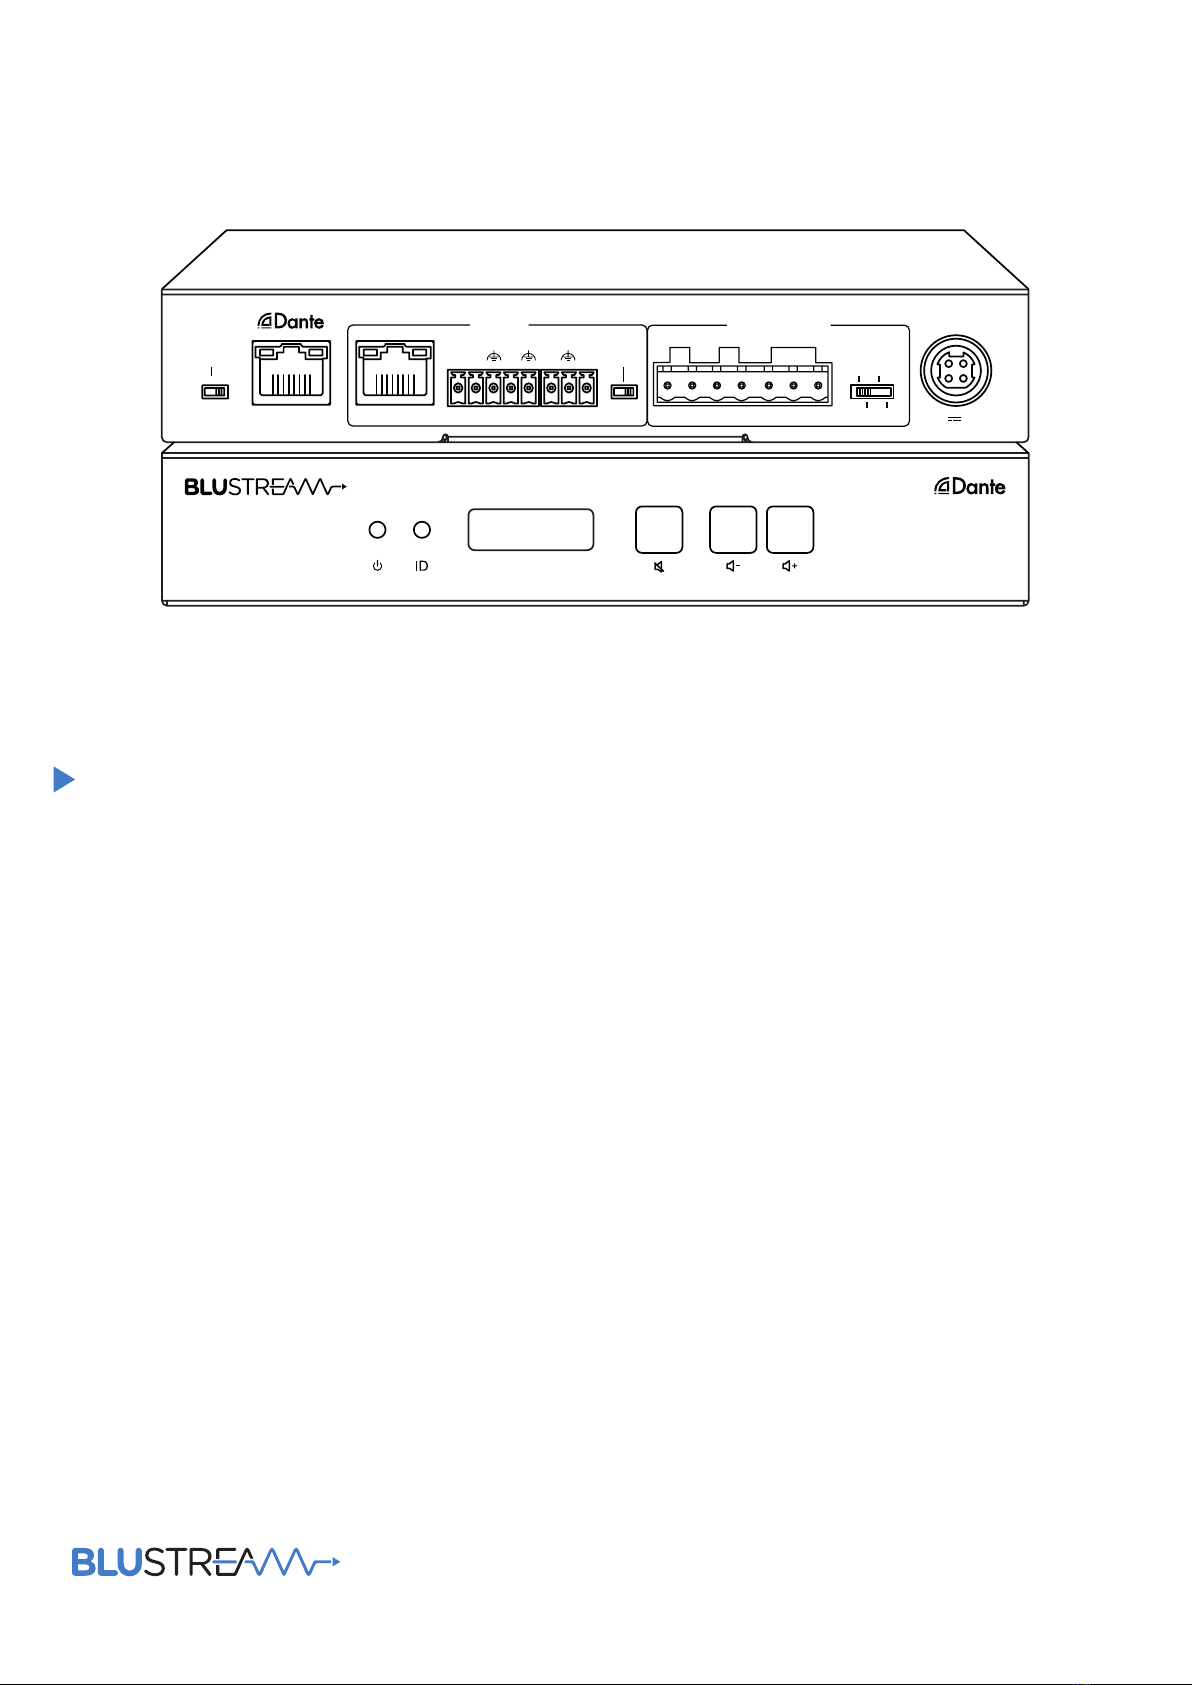
NPA70DA
User Manual
RevA2_User_Manual_NPA70DA
DANTE(PoE) TCP/IP
CONTROL
TX RX
RS-232
T
TRG
SV
IR IN IR
5V 12V
R+ R- L+ L- 100V 70V COM
+BRIDGED -
SPEAKER OUTPUT
4Ω
8Ω
70V
100V
NPA70DA
VOLUME
Dante Networked Power Amplier
MODE 1 MODE 2
NETWORK
24V 3.5A
NPA70DA USER MANUAL
www.blustream.com.au |www.blustream-us.com |www.blustream.co.uk02
Surge Protection Device
Recommended
This product contains sensitive
electrical components that may be
damaged by electrical spikes, surges,
electric shock, lightning strikes, etc.
Use of surge protection systems is
highly recommended in order to
protect and extend the life of your
equipment.
Contents
Thank you for purchasing
this product.
For optimum performance and safety,
please read these instructions care-
fully before connecting, operating or
adjusting this product. Please keep this
manual for future reference.
Introduction 03
Features 03
Front Panel Description 04
Rear Panel Description 04
Speaker Connections 05
Audio Connections 05
Trigger Connection 06
IR Connection 06
Network Connections 06
Dante® Audio & Dante® Controller 07-08
Advanced Dante® Settings 08
Web GUI Control 09-13
Schematic 14
Telnet & RS-232 Control Port 15-16
Specifications 17
Package Contents 17
Maintenance 17
Acknowledgements 18
Certifications 18

NPA70DA USER MANUAL
Contact: support@blustream.com.au |support@blustream-us.com |support@blustream.co.uk 03
Our NPA70DA networked audio zone amplifier delivers advanced audio
integration within a commercial or residential AV installation.
The NPA70DA features a 2 x 35W digital amplifier (1 x 70W mono) or 70V / 100V
hi-level constant voltage output and Dante® audio integration.
The NPA70DA can be powered via PoE++ from a compatible network switch, or
locally should the switch not support PoE++. The unit also includes the ability
to lower the amplifier power output subject to PoE capabilities, support for
combined or independent LAN and Dante® connections, DSP with a 31 band
EQ, audio delay for lip sync correction, and control via front panel, IR, RS-232,
TCP/IP, web-GUI or 12V trigger.
Introduction
FEATURES:
• Advanced network audio amplifier with Dante® integration
• Supports 2 x 35W @ 4 / 8 ohm, 1 x 70W @ 4 / 8 ohm or 70 / 100V constant output for multiple speakers with longer
cable runs
• Supports power via PoE++ on Dante® LAN connection or local power supply*
• Dual network option - independent Dante® and LAN control ports, or combined to a single LAN
• 2ch Dante® / AES67 audio input
• DSP with 31 band EQ with +3dB/-10dB and audio delay
• Local 12V input trigger for automated power control
• Control via front panel, IR, RS-232 and IP
• Auto standby mode with signal sensing
• In-built web-GUI for setup and control
* Amp power limited when using PoE+
NPA70DA USER MANUAL
www.blustream.com.au |www.blustream-us.com |www.blustream.co.uk04
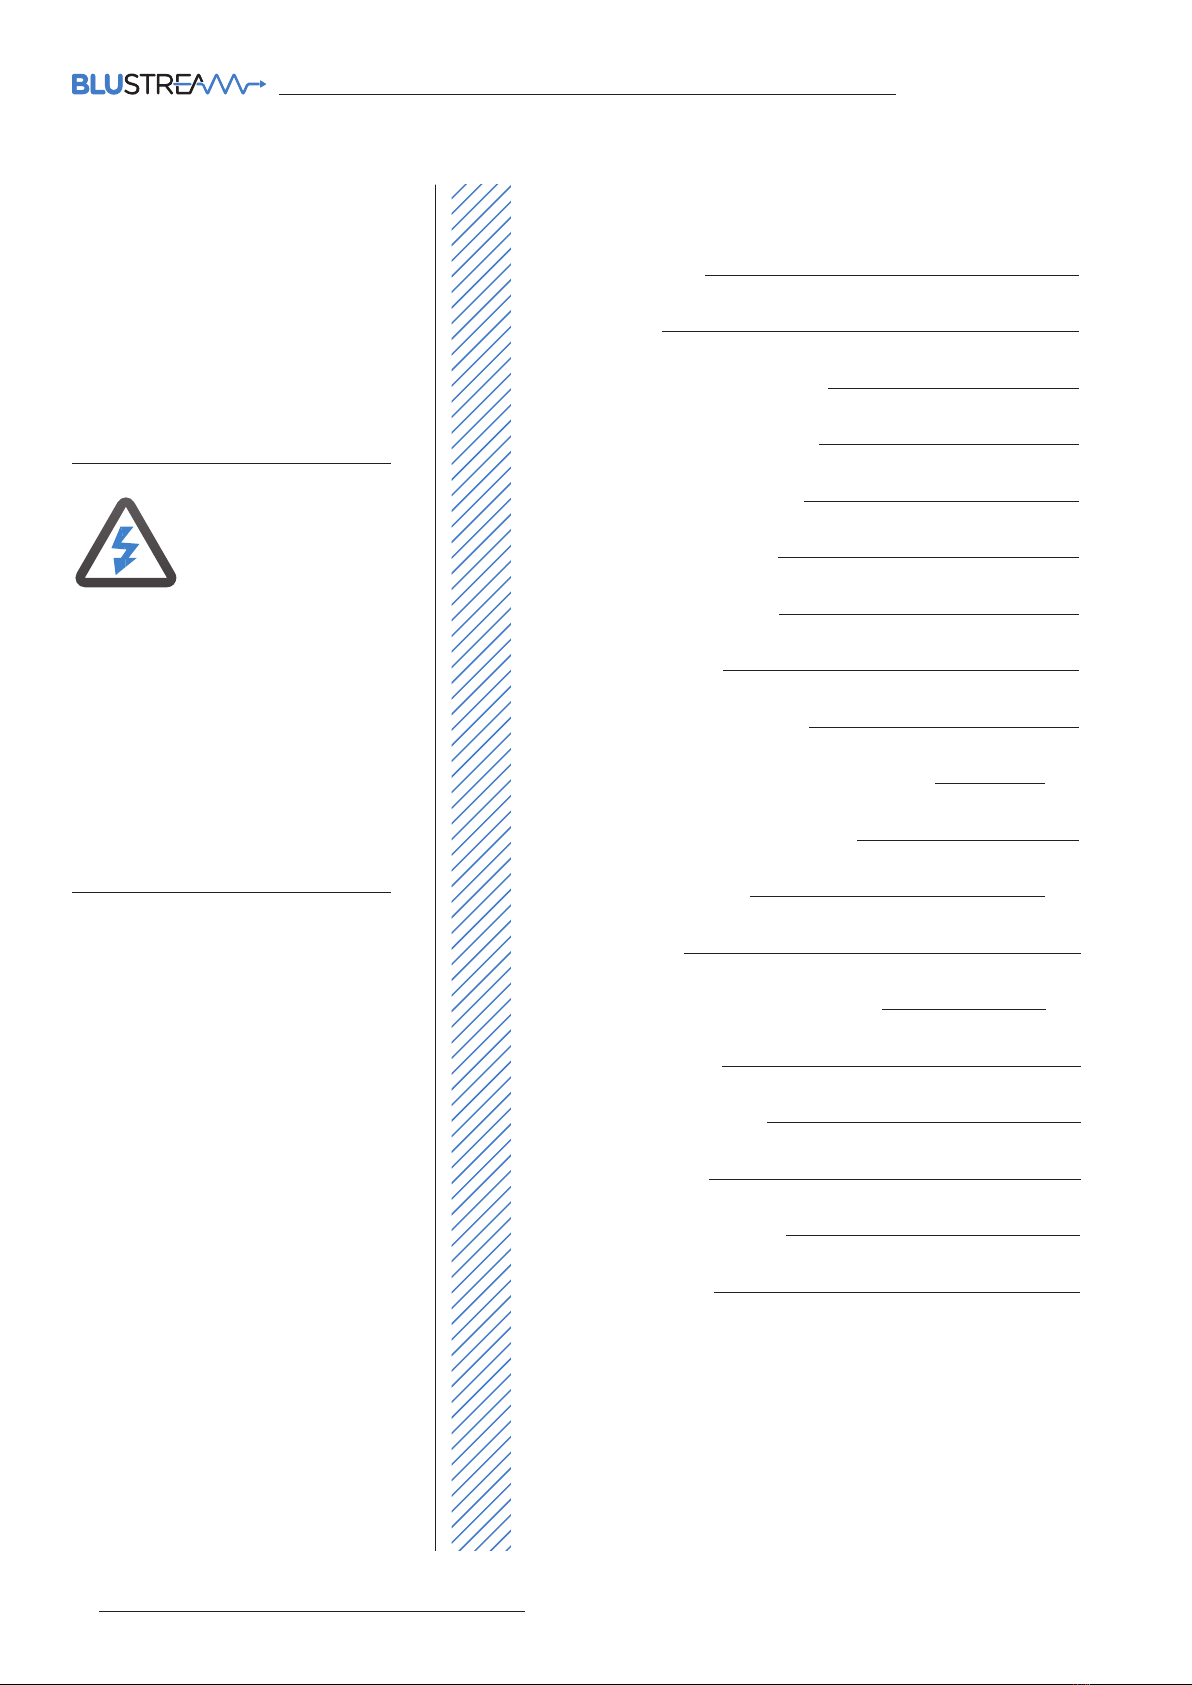
Front Panel Description
1Power Status LED
2ID LED - Illuminates to assist in identification of the device
3Volume Level LED’s - Illuminates to show current volume level
4Volume Mute Button - Toggles audio mute on or o
5Volume - Button - Decrease master output volume
6Volume + Button - Increase master output volume
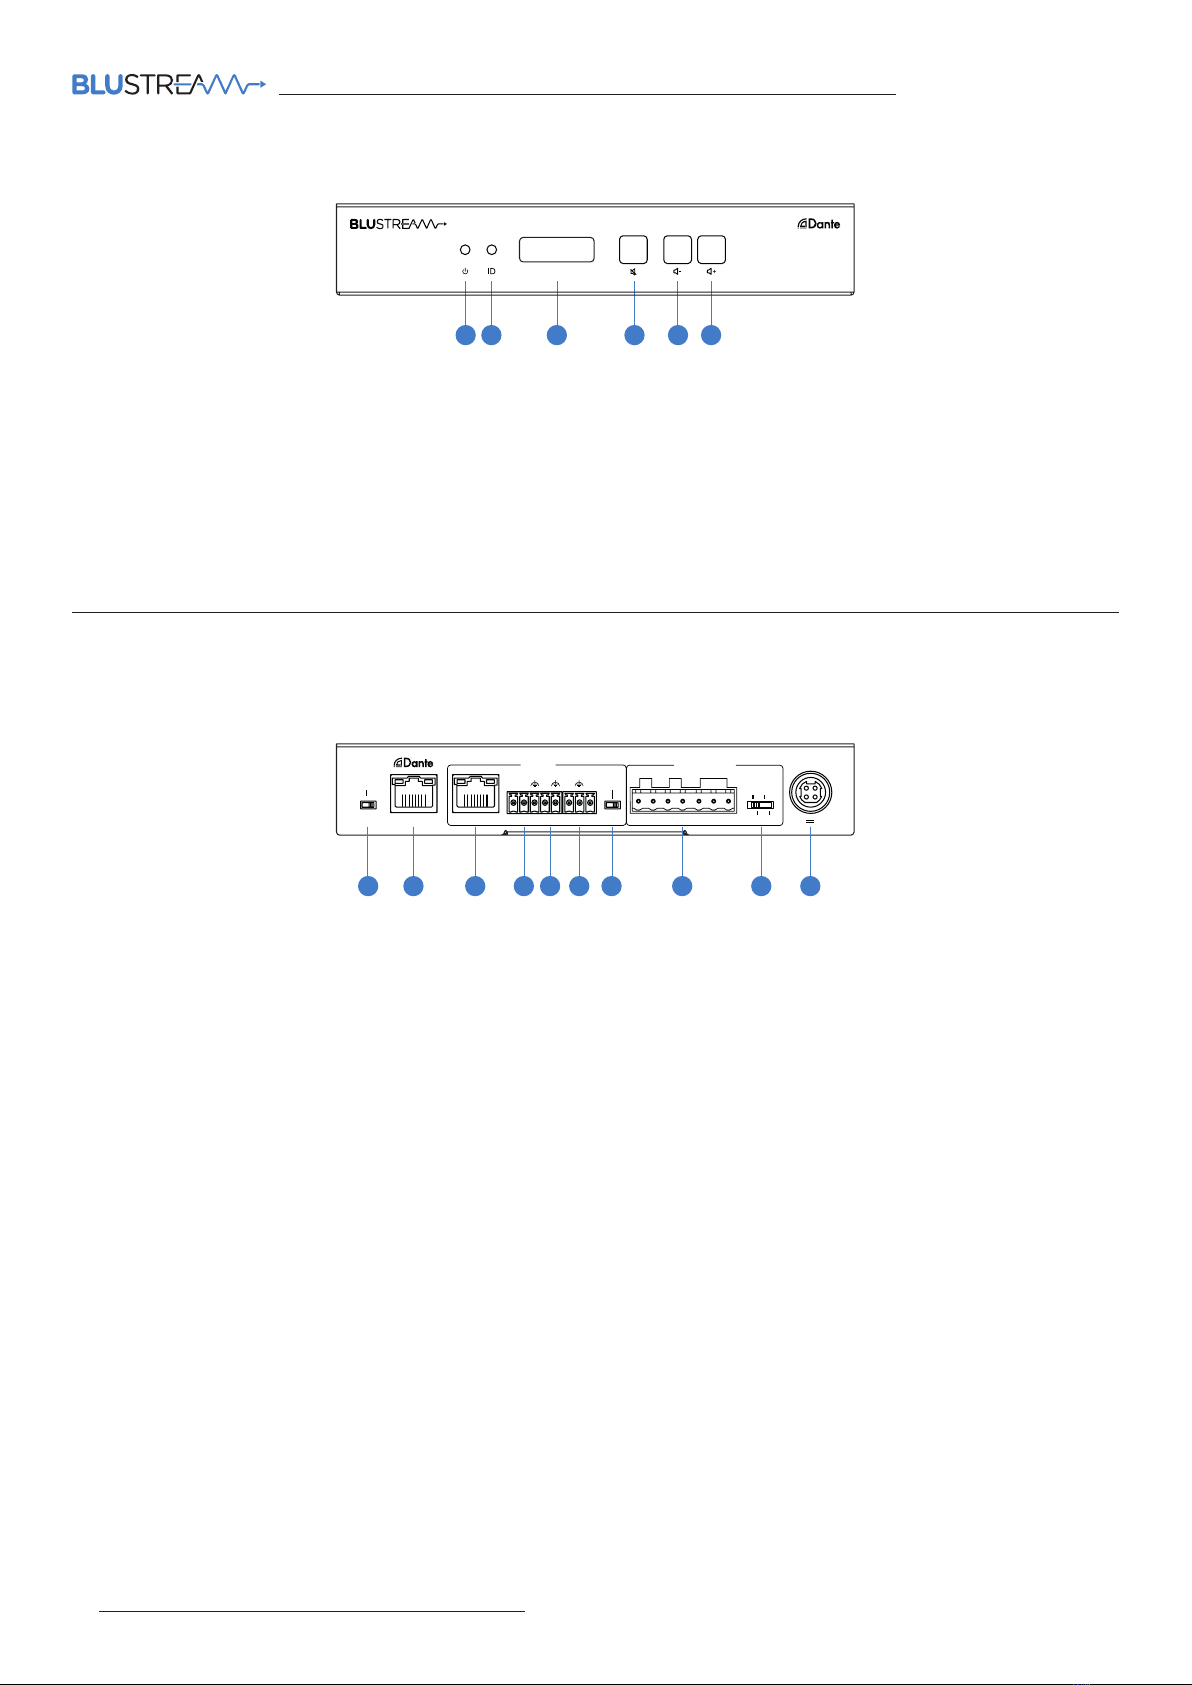
1Network Mode Switch - Mode 1 allows Dante® audio and TCP/IP and web-GUI control via the Dante® PoE port
- Mode 2 allows Dante® audio via the Dante® PoE Port, and TCP/IP and web-GUI control via the TCP/IP port
2Dante® (PoE++) Port - RJ45 connector supporting PoE++ to power NPA70DA from the network switch
3TCP/IP Port - RJ45 connector for TCP/IP and web-GUI control of the device (When Network mode is set to 2)
4RS-232 - Phoenix connector for RS-232 control of the device
5Trigger Input - Phoenix connector triggers device power on/o. Low level (0V) to turn amp on, high level (5-12V) to turn amp o
6IR Input - 3-pin Phoenix connector to connect to Blustream IR receiver for IR control of the device
7IR Voltage Switch - Select between 5V or 12V IR voltage. Please note: included Blustream IR accessories are 5V
8Speaker Output - Phoenix connector to connect speaker outputs, see Speaker Connections section for more information
9Speaker Impedance Switch - Select low impedance (LO-Z, 4-8 ohm) speakers, or high impedance (HI-70V or HI-100V) speakers
qPower Port - Use included 24V/3.5A DC power adaptor if not powered via PoE++ device
Rear Panel Description
1 4 5 632
NPA70DA
VOLUME
Dante Networked Power Amplier
DANTE(PoE) TCP/IP
CONTROL
TX RX
RS-232
T
TRG
SV
IR IN IR
5V 12V
R+ R- L+ L- 100V 70V COM
+BRIDGED -
SPEAKER OUTPUT
4Ω
8Ω
70V
100V
MODE 1 MODE 2
NETWORK
24V 3.5A
1 4 5 632 7 8 9 10
NPA70DA USER MANUAL
Contact: support@blustream.com.au |support@blustream-us.com |support@blustream.co.uk 05
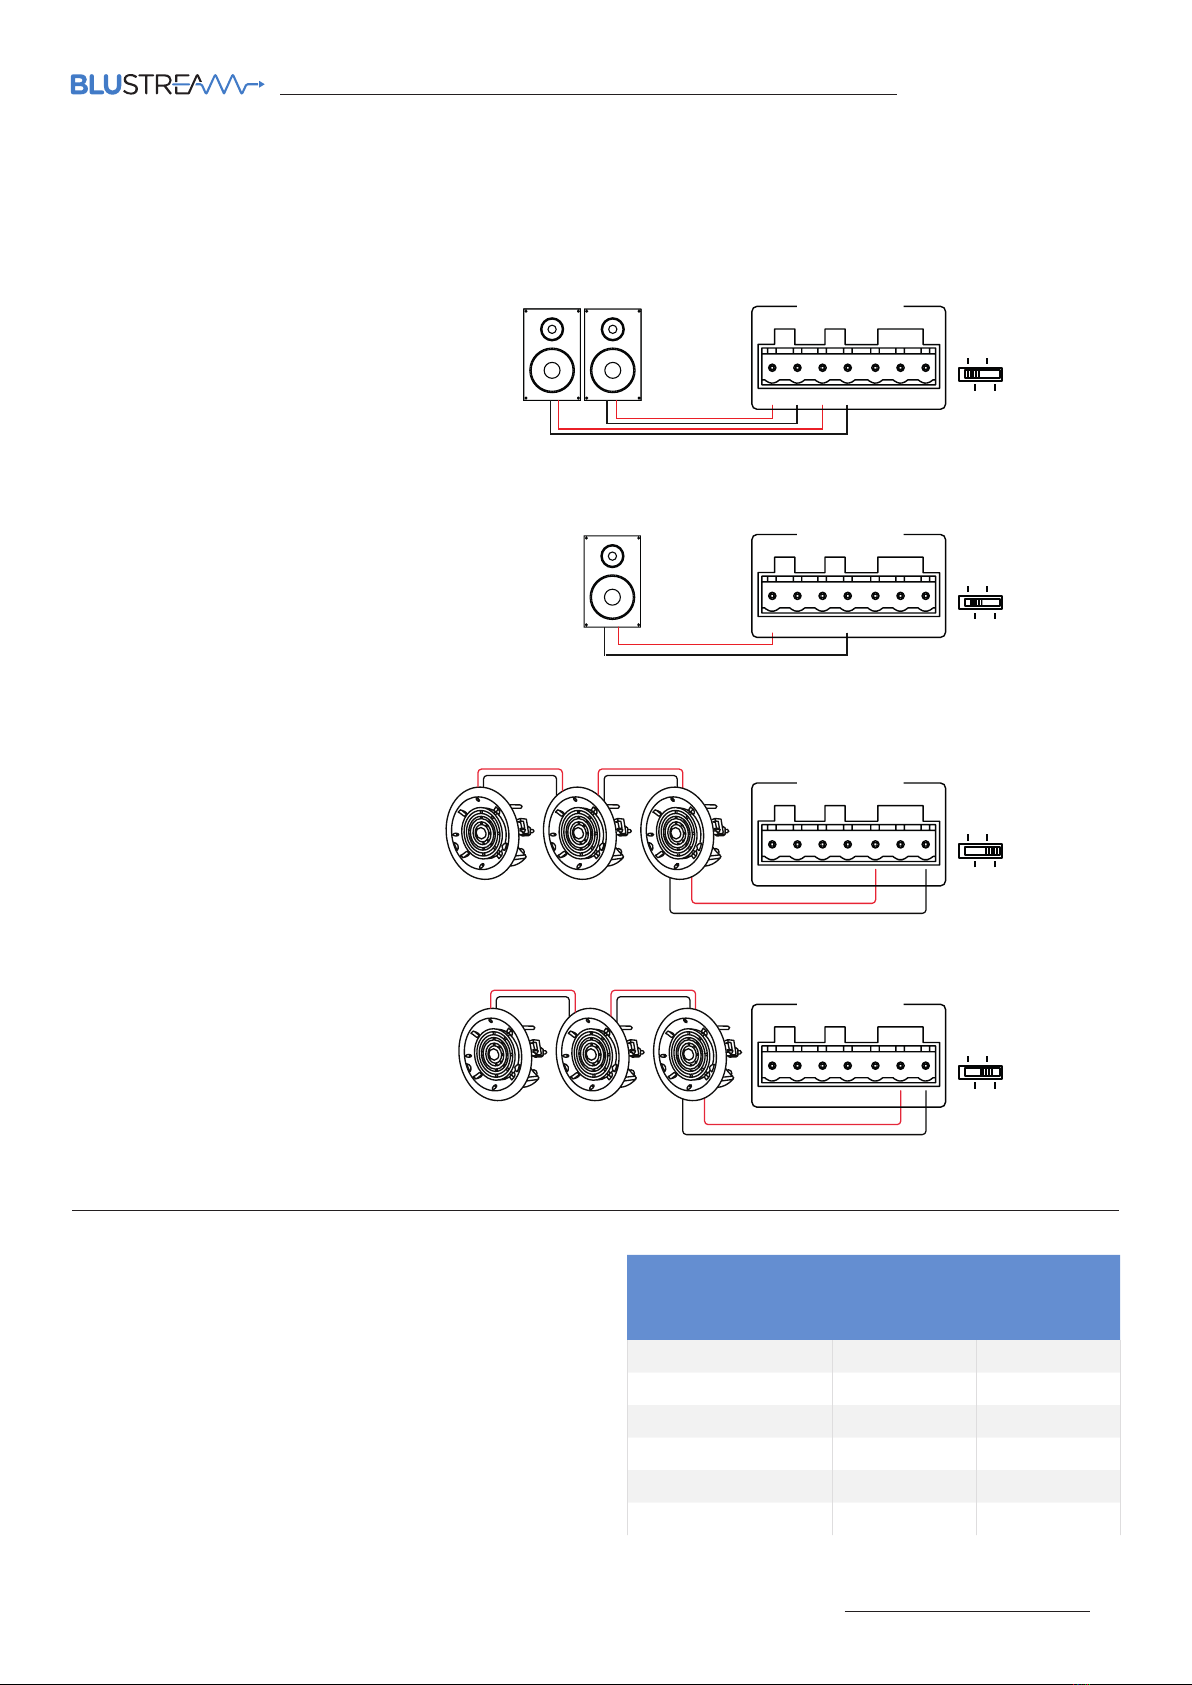
Speaker Connections
The NPA70DA supports both Low Impedance (4-8ohm) speakers as well as High Impedance (70V-100V) speakers. It
is necessary to configure the Speaker Impedance Switch as well as wire up the speakers according to the specific
speakers you are using. Wiring examples for each of the available configurations are as follows:
Low Impedance (4-8ohm) Stereo Speakers:
Low Impedance (8ohm) Mono Speaker:
High Impedance 70V Speakers:
High Impedance 100V Speakers:
+-+
-
R+ R- L+ L- 100V 70V COM
+BRIDGED -
SPEAKER OUTPUT
4Ω
8Ω
70V
100V
+
-
R+ R- L+ L- 100V 70V COM
+BRIDGED -
SPEAKER OUTPUT
4Ω
8Ω
70V
100V
+
-
+
-
+
-R+ R- L+ L- 100V 70V COM
+BRIDGED -
SPEAKER OUTPUT
4Ω
8Ω
70V
100V
+
-
+
-
+
-R+ R- L+ L- 100V 70V COM
+BRIDGED -
SPEAKER OUTPUT
4Ω
8Ω
70V
100V
Amplifier Output
The NPA70DA amplifier is capable of outputting the same
power at both 4 ohms and 8 ohms. The amplifier output
power varies depending on the input power supply or PoE
adapter connected to it, it does this by adjusting the internal
gain to allow you to get the most of the amplifier. Please
ensure that you select the correct impedence option via
the speaker impedence selection switch on the rear of the
device.
POWER SOURCE
WRMS PER
CHANNEL @
4/8OHM
WRMS
BRIDGED @
8OHM
24V/3.5A DC 2x 35W 70W
PoE++ Type 4 Class 8 2x 25W 50W
PoE++ Type 4 Class 7 2x 20W 40W
PoE++ Type 3 Class 6 2x 15W 30W
PoE++ Type 3 Class 5 2x 10W 20W
PoE+ Type 2 Class 4 2x 3.25W 7.5W
+
-
R+ R- L+ L- 100V 70V COM
+BRIDGED -
SPEAKER OUTPUT
4Ω
8Ω
70V
100V

NPA70DA USER MANUAL
www.blustream.com.au |www.blustream-us.com |www.blustream.co.uk06
Trigger Connection
The NPA70DA features a trigger input to allow 3rd party devices to trigger the units power on or o.
When the trigger input senses a low voltage level (0V) it will enable the amplifier output, while when
it senses a high voltage level (5-12V) it will disable the amplifier out. This feature is enabeld by default
and can be adjusted via the web-GUI, or control API.
Network Connections
The NPA70DA features 2 x RJ45 sockets for combined or independent Dante® network and Control network
connectivity. The Network Mode switch, located next to the RJ45 socket, determines the mode of operation for the
RJ45 sockets as follows:
• Mode 1 allows combined Dante® audio, TCP/IP, and web-GUI control via the Dante® PoE++ port
• Mode 2 allows Dante® audio via the Dante® PoE Port, then TCP/IP and web-GUI control via the TCP/IP port
DANTE(PoE) TCP/IP
CONTROL
TX RX
RS-232
T
TRG
SV
IR IN IR
5V 12V
R+ R- L+ L- 100V 70V COM
+BRIDGED -
SPEAKER OUTPUT
4Ω
8Ω
70V
100V
MODE 1 MODE 2
NETWORK
24V 3.5A
+ -
IR Connection
The NPA70DA supports both 5V and 12V IR receivers via the IR input. There is a toggle switch to the right of the IR
input port to specify the voltage required. Please note: if using a Blustream IR receiver, the switch should be in the 5V
position.
The wiring for a Blustream IR receiver is as follows:
DANTE(PoE) TCP/IP
CONTROL
TX RX
RS-232
T
TRG
SV
IR IN IR
5V 12V
R+ R- L+ L- 100V 70V COM
+BRIDGED -
SPEAKER OUTPUT
4Ω
8Ω
70V
100V
MODE 1 MODE 2
NETWORK
24V 3.5A
S
V
DANTE(PoE) TCP/IP
CONTROL
TX RX
RS-232
T
TRG
SV
IR IN IR
5V 12V
R+ R- L+ L- 100V 70V COM
+BRIDGED -
SPEAKER OUTPUT
4Ω
8Ω
70V
100V
MODE 1 MODE 2
NETWORK
24V 3.5A
PIN IR CONNECTION COLOUR
STip Red
GND Sleeve Black
VRing White
DANTE(PoE) TCP/IP
CONTROL
TX RX
RS-232
T
TRG
SV
IR IN IR
5V 12V
R+ R- L+ L- 100V 70V COM
+BRIDGED -
SPEAKER OUTPUT
4Ω
8Ω
70V
100V
MODE 1 MODE 2
NETWORK
24V 3.5A
NPA70DA USER MANUAL
Contact: support@blustream.com.au |support@blustream-us.com |support@blustream.co.uk 07
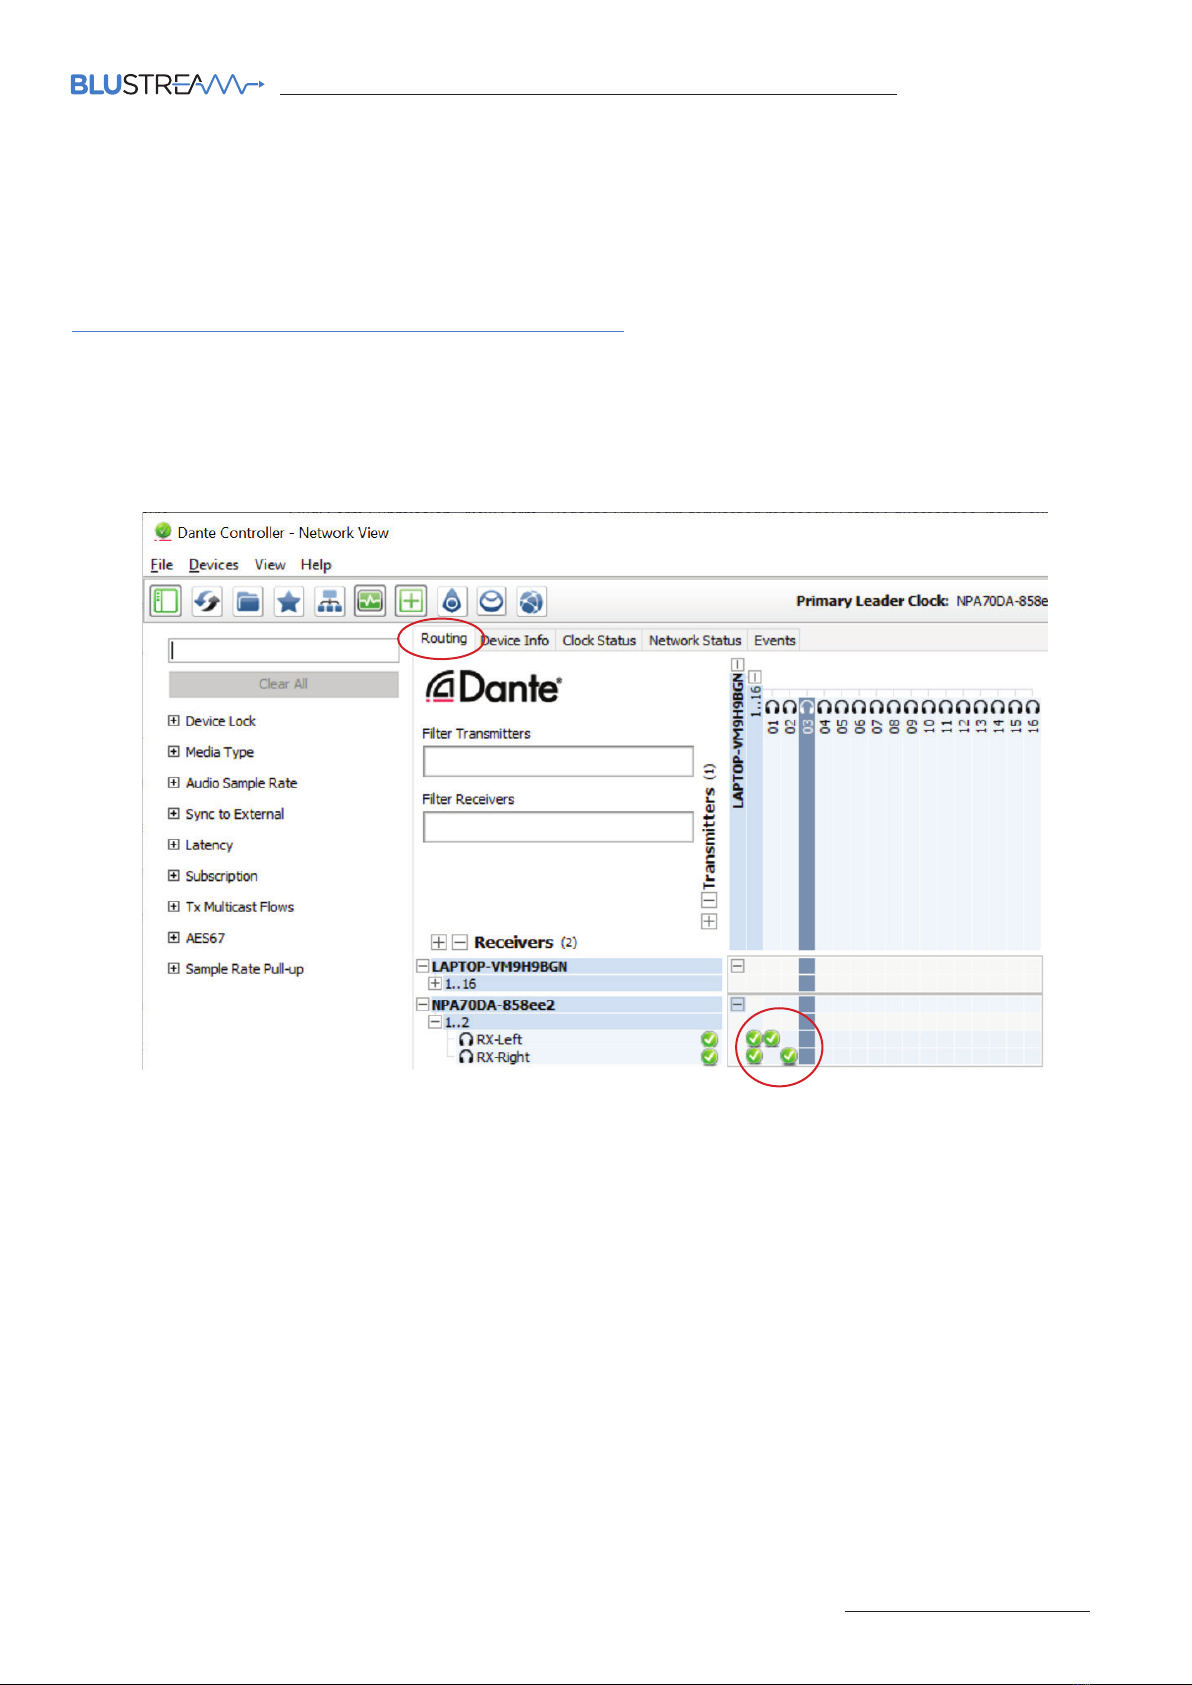
The NPA70DA features a Dante® Audio input as its only source input. The current source that is selected via Dante®
Controller will always be the source that is output via NPA70DA.
Dante® Controller soware is required in order to setup and configure the NPA70DA as well as control your Dante®
network. Audinate provide extensive training videos and documentation on their website. This can be found here:
http://www.audinate.com/products/soware/dante-controller
Upon connecting the NPA70DA to a compatible network, the Dante® Controller soware should automatically discover
the device. The NPA70DA will appear in the Dante® Controller with the name “NPA70DA”. On the “Routing” screen it is
possible to then create audio routing between Dante® transmitters and receivers within the same system.
Dante® Audio & Dante® Controller
NPA70DA USER MANUAL
www.blustream.com.au |www.blustream-us.com |www.blustream.co.uk08
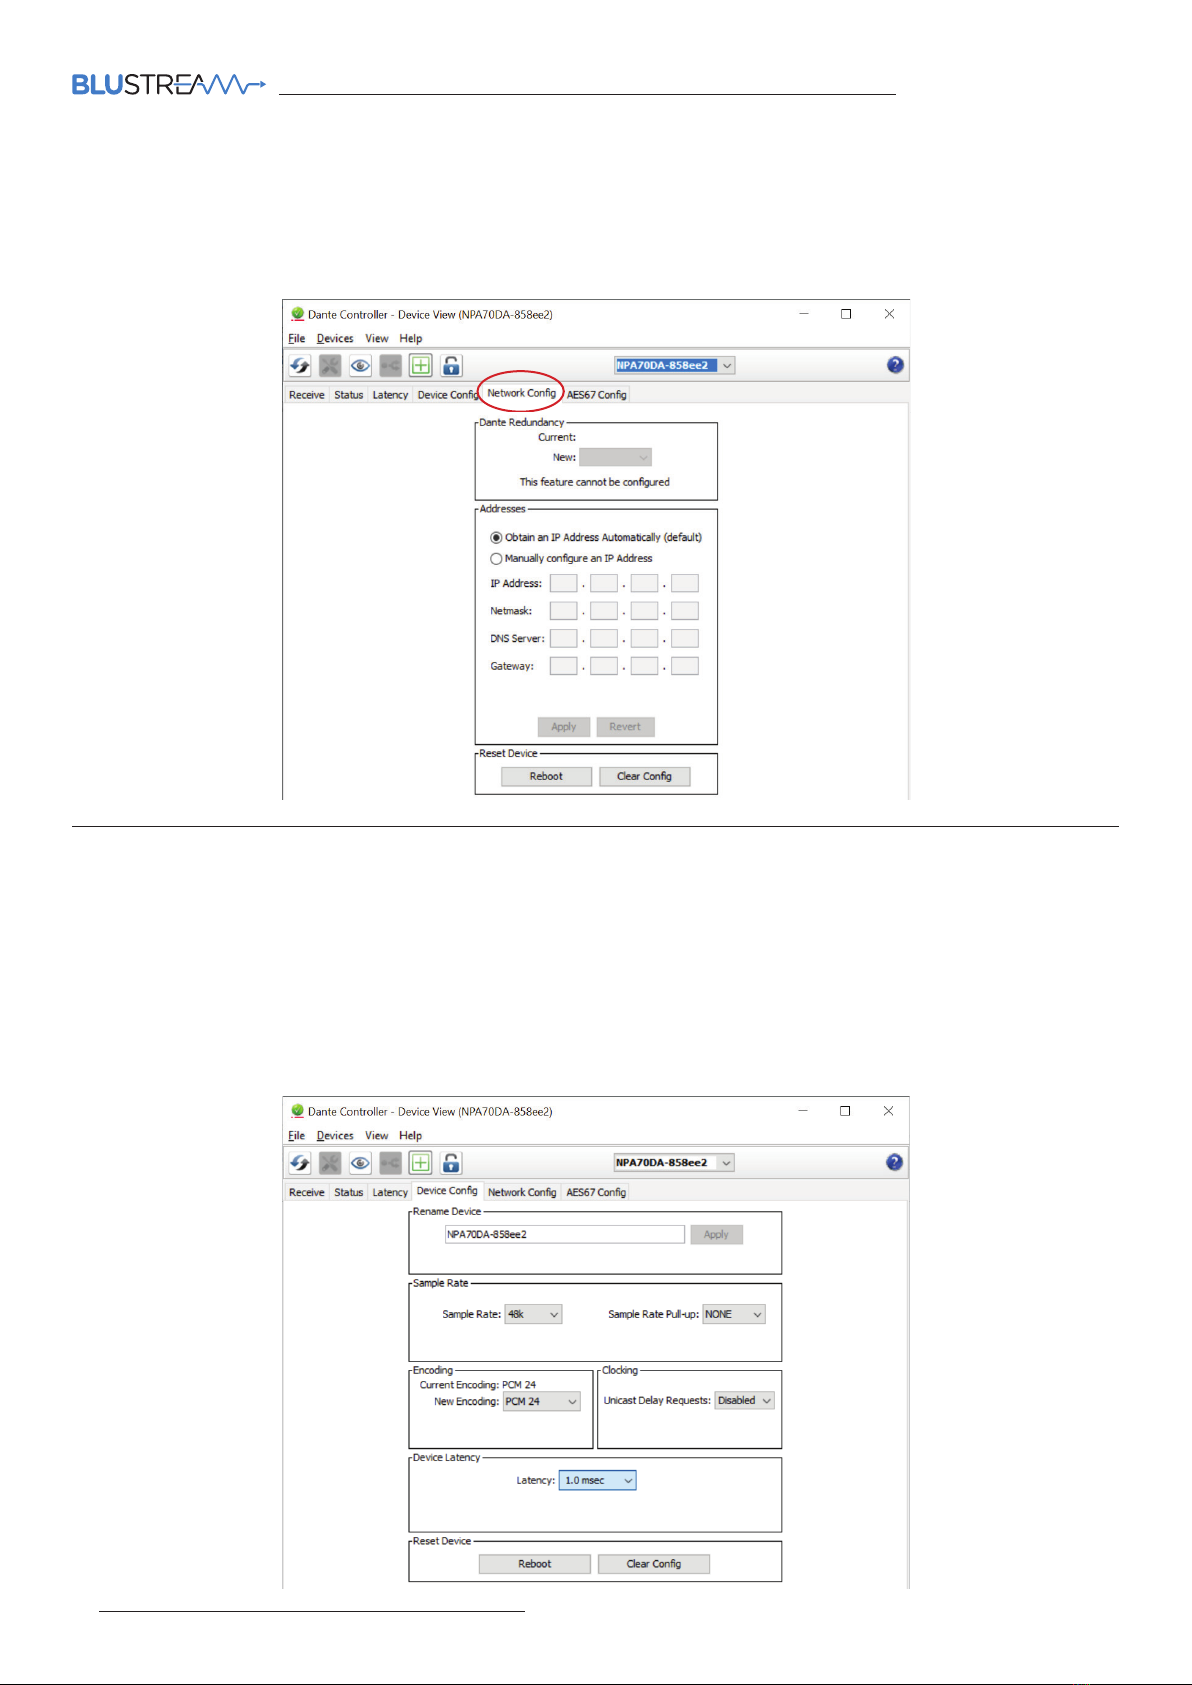
Advanced Dante® Settings
It is possible to change various Dante® related settings of the NPA70DA under the “Device Info” screen in the Dante®
Controller soware. To do so, select the “Device Config” menu.
Here it is possible to adjust the sample rate of the NPA70DA. Please note: that Dante® products can only transmit
or receive audio from other Dante® products that are set up with the same sample rate. A mismatch in sample rate
may stop audio from transmitting.
Under the “Device Config” screen the latency of the NPA70DA can be configured with 1, 2 or 5 milliseconds delay.
By default, the NPA70DA is shipped with the network settings set to obtain an IP Address automatically. This means
that if a DHCP server is present on the network, the NPA70DA will be provided with an IP Address. If no DHCP server
is present then the NPA70DA will receive a default IP Address in the 169.254.xxx.xxx range. To change the IP Address
of the NPA70DA, enter the “Network Config” menu in the “Device Info” screen of the Dante® Controller soware:
Dante® Controller

NPA70DA USER MANUAL
Contact: support@blustream.com.au |support@blustream-us.com |support@blustream.co.uk 09
Web-GUI Control
The NPA70DA features an in-built web-GUI for control and configuration of the unit. By default the device is set to
DHCP, however if a DHCP server (eg: network router) is not installed the device IP address will revert to below details:
Default Username: blustream Default Password: 1234 Default IP Address: 192.168.0.200
The device can also be accessed via its mDNS name which is defaulted to: http://NPA70DA.local/
The web-GUI supports multiple users along with multiple user permissions as follows:
Guest Account - This account does not require a user to login. The Guest account can only change sources for each
zone. Guest access can be changed by the Admin, limiting inputs or outputs as necessary. The Guest account can be
disabled.
User Accounts - User accounts can be utilised, each with individual login details. User accounts can be assigned
permissions to specific areas and functions. A User must log in to make use of these functions.
Admin Account - This account allows full access to all functions of the unit as well as assigning users with permissions
as required.
Login Page:
The Login Page allows a user or admin to login and access additional functionality within the web GUI.
Once a user is selected from the list it is required to enter the pasword for that user in order to sign in.
Please note: the first time the Admin logs into the web GUI, the default admin password will need to be changed. It is
important to record this password as there is no way to recover it in the event that it is forgotten.

NPA70DA USER MANUAL
www.blustream.com.au |www.blustream-us.com |www.blustream.co.uk10
User Control Page:
The User Control Page allows a user to adjust the volume for the input our output, as well as mute the audio signal.
The input volume adjustment could act as an audio limit function to limit the maximum output volume. A User can
also adjust the signal mix (single channel only, stero or summed mono), audio delay or 31 band graphic eq with +3dB /
-10dB of adjustment.
The user can also update their password via the Update Password button, or log out via the Log Out button.
Guest Control Page:
The Guest Control Page allows a guest to adjust the master output volume of the unit by using the volume slider or the
volume up / down buttons as well as the mute toggle button.

NPA70DA USER MANUAL
Contact: support@blustream.com.au |support@blustream-us.com |support@blustream.co.uk 11
User Page:
The Users page allows the admin to add, remove or disable users. Updating passwords of a user can be carried out
from here also.
Settings Page:
The Settings page allows users to change settings specific to the network configuration of the NPA70DA such as the
devices IP address and port settings. You can also adjust the mDNS or Domain Name for the device, which can also be
used to access unit via, for example: http://NPA70DA.local/

NPA70DA USER MANUAL
www.blustream.com.au |www.blustream-us.com |www.blustream.co.uk12
System Page:
The System page allows users to change the system configuration of the NPA70DA such as:
• Indentification - flashes the ID LED on front of the unit for the specified time period
• Key Lock On/O - enable or disable to front panel keys from functioning
• Power On/O - turn the unit on or o
• Input Trigger On/O - enable or disable input trigger function
• Power Mode - if the NPA70DA is connected to DC power supply, then PoE power modes will not be selectable. If
the NPA70DA is connected via PoE, it will default to the minimum PoE power specification (PoE+ Type 2 Class 4). It
is recommended to set this to the PoE power specification of the PoE adapter powering the NPA70DA
• Front Panel Lights - enable or disable the front panel LED lights, or set them to time out aer a specific time (15, 30
or 60 seconds)
• Serial Baud Rate - specify the baud rate of the serial RS-232 port on the device
• Auto Standby Time (minutes) - specify the time in minutes where the unit will enter standby mode if no audio
signal is being received on the selected input (default is 10 minutes)
• Firmware Update - allows a user to update the firmware of the device
• Factory Reset (Excludes Network Settings) - factory defaults all settings except for network configuration
• Factory Reset (Includes Network Settings) - factory defaults all settings including network configuration
• Reboot - power cycles the unit without changing any configuration settings
NPA70DA USER MANUAL
Contact: support@blustream.com.au |support@blustream-us.com |support@blustream.co.uk 13
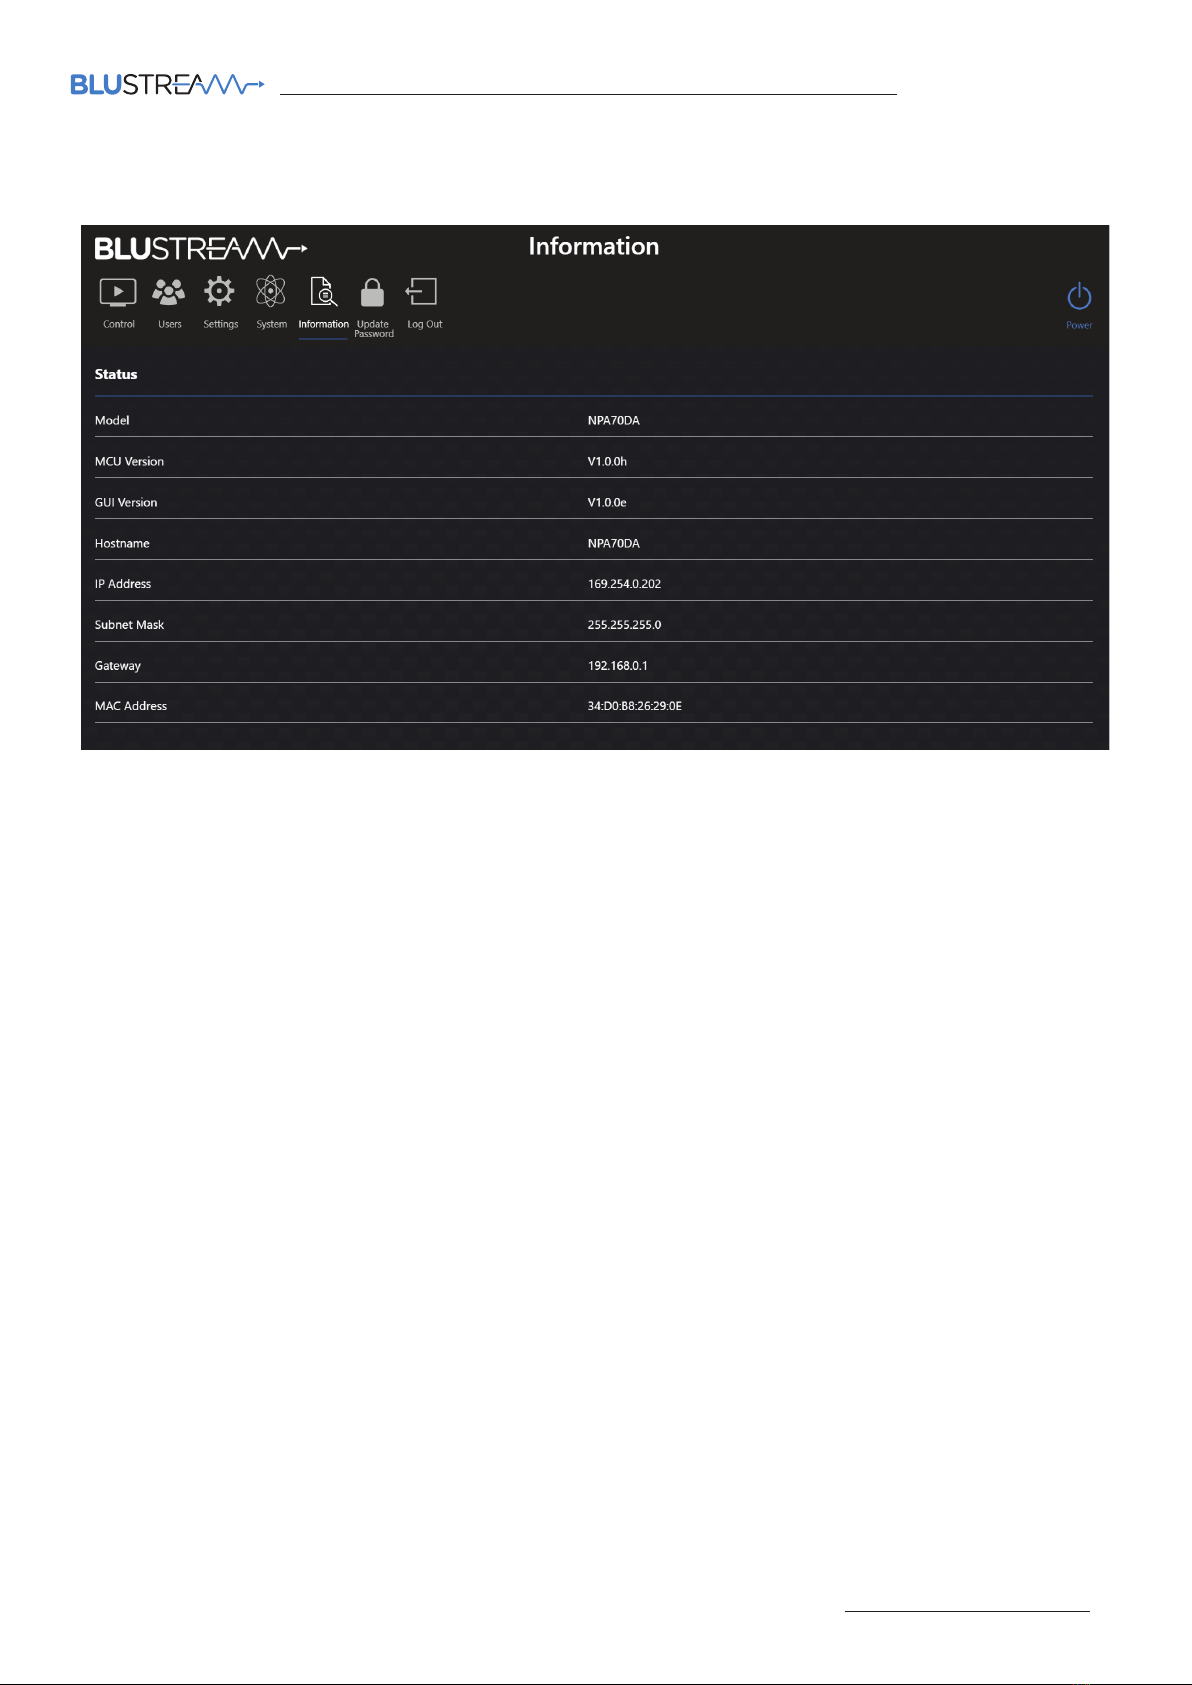
Information Page:
The Information page provides useful information such as firmware version and network settings.

NPA70DA USER MANUAL
www.blustream.com.au |www.blustream-us.com |www.blustream.co.uk14
Schematic
NPA70DA
Example Schematic
RS-232
LAN
Speaker Cable
Power
IR
+
-
+
-
+
-
+
-
+
-
+
-
Speaker Options
Control Processor
+-+-
+
-
DANTE(PoE) TCP/IP
CONTROL
TX RX
RS-232
T
TRG
SV
IR IN IR
5V 12V
R+ R- L+ L- 100V 70V COM
+BRIDGED -
SPEAKER OUTPUT
4Ω
8Ω
70V
100V
MODE 1 MODE 2
NETWORK
24V 3.5A
R+ R- L+ L- 100V 70V COM
+BRIDGED -
SPEAKER OUTPUT
4Ω
8Ω
70V
100V
R+ R- L+ L- 100V 70V COM
+BRIDGED -
SPEAKER OUTPUT
4Ω
8Ω
70V
100V
R+ R- L+ L- 100V 70V COM
+BRIDGED -
SPEAKER OUTPUT
4Ω
8Ω
70V
100V
R+ R- L+ L- 100V 70V COM
+BRIDGED -
SPEAKER OUTPUT
4Ω
8Ω
70V
100V
NPA70DA USER MANUAL
Contact: support@blustream.com.au |support@blustream-us.com |support@blustream.co.uk 15
Telnet & RS-232 Control Port
Baud Rate: 57600 bps
Data Bit: 8-bit
Parity: None
Stop Bit: 1-bit
Flow Control: None
The NPA70DA can be controlled via a 3-pin Phoenix to serial RS-232 cable or via Telnet.
The RS-232 communication settings and commands are as follows:
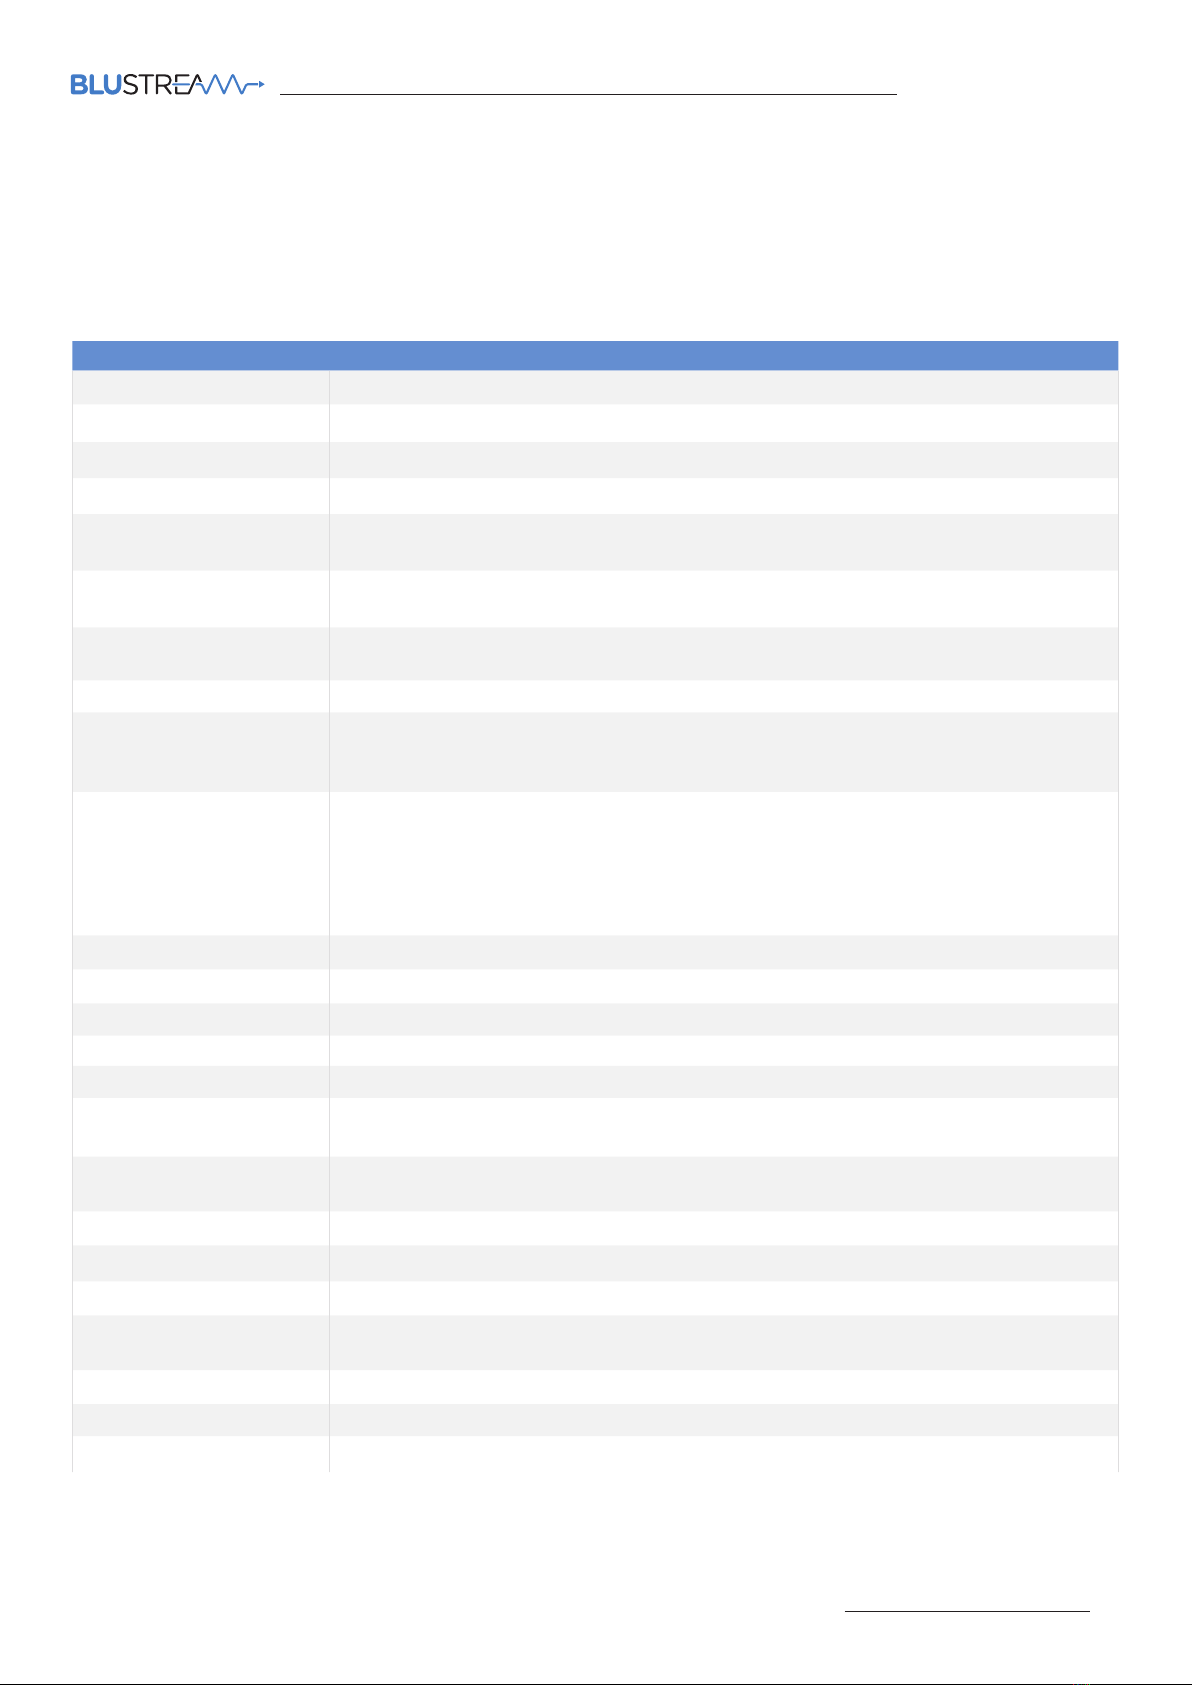
RS-232 / TELNET COMMAND DESCRIPTION
?/HELP Print Help Information
STATUS Print System Status And Port Status
PON Power On, System Run On Normal State
POFF Power O, System Run On Power Save State
PWLED FOLLOW ON/OFF ON: Set System Power Led Follow LCD Status
OFF: Set System Power Led Not Follow LCD Status In Power On State,Power Led Always On
RESET "Reset System Settings To Default
(Should Type ""Yes"" To Confirm, ""No"" To Discard)"
RESET ALL "Reset System and Network Settings To Default
(Should Type ""Yes"" To Confirm, ""No"" To Discard)"
REBOOT Set System Reboot
AUTO STB xx Set System Auto Standby Time
xx=0:Auto Standby O
xx=[1...120]:Auto Standby Time,(mins)
AMPMODE xxx
Set Amp Power to xxx
xxx=2:PoE++ Type 4 Class 8 (71W)
xxx=3:PoE++ Type 4 Class 7 (62W)
xxx=4:PoE++ Type 3 Class 6 (51W)
xxx=5:PoE++ Type 3 Class 5 (40W)
xxx=6:PoE+ Type 2 Class 4 (25.5W)
KEY ON/OFF Set System KEY Control On Or O
LCD ON/OFF/15/30/60 Set LCD Always On Or Auto Turn O In Power On State Or Turn On 15s/30s/60s
IDLED ON/OFF/15/30/60 Set IDLED On Or Auto Turn O In 15/30/60s In Power On State Or Turn On 15s/30s/60s
IR ON/OFF Set System IR Control On Or O
TRIG ON/OFF Set Trigger On Or O
RSB xx Set RS232 Baud Rate to xx bps
xx=[1...6]:1:4800,2:9600,3:19200, 4:38400,5:57600,6:115200
IN VOL yy Set Input Volume to yy
yy=[0...100]:Volume Value
IN VOL+ Increase Input Volume
IN VOL- Decrease Input Volume
IN xx MUTE ON/OFF Set Input Mute On Or O
OUT VOL yy Set Output Volume to yy
yy=[0...100]:Volume Value
OU T V OL+ Increase Output Volume
OUT VOL- Decrease Output Volume
OUT MUTE ON/OFF Set Output Mute On Or O

NPA70DA USER MANUAL
www.blustream.com.au |www.blustream-us.com |www.blustream.co.uk16
RS-232 / TELNET COMMAND DESCRIPTION
OUT DLYT yy Set Output Delay Time to yy(ms)
yy=[1..50]:Delay Time, Millisecond
OUT REVB ON/OFF Set Output Reverb On Or O
OUT PHASE yy INV ON/OFF Set Output L-Inverter Or R-Inverter On Or O
yy=[0,1]0:LEFT,1:RIGHT
OUT MIX yy Set Output Mix yy
yy=[1,2]:1:STEREO,2:LEFT-CH
yy=[3,4]:3:RIGHT-CH,4:LEFT-CH and RIGHT-CH
OUT EQ yy VAL zz Set Output GEQ:yy to zz
yy=[1..31]:EQ Index
zz=[-10..3]:EQ Value
OUT EQ PRESET yy Set Output GEQ:yy to Preset:yy
yy=[1...3]:1:Flat,2:Custom1,3:Custom2
NET DHCP ON/OFF Set Auto IP(DHCP) On Or O
NET IP xxx.xxx.xxx.xxx Set IP Address
NET GW xxx.xxx.xxx.xxx Set Gateway Address
NET SM xxx.xxx.xxx.xxx Set Subnet Mask Address
NET TCPPORT xxxx Set TCP/IP Port
NET TN xxxx Set Telnet Port
NET RB Network Reboot and Apply New Config!!!
NET DNS xxxx Set DNS Domain Name To xxxx

NPA70DA USER MANUAL
Contact: support@blustream.com.au |support@blustream-us.com |support@blustream.co.uk 17
Specifications
AMP POWER SPECIFICATION
NOTE: Specifications are subject to change without notice. Weights and dimensions are approximate.
NPA70DA
• Audio Inputs: 1 x RJ45 Dante® Audio connection
• Audio Outputs: 1 x 4-Pin Phoenix connector (4 / 8 ohm speaker)
1 x 3-Pin Phoenix connector (70 / 100V speaker)
• Ethernet Port: 1 x LAN RJ45 connector (Dante®)
1 x LAN RJ45 connector (Network)
• RS-232 Serial Port: 1 x 3-Pin Phoenix connector
• IR Input Ports: 1 x 3-Pin Phoenix connector
• Trigger Input: 1 x 2-Pin Phoenix connector
• Rack Mountable: 19” Rack mounting and wall / surface mount kit included
• Casing Dimensions (W x H x D): 202mm x 175mm x 31mm
• Dimensions Including Connections (W x H x D): 245mm x 175mm x 31mm
• Shipping Weight: 1.8kg
• Operating Temperature: 32°F to 104°F (0°C to +40°C)
• Storage Temperature: -4°F to 140°F (-20°C to +60°C)
• Power Supply: PoE++ Type 4, or 24V/3.5A DC 4-pin DIN
Package Contents
NPA70DA
• 1 x NPA70DA
• 1 x 24V/3.5A power supply
• 1 x Remote control
• 1 x IR Receiver
• 1 x Rack mounting kit
• 1 x Wall / surface mounting kit
• 4 x Rubber feet
• 1 x User Manual
POWER SOURCE AMP OUTPUT
24V/3.5A DC 70W
PoE++ Type 4 Class 8 50W
PoE++ Type 4 Class 7 40W
PoE++ Type 3 Class 6 30W
PoE++ Type 3 Class 5 20W
PoE+ Type 2 Class 4 7.5W
Maintenance
Clean this unit with a so, dry cloth. Never use alcohol, paint thinner or benzene to clean this unit.

NPA70DA USER MANUAL
www.blustream.com.au |www.blustream-us.com |www.blustream.co.uk18
Acknowledgements
Dante® is a registered trademark of Audinate Pty Ltd.
FCC Notice
This equipment has been tested and found to comply with the limits for a Class B digital device, pursuant to part 15 of
the FCC Rules. These limits are designed to provide reasonable protection against harmful interference in a residential
installation. This equipment generates, uses, and can radiate radio frequency energy and, if not installed and used
in accordance with the instructions, may cause harmful interference to radio communications. However, there is no
guarantee that interference will not occur in a particular installation. If this equipment does cause harmful interference
to radio or television reception, which can be determined by turning the equipment o and on, the user is encouraged
to try to correct the interference by one or more of the following measures:
• Reorient or relocate the receiving antenna.
• Increase the separation between the equipment and receiver.
• Connect the equipment into an outlet on a circuit dierent from that to which the receiver is connected.
• Consult the dealer or an experienced radio/TV technician for help.
CAUTION - changes or modifications not expressly approved by the party responsible for compliance could void the
user’s authority to operate the equipment.
CANADA, INDUSTRY CANADA (IC) NOTICES
This Class B digital apparatus complies with Canadian ICES-003.
Operation is subject to the following two conditions: (1) this device may not cause interference, and (2) this device
must accept any interference, including interference that may cause undesired operation of the device.
CANADA, AVIS D’INDUSTRY CANADA (IC)
Cet appareil numérique de classe B est conforme aux normes canadiennes ICES-003.
Son fonctionnement est soumis aux deux conditions suivantes : (1) cet appareil ne doit pas causer d’interférence et (2)
cet appareil doit accepter toute interférence, notamment les interférences qui peuvent aecter son fonctionnement.
CORRECT DISPOSAL OF THIS PRODUCT
This marking indicates that this product should not be disposed with other household wastes. To
prevent possible harm to the environment or human health from uncontrolled waste disposal, recycle it
responsibly to promote the sustainable reuse of material resources. To return your used device, please
use the return and collection systems or contact the retailer where the product was purchased. They
can take this product for environmentally safe recycling.
Certifications

www.blustream.com.au
www.blustream-us.com
www.blustream.co.uk
Table of contents
Other Blu Stream Amplifier manuals


 user manual")


