Blue Wave SilverWave 2019 User manual


2
4
Night Mode 4
Alerts 5
Volume Up / Down 5
6
Navigation Controls 6
Waypoint 7
Bearing 7
GPS 8
Course 9
Select Course 10
New Course 11-12
New Auto Course 13-14
16
Satellite Radio 17
AM / FM Radio / Weather 17
Viper II Bluetooth 18
USB Input 18
Auxiliary Input 19
Equalization / Preset EQ 19
TABLE OF CONTENTS
12.3 DISPLAY
MAP SCREEN
STEREO SCREEN

3
TABLE OF CONTENTS
20
21
22
Bluetooth 22
Backlighting 23
Depth Alarm 23
Air Temp Offset 24
Trim Calibration 24
Fuel Calibration 25
Units 25
Time Zone 26
System Diagnostics 26
About 27
28
Camera 1&2 28
Media View 29
PDF 29
File Transfer 30
DEPTH SCREEN
CONTROLS SCREEN
SETTINGS SCREEN
MEDIA SCREEN 12.3

4
12.3" DISPL AY
The high-resolution touch control displays bring more features to the
surface providing an unmatched user experience.
Critical information including engine performance, fuel level and depth is
always in view or just a touch away.
The center of each window screen swaps out with a touch of the top level
destination page buttons.
7
8
9
10
11
2
3
4
5
6
1- Night Mode Button
2- Map Screen (Heading)
3- Audio Screen
4- Depth Screen
5- Controls Screen
6- Media Screen
7- Seek Next
8- Seek Previous
9- Mute On/Off
10- Volume Up
11- Volume Down
NIGHT MODE
The NIGHT mode button toggles lighting brightness between NIGHT and
DAYTIME.
Adjust preferences in the SETUP MENU. The lighting of the Display dim to the
value selected in the SETTINGS MENU.

5
ALERTS
1
3
2
1- Warning Triangle Icon / Button
2- MIL Indicator/Button (will present for 3 seconds when display powers up)
3- Acknowledgment Button
VOLUME UP / DOWN
Touch VOLUME UP or VOLUME DOWN to bring up the VOLUME CONTROL
MENU.
Adjust the volume of the interior, tower and master speakers in the VOLUME
CONTROL MENU.
AUTO VOLUME will automatically adjust the stereo volume based on engine
RPM. Setting AUTO VOLUME to '0' disables.

6
MAP SCREEN
Touch the MAP button to bring up navigation. The Navionics Navigation
System uses GPS (Global Positioning System) satellites, and a map
database to calculate and display route directions. SD Card with Map Data
is required. 1 2 3 4
5 6
1- Waypoint Control
2- Course Control
3- Screen Orientation
4- GPS Control
5- Zoom In/Out
6- Cursor Position Arrows (only in
BEARING MODE)
NAVIGATION CONTROLS
Touch ANYWHERE ON THE MAP to activate the pop up controls. Touch
the SIX DIRECTIONAL ARROW buttons (while in BEARING MODE).
On the map window to position the cursor.
Touch the RETURN button to return the cursor to the CURRENT
LOCATION and the +/-buttons to ZOOM IN/OUT.

7
WAYPOINT
Touch the WAYPOINT button to place a waypoint at the cursor position.
Position the cursor over an existing waypoint to EDIT, MOVE or DELETE it.
Choose a WAYPOINT ICON to mark the waypoint with a meaningful
reminder.
BEARING
Touch the NORTH / BEARING button to change the method of
TRACKING position.
NORTH is always at the top when NORTH is selected. The BEARING is
always pointing to the top of the screen and in the direction the boat is
traveling when BEARING is selected.

8
GPS
Touch the GPS button to view available SATELLITE STATUS. IT CAN
TAKE SEVERAL MINUTES FOR GPS SATELLITES TO LOCATE AND
POSITION THE BOAT ON THE MAP.

9
COURSE
Touch the COURSE button to SELECT, CREATE, STOP or CANCEL a course.
NEW AUTO COURSE records the actual route the boat is traveling to be
saved and recalled later. NEW COURSE allows the user to build a future
course of NEW user created waypoints.
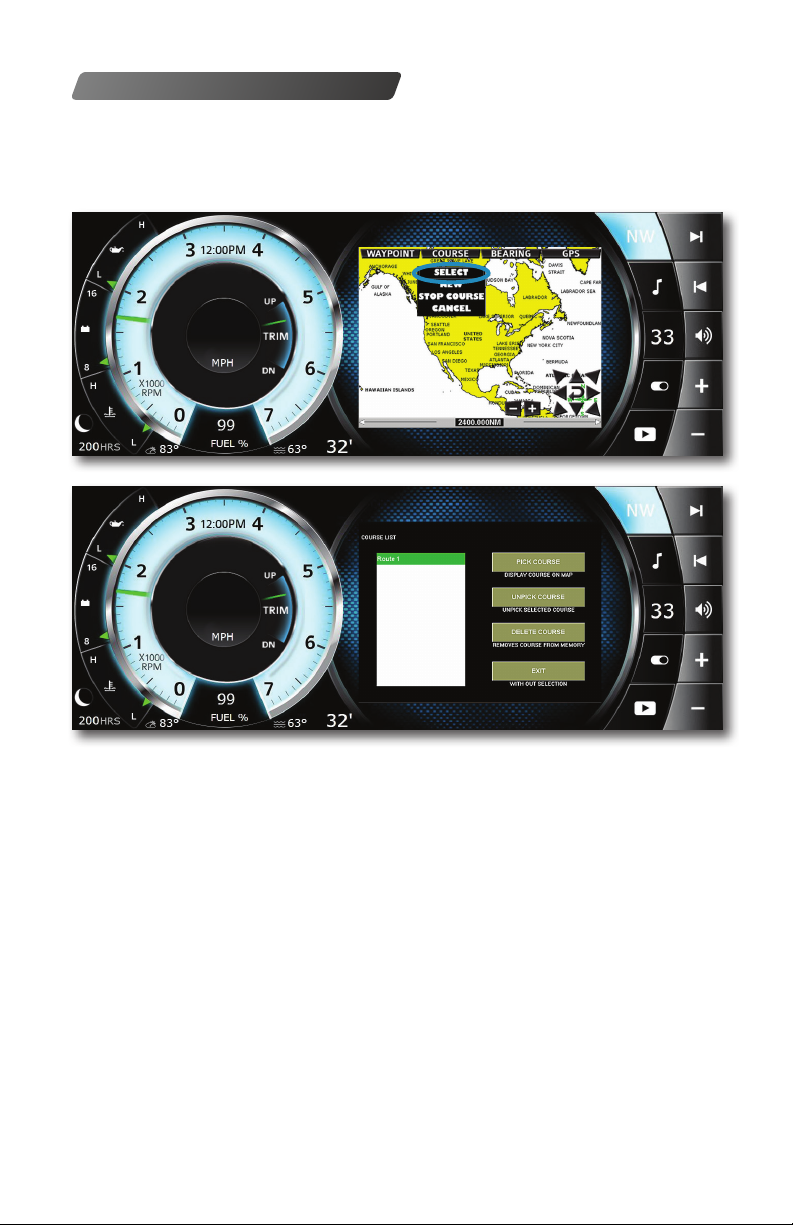
10
SELECT COURSE
Touch the COURSE then SELECT button to PICK, UNPICK or DELETE
a course. Picking a course will display the course on the map. Multiple
courses can be displayed on the map.

11
NEW COURSE
NEW COURSE allows the user to build a future course of NEW user
created waypoints. To begin, touch COURSE,then NEW,and then NEW
COURSE.
Touch SELECT WAYPOINT LOCATION, then position the cursor on the
map for the rst waypoint.
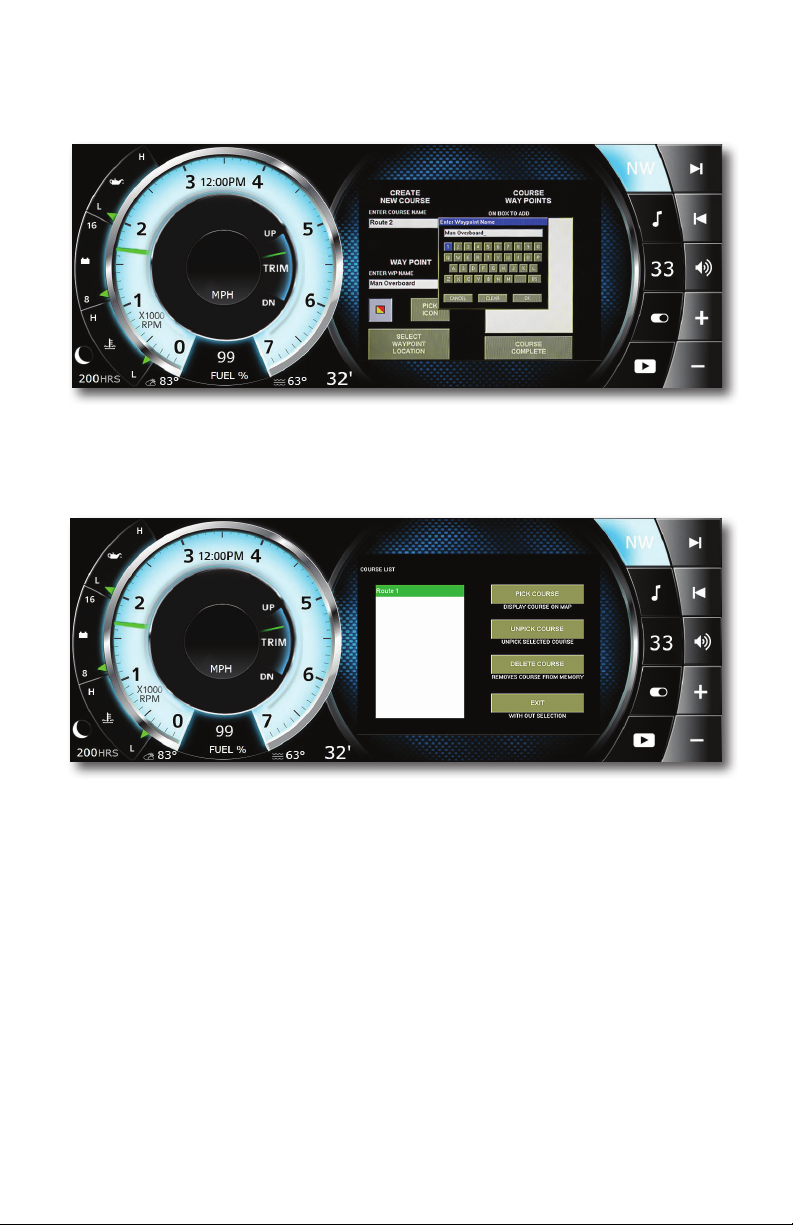
12
The last waypoint must be a COURSE COMPLETE waypoint to nalize
the course. A course cannot be changed or edited once created.
Touch the COURSE button, then the SELECT button to PICK, UNPICK
or DELETE a course. Picking a course will display the course on the map.
Multiple courses can be displayed on the map.

13
NEW AUTO COURSE
NEW AUTO COURSE records the actual route the boat is traveling to be
saved and recalled later. To begin, touch COURSE,then NEW,and then
NEW AUTO COURSE.
Touch SELECT WAYPOINT LOCATION, then position the cursor on the
map for the rst waypoint.

14
Touch the WAYPOINT button, then choose an icon and name for the
waypoint. Continue with this same procedure to create all remaining
waypoints. The last waypoint must be a COURSE COMPLETE waypoint to
nalize the course. A course cannot be changed or edited once created.
Touch the COURSE then SELECT button to PICK, UNPICK or DELETE
a course. Picking a course will display the course on the map. Multiple
courses can be displayed on the map.

15

16
STEREO SCREEN
Touch the STEREO button for direct access to certain audio controls
including AM/FM stereo channels, Bluetooth wireless, Satellite, USB and
Auxiliary input ports.
SIRIUS XM screen is only accessible after module and antenna are
connected to the black box radio.
1
86 75
2 3 4
1- FM Radio
2- Satellite Radio
3- Bluetooth
4- Power On/Off
5- AM Radio
6- USB Input
7- Auxiliary Input
8- Weather

17
SATELLITE RADIO
Touch SATELLITE for satellite radio stations.
1
78 9
23 4
6 5
1- Source Select
2- Favorite's Scroll
3- Power On/Off
4- Direct Channel
5- Seek Forward / Back
6- Lock Channel
7- Equalization Adjustment
8- Classic Audio Control
9- Save Settings
AM / FM RADIO / WEATHER
Touch AM RADIO or FM RADIO or WEATHER for AM/FM stereo
channels / weather band.

18
VIPER II BLUETOOTH
Touch BLUETOOTH to play songs on your phone or mobile device with
Bluetooth wireless technology.
Bluetooth must be turned ON in the SETTINGS menu. Then scan for the
display from your mobile device
USB INPUT
Touch USB to access USB input ports. Press MENU to view full
navigation popup.

19
AUXILIARY INPUT
Touch AUXILIARY to access the auxiliary input port.
EQUALIZATION / PRESET EQ
Touch EQ to adjust the loudness, bass, treble, fade, balance and sub of the
music.
IVOL when available, will allow adjustment of the MAX turn on volume of
the radio.

20
DEPTH SCREEN
Touch the DEPTH button at the top of the screen to view a graphical
representation of depth in addition to WATER, AIR TEMP, bluetooth
information and clock. A SHALLOW WATER ALARM sounds and a
NOTICE is displayed when the water depth is less than the shallow setting.
The shallow water level is adjusted in the settings menu. English or Metric
units are selected in the settings menu. The scrolling graph on the left
provides a visual of depth history.
Table of contents
Other Blue Wave Boat manuals


Popular Boat manuals by other brands


Alpacka Raft
Alpacka Raft GNU owner's manual

Stearns
Stearns Back Country B801 Green Red owner's manual

RYDS
RYDS 465R owner's manual

Chris-Craft
Chris-Craft 2014 36 RH Corsair owner's manual

Cobalt Digital Inc
Cobalt Digital Inc 220S owner's manual

OceanFlyer
OceanFlyer Grand Banks 49' Classic operating manual