bluefin Scout User manual
INSTRUCT I O N
MANUAL

Seat Attachment 8
Slide in Fin attachment 7
Pump Disassembly 6
Swift Pro Pump 5
Ranger Inflation and Assembly Process 4
Scout Inflation Process 3
Welcome 2
Troubleshooting 18
Technical information 21
22
Break Down Cover
Safety and Care 17
How to repair Scout (valve and puncture) 14
How to repair Ranger (valve and puncture) 15
Deflating and Packing Away (Scout) 12
Deflating and Packing Away (Ranger) 13
Paddle Assembly and Adjustment 11
How to adjust handle length 10
Bottle holders 9
C O N T ENTS
PAGE

Hey,
Welcome to the Bluefin community! We’re glad to have you on board. Your journey with us doesn’t end at the
point of purchase.
As a member of our community, you’re entitled to many benefits including lifetime support from our customer
service team and an extended warranty on all our products. Remember to activate your warranty by scanning
the QR code (see ‘Breakdown cover’) or by visiting our website.
We hope you enjoy your product and choose to explore the full Bluefin SUP and Kayak range. To get the best of
your product, we recommend that you read and refer back to the contents of this manual.
You can also find additional help and resources at www.bluefinsupboards.com.
The Bluefin team
WELCOME
TO THE C L U B

●Unpack and unroll your Bluefin Kayak on a smooth, clean, flat surface.
●Connect the air tap on your pump to the inflation valve on your Kayak.
Unscrew the valve cap and firmly push the air tap into the hole for a
friction fit. Figure 1
●Before you begin to pump, please consult the recommended PSI on
the valve(s) of your Kayak and inflate to the appropriate value. DO
NOT over-inflate your Kayak.
●The PSI may not register on your pump until you reach at least 1 PSI -
keep pumping!
●Once the desired air pressure has been reached, please safely
disconnect the pump hose from the valve and screw the valve cap
back on.
SCOUT
INFLATION PROCES S
WARNING: Please only use the pump provided, or a pump that is recommended for your Kayak.
DO NOT use an air compressor as you will risk overinflating the board and damaging it beyond
repair. Your warranty will be void in the event of damage caused by over-inflation.

●First inflate the inner floor chamber by connecting the air tap on your
pump to the inflation valve on your Kayak. Firmly push the air tap
inwards and twist clockwise to secure the connection. Figure 1
●Pump the side chambers on the kayak body halfway. To inflate this is
the same method as the pervious step.
●Insert the drop-stitch floor into the kayak body and push under the half
inflated side chambers.
●Fully inflate the side chambers to the PSI indicatted around the valve.
●Then inflate the inner chamber valve in the center of the board to the
recommended PSI noted around the valve.
WARNING: Please only use the pump provided or other recommended pumps. DO NOT use
an air compressor as you will risk over-inflating the board and severely damaging your Kayak
beyond repair. Your warranty will be void in the event of damage via over-inflation.
RANGER
INFLATION AND ASSEMBLY PROCESS

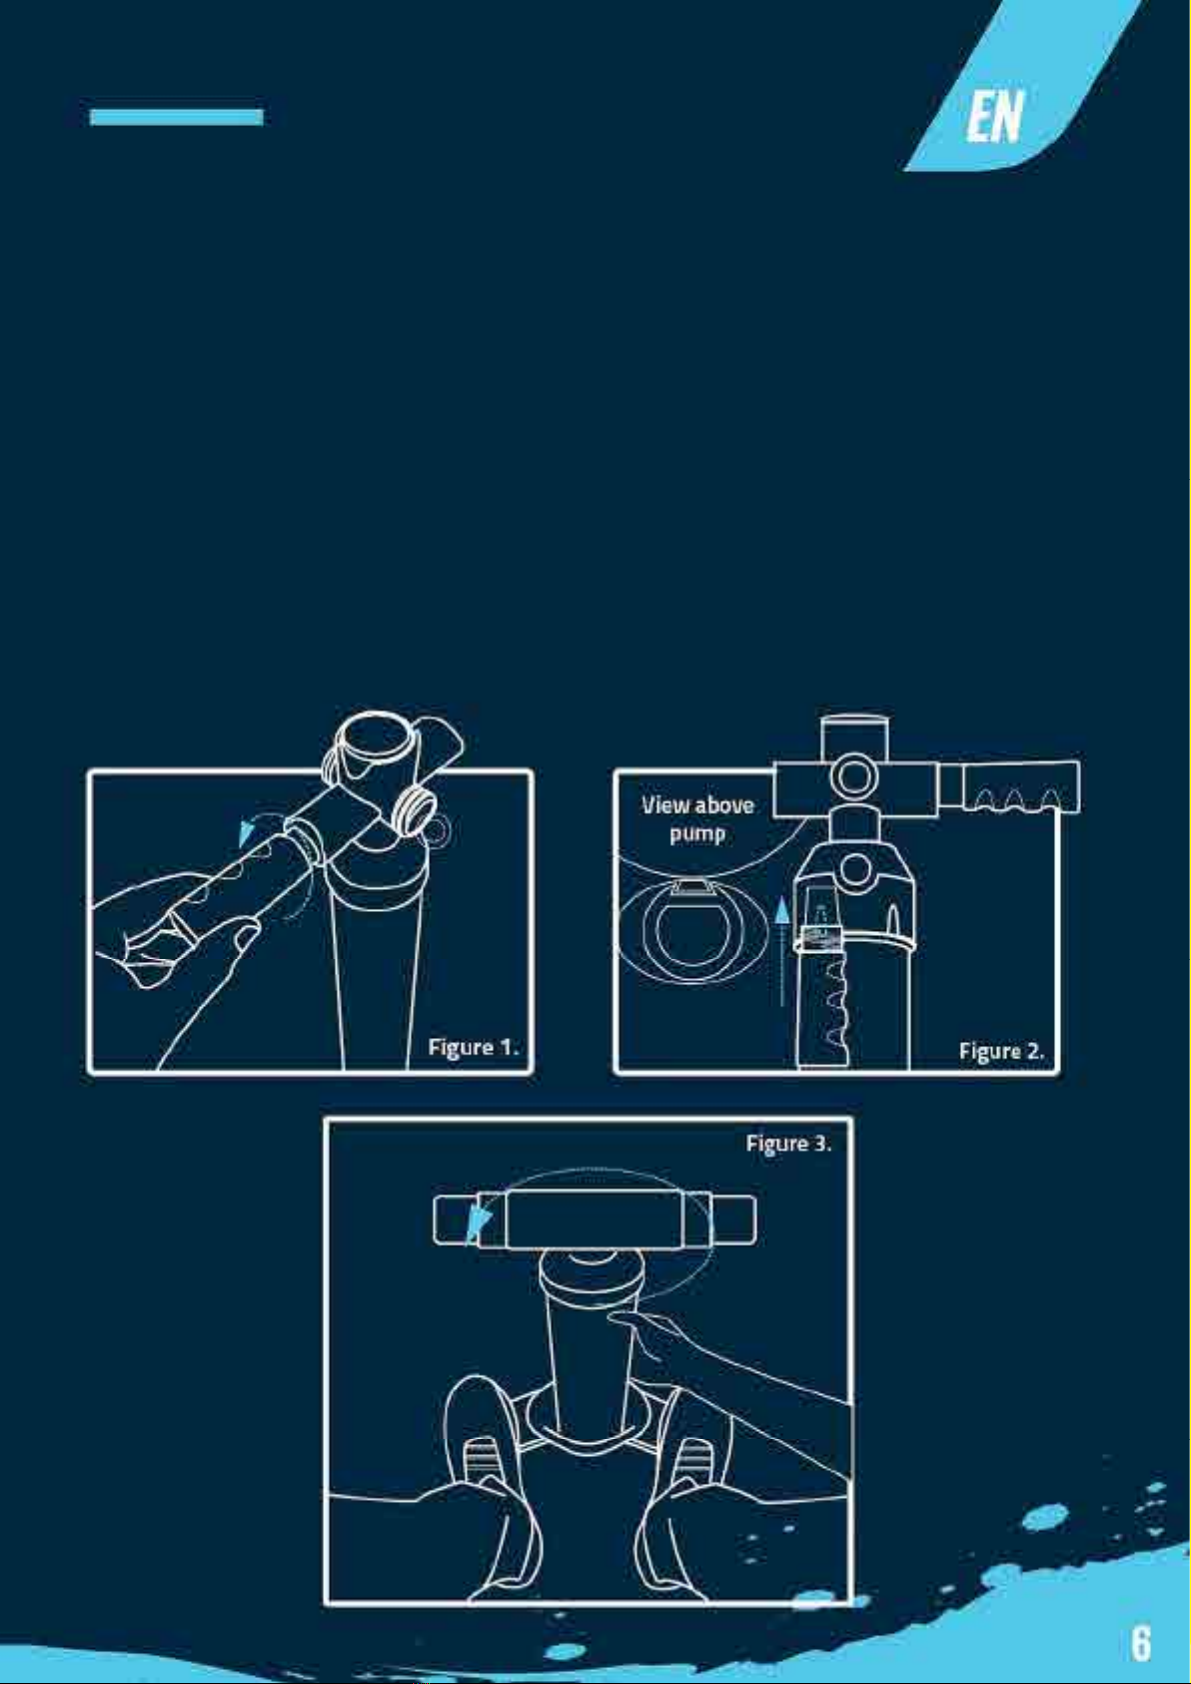
●To use the pump in dual action mode (the pump will inflate or deflate
on both the upwards and downward pump stroke) make sure the
action attachment is fixed into the inlet by twisting clockwise until
tightened fully. Figure 3 - Use this function when adding/removing
large volumes of air quickly.
●To use the pump in single action mode (the pump will only inflate or
deflate on the downward pump stroke) remove the action attachment
by twisting anti-clockwise until the inlet is open and free. Figure 4 -
Use this function when inflating at high pressure, at the latter end of
the inflating process.
●To use the pump for inflation, fix
the hose by turning clockwise
onto the pump air outlet labelled
inflate Figure 1 or to use the
pump for deflation fix the hose
by turning clockwise onto the
pump air outlet labelled deflate.
Figure 2
Single Chamber Pump
SWIFT PRO
PUMP
PUMP
DIS A SSEMBL Y
●To make the pump more compact, remove the pump handles by rotating counterclockwise. Figure 1
until fully detached and slide onto the two handle mounts. Figure 2
●To remove the footplate, stand on the base and twist the pump anti-clockwise using the centre shaft
on the pump. Figure 3
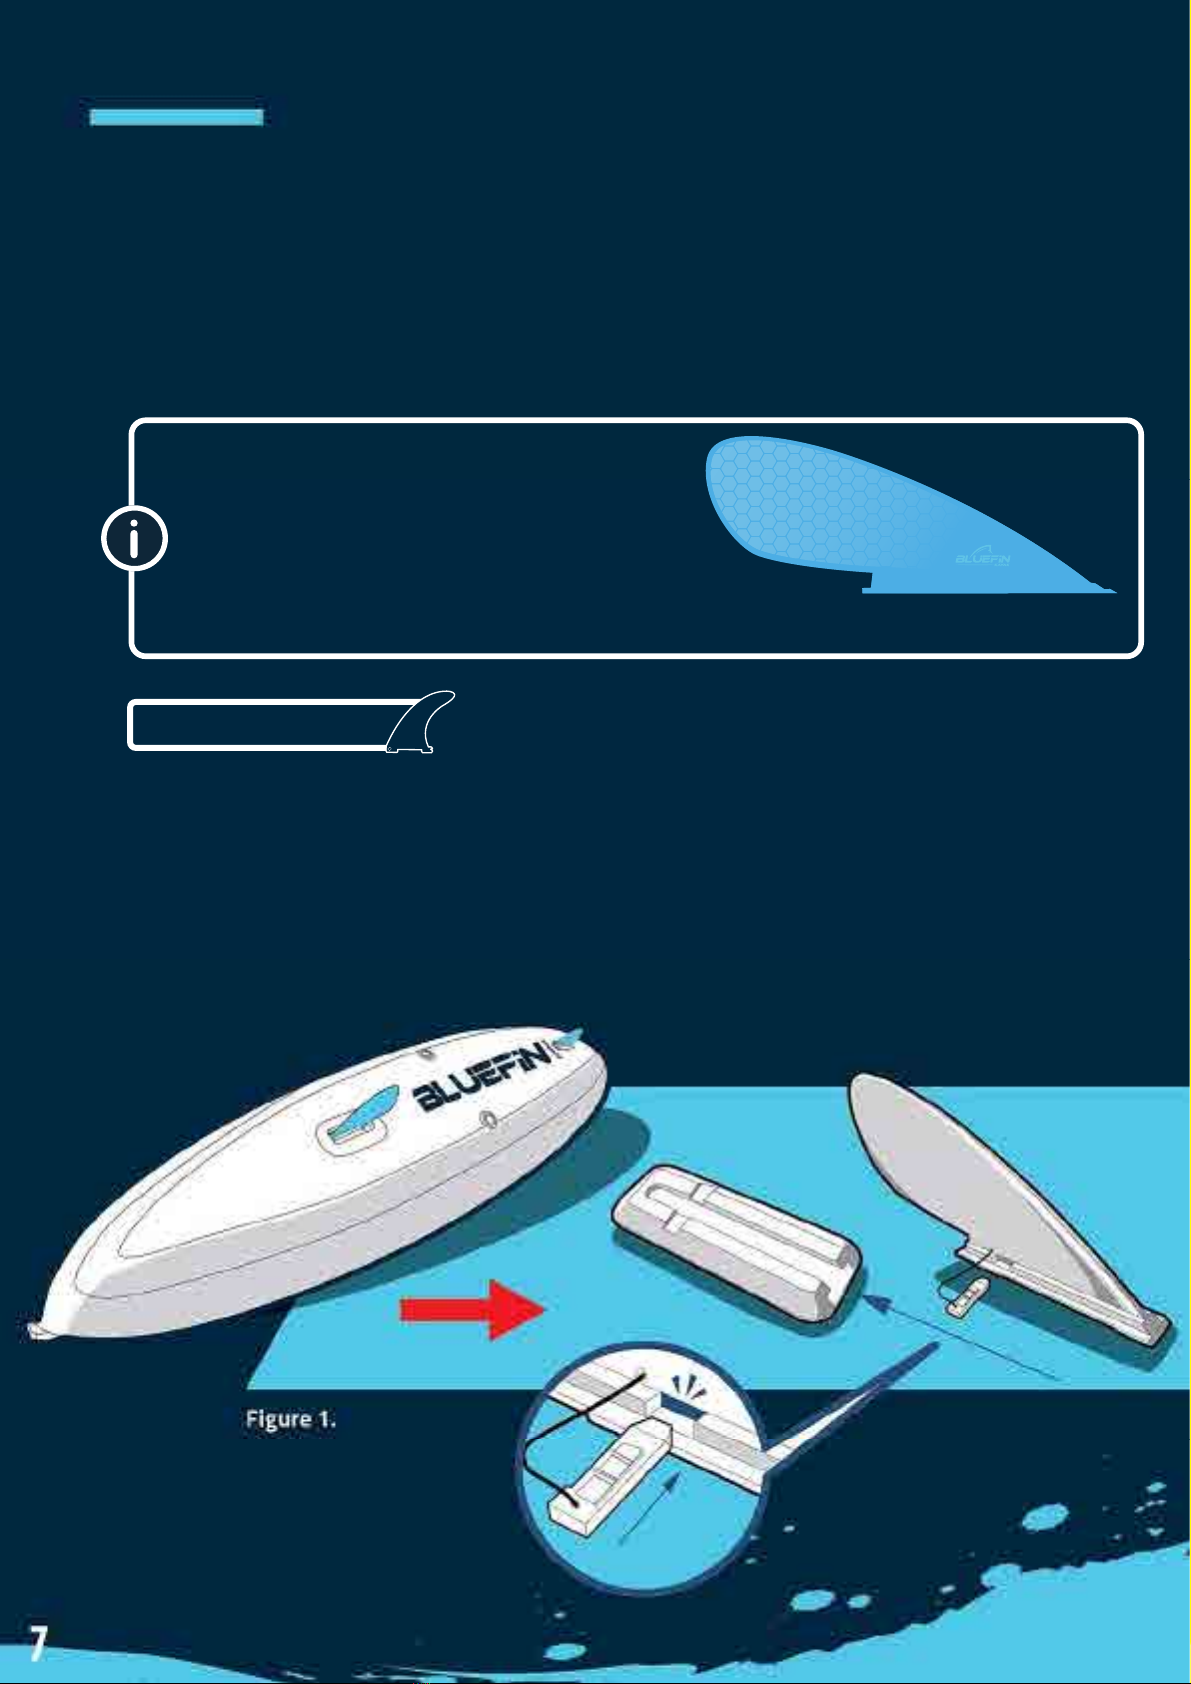
●Insert the fin into the fin box slot via the end gap. Figure 1
●Slide the clip, connected to the fin, into the side of the fin-box and through the fin body. The clip should be
secure and not come back through without pressing down the lock on the top of the clip.
●To remove the fin from the fin box, press down on the lock at the top of the clip and feed it back through
the clip slot, you can then slide the fin out of the finbox.
SLIDE IN FIN
ATTACHMENT
Before you begin please ensure the fin box
slot is clean and free of sand and grit.
Slide-in fin
Smart Lock Fin System
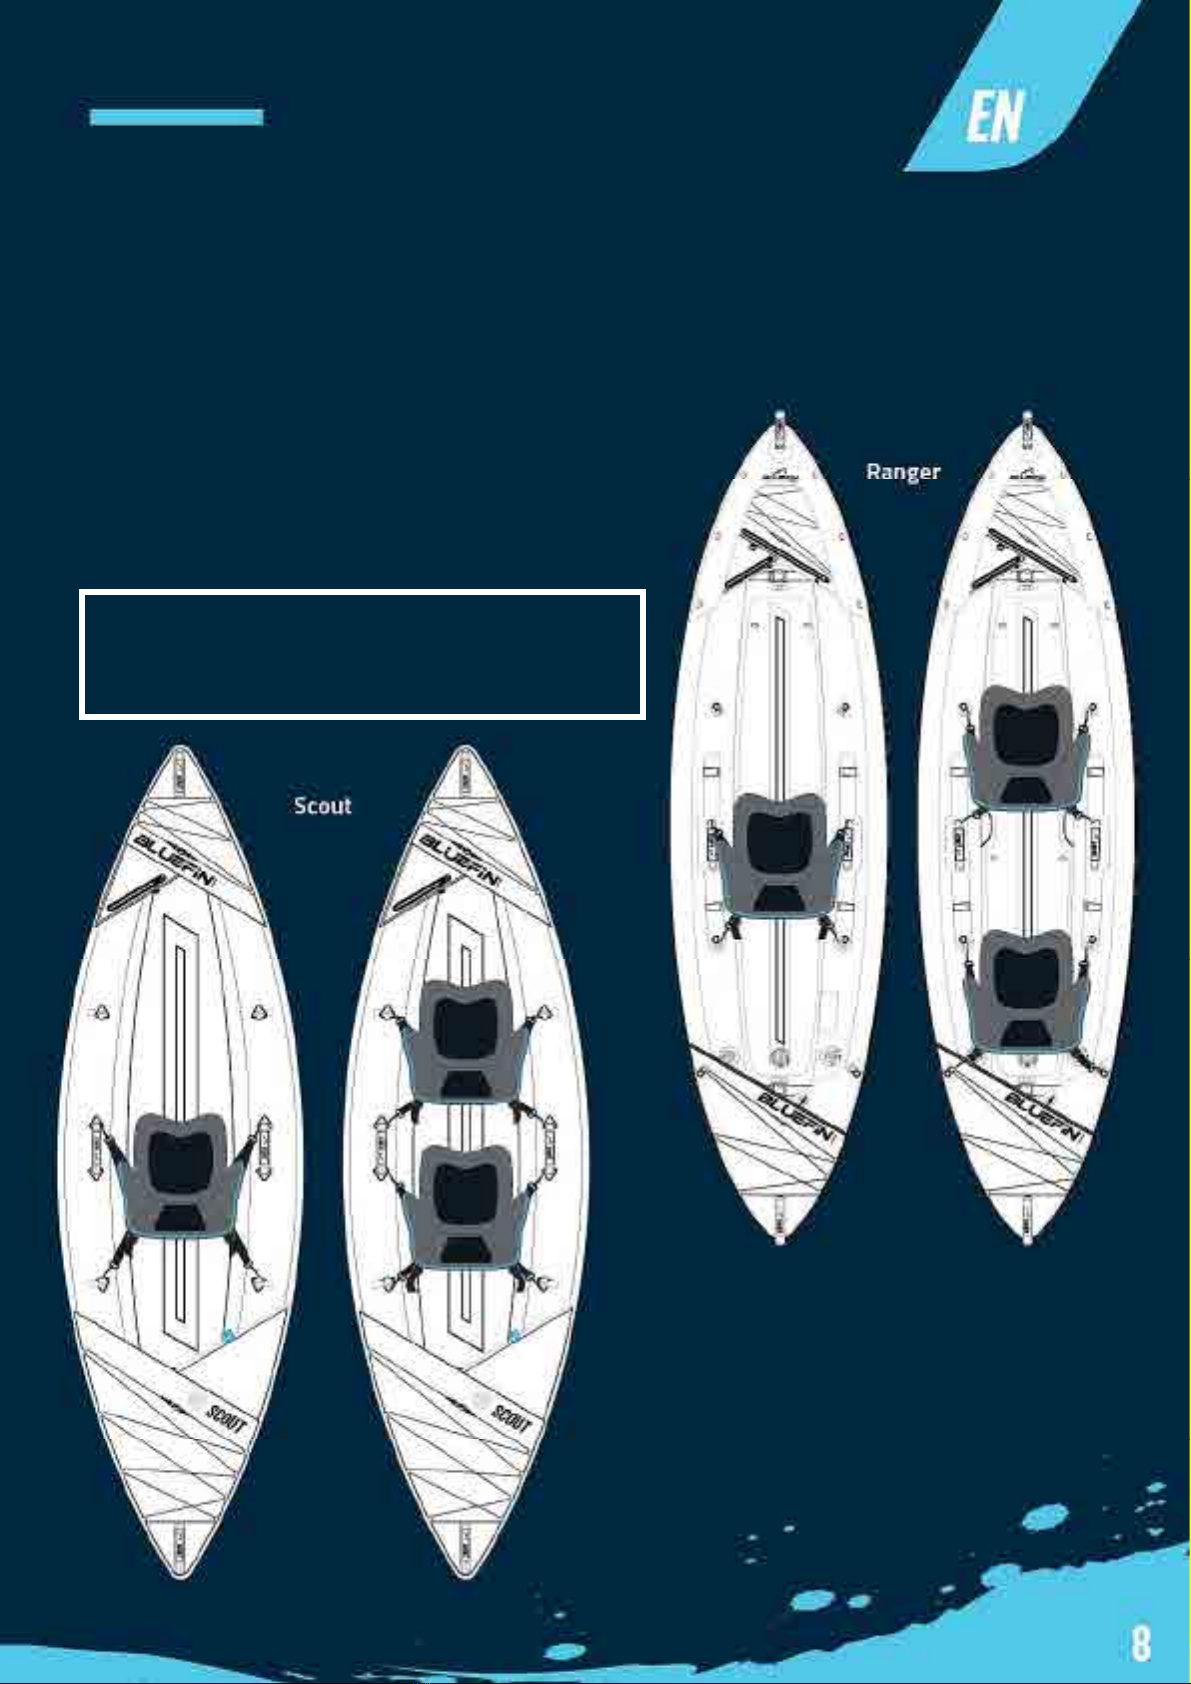
SEAT SET-UP AND
ATTACHMENT
●inflate the seat(s).
●place the seat(s) in the kayak as per the diagram,
depending on either 1 user or 2 users.
●Hold the lock into the correct D-ring as diagram.
Note: It may be easier to fit the seat by partially inflating
the seat base, positioning and fixing the seat clips and
then inflating the seat fully.

●Wrap the bottle holder around the bottle, fixing together with the Velcro.
●Place the bottle holder onto the strip on velcro on the center of the floor in
the kayak.
BOTTLE
HOLDERS

HOW TO ADJUST
HANDLE LENGTH
●Slide down the neoprene jacket on the handle.
●Adjust the handle length by re-attaching the velcro
webbing handle and slide the neoprene jacket back on top
of the webbing.

●Use the paddle in the correct orientation with the Bluefin branding at the front of the paddle shaft.
●Insert the paddle blade into the middle section. You can adjust paddle length at this stage.
● There are 3 options for you to twist the blade angle.
● Press the lever of middle section to lock the blade.
PADDL E
ASSEMBLY AND ADJUSTMENT
●Before deflating the board, please remove the central fin and ensure it is clean
and free of sand and debris. Hose down if necessary to prevent mildew build-up
in storage. Do not use harsh chemicals for cleaning. Most dirt can be removed
with mild soap and water.
●Deflate each valve on the Kayak by removing the valve cap. to do this, you will
need to unscrew the valve from the valve mount. TIP: Make sure the valve cap is
on the valve before unscrewing, this will make sure it stays fixed on the cord and
the valve isn't lost.
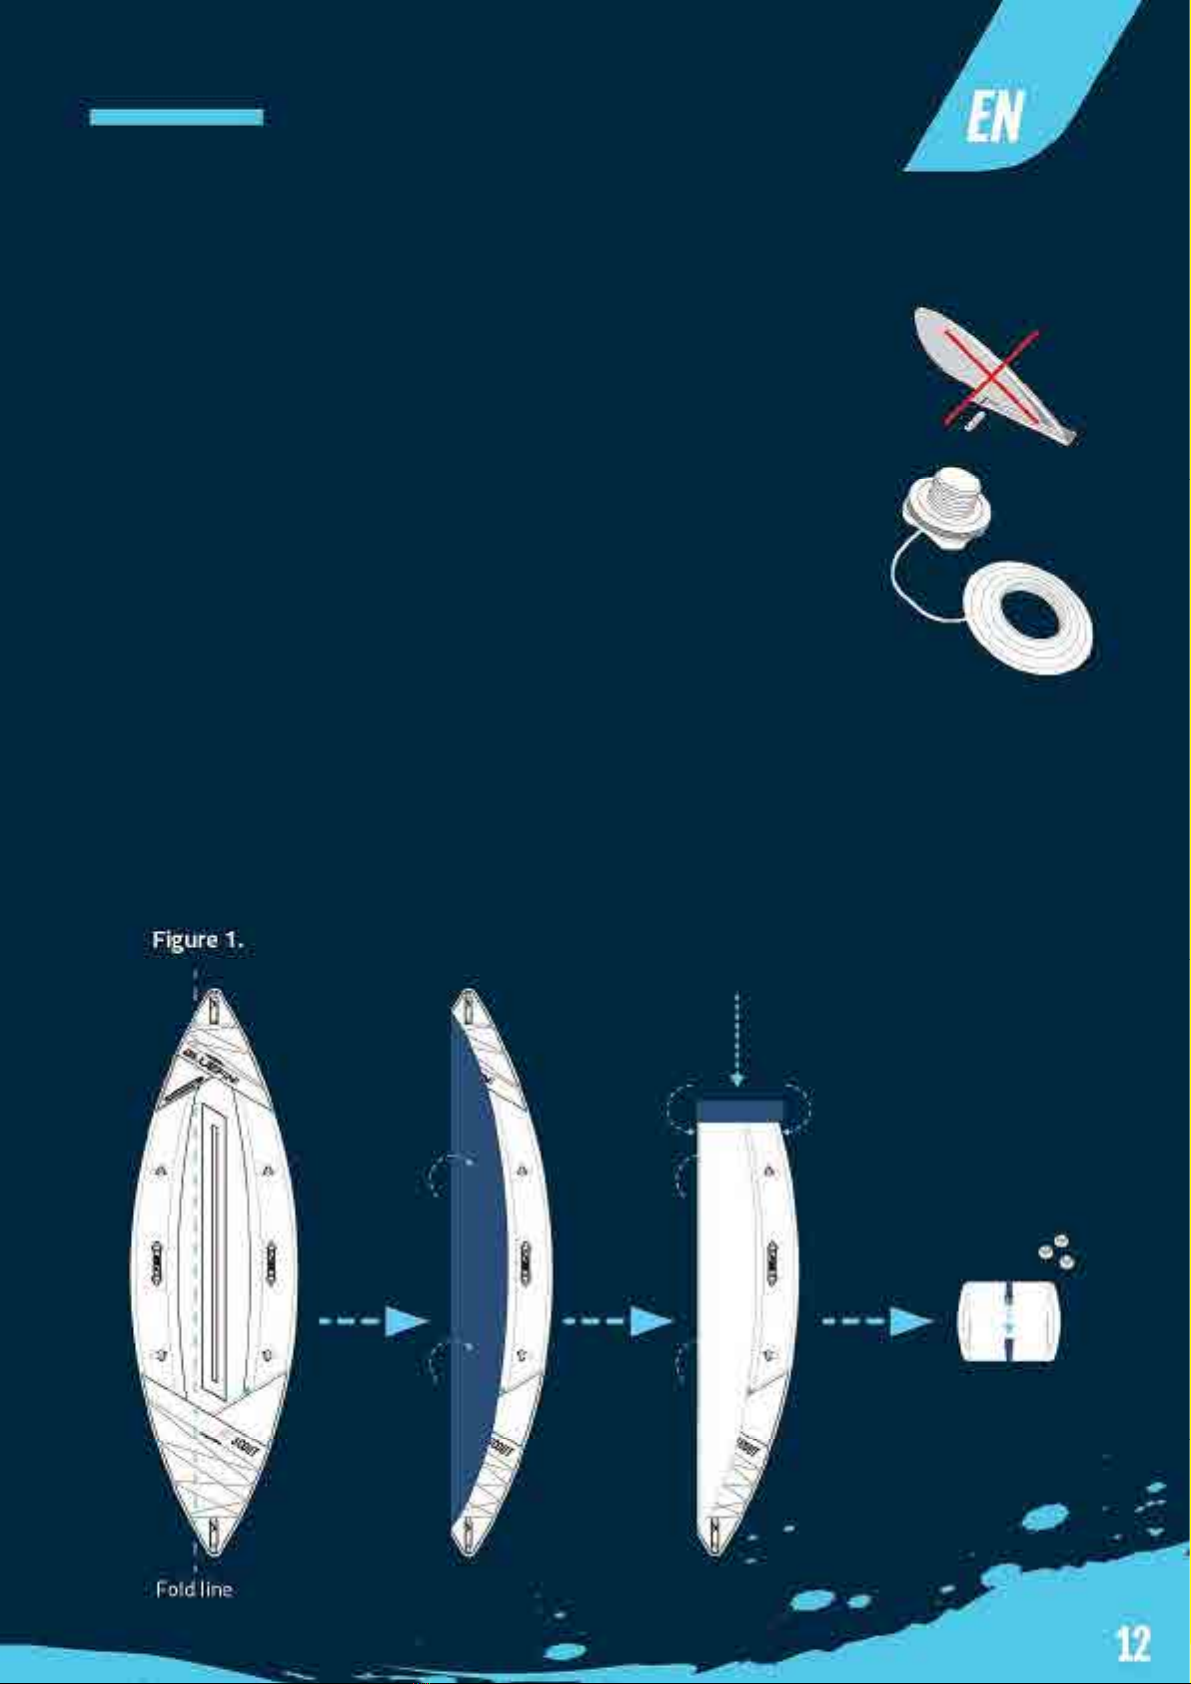
●For compact storage your kayak should be as flat as possible. Once flattened, fold the kayak in half and roll
tightly from the nose down. Figure 1
●Once the kayak is rolled up, use the buckle strap to secure and tighten the strap.
●Please pack and store the Kayak in the backpack provided in a cool dry place and away from direct sunlight.
DEFLATING AND PACKING AWAY
FOR SCOUT

●Before deflating the kayak, please remove the central fin and ensure it is clean
and free of sand and debris. Hose down if necessary to prevent mildew build-up
in storage. Do not use harsh chemicals for cleaning. Most dirt can be removed
with mild soap and water.
●Deflate each valve on the Kayak by first removing the valve cap. Next, you can
release some pressure by slightly pushing on the push-pin. TIP: Don’t face
directly over the valve when releasing the initial blast of air.
●To fully deflate the kayak, please push firmly on the push-pin and twist the knob
in any direction to lock into place. Your kayak will now rapidly deflate.
●To ensure full deflation, you can carefully kneel and crawl, or sit over parts of the
kayak to force the remaining air out. For best results you can use the deflate option on the pump to remove
any last air pockets. to stop air from being pulled back in when removing the hose, quickly twist the valve pin
to pop it back up fully, this will close the valve. Once fully deflated, please re-attach the valve caps.
●Remove the base from inside the kayak and roll this up. Figure 1.
●Fold the kayak in half and roll around the base insert tightly. Roll from the nose down. Figure 2. Once rolled
up, fix the buckle strap around the outside and tighten for storage.
●Please pack and store the Kayak in the backpack provided in a cool dry place and away from direct sunlight.
DEFLATING AND PACKING AWAY
FOR RANGER
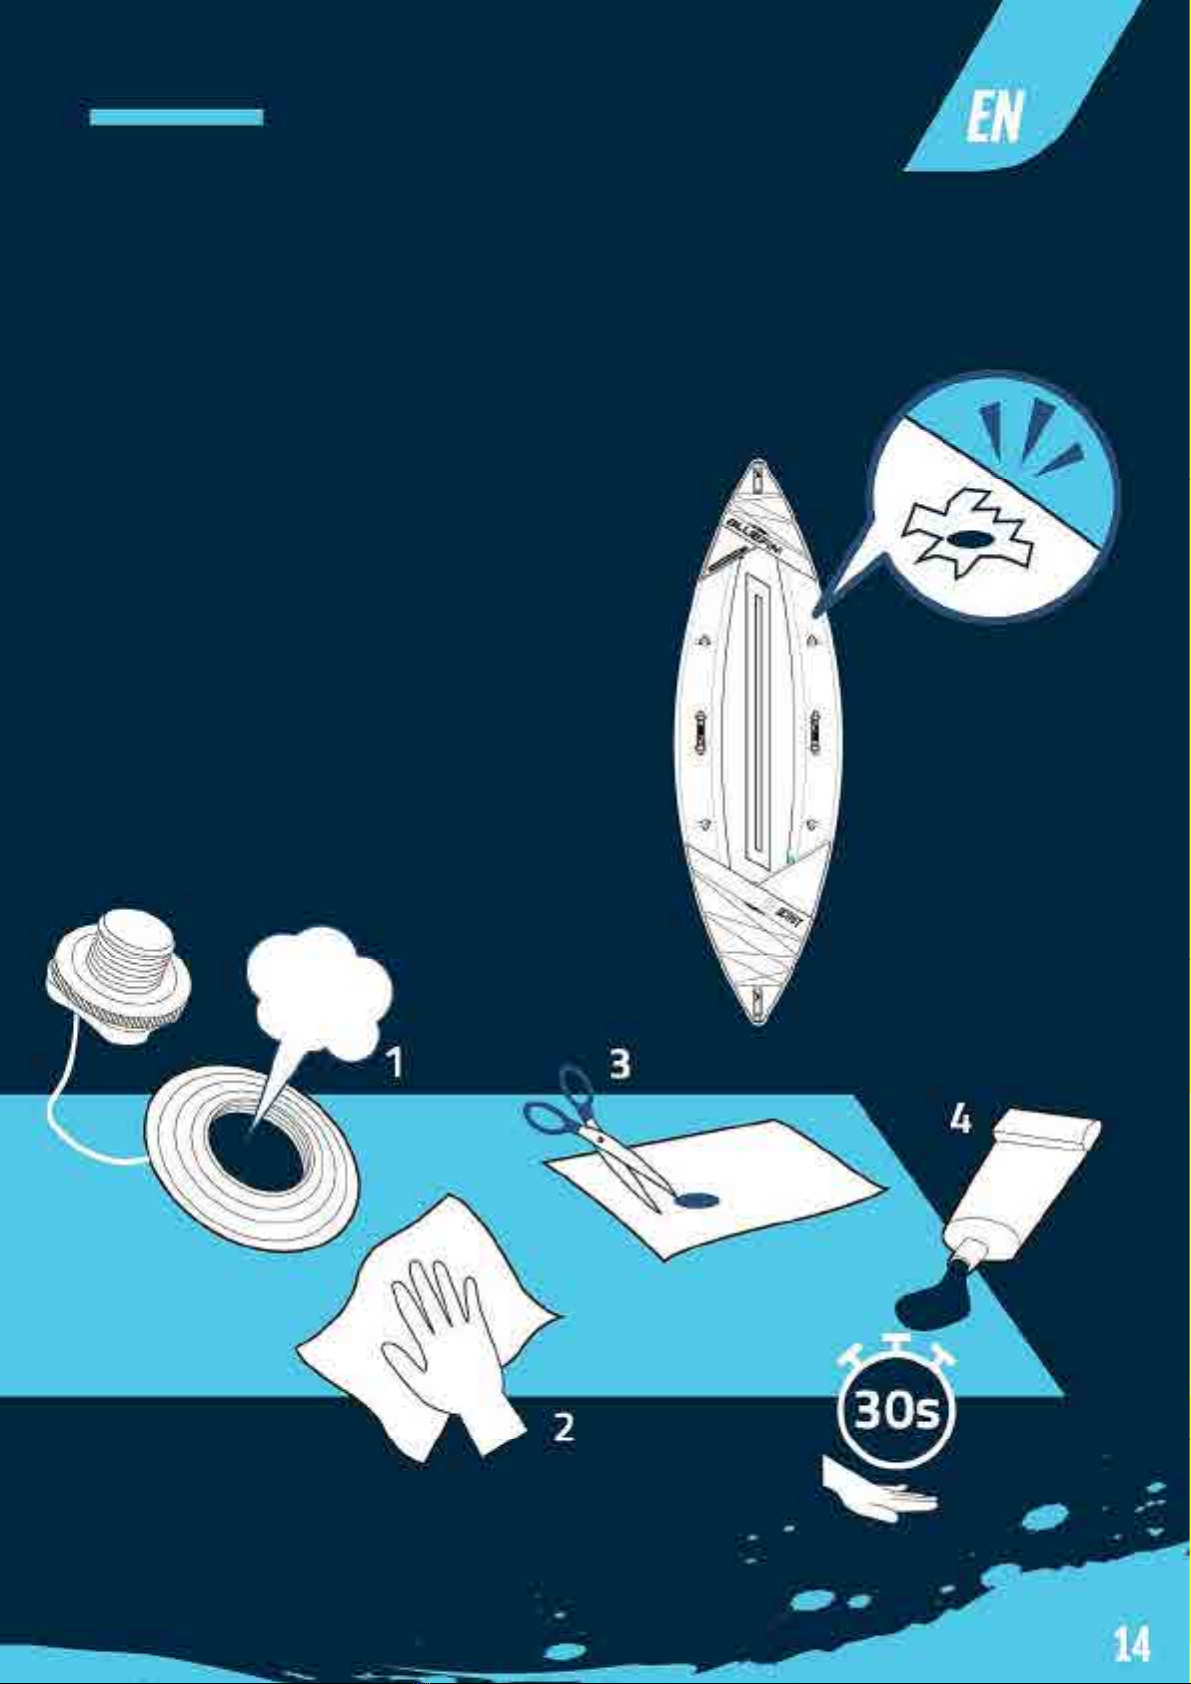
1) Locate the leak.
2) Deflate the kayak completely.
3) Unzip the outer fabric and find the puncture on the PVC.
4) Clean and dry the area to be repaired with a cloth.
- Peel a repair patch and apply over the puncture/tear.
5) Hold the patch firmly in place for 30 seconds.
HOW TO REPAIR
SCOUT (VALVE AND PUNCTURE)
HOW TO REPAIR
RANGER (VALVE AND PUNCTURE)

HOW TO REPAIR
RANGER (VALVE AND PUNCTURE)
If your kayak appears soft, it’s not necessarily because of a leak. If you inflated your kayak during the day at an
ambient temperature of 32°C, the temperature could go down to 25°C in the evening. The colder air then exerts
less pressure on the kayak and it may appear softer the next morning.
If temperature variation doesn’t explain the loss of pressure, identify the source of the leak by putting soapy
water on your kayak to locate the leak.
Case 1: leak around the valve
1) Deflate the kayak completely.
2) Firmly grab the inner part of the valve through the lower layer of the wall.
3) Insert the tightening key into the outer part of the valve.
4) Rotate the key clockwise until it’s completely sealed.
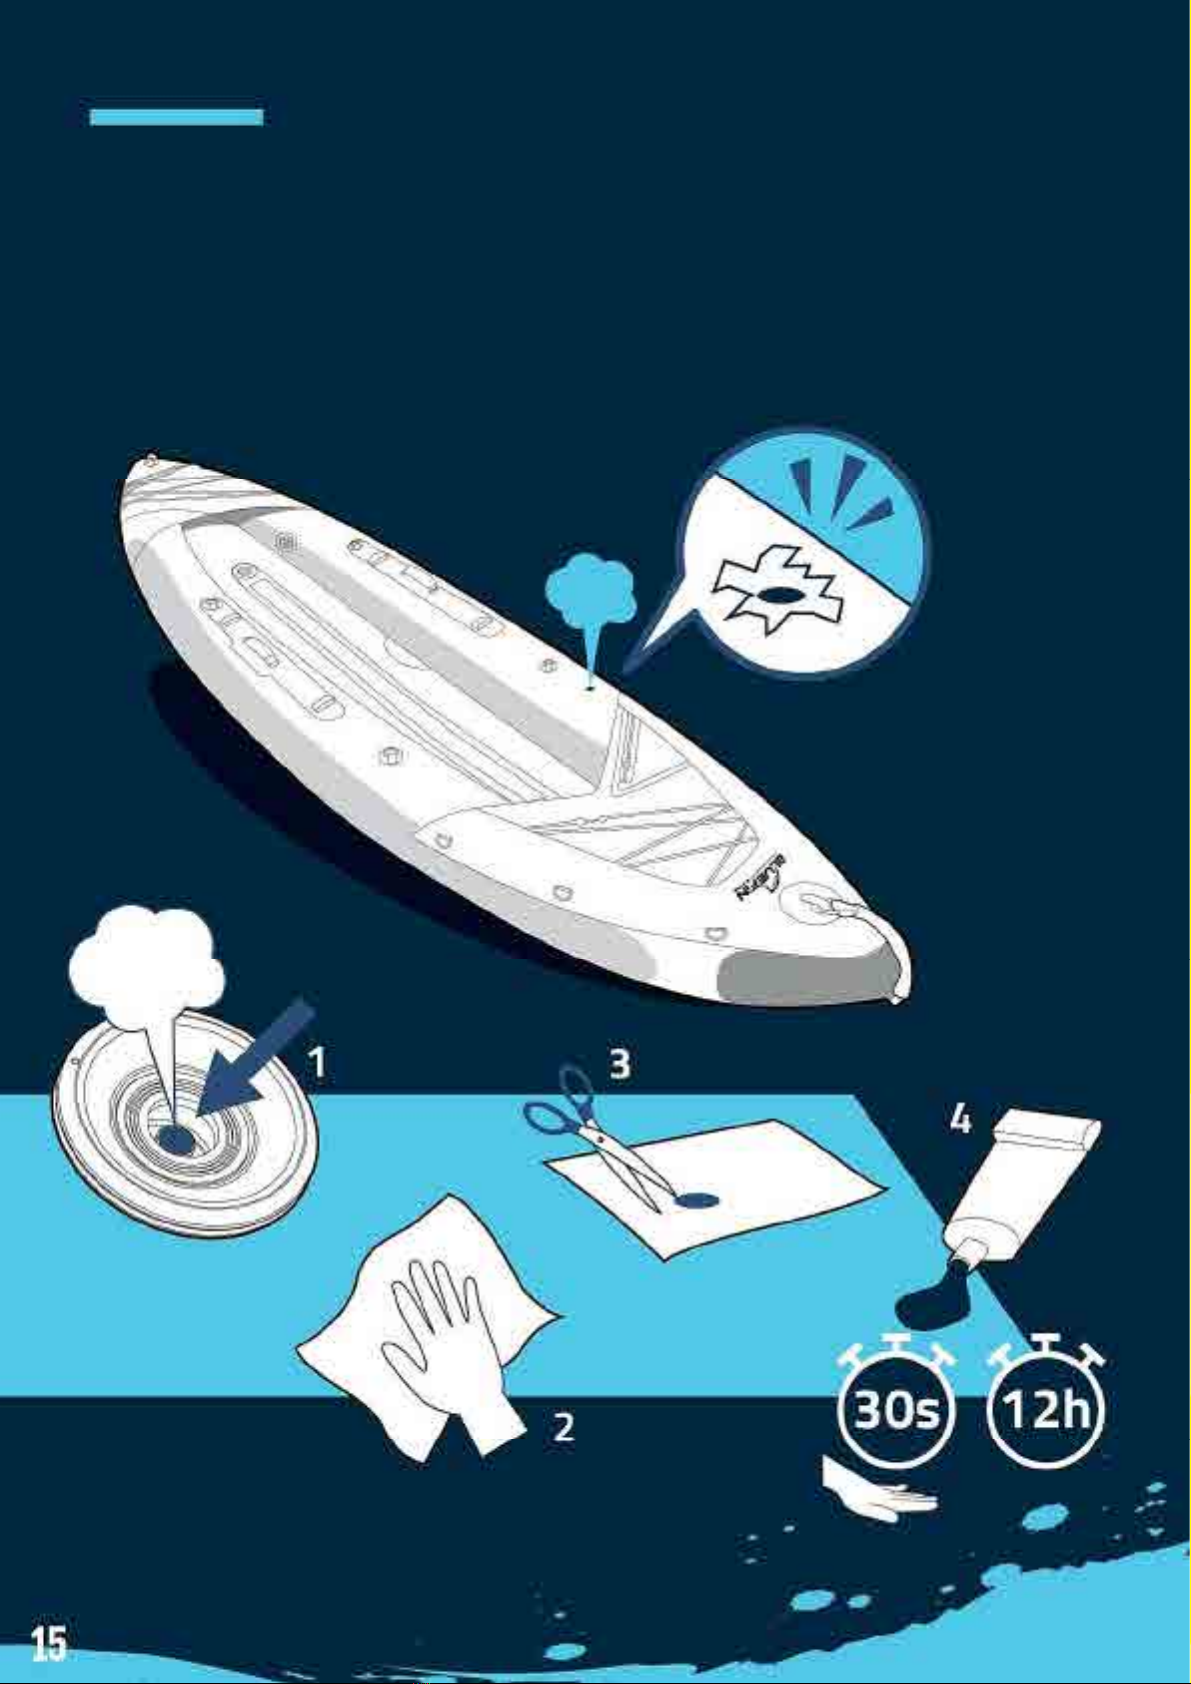
Case 3: puncture on the kayak’s surface
1) Locate the leak.
2) Deflate the kayak completely.
3) Clean and dry the area to be repaired with a cloth.
4) Choose a piece of laminated canvas from the repair kit provided with the kayak.
- Cut out a piece of fabric according to the area to be repaired, taking care to round off the corners.
- Apply a glue for “soft PVC” according to the glue assembly instructions.
5) Hold the patch firmly in place for 30 seconds. A weight can help compress the patch.
6) Allow 12 hours of drying time before re-inflating the kayak and check that the leak has been repaired
properly.
Case 2: leak in the middle of the valve
1) Deflate the kayak completely.
2) Inspect the valve body. If it appears broken, please contact Bluefin customer service.

SAFET Y
AND CAR E
●Whilst kayaking please consider appropriate clothing for the weather or climate. It is highly recommended
to wear a buoyancy aid vest or other personal flotation device, and a wetsuit in cooler conditions.
●Stay hydrated by packing a water bottle in your cargo area. You can secure a bag or cooler under the cargo
bungees with ease.
●Store your mobile phone in the waterproof case provided. Also, consider packing a whistle or flashlight in
case of an emergency.
●Your kayak can expand and over-inflate in very hot temperatures. Please check the air pressure and
deflate as necessary.
●Please pack and store the kayak in the backpack provided, in a cool dry place and away from direct
sunlight. You should clean and maintain your kayak after each use. Hose down if necessary to prevent
mildew build-up in storage. Do not use harsh chemicals for cleaning. Most dirt can be removed with mild
soap and water.
●A repair kit is provided, with extra patches and a valve tightening tool. From time-to-time your valve may
need tightening to prevent any air leaks. To tighten the valve first ensure that the board is fully deflated.
Insert the tool into the valve and push upwards from the underside of the board to ensure that the valve is
making firm contact with the thread. Next, turn the tool clockwise until the valve is fully tightened and
secure.
●Please ensure that no water gets inside of your kayak as this can severely damage the kayak. If water
gets inside the valve, then please remove the valve using the tool provided. Drain any water and dry
thoroughly before re-attaching the valve and inflating.
●Use of this product and participation in the sport involves INHERENT RISKS of SERIOUS INJURY or DEATH.
●User ASSUMES ALL RISK of injury or death.
●ALWAYS wear a properly fitted USCG type III/Level 70N, ISO/CE or other agency approved Life Jacket or
Personal Flotation Device (PFD) as required in area of use.
●NEVER use while under the influence of alcohol or drugs.
●NEVER leave children unattended. ONLY use under adult supervision. Not intended for use by children
under 5 years of age.
●NEVER place wrists or feet through handles.
●NEVER swim under this product.
●NEVER jump or dive from this product. NEVER exceed the manufacture's recommended number of users
for this product.
●NEVER add any hardware or attachments not otherwise supplied by the manufacture.
●This product is not a personal flotation device.
●ALWAYS read the User's Manual before use.
●BEWARE OF OFFSHORE WINDS AND CURRENTS.
●CAUTION the dangers associated with uneven distribution of persons or loads in the boat.
●CAUTION please follow the user manual, which may detail important inflation and assembly sequences.
●For consumer use only
WARNING:
TROUBL E S H OOTING
My pump isn’t
working.
Check whether the hose
is blocked or damaged in
any way.
Remove any blockages from the hose, or replace
if damaged.
My Kayak has a
puncture / leak.
With the kayak inflated,
apply dish-washing liquid
to a cloth and coat the
valve or any area you
believe has a leak.
If bubbling occurs, your valve may be need
tightening or the PVC will need repairing. Refer
to the pages in the manual that explain how to
repair the kayak.
If the problem persists, please contact us.
Additional resources may be found at
www.bluefinsupboards.com/info-zone/mainten
ance-repair/
The connection between
the hose / air pump /
inflation valve on your
inflatable isnot secure.
Pause the inflation, check all connections are
secure and reinstall if necessary.
The PSI gauge isn’t
working.
The PSI value won’t usually register until it
reaches 1 PSI.
If the problem persists, please contact us.
Additional resources may be found at
www.bluefinsupboards.com/info-zone/mainten
ance-repair/
Fault Inspection
Solution

TROUBL E S H OOTING
One or some of
my D-rings has
come unstuck or
has fallen off.
Check whether you just
need to glue the D-ring
back on, or if you require
a new one.
Use a strong adhesive glue to re-apply the
D-ring, source a new D-ring from a supplier or
contact us for a replacement.
My Kayak won’t
fit back into the
backpack.
The kayak is a very
tight-fit and doesn’t
appear to fit back into
the backpack.
Unfold the Kayak and ensure that all of the air
has been squeezed out. You can crawl on the
board on your knees, or apply pressure by as
possible. Roll the Kayak up in approximately 1ft
increments and re-pack. For some larger models,
it may help to fold the sides inwards before
rolling.
If the problem persists, please contact us at
resources may be found at
www.bluefinsupboards.com/info-zone/mainten
ance-repair/
If the problem persists, please contact us at
resources may be found at
www.bluefinsupboards.com/info-zone/mainten
ance-repair/
Fault Inspection
Solution
Table of contents
Languages:


