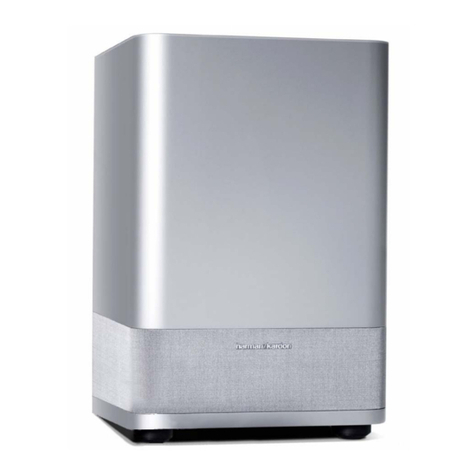
Bluesound PULSE SUB+ User manual

WIRELESS POWERED SUBWOOFER
OWNER’S MANUAL

WELCOME TO #LIVINGHIFI
Included Accessessories
Thank you for purchasing your PULSE SUB+. It’s the perfect addition to your wireless or wired Bluesound
system. Created to be a modern, robust, and integral part of your listening experience, the SUB+ brings
deep, tight, and expressive musicality to any Bluesound setup.
JUST ADD BASS. It’s really that simple. Use the BluOS App to quickly setup and pair the SUB+. With
BluOS onboard, you benefit from letting the world’s leading hi-res multiroom system help you connect
your SUB+ wirelessly to any other Bluesound Player, with simple and intuitive App controls for volume,
crossover, and phase delay. Easy software control means better options and more precision as you dial in
the best settings for your ideal listening experience.
PLACE IT ANYWHERE. We truly believe that a subwoofer doesn’t have to be as large as the furniture you sit
on. The SUB+ is a from-scratch design created to pair practicality and performance in one elegant product.
The design approach focuses on maximum output from minimal footprint, built to blend into any room and
any décor. The result is a sleek, compact, and incredibly versatile product that satisfies in both performance
and aesthetics.
ADD IT ALL UP. When you add up the BluOS smarts, the 8” driver, the 150W Smart DSP Amplifer, and the
versatility in placement and connection options, it’s not hard to see the SUB+ as a fundamental addition
to your entertainment setup. With tight, dynamic power and a depth that evokes pure emotion, listening to
your favorite music, movies, shows, and videos has never felt so good.
This Owner’s Manual will provide you a more detailed overview of PULSE SUB+ features. It also includes
some troubleshooting tips and tricks and networking best practices. The Quick Setup Guide included with
your SUB+ will help you get it on the network and paired with another Player.
If you need more help or information, please visit support.bluesound.com or send us an email at
Magnetic Rubber Feet
Wall Mount Bracket
2

INPUT SERVICE 100-240V~50/60Hz USB SERVICE LAN USB
WIRELESS POWERED SUBWOOFER
2
1
3
4 5 76 8 99 1110
1STATUS INDICATOR
Below is a table of the LED blink codes and their corresponding descriptions.
LED BLINK CODE DESCRIPTION
Short blue flash, then red Powering up, rebooting the unit
Solid green Hotspot Mode
Flashing green Connecting to Network
Long blue flash, short purple flash Connected to Network - ready to be paired
White pulse Software update available
Solid red Upgrade mode
Alternate flashing red and green Upgrading
Flashing blue Mute mode
Solid blue Connected to Network – ready to use with BluOS App
Flashing red Factory reset in progress
+/- VOLUME : Toggle either button to vary volume level. When the SUB+ is network-paired to another Player, the
volume buttons act as a +/- dB trim in relation to the primary Player’s volume level. When the SUB+ is not
network-paired to another Player, the volume buttons control the full volume range of the SUB+.
2

4
FUNCTION BUTTON :
A) TOGGLE SUB ON/OFF: When the PULSE SUB+ is network-paired to another Player, pressing the Function Button
once will toggle the Player’s Subwoofer ON/OFF switch in the BluOS App. With the switch set to ON, a crossover is
engaged: the SUB+ will handle the low frequency while the paired Player will handle the higher frequency content, as
dictated by the crossover level. With the switch set to OFF, the crossover is disengaged and the paired Player handles
the full frequency range. The SUB+ will be silent in this case. Note that using this toggle does not unpair the SUB+
from a Player. Further, this function does not work when multiple SUB+ are paired to a Player.
B) STANDBY: Press and hold the Function button for 5 seconds to place the SUB+ into Vacation Mode (0.5W
Standby). In Vacation Mode, all network activity will cease and the subwoofer will not appear in the BluOS App. Press
the Function button again to restore the SUB+ to Ready Mode.
C) UPGRADE MODE: To manually place the SUB+ into Upgrade Mode, first disconnect it from electrical power. Wait a
moment, then reconnect power. Press and hold the Function button until the LED turns Green and then back to RED,
then release. The LED will immediately turn Green and then back to Red. The SUB+ is now in Upgrade Mode. This is
only necessary in specific cases with authorization from a Bluesound support representative.
D) FACTORY RESET – more information on Factory Reset is available on page 9 of this manual.
MOUNTING FOOT : The PULSE SUB+ can be placed in several orientations, including (but not limited to) laying flat
on its back or mounted to the wall. The back panel Mounting Foot (x4) provides the necessary cushion to help prevent
unwanted vibrations when the SUB+ is laying on its back. The Mounting Foot is also the attachment point for wall
mounting; the shaped groove in the Mounting Foot slides onto the rubber foot on the supplied wall mount bracket and
uses gravity to lock into place.
LOW/LINE LEVEL INPUT : For connecting the PULSE SUB+ via wire to another Bluesound Player that has a wired
SUB OUT, or alternatively to a separate component preamplifier, integrated amplifier, or receiver, at line level.
SERVICE : Use the Service port in conjunction with USB (Type B Mini) to load firmware on the PULSE SUB+. This
is not for consumer use. Only Authorized Bluesound Service personnel can access this USB port and Service control
button.
AC MAINS INPUT : Select the AC power cord appropriate for your region (included). Before connecting the plug to the
wall outlet, firmly connect the other end of the AC power cord to the PULSE SUB+ AC Mains input socket. Never force
the plug into a wall outlet. An adaptor may be necessary in certain regions. Always disconnect the plug from the wall
outlet first, before disconnecting the cable from the SUB+ AC Mains input socket.
USB (TYPE B) : Use the Service port in conjunction with USB (Type B Mini) to load firmware on the PULSE SUB+.
This is not for consumer use. Only Authorized Bluesound Service personnel can access this USB port and Service
control button.
USB (TYPE A) : Use the USB (Type A) port for manual software upgrades. This is only necessary in specific cases with
authorization from the Bluesound Support Crew.
LAN PORT : The LAN port connection is used with an Ethernet cable (not provided) for network connection and
control. This is an optional connection since the PULSE SUB+ can be connected to the network through Wi-Fi. If you
are using wired Ethernet for network, connect one end of the Ethernet cable to the SUB+ LAN port, and the other end
directly to your router or switch.
MAGNETIC RUBBER FEET : When the PULSE SUB+ is placed in a standing position, use the supplied magnetic
rubber feet (x2) to help prevent unwanted vibrations. The magnets are mounted inside the cabinet of the SUB+. Simply
place the magnetic rubber feet near the required location and they will snap into place.
3
4
5
7
6
8
9
10
11

CHOOSE PLACEMENT
Room Acoustics
If you are critical about low-frequency response, there’s quite a bit of useful experimentation you can do,
especially in combination with the crossover, level, and phase controls of the PULSE SUB+.
Begin by considering the size of the listening room. The larger the volume of air a speaker must move,
the more acoustic output is required to achieve the sound levels you want. In smaller rooms, sound
attenuation tends to be offset by reinforcement from wall reflections. In larger spaces, sound has to travel
to reach the reflecting surfaces and then to your ears, which means it has to be louder to begin with.
After size, the most important aspect of a listening room is its shape. In any room, sound reflects off the
walls, ceiling, and floor. If the distance between two opposite parallel surfaces is a simple fraction of
the wavelength of a particular frequency, notes of that frequency will bounce back and forth in perfect
phase—an effect called a standing wave or room mode. At some point in the room, this note will be
reinforced substantially; at others it will cancel out almost entirely. If the prime listening seat is placed at
either of these locations, the note will be a horrible boom or virtually non-existent. Almost all rooms are
susceptible to some standing waves at low frequencies, but careful positioning of the speakers and the
listening seat can minimize the effects. The only way to find out what works best is by experimentation.
Positioning of a bass speaker has almost no impact on imaging, so the PULSE SUB+ can be positioned
almost anywhere.
Subwoofer Placement
The loudest bass output from a subwoofer comes from corner placement. The outward flaring of walls
from a corner focuses low frequencies, giving them no place to go but toward the listener.
If you are seated in a null spot where sound from the PULSE SUB+ is cancelled or diminished by out-
of-phase reflections, you will have to move either the subwoofer or your listening position until you get
the desired bass. Adjusting the phase control 180 degrees may make a difference, especially if the null
is a product of cancellations caused by interaction with low frequencies from your main speaker(s). If the
opposite is happening, where direct and reflected bass waves converge in phase and produce too strong a
peak at your listening position, you can change position or change your sub’s level control (or possibly the
crossover frequency chosen).
The best method for positioning the PULSE SUB+ is to put it in your listening chair, then play music
with lots of bass through the system (something with steady and obvious low frequencies). Move around
the room and note where the bass sounds best; if you place the SUB+ in that location, you should get
the same bass performance. This test only works if you have your ears at the same height as where the
SUB+ will be, so you may have to get down low. A recommended starting point for placement would be
in either of the front corners of the room.
Multiple Subwoofers—Why Two Subs Are Better Than One
Sometimes the listening room is not conducive to achieving satisfying amounts or quality of bass. There
are rooms with troublesome dimensions, especially those that are more cubical. In such a case, two
subwoofers placed carefully to work with each other are recommended to handle acoustical anomalies.
This can also be applied when the problem is too much, or too uneven, bass. The overall system benefits
from each subwoofer correcting the acoustic problems caused by the other.
A very good starting point for positioning two subwoofers is to place one each on the centre of opposing
walls. Experimenting with positioning as previously described should be used for determining the location
of the second subwoofer, except in this instance one is listening for the minimum amount of bass output.
5

CONNECT FOR SOUND
There are several ways to connect the PULSE SUB+ to your audio system.
Wireless Connection
The SUB+ is designed first and foremost as a wireless subwoofer solution to be used with other
Bluesound Players. To use the SUB+ wirelessly, you need to connect it to your desired network. A simple
App-based process will help you connect your SUB+ and pair it with another Bluesound Player.
Follow the steps in the Quick Setup Guide to get your SUB+ positioned and powered on. Open the BluOS
App on your phone or tablet. In the right-hand Player Drawer, select Add A Player, and when prompted,
select Add Subwoofer. Follow the guided wizard to add your SUB+ to the network via Wi-Fi and ensure it
upgrades to the latest BluOS firmware. This can take a few minutes.
Once connected and updated, your SUB+ will show up as ‘Unpaired’ in the My Subwoofers section of
the Player Drawer. The LED indicator on the SUB+ flashes long Blue and short Purple when it is on the
network and ready to be paired. Select the Link/Pairing icon to open the Pairing wizard and select the
Player you want to pair with your SUB+.
The PULSE SUB+ is now paired and ready to use. You can access advanced audio controls through the
Audio Settings menu of its paired Player.
Wired Network Connection
To use the PULSE SUB+ wired to your network, you need to connect it via Ethernet to your router or
switch. An ethernet cable is not included in the box.
Follow the steps in the Quick Setup Guide to get your SUB+ positioned and powered on. Open the BluOS
App on your phone or tablet. In the right-hand Player Drawer, select Add A Player, and when prompted,
select Add Subwoofer. Follow the guided wizard to add your SUB+ to the network and ensure it upgrades
to the latest BluOS firmware.
Once connected and updated, your SUB+ will show up as ‘Unpaired’ in the My Subwoofers section of
the Player Drawer. The LED indicator on the SUB+ flashes long Blue and short Purple when it is on the
network and ready to be paired. Select the Link/Pairing icon to open the Pairing wizard and select the
Player you want to pair with your SUB+.
The PULSE SUB+ is now paired and ready to use. You can access advanced audio controls through the
Audio Settings menu of its paired Player.
Analog Low/Line Level Connection
The PULSE SUB+ has been designed to allow you to use an analog RCA cable to connect for sound,
instead of sending audio over your network. If you are using your SUB+ with a receiver or integrated
amplifier with preamplifier outputs, or if you are using a separate preamplifier, the best connection is from
the Preamplifier Output of your electronics to the RCA Input of the SUB+.
The SUB+ will work with a simple low/line level RCA. However, to pair with another Player and use the
advanced audio controls via the BluOS App, you must connect it to the network via Ethernet or Wi-Fi,
even if you will transmit audio to the SUB+ via RCA cable.
Please see the previous Wireless and Wired connection information for more details on setting up your
subwoofer via WiFi or Ethernet.
6

NEXT-LEVEL CALIBRATION
The settings in the PULSE SUB+ have been set to default levels in order to work well with your
Bluesound Player in most listening environments. However, you may still require some adjustments to
the settings based on placement and personal preference.
The following procedure assumes your SUB+ is installed, connected to the network, and paired with a
Player. If you are using the SUB+ as a non-networked, powered subwoofer, your ability to do next-level
calibration will be limited.
With the Subwoofer audio settings menu open in the BluOS App, use these steps to fine-tune your
subwoofer setup.
1. Set SUB+ volume to the lowest possible level. Set the crossover frequency to the lowest
level, meaning the crossover slider is set all the way to the left side. Set any special audio
features, bass and treble, or EQ controls on your paired Player to their nominal (midpoint or
off) positions.
2. Play a familiar music source that includes substantial deep-bass content over an extended
section.
3. Gradually turn up the volume of the SUB+ until you achieve natural balance between the
subwoofer’s deep-bass output and your speaker(s).
4. Gradually adjust the crossover up to reach the best mid-bass blend with your speaker(s).
This will be the point at which the upper bass retains solid impact and fullness. Boom or
muddiness is the result if the crossover is too high. A thin, ‘reedy’ quality to the mid-bass
such as deep male voices (FM announcers; Darth Vader) is the result if the crossover is too
low.
5. Toggle the Phase control between 0° and 180° several times, leaving it in the position that
yields the fullest low to mid-bass output. You will now likely want to repeat steps 3 and 4 to
check your subwoofer blend.
Cycling through steps 3 and 4 several times with slightly different settings of both the volume and
crossover controls will help you get the most musical performance from your PULSE SUB+. The best
combination is one that yields the most solid very-low bass sounds, without mid-bass boom or a gap in
response between the SUB+ and other speaker(s).
The crossover and volume controls are interactive. Raising the latter while lowering the former can
have the effect of extending deep-bass response somewhat, with a small sacrifice in overall loudness
capability. In general, for well-recorded acoustic music the lowest crossover setting that still yields a
smooth transition between subwoofer and the main speaker(s) is often the best choice, and will promote
deeper low-bass extension.
Note: The PULSE SUB+ volume control is not intended as a bass boost or daily volume control. It is
designed as a set-and-forget adjustment, and not for day-to-day use.
7

TROUBLESHOOTING
Symptom Action
No sound
8
Ensure the power cord is connected to the subwoofer and plugged into a
live AC outlet.
The PULSE SUB+ utilizes signal sensing auto on/off circuitry. If no
signal is sent to the subwoofer, it will not power up. When using
the subwoofer output of a receiver or processor, no signal may be
immediately present in this output. The subwoofer will only power up
when bass signal appears at the subwoofer input.
If the wireless connection or low level cable is poor or has been
severed, the subwoofer may not make a sound.
Lower volume if the subwoofer begins to sound distorted to determine
if playback at a lower level solves the problem. If a slight reduction in
level solves the problem, then the subwoofer level was too high. If the
distorted sound remains at a low level, the driver may be damaged.
Hum that appears when using the PULSE SUB+’s low level input(s)
is usually caused by using an inferior, damaged, exceptionally long
low level cable or cables routed near high current wiring/appliances.
Replace/shorten the low level cable connecting the subwoofer to the
source equipment (receiver or processor). Low level cable runs of longer
than 20 feet may require the use of a line driver (not available from
Bluesound).
See your dealer if you require service. Authorized Bluesound dealers are equipped to handle almost all
problems. You may locate your nearest Bluesound authorized dealer online at www.bluesound.com. If the
problem is not resolved, please contact us, providing the model name, serial number, date of purchase,
dealer name, and a full description of the problem.
Hum
Sounds distorted

PULSE SUB+
WARNING!
THIS IS A FACTORY RESET OF YOUR PLAYER. ALL CUSTOMIZATION INCLUDING
WI-FI NETWORK CONFIGURATION, FILE SHARES AND SAVED PLAYLISTS WILL BE
LOST. YOU WILL HAVE TO RE-CREATE THESE ONCE COMPLETE. THIS PROCESS IS
ONLY RECOMMENDED IF YOUR PLAYER IS NOT FUNCTIONING AND AN INTERNET
FIRMWARE UPGRADE HAS FAILED. FOR ANY QUESTIONS OR CONCERNS CONTACT
AN AUTHORISED BLUESOUND CUSTOMER REPRESENTATIVE BEFORE PROCEEDING!
Steps to Factory Reset:
1. Disconnect the player from electrical power.
2. Wait 30 seconds.
3. Reconnect the power.
4. Once the LED turns Red, press and hold the Function button on the side of the player. The LED
will immediately turn Green and then back to Red – continue to hold the button for 30 seconds.
5. After 30 seconds, the LED will begin to blink red – then release the button.
6. All customization to the Bluesound player will be removed and restored to factory settings.
IMPORTANT: Removing your finger from the Function button at any time before the LED begins flashing
red will cancel the factory reset and leave the player in Upgrade Mode. Just start the steps again to
factory reset the player.
You will know the factory reset is successful if the player returns to Hotspot mode (wireless connection –
the LED will turn solid green). If the player is connected to your network through a wired Ethernet
connection, it will simply connect as if it was a new player (LED will turn solid blue).
9
Table of contents
Other Bluesound Subwoofer manuals
