BORETTI VFP104MIX User manual

cod. I/301/54
Installation
Manutention
MICROWAVE OVEN
MICROWAVE OVEN

2
Index
1. General
1.1 Oven and control panel description........................................................................3
1.2 Important safety warning ................................................. 4
1.3 Technical data ....................................................................................................8
1.4 Installation.........................................................................................................8
1.5 Accessories included............................................................................................8
1.6 Containers for various types of cooking .................................................................. 9
1.7 General rules and advice for using the oven............................................................ 9
1.8 Essential rules for proper microwave cooking:....................................................... 10
2. Use of controls
2.1 Setting the functions ......................................................................................... 11
2.2 Cooking time settings ........................................................................................ 12
2.3 End of cooking mode ......................................................................................... 12
2.4 Child safety...................................................................................................... 12
2.5 Oven light ........................................................................................................ 12
3. Oven use: useful hints and cooking times tables
3.1 Defrosting........................................................................................................ 13
3.2 Heating ........................................................................................................... 14
3.3 Microwave cooking ............................................................................................ 16
3.4 Combined microwave + grill cooking.................................................................... 19
3.5 Grill cooking ..................................................................................................... 20
4. Maintenance and cleaning
4.1 Cleaning .......................................................................................................... 21
4.2 Maintenance..................................................................................................... 21
Notes................................................................................................ 22

3
E
E
E
N
N
E
E
N
N
B321
A
A GRILL ELEMENT
C MICROWAVE OUTPUT COVER
D TURNTABLE SPINDLE
E TURNTABLE SUPPORT RING
F TURNTABLE
G GRILLE
H PYREX DRIP PAN
I GRILLE FOR DRIP PAN
J INSIDE OF DOOR
B CONTROL PANEL
1 FUNCTION SELECTOR
2 TIME SELECTOR AND START/STOP BUTTON
3 DISPLAY
C
G
F
H
E
I
DJ
1. General
1.1 Oven and control panel description

4
Read with care the following instructions and keep them for
further reference N.B. This oven was designed to defrost, heat
and cook foods in the home. It must not be used for other pur-
poses and must neither be altered nor tampered with in any
way.
1) WARNING: If the door or seals are damaged, the oven must not
be used until an experienced technician (trained by the manufac-
turer or shop’s Customer Service) has repaired it.
2) WARNING: It is dangerous for anyone without adequate training
to attempt maintenance or repairs that entail the removal of pro-
tection against exposure to microwaves.
3) WARNING: Do not heat liquids or other foodstuffs in sealed
containers which could explode. Do not cook or heat eggs in
their shells in the microwave as they may explode, even once
cooked.
4) This appliance must only be used in the home.
5) The microwave oven must be used for heating food and drink.
Drying food or clothes and heating warmers, slippers, sponges,
damp cloth or similar may cause physical damage, explosion and
fire.
6) Should signs of smoke be seen coming from the oven, switch off
the appliance or pull the plug from the mains without opening the
door in order to smother possible flames.
7) WARNING. Accessible parts may become very hot during use.
Keep children away from oven. Do not allow physically or mental-
ly impaired persons (also children) to use the appliance, or those
without enough experience or knowledge, unless they are care-
fully supervised and instructed by someone responsible for their
safety that makes them aware of the dangers associated with
1.2 Important safety warning

5
E
E
E
N
N
E
E
N
N
inappropriate use. Children should be supervised, ensuring that
they do not play with the appliance.
8) WARNING: when the appliance is turned on in the combined mode,
children should only use it under an adult’s supervision due to the
high temperatures it develops.
9) Do not attempt to turn on the oven with the door open, damaging
the safety devices.
10) Do not turn on the oven if any type of object remains trapped
between the inside of the door and the oven. Always keep the in-
side of the door (J) clean by using a damp cloth and non-abrasive
detergents. Do not leave dirt or food remains between the inside
of the door and the oven.
11) Do not turn the oven on if the electric cable or mains plug is da-
maged as this could cause electric shocks. If the electric cable is
damaged, it must be replaced by the manufacturer or its techni-
cal assistance service or by a suitably qualified person, to avoid
any possible risk.
12) Only use kitchenware for microwave ovens. To avoid overheating,
and subsequent risk of fire, it is advisable to check the oven whil-
st cooking food in recyclable plastic or carton containers or other
inflammable material or whilst heating small amounts of food.
13) Do not place the turntable in water while it is hot. The heat shock
could cause breakage.
14) When the “MICROWAVE Only” and “COMBINED MICROWAVE” op-
tions are used, the oven must neither be pre-heated (without
food) nor turned on whilst empty as this could cause sparks.
15) Before using the oven, ensure that the kitchenware and contai-
ners are suitable for microwaves (see section “Containers for va-
rious types of cooking”)

6
16) During use the appliance heats up. Do not place any objects on
top of the oven when in use. Do not touch the heating elements
inside the oven.
17) During heating of liquids (water, coffee, milk, etc.) it is possible
that due to delayed boiling, the contents suddenly start boiling
over, causing burns. To avoid this, before heating liquids, place a
plastic spoon or glass rod in the container. In any case handle the
container with great care.
18) Do not heat high alcohol content liquor or large amounts of oil as
they could catch fire.
19) After heating baby foods (in bibs or jars), shake or stir the con-
tents and check the temperature before feeding to avoid scalding.
It is also advisable to shake or stir the food to ensure an even
temperature. In case commercially available bib sterilizers are
used, before turning the oven on ALWAYS check that the con-
tainer has been filled with the amount of water indicated by the
manufacturer.
20) The oven must be cleaned regularly and eventual food remains
removed. Lack of cleaning may cause surface deterioration. This
can have a negative influence on the appliance’s lifespan as well
as creating possible dangerous situations.
21) Do not use steam cleaners for cleaning inside the oven.
22) Do not use scouring detergents or sharp metal implements for
cleaning the oven’s glass door, as that could damage the surface
causing its breakage.
23) All microwave ovens are tested and approved in compliance with
safety regulations and electromagnetic compatibility in force. As
a precaution, the manufacturers of pacemakers recommend ke-
eping a minimum distance of 20 – 30 cm between a working mi-
crowave oven and a pacemaker in order to avoid possible inter-

7
E
E
E
N
N
E
E
N
N
ference with the pacemaker. If for any reason you suspect there
is interference, switch off immediately the microwave oven and
contact the pacemaker’s manufacturer.
24) In case of the oven’s overheating (prolonged use, use while emp-
ty, etc.), the oven may be turned off by a safety thermostat. After
cooling, the oven will go back to working normally.
22) When the appliance is working, the door and outer surface can
become very hot.
N.B.: When switching the appliance on for the first time, it is possi-
ble that for about 10 minutes there is an unpleasant smell and a little
smoke. This is merely caused by protective substances applied to the
resistance.

8
1.3 Technical data
• Internal measurements (LxHxD): 305x290x440
• Oven’s net capacity: 35 Lt
• Turntable diameter: 27 cm
• Oven’s halogen lamp: G9 25 W
• Microwave output power: 1000 W (IEC705)
• Grill power: 1600 W
For further information, consult the appliance’s data plate.
This appliance complies with the European Directive 2004/108/CE on Electromagnetic compatibility and with the
European Regulation no. 1935/2004 of 27/10/2004 on materials destined for contact with foodstuffs.
The product is classified as belonging to Group 2, Class B of the ISM appliances. Group 2 includes all ISM ap-
pliances (industrial, scientific or medical) in which the radio frequencies are generated intentionally and/or
used in the form of electromagnetic radiation for material processing, as well as equipment for electro erosion.
Equipment for domestic use or used in buildings connected directly to a low voltage network for supplying buil-
dings destined for domestic use, fall into Class B.
1.4 Installation
1) Remove the accessories from inside the oven and remove the packaging and protection. Check that the
turntable’s spindle “D” is inserted properly in its place.
2) Clean inside with a soft damp cloth.
3) Check that there has been no damage during transport, and in particular that the door opens and shuts
perfectly.
4) Place the turntable support ring (E) in the centre of the circular housing and put the turntable (F) on top.
5) Before use, check that the power supply is the same as that indicated on the appliance’s data plate
and that the plug is earthed: the Manufacturer declines any responsibility arising from the lack
of observance of this regulation.
6) Most modern electronic appliances (tv, radio, stereo hi-fi, etc.) are shielded from radio frequencies (RF). Ho-
wever, some electronic equipment may not be shielded against radio frequencies coming from microwaves.
Keeping a distance of at least 1 – 2 metres between these appliances and the working oven is recommen-
ded.
1.5 Accessories included
A
B
C
D
1. General
A Circular grille
B Turntable
C
Rectangular grille for drip pan
D Pyrex drip pan

9
E
E
E
N
N
E
E
N
N
1.6 Containers for various types of cooking
In the microwave only and combined microwave functions, all glass (better if Pyrex), ceramic, porcelain, ear-
thenware containers can be used, so long as they are not decorated or have no metallic parts (gold trim,
handles, feet). It is also possible to use heat resistant plastic containers but just for “only microwave” cooking.
However, if in any doubt of whether to use or not a particular container, you can carry out this simple test: place
the empty container in the oven for 30 seconds on maximum power (“microwave only” function).
If the container stays cold or heats slightly it means that it is suitable for microwave cooking.
If on the other hand it becomes very hot (or sparks appear), the container is not suitable. Paper napkins,
cardboard trays and disposable plastic plates can be used as drip collectors during short heating. It is indi-
spensable that size and shape allow a proper rotation. To use large rectangular containers (which cannot rotate
freely inside the oven), block the turntable’s (F) rotation by removing its spindle (D).
Bear in mind that under these conditions, and to ensure satisfactory results, it is necessary to stir the food and
rotate the container a number of times during cooking.
All metallic, wooden, cane and crystal glass containers are not suitable for microwave cooking.
It should be remembered that, as microwaves heat the food and not the container, it is possible to cook food on
the serving plate thus avoiding the use and subsequent cleaning of pots. However, remember that it is possible
that if the food is very hot, then it is this that will heat the plate, making the use of pot holders necessary.
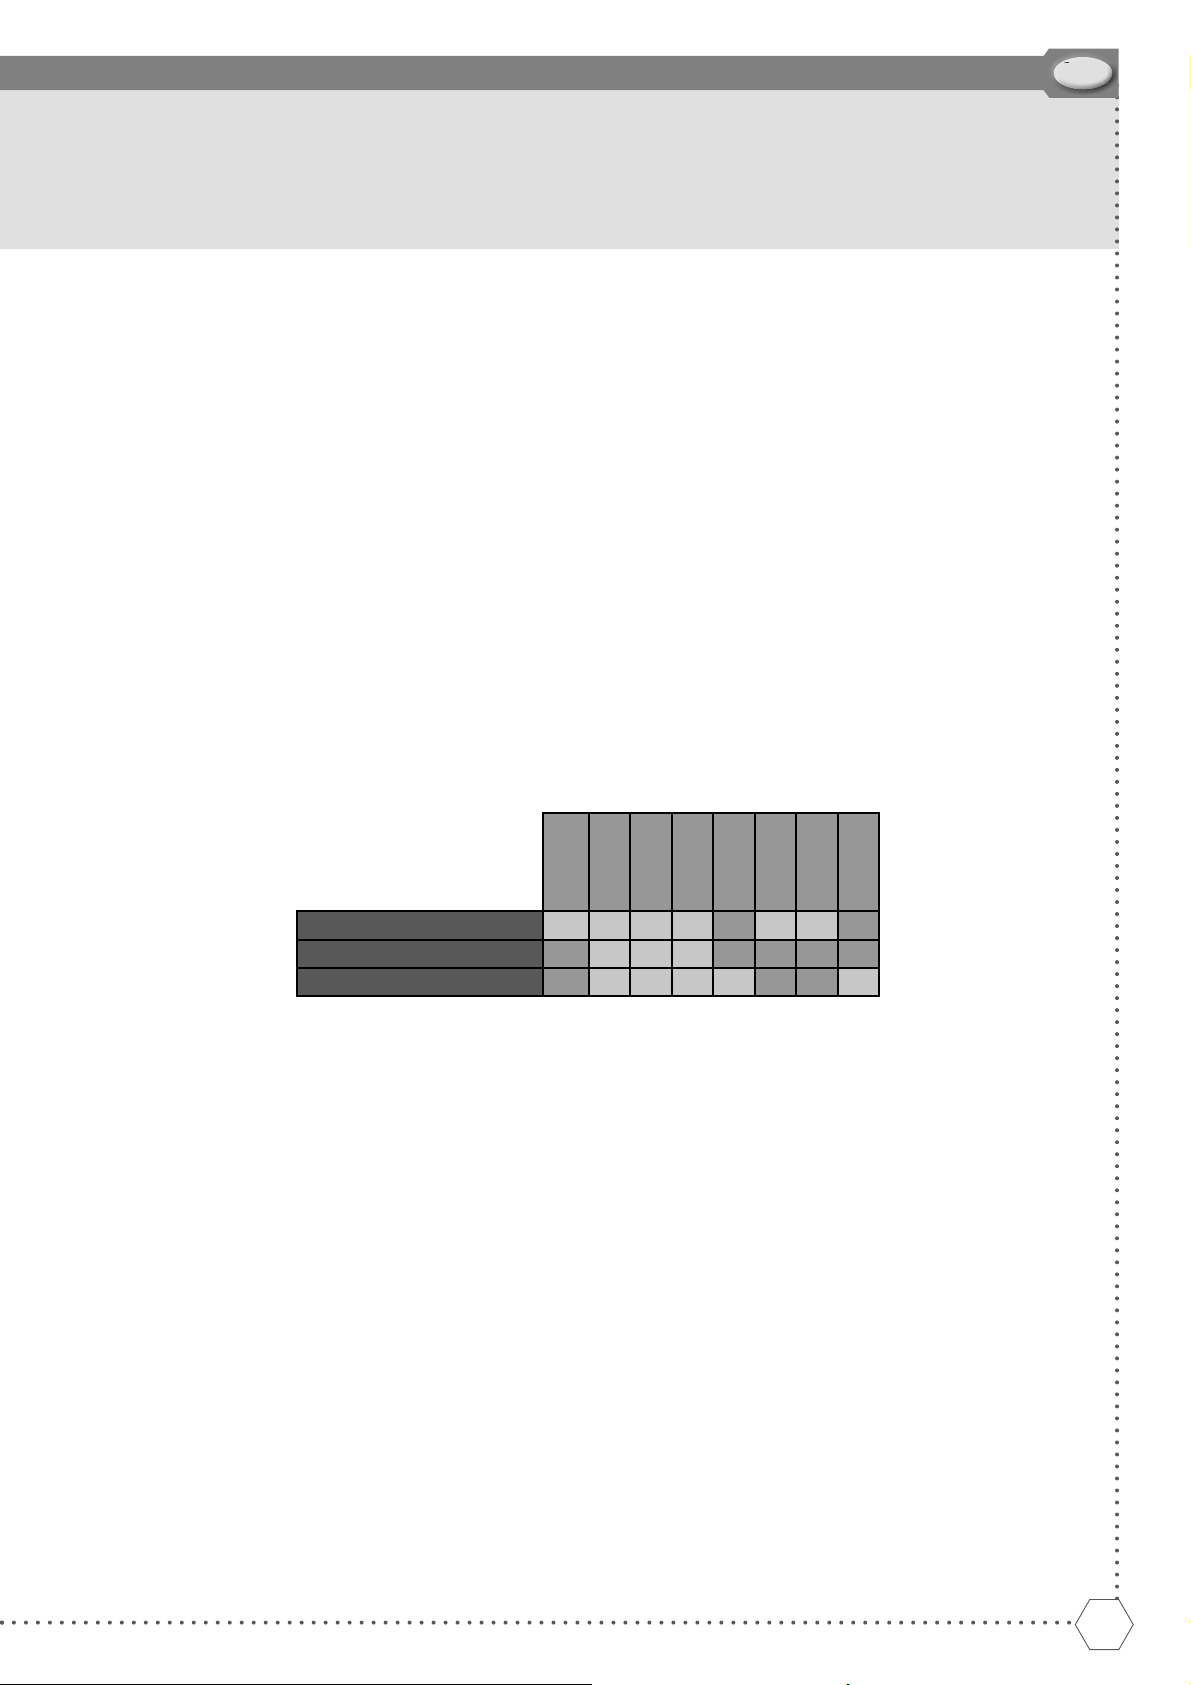
If the oven is used just as a grill, all types of oven ware can be used (see table).
Glass
Pyrex
Pyroceram
Earthenware
Aluminium foil
Plastic
Paper or
cardboard
Metallic
containers
"Microwave" only function
SI SI SI SI NO SI SI NO
Combined "Microwave + Grill" function
NO SI SI SI NO NO NO NO
"Grill" only function
NO SI SI SI SI NO NO SI
1.7 General rules and advice for using the oven
Microwaves are electromagnetic radiation also present in nature in the form of light waves (for example:
sunlight) which, inside the oven, penetrate into the food from all directions and heat the water, fat and sugar
molecules. Heat is produced very quickly just in the food, whereas the container heats up indirectly through
heat transfer from the hot food. This stops the food from sticking to the container making it possible to use (or,
in some cases, not use at all) very little fat during the cooking process.
As it is low in fats, microwave cooking is judged to be very healthy and dietetic. Furthermore, with respect to
traditional systems, cooking takes place at lower temperatures and therefore, dehydrating less, the food does
not lose its nutrients and keeps its flavour.

10
1.8 Essential rules for proper microwave cooking:
1) Cooking is closely linked to the size and uniformity of the foods to be cooked: a stew cooks quicker than a
roast as it is made up of smaller and uniform pieces of meat.
To set the times properly, bear in mind that making reference to the tables on the following pages, increasing
the amount of food, the cooking time must also be increased proportionately and vice versa. It is important
to respect the “settling” times : by settling time what is meant is the time in which the food must be left
to rest after cooking to allow a further temperature distribution inside it. For example, meats’ temperature
will increase by about 5 – 8°C during the resting time. Settling times can also be obtained out of the oven.
2) One of the main tasks to be performed is to stir a number of times during cooking: this is needed to make
the temperature more uniform and reduce cooking times.
3) It is also advisable to turn the food over during cooking: mainly for large pieces (roasts, whole chickens...)
and smaller pieces of meat (chicken breasts, stews...).
4) Foods with skins, shells or peel (for example: apples, potatoes, tomatoes, würstel, fish) are pier-
ced all over with a fork so that the steam can escape and the skin or peel does not explode.
5) If cooking many portions of the same food, for example boiled potatoes, place them in a ring in an oven
dish for uniform cooking.
6) The lower the food’s temperature on entering the microwave oven, greater the time needed. Room tempe-
rature food will cook quicker than refrigerated food.
7) Always cook with the container in the centre of the turntable.
8) Condensation inside the oven and around the door and air vent is normal. To reduce it, cover the food
with cling film, greaseproof paper, glass covers or simply an overturned plate. Furthermore, foods
high in water content (e.g. greens), cook better if covered. Covering the food also helps to keep the inside
of the oven clean. Use cling film suitable for microwave ovens.
9) Do not cook eggs in their shells in a microwave oven: the pressure formed inside would make the egg
explode, even at the end of the cooking. Do not heat cooked eggs, unless scrambled.
10) Before heating or cooking foods in sealed containers in the oven, make sure you open them. The pressure
within the container would increase, making it explode even at the end of the cooking.
11) You are advised not to cook, defrost or heat vacuum packed foods. The rubber seal in the cover could be
damaged.
1. General

11
E
E
E
N
N
E
E
N
N
The microwave oven’s operation is controlled by knobs ST2 and SM2 and by digital programmer P.
2.1 Setting the functions
Select the desired function by turning selector SM2. “On” appears on the display.
After 2 seconds the display shows (00:00) and the icon on the opening side lights up.
Set the cooking time by turning knob ST2 (clockwise the time on the display increases, anti-clockwise it decre-
ases).
2. Use of controls
P DIGITAL TIMER
SM2
FUNCTION SELECTOR
ST2
TIME SELECTOR AND START/STOP BUTTON
OFF
0Position Function
1
100% MICROWAVE COOKING
(1000W)
2
70% MICROWAVE COOKING
(700W)
3
40% MICROWAVE COOKING
(400W)
4MICROWAVE DEFROSTING (160W)
5
COMBINED COOKING 70% GRILL
+ MICROWAVE
6
COMBINED COOKING 40% GRILL
+ MICROWAVE
7GRILL ONLY COOKING
P ST2 SM2
SM2

12
Start cooking by pressing knob ST2; the display will show the countdown to
end of cooking.
NOTE: if cooking is not started within 2 minutes of setting the time the display
will automatically go back to 00:00.
If the ST2 knob is pressed during cooking it will be interrupted (STOP function)
and the display will not reset, but the remaining time shows.
Pressing ST2 again the oven re-starts and the countdown starts again.
The STOP function can also be achieved by opening the door: in this case to re-
start cooking after having shut the door you need to press knob ST2 (START)
again.
Pressing knob ST2 for more than 2 seconds the function is interrupted and
display reset (CLEAR function). After 10 minutes in the STOP mode it passes
automatically to the CLEAR function.
2.2 Cooking time settings
Maximum time setting is 59’ 59’’ and is adjusted by turning knob ST2 in either direction.
Adjustment steps are:
5’’ from 0 to 30’’
10’’ from 30’’ to 2’
30’’ from 2’ to 10’
1’ over 10’.
NOTE: it is also possible to alter the set time during cooking: to do so press knob ST2 (STOP), set the new time
and press again knob ST2 (START) to re-start the oven.
2.3 End of cooking mode
When cooking ends an acoustic signal is emitted and “End” appears on the display, and the corresponding ope-
ning’s symbol flashes.
The oven is now ready for further settings; it is possible to select a new function and /or a new cooking time, or
switch off definitively by putting SM2 selector in position “0”.
If at the end of cooking the door is left open after 1 minute the light goes out and the display remains “00:00”
until the oven is not turned off definitively by putting SM2 selector in position “0”.
2.4 Child safety
The oven is fitted with a safety device that stops the oven’s unwanted/accidental switching on by children.
To set the safety:
Press down and hold knob ST2 for 5’’ (with the oven switched off). A short acoustic signal is emitted and “n—o”
appears on the display followed by “ON”. Now it is not possible to turn the oven on.
To unlock the safety, hold down knob ST2 for 5’’. “n-o” followed by “OFF” appears on the display.
2.5 Oven light
The following functions are provided for:
Oven off door closed: light off. Pressing ST2 it lights up for 1 minute
Oven off door open: light on for 1 minute then goes off. Pressing ST2 it lights back up for 1 minute
Oven on door closed: light always on
Oven on door open or in stop countdown: light always on. After 5 minutes the time resets and the light goes out
End of cooking door closed: light on 1 minute
End of cooking door open: light on 1 minute. It goes out when the door is closed
2. Use of controls
ST2

13
E
E
E
N
N
E
E
N
N
3.1 Defrosting
• Frozen foods in bags or plastic wrap or in their own package can be put directly into the oven, so long as there
are no metal parts (e.g. ties or staples).
• Certain foods, such as greens and fish, do not need to be completely defrosted before cooking.
• Stews and meat sauces defrost better and quicker if stirred from time to time, turned over and/or separated.
• During defrosting, meat, fish and fruit lose liquids. It is therefore advisable to defrost them in a tray.
• It is advisable to separate each single piece of meat into its own bag before putting it in the freezer. This will
save you precious time during preparation.
• Follow with care the times stated on the frozen foods’ package, as they are not always right. It is a good idea
to use slightly lower defrosting times than those stated. The duration of the defrosting will vary according to
the degree of freezing.
Defrosting times
Type Quantity Set time
(minutes) Notes
Settling
time
(minutes)
Meat
• Roasts (pork, beef, veal, etc.)
• Steaks, cutlets, slices
• Stew, goulash
• Mince
• Mince
• Hamburgers
• Sausages
1 kg
200 gr
500 gr
500 gr
250 gr
200 gr
300 gr
19 - 21
4 - 6
10 - 12
10 - 12
5 - 7
4
6 - 8
Turn over half way through defrosting
See note (*)
20
5
10
15
10
5
10
Poultre
• Duck, turkey
• Whole chickens
• Chicken pieces
• Chicken breast
1,5 kg
1,5 kg
700 gr
300 gr
25 - 27
25 - 27
13 - 15
8 - 10
Turn the poultry over half way through
defrosting. At the end of the settling
time, wash under hot water to remove
traces of ice.
20
20
10
10
Vegetables Frozen greens do not need defrosting be-
fore cooking
Fish
• Fillets
• Slices
• Whole
• Prawns
400 gr
400 gr
500 gr
400 gr
6
8 - 10
10 - 12
8 - 10
Turn the fish over half way through de-
frosting
5
7
7
7
Bread
• 2 medium sized rolls
• 4 medium sized rolls
• Sliced bread
• Sliced brown bread
150 gr
300 gr
250 gr
250 gr
1 - 2
2 - 4
2 - 4
2 - 4
Place the bread directly onto the turn-
table
3
3
3
3
Frutta Fruit
• Strawberries, plums, cherries,
blackcurrants, apricots
• Raspberries
• Blackberries
500 gr
300 gr
250 gr
8 - 10
5 - 7
3 - 5
Stir 2 - 3 times
Stir 2 - 3 times
Stir 2 - 3 times
10
10
6
3. Oven use: useful hints and cooking
times tables

14
3.2 Heating
Heating food is where your oven comes into its own. With respect to traditional methods, the use of the micro-
wave saves time and electricity.
• We recommend heating food (mostly frozen) at a temperature of at least 70°C (it must be hot!). It will not be
possible to eat the food immediately, as it is too hot, but its total sterilization is guaranteed.
• To heat pre-cooked or frozen foods, always follow the following rules:
a) remove from metallic containers;
b) cover with clear film (suitable for ovens or microwaves) or greaseproof paper; in this way all the natural
flavour will be held in and the oven will remain clean; it’s also possible to cover with an overturned plate;
c) if possible, stir or turn over frequently to speed up and make uniform the heating process;
d) follow with caution the times indicated on the package; remember that, under certain conditions, the sta-
ted times should be increased.
• Frozen foods must be defrosted before heating. The lower the food’s initial temperature, the longer the time
needed for heating.
• Food and drink can be heated for short periods of time in cardboard or plastic containers. However, these
containers may distort if the cooking time is lengthy.
3. Oven use: useful hints and cooking
times tables

15
E
E
E
N
N
E
E
N
N
Heating times
Type Quantity
Knob
position
Duration
(minutes) Notes
Food softening
• Chocolate/icing
• Butter
100 gr
50 -70 gr
4
4
6
3
Break the tablet into small pieces. Put on a plate.
Stir the icing once.
To melt the butter add 1 minute.
Refrigerator temperature foods (initial temp. 5/8°C) up to 20/30°C
• Yoghurt
• Bίb
125 gr
240 gr
1
1
0’.15” - 0’.20”
0’.30” - 0’.35”
Remove foil lid.
Heat the bib without the teat and agitate immediately to
make the temperature uniform. Check temperature of
contents before consuming. If the milk is at room tem-
perature, reduce slightly the indicated temperature. If
using powdered milk, stir very well as any remaining
powder could catch fire. Use sterilized milk.
Pre-cooked foods from refrigerator temperature (initial temp. 5/8°C) up to about 70°C
• Packet of lasagne or stuffed
pasta
• Packets of meat and rice and/
or greens
• Packet of fish and/or greens
• Portion of meat and/or greens
• Portion of ρasta, cannellonίοr
lasagne
• Portion of fish and/or rice
400 gr
400 gr
300 gr
400 gr
400 gr
300 gr
1
1
1
1
1
1
3-5
3-5
2-4
4-6
4-6
3-5
These are packets of any type of commercially available
pre-cooked food for heating at a temperature of 70°C.
Remove the food from metallic packing and place it di-
rectly onto the serving plate. For best results the food
should always be covered.
This is for portions of any type of pre-cooked food for
heating at a temp. of 70°C. The food is placed directly on
the serving plate and is always covered or with a clear
wrap or with an upturned plate.
Frozen food for heating / cooking (initial temp. -18°/-20°C) up to about 70°C
• Packet of lasagne or stuffed
pasta
• Packet of meat with rice and/
or greens
• Packet of fish and/or pre-coo-
ked greens
• Packet of fish and/or raw gre-
ens
• Portion of meat and/or greens
• Portion of ρasta cannellonίοr
lasagna
• Portion of fish and/or rice
600 gr
400 gr
300 gr
300 gr
400 gr
400 gr
300 gr
1
1
1
1
1
1
1
8
4 - 6
2 - 4
6 - 8
5 - 7
6 - 8
3 - 5
These are packets of any type of pre-cooked frozen food
to heat at a temp. of 70°C in their containers; if the
container is metal, put the food directly on the serving
plate and increase the time by a few minutes. Remove
the raw food from the packet and put it in a microwave
oven container and cover.
These are portions of any type of pre-cooked frozen food
to heat at a temperature of 70°C. Place the frozen food
on a serving plate and cover with an upturned plate or
Pyrex dish. Ensure that the centre is well heated, if pos-
sible stir the food.
Refrigerated drinks (initial temp. 5/8°C) up to about 70°C
• 1cup of water
• 1cup of milk
• 1 cup of coffee
• 1 plate of broth
180 cc
150 cc
100 cc
300 cc
1
1
1
1
1’.30” - 2
1’.15” - 1’.45”
1’.15” - 1’.45”
3 - 4
All drinks are stirred after heating to make the tempe-
rature uniform. We advise covering the broth with an
upturned plate.
Room temperature drinks (initial temp. 20°/30°C) up to about 70°C
• 1cup of water
• 1cup of milk
• 1 cup of coffee
• 1 plate of broth
180 cc
150 cc
100 cc
300 cc
1
1
1
1
1‘.15” - 1’.45”
1 - 1’.30”
0’.45” - 1’.15”
2 - 3
All drinks are stirred after heating to make the tempe-
rature uniform. We advise covering the broth with an
upturned plate.
Knob position
1234567

16
3.3 Microwave cooking
Soups and rice
In general soups need lesser liquid as evaporation in microwave ovens is rather poor. Salt must be added only
after cooking or during the settling time, as it dehydrates. It is right to say that the time necessary for cooking
rice in a microwave oven (as for pasta) is more or less the same as cooking it traditionally on a cooker. The
advantage of preparing rice in a microwave oven is in the fact that it does not need continuous stirring (2 – 3
times is enough). The ingredients are put into a microwave container and covered with a clear film (for 300 gr of
rice, 750 gr. of broth are necessary with microwaves at maximum power for about 12 – 15 minutes). Moreover,
the rice does not stick to the bottom of the container and, as it can be cooked in a tureen or other table dish, it
is not necessary to pour into a serving dish.
Meat
When it is cooked with the microwave only, it is advisable to cover it with a clear film suitable for microwave
ovens; in this way the heat is distributed better and dehydration which makes it dry and tough is avoided. This
function is suitable for stews, goulash, chicken breasts etc. The combined function must be used for cooking
roasts, kebabs, etc.
Fish
Fish cooks very quickly and with excellent results. It can be prepared with a little butter or oil (or nothing at
all). Cover with a clear film for microwaves. Naturally, if it has a skin, this needs to be cut; the fillets are evenly
distributed. It is not recommended to cook fish breaded with egg.
Vegetables
Microwave cooked vegetables keep their colour and nutrients more than during traditional cooking. Before coo-
king, wash and clean them. The bigger ones should be cut into smaller pieces.
For every 500 gr. of vegetables, add about 5 spoonfuls of water (fibrous vegetables need more water). The
vegetables must always be covered with microwave clear film. Stir at least once half way through cooking and
add a little salt only at the end.
Desserts and fruit
Desserts rise (on reduced power) much more than during traditional cooking. As they do not crust, the top
should be covered with cream or iced (e.g. chocolate); Moreover they should be kept covered after cooking as
they tend to dry out more quickly than those cooked in traditional ovens. Fruit needs to be pierced if cooked with
the skin and kept covered: it is important to respect the settling time (3 - 5 minutes).
3. Oven use: useful hints and cooking
times tables

17
E
E
E
N
N
E
E
N
N
Cooking times
Type Quantity
Knob
position
Setting
times
(minutes)
Notes
Setting
rest time
(minutes)
Fish
• Fillets
• Slices
• Whole
• Whole
• Steaks
• Prawns
315 gr
300 gr
500 gr
250 gr
400 gr
500 gr
2
2
2
2
2
2
6
7 - 9
8 - 10
5 - 7
7 - 9
7 - 9
Cover with film
Cover with film
Cover with film
Cover with film
Cover with film
Cover with film
2
2
2
2
2
2
Vegetables
• Asparagus
• Artichokes
• Runner beans
• Broccoli
• Brussels sprouts
• White cabbage
• Red cabbage
• Carrots
• Cauliflower
• Celery
• Aubergines
• Leek
•
Champignon mushrooms
• Onions
• Spinach
• Peas
• Fennel
• Peppers
• Potatoes
• Courgettes
500 gr
300 gr
500 gr
500 gr
500 gr
500 gr
500 gr
420 gr
500 gr
500 gr
500 gr
500 gr
500 gr
250 gr
300 gr
500 gr
500 gr
500 gr
500 gr
600 gr
1
1
1
1
1
1
1
1
1
1
1
1
1
1
1
1
1
1
1
1
8 - 9
10 - 11
10 - 11
6 - 7
6 - 7
6 - 7
6 - 7
7 - 8
10 - 11
6 - 7
5 - 6
5 - 6
5 - 6
4 - 5
5 - 6
9 - 10
11 - 12
8 - 9
7 - 8
7 - 8
Cut into 2 cm long pieces
It is preferable to use the artichoke hearts
Cut into pieces
Divide into single “flowers”
Leave whole
Cut into strips
Cut into strips
Cut into equal sized pieces
Divide into florets
Divide into pieces
Dice
Cut into strips
Leave whole. Do not need water
Same sizes whole. Do not need water
Cover, after having washed and drained
Cut into quarters
Cut into pieces
Cut into equal sized pieces
Leave whole
4
4
4
4
4
4
4
4
4
4
4
4
4
4
4
4
4
4
4
4
Meat
• Goulash
• Chicken breasts
• Meatloaf
1,5 kg
500 gr
900 gr
2
2
2
30 - 35
10 - 15
19 - 21
Cook without covering and stir 2 - 3 times.
Turn over half way through cooking
(*)
10
3
5
Knob position
1234567
N.B: The cooking times in the table are only meant to be indicative and are based on weight, the food’s initial
temperature and, for the vegetables, their texture and structure.
(*) These indications are suitable for carrying out a cooking Test on mince meat according to Regulation 60705,
Par. 12.3.3. Cover the container with microwave clear film. Further information, also concerning other Per-
formance Tests according to Regulation 60705, are listed in the table on pag. 2.

18
Cooking times for desserts and fruit
Type / Quantity
Knob
position
Setting
times
(minutes)
Setting
rest time
(minutes)
Observations and advice
Walnut cake (700 gr)
Pineapple cake (800 gr)
Apple cake (1000 gr)
Coffee cake (750 gr)
Zabaglione
Cooked pears (300 gr)
Cooked apples (300 gr)
Egg custard (750 gr)
Sponge cake (475 gr)
3
3
3
3
3
3
3
2
2
7 -8
17 - 19
19 - 21
15 - 17
2 - 4
4 - 6
5 - 7
15 - 17
6 - 8
5
5
5
5
3
3
3
5
5
Can be accompanied by any cream.
The pineapple slices can be laid out on the base of the cake
tin, or cut into pieces in the cake mixture.
The apple Is surface decoration.
Best with a cream filling.
Stir with a whisk every 30”.
The pears are cut into quarters.
The apples are cut into slices.
These indications are suitable for carrying out Cooking Tests
according to Regulation 60705, par. 12.3.1.
These indications are suitable for carrying out Cooking Tests
according to Regulation 60705, par. 12.3.2. Further infor-
mation, also concerning other Performance Tests according
to Regulation 60705, are listed in the table on pag. 2
Knob position
1234567
3. Oven use: useful hints and cooking
times tables

19
E
E
E
N
N
E
E
N
N
3.4 Combined microwave + grill cooking
This function is ideal for all those dishes that need “browning” or that need to take on a certain colour. It is ho-
wever necessary to bear in mind the following:
• Do not add seasoning (put only ½ a glass of water to keep the meat tender).
• Turn roasts and large pieces of meat over half way through cooking.
• To check progress, open the oven door. In this case it is advisable to use oven gloves; opening the door inter-
rupts the microwave’s function. To re-start, it is enough to close the door and press ST2. If during cooking the
top surface browns before reaching the set time, turn the oven off.
• In combined cooking with the grill, the oven must never be pre-heated or used without food in it.
Cooking times
Type Quantity
Knob
position
Setting
times
(minutes)
Notes
Setting
rest time
(minutes)
• Lasagne
•Gnocchi alla romana
• Baked macaroni
• Cauliflower in white
sauce
• Tomato gratin
• Stuffed
peppers
•Parmesan style auber-
gines
• Roast potatoes
• Potatoes gratin
•Roasts (pork, beef)
• Meatloaf (these in-
structions do not re-
fer to IEC regulation
60705 test 12.3.3. For
this go to table 2)
• Whole
chicken
• Kebabs
• Lamb
•Turkey (in pieces)
• Duck
1100 gr
600 gr
1500 gr
1000 gr
800 gr
1400 gr
1300 gr
750 gr
1100 gr
1000 gr
800 gr
1200 gr
600 gr
1000 gr
1000 gr
1500 gr
5
5
5
5
6
5
5
5
5
6
6
6
6
6
6
6
8+
8 microwave
only
12
8
17
10
17
10
30
30
55
20
45
20
40
45
50
Times obtained with raw pasta. If the pasta is
pre-cooked cook in combined mode up to rea-
ching the desired amount of browning (colour).
Avoid too many layers.
The pasta needs boiling separately beforehand
Times obtained with 500 gr. of raw cauliflower.
If it has already been boiled, cook in combined
mode until the desired browning (colour) is
achieved.
Preferably they are of equal size.
Preferably they are flat and wide.
Aubergines can be prepared fried or grilled be-
forehand.
Stir 2 - 3 times.
On the turntable (*)
Leave a little fat around so that they don’t dry
out.
Turn over after 35’ -40’.
Mix 500 g. of beef mince with egg, ham, bre-
adcrumbs etc. Turn over half way through co-
oking
.
On the turntable (**)
Turn over half way through cooking.
5
5
5
5
5
5
5
5
5
10
10
10
10
10
10
10
Knob position
1234567
(*) These indications are suitable for carrying out the cooking Test according to Regulation 60705, Para. 12.3.4.
(**)These indications are suitable for carrying out the cooking Test according to Regulation 60705, Para. 12.3.6.

20
3.5 Grill cooking
This function is suitable for any type of traditional grilling, for example: hamburgers, chops, würstel, toasted
bread, etc.
Pre-heat the grill as follows: turn knob SM2 to position 7. Set the desired pre-heating time by using knob ST2.
The door must be closed.
After about 5 ÷ 8 minutes place the food on the grille in the drip pan or on the circular grille resting on the plate.
The distance away from the grill depends on the amount of grilling. Regulate cooking time with knob ST2. Once
the set time has elapsed, an acoustic signal indicates that cooking is over.
With this function you can do many tasty grills. Remember to always pre-heat the grill for 5 – 8 minutes before
starting coking. All foods need turning over half way through cooking as the grill element heats only from the
top half of the oven.
Cooking times
Type Quantity
Setting
times
(minutes)
Notes
• Veal or pork chops
• Sausages
• Hamburgers
• Peppers
• Aubergines
• Courgettes
• Toasted bread
3
3
2 = 200 gr
1
4 slices
6 strips
6 slices
16 - 18
10 - 12
10 - 12
9 - 11
9 - 11
8 - 10
2,30
Turn over after 7-8 mins.
Always need piercing. If they are large, preferably cut in
half. Turn over after 4-5 mins.
Turn over after 3-4 mins.
Cut into quarters.
Turn over after 3-4 mins.
1 cm thick slices.
Turn over after 3-4 mins.
1 cm thick strips.
Turn over after 2-3 mins.
Cut off the crusts.
Turn over after 1.15 mins.
3. Oven use: useful hints and cooking
times tables
Table of contents