BOSSCO MC425BA User manual


Thank you for choosing our product!
Please read the instructions carefully so you will know how to operate your
product properly.
If there are any technical questions, please contact:
Customer care: (805) 751-4853 & Live chat
Online support: www.bossaudio.com/support
IMPORTANT
Please enter below the Serial No. which is located on the exterior of the product.
Retain this information for future reference.
Model No.
Serial No.
Date of Purchase

- 1 -
Table of Contents
Introduction.........................................................................................................................................1
Package Contents ..............................................................................................................................1
Important ............................................................................................................................................2
Mounting.............................................................................................................................................3
Wiring .................................................................................................................................................4
Bluetooth Streaming...........................................................................................................................5
AUX Input ...........................................................................................................................................6
Troubleshooting..................................................................................................................................7
Specications .....................................................................................................................................8
Introduction
This product is a pair of speaker pods with a built-in amplier. The product is designed to be
installed on the handlebar of a motorcycle or cage bar of a UTV vehicle. The applicable mounting
bar ranges 0.75” to 1.25” in diameter.
You can stream audio from a mobile phone to this product via Bluetooth. You can also play music
from an external device (e.g. a mobile phone or MP3 player) via 3.5mm audio input. The product
has inline ON/OFF control and volume control.
This product is water resistant. However, never submerge the product in water. Connect this
product to only 12VCD power source. Do not connect to other voltage for power supply.
Package Contents
When rst unpacking this product, please check that the package contains each of the items listed
below. If something is missing, contact the store where you purchased the product.
• 2 x Speakers (with a built-in amplier)
• 1 x Power cable harness (with a 7.5A inline fuse)
• 1 x Function knob cable (with 3.5mm audio input)
• 4 x Rubber mounting shims
• 5 x Cable zip tie
• 2 x Clamp mounting kits (pre-attached to the speakers)
• Quick Installation Guide / User Manual / Warranty card

- 2 -
Important
Read and understand all instructions before you use your product. If you do not follow
the instructions in this manual, we are not responsible for any resulting personal injury or
damage to property. This will also void the warranty.
Important Safety Precautions
• Be sure to observe the following guidelines:
- Do not increase speaker volume so high that you cannot hear what is around you.
- Use caution or temporarily discontinue use in potentially hazardous situations.
• Do not make any adjustment on the product when driving or in other situations where
distractions can be hazardous. Responsible and safe driving is your primary responsibility when
operating a vehicle.
• Start volume at a low setting then gradually increase the volume until you can hear it
comfortably, without sound distortion or ear discomfort.
• In the event of smoke, strange noise or odor emitted from the product or any other abnormal
operational signs appearing on the product, disconnect the product from the power supply.
Discontinue use and contact your dealer or our technical support. Using the product in this
condition may result in permanent damage to the product.
• Servicing must only be carried out by a technician. Contact our technical support for any service
questions.
Installation Precautions
• WARNING: Always consult a professional installer.
• Installation must be performed by a professional. Contact our technical support for any
installation questions.
• Before installation, disconnect the negative terminal of the vehicle battery to prevent damage to
the product, re, and/or possible injury.
• Use only installation parts provided with the product. Using other mounting methods may void
the warranty.
• Observe the safety and operating instructions of the devices which are connected to the product.
• Important! Replace the faulty fuse with the same type and rating. Using a different type or
rating of use may result in damage to the product or vehicle, or cause a re.
• Do not use any aggressive cleaning agents. Clean the product with a dry, ber-free cloth.
• This product is water resistant against splashing water. Do not submerge the product in water
under any circumstances.
Environmental Care
Do not throw away the product with normal household waste at the end of its life. Follow your local
laws if/when disposing of electronic products. By doing this, you help preserve the environment.

- 3 -
Mounting
See the section “Installation Precautions” on page 2.
Keep connection cables away from any pinch points, moving parts, or any hot exhausts.
Do not install the speakers where they may obstruct the rider’s view or inhibit any safety
features on the vehicle (e.g. lights, horns, brake levers, etc.).
To ensure security of the mounted speakers, always check the mounting conditions (e.g.
clamp fastening) of the speakers before each vehicle ride.
1. Find a safe and ideal mounting location on the handlebar. Make sure the speakers will not
obstruct the rider’s view or any safety features.
2. The supplied clamp is pre-attached to the bottom of the speaker. Unfasten the clamp through the
mounting nuts.
3. Fit the clamp around the handlebar of your vehicle. Remember to attach the supplied rubber
shims over the mounting bar to secure clamping and prevent abrasion.
4. Re-fasten the mounting nuts to tighten the clamp. Before fully tightening, adjust the speaker so it
points directly at the rider.
d
a
a
bc
Mounting inline function knob
Mount the function knob in a safe, easy-to-access location where it will not impede the rider’s ability
to drive safely. Secure the function knob using a supplied zip tie.
a. Mounting nut
b. Rubber shim
c. Speaker clamp
d. Mounting bar (0.75” - 1.25” in diameter)

- 4 -
Wiring
See the section “Installation Precautions” on page 2.
For safety, disconnect the negative terminal of the vehicle battery prior to wiring.
Keep connection cables away from any pinch points, moving parts, or any hot exhausts.
Secure the connected cables.
Reconnect the negative terminal of the vehicle only when all wire connections are
correctly and securely made.
Power Source Connection
Important:
Before you make power connection, disconnect the negative battery terminal to avoid short circuits
and any resulting damage to the speakers.
Option 1: Connection to ignition switch
When connecting the speakers to the vehicle’s ignition switch, the speakers can be automatically
powered on or off with the operation of the ignition switch.
1. Locate and identify two power wires in the ignition switch, one for switched +12V and the other
for negative/ground.
2. Using the supplied power cable harness, connect the black cable (labeled “GROUND”) to the
negative/ground wire of the accessory power and the red cable (labeled “+12V”) to the switched
+/12V wire of the accessory power.
Insulate the cable connection with electrical tape.
3. Connect the power cable harness to the connector of the power cable (labeled “POWER”) which
is attached to the speaker.
Option 2: Direct connection to vehicle battery
Note: Direct connection to vehicle battery consumes power. Always use the inline function knob to
cut the battery power when the speakers are not used.
1. Using the supplied power cable harness, connect the black cable (labeled “GROUND” ) to the
vehicle’s metal frame or to the negative battery terminal and the red cable (labeled “+12V”) to
the positive battery terminal.
2. Connect the power cable harness to the connector of the power cable (labeled “POWER”) which
is attached to the speaker.
- 5 -
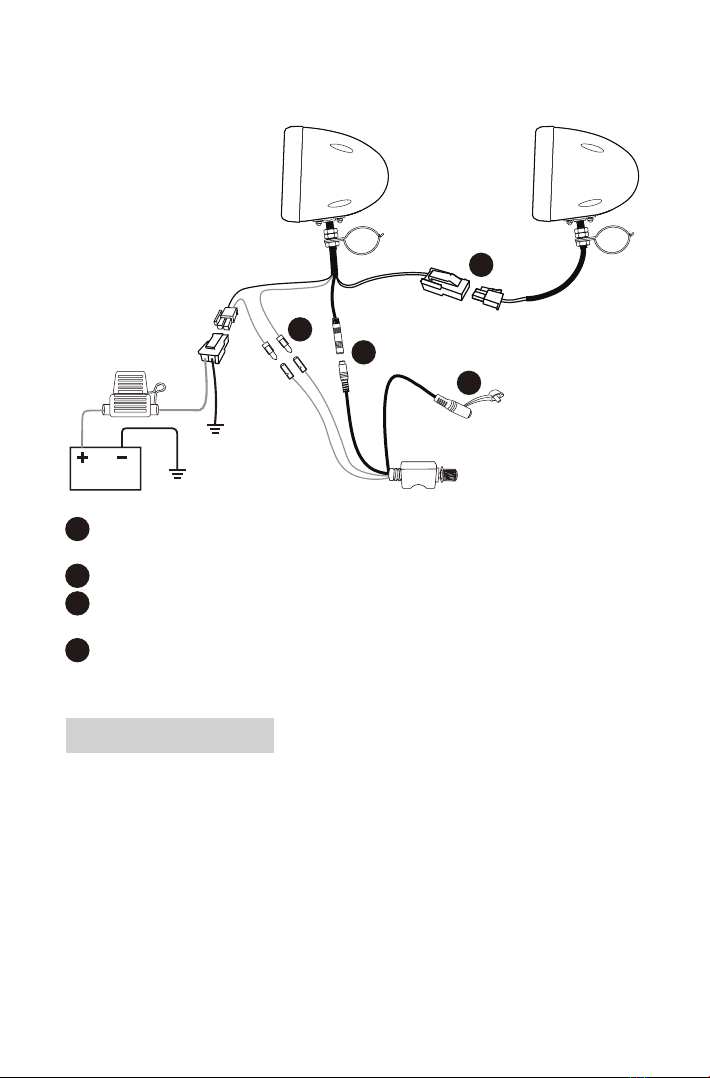
Wiring Overview
Right speakerLeft speaker
(with a built-in amplier)
Function knob
(On/Off and volume control)
Battery
Vehicle’s
metal frame
7.5A fuse
Black
Red
3.5mm audio input
A
B
C
D
A: Connect the power control wires so that the function knob can work as ON/OFF control. See
the section “Power Source Connection” for complete power connection instructions.
B: Connect the signal input cables to enable the volume control and the 3.5mm audio input.
C: Connect two speakers together using the speaker wires (white/black) which are pre-attached
to the speakers.
D: Connect your mobile phone or MP3 player for audio input to the speakers, using an audio
cable (e.g. 3.5mm audio cable or 3.5mm audio input adapter).
Bluetooth Streaming
Before you can stream music from your mobile device (iOS device or Android device) to this product
through Bluetooth, pair this product with your mobile device.
1. Power on the product (rotate the inline function knob). The product will automatically switch to
Bluetooth mode.
2. On your mobile device, enable Bluetooth function and select the device name (“Boss Audio
MC425BA”) to pair this product with the mobile phone.
If prompted for password input on your mobile device, input “0000”.
Note: Only one device can be paired at a time.

- 6 -
3. When successfully paired/connected, conrmation tone can be heard. Play audio on your
mobile device, and audio will be streamed to this product. Rotate the inline function knob to
adjust volume.
After pairing, the product will be automatically connected to your mobile device each time the two
are turned on. To change Bluetooth source, disconnect the Bluetooth connection on the current
mobile device. Then repeat Step 2 above to pair/connect with another mobile device.
For best audio performance, set the volume of the mobile device to maximum. If there is
distortion heard, turn down the mobile device’s volume a little.
Operating this product consumes the vehicle battery. To avoid battery exhaustion, be sure
to run the vehicle engine when operating the product.
Operational range can be reduced by any obstacle between this product and the device.
If the connected device is out of the effective range from this product, the device will be
automatically disconnected. The device will be automatically re-connected if it is within the
effective range again.
AUX Input
You can listen to an external audio device (e.g. a mobile phone or MP3 player) through this product.
1. Power on the product (rotate the inline function knob), and make sure the product is not connected
to Bluetooth.
2. Connect the 3.5mm audio input jack of the speaker to the audio output connector on your mobile
phone, using the following audio cable.
• For a mobile phone with 3.5mm headphone jack, use a 3.5mm audio cable (not included).
• For a mobile phone with a USB-C port, use a USB-C to 3.5 audio cable (not included).
• For an iPhone, use a lightning to 3.5 audio cable (not included).
3. Play audio les on your audio device. Audio from the mobile phone will be played on this product.
Rotate the inline function knob to adjust volume.
For best audio performance, set the volume of the mobile device to maximum. If there is
distortion heard, turn down the connected device’s volume a little.
Operating this product consumes the vehicle battery. To avoid battery exhaustion, be sure
to run the vehicle engine when operating the product.

- 7 -
Troubleshooting
If you have problems using this product, check the following points before you request service. If
you still have a problem, contact our technical support.
Problem Solution
No power Check that power source connection is correctly or securely
made. See the section “Power Source Connection” for details.
Check that the power ON/OFF wires are correctly or securely
connected. See the section “Wiring Overview”.
Turn on the vehicle’ ignition switch if power is connected to the
ignition switch.
The inline fuse is blown. Replace the fuse with the same type
and rating.
No sound Check the connected device for volume level or playback status
(e.g. pause or stop).
For 3.5mm audio input, make sure Bluetooth connection is
disabled.
Bluetooth not connected Check that Bluetooth on your mobile device is enabled.
Ensure your mobile device is within Bluetooth’s range.
This product is connected with another Bluetooth device.
Disconnect the current Bluetooth connection.
Poor audio quality from
Bluetooth connection
Move your mobile device closer to the product, or remove
obstacles or sources of interference that are affecting Bluetooth
reception.

- 8 -
Specications
Bluetooth
Bluetooth version......................................... 5.0 / EDR
Bluetooth proles......................................... A2DP
Bluetooth frequency..................................... 2402 – 2480 MHz
Transmission power..................................... <4 dBm
Transmission distance................................. up to 33 ft /10 m (line of sight)
Audio
Speaker driver ............................................. 3” (76 mm)
Speaker impedance..................................... 4Ω
Frequency response.................................... 50 Hz – 15 KHz
Total harmonic distortion (THD)................... <0.1%
Signal-to-noise ratio..................................... >75 dB
Channel separation ..................................... >50 dB
Input sensitivity............................................ 750 mV
General
Power supply............................................... 12VDC (allowable 10 – 16VDC)
Current consumption ................................... max. 5A
Fuse............................................................. ATO type, 7.5A
Clamp range (Ø).......................................... 0.75” – 1.25”
Cable length ................................................ 10.8’/3.3 m (speaker wires); 10.5’/3.2 m (power cable);
3.9’/1.2 m (function knob cable)
Dimensions.................................................. 4.7” x 6.3”x 4.7” (120 x 160 x 120 mm)
Specications are subject to change without notice.


rev 0922
KEY ON KEY OFF
Fit the speaker brackets around the handlebar of the desired
installation location. Use the included Rubber Mounting Shims to
secure the speaker brackets.
Fasten the mounting bolts on the bottom of the speaker
brackets. Before fully tightening, adjust the speakers so they are
pointing directly at the rider. Proceed to tighten mounting bolts
securely, then connect the corresponding colored speaker wires
together.
Mount the In-Line Function Knob in a safe, easy to access location
where it will not impede the rider’s ability to drive safely.
1) Remove the seat.
2) You will need to locate the fuse box, generally near the battery.
3) Look for and identify the two wires needed, Switched +12V and Ground (-).
4) Disconnect the negative battery terminal, before making any connections.
Connect the Red wire (+12V) to the identified Switched wire on the motorcycle.
Protect it by wrapping it with electrical tape and secure it.
Connect the Black wire (Ground, -) to the identified Ground wire on the motorcycle.
Protect it by wrapping it with electrical tape and secure it.
Reconnect the negative battery terminal and switch on motorcycle to test system.
*DISCLAIMER: Basic electrical knowledge and tools are required for
the following steps.
See the supplied user manual for complete power connection
instructions. Use the in-line function knob to control power.
OFF
ON
LOCK
OFF
ON
LOCK
To the function knob
wire connectors Battery negative or
chassis ground
Red
Fuse
Black
Table of contents
Other BOSSCO Speakers manuals

BOSSCO
BOSSCO ATV82C User manual

BOSSCO
BOSSCO MRGB65 User manual

BOSSCO
BOSSCO MCBK420B User manual

BOSSCO
BOSSCO MR4.3W Operating instructions

BOSSCO
BOSSCO MC470B User manual

BOSSCO
BOSSCO MC650B User manual

BOSSCO
BOSSCO MC600B User manual

BOSSCO
BOSSCO POWERSPORTS PHANTOM 900 User manual

BOSSCO
BOSSCO MR4.3W Installation instructions

BOSSCO
BOSSCO MC420B User manual


