BOXER MASTER Series User manual

MULCHING MOWER
MASTER SERIES
USER MANUAL
P. de Heus en Zonen Greup B.V.
Stougjesdijk 153
3271 KB Mijnsheerenland
The Netherlands
Tel: +31 (0) 18 66 12 333
E-mail: info@boxeragri.nl

MULCHING MOWER MASTER SERIES | User manual February 2021
EN | ENGLISH
TRANSLATION OF THE ORIGINAL MANUAL

CONTENT
February 2021MULCHING MOWER MASTER SERIES | User manual
1. GENERAL INFORMATION ............................................................................................................ 4
1.1 Introduction ......................................................................................................................................... 4
1.2 Symbols ................................................................................................................................................ 4
2. SAFETY LABELS ........................................................................................................................... 5
3. SAFETY ....................................................................................................................................... 9
3.1 Intended use ........................................................................................................................................ 9
3.2 Improper use ........................................................................................................................................ 9
3.3 Safety at the workplace........................................................................................................................ 9
3.4 Demands on the operator .................................................................................................................. 10
3.5 Work clothes ...................................................................................................................................... 10
3.6 General safety instructions ................................................................................................................ 10
3.7 Preparation......................................................................................................................................... 10
4. SPECIFICATIONS ....................................................................................................................... 12
5. INSTALLATION INSTRUCTIONS .................................................................................................. 13
6. IMPORTANT NOTES PRIOR TO COMMISSIONING ...................................................................... 26
7. COMMISSIONING ..................................................................................................................... 27
7.1 Fitting to the tractor........................................................................................................................... 27
7.2 Fitting the drive train.......................................................................................................................... 29
7.3 Adjusting the working height ............................................................................................................. 29
7.4 Adjusting the mulcher mower unit .................................................................................................... 30
7.5 Adjusting the drive belts .................................................................................................................... 30
8. TRANSPORTATION AND STORAGE ............................................................................................ 32
9. SERVICING AND COMMISSIONING ............................................................................................ 33
9.1 First inspection on commissioning ..................................................................................................... 33
9.2 Servicing schedule .............................................................................................................................. 34
10. EXPLODED-VIEW DRAWING ......................................................................................................35
10.1 Master ................................................................................................................................................ 35
10.2 Transmission shaft.............................................................................................................................. 40
10.3 Transmission ...................................................................................................................................... 41
11. CE CONFORMITY DECLARATION ............................................................................................... 42

Page 4/42
MULCHING MOWER MASTER SERIES | User manual February 2021
1. GENERAL INFORMATION
1.1 Introduction
MASTER mulchers are primarily designed to mow grass, weeds, and light undergrowth.
The mulchers are only suitable for tractors with a power take-off speed of 540 rpm.
The mulcher is designed for attachment to Category I tractor three-point mounts, but can also be operated on Cat. II
by means of adapter sleeves.
1.2 Symbols
This brochure contains three graphical safety symbols highlighting the level of danger or important information:
WARNING
Draws the attention of the operator to situations where the safety of people may be at risk.
CAUTION
Draws attention to situations where the efficiency of the machine may be compromised but not the safety of
people.
NOTE
Highlights general information that does not endanger the safety of people or the efficiency of parts of the machine.

Page 5/42
February 2021MULCHING MOWER MASTER SERIES | User manual
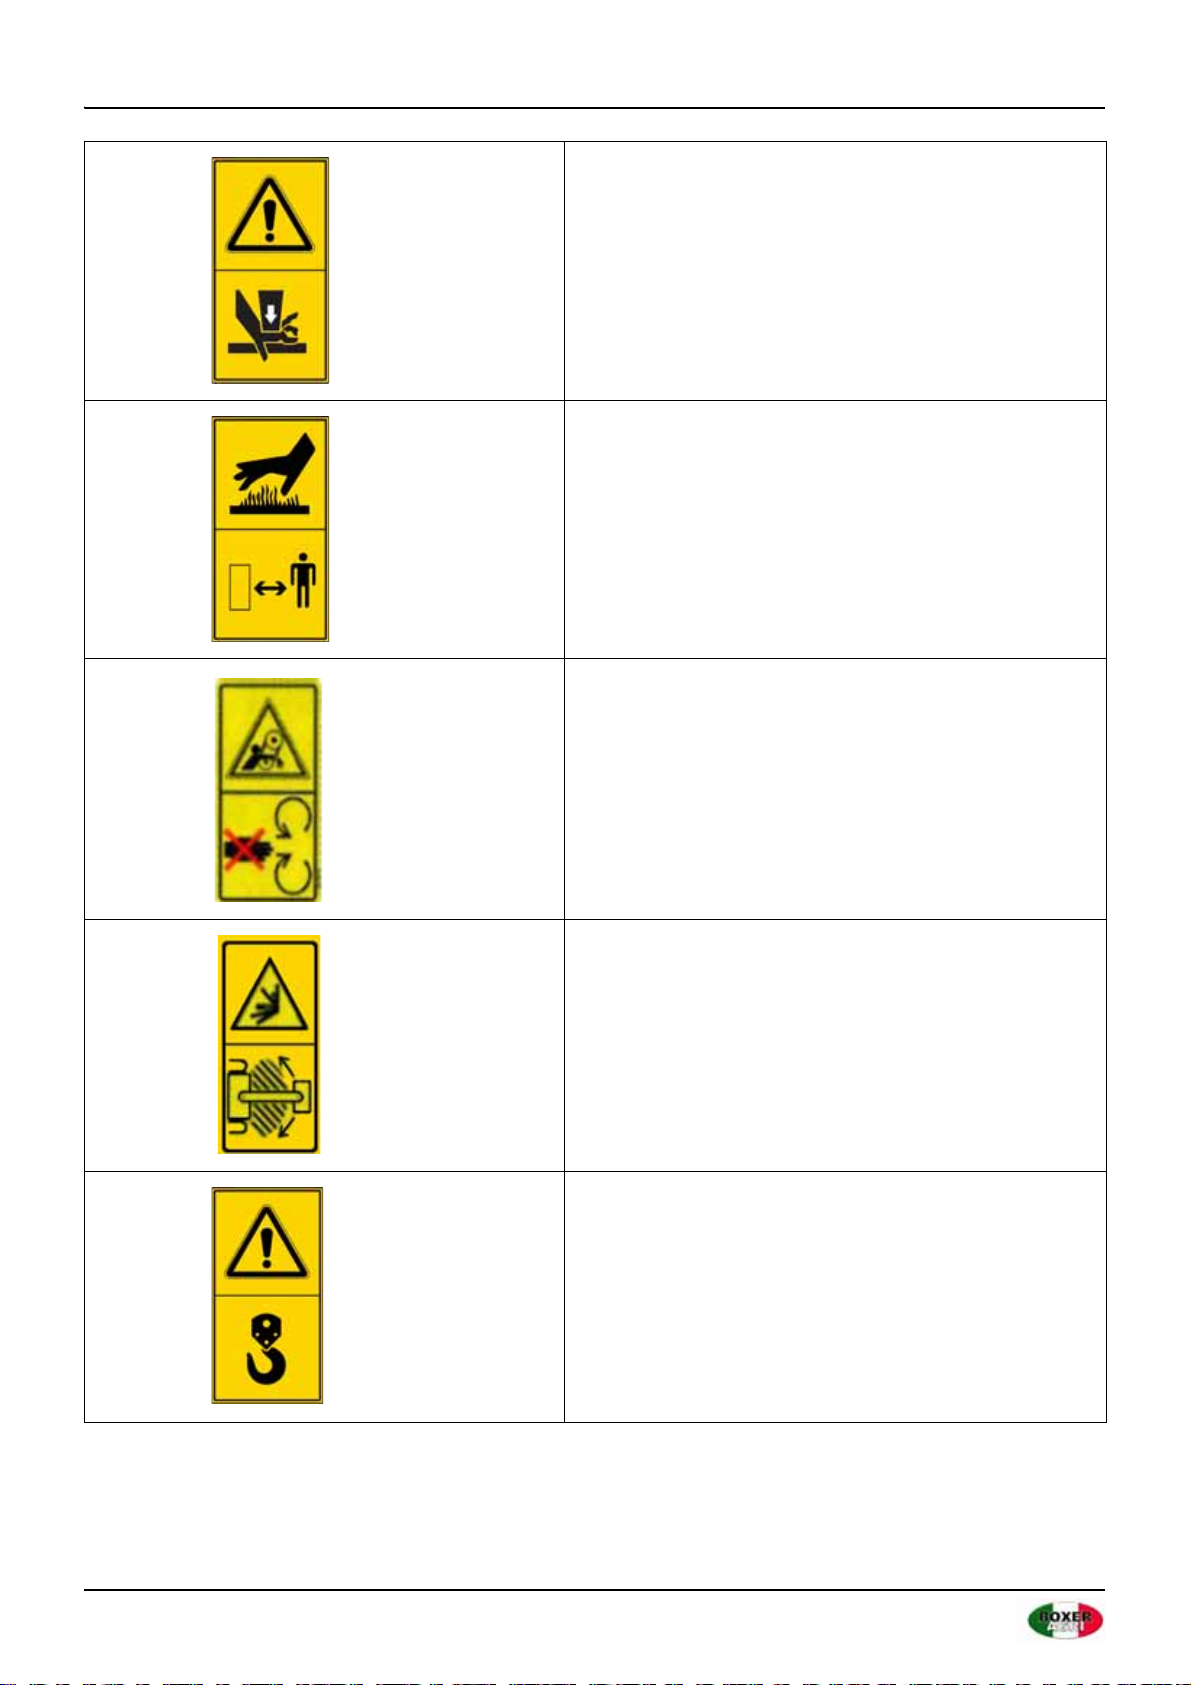
2. SAFETY LABELS
The safety labels and information on the machine, listed below, must be read and followed. Failure to do so may
result in death or serious injury. Make sure that the sticky labels are always present and legible. If this is not the
case, contact your dealer to replace the missing or illegible labels immediately.
WARNING Control and servicing may only be carried out
after the operating and servicing manual has been
carefully read, with the prime mover switched off and the
ignition key removed.
WARNING - HAZARD from liquids under pressure. Read
the manual before commencing work and contact a doctor
if you are injured.
WARNING Make sure that the direction of rotation and
the speed (540 RPM) at the tractor's PTO are correct
before connecting the universal shaft.
WARNING - HAZARD Make sure that the flail shaft is
absolutely still before you approach it.

Page 6/42
MULCHING MOWER MASTER SERIES | User manual February 2021
WARNING - HAZARD Hands and feet can be seriously
injured. Keep your distance.
WARNING Machine can throw off metal parts or other
objects. Do not stand next to the machine, do not climb
over or approach the machine.
Keep a safety distance of at least 70 m to the machine.
WARNING Do not approach the machine under any
circumstances when it is operating.
WARNING Do not stand between the tractor and the
machine.
WARNING The machine can pull you in and drag you along.
Keep your hands away from the drive shaft while it is
moving.
Page 7/42
February 2021MULCHING MOWER MASTER SERIES | User manual
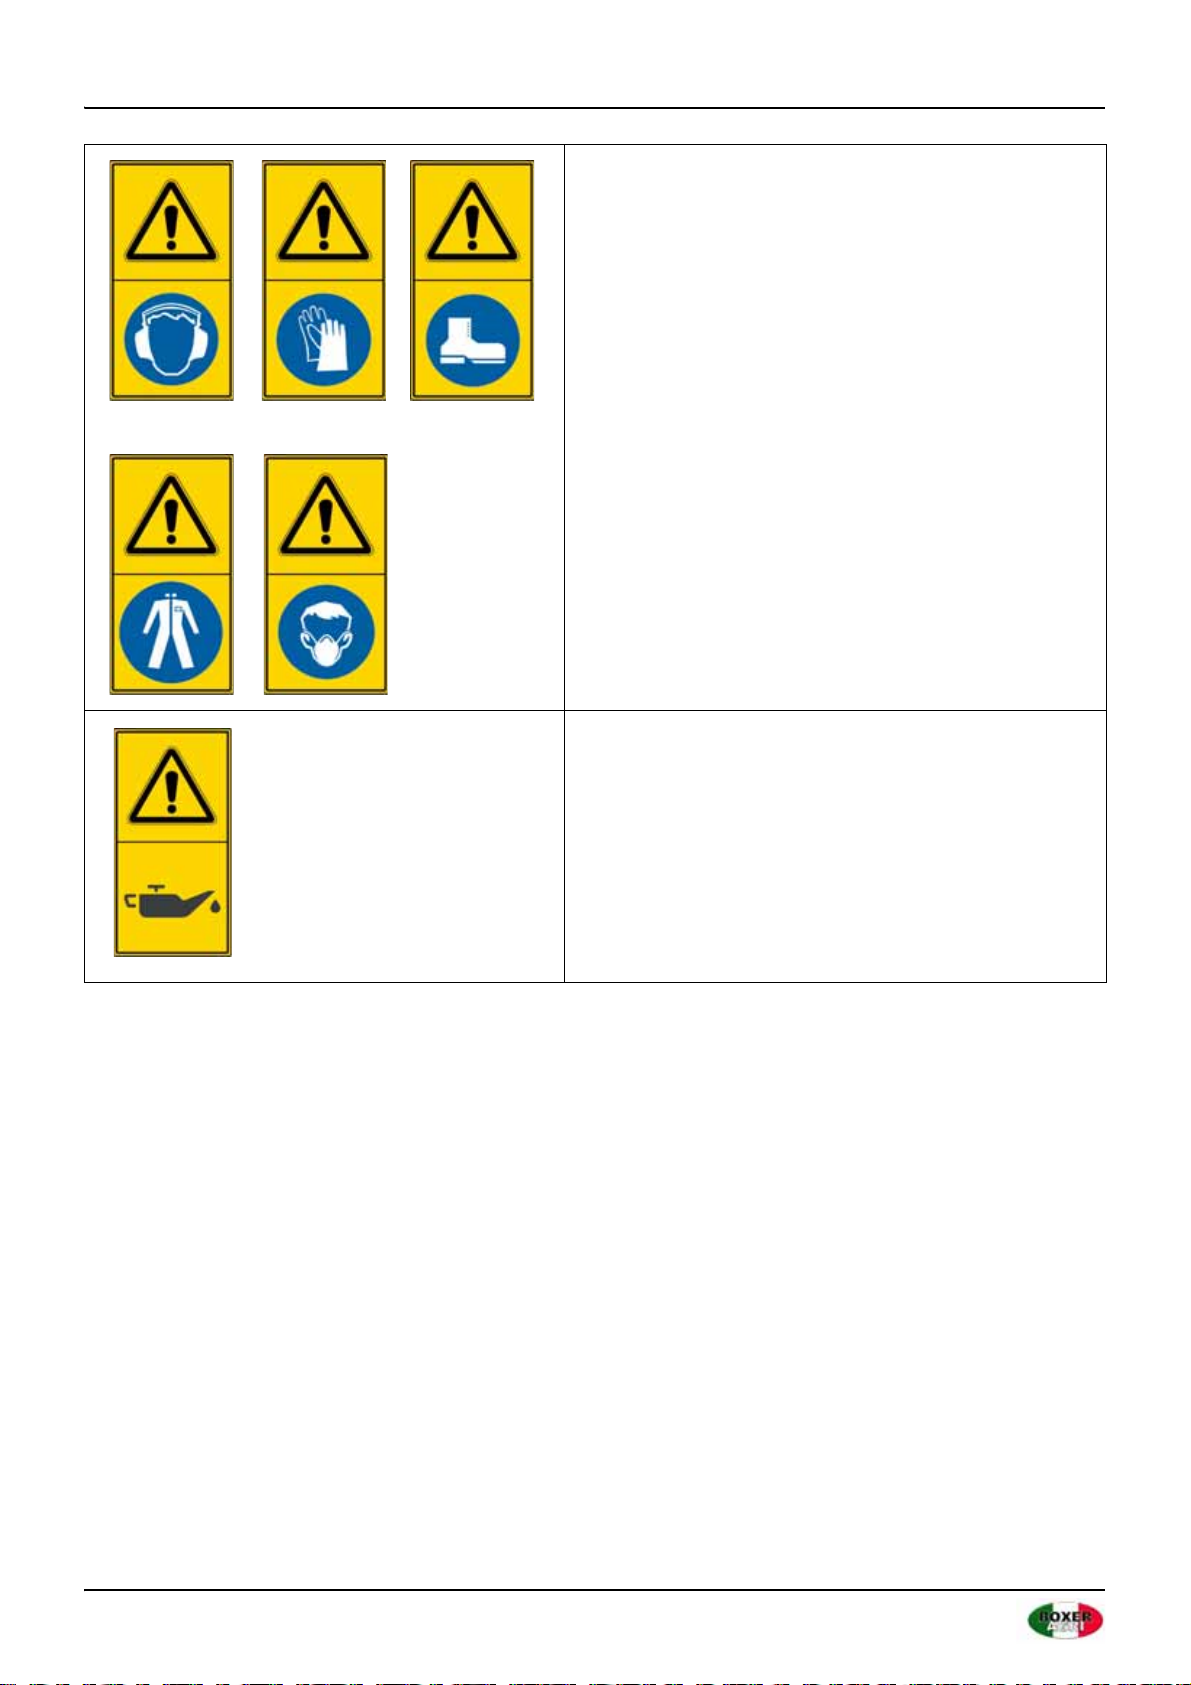
HAZARD Crushing/Cutting.
WARNING Hot surface. Keep an appropriate distance.
WARNING Only remove or open protection devices once
the belts no longer move.
WARNING - HAZARD to the upper and lower extremities.
Keep an appropriate distance.
WARNING Only hook to the displayed load points to lift
the machine.
Page 8/42
MULCHING MOWER MASTER SERIES | User manual February 2021
Wear protective clothing.
Grease nipple.

Page 9/42
February 2021MULCHING MOWER MASTER SERIES | User manual
3. SAFETY
3.1 Intended use
MASTER mulching mowers were specially designed, as described in these operating instructions, to mow grass,
weeds, and light undergrowth. Any other use can threaten the safety of the operator and the machine as a whole.
3.2 Improper use
The mulching mower was developed for mowing grass, weeds, and light undergrowth only. Use this mulching
mower only on a properly equipped tractor of the size recommended by the manufacturer for this equipment.
When using MASTER mulching mowers the following, in particular, is PROHIBITED:
• to connect the machine to tractors with unsuitable capacity or weight
• to use a different speed than 540 RPM for the PTO
• to use the machine on very stony soil
• to use the machine on a very steep slope
• to approach the machine wearing unsuitable working clothes
• to climb on the machine while it is in use or being transported
WARNING
Using this mulching mower for any application other than it is intended for, or using it with a tractor of unsuitable
size may result in damage to the machine and equipment, as well as in serious injury or even death.
3.3 Safety at the workplace
Many accidents that occur during operation of the machine or equipment or during servicing and repair work are
caused by failure to adhere to basic safety precautions. Accordingly, it is important to be aware of the potential risks
of an activity and to always be aware of the effects.
If potentially hazardous situations are known, accidents can be prevented!

Page 10/42
MULCHING MOWER MASTER SERIES | User manual February 2021
3.4 Demands on the operator
•Physical: good eyesight, coordination and the ability to execute all functions necessary to operate the machine.
•Mental: The ability to understand and apply the applicable rules and safety regulations. Users must exercise
care, for their own safety and that of other people.
•Familiarization: Users must have read and studied these operating instructions, any accompanying graphics
and schematics and their identification, and danger signs. Users must be briefed and trained in use or servicing.
3.5 Work clothes
The following items of clothing and safety accessories must be worn at work, and especially during repair and
servicing work:
• One-piece or other comfortable clothing that is not too loose, so that no parts of it can get caught in the
machine.
• Protective gloves.
• Safety goggles or mask to protect eyes and face.
• Safety helmet.
•Safety shoes.
Only wear personal safety equipment in a good condition, complying with the respective legal regulations.
3.6 General safety instructions
ALWAYS PAY ATTENTION TO THE PROPERTIES OF THE AREA YOU ARE WORKING ON
When the machine is running, it is not permitted to remain in the radius of action of the machine or other
accessories.
3.7 Preparation
• Do not drink alcohol or take any drugs or other substances that may impair your ability to work with machines
before and during work.
• Make absolutely sure you have enough fuel to prevent the machine stopping abruptly, possibly during a critical
process.
• Only use the equipment in safe conditions. For example, it is prohibited to use makeshift solutions to start the
machine. Similarly, it is prohibited to work at night in an insufficiently illuminated area.
• NEVER work if not all protective shields are correctly installed or in perfect condition. The operator must be
familiar with the mower unit, tractor, and any associated safety applications before using the mower unit or
tractor.

Page 11/42
February 2021MULCHING MOWER MASTER SERIES | User manual
IT IS IMPORTANT TO REMEMBER THE FOLLOWING POINTS AT WORK OR DURING SERVICING
• The instruction and hazard labels may not be removed, hidden or illegible.
• Do not remove safety signs, protective covers or deflectors on the machine unless you do so during servicing.
If you do remove them, turn off the engine. Be careful and refit them correctly before restarting the engine and
before using the unit. The mower unit is equipped with protective deflectors to prevent objects being thrown
out by the blades. Be aware that this shielding cannot be 100% effective. All safety signs, protective covers and
deflectors must be kept in good condition.
• Greasing, cleaning or adjusting moving parts during operation is prohibited.
• It is prohibited to use your hands for activities for which specific equipment is available when servicing or
adjusting the machine.
• Do not use equipment inappropriately or if they are in poor condition. For example, do not use pipe wrenches
instead of wrenches.
• Once you have completed any servicing or repair work, ensure that no equipment, wipes, or other material is
left in voids or guides with moving parts.
• When using the machine, never give more than one person instructions and signals. Instructions and signals
relating to lifting loads may only be given by one person.
• Do not call the operator unnecessarily while he or she is working with the machine. It is also prohibited to
frighten the operator or throw objects at him or her, not even in fun.
• Pay attention to people present, in particular children! Do not allow people to climb on the machine.
• When the machine is no longer needed, stop the engine and park on a flat surface. Then pull the handbrake
and switch off the PTO shaft.
• When the engine is running and the machine is lifted, it may not be cleaned, greased, repaired or adjusted.
• Never use the machine on steep slopes. This could endanger the stability of the device.
The manufacturer accepts no responsibility if these instructions are not adhered to.
Page 12/42
MULCHING MOWER MASTER SERIES | User manual February 2021
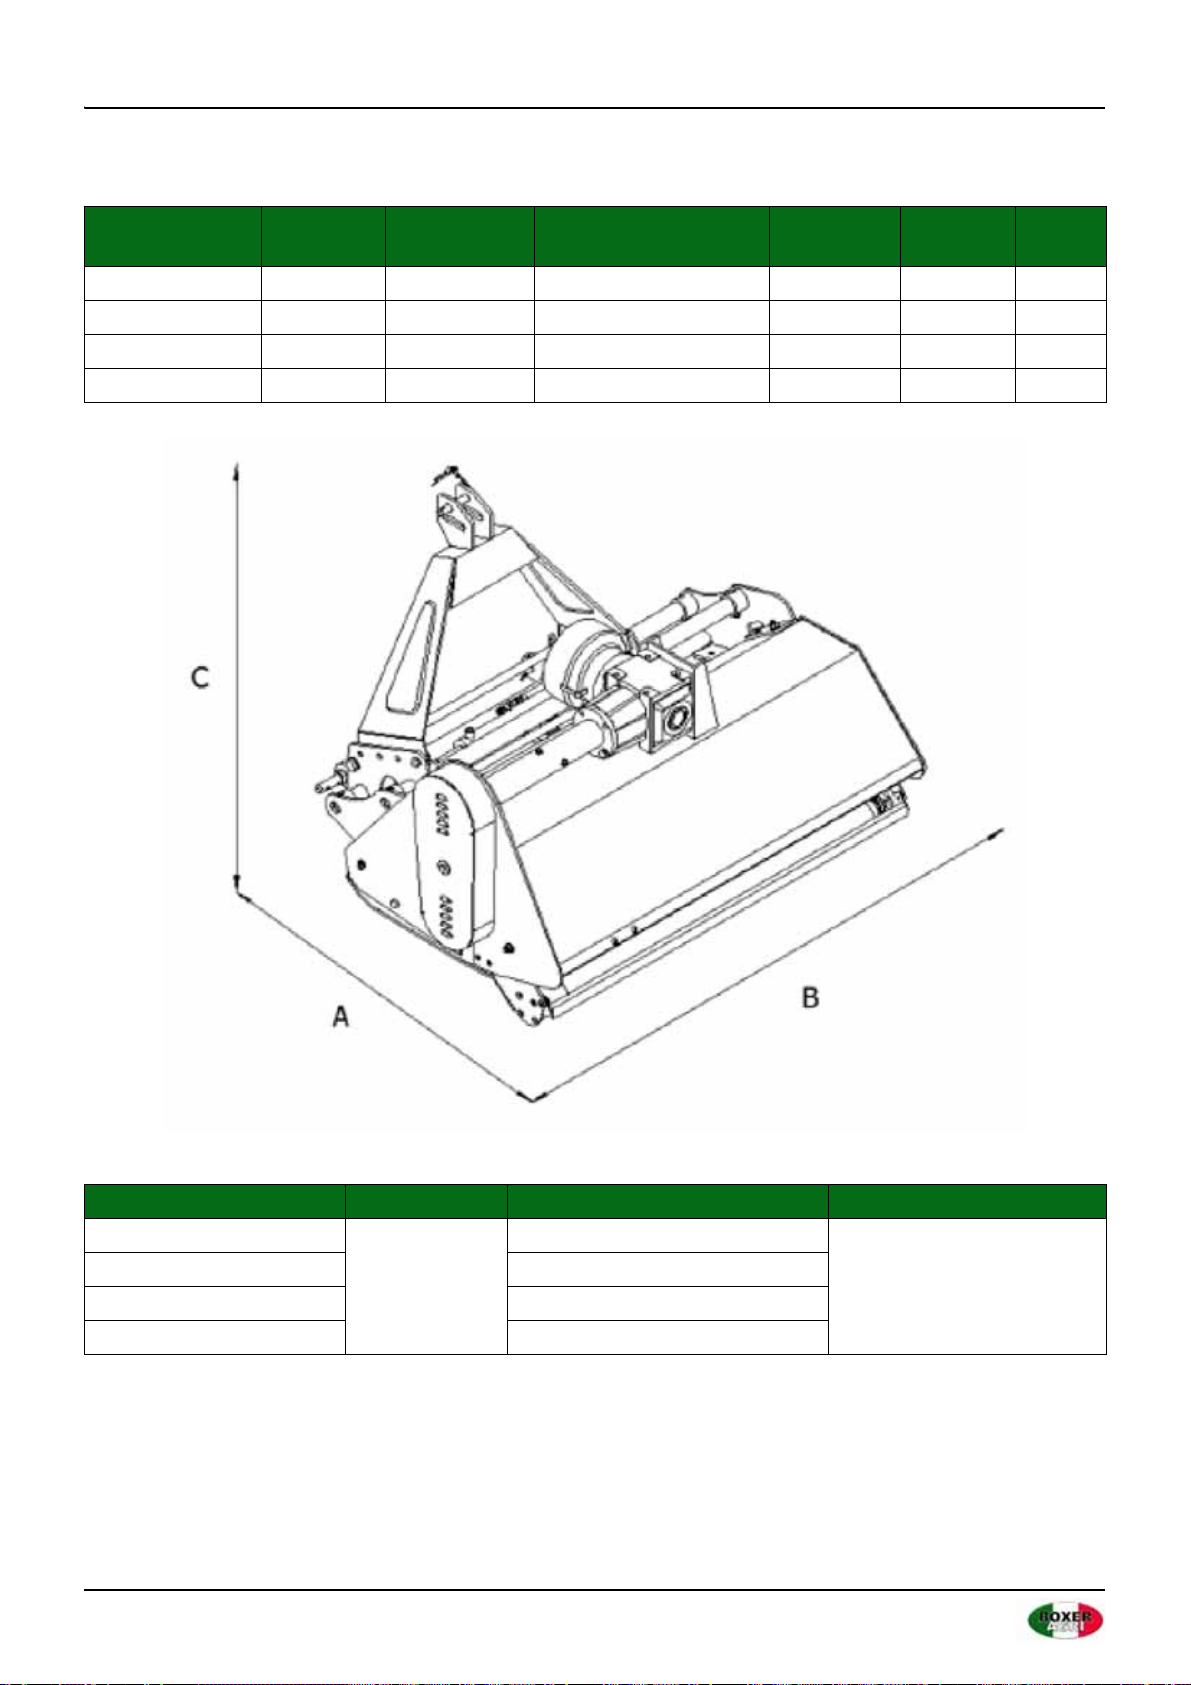
4. SPECIFICATIONS
Model Operating
width
PTO speed
(rpm)
Recommended power
(HP)
Category Weight
(kg)
Blades
MASTER 155 155 540 30–65 CAT. I 367 24
MASTER 175 175 540 35–65 CAT. I 412 28
MASTER 200 200 540 55–70 CAT. I/II 460 32
MASTER 220 220 540 75–90 CAT. I/II 500 36
Model A B C
MASTER 155
950
1670
950
MASTER 175 1870
MASTER 200 2120
MASTER 220 2320

Page 13/42
February 2021MULCHING MOWER MASTER SERIES | User manual
5. INSTALLATION INSTRUCTIONS
The machine is delivered ex works in its transportation configuration. Always use tools, equipment and lifting
equipment of appropriate size and capacity for installation. Always lift, move and install the equipment with
2 persons. Wear suitable protective clothing such as safety shoes and protective gloves. Observe the safety
measures as described in the "Safety" section of these operating instructions. Inspect all screws and nuts for correct
seating during assembly. When opening the wooden crate, pay attention to the sharp edges on the closing
mechanisms.
When you start assembling the machine, please pay attention to the following:
Clear the area of people, in particular children.
Use a forklift or similar device to move or lift the pallet/machine.
Carry the load close to the ground. Move the machine to the installation area.
Ensure there is sufficient clearance to safely assemble the machine and to access it from all sides.
1. Remove the transportation packaging as shown in figures 1 to 4.
Fig. 1 Mulcher in transportation packaging Fig. 2 Using the lever
Fig. 3 Opening the fasteners Fig. 4 Opening the fasteners

Page 14/42
MULCHING MOWER MASTER SERIES | User manual February 2021
2. Remove the complete wooden packaging and protective sheeting. Remove any loose parts and set to one side
for later use. Check the delivery for completeness, see figures 5 to 8.
Note: There may be more screws, nuts, washers, etc., in the transportation crate than are needed for initial
installation. This is intended and is not a quality flaw.
Fig. 5 Scope of delivery Fig. 6 Scope of delivery
Fig. 7 Scope of delivery Fig. 8 Scope of delivery

Page 15/42
February 2021MULCHING MOWER MASTER SERIES | User manual
3. Attach mounting bracket for 3-point mounting to hydraulic lateral shifter:
• Due to the size and weight, please only attach the bracket with 2 persons!
• The flail mulcher must stand on an absolutely solid ground (concrete, asphalt, tiles), in particular if you intend
to jack up the machine on square timbers.
• The bracket is attached to the hydraulic lateral shifter using 8 screws, 8 nuts and 8 washers (Figure 9).
• Be careful not to crush or damage the hydraulic lines.
• Before attaching the 3-point bracket, check the position of the 4 grease nipples on the underside of the
hydraulic lateral shifter.
• The grease nipples must point to the outside, because otherwise the grease gun cannot be used later.
• The arrows in Figure 11 show the correct alignment of the grease nipples. If a grease nipple is not aligned
correctly, this can be corrected using a small washer (not included in scope of delivery).
• Align the mulcher with the hydraulic lateral shifter as shown in Figure 12. Ensure that the beveled side is at the
bottom right (see red arrow in Figure 12).
Fig. 9 Bore for 3-point bracket (4 x 2) Fig. 10 Jacking up the mulcher
Fig. 11 Underside with correct grease nipple alignment Fig. 12 Alignment of lateral shifter

Page 16/42
MULCHING MOWER MASTER SERIES | User manual February 2021
• Attach the 3-point mounting bracket as shown in Figure 13 using the 8 screws, nuts and washers.
4. Attach the 3-point bracket and the hydraulic lateral shifter to the mulcher housing:
• Figure 14 shows the material for two of four shims that secure the hydraulic lateral shifter to the mulcher
housing. The image shows the left side as an example. It is important to mount the reinforcing shims from the
inside of the housing. For convenience, the flail mower can be jacked up for easier installation (Figure 10). Here,
please also note the safety instructions.
• Tighten the screws and nuts!
Fig.13 Mounting bracket attached to hydraulic lateral shifter using 8 screws, nuts and washers.
Fig. 14 Mounting material for hydraulic lateral shifter, left
side Fig. 15 Mounted hydraulic lateral shifter (right side)
Page 17/42
February 2021MULCHING MOWER MASTER SERIES | User manual
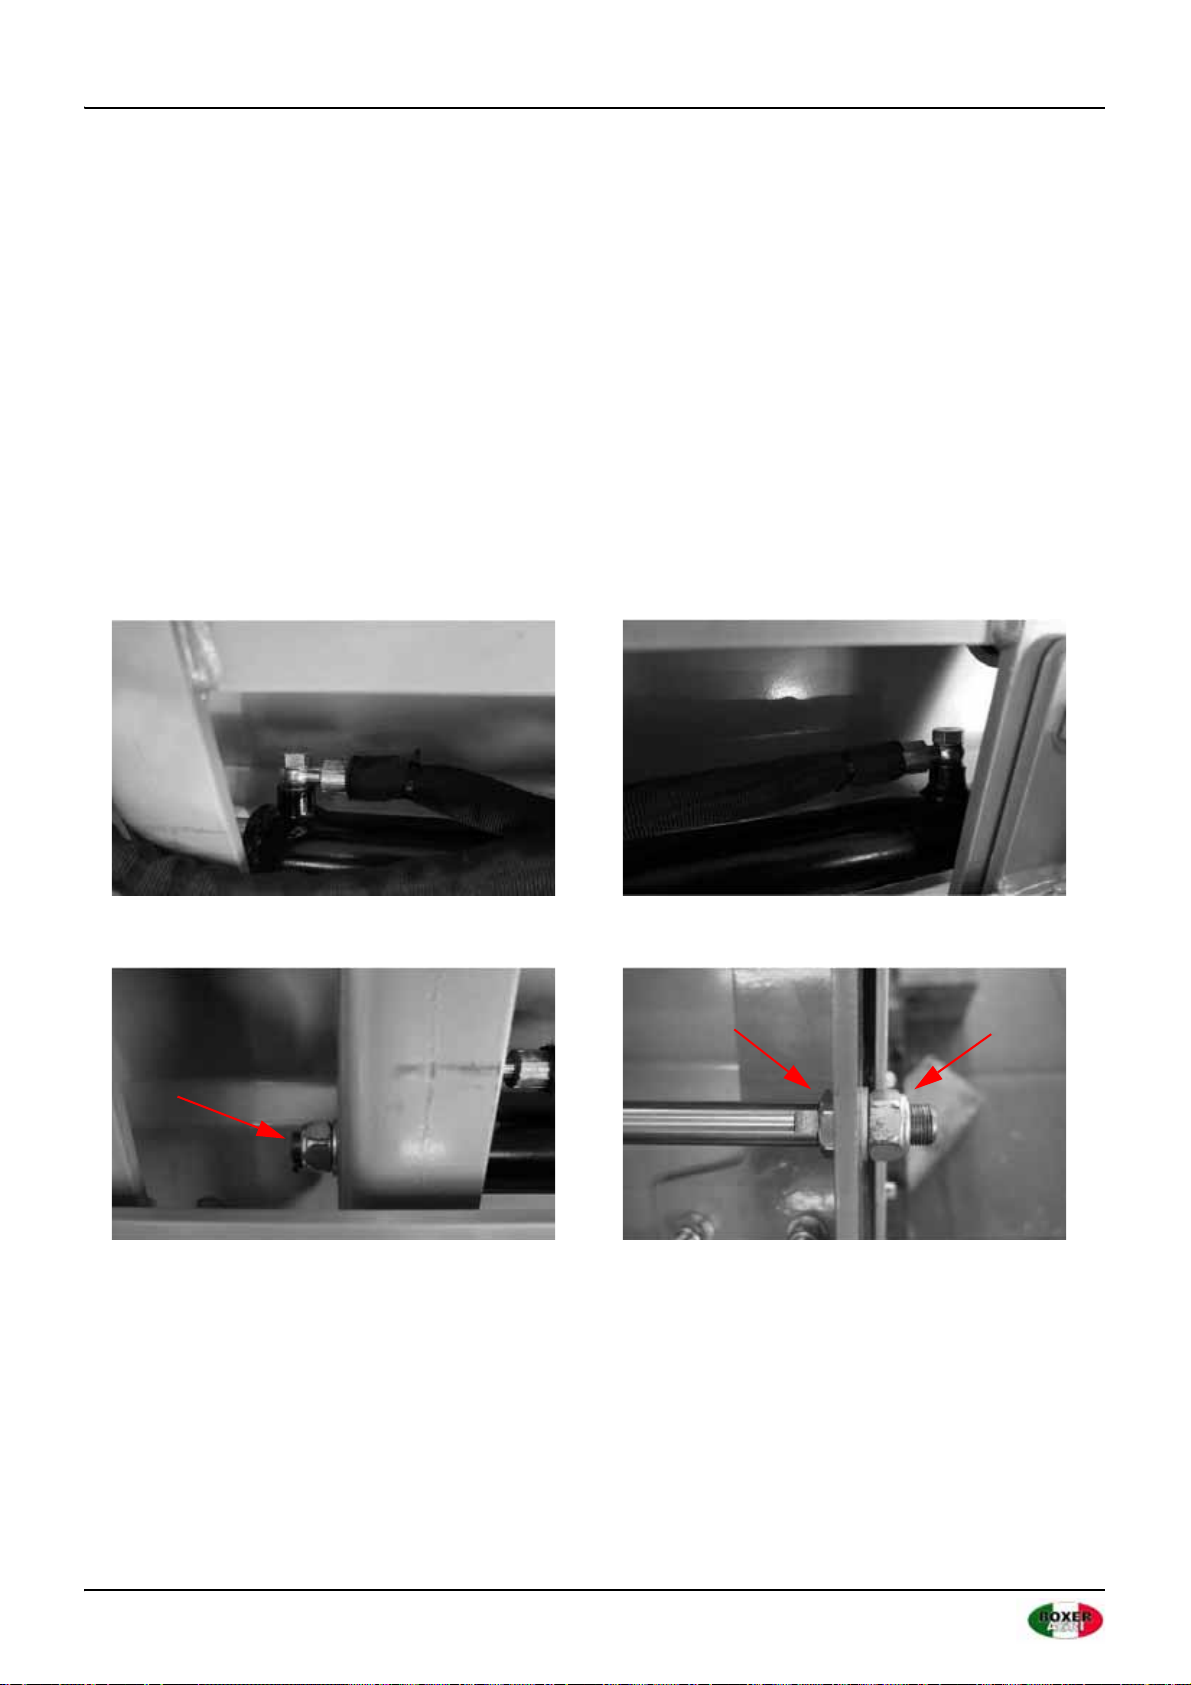
5. Attach the hydraulic lines:
• Attach the hydraulic lines as shown in Figure 16 and 17. Align them parallel to the lateral shifter, ensuring the
lines cannot be pinched.
• Before attaching the flail mulcher to a tractor, align the hydraulic lines in such a way that they cannot be
damaged.
• Check the hydraulic lateral shifter for clearance (no hydraulic lines, etc., in the way) before using the flail
mulcher for the first time.
• Remove the protective caps from the hydraulic hoses only when using the machine.
6. Attach hydraulic ram:
• Tighten the nut on the left side (Figure 18).
• Tighten the nut and locknut (Figure 19) on the right side.
• If the hydraulic connections move excessively around the ram axis, readjust the hydraulic ram and re-tighten
the ram nuts.
Fig. 16 Hydraulic line left Fig. 17 Hydraulic line right
Fig. 18 Nut for hydraulic ram left Fig. 19 Mounting for hydraulic ram right

Page 18/42
MULCHING MOWER MASTER SERIES | User manual February 2021
7. Pulleys and drive belts:
• Please check the correct seating of the 3 belts and two pulleys before operating the mulcher and before
attaching the pulley guard.
• The alignment of the upper and lower pulley must be absolutely vertical to avoid wear and malfunctioning.
Figure 23 below shows the correct pulley alignment. The pulleys must be vertically aligned, i.e. they must be
vertically parallel above each other.
• The correct pulley alignment is adjusted via the:
- Shaft guide (Figure 20)
- Tensioning device (Figure 21)
- Transmission mounting (Figure 22)
For details on adjusting the pulley alignment, please refer to the "Commissioning" section of these operating
instructions.
The drive belt tension is also adjusted via the shaft guide, tensioning device and transmission mounting.
Fig. 20 Shaft guide Fig. 21 Belt tensioning device
Fig. 22 Transmission mounting Fig. 23 Pulley alignment

Page 19/42
February 2021MULCHING MOWER MASTER SERIES | User manual
8. Correctly adjusted drivetrain:
• Figure 24 shows the correct pulley alignment. Vertical and parallel!
• Figure 25 shows the correct drive shaft position. It is important that the shaft has sufficient distance to the
housing and does not drag on the housing.
• Figure 26 shows the correct drive belt tension. The deflection depth of the belt may not exceed 10 mm,
because otherwise the tension is insufficient and the forces are not transferred correctly. (Adjustment via
tensioning device, see Figure 15)
Fig. 24 Correct pulley alignment
Fig. 25 Correct drive shaft distance Fig. 26 Correct drive belt tension

Page 20/42
MULCHING MOWER MASTER SERIES | User manual February 2021
9. Inspect pulleys for secure seating
Please ensure that the eight Allen screws on the pulleys are tightened and correctly connected to the drive shaft
(Figure 27) and the flail shaft (Figure 28).
Fig. 27 Upper pulley mounting Fig. 28 Lower pulley mounting
This manual suits for next models
4
Table of contents
Other BOXER Lawn Mower manuals


Popular Lawn Mower manuals by other brands


Exmark
Exmark Metro HP Operator's manual

Snapper
Snapper 7800776 parts manual

GreenWorks Pro
GreenWorks Pro MO60L00 owner's manual

EINHELL
EINHELL BG-PT 3041 Original operating instructions

Textron
Textron Ransomes Jacobsen Super Certes 51 Safety, operation and maintenance manual

Leader
Leader LM41PF instruction manual


