BRASH IMPORTS LM7401DVD User manual

CAR MULTIMEDIA ENTERTAINMENT
Operation Instructions

Table of Contents
Features……………………………………………………… 1
Precautions…………………………………………………….. 2
Connection Instructions………………………………… 3
Installation and Connection schematics………………………. 4
Button Positions and Functions……………………….. 5
Host…………………………………………………… 5
Card Remote controller……………………………… 8
Basic Operations……………………………………… 11
Angle Adjustment…………………………………… 11
Picture Adjustment…………………………………. 11
Setup Menu………………………………………… 12
Volume Adjustment……………………………… 13
Monitor-OFF Operations………………… 13
Monitor-ON Operations………………. 14
FM Function Operations……………………. . 15
Monitor-OFF Operations……………………. 15
Monitor-ON Operations……………………… 16
Setup of the Multi-Disc Player…………………. 18
Operation of Disk-Player .……………………….. 21
Monitor-OFF Operations………………. 21
Monitor-ON Operations……………… 22
AV Function Operations…………………………… 26
Monitor-OFF Operations…………………….. 26
Monitor-ON Operations……………………….. 26
TV Function Operations…………………………… 27
Clock enactment…………………………………… 29
Battery Replacing……………………………………. 29
Radar Installation Instructions…………………. 31
Supplementary Information…………………… 35
Basic Troubleshooting…………………………….. 38

FEATURES
Thank you for purchasing our car multimedia entertainment system. Before
operating the unit, please read through this manual and keep it well for future
reference.
The 7-inch TFT Monitor with built-in Panel (1.440H x 234V, 336960 pixel)
The innovative design of this monitor enables this machine to be fixed in
a DIN slot. Press a button, the 7-inch monitor with the aspect ratio of 16:9 will
slide out; you can watch VCD or DVD cozily.
Intelligentized Remote control and Built-In FM/TV Tuner
One can operate the built-in FM/TV tuner and the DVD multi-disc
changer on the unit conveniently. Up to 20 FM frequency stations can be stored
and the built-in TV tuner can receive all channels programs。
Built-in 50W X 4 Power Amplifiers
Although the size is small, it has 4 powerful amplifier signal channels,
each of their output is up to 50w. Music can be presented easily.
Optional Modes of Monitor Between 16 :9 and 4 :3
It can be switched directly by pressing a key, which is more convenient.
Use Rotary Knob to control volume
With the rotary knob, you can control the volume and bass, treble and the
balance of front and rear, right and left sound channels, which is more suitable
for drivers.
Two A/V input (one is backside scene) and one A/V input
An in-dash Car CCD Camera and a 4-sensor radar distance detecting OSD
overlay system are optional for this product. With these options, any roadblock
within visible range and the minimal distance from the roadblock can be shown
on the screen; therefore, the driver may back his car according to different
warning sounds.

Precautions
To avoid any injury or accident, please read through the following
precautions before installation and operation.
On Safety
Please abide by the traffic laws and regulations of the country you are in.
Never watch or operate the monitor when driving. Otherwise it may divert
your attention and consequently cause an accident. Please park your vehicle in
a safe place before watching the monitor or operate the unit.
During operation or when the monitor is working, please do NOT insert
your hand, finger or any objects into this unit. This may result in injuring or
damaging the unit. Please put small parts in places out of children’s reach.
In thunderstorm weather, do not touch the TV antenna and the monitor
simultaneously. This may cause electric shock. If you park your vehicle under
direct sunlight, the temperature inside the vehicle will go up quickly, please
cool it down before operation.
Only when your vehicle is parked and braked will the TV/Video pictures
appear on the monitor. Do NOT watch the monitor when driving. If the
monitor distracts your attention, traffic accidents may be caused.
On Installation
This machine should be installed by qualified technician or service staff.
If it doesn’t work well, please first check the connection. If no problem
with connection is found, check the fuse.
Incorrect installation may result in electricity leakage of battery
or short circuit.
Replace the fuse
When replacing the fuse, always use fuses with the same specifications
(current specifications).
To use fuses with different specifications or even electric wire is
extremely hazardous, which may cause serious damages.

Protect the surface of the unit from any damage
Please do not expose the surface of the unit to chemicals such as pesticide,
hair glue, vermicide, etc.
Please do not contact the unit with rubber or plastic materials for a long
time. Otherwise, the surface lacquer may be damaged or distorted.
When installation, turn the ignition key to OFF. Otherwise, it may cause
electricity leakage of battery or short circuit.
During installation, avoid the drill damage any interior parts of your
vehicle such as pipelines, gasoline tank or wires. Otherwise, fire or accident
may be caused.
Dew condensation
If the ambient temperature changes rapidly, dew may occur in the interior
of the monitor. Wait for a moment, the unit will restore to its normal state when
the moisture evaporates.
Installation Location
Do NOT install the unit in where it may:
Obstruct the driver’s vision when the monitor is either open or closed.
Obstruct the performance of the vehicle’s operation or air bags.
Obstruct the operation of the vehicle, especially the steering wheel,
gearlever or brake pedal.
If you have any query or question with the unit, please consult
the nearest dealer.

Connection Instructions
◘Connect the power cord ACC (red) to the ignition switch.
◘Connect BATT (yellow) to the circuitry of storage cell of your vehicle.
◘Connect the reverse wire (blue) to the reverse switch or the circuitry of the
reversing light (applicable to 12V).
◘Connect to the antenna and the control wire of power amplifier.
◘Lead various video signals to video input jack.
◘Connect the speaker to the output wire of power amplifier.
◘Plug the antenna into the antenna socket of this unit.
◘Check if all the connections are correct.
◘Put all the wires in order for installation.
Note: Blue/black wires are for detecting parking; they are valid when
grounded, otherwise, you will only have sound but without pictures.

Installation and Connection
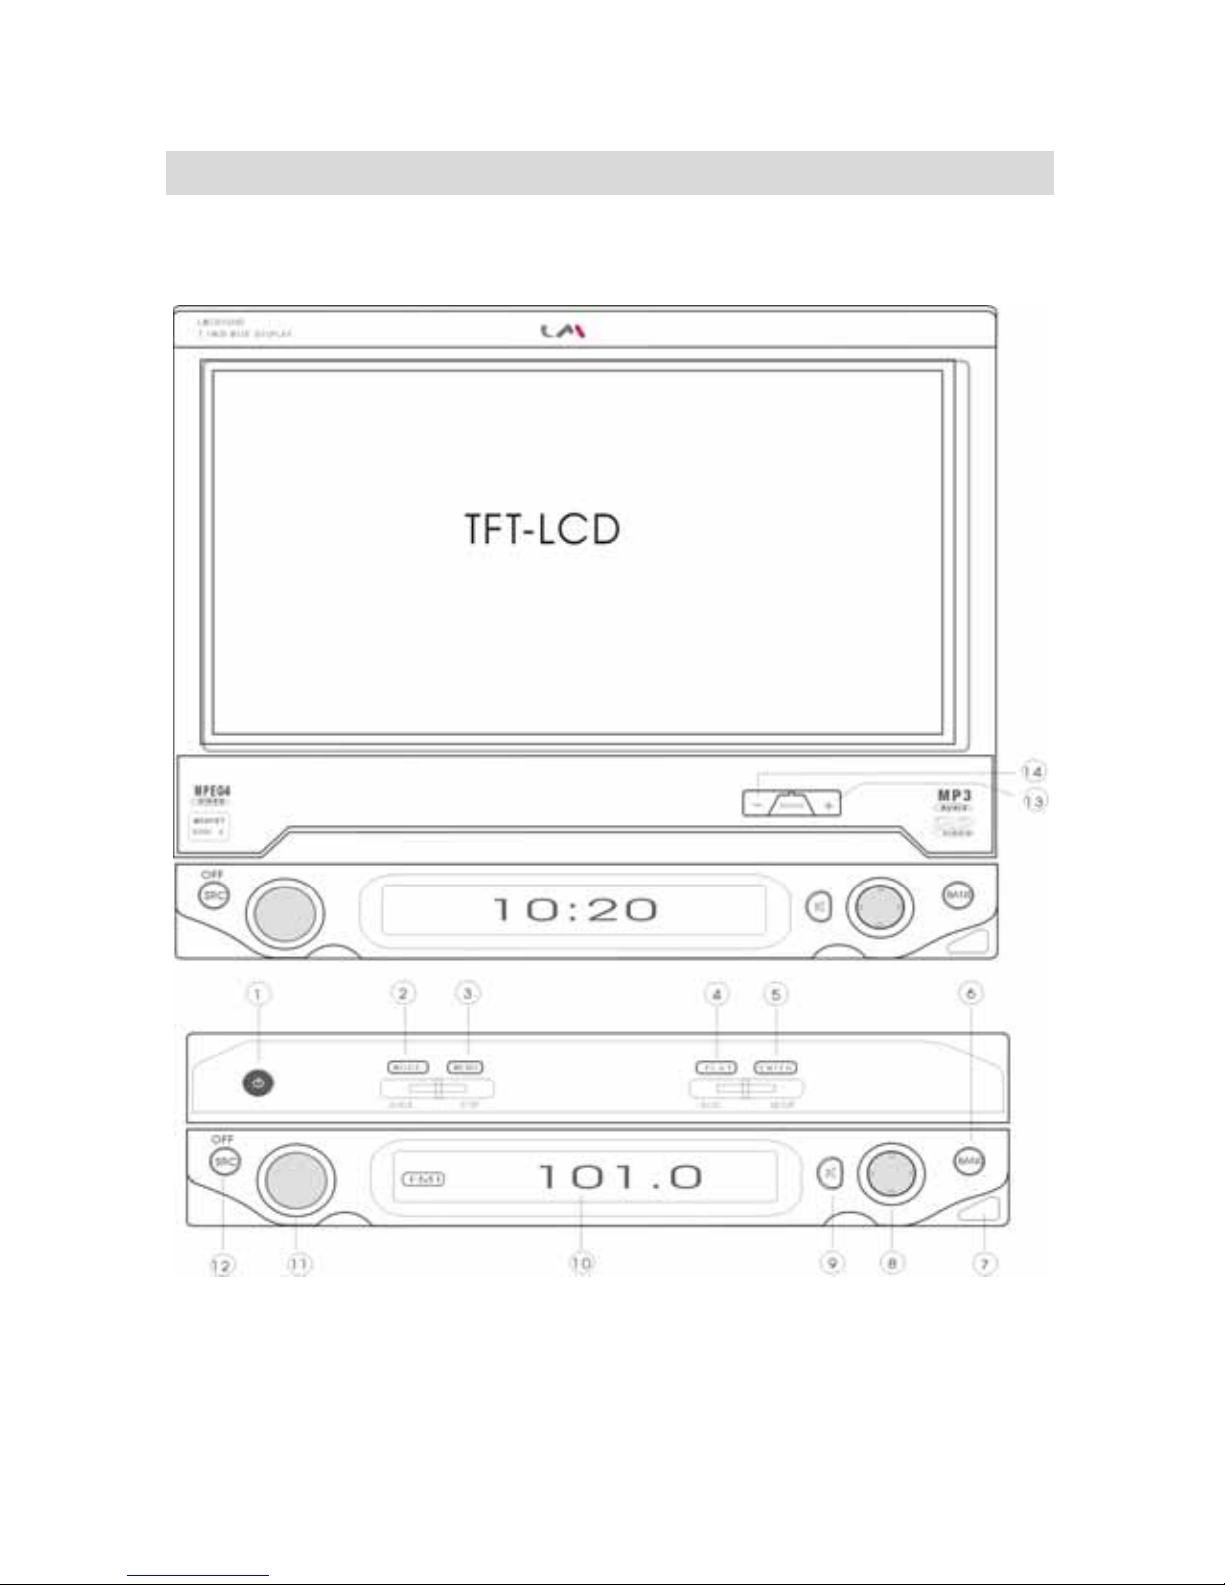
ControlButtonPositions
Key Functions introduction for host panel

Key Functions:
1. POWER/EJECT
Press to shut down the system, long-press to shut down the system and flip down
the LCD, press to start the system and eject the LCD in idle state.
2. MODE/SCALE
Press to select preset picture modes (soft, customized, bright), long-press to adjust
the aspect ratio of picture monitor (full, wide, center, zoom).
3. MENU/STOP
Press to enter DVD menu when playing DVD, long-press to stop playing DVD.
4. PLAY/DISC
Press to switch between play and pause, long-press to enter or exit disc selection
interface.
5、ENTER/SETUP
When playing DVD, press ENTER key (long-press DVD setup menu); when it is
idle, press CLOCK key (double press to set the clock).
6、BAND
When listening to the radio, press to select bands among FM1, FM2 and AM,
long-press to start FM auto search (AS).
7、Remote controller Receiving
8、Five-direction Key (Joystick)
Left: adjust key “-”, Right: adjust key “+”, Up: disc channel select key “+”, Down:
disc channel select key “-”, Center: menu key
Move to make manual seeking, fast forward, fast reverse and track searching
control. The central button is for main menu, move to select and adjust main menu.
9、MUTE Press it repeatedly to switch between mute and sound.
10、LCD display window
11、Multi-function key
Rotate to increase or decrease the volume, press to bring up sound effects menu
(bass, treble, R/L balance, front and rear balance) and rotate to adjust
corresponding value.
12、Selecting signal sources of AV, CD-C(DVD) and TV
Selecting a source turns on this unit. Press to cycle through different signal
sources and the selected item will be automatically applied in 2 seconds.
Long-press the OFF button for 2 seconds to turn off the unit.
13、Monitor angle adjusting “+”
14、Monitor angle adjusting “-”

Operation Points:
1. Press multi-function key (11) to switch on the host; when the host is ON,
this key only serves as sound menu button and volume adjusting button.
2. If ACC is turned off, the system will be in auto memory mode; it will restore
automatically when ACC is started, but the monitor will not flip up.

Card Remote Controller
This unit can be operated with a card style remote controller. For safety,
please park your vehicle before you use the remote controller or have a
passenger to operate it.
Point:
Please refer to “Replacing the lithium battery” in details for replacing batteries.

Key functions of the remote controller
1. POWER/EJECT key
Press to shut down the system, long-press to shut down the system and retract
the LCD, press to start the system and eject the LCD when idle.
2. MODEkey
Press to select preset picture modes (soft, customized, bright), long-press to
adjust the aspect ratio of picture monitor (full, wide, center, zoom).
3. NumericKeys
4. PLAYkey
Press to switch sequentially between playback and pause, long-press to enter or
exit disc-selecting interface.
5. TITLE
When playing DVD, press it to play titles of the DVD.
6. Channel(menu) selecting key “+”
7. SRC (playback sources) key
Select among signal sources of AV, CD-C (DVD) and TV. Selecting a source turns
on this unit. Press to cycle through different signal sources and the selected item
will be automatically applied in 2 seconds. Long-press the button for 2 seconds
means to shut off the unit.
8. Adjusting key “-”
9. BAND
When listening to the radio, press it to select among the bands of FM1, FM2 and
AM, long-press to start FM auto search (AS).
10. VOL+ (volume) key
11. SOUND (sound menu) key
Press to bring up the menu of sound effects (bass, treble, R/L balance, front and
rear balance).
12. VOL- (volume) key
13. MUTEkey
Press to switch between mute and sound.
14. ANGLE(+)key
Press to change the monitor (LCD panel) angle.
15. ANGLE (-) key
Press to change the monitor (LCD panel) angle.
16. REPEAT key

Press to select the mode of repeated playback when playing a DVD.
17. AUX (auxiliary input) key
Repeatedly press to switch between AUX and CAMERA.
18. Adjusting key “+”
19. Main menu (MENU) key
20. ENTER key
When playing a DVD, it is an ENTER key (long-press to enter or exit the setup
menu of DVD changer); when idle, it is a CLOCK key (double press to enter clock
setting).
21. Channel (menu) select key “-”
22. GOTO key
When playing discs, press this key, and then use numeric keys to go to desired
position, long-press to select monitor patterns of playback information.
23. L/R (sound channels conversion) key
In AV, CD C (playing discs) modes, press to cycle through sound channels
conversion (R+R, L+L, STEREO); In TV mode, press to switch ON or OFF blue
screen.
Notes: ①Part of the key functions will be valid only under certain
conditions.
②“Long-press” means to press a key for 2 seconds.
③correlations between the keys on host panel and
remote controller are as follows:
Main Unit Panel Remote controller
1 ----------------------- 1
2 ----------------------- 2
4 ----------------------- 4
5 ----------------------- 20
6 ----------------------- 9
8 ----------------------- 6、8、18、19、21
9 ----------------------- 13
11 ----------------------- 10、11、12
12 ----------------------- 7
13 ----------------------- 14
14 ----------------------- 15
BasicOperations
☆When playing AV, CD-C (DVD) or TV, press “MENU” key to sequentially display
“picture adjustment”, “setup menu” and “exit sub-menu”.
Angle adjusting
Repeatedly press (or long-press) the ANGLE “∆/▽” key, or press the
ANGEL“+/-” key in the right-bottom corner, then the monitor will flip up or down. If the
unit is normally shut down, the system will automatically store the current monitor angle.
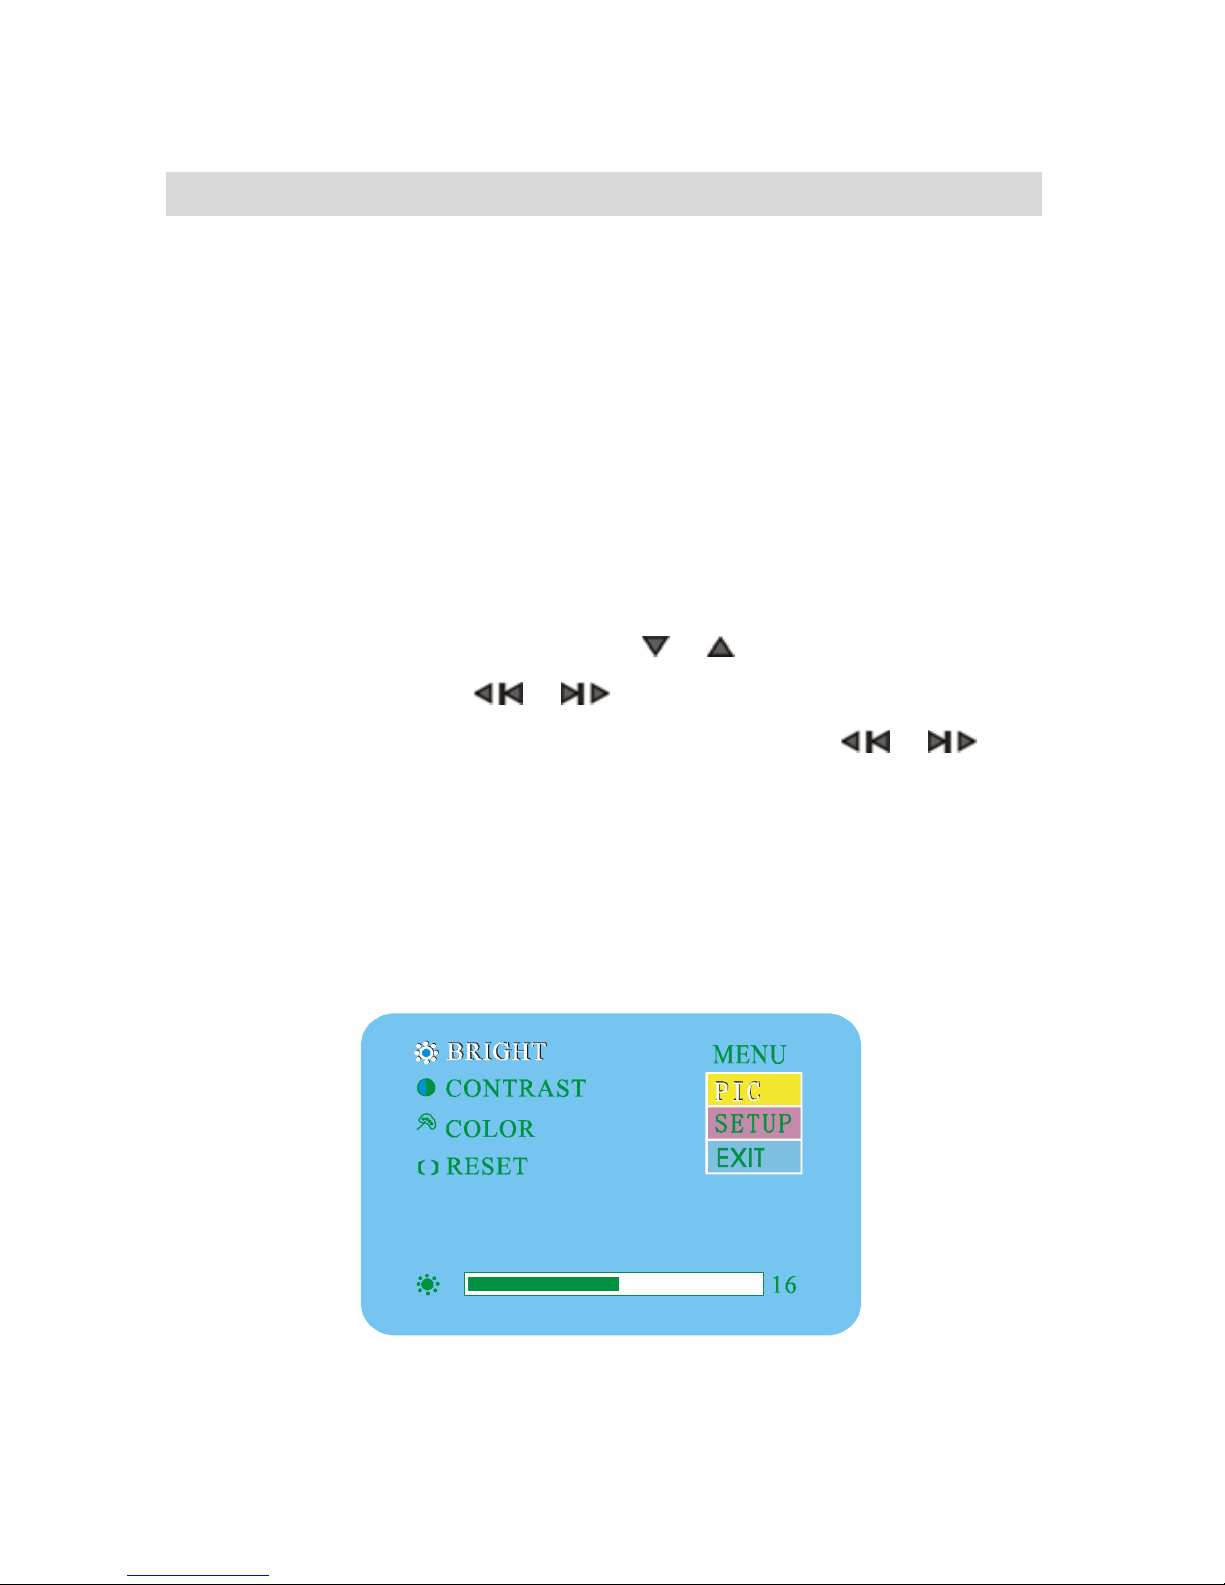
Picture adjustment
When playing AV, CD-C (DVD) or TV, press “MENU” key, then the screen will
display as shown in the following picture. Press “ OR ” key to sequentially select bright,
contrast, color and reset; Press “ OR ” key to adjust the above parameters.
☆Highlighted item is the parameter being adjusted. Hold “OR ” key to
continually adjust the above parameters.
☆When each parameter is adjusted to its proper value, if you don’t press any key
within 3 seconds, the menu will be hidden automatically and each adjusted value
will be stored. All the adjusted values will be automatically loaded next time when
you start the unit.

Setup Menu
When playing AV, CD-C (DVD) or TV, double press “MENU” key, the screen will
display as shown in the following picture. Press “ OR ” key to sequentially select mirror,
blue, bell and tune; Press “ OR ” key to adjust the above parameters.
☆Highlighted item is the parameter being adjusted, flashing item is the virtual value
which will go into effect when the menu disappears. You cannot use the mirror
function when the menu is monitoring.
☆When each parameter is adjusted to its proper value, if you don’t use any key within 3
seconds, the menu will be hidden automatically and each adjusted value will be
stored. All the adjusted values will be automatically loaded next time when you
start the unit.
A. Mirror
☆Mirror is only for AV2 (reversing camera).
☆When entering AV2 (reversing camera), whether to mirror or not depends on the
mirror setup in the menu.
B. Blue (valid for TV only)
☆In watching and tuning TV, if the function of blue screen is set to be “OFF”, the

screen won’t turn blue if there is no signal. If the function is set to be “ON”, the screen will
turn blue if there is no signal.
☆When displaying a menu, even if the function of blue screen is OFF, the screen will
be in blue automatically.
C. Key Sound
If this function is switched ON, there will be sound when pressing a key. Switch OFF
this function to clear the sound when pressing a key.
Volume adjustment
Monitor OFF
☆Rotate the knob on the panel to increase or decrease the volume. Adjusted values are
shown on the screen of the panel.
☆Hold the volume control button on the remote controller to continuously adjust the
volume. Continuously changing values will be shown on the screen of the panel.
Sequentially press the sound menu key to cycle through volume adjustment, bass
adjustment, treble adjustment, L/R balance adjustment, front and rear balance adjustment
and cancel menu monitor.
A. Volume adjustment
☆Press the knob or “SOUND” once to bring up the volume adjustment menu.
☆Rotate the knob on the panel to increase or decrease the volume. Volume values will
be shown on the screen of the panel.
☆You can use the sound-adjusting button on the remote controller to adjust volume.

Volume values will also be shown on the screen of the panel.
B. Bass adjustment
☆Double press the knob or “SOUND” to bring up the bass adjustment menu, rotate the
knob to adjust bass effects. Volume values will be shown on the screen of the panel.
Bass adjustment-8-8
☆You can use the sound-adjusting button on the remote controller to
adjust bass. Bass values will also be shown on the screen of the panel.
C. Treble Adjustment
Treble Adjustment-8-8
☆Triple press the knob or “SOUND” to bring up treble adjustment menu, rotate the
knob to adjust treble effects. Volume values will be shown on the screen of the panel.
☆You can use the sound adjustment button on remote controller to adjust treble. Treble
values will also be shown on the screen of the panel.
D. L/R Balance Adjustment
L/R Balance-8-8
☆Press the knob or “SOUND” 4 times to bring up L/R balance adjustment menu, rotate
the knob to adjust L/R balance effects. On the panel screen: “——” means two channels are
in balance, “—X” means adjusting the right channel, “ X— ” means adjusting the left
channel.
☆You can use the sound-adjusting button on the remote controller to
adjust L/R balances. Balance values will be shown on the screen of the panel.

E. Front and rear balance adjustment
Front & rear balance -8-8
☆Press the knob or “SOUND” 5 times to bring up the balance-adjusting menu for front and
rear channels, rotate the knob to adjust front and rear balance effects. On the panel screen:
“——” means front and rear tracks are in balance, “—X” means adjusting rear track,
“ X— ” means adjusting front track.
☆You can use the sound-adjusting button on the remote controller to adjust front and
rear balances. Balance values will be shown on the screen of the panel.
Monitor ON
Volume adjustment
Use the key on the remote controller or the knob on the panel to adjust volume.
When playing AV, CD-C (DVD), TV or BAND, press the “SOUND” button or the
knob on the panel to bring up the menu as shown in the following picture. Sequentially press
the “SOUND” key to cycle through bass, treble, L/R balance, front/rear balance and rotate.
Press VOL“+” or “-” to adjust the above parameters. Highlighted item is the parameter
being adjusted.
☆Hold VOL“+/-” key or the knob on the panel to continuously adjust the above
parameters.
☆When each parameter is adjusted to its proper value, if you don’t press any key within
3 seconds, the menu will be hidden automatically and each adjusted value will be
stored. All the adjusted values will be automatically loaded next time when you start
the unit.

Note: Whether the monitor is ON or not, you can always use the key on the remote
controller or the knob on the panel to make the above adjustments.

FM function Operations
Note: If the monitor is not turned on, Radio (BAND), CD-C (DVD) and AV can be
used normally except TV. All functions and statuses of this unit are shown on the
screen of the panel.
Hint: If you select radio, power antenna will be automatically extended out.
Monitor OFF
Press BAND key to enter radio mode, sequentially press BAND to select FM1, FM2
and AM.
Tuning
A. Manual search
Press “ OR ” key to search radio stations forward or backward by every
0.05MHz, the current frequency will be monitored on the screen of the panel.
Current Frequency
B. Auto search
Long-press “ OR ” key, when a “tick” tone is given, the unit will
automatically search radio stations until a station is found. When searching, the
current frequency number on the screen will flash till the end of search. And the
screen shows the current frequency.
Channel to store 0-9
Table of contents


