Braun Activator 8590 User manual

Activator 8590/85 MN KURTZ DESIGN 04.02.03
www.braun.com/register
Type 5644
8590
8585
full
cartridge
empty
clean
eco
normal
intensive
auto select
s
t
a
r
t
c
l
e
a
n
i
n
g
off
321
8590
0...20 40 60 80 100
5-644-450/02/VII-04/G2
D/GB/F/E/P/I/NL/DK/N/S/FIN/TR/GR
Printed in Germany
5644450_S1 Seite 1 Montag, 6. September 2004 10:19 10

Deutsch 4, 10, 96
English 11, 17, 96
Français 18, 24, 96
Español 25, 31, 96
Português 32, 38, 96
Italiano 39, 45, 96
Nederlands 46, 52, 96
Dansk 53, 59, 96
Norsk 60, 66, 96
Svenska 67, 73, 96
Suomi 74, 80, 96
Türkçe 81, 96
∂ÏÏËÓÈο 88, 95, 96
Braun Infoline
Haben Sie Fragen zu diesem
Produkt?
Rufen Sie an (gebührenfrei):
00 800 27 28 64 63
00 800 BRAUNINFOLINE
08 44 - 88 40 10
Servicio al consumidor para España:
901 11 61 84
Serviço ao Consumidor para Portugal:
808 20 00 33
Servizio consumatori:
(02) 6 67 86 23
Heeft u vragen over dit produkt?
Bel Braun Consumenten-infolijn:
(070) 4 13 16 58
Vous avez des questions sur ce produit ?
Appelez Braun Belgique
(02) 711 92 11
Har du spørgsmål om produktet? Så ring
70 15 00 13
Spørsmål om dette produktet? Ring
22 63 00 93
Frågor om apparaten? Ring Kundservice
020 - 21 33 21
Onko Sinulla kysyttävää tuotteesta? Soita
0203 77877
Müµteri Hizmetleri Merkezi:
0212 - 473 75 85
D
A
CH
E
P
I
NL
B
DK
N
S
FIN
TR
5644450_S2 Seite 1 Montag, 6. September 2004 10:19 10

321off
8585
empty charge
0...20 40 60 80 100
321off
8590
Activator 8590/8585
34
7
6
5
1
Activator 8590/85 MN Explo KURTZ DESIGN 03 02.03
start
clea
ning
clean
eco
normal
intensive
full
cartridge
auto select
empty
2
8
9
10
13
14
15
16
17
16
17
18
19
12 12
11
8585
8590
5644450_S3 Seite 1 Freitag, 21. Februar 2003 11:51 11

4
Ihr Activator bildet mit Rasierer und Lade-/Reinigungs-
station (Clean&Charge) ein System, das mit seiner an-
spruchsvollen Elektronik unübertroffenene Gründlichkeit,
höchstmöglichen Komfort für Sie und die optimale Pflege
für Ihren Rasierer garantiert.
• Das System passt sich automatisch jeder Netzspan-
nung weltweit an.
• Es erkennt, ob die Reinigung Ihres Rasierers erforder-
lich, und wenn ja, welches der drei Reinigungspro-
gramme angemessen ist.
• Am Netz angeschlossen, steuert das System den
Ladeprozess so, dass Kapazität und Lebensdauer der
Akku-Einheit Ihres Rasierers optimal gewährleistet
sind.
• Das System übernimmt die Schmierung des Scher-
systems.
Vorsicht
Ihr Rasierer-System ist mit einem Spezialkabel mit
integriertem Netzteil für Schutzkleinspannung aus-
gestattet. Daher dürfen auf keinen Fall Teile ausge-
tauscht oder Veränderungen vorgenommen werden.
Es besteht sonst Stromschlaggefahr.
Um ein Auslaufen der Reinigungsflüssigkeit zu vermei-
den, achten Sie beim Aufstellen der Station auf einen
sicheren, waagerechten Stand.
Die Station darf mit eingesetzter Kartusche nicht
gekippt, nicht heftig bewegt und in keiner Weise
transportiert werden.
Die Station sollte weder in Spiegelschränken noch
über Heizungen aufbewahrt, noch auf empfindlichen
(polierten oder lackierten) Flächen abgestellt werden.
Nicht längere Zeit direktem Sonnenlicht aussetzen.
Die Station enthält leicht entzündliche Flüssigkeit.
Von Zündquellen fernhalten, in der Nähe der Station
nicht rauchen. Von Kindern fernhalten.
Die Reinigungskartusche nicht neu füllen.
Verwenden Sie ausschließlich die original Reinigungs-
kartusche von Braun.
STOP
Deutsch
5644450_S4_102 Seite 4 Montag, 6. September 2004 10:19 10

5
Beschreibung
1. Spezialkabel mit integriertem Netzteil
2. «start cleaning» Start-Taste
3. Kontakte Station–Rasierer
4. Lift-Taste für Kartuschenwechsel
5. Anzeige der Reinigungsprogramme
6. Füllstands-Anzeige
7. Steckerbuchse (Station)
8. Reinigungskartusche
9. Schutzkappe
10. Scherfolie
11. Klingenblock
12. Entriegelungstasten
13. Langhaarschneider
14. Kontakte Rasierer–Station (Rasierer-Rückseite)
15. Schalter
16. Ladekontroll-Leuchten Rasierer (grün)
17. Restkapazitäts-Leuchte Rasierer (rot)
18. Kontroll-Lampe
19. Steckerbuchse (Rasierer)
Vor der Rasur
Wenn Sie es wünschen, können Sie gleich mit der Rasur
beginnen (vorausgesetzt, der Rasierer ist geladen – siehe
Abschnitt «Rasierer-Funktionsanzeige»). Wir empfehlen
jedoch wie folgt vorzugehen:
• Verbinden Sie die Steckerbuchse der Station (7) über
das Spezialkabel (1) mit dem Netz.
• Drücken Sie die Lift-Taste (4), um das Gehäuse-
Oberteil anzuheben.
• Halten Sie die Kartusche (8) auf einer ebenen, festen
Unterlage.
• Ziehen Sie den Verschluss vorsichtig ab.
• Schieben Sie die Kartusche bis zum Anschlag in das
Bodenfach.
• Drücken Sie das Gehäuse-Oberteil langsam nach
unten, bis es einrastet.
eco
normal
intensive
auto s
el
full
cartridge
empty
2
clean
eco
normal
intensive
full
cartridge
autoselect
empty
1
clean
eco
normal
intensive
full
cartridge
autoselect
empty
clean
eco
normal
intensive
full
cartridge
autoselect
empty
5644450_S4_102 Seite 5 Montag, 6. September 2004 10:19 10

6
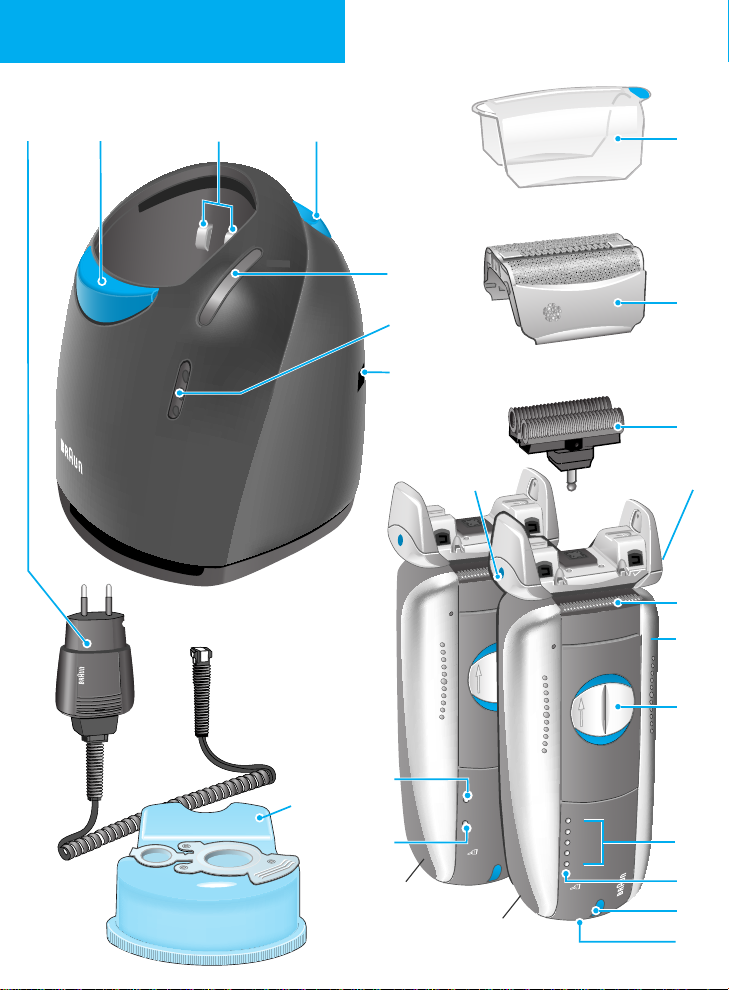
Die Füllstands-Anzeige (6) zeigt, wieviel Reinigungs-
flüssigkeit in der Kartusche ist:
a) Ausreichend Flüssigkeit vorhanden
b) Noch 7 Reinigungen möglich
c) Neue Kartusche erforderlich
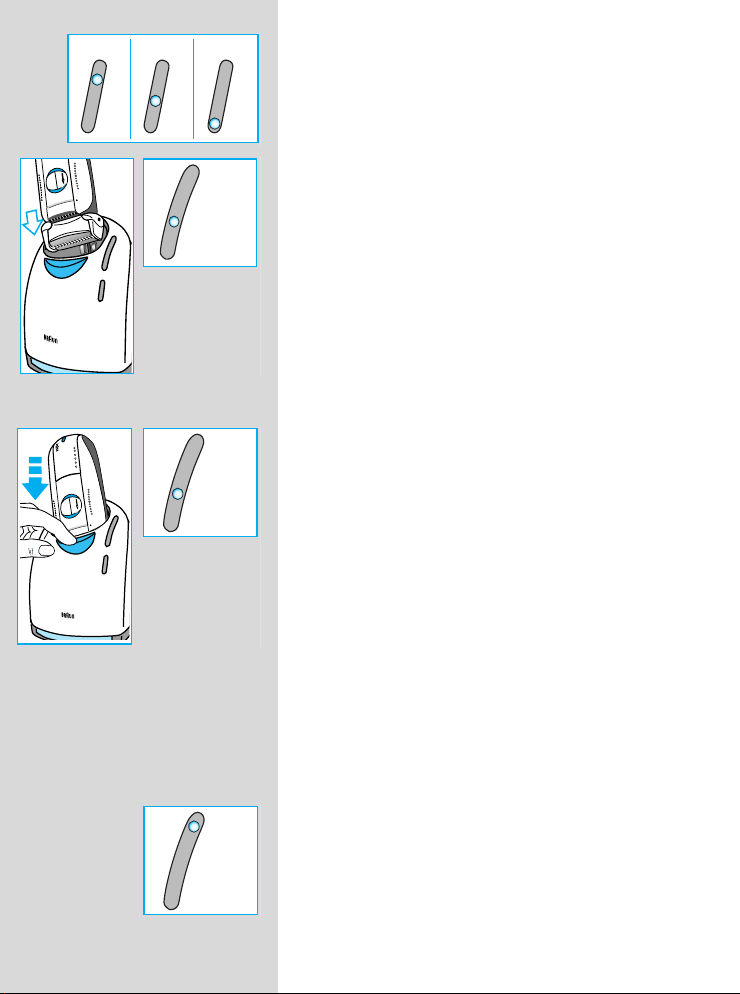
Nehmen Sie die Schutzkappe (9) vom Rasierer ab.
Stellen Sie den Rasierer mit dem Kopf nach unten in die
Station (die Kontakte auf der Rasierer-Rückseite (14)
berühren dann die Kontakte in der Station (3)). Wenn
erforderlich, sorgt das System jetzt für die Aufladung des
Rasierers.
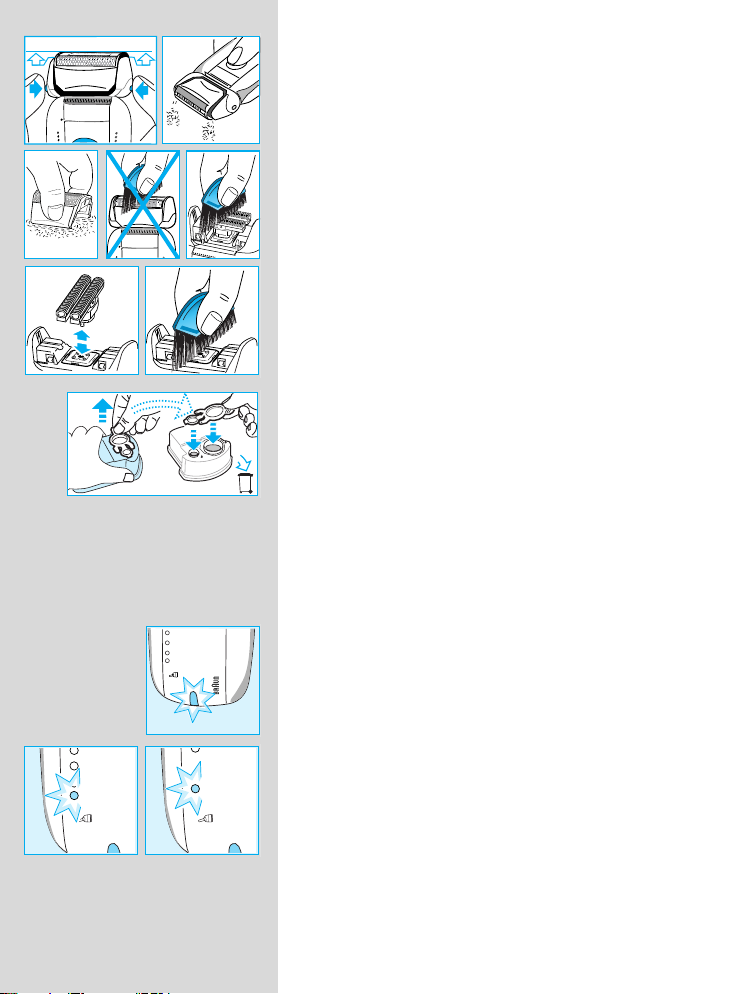
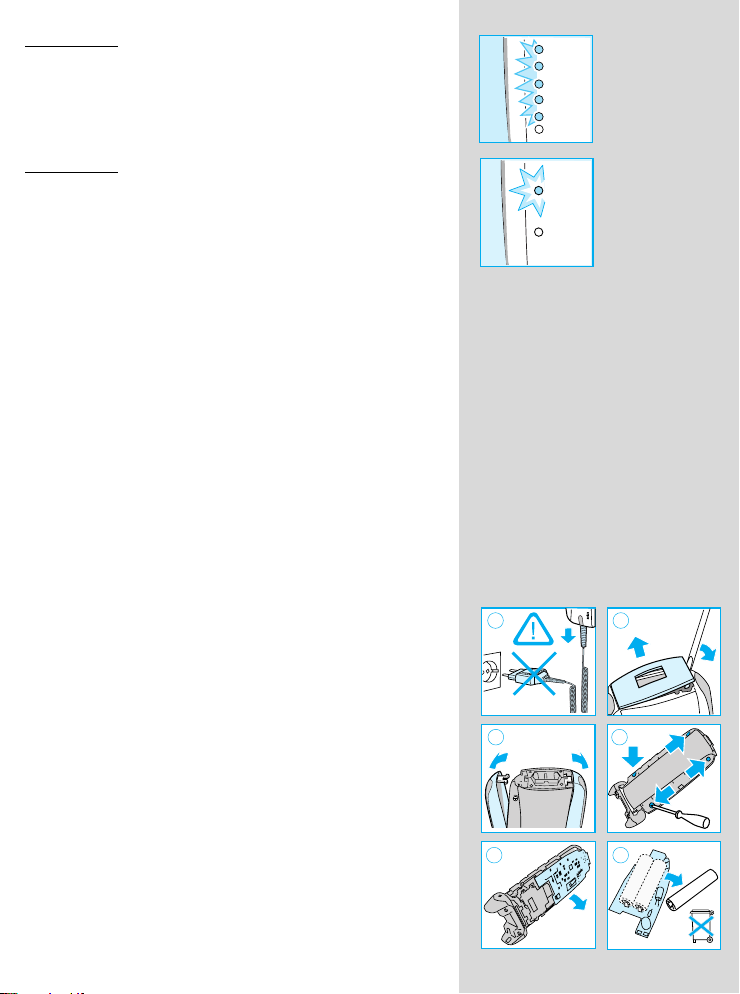
Zudem wird der Reinigungsstatus automatisch überprüft
und eine der vier Leuchtdioden der Anzeige der Reini-
gungsprogramme (5) leuchtet auf:
a) Der Rasierer ist sauber
b) Sparprogramm (eco) – nur kurze Reinigung
erforderlich
c) Normale Reinigung erforderlich
d) Intensive Reinigung erforderlich
Hat das System eines der drei Reinigungsprogramme
gewählt, wird es erst beginnen, wenn Sie die Start-Taste
(2) drücken. Damit wird der Rasierer in der Station
verriegelt und das Reinigungsprogramm gestartet.
Wir empfehlen, nach jeder Rasur zu reinigen.
Während das Reinigungsprogramm läuft, blinkt die
entsprechende Leuchtdiode. Jede Reinigung hat mehrere
Zyklen (in denen die Reinigungsflüssigkeit durch den
Rasiererkopf gespült wird) und eine Trocknungsphase
(durch Erwärmung). Die Gesamt-Reinigungszeit beträgt
zwischen 33 und 50 Minuten.
Reinigungsprozesse in der Station sollten nicht
unterbrochen werden, denn während des Trocknens
können die Metallteile des Rasierers heiß werden.
Außerdem kann die Elektronik Schaden nehmen,
wenn der Rasierer vorzeitig herausgenommen wird
und noch nicht trocken ist.
Ist das Reinigungsprogramm beendet, leuchtet das blaue
«clean»-Licht. Sie können die Start-Taste drücken und
den Rasierer entriegeln.
Ihr Rasierer ist jetzt sauber und bereit zur Benutzung.
cartridge
full
empty
cartridge
full
empty
cartridge
full
empty
abc
full
cartridge
auto select
empty
s
t
a
r
t
c
l
e
a
n
i
n
g
eco
normal
intensive
clean
321off
auto select
eco
normal
intensive
clean
a
b
c
d
auto select
eco
normal
intensive
clean
full
cartridge
auto select
empty
s
t
a
r
t
c
l
e
a
n
i
n
g
eco
normal
intensive
clean
321off
0...2040
8590
6080100
auto select
eco
normal
intensive
clean
5644450_S4_102 Seite 6 Montag, 6. September 2004 10:19 10

7
Rasieren
Ist der Rasierer in der Station verriegelt, drücken Sie die
Start-Taste (2) zur Entriegelung und nehmen den Rasierer
heraus.
Schalterpositionen
off = aus (Einschaltsperre aktiv)
Schalter drücken und hochschieben, um den
Rasierer einzuschalten:
1=Rasur mit beweglichem Schwingkopf
(das bewegliche Schersystem sorgt automatisch für
eine optimale Anpassung an die Gesichtsform).
2=Rasur mit fixiertem Schwingkopf in Winkelstellung
(z.B. Rasur an engen Gesichtspartien wie unter der
Nase).
3=Der Langhaarschneider ist zugeschaltet
(zum kontrollierten Trimmen von Schnauzbart und
Haaransatz).
Tipps für eine optimale Rasur
Es empfiehlt sich, vor dem Waschen zu rasieren, da
nach dem Waschen die Haut leicht aufgequollen ist.
Rasierer im rechten Winkel (90°) zur Haut halten.
Haut straffen und gegen die Bartwuchsrichtung rasieren.
Um 100 % der Rasierleistung zu erhalten, wechseln Sie
die Scherfolie und den Klingenblock alle 18 Monate oder
sobald sie Verschleißerscheinungen zeigen.
Netzbetrieb
Wenn der Akku leer ist, kann die Rasur auch direkt
über das Spezialkabel vom Netz erfolgen. (Sollte der
Rasierer nach dem Einschalten nicht sofort laufen,
ca. 1 Minute bei Schalterstellung «0» laden.)
Nach der Rasur
Automatische Reinigung
Stellen Sie nach jeder Rasur den Rasierer in die Station
und verfahren Sie wie im Abschnitt «Vor der Rasur» be-
schrieben. Alle Reinigungs- und Ladefunktionen werden
dann automatisch durchgeführt. Bei täglicher Reinigung
reicht eine Kartusche für ca. 30 Reinigungsvorgänge.
Aus hygienischen Gründen enthält die Reinigungsflüssig-
keit Alkohol, der sich nach dem Öffnen der Kartusche
langsam verflüchtigt. Daher sollte eine Kartusche, falls sie
nicht täglich verwendet wird, nach ca. 8 Wochen ausge-
tauscht werden.
21
21
321
8590
full
cartridge
autoselect
empty
s
t
a
r
t
c
l
e
a
n
i
n
g
eco
normal
intensive
clean
321off
0...2040
8590
6080100
5644450_S4_102 Seite 7 Montag, 6. September 2004 10:19 10

8
Schnellreinigung
Drücken Sie die Entriegelungstasten (12) um die
Scherfolie anzuheben (nicht vollständig abheben).
Schalten Sie den Rasierer ca. 5 –10 Sekunden lang ein,
damit der Rasierstaub herausrieseln kann.
Gründliche manuelle Reinigung
Die manuelle Reinigung ist nur empfehlenswert, wenn
die Station nicht zur Verfügung steht, z.B. auf Reisen.
Reinigen Sie niemals mit Wasser.
Nehmen Sie die Scherfolie ab und klopfen Sie sie aus.
Den Klingenblock mit der Bürste reinigen und auch die
Innenseiten des Schwingkopfs ausbürsten. Wenn Sie die
Station längere Zeit nicht benutzen, sollten Sie einen
Tropfen Leichtmaschinenöl auf der Scherfolie verteilen.
Kartuschenwechsel
Nach dem Drücken der Lift-Taste (4) zum Öffnen des
Gehäuses einige Sekunden warten, bevor die gebrauchte
Kartusche herausgenommen wird.
Schließen Sie vor dem Entsorgen der gebrauchten
Kartusche die Öffnungen mit dem Verschluss der neuen
Kartusche, denn die gebrauchte Kartusche enthält
verschmutzte Reinigungsflüssigkeit.
Reinigung des Gehäuses
Gehäuse des Rasierers und der Station gelegentlich mit
einem feuchten Tuch abwischen, insbesondere die Mulde
in der Station, in der der Rasierer sitzt.
Rasierer-Funktionsanzeige
Kontroll-Lampe (18) zeigt an, dass der Rasierer mit
Spannung versorgt wird.
Bei eingeschaltetem Rasierer blinkt die rote Rest-
kapazitäts-Leuchte (17), wenn die Kapazität der Akku-
Einheit auf ca. 20% abgesunken ist. Dann reicht die
Ladung noch für 2–3 Rasuren.
21off
1off
old
new
8590 0...20 40 60
0...20 40 6
0
8590
empty ch
a
8585
5644450_S4_102 Seite 8 Montag, 6. September 2004 10:19 10

9
Modell 8590: Bei Volladung leuchten alle fünf Lade-
kontroll-Leuchten (16) (20% pro Leuchte), vorausgesetzt,
der Rasierer ist am Netz angeschlossen oder einge-
schaltet.
Modell 8585: Die grüne Ladekontroll-Leuchte (16) zeigt
an, dass der Rasierer geladen wird. Nach Vollladung der
Akku-Einheit blinkt oder erlischt die Ladekontroll-
Leuchte. Späteres, gelegentliches Aufleuchten der
Ladekontroll-Leuchte zeigt an, dass der Rasierer zur
Erhaltung seiner Vollladung nachgeladen wird.
Informationen zum Laden
Vollgeladen kann der Rasierer je nach Bartstärke
ca. 50 Minuten ohne Netzanschluss betrieben werden.
Günstige Umgebungstemperatur beim Laden: 15 °C
bis 35 °C.
Zur Akku-Pflege nimmt das System automatisch eine
vollständige Entladung und dann Aufladung vor. Dies
geschieht höchstens alle sechs Monate, und auch nur,
wenn erforderlich.
Zubehör
Im Handel oder beim Braun Kundendienst erhältlich:
•
Scherfolie und Klingenblock
No.8000
Um 100% der Rasierleistung zu erhalten, wechseln
Sie die Scherfolie und den Klingenblock alle 18 Monate
oder sobald sie Verschleißerscheinungen zeigen.
Für eine gründlichere Rasur mit weniger Hautreizung
sollten Sie beide Teile gleichzeitig wechseln.
•
Reinigungskartusche Clean&Charge
CCR
Informationen zum Umweltschutz
Der Rasierer enthält eine Nickel-Hydrid Akku-Einheit, die
frei von umweltbelastenden Schwermetallen ist. Dennoch
sollte das Gerät im Interesse der Rohstoff-Rückgewin-
nung am Ende der Lebensdauer nicht mit dem Hausmüll
entsorgt werden. Die Entsorgung kann über eine Braun
Kundendienststelle oder über entsprechende Sammel-
stellen erfolgen.
Die Kartusche kann im Hausmüll entsorgt werden.
0...20 40 60 80 100
empty charge
8590
12
4
5 6
3
5644450_S4_102 Seite 9 Montag, 6. September 2004 10:19 10

10
Änderungen vorbehalten.
Dieses Gerät entspricht der EMV-Richtlinie 89/336/EWG
sowie der Niederspannungsrichtlinie 73/23 EWG.
Elektrische Angaben siehe Bedruckung auf dem Gerät.
Garantie
Als Hersteller übernehmen wir für dieses Gerät – nach
Wahl des Käufers zusätzlich zu den gesetzlichen Gewähr-
leistungsansprüchen gegen den Verkäufer – eine Garantie
von 2 Jahren ab Kaufdatum. Innerhalb dieser Garantiezeit
beseitigen wir nach unserer Wahl durch Reparatur oder
Austausch des Gerätes unentgeltlich alle Mängel, die auf
Material- oder Herstellungsfehlern beruhen. Die Garantie
kann in allen Ländern in Anspruch genommen werden, in
denen dieses Braun Gerät von uns autorisiert verkauft
wird.
Von der Garantie sind ausgenommen: Schäden durch
unsachgemäßen Gebrauch (Knickstellen an der Scher-
folie, Bruch), normaler Verschleiß (z.B. Scherfolie oder
Klingenblock) sowie Mängel, die den Wert oder die
Gebrauchstauglichkeit des Gerätes nur unerheblich
beeinflussen. Bei Eingriffen durch nicht von uns autori-
sierte Braun Kundendienstpartner sowie bei Verwendung
anderer als Original Braun Ersatzteile erlischt die Garantie.
Im Garantiefall senden Sie das Gerät mit Kaufbeleg bitte
an einen autorisierten Braun Kundendienstpartner. Die
Anschrift für Deutschland können Sie kostenlos unter
00800/27 28 64 63 erfragen.
5644450_S4_102 Seite 10 Montag, 6. September 2004 10:19 10

11
Your Activator (shaver with Clean&Charge station)
is a system equipped with highly advanced electronic
processors. It ensures unsurpassed closeness and
comfort for you and optimum care for your shaver:
• The system automatically adapts to any voltage
worldwide.
•The system recognizes when cleaning of your shaver is
required, and automatically recognizes which of the
three cleaning programs is appropriate.
•While the shaver is connected to the mains, the system
automatically takes care of charging and discharging in
a way that is optimized for the shaver’s battery capacity
and life span.
• The system takes care of lubrication of the shaver’s
cutting parts.
Warning
Your Activator is provided with a low-voltage adapter.
Therefore you must not exchange or manipulate any
part of it. Otherwise there is risk of electric shock.
In order to avoid any leakage of the cleaning fluid,
place the Clean&Charge station on a flat, stable
surface.
Do not tip, move suddenly or transport the station in
any way if a cleaning cartridge is installed.
Do not place the station in a mirror cabinet, nor store
it over radiators, nor place it on polished or laquered
surfaces. Do not expose to direct sunlight.
The station contains highly flammable liquid. Keep it
away from sources of ignition.
No smoking.
Keep out of reach of children.
Do not refill cartridge.
Use only original Braun refill cartridge.
STOP
English
5644450_S4_102 Seite 11 Montag, 6. September 2004 10:19 10

12
Description
1. Low-voltage adapter
2. «start cleaning» button
3. Station-to-shaver connecting contacts
4. Station lift button for cartridge exchange
5. Display for cleaning programs
6. Display for cleaning fluid status
7. Station mains socket
8. Cleaning cartridge
9. Shaver foil protection cap
10. Shaver foil
11. Cutter block
12. Foil release buttons
13. Long hair trimmer
14. Shaver-to-station connecting contacts
(shaver backside)
15. Switch
16. Shaver charging lights (green)
17. Shaver low-charge light (red)
18. Pilot light
19. Shaver mains socket
Before shaving
If you wish, you may start shaving right away (if the shaver
is charged, see section «Shaver indicator lights»).
However, we recommend to follow the procedure
described here:
• Using the low-voltage adapter (1), connect the mains
socket of the Clean&Charge station (7) to the mains.
• Press the station lift button (4) to open the housing.
• Hold the cleaning cartridge (8) down on a flat, stable
surface (e.g. table).
• Carefully remove the lid from the cartridge.
•Slide the cartridge into the base of the station as far as
it will go.
• Slowly close the housing by pushing it down until it
locks.
eco
normal
intensive
auto s
el
full
cartridge
empty
2
clean
eco
normal
intensive
full
cartridge
autoselect
empty
1
clean
eco
normal
intensive
full
cartridge
autoselect
empty
clean
eco
normal
intensive
full
cartridge
autoselect
empty
5644450_S4_102 Seite 12 Montag, 6. September 2004 10:19 10

13
The display for cleaning fluid (6) will show how much
cleaning fluid is in the cartridge:
a) Cleaning solution sufficiently available
b) Up to 7 cleanings left
c) New cartridge required
Make sure the foil protection cap (9) is removed from the
shaver. Insert the shaver head down into the station (the
contacts on the back of the shaver (14) will correspond to
the contacts in the station (3)). If necessary, the system
will now charge the shaver.
Also, the cleaning status will be automatically analyzed
and one of the four diodes of the cleaning program display
(5) will light up:
a) The shaver is clean
b) Eco(nomic), i.e. short cleaning required
c) Normal cleaning required
d) Intensive cleaning required
If the system has selected one of the three cleaning
programs, it will not start until you push down the «start
cleaning» button (2). This locks the shaver into the station
and starts the cleaning process.
We recommend cleaning after each shave.
While the cleaning is in progress, the respective cleaning
program light will flash. Each cleaning consists of several
cycles (where the cleaning fluid is flushed through the
shaver head) and a heat drying period. The total cleaning
time is 33 to 50 minutes.
Cleaning processes in the Clean&Charge should not
be interrupted. While the shaver is drying, the metal
parts of the shaver may be hot. Also, if the shaver is
taken out prematurely and is not dry, its electronics
could be harmed.
When the program is finished, the blue «clean» light will
shine. You can release the shaver by pushing the «start
cleaning» button.
Your shaver is now clean and ready for use.
cartridge
full
empty
cartridge
full
empty
cartridge
full
empty
abc
full
cartridge
auto select
empty
s
t
a
r
t
c
l
e
a
n
i
n
g
eco
normal
intensive
clean
321off
auto select
eco
normal
intensive
clean
a
b
c
d
auto select
eco
normal
intensive
clean
full
cartridge
auto select
empty
s
t
a
r
t
c
l
e
a
n
i
n
g
eco
normal
intensive
clean
321off
0...204
0
8590
60 80100
auto select
eco
normal
intensive
clean
5644450_S4_102 Seite 13 Montag, 6. September 2004 10:19 10

14
Shaving
If the shaver is locked into the Clean&Charge station,
push the «start cleaning» button (2) to release the shaver
and take it out.
Switch positions
off = (switch is locked)
Press and push up the switch to operate the shaver:
1=Shaving with the pivoting head
(the pivoting cutting system automatically adjusts to
every contour of your face).
2=Shaving with the pivoting head locked at an angle
(to permit shaving in difficult areas, e.g. under the
nose).
3=The long hair trimmer is activated
(for trimming sideburns, moustache and beard).
Tips for the perfect shave
We recommend that you shave before washing, as the
skin tends to be slightly swollen after washing.
Hold the shaver at right angles (90°) to the skin.
Stretch your skin and shave against the direction of beard
growth.
To maintain 100% shaving performance, replace your foil
and cutter block every 18 months or when worn.
Shaving with the cord
If the shaver is completely discharged and you do not
have the time to recharge in the Clean&Charge station,
you may also shave with the shaver connected to the
mains via the low-voltage adapter.
After shaving
Automatic cleaning
After each shave, return the shaver to the Clean&Charge
station and proceed as described above in the section
«Before shaving». All charging and cleaning needs are
then taken care of. With daily use, a cleaning cartridge
should be sufficient for about 30 cleaning cycles.
The hygienic cleaning solution cartridge contains alcohol
which, once opened, will naturally evaporate slowly into
the surrounding air. Each cartridge, if not used daily,
should be replaced after approximately 8 weeks.
21
21
321
8590
full
cartridge
autoselect
empty
s
t
a
r
t
c
l
e
a
n
i
n
g
eco
normal
intensive
clean
321off
0...2040
8590
6080100
5644450_S4_102 Seite 14 Montag, 6. September 2004 10:19 10

15
Quick cleaning
Press the foil release buttons (12) to lift the shaver foil
(do not remove the foil completely). Switch on the shaver
for approx. 5–10 seconds so that the shaved stubbles can
fall out.
Thorough manual cleaning
Manual cleaning is recommended only when the
Clean&Charge station is not available, e.g. when travel-
ling. Never use water to clean the shaver.
Remove the shaver foil and tap it out on a flat surface.
Using the brush, clean the cutter block and the inner area
of the pivoting head. If you do not use the Clean&Charge
station for a longer period of time, you should apply a drop
of light machine oil onto the shaver foil.
Replacing the cartridge
After having pressed the lift button (4) to open the
housing, wait for a few seconds before removing the used
cartridge.
Before discarding the used cartridge, make sure to close
the openings using the lid of the new cartridge, since the
used cartridge will contain contaminated cleaning
solution.
Cleaning the housing
Clean the housing of shaver and station from time to time
with a damp cloth, especially inside the opening of the
station where the shaver rests.
The shaver indicator lights
Pilot light (18): the shaver is connected to the mains.
The red low-charge light (17) flashes when the battery
capacity has dropped below 20%, provided the shaver is
switched on. The remaining capacity will then be sufficient
for 2 to 3 shaves.
21off
1off
old
new
8590 0...20 40 60
0...20 40 6
0
8590
empty ch
a
8585
5644450_S4_102 Seite 15 Montag, 6. September 2004 10:19 10

16
Model 8590: When the shaver is fully charged, all five
charging lights (16) will light up (20% per light), provided
the shaver is connected to the mains or switched on.
Model 8585: The green single charging light (16) shows
that the shaver is being charged. When fully charged, the
charging light flashes or goes off. If later on, the charging
light comes on again, this indicates that the shaver is
being recharged to maintain its full capacity.
Charging information
A full charge will give up to 50 minutes of cordless shaving
time, depending on your beard growth.
Best environmental temperature range for charging is
15 °C to 35 °C.
For battery maintenance, the system will automatically
initiate full discharging and then recharging of the
batteries. This will take place every six months at the
most, and only if necessary.
Accessories
Available at your dealer or Braun Service Centres:
•
Shaver foil and cutter block
No. 8000
To maintain 100% shaving performance, replace your
foil and cutterblock every 18 months or when worn.
Change both parts at the same time for a closer shave
with less skin irritation.
•
Cleaning cartridge Clean&Charge
CCR
Environmental notice
This appliance is provided with nickel-hydride recharge-
able batteries. To protect the environment, do not dispose
of the appliance in the household waste at the end of
its useful life. Open the housing as shown, remove and
dispose of the batteries at your retail store or at appro-
priate collection sites according to national or local
regulations.
The cartridge can be disposed with regular garbage.
0...20 40 60 80 100
empty charge
8590
12
4
5 6
3
5644450_S4_102 Seite 16 Montag, 6. September 2004 10:19 10

17
Subject to change without notice.
This product conforms to the EMC-Directive 89/336/EEC and
to the Low Voltage Regulation 73/23 EEC.
Electric specifications see printing on the housing.
Guarantee
We grant 2 years guarantee on the product commencing
on the date of purchase. Within the guarantee period we
will eliminate, free of charge, any defects in the appliance
resulting from faults in materials or workmanship, either
by repairing or replacing the complete appliance as we
may choose.
This guarantee extends to every country where this
appliance is supplied by Braun or its appointed
distributor.
This guarantee does not cover: damage due to improper
use, normal wear and tear (e.g. shaver foil or cutter block)
as well as defects that have a negligible effect on the value
or operation of the appliance. The guarantee becomes
void if repairs are undertaken by unauthorised persons
and if original Braun parts are not used.
To obtain service within the guarantee period, hand in or
send the complete appliance with your sales receipt to an
authorised Braun Customer Service Centre.
For UK only:
This guarantee in no way affects your rights under
statutory law.
5644450_S4_102 Seite 17 Montag, 6. September 2004 10:19 10

18
Votre Activator (rasoir avec chargeur Clean&Charge) est
un système équipé de micro-processeurs de haute
technologie. Il vous assure une précision et un confort
inégalés, ainsi qu’un entretien optimal de votre rasoir :
• Le système s’adapte automatiquement à n’importe
quelle tension dans le monde.
• Le système détecte quand votre rasoir a besoin d’être
nettoyé, et sélectionne automatiquement le programme
de nettoyage le plus adapté parmi les trois.
• Lorsque votre rasoir est sous tension, le système gère
automatiquement la charge et la décharge de la batte-
rie de façon à optimiser sa capacité et sa durée de vie.
• Le système prend en charge la lubrification des élé-
ments de coupe du rasoir.
Attention
Votre Activator est fourni avec un adaptateur basse
tension. Par conséquent, vous ne devez modifier ou
manipuler aucun de ses composants, afin d’éviter tout
risque d’électrocution.
Placer le chargeur Clean&Charge sur une surface
plane et stable afin d’éviter toute fuite du liquide
nettoyant.
Ne pas incliner, bouger brusquement ou transporter
le chargeur de quelque façon que ce soit s’il contient
une cartouche de liquide nettoyant.
Ne pas placer le chargeur sur une surface en verre,
ne pas ranger au-dessus d’un radiateur ni poser sur
des surfaces polies ou laquées. Ne pas exposer aux
rayons du soleil.
Le chargeur contient du liquide hautement inflam-
mable. Tenir éloigné de toute source d‘inflammation.
Ne pas fumer.
Tenir hors de portée des enfants.
Ne pas remplir la cartouche lorsqu’elle est vide.
Utiliser uniquement des recharges Braun.
STOP
Français
5644450_S4_102 Seite 18 Montag, 6. September 2004 10:19 10

19
Description
1. Cordon d’alimentation
2. Bouton de démarrage du nettoyage « start cleaning »
3. Points de contact chargeur-rasoir
4. Bouton d’ouverture du chargeur pour le
remplacement de la cartouche
5. Indicateur de programmes de nettoyage
6. Indicateur du niveau de liquide nettoyant
7. Prise d‘alimentation secteur du chargeur
8. Cartouche de liquide nettoyant
9. Capot de protection de la grille
10. Grille de rasage
11. Bloc-couteaux
12. Bouton d‘éjection de la grille de rasage
13. Tondeuse rétractable
14. Points de contact rasoir-chargeur (au dos du rasoir)
15. Interrupteur
16. Témoin lumineux de charge (vert)
17. Témoin lumineux de faible charge (rouge)
18. Témoin lumineux
19. Prise d‘alimentation secteur du rasoir
Avant le rasage
Si vous le désirez, vous pouvez commencer à vous raser
directement (si le rasoir est chargé, voir section « Les
témoins lumineux du rasoir »). Néanmoins, nous recom-
mandons de suivre la procédure décrite ci-dessous :
• Branchez le cordon d’alimentation (1) sur la prise du
chargeur Clean&Charge (7) puis à une prise de courant.
• Pressez le bouton d’ouverture du chargeur (4) pour
ouvrir le boîtier.
• Posez la cartouche de liquide nettoyant (8) sur une
surface plane et stable (ex : une table).
• Retirez soigneusement le couvercle de la recharge.
• Glissez la recharge dans le compartiment jusqu’à ce
qu’elle soit bien installée.
•Fermez doucement le boîtier en le rabattant jusqu’à ce
qu’il soit verrouillé.
eco
normal
intensive
auto s
el
full
cartridge
empty
2
clean
eco
normal
intensive
full
cartridge
autoselect
empty
1
clean
eco
normal
intensive
full
cartridge
autoselect
empty
clean
eco
normal
intensive
full
cartridge
autoselect
empty
5644450_S4_102 Seite 19 Montag, 6. September 2004 10:19 10

20
L’indicateur du niveau de liquide nettoyant (6) rend
compte de la quantité de liquide restant dans la
cartouche :
a) Liquide nettoyant en quantité suffisante
b) Encore 7 nettoyages possibles
c) Changez la cartouche
Assurez-vous que le capot de protection de la grille (9)
a été retiré du rasoir. Insérer le rasoir dans le chargeur,
la tête de coupe vers le bas (les points de contact au dos
du rasoir (14) correspondent aux points de contact du
chargeur (3). Si nécessaire, le système va maintenant
charger le rasoir.
De plus, le niveau de nettoyage requis est automatique-
ment analysé, et un des quatre témoins lumineux de
l’indicateur de programmes de nettoyage (5) s’allume :
a) Le rasoir est propre
b) Eco(nomique), c’est-à-dire nettoyage rapide requis
c) Nettoyage normal requis
d) Nettoyage intensif requis
Si le système a sélectionné un des trois programmes de
nettoyage, il ne démarrera que lorsque vous appuierez
sur le bouton de démarrage du nettoyage « start cleaning »
(2). Cela verrouillera le rasoir dans le chargeur et débutera
le programme de nettoyage.
Nous recommendons le nettoyage après chaque
rasage.
Pendant que le nettoyage est en cours, l’indicateur
lumineux du programme correspondant clignote. Chaque
nettoyage est composé de plusieurs cycles (où le liquide
nettoyant passe au travers de la tête de coupe) et d’un
cycle de séchage à chaud. La durée totale d’un nettoyage
varie de 33 à 50 minutes.
Les programmes de nettoyage du chargeur ne doivent
pas être interrompus. Lorsque le rasoir est en train de
sécher, les parties métalliques du rasoir peuvent être
chaudes. De plus, si le rasoir est retiré prématurément
et n’est pas sec, ses composants électroniques
pourraient être endommagés.
Lorsque le programme est terminé, l’indicateur lumineux
bleu « clean » s’allume. Vous pouvez libérer le rasoir en
appuyant sur le bouton de démarrage du nettoyage « start
cleaning ».
Votre rasoir est alors propre et prêt pour une nouvelle
utilisation.
cartridge
full
empty
cartridge
full
empty
cartridge
full
empty
abc
full
cartridge
auto select
empty
s
t
a
r
t
c
l
e
a
n
i
n
g
eco
normal
intensive
clean
321off
auto select
eco
normal
intensive
clean
a
b
c
d
auto select
eco
normal
intensive
clean
full
cartridge
auto select
empty
s
t
a
r
t
c
l
e
a
n
i
n
g
eco
normal
intensive
clean
321off
0...204
0
8590
6080100
auto select
eco
normal
intensive
clean
5644450_S4_102 Seite 20 Montag, 6. September 2004 10:19 10
This manual suits for next models
2
Table of contents
Languages:
Other Braun Electric Shaver manuals