BRAX GX2000 User manual

GX2000
Instruction Manual

13
Congratulations on your purchase of this high-quality BRAX amplier.
With the amplier BRAX GX2000 you have chosen a product which combines ultimate perfection in sound and technical
maturity with a maximum of individuality. Only hand selected components and nest materials are used in the amplier‘s
production process and thus guarantee a top-class high-end music experience.
For more than 30 years we have been working on the development and manufacturing of top-notch audio components.
The brand BRAX has worldwide an excellent reputation for superior quality. Various honours by the world‘s major car audio
magazines and, last but not least, numerous innovation awards are the proof of our excellent work.
We have provided the amplier BRAX GX2000 with everything it requires in order to set new standards concerning sound
quality, manufacturing, and longevity. We are very proud to offer you this high-end product MADE IN GERMANY.
We wish you many hours of enjoyment with your BRAX GX2000.
AUDIOTEC FISCHER GMBH
Heinz Fischer
Founder and Managing Director
DEAR CUSTOMER
Your amplier BRAX GX2000 has the serial number:

14
Based on our basic principles “handmade” and “made in Germany” we have designed the amplier BRAX GX2000 accord-
ing to the latest technical knowledge. The result is both a top-class amplier and a true high-end statement: A long lasting
period of research and development, innovative technologies and an extremely fastidious manufacturing combined with
the love for music as the driving force for our work make the BRAX GX2000 doubtlessly to one of the most powerful and
best sounding 2-channel ampliers.
Concerning the straight design of the GX2000 amplier and the sophisticated layout of the circuit board, we have deliber-
ately set crossovers and lter functions aside. Short signal paths combined with selected components “made in Germany”
ensure pristine listening pleasure and underline the puristical high-end philosophy of BRAX ampliers.
In order to completely eliminate power differences and manufacturing tolerances, we only use hand-selected transistors
for the production of each GX2000 amplier. Concerning power-, voltage- and resistance data we select them in more
than 300 categories. Thus, all transistors harmonize perfectly in terms of technical specications. In doing so, our BRAX
ampliers obtain a worldwide reference status. Striving for ultimate perfection, Audiotec Fischer is the only manufacturer
of audiophile products on the globe that conducts this extensive and time-consuming hand-selection. Of course, all mea-
surement devices which are necessary for this procedure are in-house developments.
In order to control voltage uctuations, an external power stabilizer can directly be connected to the power supply. More-
over, the solid and gold-plated terminals for cables up to 50 mm² make another contribution to an ideal power supply of
the BRAX GX2000.
At the end of the day, the BRAX GX2000 can be described as an amplier with a sound rendition that is highly dynamic,
powerful in an awsome way and swift as an arrow. The underlying philosophy is topped-off by a packaging in a precious
wooden box. Furthermore, each single amplier is manufactured individually and its respective serial number is recorded in
our data-base. The amplier BRAX GX2000 is only produced on demand and of course we can respond to our customer’s
requirements. In this way, each amplier is a valuable individual item that rightly deserves the title “high-end made in
Germany”.
THE BRAX PHILOSOPHY
15
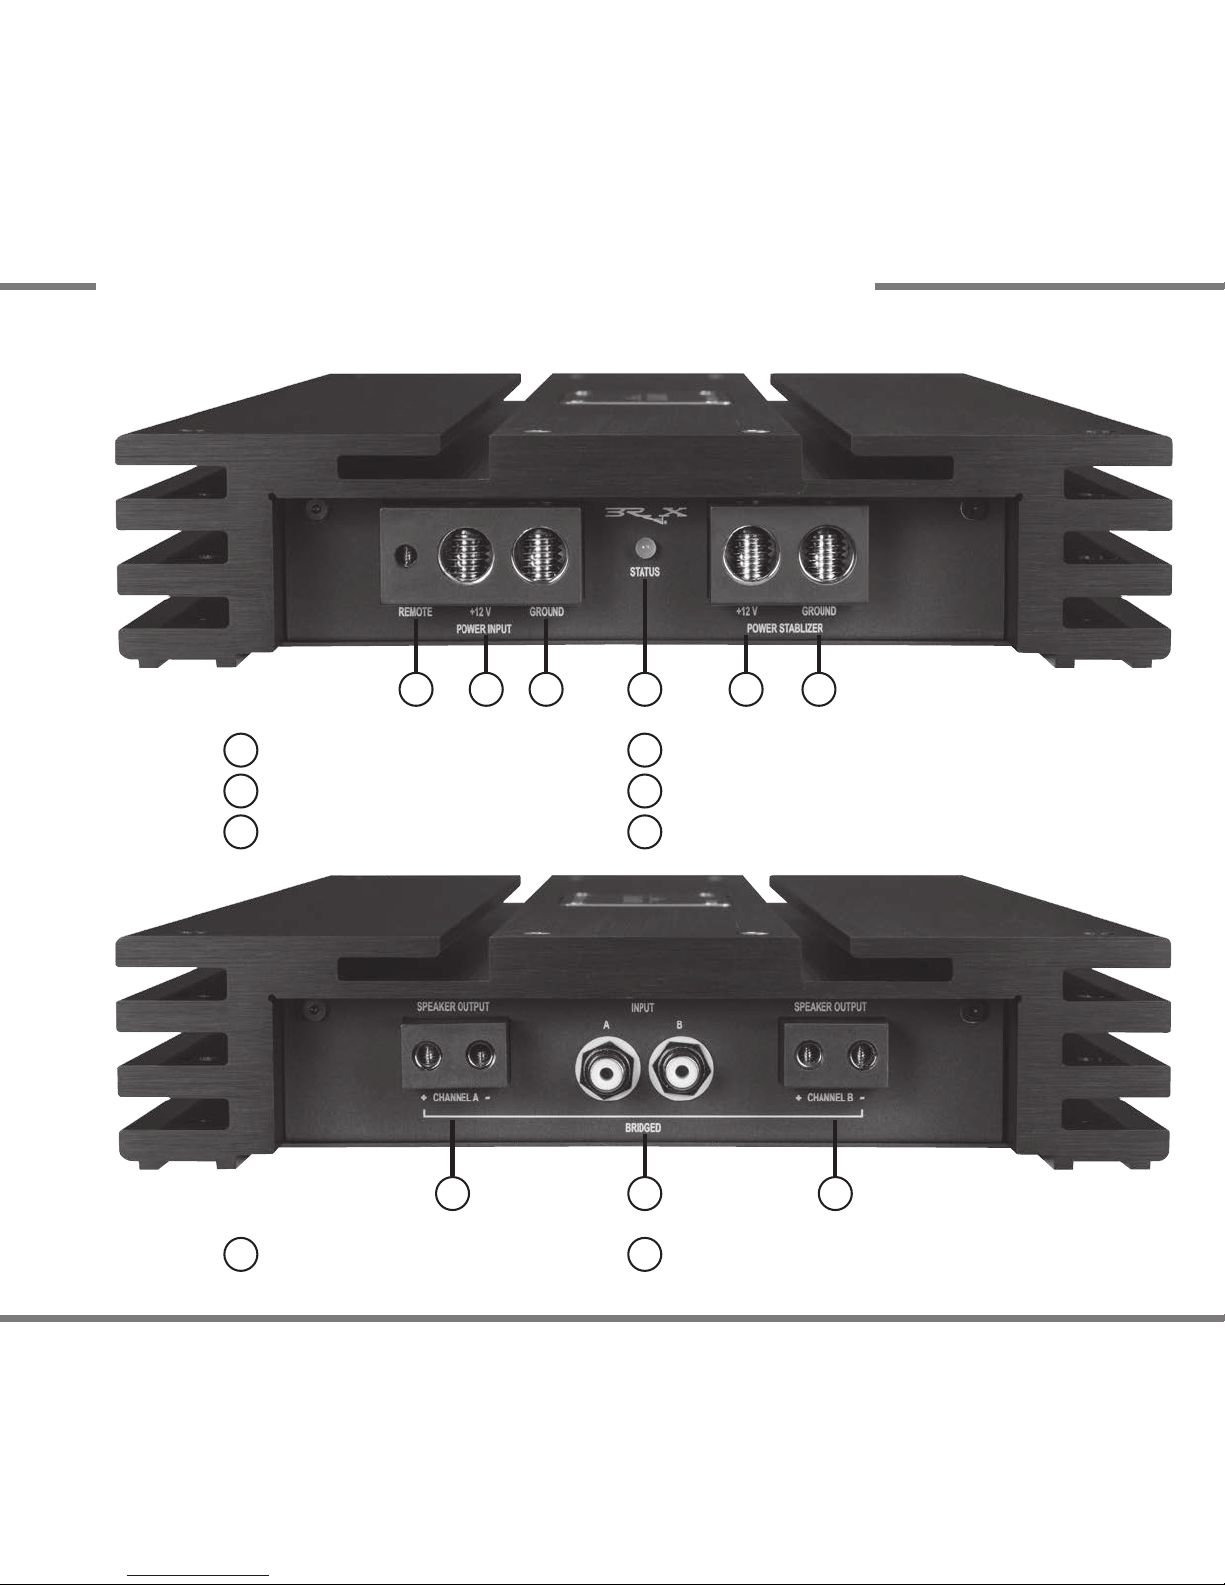
CONNECTION AND CONTROL ELEMENTS
7 78
Loudspeaker terminals
7Signal inputs
8
1 2 3 56
Connection remote lead
1
Connection +12 V battery cable
2
Connection ground cable
3
CPS LED
4
5Connection BRAX Power Stabilizer (plus)
4
6Connection BRAX Power Stabilizer (minus)
16
13
6
2
4
4
5 5
9
11
16
15
16
18 17
14
1
8
8
13 13 13 13 13
8
8
13 13 13 13 13
12
12
19 19
20
1
1
7
10

17
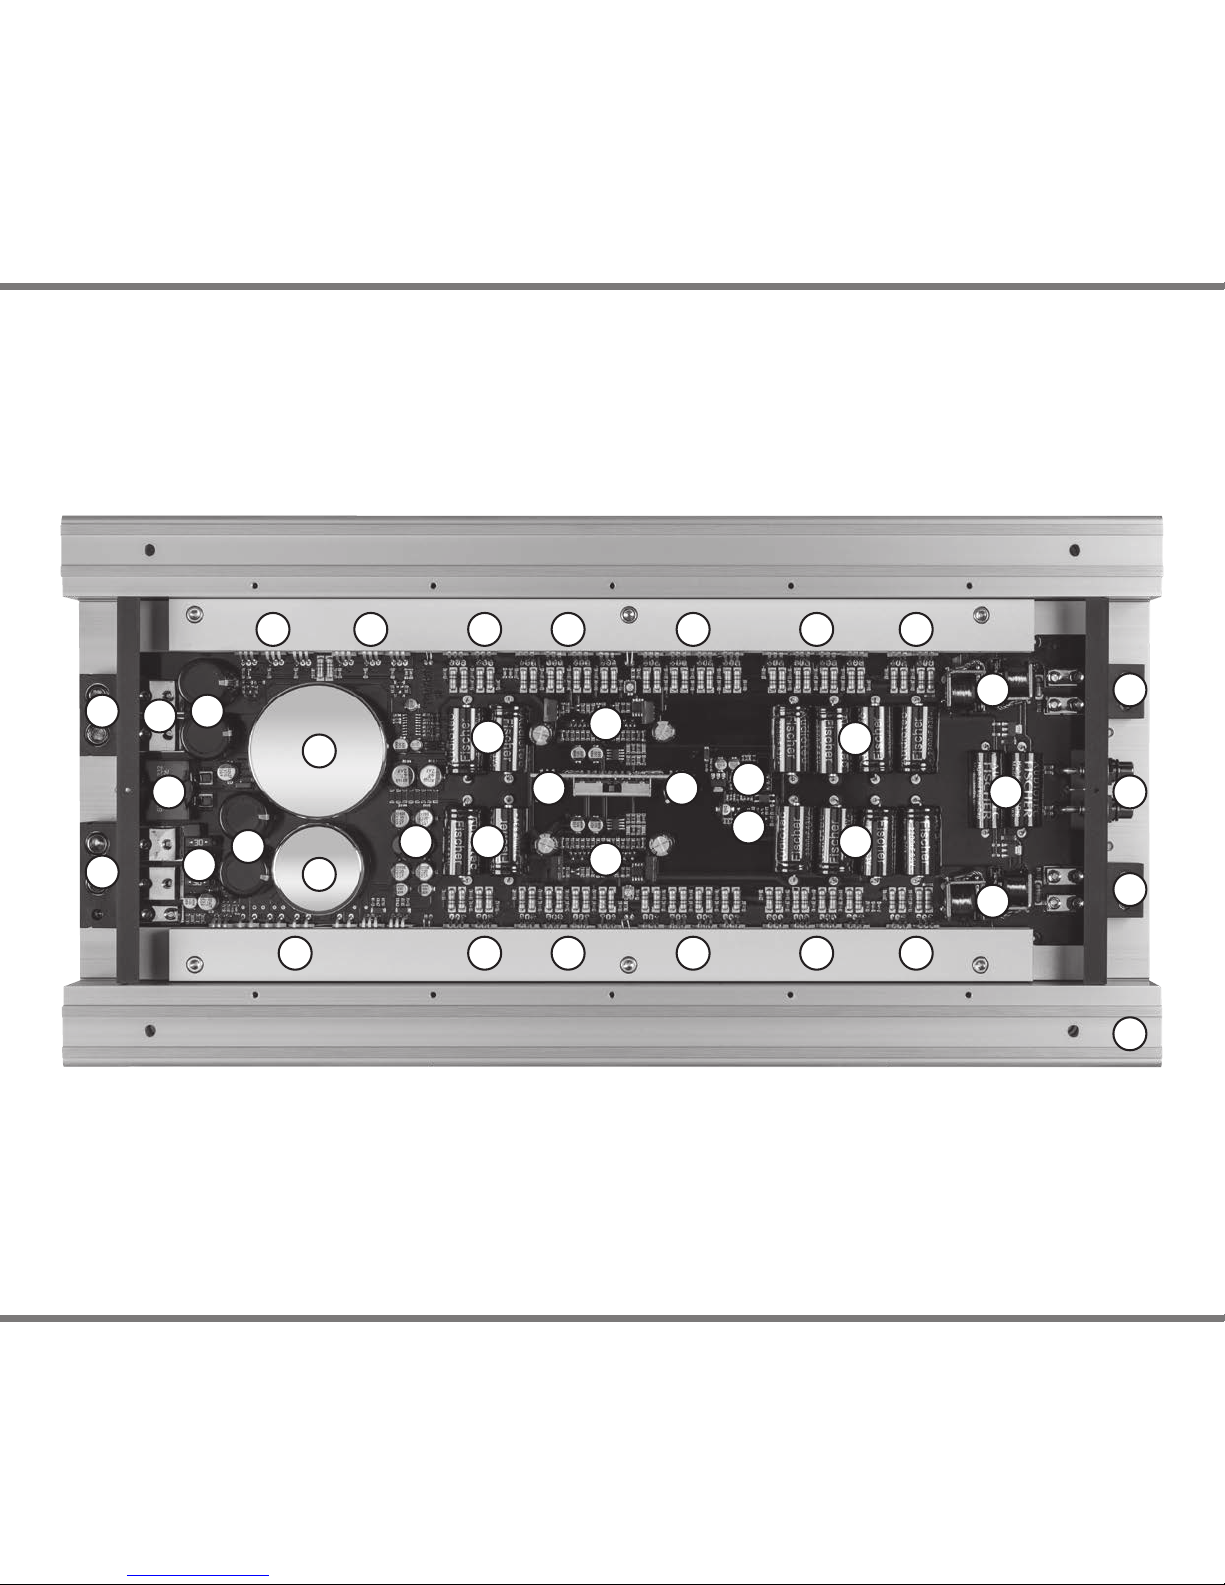
THE DESIGN OF THE AMPLIFIER
1Ultra-low internal resistance due to solid, gold-plat-
ed terminals; for power cables up to 50 mm² and
speaker cables up to 6 mm².
2External connection for BRAX-Power-Stabilizers,
directly connected to the switching transistors,
guarantee exceptional high efciency and optimum
power stabilization.
3Mini-Blade fuses in parallel (4 x 30 Ampere) in order
to minimize the internal resistance.
4 Eight capacitors, each with 5,000 µF (in total
20,000 µF), take care of an extremely high current
impulse load. Especially designed capacitors with
8-times-contacted wound foils minimize the internal
resistance.
5200 Ampere high-performance switching transis-
tors.
6Interference-free power supply due to optimized
suppression coil up to 120 Ampere with ultra-low
internal resistance.
7 Especially developed transformers with high-ef-
cient core materials guarantee a total performance
of more than 1,000 Watts.
8 Optimum power supply of the transistors due to
12-times-contacted low-impedance capacitors with
a total capacity of 26,400 µF.
9 High efciency due to super-fast Schottky power di-
odes with more than 160 Ampere in total.
10 Optimum power supply of the amplier transistors
due to newly developed storage coils that bridge
the switching delay dead times.
11 Separate stabilized power supply for the driver
section.
12 Best signal processing due to a newly developed
designed driver.
13 32 hand-selected high-end MOS-FET transistors
for brilliant sound.
14 Processor controlled operating data management
of the amplier and power supply. Furthermore
the processor is supervising the whole amplier
and shuts it down in case of malfunctions.
15 Protection electronics
16 High-current relays with Degussa-contacts ac-
count for the internal and external protection of
the amplier.
17 Gold-plated RCA (cinch) inputs and outputs guar-
antee an interference-free signal transmission.
18 Signal inputs with high-end signal capacitors
make an essential contribution to a perfect and
pure sound reproduction.
19 Premium Alps potentiometers adjust the input
sensitivity to the output voltage of the connected
head unit.
20 The solid heatsink, made of a special aluminium
alloy for a perfect cooling of power supply transis-
tors and those of the amplier.

18
GENERAL INSTRUCTIONS
In order to maintain the quality of this product and to ensure safe operation, we strongly recommend that our
ampliers should be installed by an authorized BRAX dealer. The installation made by a specialist is a crucial
factor for the extended warranty. Your BRAX dealer will assist you by choosing the perfect matching components.
General instructions: Installation of BRAX ampliers
To nd out how BRAX GX2000 works best for you, read this manual carefully and follow the instructions for installation. We
guarantee that this product has been checked for proper functioning before shipping. Before you start installation, discon-
nect the car battery at the minus pole. Once again we would like to urge you to have the installation work carried out by a
specialist, as a verication of correct installation and connection of the unit is a prerequisite for warranty cover of BRAX by
AUDIOTEC FISCHER Germany.
1. Install your amplier at a dry location in the car where there is sufcient air circulation to ensure adequate cooling of
the equipment. Also ensure that there is sufcient clearance available for making the cable connections and operating the
controls.
2. For safety reasons the amplier must be secured in a professional manner. This is performed by means of four xing
screws screwed into a mounting surface. Before drilling the holes for the screws, carefully examine the area around the
installation position and make sure that there are no electrical cables or components, hydraulic brake lines or any part of
the petrol tank located behind the mounting surface - otherwise these could be damaged. You should be aware of the fact
that such components may also be concealed in the double-skin trim panels/mouldings.
General instructions: Connection of BRAX ampliers
The amplier may only be installed in motor vehicles which have a 12 V negative terminal connected to the chassis ground.
Any other system could cause damage to the amplier and the electrical system of the vehicle. The positive lead from
the battery for the complete system should be provided with a line fuse at a distance of max. 30 cm from the battery. The
amperage rating of the fuse is calculated from the maximum total current input of the car audio system.

19
Never bridge fuses or replace them with fuses with a higher amperage rating as such actions can destroy both of
the amplier and the entire electrical system of the vehicle.
Install the cabling in a manner which preludes any danger of the leads being exposed to shear, crushing or rupture forces.
If there are sharp edges in the vicinity (e.g. holes in the body work), all cables must be cushioned and protected to prevent
fraying. Never lay the power supply cables adjacent to leads and lines connecting other vehicle equipment (fan motors, re
detection modules, gas/petrol lines etc.). In order to ensure safe installation, use only high-quality connection materials.
As an aid to calculating the cross-sectional requirements of power cables which are not longer than 5 m, we recommend
max. 5 A per mm². For the amplier BRAX GX2000 we suggest a minimum cross section of 35 mm² for the positive 12 Volt
supply lead and for the ground (chassis) cable. The remote lead should have a cross section of at least 1 mm². In order to
ensure the ideal sound quality and a distortion-free music rendition, please make sure that all cables are securely xed in
the respective terminals.
INITIAL START-UP AND FUNCTIONS
1 Connecting the remote lead
The remote lead is connected to the remote output of the head unit/car radio. This is only activated if the head unit is
switched ON. Thus the amplier is switched on and off with the head unit.
2 Connecting the battery cable
Connect the +12 V power cable to the positive terminal of the battery. Recommended cross section: min. 35 mm².
3 Connecting the ground cable
The ground cable should be connected to a central ground reference point (this is located where the negative terminal of
the battery is grounded at the metal body of the vehicle), or to a bright bare-metal location on the vehicle chassis, i.e. an
area which has been cleaned of all paint residues.
20
4 CPS - Colour Protection System
The LEDs show the operation status of the amplier. Green ashing = startup of the amplier; Green = ready for use;
Yellow ashing = internal fuse is faulty; Yellow = malfunction: short-circuit at speaker output; Red = overheated: If the amp
shuts off due to overheating it will take some time (depending on the outside temperature) until it switches on again.
5 - 6 Connectors for a BRAX Power Stabilizer
By connecting a BRAX Power Stabilizer peak loads in the power supply will be eliminated. Thus, the amplier has always
enough power for a perfect performance.
7 Loudspeaker terminals
To connect the speaker cables. Never connect the loudspeaker cables with the car chassis ground. It damages your
amplier. All speaker systems must be connected in-phase, this means plus to plus and minus to minus. Inverting plus and
minus will result in the loss of bass rendition. The positive terminal is marked on most speakers.
8 Signal inputs
The amplier has RCA connectors for RCA cables that can be connected to the pre-amplier outputs/line outputs of the
head unit or to a pre-amplier. The connectors are gold-plated to ensure a better signal transmission.
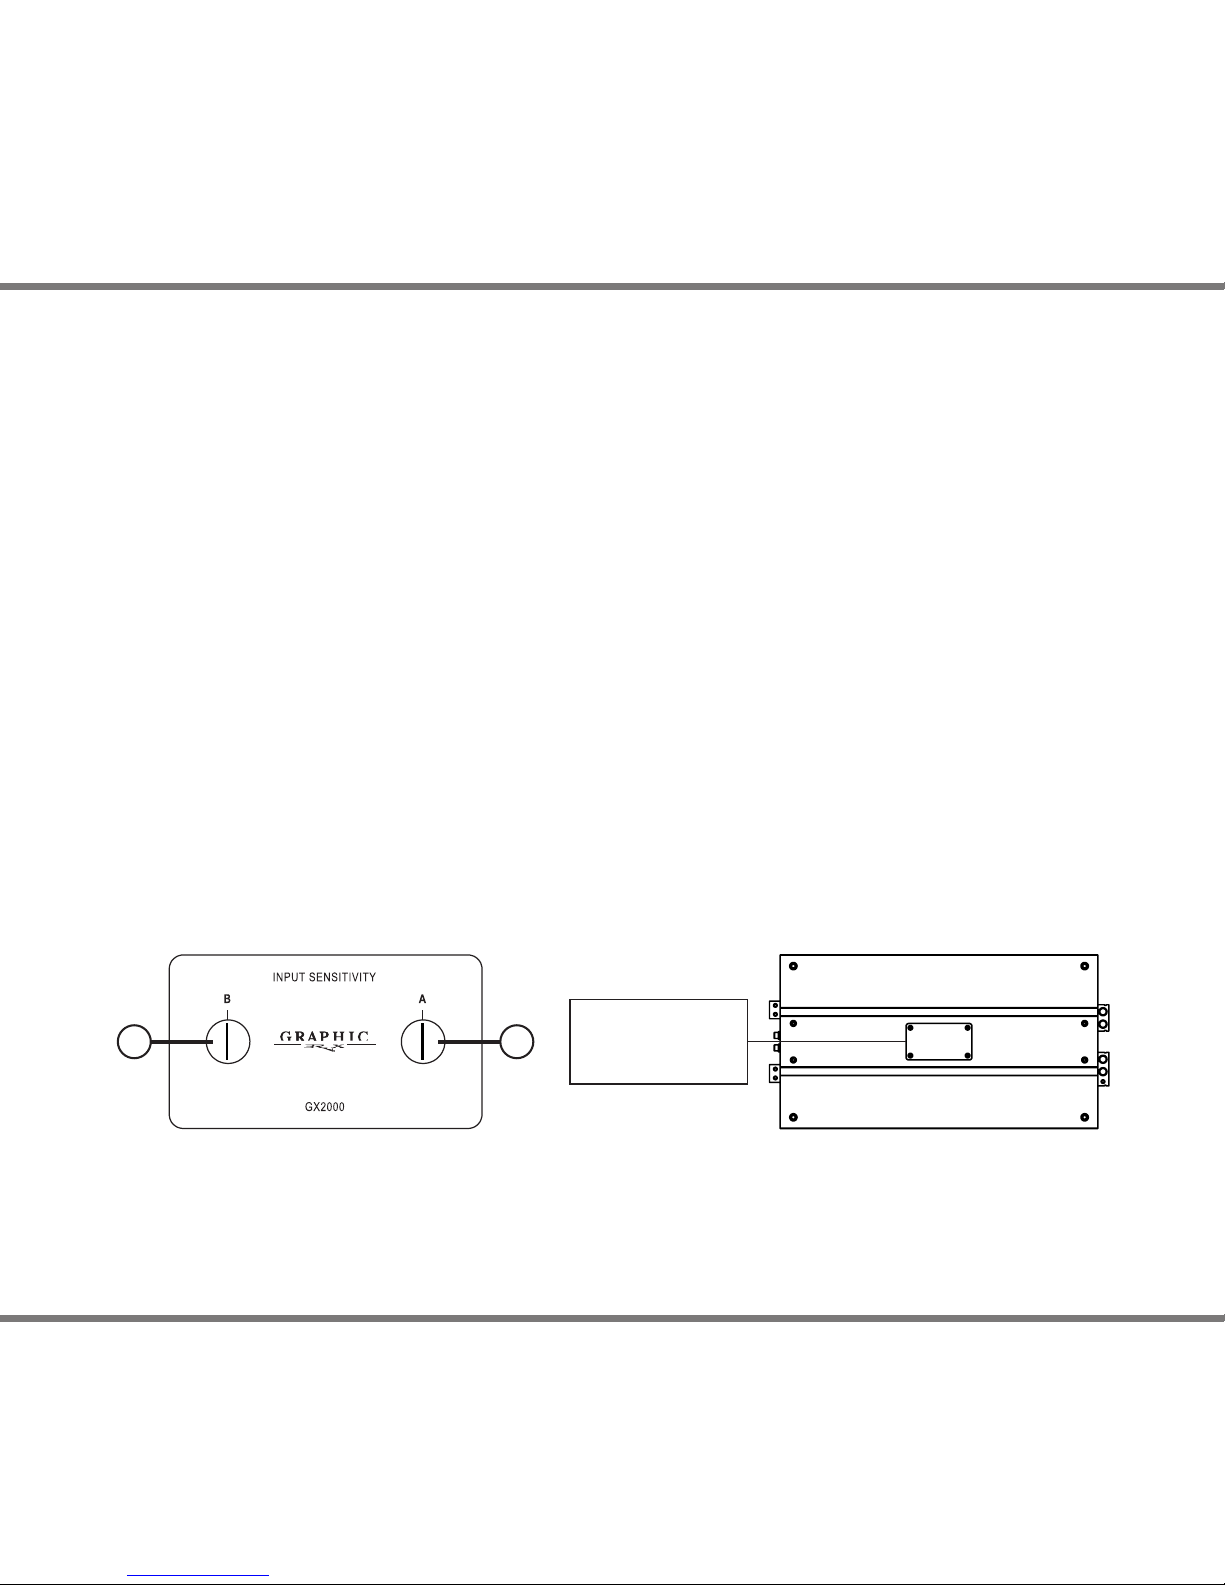
9 Level controls for input sensitivity
These controls can be used to match the input sensitivity of the individual channels to the output voltage of the connected
head unit. To adjust the input sensitivity you have to remove the name plate on top of the amplier with the included hexa-
gon socket screw key. Under this plate are the level controls.
By turning a control clockwise the input sensitivity of the respective channel will be increased. The controls are no volume
controls and are only for setting up the input levels of the amplier to the output levels of the head unit or pre-amplier.
9 9
Remove the name
plate on top of the
amplier to get access
to the level controls
21
The control range extends from 1.0 V (maximum CW) to 8.0 V (maximum CCW).
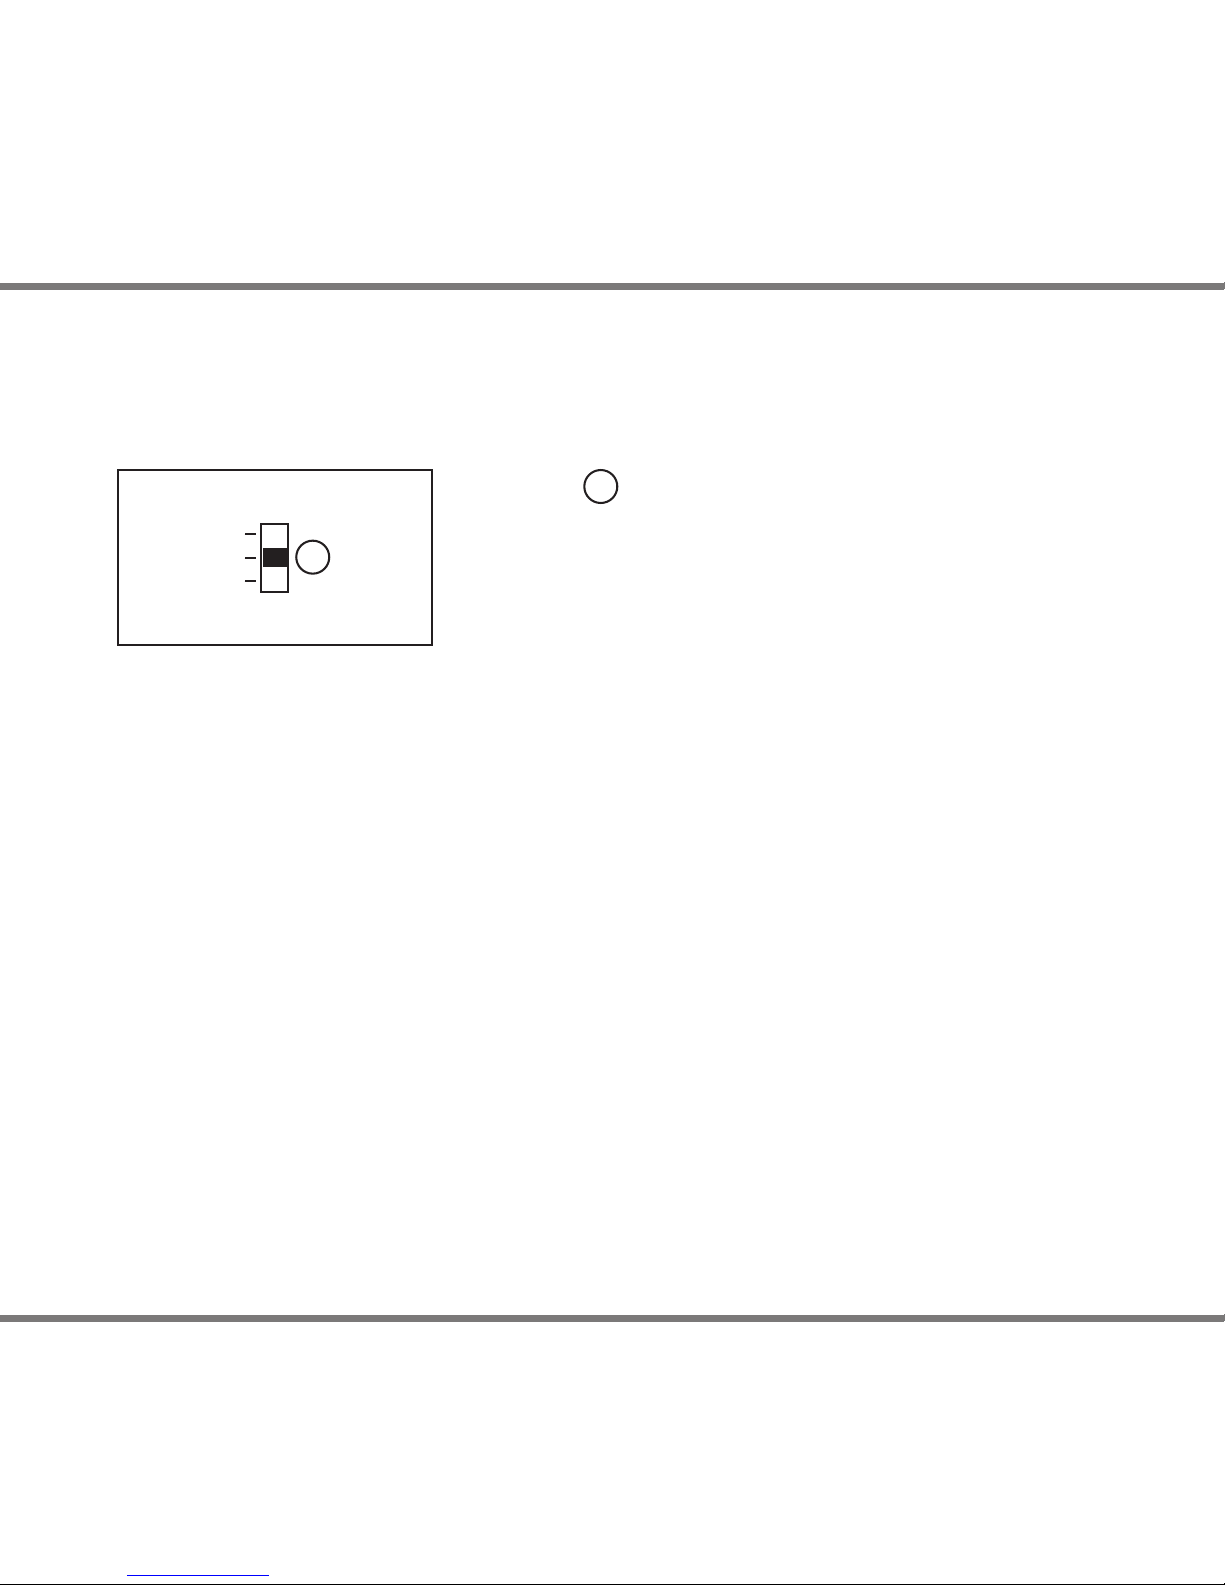
10 Operation mode switch
To select the mode of the amplier. This switch is located on the bottom of the amplier.
Stereo: Select the STEREO MODE for using the channels A/B in a 2-channel mode. In this conguration both level con-
trols are activated to adjust the input sensitivity.
Stereo Bridged: Select the stereo bridged mode for using the channels A/B in the mono mode. In this conguration both
channels are bridged to one channel (mono). At position STEREO BRIDGED both signal inputs of the channels A/B
have to be used. In this conguration both level controls are activated to adjust the input sensitivity. The controls should
be set to the same position.
Mono Bridged: Similar as in mode stereo bridged the amplier is switched to mono and both channels will be bridged
to one channel. If you select MONO BRIDGED only the input A has to be used. This can be necessary if there is only
one mono signal available. In this conguration only level control A is activated to adjust the input sensitivity of the bridged
channel pair.
Operation mode switch for channels A/B
10
STEREO
STEREO BRIDGED
MONO BRIDGED
CHANNEL A/B
10

22
TECHNICAL DATA
Continous power rating at 4 Ohms per channel ...................................................................................... 2 x 290 Watts RMS
Continous power rating at 2 Ohms per channel ...................................................................................... 2 x 530 Watts RMS
Continous power rating, bridged at 4 Ohms.......................................................................................... 1 x 1060 Watts RMS
Frequency response....................................................................................................................................... 10 Hz - 80 kHz
Total harmonic distortion (THD)............................................................................................................................< 0.0009 %
Total harmonic distortion (THD+N) .......................................................................................................................< 0.0015 %
Signal to noise ratio..................................................................................................................................................> 120 dB
Damping factor ............................................................................................................................................................ > 1000
Input impedance.....................................................................................................................................................10 kOhms
Input sensitivity................................................................................................................................................... 1.0 V - 8.0 V
Internal fuse................................................................................................................................................................... 120 A
Dimensions heatsink “Short” (H x W x D)..............................................................................................53 x 237.5 x 433 mm
Dimensions heatsink “Long” (H x W x D) ..............................................................................................53 x 237.5 x 473 mm
Weight net version “Short”............................................................................................................................................ 8.1 kg
Weight net version “Long” ............................................................................................................................................ 8.5 kg
The BRAX GX2000 is in protection mode and the Status-LED lights up yellow.
Cause: The speaker wiring is faulty (short circuit between the wires or to the chassis of the vehicle).
Remedy: Check the speaker wires or the speakers themselves for short-circuiting (p. 19 - 21).
The BRAX GX2000 is in protection mode and the Status-LED is ashing yellow.
Cause: The internal fuses are burned.
Remedy: Exchange the internal fuses - only 30 Ampere mini blade fuses are allowed.
The BRAX GX2000 is in protection mode and the Status-LED lights up red.
Cause: The amplier is overheated. Depending on the outside temperature it will take some time until the amplier
is cooled down and switches on again.
TROUBLE-SHOOTING

23
Due to their high quality standards, BRAX products achieved an excellent international reputation. Therefore, we grant
a warranty period of 2 years. Additionally, we provide an extended warranty on all electronic components to each
original owner who can verify a professional installation of BRAX GX2000. Mechanical parts are excluded. The
products are checked and tested carefully during the entire production process. In the case of service, please note the
following:
1. The 2 years warranty period begins with the purchase of the product and is applicable only to the original owner.
2. During the warranty period we will rectify any defects due to faulty material or workmanship by replacing or repai-
ring the defective part at our decision. Further claims, and in particular those for price reduction, cancellation of sale,
compensation for damages or subsequential damages, are excluded. All replaced parts removed from the system in
connection with any services become the property of Audiotec Fischer GmbH upon their replacement. The warranty
period is not altered by the fact that we have carried out warranty work.
3. Unauthorized tampering with the product will invalidate this warranty.
4. Consult your authorized dealer rst, if warranty service is needed. Should it be necessary to return the product to
the factory, please ensure that:
a) the product is packed in original factory packing in good condition.
b) the product is shipped prepaid, i.e. at your expense and risk.
c) the receipt/invoice as proof of purchase is enclosed.
5 Excluded from the warranty are:
a) Shipping damages, either readily apparent or concealed (claims for such damages must be immediately
notied to the forwarding agent).
b) Scratches in metal parts, front panels or covers etc. This must be notied to your dealer within 5 days of
purchase.
c) Defects caused by incorrect installation or connection, by operation errors, by overloading or by external force.
d) Products which have been repaired incorrectly or modied or where the product has been opened by other
persons than us.
e) Consequential damages to other equipments.
f) Reimbursement when repairing damages by third parties without our previous permission.
g) Products with removed serial numbers.
WARRANTY REGULATIONS

Audiotec Fischer GmbH
Hünegräben 26 · D-57392 Schmallenberg
Tel.: +49 (0) 2972-97880 · Fax: +49 (0) 2972-978888
E-mail: brax@audiotec-scher.com · Internet: www.audiotec-scher.com
Table of contents
Other BRAX Car Amplifier manuals


