8
6 DEUTSCH: Frontplatte
OFF
SETUP REW
ON
PLAY PAUSE
USBSD CARD
FF STOP REC
DISPLAY
SEARCH
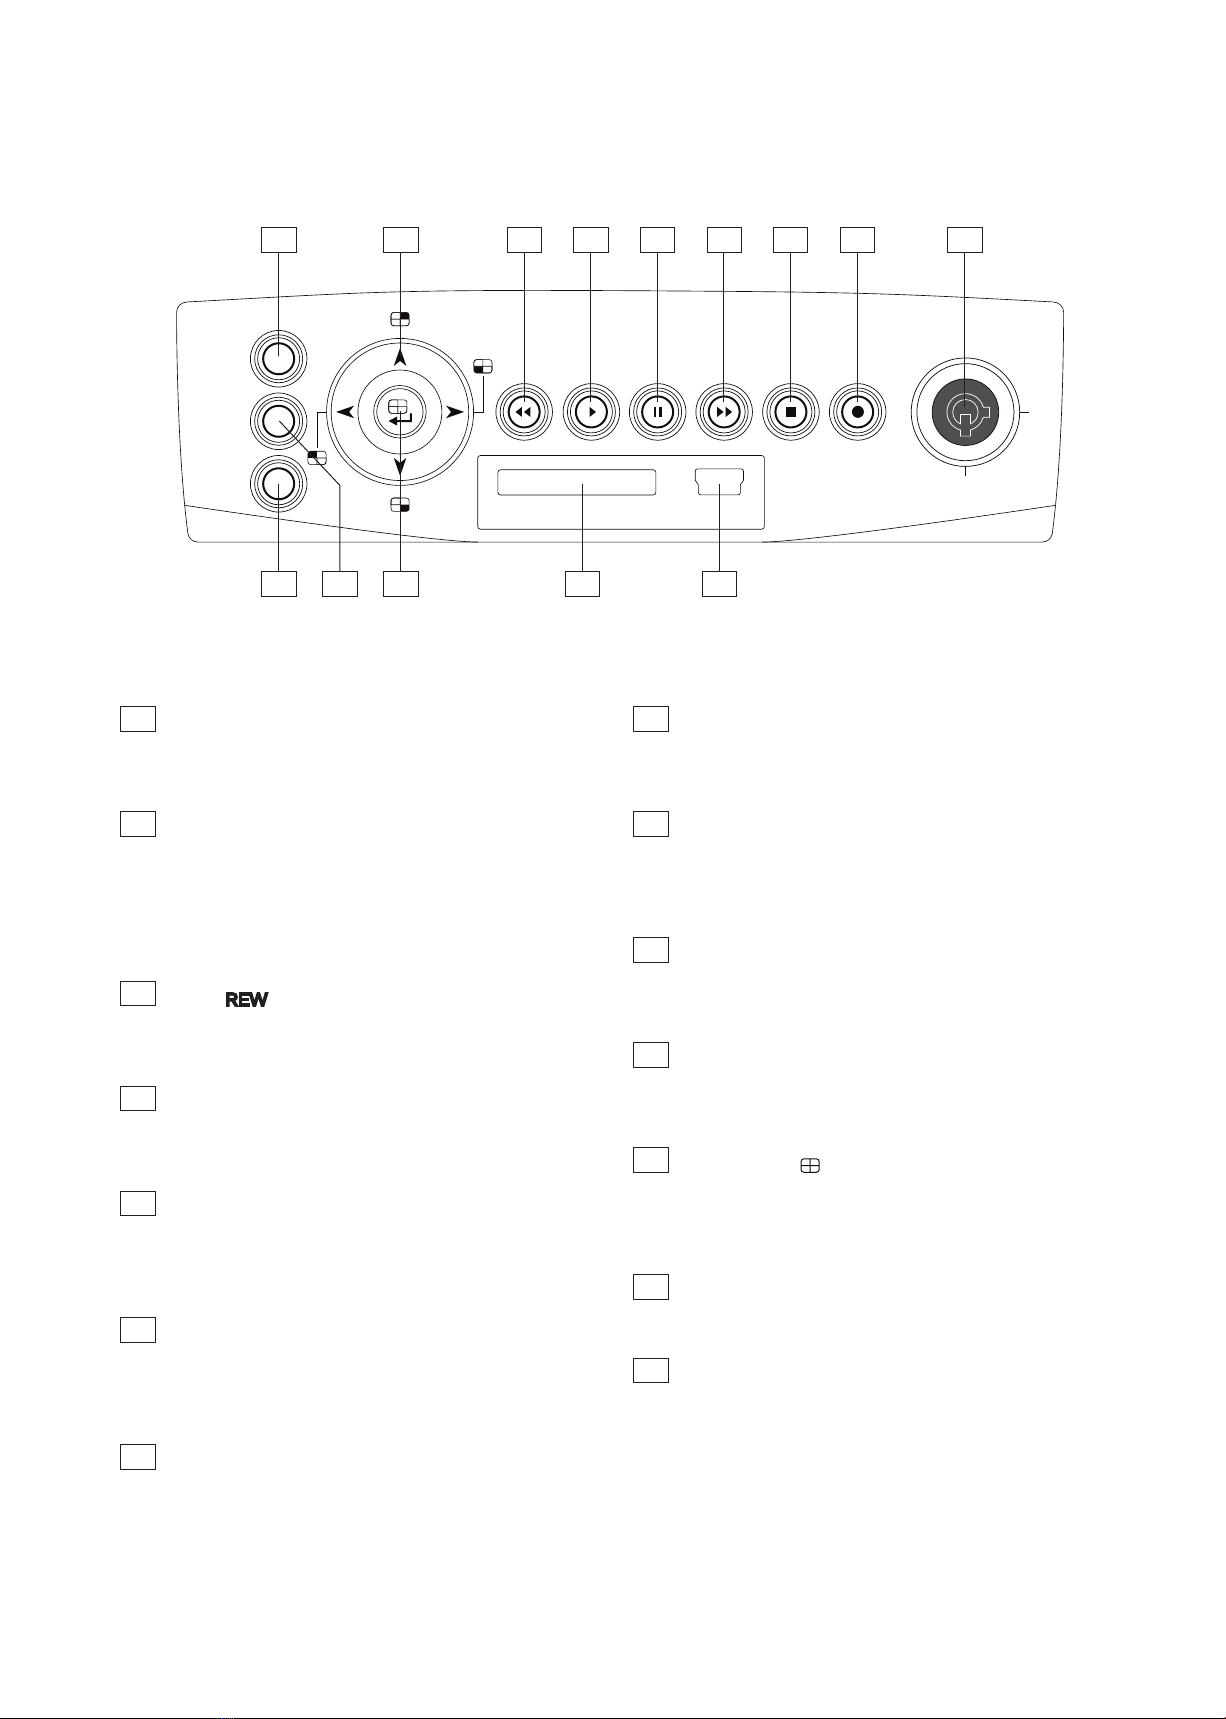
1
10 11 12 13 14
2 3 4 5 6 7 8 9
1 SETUP-Taste:
Mit dieser Taste wird das Konfigurationsmenü geöffnet.
Um das Konfigurationsmenü wieder zu schließen, drücken
Sie die Taste erneut.
2 Tasten „Nach links“/„Nach rechts“/„Nach oben“/
„Nach unten“ (Kanal 1/3/2/4):
Im Konfigurations- oder Suchmenü werden mit diesen vier
Tasten auf dem Wählknopf die gewünschten Optionen
gewählt. Im Live- oder Wiedergabemodus wird mit den
vier Tasten auf dem Wählknopf ein Kanal zur Anzeige
ausgewählt.
3 R E W -Taste:
Mit dieser Taste wird das aufgezeichnete Video
rückwärts abgespielt, wobei die Geschwindigkeit
wahlweise höher oder niedriger sein kann als die
Aufzeichnungsgeschwindigkeit im Wiedergabemodus. Die
Taste leuchtet nach dem Drücken rot auf.
4 P L A Y -Taste:
Mit dieser Taste wird ein auf der Festplatte
aufgezeichnetes Video abgespielt. (Im WIEDERGABE-
Modus leuchtet eine rote Lampe auf.)
5 P A U S E -Taste:
Mit dieser Taste wird das Bild während der Wiedergabe
angehalten. Im Pause-Modus kann durch erneutes
Drücken der Taste ein Einzelbild nach dem anderen in
Vorwärtsrichtung angezeigt werden. (Im PAUSE-Modus
leuchtet eine rote Lampe auf.)
6 F F -Taste:
Mit dieser Taste wird das aufgezeichnete Video
vorwärts abgespielt, wobei die Geschwindigkeit
wahlweise höher oder niedriger sein kann als die
Aufzeichnungsgeschwindigkeit im Wiedergabemodus. Die
Taste leuchtet rot auf.
7 STOP-Taste:
Mit dieser Taste wird die Wiedergabe des
aufgezeichneten Videos abgebrochen. (Im STOP-Modus
leuchtet eine rote Lampe auf.)
8 R E C -Taste:
Wenn diese Taste im Live-Anzeigemodus gedrückt wird,
wird das Video auf der Festplatte aufgezeichnet. (Im
Aufnahmemodus leuchtet eine rote Lampe auf.)
9 Gehäuseverriegelung:
Mit diesem Schloss wird die Innenkassette mitsamt der
eingesetzten Festplatte verriegelt. Wenn die Kassette mit
dem Schlüssel verriegelt wird, schaltet sich das Gerät ein.
Wenn die Kassette entriegelt und herausgenommen wird,
schaltet sich das Gerät automatisch ab.
10 SEARCH-Taste:
Über diese Taste wird der Suchmodus zum Zugriff auf das
aufgezeichnete Video aufgerufen. Durch erneutes Drücken
wird der Modus beendet.
11 DISPLAY-Taste:
Über diese Taste wird der Betriebsstatus das Systems auf
dem Bildschirm angezeigt. Durch erneutes Drücken wird
die Anzeige wieder ausgeblendet.
12 Eingabetaste/Taste für Vierfachanzeige :
Im Konfigurationsmenü wird mit dieser Taste eine
gewählte Option bestätigt und gespeichert. Im
Live-/Wiedergabemodus wird mit dieser Taste eine
Vierfachanzeige aufgerufen.
13 Steckplatz für SD-Karte:
Zum Kopieren von Videos oder Einzelbildern direkt auf
eine SD-Karte.
14 U S B -Port:
Zum Anschluss an einen PC zum Kopieren von Videos
oder Einzelbildern mit Hilfe von HDD Viewer.