Brionvega BV1 User manual

BV1
Instruction manual
INGLESE_OK 12-09-2003 11:47 Pagina 1

13
2
46
5
79
8
0
BV1
TV
menu
AV
over
view
others
TXT
123
456
789
0
TV AV
BV 2
menu
over v. others
BV 2 remote control , supplied only with some models.
Press key (9) when the television tells you to press
the “WHITE KEY”
BV 1 remote control , supplied only with some models.
Press key (9) when the television tells you to press
the “WHITE KEY”
14
4
7
5
15
8
16
9
17
12 10
13
14
17
2
15
9
8
7
3
10
18
5
6
4
12
19
11
16
3
18
19
2
11
7
5
13
6
2
ENGLISH
INGLESE_OK 12-09-2003 11:47 Pagina 2

3
ENGLISH
DESCRIPTION OF THE
CONTROLS
REMOTE CONTROL (TV mode)
2TV switch off button (in stand-by)
3Immediate zero resetting of audio (muting)
4Numerical keypad to directly request Programmes
5Programme scrolling /
6Switching over to AV or returning to TV
7Volume + / --
8MENU activation
9Autostore (in summary menu)
10 Clock
11 Image pre-selection
12 TV status
13 Coloured buttons for direct access to the menus:
red - SOUND; yellow - SUMMARY
green - IMAGE; cyan - OTHER FUNCTIONS
REMOTE CONTROL (MENU mode)
5Function selection, up/down
6Function variation
8Next menu
14 Return to TV
15 Videomix
REMOTE CONTROL (TELETEXT mode)
4Direct request of page
5Next or previous page (up/down)
9Enlargement of text
10 Sub-code
12 Index page button (page 100)
13 Coloured buttons (TOP/FLOF)
14 Return to TV
15 Videomix
16 Button to stop the automatic page scrolling
17 TXT request button
18 Cancel
19 Games solutions
TV SET FRONT PANEL (CUBO)
1Main switch
2Video in socket
3Audio in socket
4Phones socket
5Programme e
7Volume + / --
8TV in MENU mode / TXT index page mode (only with
type TOP teletext)
20 Stand-by led indicator
21 Remote control infrared signals receiver
REAR PANEL OF THE TELEVISION SET (CUBO)
24 SCART socket
25 Aerial socket
TV SET-REAR PANEL (ALGOL)
22 S-VHS video input / scart socket
23 Left and right audio inputs
24 SCART socket
25 Aerial socket
26 Socket for connecting the power lead provided with the set
27 Plug for the monopole aerial
TELEVISION UPPER PANEL (ALGOL)
1Main switch
2Monopole antenna
3Headphone socket
4Programme + () and -- ()
5Volume + and --
6MENU in TV mode / Index page in TTX mode
TELEVISION UPPER PANEL (DONEY)
1Main switch
2Monopole aerial
3Headphone socket
4Programme scrolling + () and -- ()
5Volume + / —
6MENU, in TV mode / Index page, in TELETEXT mode
REAR PANEL OF THE TV SET (DONEY)
22 S-VHS Video input socket
23 Audio input sockets (left and right)
24 SCART socket
25 Aerial socket
26 Socket for connecting the power lead provided with the set
27 Plug for the monopole aerial
INGLESE_OK 12-09-2003 11:47 Pagina 3

4
ENGLISH
- Headphone socket
- Keys to turn volume up or down.
- Keys to scroll the programme number
forwards or backwards.
- (in TV mode) Key that displays the OSD
menu. (in TELETEXT mode) Key that recalls
the Index page.
- Audio input socket for the right channel
- Audio input socket for the left channel.
- (only for the European market) Socket to
connect the lead supplied.
- (only for the USA, Canadian and Japanese
markets) Socket to connect the lead supplied.
- Scart socket.
- Socket for the Video input with signal in S-
VHS.
- Monopole plug housing.
- Aerial socket.
VOL. — /+
ON-OFF
OSD
— VOL +
— PROG +
VIDEO
AUDIO
PHONES
EURO AV
PROG. — /+
SELECT
AUDIO RIGHT
AUDIO LEFT
230 Vac~
115 Vac~
EURO-AV
S-VHS
- On-Off key.
- (in TV mode) Key that displays the OSD
menu. (in TELETEXT mode) Key that recalls
the Index page.
- Keys to turn volume up or down.
- Keys to scroll the programme number
forwards or backwards.
- Video input socket.
- Audio input socket.
- Headphone socket.
- Scart socket.
- Aerial socket.
LEGEND OF THE FUNCTION
SYMBOLS ON THE ALGOL and
DONEY TELEVISION MODELS
LEGEND OF THE FUNCTION
SYMBOLS ON THE CUBO
TELEVISION MODEL
INGLESE_OK 12-09-2003 11:47 Pagina 4

5
ENGLISH
27
25
22 23 26
4
6
5
2
3
1
2
4
6
31
5
25 24
27
25
22 23 26
24
24
ALGOL Television Set
Top panel of the television set Rear panel of the television set
CUBO Television Set
Front panel of the television set Rear panel of the television set
21 20 1 7 8 5 2 3 4
DONEY Television Set
Top panel of the television set Rear panel of the television set
INGLESE_OK 12-09-2003 11:47 Pagina 5

6
ENGLISH
ENGLISH
Dear Customer, the television you have purchased contains
specific functions for optimal video and audio performance.
Read this manual carefully for best operation.
IMPORTANT SAFETY INSTRUC-
TIONS
• Read these instructions.
• Keep these instructions.
• Heed all warnings.
• Follow all instructions.
• Do not install near any heat sources such as radiators,
heat registers, stoves, or other apparatus (including ampli-
fiers) that produce heat.
• Do not defeat the safety purpose of the polarized or
grounding-type plug. A polarized plug has two blades with
one wider than the other. A grounding type plug has two
blades and a third grounding prong. The wide blade or the
third prong are provided for your safety. If the provided plug
does not fit into your outlet, consult an electrician for replace-
ment of the obsolete outlet.
• Unplug this apparatus during lightring storms or when
unused for long periods of time.
Safety symbols meaning, printed on
back cover label.
Class 2 device.
Electrical discharge warning, hazardous volt-
age inside.
Please refer to the instruction manual.
INGLESE_OK 12-09-2003 11:47 Pagina 6

7
ENGLISH
GENERAL INFORMATION
Before operating your TV set, carefully read the recommen-
dations preceding the instructions for use.
SAFETY
Here are some recommendations that will enable you to use
your new TV set at its best and safely.
•Do not use the set in case the mains cable or the mains
plug show abnormalities or are damaged.
•The TV set has a high voltage, therefore never remove the
rear panel.
•Never try to recharge, heat or throw the batteries on the
fire: they may explode.
•Always have the TV set checked and repaired by spe-
cialised personnel.
•Make sure children do not introduce objects into the set.
•Do not let children play with the batteries.
•Never use the set in a humid environment or near sprin-
kling water.
•Never let children play with the batteries.
•Never let children play with the packaging parts: bags,
plastic sheets, cardboard because they may cause chok-
ing and injuries.
ECOLOGY
Recommendations for the protection of the environment:
– Packaging
The materials used for packaging are in conformity with envi-
ronmental regulations.
If you do not have space problems, keep them at least until
the product warranty expires.
If you want to eliminate them, do so without damaging the
environment.
– Batteries
The batteries that are not of the ecological (environmentally
friendly) type must be brought to suitable sites for collection
and disposal of polluting material.
INSTALLATION
•In order to obtain a well-contrasted image, position your
TV set so as to prevent light from lamps or the sun rays
from reflecting on the screen.
•Place your TV set in a well-ventilated room. Aeration slots
located on the rear panel must remain free because they
have been designed to cool the set.
If the TV set is installed on a shelf or in a cabinet, leave
enough space around the appliance.
•Never put vases or bowls with water or other liquids on
your TV set. If they should overturn, the liquid could spill
and cause damage.
CLEANING
Your TV set must be cleaned using a soft cloth. Do not use
products containing abrasive substances, solvents or alcohol.
When cleaning your TV set turn it off and do not allow liquids
to get into the aeration slots.
CONNECTIONS
– To the electric supply
• To connect the television to the mains proceed as fol-
lows:
01) - Connect the lead (supplied) to socket (26).
02) - Lastly put the plug (at the other end of the lead) in the
mains socket at 230Vac ~ 50Hz (for Europe) and 110Vac ~
60Hz (for the USA and Japan).
– To the antenna
Connect the antenna cable (75 Ohm coaxial) to the antenna
socket located at the rear of your TV set.
• To use the monopole (2) on the television set, instead of
the fixed home aerial, proceed as follows:
01) - Grip the monopole's plug (27) with your fingers and pull
it out towards you. The plug and its lead will slip out of their
housing easily (27).
02) - Turn the plug (27) downwards and put it in the aerial
socket (25).
03) - Lastly, extract the monopole (2) and turn it until you find
the best reception position.
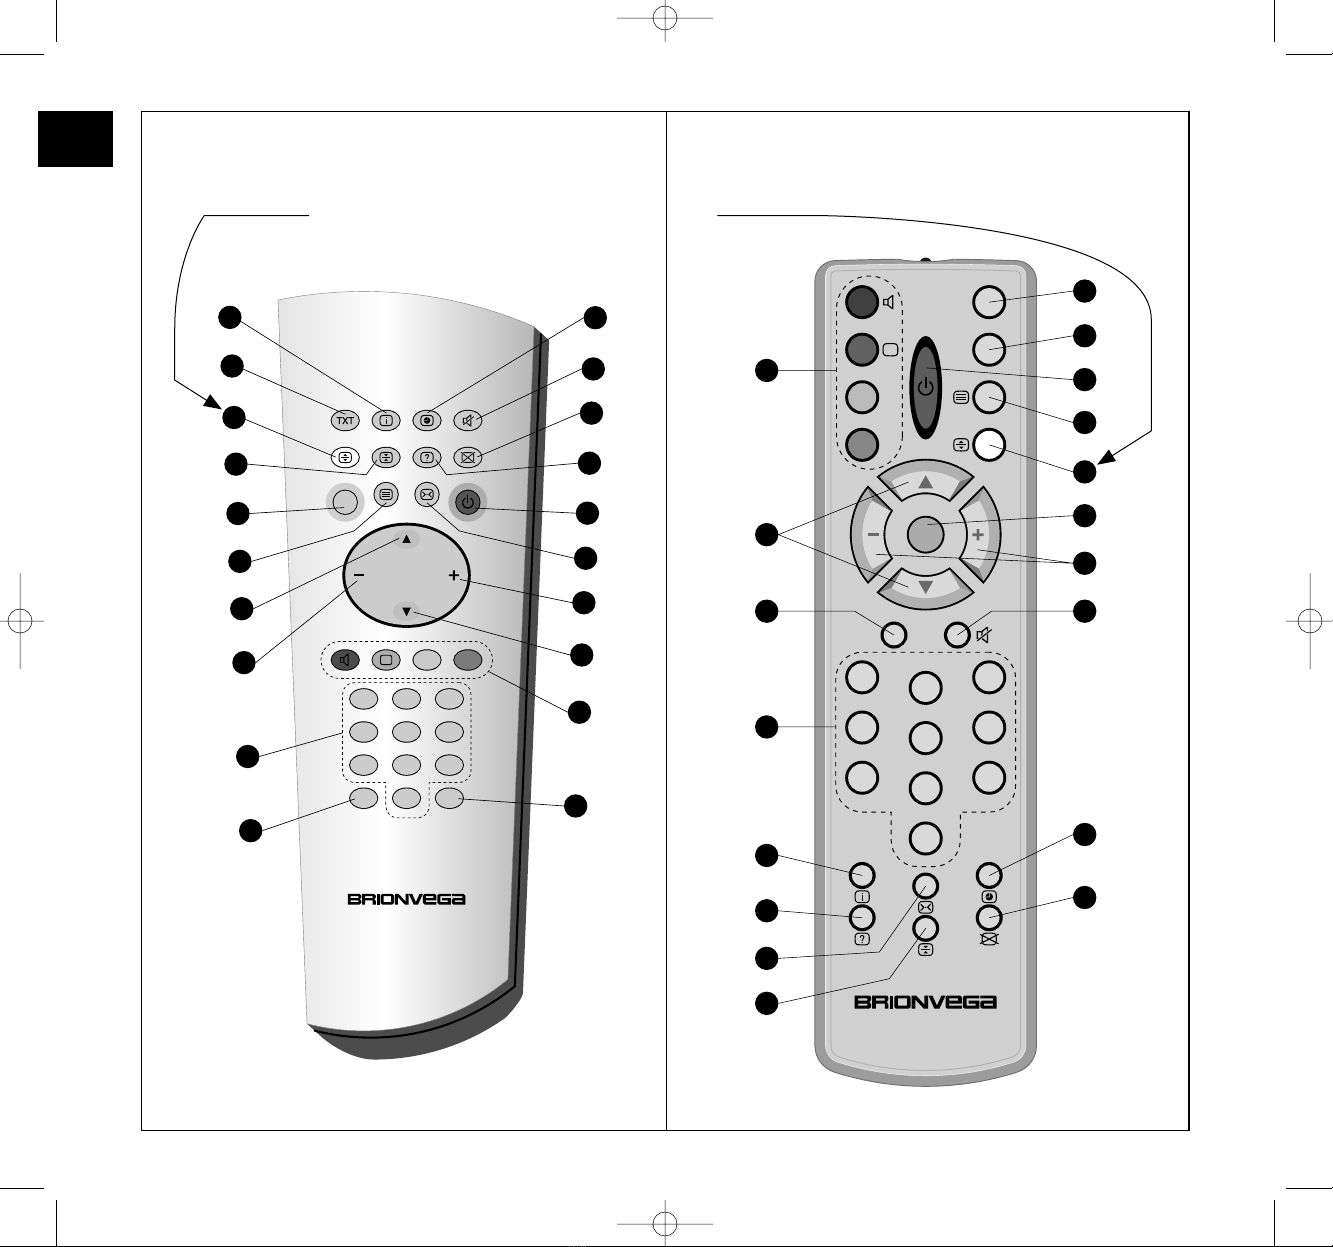
Remote control
Two 1.5 V batteries are necessary to operate the remote control.
Open the flap on the back of the remote control and insert the
batteries, making sure that the polarities are not inverted.
Never replace batteries individually as those already used take
energy out from the new ones thus reducing their duration.
The batteries need to be replaced when the remote control
efficiency becomes unstable, that is to say when there is a
reduction of the distance or action range.
Never throw run down batteries away, always deposit them in
the appropriate collection and disposal containers.
INGLESE_OK 12-09-2003 11:47 Pagina 7

8
ENGLISH
In any case, in order to protect the environment, always use
batteries that do not contain mercury.
QUICK OPERATION OF THE TV
SET
The previous sections introduced some rules and recom-
mendations that you shall certainly acknowledge as being
useful. This paragraph aims to make up for the lost time and
to satisfy your desire to use your new TV set as soon as pos-
sible.
HOW TO TURN ON YOUR TV SET
1. 1. Effect the connections to the electrical supply and to the
antenna as indicated in the CONNECTIONS paragraph.
2. Push the main switch. After a few seconds the screen
lights up and the TV set switches on programme 1. You
will probably see only some bright moving dots. In techni-
cal jargon this is called "snow effect".
PROGRAMMED SWITCHING ON
You can have your television set switch itself on automatically at
the time wanted and on the programme wanted only when it is
in the standby mode.
You need the remote control to do this:
01) - Enter the OTHER FUNCTIONS menu by pressing the
MENU key (8) 4 times or the blue key (13) once to access the
function directly.
02) - Move the cursor to the "Time --/--" function with the
/keys (5).
03) - Tap in the current time using the numerical keys (4).
04) - Now move the cursor to the next function "On at --/--"
using the /keys (5).
05) - Tap in the time you want the television to come on.
06) - Move the cursor to the next function "Go to prog. 0".
07) - Tap in the number of the programme you want to see
when the television switches itself on using the numerical
keypad (4).
08) - Exit the OTHER FUNCTIONS menu by pressing the TV
key (14).
Programming will remain stored even if you use key (2) on
the remote to switch it off and then it goes in standby but it
will be deleted if switched off via the mains switch (1).
HOW TO STORE PROGRAMMES WITH THE
AUTOMATIC TUNING SYSTEM
To rapidly programme the channels available in your area
proceed as follows:
1. Enter the SUMMARY menu by keeping the MENU button
(8) pressed for at least 2 sec.
2. The SUMMARY menu is displayed on the screen, the cur-
sor is in the position corresponding to programme 1.
3. Start the automatic tuning by keeping the white automatic
tuning button (9) pressed for about 2 seconds until the
cursor begins to flash.
4. You will notice that the system stops for a short period on
each channel found, marks it with "ok" and then the
search starts again. During this time interval several
checks are carried out so as to arrange the channels
according to their importance.
E. g. RAI 1 on programme 1, RAI 2 on programme 2,….
The information box displays the search percentage con-
dition.
SEARCH 23%
[B-02] SUMMARY
01020
1ok 11 21
2ok 12 22
3ok 13 23
41424
51525
61626
71727
81828
91929
(red) (green) (blue)
Hide Insert Name
(yellow) (white)
Cancel Automatic tuning
1
[B-01] SUMMARY
01020
11121
21222
31323
41424
51525
61626
71727
81828
91929
(red) (green) (blue)
Hide Insert Name
(yellow) (white)
Cancel Automatic tuning
Cursor
The information box
contains the selected
programme
INGLESE_OK 12-09-2003 11:47 Pagina 8

5. THE WHOLE AUTOMATIC TUNING SEQUENCE CAN
TAKE FROM 5 TO 10 MINUTES (depending on the num-
ber of broadcasting stations found) . During this time peri-
od DO NOT PRESS ANY BUTTON (neither on the front
panel nor on the remote control).
Moreover, it is normal that a TV channel is stored more
than once: for example RAI 2 shall be stored on
Programme 2 but it can be also found on Programme 8.
6. When the tuning operation is over, the information box will
display "SEARCH 100%".
Now the system automatically ARRANGES and STORES the
programmes.
This operation takes a few minutes. Once it is over, the mes-
sage "READY" will be displayed on the screen, the TV set
turns off and then turns on automatically on programme 1.
HOW TO SET THE VOLUME
Buttons + / - (7) reduce and increase the volume.
Any variation is automatically stored.
HOW TO CHANGE THE PROGRAMME
Digitise the figures of the desired programme using the but-
tons 4.
E. g. To select programme 15 digitise
HOW TO ACCESS TELETEXT
1. Press the button TXT (17) to visualise teletext on the chan-
nels broadcasting both TV programmes and Teletext.
2. Insert the page number (always three digits) using the
numerical buttons (4).
E. g. To select page 501 digitise
3. To go back to the TV mode push button (14).
HOW TO TURN THE TV SET OFF (STAND
BY)
Push button (2) on the remote control to turn the TV to stand-by.
The stand-by led (20) on the TV remains on.
HOW TO DISCONNECT THE TV SET FROM
THE MAINS
To switch off the TV set and disconnect it from the mains, viz. at
the end of the day, push the main switch (1) on the front panel.
This operation, already recommended in the paragraph con-
cerning safety, saves energy and reactivates the demagnetis-
ing circuit of the TV screen, which, due to the earth’s electro-
magnetic fields or of a different nature, might display unde-
sired colour spots altering the vision of the image.
Switching off the TV set and switching it on again (after one
hour minimum) allows the inner circuits to make the neces-
sary demagnetisation that removes any possible undesired
colour spots.
AUTOMATIC SWITCH-OFF TO STAND-BY
The TV set is equipped with a safety system that, in absence
of a broadcasting signal (at night for instance), automatically
switches it to stand-by after 10 minutes.
MENU-CONTROLLED FUNC-
TIONS
Your TV set is equipped with a computerised system that,
through access MENUS or simple subsequent selections,
enables you to change the standard adjustments carried out
in the factory and personalise them with a remote control
according to your needs in a quick and simple way. The
MENUS are arranged on two “Carousels”:
- The first “carousel” contains the Menus whose entries are
subject to frequent changes.
(e.g. contrast, brightness, etc.)
Press the MENU button to enter the menu SOUND. The user
can proceed in the “carousel” of subsequent menus
(…..IMAGE, SUMMARY, OTHER FUNCTIONS) by pressing
the menu button (8) again. The TV mode is automatically
accessed at the end of the carousel.
5 0 1
[B-04]
1 5
[B-03]
9
ENGLISH
INGLESE_OK 12-09-2003 11:47 Pagina 9

10
ENGLISH
Access to each single menu is also possible directly by using
the coloured buttons (13):
- RED button – for access to the AUDIO menu
- GREEN button – for access to the IMAGE menu
- YELLOW button – for access to the SUMMARY menu
- BLUE button – for access to the OTHER FUNCTIONS
menu
– The second “Carousel” contains those menus whose
entries are not subject to frequent changes.
(e.g. language selection, channel storing, etc.).
Keep the MENU button pressed for at least two seconds to
gain access to the SUMMARY menu.
You can proceed in the menu carousel by pressing the
MENU (8) button again. The TV mode is automatically
accessed at the end of the carousel.
The second carousel is not accessible if an external source
has been selected (e.g. AV1 or SVHS input) or with TV input
on the models equipped with CHILD LOCK and HOTEL
MODE functions activated.
FIRST CAROUSEL:
The menus of the first Carousel remain active on the screen
until operations are carried out; (e. g. movement of the cursor,
adjustments, etc.). The Menus automatically deactivate after 7
seconds if no operation is carried out , or by pressing the TV
(14) button.
AUDIO MENU:
This menu contains the following functions:
•Volume: volume variation is displayed with a 32-segment
bar. Once the audio level has been set, it is stored auto-
matically.
•AVL:it activates or deactivates the automatic volume limi-
tation. When the TV programme is interrupted by an adver-
tisement, most of the time the audio increases to unpleas-
ant levels; with this function the audio level remains practi-
cally unvaried.
Here is an example of how to activate the AVL function:
1. Enter the AUDIO menu by pressing MENU button (8) or
the RED (13) coloured button for direct access.
2. The screen displays the AUDIO menu with the red CUR-
SOR highlighting the VOLUME function.
SUMMARY
INSTALLATION
CONFIGURATION
[B-06]
MENU
MENU
MENU
TV (EXIT)
SECOND
CAROUSEL
(keep pressed for 2 seconds)
AUDIO
(Red)
IMAGE
SUMMARY
OTHER
FUNCTIONS
[B-05]
MENU
MENU
MENU
MENU
(Green)
(Yellow)
(Cyan)
TV (EXIT)
FIRST
CAROUSEL
INGLESE_OK 12-09-2003 11:47 Pagina 10

3. Position the red CURSOR on the function to change, in
our case AVL, by pressing button /(5).
4. Change the selected function, in our case activate AVL, by
using buttons -/ +(7).
5. Return to TV mode by pressing button (14) or wait 7 sec.
NOTE:The adjustment of the VOLUME can even be carried
out without entering the AUDIO menu. By using buttons -/ +
(7) the screen will display the word VOLUME followed by a
bar indicating the adjustment level. The volume level set shall
be automatically stored.
IMAGE MENU:
This menu contains the following functions:
•BRIGHTNESS adjustment
•CONTRAST adjustment
•COLOUR adjustment
•DEFINITION adjustment
•Selection of one of the 5 possible personalised IMAGE
CONFIGURATIONS:
Sport / Show / Games / Nature / Cinema
Initially, all the adjustment levels are set at half scale; you can
modify them as you wish and personalise each of the 5
image configurations. For instance:
The GAMES selection can be set using scart input video
games with medium-low contrast and brightness.
The CINEMA selection can be set for the vision of video-
tapes, increasing the definition value.
Lastly, the SPORT selection can be set with medium-high
contrast and colour values, to enhance the field depth and to
obtain brighter colours.
If brightness and contrast are wrongly set in such a way
that the image on the screen is not visible, you must:
1. Change selection using button (11).
2. Go back to the wrongly adjusted selection: you will
find that the previous mistakes concerning brightness
and contrast levels are cancelled.
3. Select the new desired values.
Here is how to personalise the Nature selection by increasing
the brightness.
1. Enter the IMAGE menu by pressing MENU button (8) twice
or the GREEN (13) coloured button for direct access.
2. The IMAGE menu is displayed on the screen with the red
CURSOR highlighting the BRIGHTNESS function.
If the selections have not yet been personalised, you will
find all the adjustment levels halfway.
3. Position the red CURSOR on SELECTION by using but-
tons /(5).
4. Change the selection by using buttons -/ +(7) until the
word "Nature” appears on the screen.
[B-11] IMAGE
BRIGHTNESS IIIIIIIIIIIIIIIIIIIIIIIIIIII
CONTRAST IIIIIIIIIIIIIIIIIIIIIIIIIIII
COLOUR IIIIIIIIIIIIIIIIIIIIIIIIIIII
DEFINITION IIIIIIIIIIIIIIIIIIIIIIIIIIII
SELECTION Cinema
[B-10] IMAGE
BRIGHTNESS IIIIIIIIIIIIIIIIIIIIIIIIIIII
CONTRAST IIIIIIIIIIIIIIIIIIIIIIIIIIII
COLOUR IIIIIIIIIIIIIIIIIIIIIIIIIIII
DEFINITION IIIIIIIIIIIIIIIIIIIIIIIIIIII
SELECTION Cinema
[B-09] AUDIO
VOLUME IIIIIIIIIIIIIIIIIIIIIIIIIIIIIIIIIIIIIII
AVL ACTIVATED
[B-08] AUDIO
VOLUME IIIIIIIIIIIIIIIIIIIIIIIIIIIIIIIIIIIIIII
AVL DEACTIVATED
[B-07] AUDIO
VOLUME IIIIIIIIIIIIIIIIIIIIIIIIIIIIIIIIIIIIIII
AVL DEACTIVATED
11
ENGLISH
INGLESE_OK 12-09-2003 11:47 Pagina 11

12
ENGLISH
5. Now any adjustments regarding Brightness, Contrast,
Colour, Definition shall be stored in the “Nature” selection.
6. Position the red CURSOR on BRIGHTNESS using buttons
/(5).
7. Adjust the brightness by using the buttons -/ +(7).
During this operation only the selected function is dis-
played on the screen.
Keep the button +pressed if you want to increase the
BRIGHTNESS. Keep the button -pressed if you want to
decrease the BRIGHTNESS.
8. After approximately two seconds the entire IMAGE menu
will appear on the screen. It is now possible to modify the
other functions of the “Nature” SELECTION, for example
Contrast. (repeat point 6 by moving the cursor to CON-
TRAST, repeat point 7 if you want to increase contrast).
9. Return to TV mode by pressing button (14) or wait for 7 sec.
When you exit the IMAGE menu the NATURE selection will
be automatically memorised with the newly set Brightness
value.
NOTE:It is possible to directly select one of the 5 set selec-
tions (without entering the image menu) by using button (11).
In this case an indication (written in green) will appear on the
upper right of the screen stating the selection being used,
e.g. Cinema. If you want to select Nature, press button (11)
until the word Nature appears on the screen. (See also the
DIRECT ACCESS FUNCTIONS paragraph).
SUMMARY MENU
This menu contains a list of the programmes available. It is
possible to associate a name of about 5 characters to each
programme. For example, in the figure below programme 1
has been associated with the wording RA/1 (to insert the
names, see “Second carousel” chapter).
The main purpose of the SUMMARY menu is to display the
contents of the programmes either by moving the CURSOR
(cyan-light blue colour) or digitising the number corresponding
to the programme.
By using buttons /(5) it is possible to move vertically up
and down the column, whereas by means of buttons -/ +(7)
the cursor moves from one column to the other.
Here follows an example of how to select programme 3 from
the SUMMARY menu.
1. Enter the SUMMARY menu by pressing the MENU button
(8) three times or by pressing the yellow button (13) for
direct access.
2. The SUMMARY menu appears on the screen, the cursor
is in the position associated with the programme viewed,
e. g. if you are watching programme 12 the cursor shall be
on number 12.
3. It is now possible to digitise number 3 on the remote con-
trol by using the numerical buttons (4), the cursor moves
on 3 and programme 3 appears on the screen.
Alternatively, from the start position 12 (as indicated in the
picture) place the cursor on 3 using buttons /(5) and -
/ +(7).
[B-15] SUMMARY
01020
1RAI1 11 21
21222
31323
41424
51525
61626
71727
81828
91929
[B-14]
BRIGHTNESS IIIIIIIIIIIIIIIIIIIIIIIIIIII
[B-13] IMAGE
BRIGHTNESS IIIIIIIIIIIIIIIIIIIIIIIIIIII
CONTRAST IIIIIIIIIIIIIIIIIIIIIIIIIIII
COLOUR IIIIIIIIIIIIIIIIIIIIIIIIIIII
DEFINITION IIIIIIIIIIIIIIIIIIIIIIIIIIII
SELECTION Nature
[B-12] IMAGE
BRIGHTNESS IIIIIIIIIIIIIIIIIIIIIIIIIIII
CONTRAST IIIIIIIIIIIIIIIIIIIIIIIIIIII
COLOUR IIIIIIIIIIIIIIIIIIIIIIIIIIII
DEFINITION IIIIIIIIIIIIIIIIIIIIIIIIIIII
SELECTION Nature
INGLESE_OK 12-09-2003 11:47 Pagina 12

4. Return to TV mode by pressing button (14).
CAUTION: The SUMMARY menu is only available in the TV
mode, it is not displayed while in AVI or SVHS.
OTHER FUNCTIONS MENU
This menu contains the following functions:
•INPUT: it allows selection of the TV source.
- TV (antenna)
- AV1 (SCART socket)
- AV2 (2 Cinch sockets, only on certain models)
- S-VHS (S-VHS video socket / audio Cinch socket, only
on certain models).
At switch on, the input will be in TV mode.
•FIXED OSD:it activates or deactivates the possibility to
have the programme number as permanent information on
the screen. When the TV set is turned on for the first time,
this function is not active, however by modifying it the set
value is automatically stored.
•ZOOM:it allows the activation or deactivation of doubling
the size of the menu characters, thus permitting a better
readability of the entries contained in the menus. When the
TV is switched on for the first time, this function is active;
if changes are made, the set value is automatically stored.
•TIMER:This function allows a time period to be set (at
intervals of 15 minutes up to a maximum of 120 minutes).
When the set time period has elapsed, the TV automati-
cally switches off to "stand by". When switching the TV on,
this function is never active.
Hereunder is an example of how to enter the OTHER FUNC-
TIONS menu and change the input on a SVHS external source
(see also "Connections to external sources", e.g. Video
recorders, cameras).
1. Enter the OTHER FUNCTIONS menu by pressing the
MENU button (8) 4 times or by pressing the BLUE
coloured button (13) once for direct access.
2. The screen displays the OTHER FUNCTIONS menu with
the red CURSOR on the INPUT entry.
3. Change the source: by pressing button -/ +(7) twice the
S-VHS entry is displayed.
4. Return to the TV mode by pressing button (14) of the
MENU button (8) or wait for 7 sec.
SECOND CAROUSEL
The purpose of the menus of the second carousel is to install
the TV set. They remain active on the screen until access to
the successive menu is obtained, or until the TV mode is
recalled.
To gain access to the second carousel, keep the MENU but-
ton (8) pressed for at least two seconds.
CAUTION: The second Carousel can be activated only in the
TV mode since it cannot be visualised in the AVI or SVHS
modes. Furthermore, it cannot be accessed in models
equipped with CHILD LOCK and HOTEL MODE functions, if
these are activated.
SUMMARY MENU
This menu is used to organise the programme list, associat-
[B-18] OTHER FUNCTIONS
Input S-VHS
Fixed OSD Deactivated
Zoom Activated
Timer Deactivated
[B-17] OTHER FUNCTIONS
Input TV
Fixed OSD Deactivated
Zoom Activated
Timer Deactivated
[B-16] SUMMARY
01020
1RAI1 11 21
21222
31323
41424
51525
61626
71727
81828
91929
13
ENGLISH
INGLESE_OK 12-09-2003 11:47 Pagina 13

ing a 5-character name to each one of them.
By using button /(5) it is possible to move up and down
the column, while buttons -/ +(7) enable the cursor to move
from one column to the other.
Compared to the SUMMARY menu appearing in the first
Carousel, here it is possible to select those functions permit-
ting the rearrangement and insertion of the names associat-
ed to each single programme. Furthermore, during the above
mentioned operations, an information box containing useful
indications is displayed on the screen.
1. Enter the SUMMARY menu by keeping MENU button (8)
pressed for at least 2 sec.
2. 2. The screen displays the SUMMARY menu, the cursor is
in the position corresponding to the programme being
viewed e.g. If you are watching programme 2, the cursor
will be on number 2 (see the picture).
Remember that to move the cursor from one column to
another press buttons -/ +(7) while to move the cursor up
and down the column press buttons /(5). Alternatively,
digitise the programme number on the remote control using
buttons (4), the cursor shall immediately place itself on the
selected programme.
In the programme it is possible to select the following func-
tions by using the coloured buttons (13) on the remote con-
trol:
Hide / Enter / Cancel / Name / automatic tuning
•Hide: This function adds or removes a programme from the
list of favourite programmes. A favourite programme is one
whose access is obtained by using buttons /(5). During
this operation the hidden programme is skipped (in the sum-
mary menu the hidden programmes are marked in red).
Hereunder is an example of how to hide programme 2 from
the list of favourite programmes:
If in TV mode the list of favourite programmes is:
button (5) Programme 1
button (5) Programme 2
button (5) Programme 3
button (5) Programme …
1. Move the cursor to programme 2 using the /(5) but-
tons.
2. Press the RED button (13) on the remote control corre-
sponding to the HIDE function as indicated in the Legend
menu.
3. The number indicating the programme (as well as its name
if it has been entered) are marked in red.
Now, in the TV mode, the list of favourite programmes is:
tasto (5) Programme 1
tasto (5) Programme 3
tasto (5) Programme …
•Insert: This function changes the position of a programme
in the summary menu.
Hereunder is an example of how to change the position of
programme 15 (e.g. tuned into RETE A) with programme 8
(e.g. tuned into TMC):
1. Move the cursor to programme 15 using the /buttons
(5).
2. Press the green button (13) corresponding to the INSERT
function. The information box will now have a green back-
ground and will display the programme number 15 (as well
as its name if inserted).
3. Move the cursor to programme 8 using the /buttons
(5).
2
Cursor
The information box
contains the selected
programme.
[B-19] SUMMARY
01020
11121
21222
31323
41424
51525
61626
71727
81828
91929
(red) (green) (blue)
Hide Insert Name
(yellow) (white)
Cancel Automatic tuning
2
Cursor
The information box
contains the selected
programme.
[B-19] SUMMARY
01020
11121
21222
31323
41424
51525
61626
71727
81828
91929
(red) (green) (blue)
Hide Insert Name
(yellow) (white)
Cancel Automatic tuning
14
ENGLISH
INGLESE_OK 12-09-2003 11:47 Pagina 14

4. Press the green button corresponding to the INSERT func-
tion again. Now the information box will regain its normal
colour (cyan) and contains programme number 8 (and its
respective name if inserted) which now corresponds to
RETE A.
5. The programmes positioned from 8 onward slide one place
forward, thus TMC formerly in position 8 now moves to 9,
MTV shifts from 9 to 10 and so on.
•Cancel: This function eliminates a programme from the list
of programmes and updates the list.
Here is an example of how to eliminate programme 2.
1. Move the cursor to programme 2 using the /buttons
(5).
2. Press the YELLOW button (13) corresponding to the func-
tion “Cancel”.
By cancelling programme 2, the programmes that follow
move by one place.
If the situation before deleting was:
1RAI1
2RAI2
3RAI3
4RETE4
After eliminating programme 2 it will be:
1RAI1
2RAI3
3RETE4
4....
•Name: This function permits to name the programmes
using up to 5 characters.
Here is an example of how to insert the name RAI 2 in pro-
gramme 2.
1. Move the cursor to programme 2 using the /buttons
(5).
2. Press the BLUE button (13) corresponding to the Name
function.
3. By pressing the Name function, the information box back-
ground becomes blue and a white cursor appears on the
first character of the name to insert. The character, indicat-
ed by the cursor, can be edited using the /buttons (5).
4. Insert the first character of the name, e.g. R.
5. Move the cursor using the +button (7) and insert the next
character, e.g. A.
2
Cursor
The information box
contains the selected
programme.
[B-19] SUMMARY
01020
11121
21222
31323
41424
51525
61626
71727
81828
91929
(red) (green) (blue)
Hide Insert Name
(yellow) (white)
Cancel Automatic tuning
8 RETEA
[B-22] SUMMARY
010MTV 20
11121
21222
31323
41424
51525
61626
71727
8RETEA 18 28
9TMC 19 29
(red) (green) (blue)
Hide Insert Name
(yellow) (white)
Cancel Automatic tuning
15 RETEA
[B-21] SUMMARY
01020
11121
21222
31323
41424
515RETEA 25
61626
71727
8TMC 18 28
91929
(red) (green) (blue)
Hide Insert Name
(yellow) (white)
Cancel Automatic tuning
15
ENGLISH
INGLESE_OK 12-09-2003 11:47 Pagina 15

6. Once all the characters of the name have been inserted,
press the BLUE button (13) again to insert the name in the
list.
7. To go back to the TV mode, press button (14).
NOTE: The characters are alphanumeric, by pressing (5),
they appear in the following sequence:
A B C D E F G H I L K J M N O P Q R S T U V W X Y Z
0 1 2 3 4 5 6 7 8 9 - + , |‘space’.
By pressing (5) they appear in the opposite sequence i.e.
first the numbers followed by the letters.
•Automatic tuning: See the "Channel memorisation" chap-
ter for instructions on this function.
INSTALLATION MENU
If you know the numbers of the channels received in your
area, you can store them one by one through the installation
menu (NOTE:unless you are an expert user, we suggest you
ask your installer to do this for you). This menu contains the
necessary functions to tune and store each single pro-
gramme. The functions are the following:
•Programme:insert the programme number you want to
store the broadcasting station in. The number can be
inserted either by using the numeric buttons (4) or using
the -/ +buttons (7) (scrolling can be speeded up by keep-
ing one of the two -/ +buttons pressed for a longer peri-
od). NOTE: Reserve programme Ø to store your video
recorder channel with the AFC deactivated.
•System:the TV set can recognise the colour standards
automatically (except for the FRANCE standard which has
to be selected manually).
•Channel type:selects whether a channel is a CH-type (a
traditional band) or a S-type channel (via cable or hyper-
band).
•Channel:insert the channel number of the TV programme
to store.
Insert the number either by using the numeric buttons (4)
or the + / - (7) buttons (keeping one of the two buttons
pressed for a longer period activates the channels auto-
matic search). CH-type channels range from 1 to 69, the
S-type channels range from 1 to 54.
•Fine-tuning:it makes a fine adjustment of the frequency
within the channel possible.
•AFC:automatic frequency control. When it is activated it
automatically hooks onto the correct frequency value. It
deactivates itself when a correction is made using “ Fine-
Tuning”.
•Store:it allows the settings displayed in the menu to be
stored. Press one of the two -/ +(7) buttons: the wording
"stored" appears on the screen for 3 seconds, indicating
that the action has been completed successfully.
Below is an example of how to manually tune into and store a
broadcasting station.
Example: tune into and store channel CH 23 (RAI 2) on pro-
gramme 2:
1. Enter the menus of the Second Carousel by keeping the
MENU button (8) pressed for at least 2 sec.
2. Enter the INSTALLATION menu by pressing the MENU
button (8).
3. The INSTALLATION menu is displayed on the screen with
the CURSOR highlighting the PROGRAMME entry.
2 RAI2
[B-26] SUMMARY
01020
11121
2RAI2 12 22
31323
41424
51525
61626
71727
81828
91929
(red) (green) (blue)
Hide Insert Name
(yellow) (white)
Cancel Automatic tuning
2 R
cursor
[B-25] SUMMARY
01020
11121
21222
31323
41424
51525
61626
71727
81828
91929
(red) (green) (blue)
Hide Insert Name
(yellow) (white)
Cancel Automatic tuning
16
ENGLISH
INGLESE_OK 12-09-2003 11:47 Pagina 16

4. With the cursor on the PROGRAMME entry, select number
2 as the programme on which you want to store the broad-
casting station (use numeric buttons (4) or -/ +(7) buttons).
5. Select the CHANNEL (or FREQUENCY for television sets
with search selected in Frequency) function by using the
(5) button.
6. If the channel to be stored is CH 23(or FREQUENCY, exam-
ple: 193 MHz), digitise the number using buttons (4) or
reach channel 23 (or 193 MHz) by pressing button -(7).
7. Position the cursor on STORE using the button (5).
8. Store the programme using buttons - / +(7). The word
"stored" will appear for 2 seconds indicating that the oper-
ation has been carried out successfully.
If the channel to be stored is an S-type (instead of CH-type)
select the Channel type function and set Sinstead of CH
using buttons -/ +(7).
IMPORTANT: (in multi-standard models)
In multi-standard models it is necessary to set the broadcast-
ing standard if the one detected automatically by the TV does
not correspond to the broadcasting standard of your Country
(e.g. FRANCE or PAL-DK standards).
1. Position the cursor on SYSTEM using the /buttons (5).
2. Select the desired standard using the -/ +buttons (7).
CONFIGURATION MENU
This menu contains all the necessary functions to configure
the TV set.
These are the following:
•Nation:it enables the Country to be selected. This entry is
used to arrange channels automatically (see "CHANNEL
MEMORIZATION" ). The following nations are available:
"Austria" "Belgium" "Switzerland" "Germany" "France"
"Great Britain" "Italy" "Holland" "Spain".
•Language:it selects the language of the menus: Italian,
Dutch, English, French, German, Spanish.
•Channel List:it enables the canalisation of the broadcast-
ing stations to be chosen. This function has already been
set by the manufacturer and we recommend you do not
modify it if you do not know the canalisation tables in your
country.
•Without Video:in absence of the signal, it is possible to
select a blue or black background to avoid seeing the so-
called "snow effect".
•Switching on:it selects the possibility to switch on the TV
set on the last channel viewed or in stand by.
[B-30] INSTALLATION
Programme 2
System AUTO (PAL-BG)
Channel Type CH
Channel 23
Fine Tuning IIIIIIIIIIIIIIIIIIIIIIIIIIII
AFC Activated
Store Stored
INSTALLATION
Programme 2
System AUTO (PAL-BG)
Channel Type CH
Channel 66
Fine Tuning IIIIIIIIIIIIIIIIIIIIIIIIIIII
AFC Activated
Store
[B-29] INSTALLATION
Programme 2
System AUTO (PAL-BG)
Frequency 193
AFC Activated
Store
[B-27] INSTALLATION
Programme 9
System AUTO (PAL-BG)
Channel Type CH
Channel 66
Fine Tuning IIIIIIIIIIIIIIIIIIIIIIIIIIII
AFC Activated
Store
[B-27] INSTALLATION
Programme 9
System AUTO (PAL-BG)
Channel Type CH
Channel 66
Fine Tuning IIIIIIIIIIIIIIIIIIIIIIIIIIII
AFC Activated
Store
17
ENGLISH
INGLESE_OK 12-09-2003 11:47 Pagina 17

18
ENGLISH
•AV1:it selects the external source, be it a VCR or a
Decoder.
•Max. Volume:it limits the maximum volume level.
To gain access to these functions, proceed as follows:
1. Enter the menus of the second Carousel by keeping
MENU button (8) pressed for at least 2 seconds.
2. Enter the CONFIGURATION menu by pressing MENU but-
ton (8) twice.
3. The screen displays the CONFIGURATION menu with the
CURSOR on NATION .
Your TV has been pre-set before leaving the factory so as to
correctly match Nation, Language and Channel list.
However it may be necessary to carry out some changes either
of Nation or Language in order to have a correct arrangement of
channels during the automatic tuning operation.
In the above cases follow this procedure:
1. Position the cursor on the entry to be changed, using the
/buttons (5).
2. Select the correct configuration by using the -/ +buttons (7).
CHANNEL MEMORISATION
This operation cannot be carried out in the factory as the
channels that can be received vary according to the area
where the receiver is located.
You can memorise channels one at a time or using the auto-
matic tuning system.
MANUAL TUNING SYSTEM
To carry out manual tuning, see instructions on chapter
“INSTALLATION MENU”.
AUTOMATIC TUNING SYSTEM
(SOME INFORMATION)
To carry out automatic tuning see the instructions in the
"Quick operation of the TV set" chapter.
The AUTOMEMO automatic tuning system automatically
tunes into and stores channels; those also transmitting their
recognition code are stored in the first programmes according
to their importance, e.g. RAI 1 in programme 1 (the pro-
gramme name is also inserted automatically), RAI 2 in 2,
RAI 3 in 3 and so on. The channels without recognition code,
usually those that do not broadcast Teletext, are stored in the
sequence in which they are found during automatic tuning.
Channels with a poor reception are stored at the end.
BEFORE STARTING THE AUTOMATIC TUNING OPERA-
TION MAKE SURE THAT THE CONFIGURATION MENU
CONTAINS THE APPROPRIATE NATION, OTHERWISE THE
CHANNEL ARRANGEMENT OPERATION DOES NOT TAKE
PLACE.
The whole automatic tuning sequence can take from 5 to 10
minutes (depending on the number of stations detected).
During this period do not give any command to the TV (nei-
ther using the front panel nor the remote control). It is normal
that a broadcasting station is stored more than once, e.g..
RAI 2 is stored on Programme 2 and on Programme 8 as
well. If you do not want multiple storage, simply eliminate the
unwanted ones from the SUMMARY menu by means of the
CANCEL button (see the SUMMARY MENU paragraph).
IMPORTANT! (for multi-standard models only)
To effect automatic tuning/automemo on TV sets receiving
also French signals, SET THE CHANNEL LIST ON
“FRANCE”.
IMPORTANT! (for multi-standard models only)
In multi-standard models the automemo creates some multiple
storages, some of which do not reproduce the sounds correct-
ly; this occurs because the audio standard is not the same for
all Countries. In this case simply eliminate the programmes that
are not tuned properly.
DIRECT ACCESS FUNCTIONS
These functions do not require access to a menu, but they
are directly available on the remote control.
•Button (3) Audio zero setting: this button is also called
MUTING and it rapidly turns off and restores the audio. It
[B-31] CONFIGURATION
Nation Italia
Language Italiano
Channel List Italia
Without Video Blue
Accensione Ultimo stato
AV1 VCR
Max. Volume IIIIIIIIIIIIIIIIIIIIIIIIIIII
INGLESE_OK 12-09-2003 11:47 Pagina 18

may be necessary to turn off the audio rapidly when you
have to answer the phone (the screen displays the word
"Mute" when this function is activated).
•Button (12): this button displays the correct time (on chan-
nels broadcasting Teletext), the programme number (and
its name if previously assigned), the pre-set image and
the audio level.
•Button (10): Timer: it has the same function as the timer
described in the “Other Functions” menu. The screen dis-
plays the word Timer and indicates its status.
•Button (11): this button allows you to choose one of the 5
pre-set images: Show, Nature, Cinema, Sport, Games (see
“Image Menu”). In OSD the selection is displayed. The
screen will show the word describing the chosen configu-
ration.
•Button (7): these buttons increase or decrease the vol-
ume. An audio level bar is displayed on the screen.
•Button (5): this button allows forward () and backward
() scrolling of programmes.
•Button (15): this button modifies the OSD or TXT back-
ground from a) completely transparent, to b) semi trans-
parent or to c) black. When the transmission standard is in
PAL this key displays no "Programme Number" information
on the screen.
•Button (6):this button modifies the video input source for
your TV, e.g.
1. By pressing the AV (6) button once you select AV
2. By pressing the AV button a second time you select S-VHS
3. By pressing the AV button a third time you select the TV
source
TELETEXT FUNCTIONS
The Teletext is a video information system (video magazine)
broadcast by many TV stations and concerning specific top-
ics. This data, grouped under headings, is organised in
pages, each of which is identified by a three-digit number.
One of the pages (usually page 100) contains the general
index with the relative identification number.
Different stations broadcast Teletext in different ways. The
identification of the broadcasting mode is carried out auto-
matically by the internal decoder of the TV set.
Currently, two more types of Teletext are available besides the
standard one: TOP and FLOF or FASTEXT.
The page numbers or the information headings appear on the
bottom line in different colours and they can be selected by
pressing the button with the same colour on the remote con-
trol.
Note: the Teletext information is superimposed on the TV sig-
nal and is broadcast cyclically; for this reason, a short time
may pass after selecting a page or a heading before the page
appears on the screen.
– STANDARD Teletext:
In the following picture, the four buttons (13) select the page
number displayed on the bottom line. After each selection the
page numbers are updated, i.e. the first three on the left indi-
cate the subsequent pages and the last on the right, indicates
the page before the one being displayed.
– TOP Teletext
In the following picture, the two RED (13) and GREEN (13)
buttons corresponding to the arrows change (forward and
backward) the page number sequentially. The YELLOW but-
ton (13) selects the heading, whereas the BLUE (13) button
selects the subject. In the picture, the general heading is
"Ultim'ora" (Latest News) in the specific subject “Sport news”.
[B-33]
100 100 TELETEXT Thu. 06-10-99 11:40
RAI - TELETEXT
100 102 103 899
STANDARD Teletext
[B-32]
12:30:3 RAI3 P3
Show
VOLUME IIIIIIIIIIIIIIIIIIIIIIIIIIII
19
ENGLISH
INGLESE_OK 12-09-2003 11:47 Pagina 19

– FLOF/FASTEXT Teletext
In the following picture, the four buttons (13) choose amongst
the subject headings displayed on the bottom line. At each
selection the headings change according to the criterion fixed
by the broadcasting station.
Note: the functions described here are accessible only after
activating the Teletext by the TXT button (17).
•Numerical buttons (4):You can select the page using the
four coloured buttons (13) as well as digitising the three
digits with the numerical buttons (4). The system briefly
waits for the page requested to be broadcast and then dis-
plays it.
•/buttons (5):these two buttons allow the pages to be
selected sequentially. Shortly after the Teletext selection,
the internal memory of the TV set stores four information
pages: the page displayed as well as the previous and the
two successive ones. This makes appearance of these four
pages on the video quicker when selected.
•Buttons (9):to facilitate the reading of the text, this button
enables you to enlarge it. By pressing it successively the
upper half is enlarged first, followed by the lower part. The
third time you press it, the text is restored to its normal size.
•Button (12):gives you direct access to the index page
(often corresponding to page 100) or the MENU page with
the subjects.
If the page looks like the one in the picture, it means that
the Teletext broadcast is not standard and does not even
broadcast the MENU. In this case, press button (12) again
to exit the menu function.
•Button (16):this button stops on a page on the video. In
some cases the information can be contained in groups of
more than one page that scroll automatically during vision.
If you want to stop on a page, press this button (16). On
the upper left part of the page, the word "STOP" will be
displayed instead of the page number. To unlock the page,
press button (16) again.
•Button (18):In some cases it may take a while for a page
to be displayed. If in the meantime you want to watch a TV
programme, press this button (18). As soon as the desired
page is reached, the number will appear on the screen. To
view it, press button (18) again.
Note: while waiting, the TV remains in the Teletext function
therefore it will be possible to change the pages but not
the TV programmes using the numerical buttons.
IMPORTANT: When in the MENU mode (e.g. AUDIO,
IMAGE, OTHER FUNCTIONS menu), if button (18) is
pressed, only the function highlighted by the cursor is
[B-37]
MENU
** NO INDEX **
[B-36]
100 100 TELETEXT Thu. 06-10-99 11:40
RAI - TELETEXT
100 102 103 899
[B-35]
FLOF/FASTEXT Teletext
100 BBC World 100 Tue. 26Oct. 09:52:10
BBC - WORD
World Today Prime Today News Business
100 100 TELETEXT Thu. 06-10-99 11:40
RAI - TELETEXT
«» Latest News Sport
[B-34]
TOP Teletext
20
ENGLISH
INGLESE_OK 12-09-2003 11:47 Pagina 20
Other manuals for BV1
1
This manual suits for next models
1
Other Brionvega TV manuals