Brother GeoBook NB-80C User manual
NB-80C
2
Word Processing, Spreadsheet, Drawing,
Scrapbook, Addressbook, Planner
Book Reader, Text File Editor, Games &
Glossary
_GEOS ® US ENGLISH

€
AbOut this Manual
In this manual, Book 2, look for information on these desktop publishing,
personal planning, and electronic accessory programs:
•Word Processing. Creates,edits, ,and prints documents, such as
memos, letters, and reports.
• Spreadsheet. Creates and edits Spreadsheet documents, performs
calculations, and creates charts.
• Drawing. Creates graphics by drawing and painting, or by importing
and editing.
•Scrapbook. Stores a graphic or piece of text for placing in a Word
Processing, Spreadsheet, or Drawing document. Also allows you to
place' clip art, which is supplied on diskette.
• Addressbook. Stores names and addresses and other information for
reference, including email addresses.
•Planner. Schedules appointments on a perpetual calendar.
•Book Reader. Opens books on screen.
• Text File Editor. Creates and edits DOS text files. This program is on
diskette
i Games. Solitaire and Turnabout are on diskette.
This manual assumes you are familiar with the basics of using programs such
as opening and saving documents and working with menus. If not, see
Getting Started in Book 1 for basic information.
In Book 1you will also find instructions on using File Manager to organize
your documents; sending email; browsing the World Wide Web; and using
the Function Key accessories: Calculator, World Clock, and To Do List.
[ Model Number: [ Serial Number: [
Geoworks® application software and GEOS® operating system software copyright ©1990-1997
Geoworks. All fights reserved. United States Patent 5,327,529.
Part of the software in this product is ©copyright STNC Enterprises 1994-1997. All rights reserved.
Hardware and software floating point math library copyright ©1984-1991 Dimensions Research, Inc.
Portions of this work are derived from The Standard C Library copyright ©1992 by P.J. Plaguer, published
by Prentice-Hall, and are used with permission.
ROM-DOS operating system software copyright ©1989-1997 Datalight, Inc.
CardTrick flash file system software copyright ©1989-1997 Datalight, Inc.
Word for Word import export software copyright ©1986-1993, Mastersoft, Inc. All rights reserved.
The American Heritage Dictionary licensed from Inso Corporation © 1989 by Inso Corporation. All rights
reserved. Reproduction or disassembly of embodied programs or database prohibited. Based upon The
American Heritage Dictionary, Office Edition.
English Hyphenator licensed from Inso Corporation ©1991 by Inso Corporation. All rights reserved.
Reproduction or disassembly of embodied algorithms or database prohibited.
Elecu'onic Thesaurus licensed from Inso Corporation. ©1987 by Inso Corporation. All rights reserved.
Thesaurus U.S. Pat. No. 4,724,523. Reproduction or disassembly of embodied programs or database
prohibited. Based upon Roget'slI: TbeNew Thesaurus ©1980 by Houghton Mifflin Company.
International CorrectSpell _" English spelling correction system © 1994 by Inso Corporation. All rights
reserved. Reproduction or disassembly "of embodied_gorithms or database prohibited.
Portions of BIOS software provided by Phoenix ©1997 by Phoenix. All rights reserved.
Portions of software provided by Brother International. ©1997 by Brother International Corporation.
The GEOS software in this device contains Nimbus Q from Digital Typeface Corp. and typefaces from
URW, GmbH, URW Roman©, URW Sans©, and URW Mono© are registered trademarks of URW GmbH.
Geoworks® and GEOS®, are registered trademarks of Geoworks, and Scrapbook TM is a trademark of
Geoworks in the United States of America and other countries.
Mastersoft is a registered trademark of Mastersoft, Inc. in the U.S.A.-
Copyright© 1997 by Brother International Corporation. All rights reserved.
Black & white clip art images in this product are licensed from Media Graphics International and are
protected by U.S. and worldwide copyright laws.
Portions of color clip art images in this product are provided by Express Software, Inc.© Copyright
Express Software, Inc. Portions of color clip art images in this product are provided by Studio Advertising
Art, Inc. © Copyright Studio Advertising Art, Inc.
All-other brand and product names are trademarks or registered trademarks of their respective holders.
Keep this manual in a safe place for future reference. We recommend that you write the unit's model
number and serial number (from the rear panel of the keyboard/printer unit) in the blank spaces at the
top of the previous page.
FCC NOTICE
This equipment has been tested and found to comply with the limits for a Class B digital device, pursuant
to Part 15 of the FCC Rules. These limits are designed to provide reasonable protection against harmful
interference in a residential installation. This equipment generates, uses, and can radiate radio frequency
energy and, if not installed and used in accordance with the instructions, may cause harmful interference
to radio or television reception. However, there is no guarantee that interference will not occur in a
particular installation. If this equipment does cause intereference, which can be determined by turning the
equipment off and on, the user is encouraged to try to correct the interference by one or more of the
following measures:
•Reorient or relocate the receiving antenna or increase the separation between the equipment and
receiver
• Connect the equipment to an outlet on a circuit different from that to which the receiver is connected
• Consult the dealer or an experienced radio/television technician for help (changes or modifications
not expressly approved by Brother International Corporation could void the warranty)
This product uses RJllC/W jacks and is designed to connect to the telephone network or premises wiring
using a compatible modular jack that is Part 68 compliant.
If this telephone equipment causes harm to the telephone network, the telephone company will notify
you in advance that temporary discontinuance of service may be required. If advance notice is not
practical, the telephone company will notify you as soon as possible. Also, you will be advised of your
right to file a complaint with the FCC if you believe it is necessary.
The telephone company may make changes in its facilities, equipment, operations, or procedures that
could affect the operation of the equipment. If this happens, the telephone company will provide advance
notice for you to make necessary modifications to maintain uninterrupted service.
Do- not connect dai_e'-@ipment to pat_-_,-lines -" _ _ ;
_.or coin'-x3"perated telephone lines.
The FCC Registration number on this product shows compliance with Federal Communications
Commission Part 68 Rules. To ensure product compliance, use the AC adapter that comes with this
product. Do not substitute adapters.
If trouble is experienced with this equipment, for repair or warranty information, please contact Brother
International Corporation, 3131 Appling Road, Bartlett, TN 38133, (901) 373-8500. If the equipment is
causing harm to the telephone network, the telephone company may request that you disconnect the
equipment until the problem is solved.
DOC NOTICE
This Class B digital apparatus meets all the requirements of the Canadian Interference-Causing Equipment
Regulations. Le proem appareil num6rique d6 la classe B respecte toutes les exigences du R6glement sur
le materiel brouilleur du Canada.
WARNING -FOR YOUR IIFALTH
To avoid repetitive motion injuri.es When using this keyboard, we recommend the
following steps: maintain a comfortable, straight wrist position when typing, take breaks,
at least every hour, to stretch hands and arms, and report any pain or other symptoms
to your physician.
Table of Contents
THEBASICS
1 Word Processing
Word Processing 13ps ................................................................. 1
Starting Word Processing ............................................................. 2
Opening a Document ................................................................ 2
Using the Tool Bars .................................................................. 3
The Basic Functions Tool Bar ....................................................... 3
The Advanced Functions Tool Bar ................................................... 4
The Graphic Bar .................................................................. 4
The Drawing and Bitmap Tool Bars .................................................. 5
Saving On-screen Settings (Configuration) ............................................. 5
Beginning aDocument ............................................................... 6
Setting Up Your Page .............................................................. 6
Working with Text ................................................................... 7
Entering Text ..................................................................... 7
Deleting Text .................................................................... 10
Cutting, Copying, Pasting, and Replacing Text ....................................... 10
Dragging and Dropping Text ...................................................... 11
Usihg-U_do_to Reverse-Your Last..Acfi_,_,..: .... :........................... ._..... 12
Using Special Characters and S_nbols .............................................. 12
Changing Text Font, Size, Style, and Alignment ...................................... 12
Using Tone in Text ............................................................... 15
Finding and Replacing Text ....................................................... 17
Formatting Documents .............................................................. 19
Setting Line Spacing .............................................................. 20
Using Indentations, Tabs, and Rulers ............................................... 21
Adding Borders .................................................................. 25
Setting Hyphenation ................................... .......................... 26
Using Headers and Footers ........................................................ 27
Creating a Title Page ............................................................. 2_
Using Page Breaks ............................................................... 29
Managing Columns .............................................................. 29
Using Text Style Sheets .................. -.. ...................................... 31
Using Master Pages to Design Documents ........................................... 36
Using Graphics in a Document ....................................................... 38
Using Frames for Graphics and Text ................................................ 39
Using Grids ..................................................................... 41
Using Clip Art in Documents ...................................................... 42
Contents i
Wrapping Text ................................................................... 44
Inserting, Appending, and Deleting Graphic Layouts ................................. 45
Finishing Your Document ........................................................... 46
Using Footnotes ................................................................. 46
Creating a Table of Contents ....................................................... 48
Creating a Bibliography ....................... ..................................... 48
Proofing Your Document ............................................................ 49
Checking Your Spelling ........................................................... 49
Creating a User Dictionary ........................................................ 51
Using the Thesaurus .............................................................. 51
Printing or Faxing Your Document ................................................... 52
Merging Information from Other Programs ........................................... 53
Setting up the Merge Fields ....................................................... 54
Merging Addressbook Information ................................................. 55
Merging Spreadsheet Information .................................................. 56
Printing aMerge Document ....................................................... 57
Spedal Effects ...................................................................... 58
Displaying Invisible Characters .................................................... 58
Displaying Counts ............................................................... 58
Using Abbreviated Phrases ........................................................ 59
Inserting Special Characters ....................................................... 60
Importing and Exporting Documents ................................................. 64
2 Spreadsheet......................... ._ ,.................. 65
Starting Spreadsheet .............. _.......... ,...................................... 65
Opening a Document ............................................................... 66
Using the Tool Bars .................................................................. 67
The Basic Functions Tool Bar ...................................................... 67
The Advanced Functions Tool Bar .................................................. 68
Graphic Bar, Drawing Tools, and Bitmap Tools ....................................... 68
Moving around in a Spreadsheet ..................................................... 69
Selecting Cells and Ranges ........................................................... 69
Working with Values and Labels ...................................................... 72
Entering Values and Labels ........................... '............................. 72
Notes on Entering Labels ......................................................... 73
Notes on Entering Values ......................................................... 73
Changing the Number Format for Values ............................................ 74
Entering and Changing Dates and 1imes ............................................ 75
Format Formulas ................................................................ 77
Formatting Spreadsheets ............................................................. 78
Showing Grid Lines .............................................................. 78
Showing Cell Borders ............................................................. 78
Using Headers and Footers ........................................................ 79
Using Tones ..................................................................... 80
Contents ii
Creating Notes .................................................................. 81
Changing the Appearance of a Spreadsheet ............................................ 82
Adjusting Column Width and Row Height .......................................... "82
Changing Alignment ............................................................. 83
Using Different Text Styles ........................................................ 84
Working with Formulas .............................................................. 85
Entering Formulas ..................... :......................................... 85
Using References in Formulas ..................................................... 86
Using Operators in Formulas ...................................................... 88
' Using Built-in Functions in Formulas ............................................... 88
Spreadsheet's Built-in Functions ................................................... 91
Editing the Spreadsheet ............................................................. 93
Editing the Contents of a Cell ...................................................... 93
Copying and Moving Information .................................................. 94
Inserting and Deleting Rows and Columns .......................................... 96
Filling aRange of Cells with Incremental Values ..................................... 97
Options for Spreadsheet Formulas ................................................... 98
Showing and Hiding Formulas .................................................... 98
Naming Cells and Ranges ......................................................... 98
Controlling Automatic Recalculation .............................................. 100
Using Iteration and Circular References ............................................ 101
Charting in Spreadsheet .. ; ......................................................... 102
What Is a Chart? ................................................................ 102
Types of Charts ................................................................. 103
Creating-Charts ..................... .._.. .... ........................................ 108
Changing the Type Of Chart .......... "_ " 108
Manipulating Charts ............................................................ 109
Resizing and Moving a Chart ..................................................... 109
Changing Chart Properties and Attributes .......................................... 110
Deleting a Chart ................................................................ 110
Using a Chart in Another Program ................................................ 110
Adding Titles and a Legend ...................................................... 111
Changing Markings ............................................................. 112
Changing Marker Shapes ........................................................ 114
Using Additional Spreadsheet Features ..................... ......................... 114
Sorting ........................................................................ 11.4
Creating Number and Date Formats ............................................... 116
Using Rulers ................................................................... 117
Adding Graphics ...................... ...: ...................................... 117
Locking Titles .................................................................. 118
Using Spreadsheet with Other Programs ........................................... 118
Printing and Faxing ................................................................ 119
Setting Page Setup Options ....................................................... 119
Printing and Faxing Spreadsheets and Charts ....................................... 120
Contents iii
Exporting and Importing Spreadsheets ................................................ 121
Spreadsheet Error Codes ............................................................ 124
3 Drawing .......................................... 125
Starting Drawing .................................................................. 125
Opening a Document .............................................................. 126
Using the Tools .................................................................... 126
Drawing Tools .................................................................. 126
Bitmap Tools ................................................................... 127
Pointers ....................................................................... 128
Creating and Editing Simple Objects ................................................ 129
Selecting Objects ................................................................ 131
Resizing Objects ................................................................ 132
Deleting Objects ................................................................ 132
Changing the On-screen View ...................................................... 133
Advanced Work with Objects ....................................................... 134
Drawing Objects, Arcs, and Straight Lines .......................................... 134
Setting Attributes ............................................................... 136
Transforming Objects .............................................................. 141
Flipping Objects ................................................................ 141
Rotating Objects ................................................................ 142
Skewing Objects ................................................................ 143
Untransforming Objects ......................................................... 143
Duplicating Objects ............................................................. 143
tirtg't_ phi '" _ _ _-Conver a Gra c.................. ........ . ................................... ,. 145
Arranging Objects _.146
Moving Objects to the Front or Back ............................................... 146
Moving Objects ................................................................. 146
Grouping and Ungrouping Objects ................................................ 148
Pasting Inside .................................................................. 149
Using Rulers ................................................................... 150
Using Grids .................................................................... 151
Using Text in Drawings ............................................................ 152
Changing Text Style, Size ........................................................ 154
Aligning Text ................................................................... 155
Adding Tone to Text ............................................................. 155
Working with Bitmap Objects ...................................................... 156
Creating a Bitmap Frame ......................................................... 157
Drawing Bitmap Shapes ..................... . - .................................. 158
Editing Bitmap Objects .......................................................... 160
Using Tone or Fill Pattern in aSelected Area ........................................ 161
Erasing in the Bitmap Frame ..................................................... 161
Using the Pixel View Tool ........................................................ 161
Changing the Bitmap Color and Resolution ......................................... 163
Contents iv
Printing or Faxing Drawing Documents .............................................. 163
Importing and Exporting Graphics .................................................. 165
4 Scrapbook ........................................ 167
Starting Scrapbook ................................................................ 167
Using 'Scrapbook Documents ....................................................... 168
Placing and Deleting Clip Art and Other Scraps ..................................... 168
Navigating Through Scraps ...................................................... 169
: Naming a Page of Scraps ......................................................... 170
Creating a New Scrapbook Document ............................................... 171
Importing a Scrap from a DOS Program .............................................. 171
PERSONAL PLANNING
5 Addressbook ...................................... 173
Starting Addressbook .............................................................. 173
Working with Cards ............................................................... 174
Creating and Adding New Cards ................................................. 174
Adding and Changing Phone Types ............................................... 176
Flipping through Cards .......................................................... 176
Editing Cards .................................................................. 177
Copying Cards ................................................................. 177
Deleti rds .................. .... __--_..... :. .... .'. .......................... _:.... 178
Adding Notes to Cards ...... _.................................................... 178
Searching through Cards ......................................................... 179
Making New Addressbooks ......................................................... 180
Printing and Faxing an Addressbook ................................................ 180
Importing a Document ............................................................. 182
Exporting an Addressbook Document ............................................... 183
6Planner ........................................... 185
Starting Planner ................................................................... 185
Viewing the Calendar .............................................................. 18.6,
Selecting and Viewing Events ....................................................... 187
Switching between the Calendar Window and the Events Window .................... 188
Selecting a Range of Days and Viewing Their Events ................................. 189
Scheduling Events ................................................................. 190
Scheduling an Event ............................................................. 190
Changing a Scheduled Event ..................................................... 191
Removing a Scheduled Event ..................................................... 191
Adding Events between Two Scheduled Events ..................................... 191
Adding an Event at a Particular Time .............................................. 192
Contents v
Copying Event Descriptions ...................................................... 192
Scheduling Repeating Events ..................................................... 193 •
Changing a Repeating Event ..................................................... 196
Removing a Repeating Event from the Calendar .................................... 196
Finding Specific Events .......................................................... 196
Printing or Faxing Planner Documents ............................................... 197
Creating New Calendars ........................................................... 200
ELECTRONIC ACCESSORIES
7 Book Reader ...................................... 201
Starting Book Reader .............................................................. 201
Using Information and Text ......................................................... 202
Printing from Book Reader ......................................................... 204
8 Text File Editor 205
Starting Text File Editor ............................................................ 205
What Text File Editor Can and Cannot Do ............................................ 206
Word Wrap and Line Endings ....................................................... 206
Changing the Text Size ............................................................. 206
Printing a DOS Text File ............................................................ 207
Naming a DQ__.Text File ................. ._....... _..... _............................. 208
9 Games ............................................ 209
Turnabout ...... , .................................................................. 209
Capturing Pieces 209
Sequence of Play ................................................................. 209
Setting User Options ............................................................ 210
Solitaire .......................................................................... 210
Starting Solitaire ................................................................ 211
Playing the Game .................................. :............................ 211
Finishing aGame 212
Setting the Playing Level ......................................................... 212
Changing the Scoring ............................................................ 213
Changing the Number of Cards Drawn ............................................ 214
Changing Other Options ......................................................... 214
Contents vi
APPENDIX
Spreadsheet Built-in Functions ........................ 215
Argument Rules ................................................................... 215
Fina_idal Functions ................................................................ 216
Information Functions .............................................................. 217
Logical Functions .................................................................. 220
Mathematical Functions ............................................................ 222
Print Functions .................................................................... 223
Statistical Functions ................................................................ 223
String Functions ................................................................... 224
Time and Date Functions ........................................................... 226
Trigonometric Functions ............................................................ 227
Glossary ............................................ 229
Index ............................................... 237
Contents vii

Contentsviii

1Word Processing
Before starting, review
these basic procedures
from the Getting Started
chapter in Book 1:
•Working with Documents
•Saving Documents
• Working with Menus
•Working with Dialog Boxes
This chapter explains how to create almost any type of document. It also
explains how to write a form letter and merge it with names and addresses
from Addressbook or Spreadsheet.
Word Processing Tips
Toselect(or dick on)
an item,p/ace the
on-screen pointer on
the item; then clickon
the Selectbutton or
tap once on the
glidepad.
Glidepad
surface
Selectbutton(left
buttononamouse)
Dragbutton(right
buttononamouse)
For word wrap to work properly, press ENTER only at the end of a
paragraph, never at the end of every line. If you press ENTER at the
end of every line, and later change something, the words will not
wrap smoothly.
•Use TAB rather than the SPACEBAR to align text. If you use TAB to
set the spacing between text, then you can Simply change the
measurement of the tab space to change the location of a column.
•Type only one space after a period or colon. When using a
typewriter,_you enter two spaces after a period or colon because of
--the spacing-o'_e typ_ewdtet:characters. _°
Use italic style text rather than underline for book tides. Typewriters
do not have italic font style available, so your only option is to
underline book tides. Word Processing provides italic and bold type
styles and other typographical features of typeset printing.
• Since an en dash (-) and em dash (--) are available on the symbols
keyboard, use them rather than multiple hyphens. (See Using Special
Characters and Symbols on page 12.)
•Use bullets for denoting lists such as this list of tips. (See Using
Special Characters and Symbols on page 12.)
•You can undo almost anything. The most important thing to
remember about undoing a mistake is that you can undo only the
last action.
Word Processing 1

Starting Word Processing
•To create a new document:
By default, the Word
Processingicon is
automaticallysel_cted
(outlinedin dottedwhite
line) whenyou turnon
your machine or any
time you go 1othe Main
Menu.
1. Click on Word Processing from the Main Menu. The New/Open dia/og box
appears.
2. Click on New. A new Word Pr_essing document appears.
Opening a Document_
Templates allow you
to create standard
documents, such as
envelopes, quicldy.
See Using Templates
in Getting Started
(Book 1).
•To open an existing document or template:
1. Insert the diskette that contains the document or template into the disk
drive,
2.
3.
Select New/Open from the File menu. The New/Open dialog box appears.
Double-click on the name of the folder and file you want to open. The
document appears in the Word Processing window and replaces the empty
default document.
Word Processing 2

Using the Tool Bars
The tool bars provide quick access to menu functions. In Word Processing,
you can open five different tool bars: Basic Functions, Advanced Functions,
Graphic Bar, Drawing Tools, and Bitmap Tools.
•To open a tool bar:
1. Select Show Tools from the Options menu. A submenu appears.
2. Select the tool bar. The tool bar appears on the screen.
•To use a tool on the tool bar:
1. Select the text or graphics whose characteristics you want to change.
2. Click on the tool button. The characteristics change.
The Basic Functions Tool Bar
To remove tool bars, click
again on the name of the
tool bar in the Show Tools
submenu of the Options
menu.
The Basic Functions tool bar appears when you open Word Processing. Use it
for functions like copying or changing the font size of selected text.
Open
Close Textstyles:plain;bold,
italic,andundedined
Save
I
Print
Previouspage
Go to page or
current page
ISpell check
I
1_12 I@1[] Iol_l_l_mixl lun"Rom-,=l1,2=111;I
Next page t , :t,:
Copy
Font size:
increase and Redraw
Click to see a list decrease / screen
of fonts and sizes. [
I [-- 1 [I
ITITIZI_I_!]
Paste
Word Processing 3

The Advanced Functions Tool Bar
When opened, the Advanced Functions tool bar appears above the Basic
Functions tool bar.
Findandreplace Styleinuse
I st°reStyle I
iR_cal,Style Hyphenation
I
I1_1 kZ!l'_l.o,m.,"1 []
°.."0n..
I-I=1=1-1
Zoomin
Zoom
Scale ol t
tofit
Alignment Linespacing View
The Graphic Bar
Use the Graphic bar for editing graphic objects created in or imported to
Word Processing. For example, use the Duplicate button to make a copy of a
graphic object, or use the Area Fill tool to fill a graphic object.
AreaPattern LineShading ,
LineStyle .PasteInside
AreaFill ILine Tone [ I TextShading
- AreaShadin_ "_-I- -1 -._---. ,. -l-_Te'x'_Tone'( Ungroup
I]I L'"e'T'°"_/ II Gr_upI
BreakOutPasteInside
BringtoFront
SendtoBack
[ PullForward
IIPt_sh Back
Duplicate I I
FlipLefttoRight
FlipToptoBottom
Word Processing 4

The Drawing and Bitmap Tool Bars
Pointertool
I-beamtool I'_
In Word Processing, the Drawing tool bar appears on the left of the window
When you are working with this tool bar in Word Processing, remember the
following:
• To select a graphic.in Word Processing, use the Pointer tool.
Texttool
In Drawing, the
Drawing and Bitmap
toolbars are in
different locations
than they are in Word
Processing, but they
stillcontain the same
tools.
• To select text in Word Processing, use the I-beam tool.
• To create text in a graphic frame, use the Text tool.
You can also use the Bitmap tool bar to create bitmap graphics or to edit
bitmap graphics imported into Word Processing.
The Drawing tools, Bitmaps, and the Bitmap tool bar are explained in detail
in the Drawing chapter, which starts on page 125.
Saving On-screen Settings (Configuration)
Saving the configuration allows you to save the settings from the Options
menu. For example, if you want the Advanced Functions tool bar to be
visible every time you open Word Processing, select Show Tools from the
Options menu; then click on Advanced Tools. Save the configuration, and the
tool bar will appear every time you open Word Processing.
I!_To save the configuration:
For information on
rulers, see page 24
in this chapter.
With your settings (tool bars and rulers) on the screen the way you want
them, select Save Configuration from the Options menu.
Word Processing 5

Beginning a Document
Before typing, first define the type of document you are creating by setting
your page size and page setup options.
Setting uP Your Page
You can create a
document larger than
the printing area.
When you print a
large page, you are
asked if you want to
scale the document or
pffnt it actua/ size.
Select Print Actual
Size; then insert as
many sheets of paper
as required. When
finished, tape the
pages together.
To change your view of
the document select
Zoom In or Zoom Out
from the View menu.
To change the margins
on an individual page in
your document,
reduce your document
to Scale to Fit from the
View menu and use the
pointer from the
Drawing tools to select
and resize header,
footer, or main body
region.
To select the page size:
1. Open a new document.
2. Select Page Size from the File menu. A dialog box appears.
3. Select either Paper, Envelope, Label, or the width and height of your
document if it is not a standard size.
4. Select Page Layout, either portrait (vertical) or landscape (horizontal).
5. Click on Apply; then click on Close. The dialog box closes, andyour
document outline will be represented by a rectangle with dotted borders.
2.
3.
set up the page:
Select the document for which you want to change the page setup. (Place
the insertion point anywhere in that document.)
Select Page Setup from the File menu. A dialog box appears.
Fill in the dialog box, making the selections you want:
• Starting Page Numlmr. You can start your document on a page
other than 1: If you_have several sections in the same document, you
can save them separately and still have consecutive page numbering.
• Columms. Select the number of columns in the document. See
Mana_ng Columns on page 29.
•Spacing. If you have more than one column, select the distance
between columns. Spacing is the same between all columns. By
default, this setting is 0.125 inches.
• Rule Width. If you have more than one column, you may want to
draw a vertical line (rule) in between and then select the width of
that line. By default, this setting is 0 points,or no rule.
.
• Master Pages. Select your layout: either a single page (one) or facing
pages (two). By default, this setting is one master page. See Using
Master Pages to Design Documents on page 36.
• Margim_. By default, the margins are 1 inch. You can change the
margins for an individual page in your document (see side note).
Click on Apply; then click on Close.
Word Processing 6
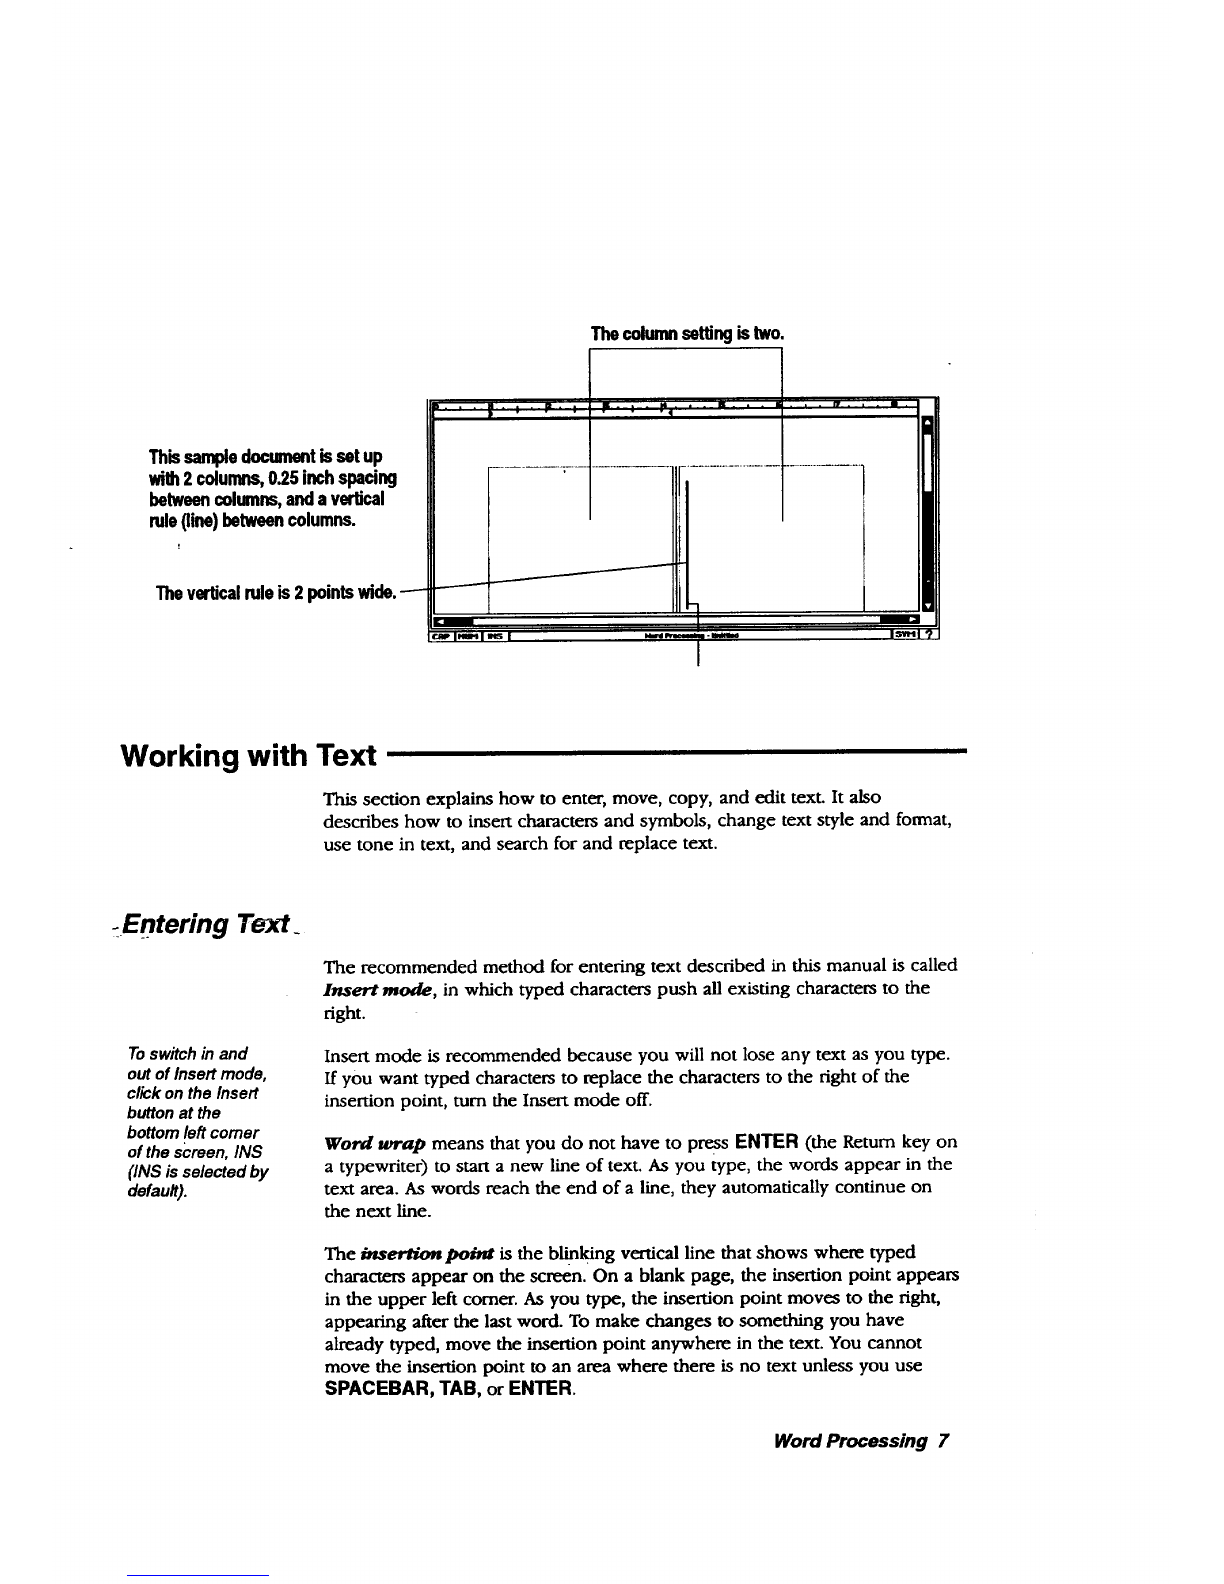
Thecolumnsettingistwo.
Thissampledocumentissetup
with2 columns,0.25inch spacing
betweencolumns,anda vertical
rule(line)betweencolumns.
Theverticalruleis2
Working with Text
This section explains how to enter, move, copy, and edit text. It also
describes how to insert characters and symbols, change text style and format,
use tone in text, and search for and replace text.
-Entering Text.
Toswitch in and
out of Insert mode,
click on the Insert
button at the
bottom left comer
of the screen, INS
(INS is selected by
default).
The recommended method for entering text described in this manual is called
Insert mode, in which typed characters push all existing characters to the
right.
Insert mode is recommended because you will not lose any text as you type.
If you want typed characters to replace the characters to the right of the
insertion point, turn the Insert mode off.
Word wrap means that you do not have to press ENTER (the Return key on
a typewriter) to start a new line of text. As you type, the words appear in the
text area. As words reach the end of a line, they automatically continue on
the next line.
The in.,erti.on poim is the b"linking vertical line that shows where typed
characters appear on the screen. On a blank page, the insertion point appears
in the upper left comer. As you type, the insertion point moves to the right,
appearing after the last word. To make changes to something you have
already typed, move the insertion point anywhere in the text. You cannot
move the insertion point to an area where there is no text unless you use
SPACEBAR, TAB, or ENTER.
Word Processing 7
!l_To go to another page:
You can also select a
page to go to from the
Basic Functions tool
bar.
Select Go to Page from the View menu. If your document has more than one
page, tbe page you select appears, lf your document begins on apage other
than I (you can set it up this way in Page Setup), Go to Page will still see the
first page as page 1.
Tosplit an existing
paragraph into two,
place the insertion
point where you
want the split and
press ENTER.
l_ To correct as you type:
Press BACKSPACE to erase characters to the lej_ of the insertion point.
OR
Press DELETE to erase characters to the right of the insertion point.
To start a new paragraph:
Press ENTER. The insertion point moves to the lej_ margin of the next line.
To place the insertion point M the text:
Position the insertion point in the text and press the Select button. You can
type in the text.
._, To select text:
-1. Move _inserti_-p-6in'_o the beginning of the word, line, or paragraph
you want to select.
2. Hold the Select button and drag across the text until what you want is
selected; then release the button.
OR
Click the Select button at the beginning of the text, hold down SHIFT,
and click at the end of the text.
Use these methods for selecting text: . o
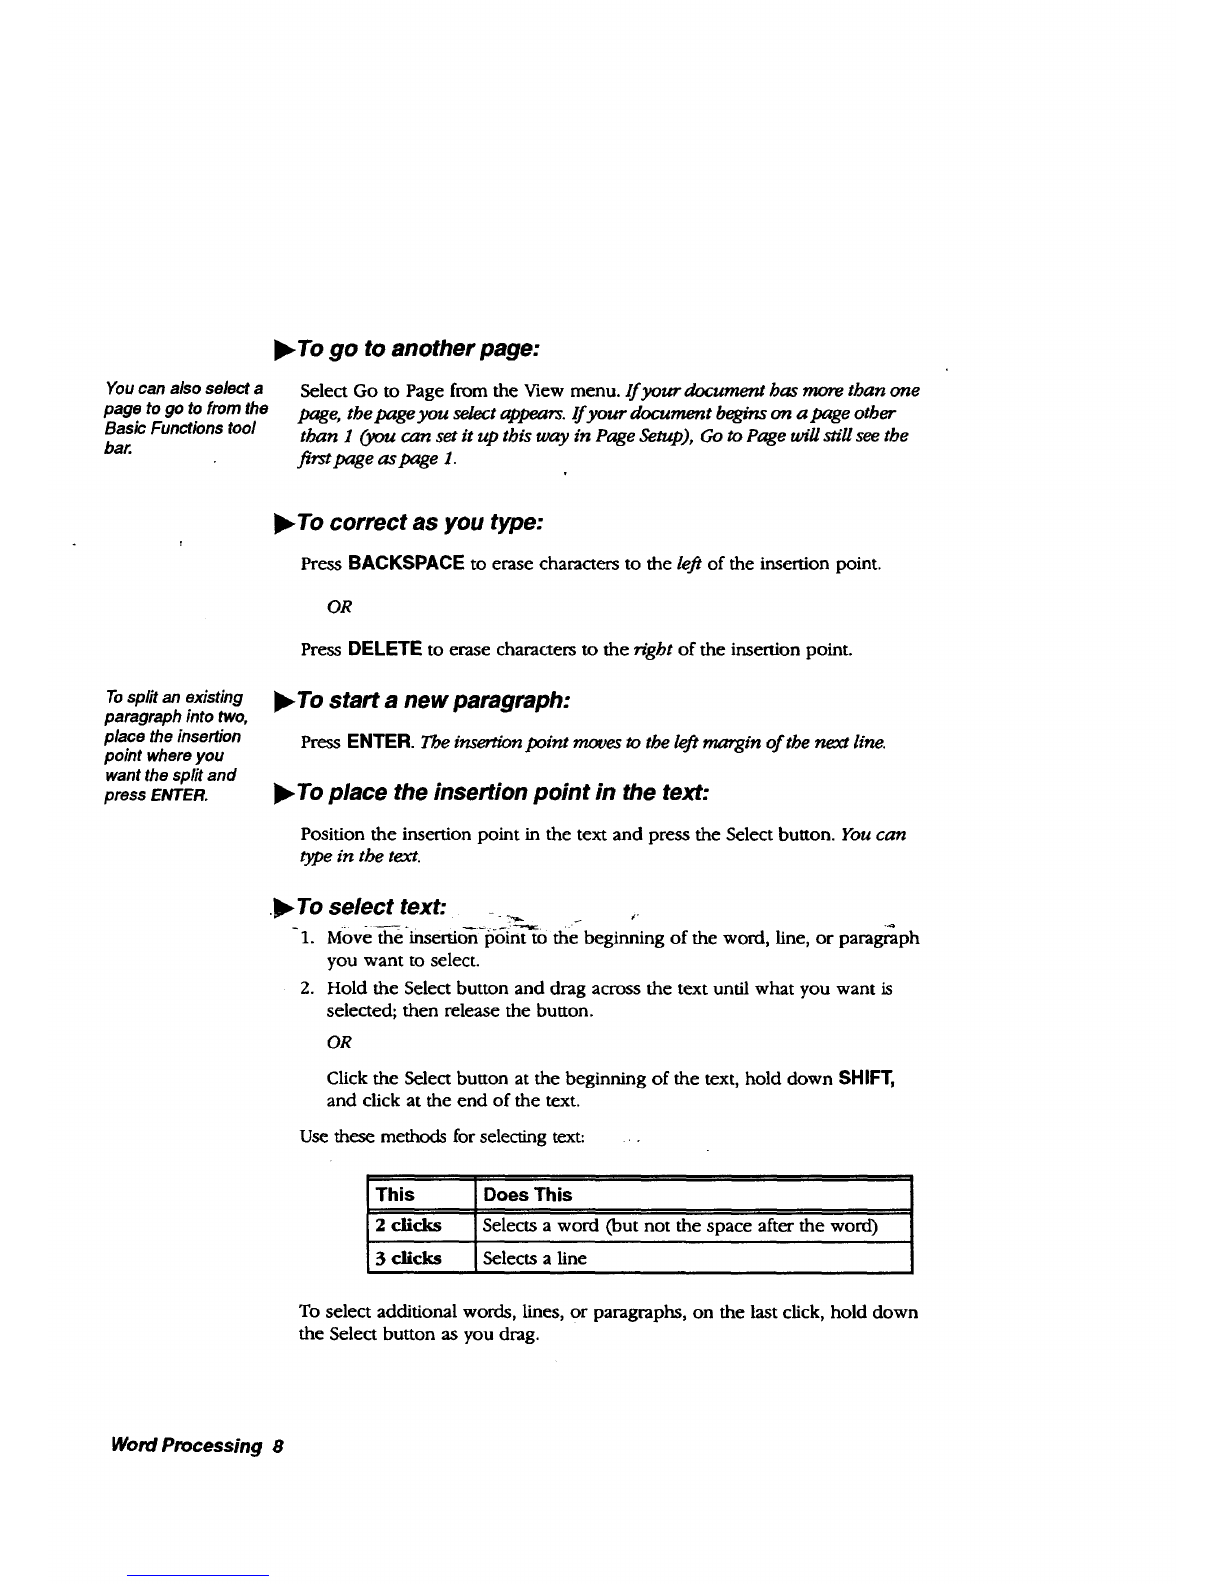
This Does This
2 clicks Selects a word (but not the space after the word)
3clicks Selects a line
To select additional words, lines, or paragraphs, on the last click, hold down
the Select button as you drag.
Word Processing 8
This manual suits for next models
1
Table of contents
Other Brother Laptop manuals


