manuals.online logo
Brands
  1. Home
  2. •
  3. Brands
  4. •
  5. Brother
  6. •
  7. Sewing Machine
  8. •
  9. Brother PR-620 Assembly instructions

Brother PR-620 Assembly instructions

Tips and Techniques on the PR-620
Techniques and Tips on the PR-620
Learn how to demonstrate the PR-620 and make it look as
easy as it really is. Topics to be covered will be: basic
operation, machine threading, screen icons, merging
patterns, using more than 6 colors in a single project and
much more. Be impressed at how swiftly you can transfer
designs from Brothers extensive library of cards or from the
computer/PE Design 8.0 software to the PR-620. Create
endless possibilities with the editing and copy function built
right into the machine.
Tips and Techniques on the PR-620
Machine Parts
Front View:
1. Thread tension knobs
2. Thread pin guide
3. Needle bar case
4. Carriage
5. Hook cover/hook
6. Thread guide assembly support
7. Spool stand
8. Operation panel
9. Feet
Side view:
1. USB type “A” (host) port connector
2. Embroidery card slot
Side/rear view:
3. Hand wheel
4. USB type “B” (function) port connector
5. Power supply plug
6. Main power switch
7. Ventilation slots
Operation panel:
1. Start/stop button
2. Thread trimming button
3. Automatic needle-threading button
4. LCD (touch panel)
Tips and Techniques on the PR-620
Opening screen
1. Settings key
2. Machine operations key
3. New Embroidery key
4. Help key
5. Pattern Display area
Threading the bobbin and inserting
the bobbin case into the hook
1. Insert the bobbin into the bobbin case
2. Pull the thread through the opening in the tension
adjusting spring
3. Insert bobbin case into machine and close cover
Use only prewound bobbin (“L” type/Polyester) or bobbins specifically
designed for this machine
Tips and Techniques on the PR-620
Threading the machine
The numbers indicate the thread path for each of the numbered needle
bars.
1. Place on spool pin 1 the spool of the thread with
the color specified for the needle bar 1
2. Pass the thread through the number 1 hole in
the thread guide and wind the thread clockwise
once around the thread tension disc.
3. Use thread guides etched on machine to follow
path for each thread.
4. Pass the thread through the slot on the thread
guide, and then through the hole in the number 1
lower thread guides.
Tips and Techniques on the PR-620
5. Use the included threader to pass the thread through the number 1
needle bar thread guide.
6. Repeat this process for each needle to be threaded.
Threading the needle
Note: A design should be loaded in order to thread the
needles.
1. Move the needle threader to proper needle by
selecting that thread color.
2. Press the automatic needle threading button.
The hook on the automatic needle threading
mechanism passes through the eye of the
needle.
3. Pull out about 6 inches of thread. Then, as shown
in the illustration, pull the thread through the fork
of the automatic needle threader from the right,
and then after pulling the thread through the guide
on the presser foot, pull the thread through the
thread cutter to cut it.
4. Press the automatic needle threading button.
5. Repeat for remaining needles.
Tips and Techniques on the PR-620
Hooping the fabric in the embroidery frame
Select an embroidery hoop to use. Be sure to use an
appropriate size frame for the size of embroidery that you
will be doing. If the embroidery frame that is used
is too large, the pattern may be misaligned or the
fabric may pucker.
1. Loosen the screw on the outer frame.
2. Place the fabric with the right side up on top of
the outer frame.
3. Press the inner frame onto the outer
frame. Be sure there are no wrinkles in
the fabric after it is streched in the
embroidery frame.
4. Lightly tighten the screw, and then pull the
edges of the fabric.
5. Securely tighten the screw, and then check that
the fabric is taut.
Tips and Techniques on the PR-620
6.Using the disk shaped screwdriver, firmly
tighten the screw.
Check the embroidery area
1. Touch , a message appears warning that the embroidery frame is
about to move, select .
2. Touch again. The corners of the octagon
showing the embroidery area for the pattern
are indicated by needle punch points.
3. Carefully watch the movement of the embroidery frame and check that
the embroidery frame does not hit the presser foot.
4. When the embroidery frame moves to the desired position, touch
again.
5. To continue moving the embroidery frame, touch . To stop checking
the embroidery area, touch .
Finding the sewing position
TIP: By locking the needle bar and presser foot in the down position,
the needle drop point can easily be easily seen.
1. Hold the needle clap that is at the sewing position, and
then fully lower the needle.
2. The needle and presser foot are locked into the down
position.
3. Touch the arrow keys in the embroidery settings screen to move the
embroidery frame so that the needle drop point is at
the center of the area you wish to embroider.
Tips and Techniques on the PR-620
4. Display the embroidery screen, and then
touch the key for any needle bar other than
the one that is locked and the
needle bar will unlock.
To transfer a design from the computer using the USB cable included with
the machine
1. Plug the USB cable connector into the corresponding
connectors on the computer and the USB port connector
on the machine.
2. After the “Removable Disk” folder appears in
the “My Computer” folder on the computer, the
connection is complete.
3. Move/copy the pattern data that you wish to recall
into the “Removable Disk” folder.
4. On the machine, touch and a list of patterns will be displayed.
To transfer a design from an Embroidery Card to the machine
1. With the side of the embroidery card marked with an arrow facing
towards you, fully insert the card into the embroidery card
slot on the right side of the operation panel.
2. Touch and a list of patterns on the embroidery card
apears.
3. Select desired pattern.
Tips and Techniques on the PR-620
To transfer a design from a USB device (purchased separately) to the
machine
1. With the front of USB drive facing towards you, fully
insert the stick into the right side of the operation panel.
A list of approved USB devices can be found on the
Brother web site under the updates.
2. Touch and a list of patterns will appear.
3. Select desired pattern.
Basic Operation/Quick Start
Tips and Techniques on the PR-620
Selecting an Embroidery Pattern and merging letters
Vario
us patterns, such as embroidery patterns, frame patterns, built in
designs and patterns on embroidery cards, can be easily combined.
1. To merge designs, select Built in designs on the operation panel.
2. Select the Birdhouse and SET.
3. Select .
4. Select the Built in Alphabets and touch .
5. Type in H, select size (medium).
6. Continue typing in the letters in upper and lower case o m e_T w e e
t_H o m e and select .
7. Select Array and .
8. Use button to move lettering above bird house. Touch and
9. Touch centering button to center design in hoop.
10. Check the design by selecting preview .
11. Select and change threads as needed.
12. Load fabric in suggested hoop and place on machine.
13. Press and start/stop button to start embroidery
Tips and Techniques on the PR-620
Create a repeating pattern
The entire pattern can be copied and repeated the specified number of
times. The pattern can be repeated a maximum of 30 times in both vertical
and horizontal directions with in the embroidery area.
1. Using the
Brother 73
(Asian) card,
insert card
into the card
slot.
2. Select on the operation panel.
3. Select , touch , and .
4. Touch four times. Each time you press this button, it will add
another design.
5. Select and to finish design.
6. Change threads accordingly and stitch out design.
Changing the Thread Spools with Designs of seven or More Colors
The spool change indicator in the navigation screen indicates the
number of times that the thread spools will need to be changed. When it is
time for a thread change, the machine signals with Change thread
1. The needle bars where the thread spools must be
changed appear in color.
2. The needle bars where it is not necessary to change
colors appear in gray.
3. Touch the key to store the current thread change.
Tips and Techniques on the PR-620
Changing colors of a pattern
1. In the Operation panel, select , the letter R
and .
2. Touch . The thread change color screen
appears.
1. The part of the pattern in the color at the top of the thread color
sequence is displayed
2. Shows the number of thread changes
3. Selects the previous color in the thread color sequence display
4. Selects the next color in the thread color sequence display
5. Use these keys to select a color from the color chart
6. Applies the color change
7. Color thread chart
8. Specifies pause locations
9. Touch this key to close screen
10. Name of the thread chart in use
3. Touch and until the color to be
changed appears at the top of the thread color
sequence display (the thread color for the part of
the pattern displayed at the top will be changed).
For this sample, change the letter R coloring.
4. Touch and to select the new color from the color
palette. Change color to 328.
5. When changes are complete, touch .
Tips and Techniques on the PR-620
Specify pause locations before embroidering
1. Pause locations can be specified in the thread color change screen.
2. Touch in the pattern editing screen or the embroidery settings
screen.
3. Touch and so that the color at the top of the thread color
sequence display is the color where you wish to stop the machine before
sewing it.
4. Touch and the mark will appear where you have designated
a stop.
5. After specifying the desired stops, press .
Temporary Needle Bar Settings
1. After embroidery begins, the machine can be stopped at a color change
and a different needle bar can be specified for the next color to be sewn
2. While sewing the color before the one that you wish
to change, touch . After the color being sewn
is finished, the threads are trimmed and the
machine stops.
3. Touch .
4. Touch the key for the needle bar threaded
with the color that you wish to embroider with.
5. Touch and the embroidery screen apears again.
6. Press and the Start/Stop button and Embroidery will continue
with the selected replacement color.
Tips and Techniques on the PR-620
Setting a lock stitch between each color
Lock stitches can be sewn at the beginning of the pattern, the beginning of
sewing each thread color change and at the beginning of sewing after the thread
trim.
1. Touch to set the lock stitch.
If the first stitch length is less than 0.8 mm, the lock stitch won’t be
inserted
The automatic lock stitch setting stays the same until the key is
touched to turn it off.
Starting/Ending Position Settings
1. Touch and the Start/Ending position
screen appears. Select point for starting.
2. Select ending point.
3. Select
Changing the size of a pattern
The size of a pattern can be increased or decreased to between 90% and 120% of
its original size.
1. Touch . touch to decrease size or to increase the size.
2. Touching any one of these 4 symbols will adjust the
size vertically or horizontally, larger or smaller.
3. After making the desired changes, touch and the editing screen
appears again.
Tips and Techniques on the PR-620
Tips and hints for the PR620
1. You must place the hoop on the machine, turn on the machine and then
select your design for proper centering within the desired hoop. If you
choose to "resume" a design with a different size hoop, it will not be
centered correctly.
2. You can also select . This will cancel all operations previously
performed and returns to the initial patter group selection screen.
3. Decrease the sewing speed when sewing on thick, thin or heavy fabrics.
4. The sewing speed can be changed while the machine is embroidering.
5. Decrease the sewing machine speed when using metallic threads.
6. Up to 100 patterns can be combined and saved to the machine as long as
it doesn’t exceed 500 colors.
7. Stabilizers are important. Be sure to use the right stabilizer or backing
for the right job. In addition, some fabrics such as toweling or corduroy
will require a topping. Take into consideration the fabric, thread and
stitch count. Refer to pages 165 of the manual for a bit about stabilizers
and page167 to see the stabilizer/fabric compatibility chart.
8. Hooping techniques: Use the right tool for the right job. The wrong size
of embroidery hoop may result in poor design alignment. Try to use the
hoop suggested by the machine. Refer to page 166 of the manual.

Other manuals for PR-620
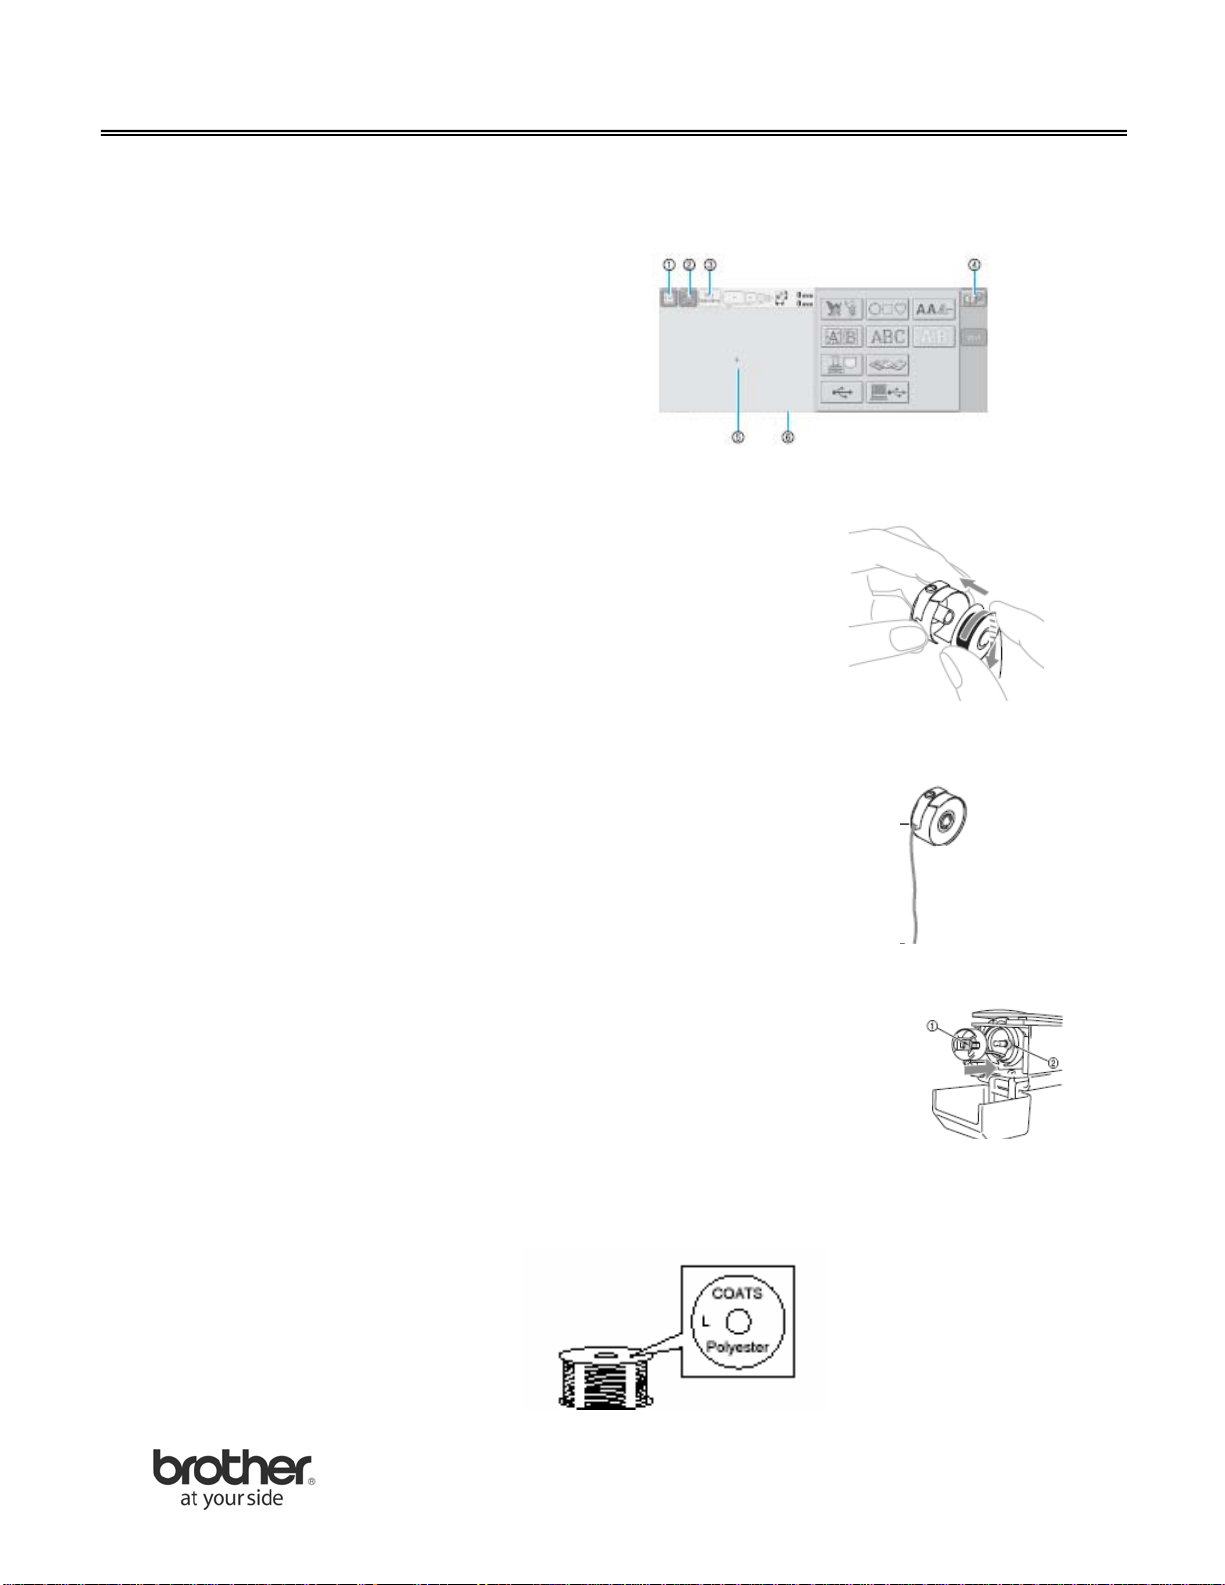
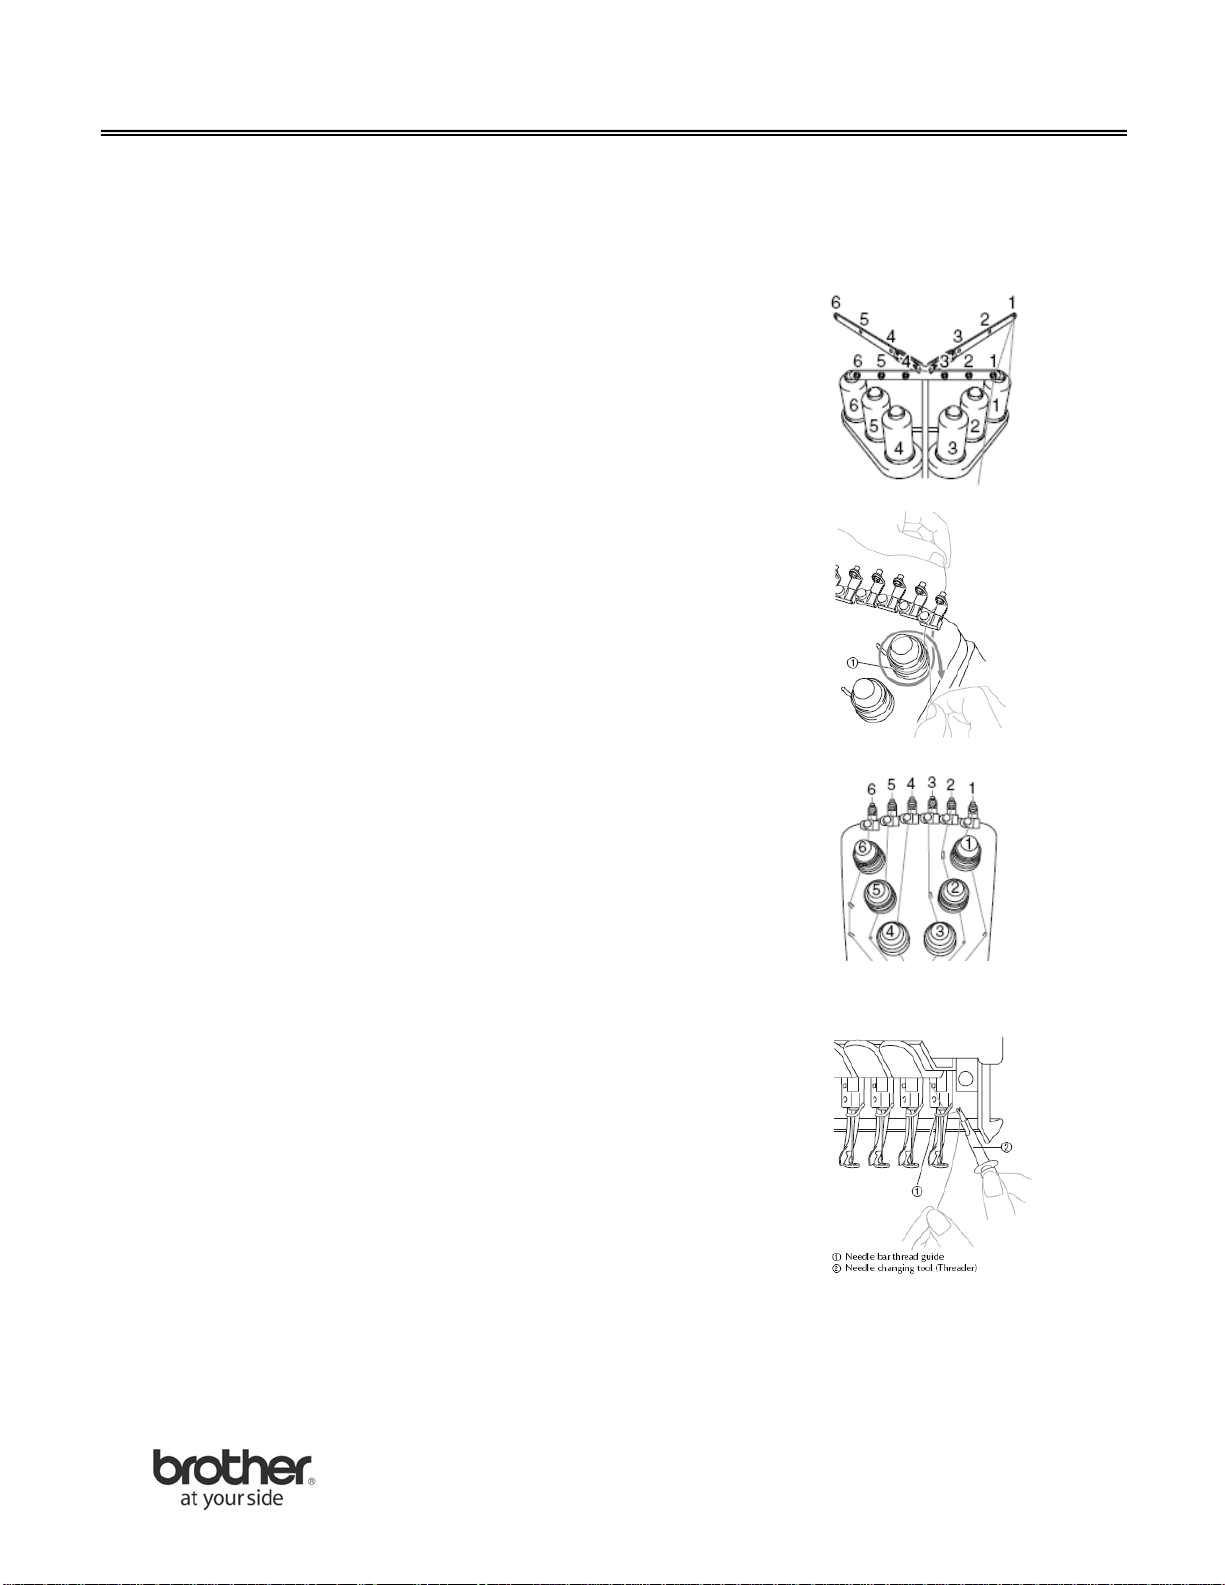
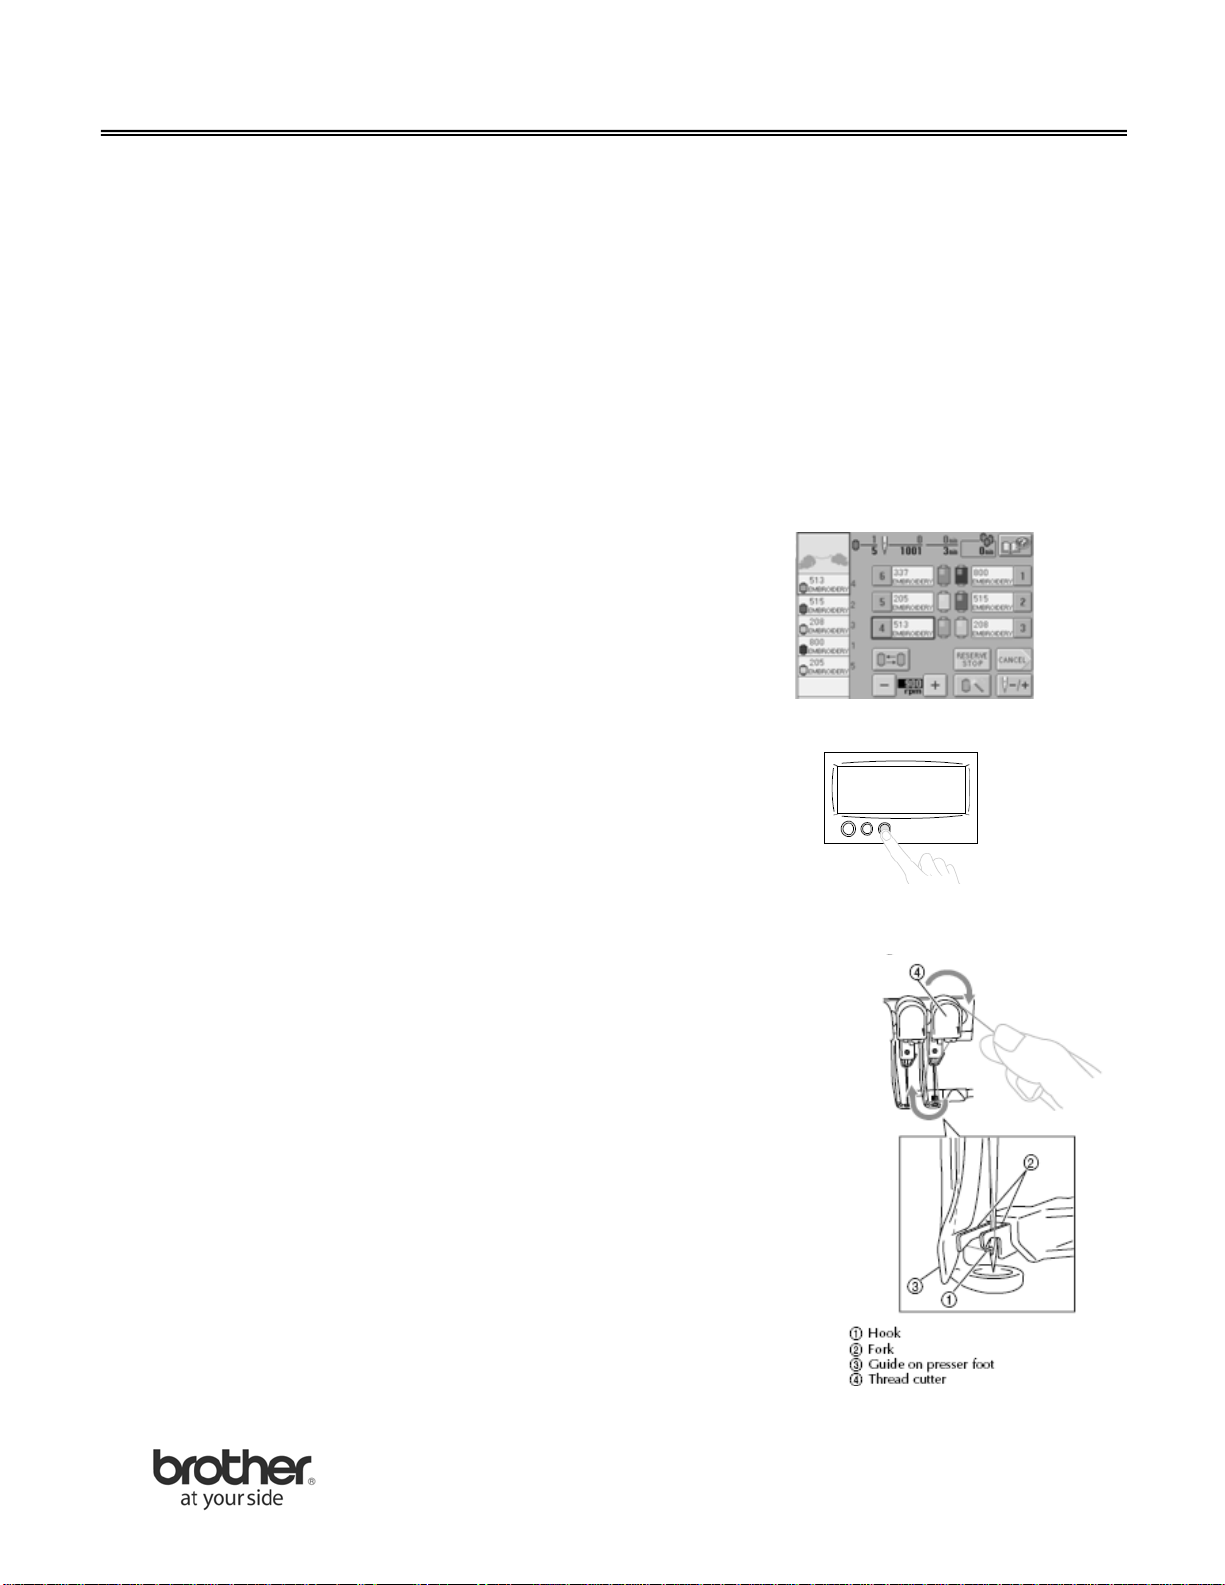
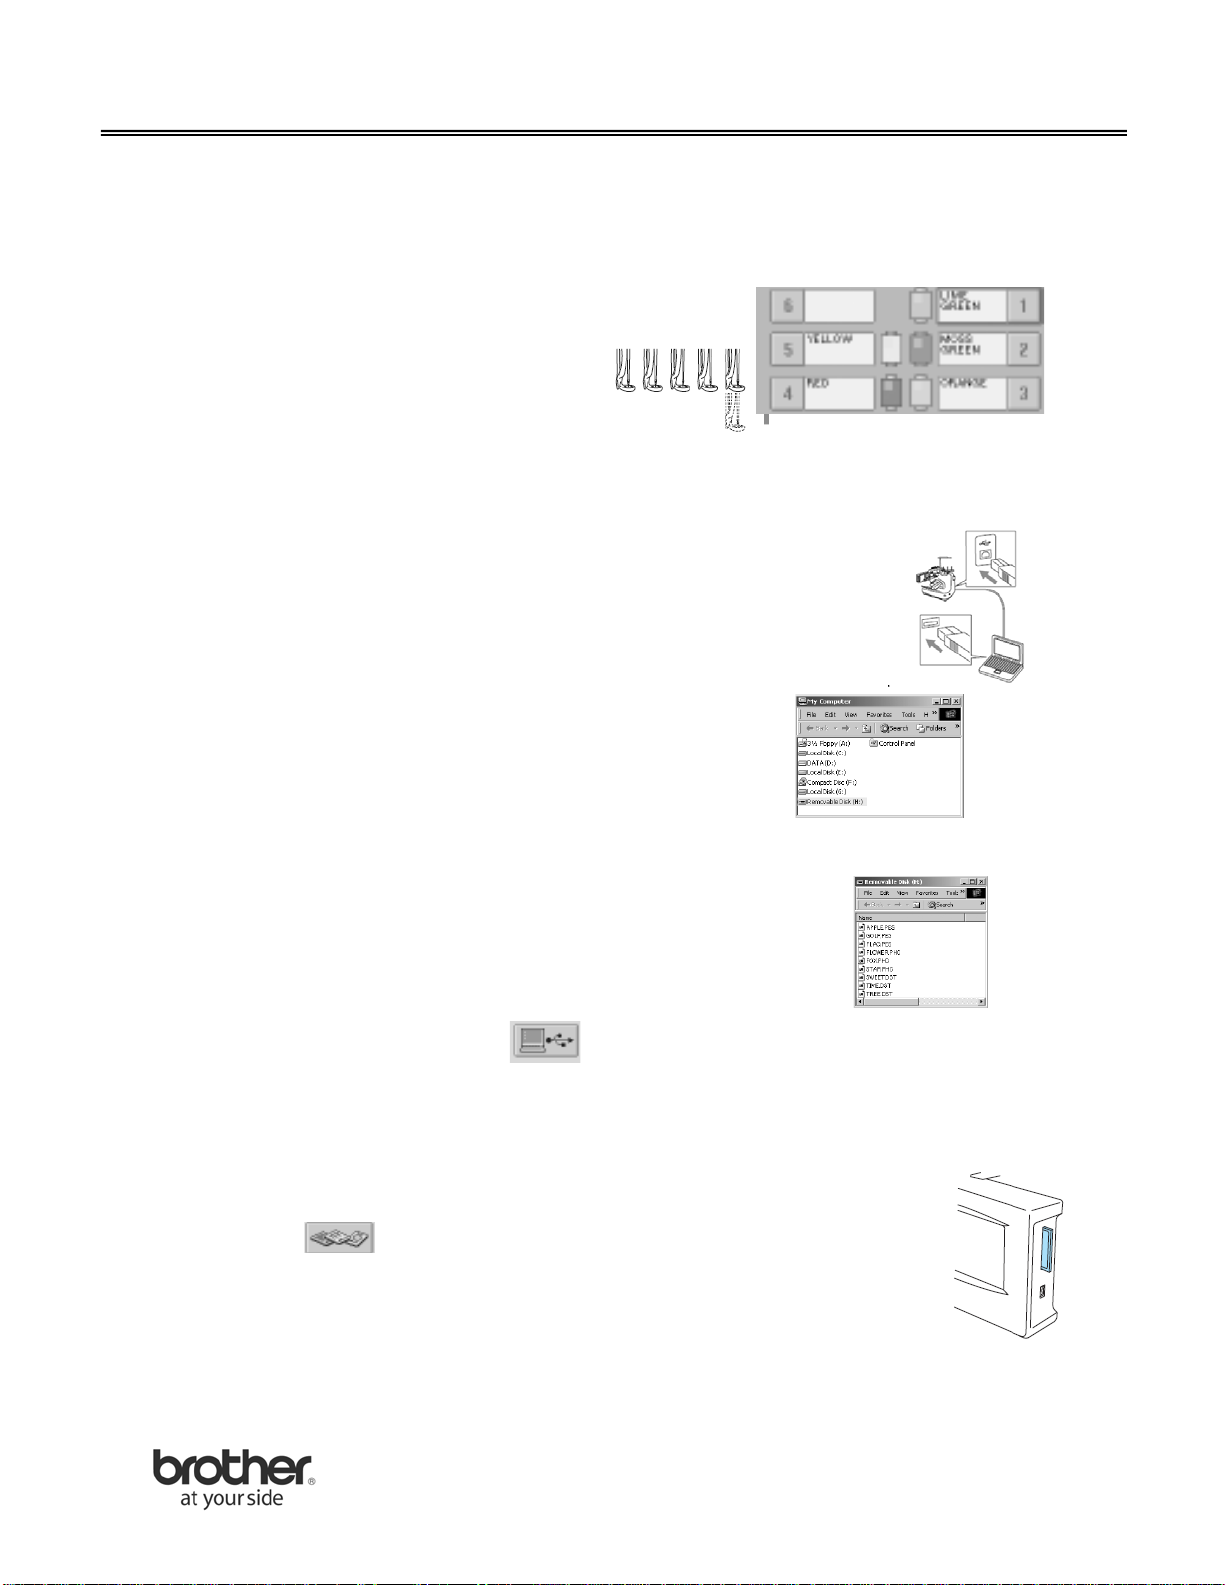
4

Other Brother Sewing Machine manuals

Brother Computerized Embroidery Sewing Machine User manual

Brother

Brother Computerized Embroidery Sewing Machine User manual

Brother 882-W07 Quick start guide

Brother

Brother 882-W07 Quick start guide

Brother EF4-B561 User manual

Brother

Brother EF4-B561 User manual

Brother BE-0901E-AC Installation manual

Brother

Brother BE-0901E-AC Installation manual

Brother X L 2010 User manual

Brother

Brother X L 2010 User manual

Brother BAS-6150 User manual

Brother

Brother BAS-6150 User manual

Brother PS-300B User manual

Brother

Brother PS-300B User manual

Brother PC8200 SUPER GALAXIE 2000 User manual

Brother

Brother PC8200 SUPER GALAXIE 2000 User manual

Brother BES-1240 User manual

Brother

Brother BES-1240 User manual

Brother Quattro 2 6700D User manual

Brother

Brother Quattro 2 6700D User manual

Brother BAS-342G PS User manual

Brother

Brother BAS-342G PS User manual

Brother PC-6000 User manual

Brother

Brother PC-6000 User manual

Brother Electroknit KH-910 User manual

Brother

Brother Electroknit KH-910 User manual

Brother PR-600 User manual

Brother

Brother PR-600 User manual

Brother Sewing Machine User manual

Brother

Brother Sewing Machine User manual

Brother JA1450NT User manual

Brother

Brother JA1450NT User manual

Brother Computerized Embroidery Sewing Machine User manual

Brother

Brother Computerized Embroidery Sewing Machine User manual

Brother RH-9820 User manual

Brother

Brother RH-9820 User manual

Brother 888-X01 User manual

Brother

Brother 888-X01 User manual

Brother Innov-is 2800D User manual

Brother

Brother Innov-is 2800D User manual

Brother NX-450 Mounting instructions

Brother

Brother NX-450 Mounting instructions

Brother LS-1717 User manual

Brother

Brother LS-1717 User manual

Brother BAS-511 User manual

Brother

Brother BAS-511 User manual

Brother LT5-P13 User manual

Brother

Brother LT5-P13 User manual

Popular Sewing Machine manuals by other brands

DURKOPP ADLER 8967 operating instructions

DURKOPP ADLER

DURKOPP ADLER 8967 operating instructions

iSP 406 owner's manual

iSP

iSP 406 owner's manual

Singer 6408 parts list

Singer

Singer 6408 parts list

Texi 781 SERVO Operation manual

Texi

Texi 781 SERVO Operation manual

JUKI MO-102 Instruction book

JUKI

JUKI MO-102 Instruction book

Pfaff 60 instructions

Pfaff

Pfaff 60 instructions

Singer 149-4 parts list

Singer

Singer 149-4 parts list

Pfaff hobby 4240 Instructions for use

Pfaff

Pfaff hobby 4240 Instructions for use

FISCHBEIN Empress Series Operator's manual

FISCHBEIN

FISCHBEIN Empress Series Operator's manual

Pfaff 335 instruction manual

Pfaff

Pfaff 335 instruction manual

Pfaff Sewing Machine maintenance

Pfaff

Pfaff Sewing Machine maintenance

Unicorn LT5-H710-1 Operation manual

Unicorn

Unicorn LT5-H710-1 Operation manual

Janome Decor Excel 5018 Instruction book

Janome

Janome Decor Excel 5018 Instruction book

Singer 457 G 103 Illustrated parts list

Singer

Singer 457 G 103 Illustrated parts list

Husqvarna VIKING Amber Air S 600 user guide

Husqvarna

Husqvarna VIKING Amber Air S 600 user guide

Singer CONFIDENCE 7465 Features

Singer

Singer CONFIDENCE 7465 Features

artisan 1798-1 AZ instruction manual

artisan

artisan 1798-1 AZ instruction manual

Pfaff electronic 6250 Instruction book

Pfaff

Pfaff electronic 6250 Instruction book

manuals.online logo
manuals.online logoBrands
  • About & Mission
  • Contact us
  • Privacy Policy
  • Terms and Conditions

Copyright 2025 Manuals.Online. All Rights Reserved.