Browan BW1257 User manual

Page 1 of 28
USER GUIDE
Model : BW1257
Tri-Band Wi-Fi AC3000 Indoor Access Point
V1.1

Page 2 of 28
Copyright
© 2002-2019 BROWAN COMMUNICATIONS.
This USER GUIDE is copyrighted with all rights reserved. No part of this publication may be
reproduced, transmitted, transcribed, stored in a retrieval system, or translated into any language in
any form by any means without the written permission of BROWAN.
Notice
BROWAN reserves the right to change specifications without prior notice.
While the information in this document has been compiled with great care, it may not be deemed an
assurance of product characteristics. BROWAN shall be liable only to the degree specified in the
terms of sale and delivery.
The reproduction and distribution of the documentation and software supplied with this product and
the use of its contents is subject to written authorization from BROWAN.
Trademarks
The product described in this book is a licensed product of BROWAN.
Microsoft, Windows 95, Windows 98, Windows Millennium, Windows NT, Windows 2000, Windows
XP, Windows 7,and MS-DOS are registered trademarks of the Microsoft Corporation.
Novell is a registered trademark of Novell, Inc.
MacOS is a registered trademark of Apple Computer, Inc.
Java is a trademark of Sun Microsystems, Inc.
Wi-Fi is a registered trademark of Wi-Fi Alliance.
All other brand and product names are trademarks or registered trademarks of their respective
holders.

Page 3 of 28
Federal Communication Commission Interference Statement
This equipment has been tested and found to comply with the limits for a Class B
digital device, pursuant to Part 15 of the FCC Rules. These limits are designed to
provide reasonable protection against harmful interference in a residential installation.
This equipment generates, uses and can radiate radio frequency energy and, if not
installed and used in accordance with the instructions, may cause harmful
interference to radio communications. However, there is no guarantee that
interference will not occur in a particular installation. If this equipment does cause
harmful interference to radio or television reception, which can be determined by
turning the equipment off and on, the user is encouraged to try to correct the
interference by one of the following measures:
- Reorient or relocate the receiving antenna.
- Increase the separation between the equipment and receiver.
- Connect the equipment into an outlet on a circuit different from that to
which the receiver is connected.
- Consult the dealer or an experienced radio/TV technician for help.
FCC Caution: Any changes or modifications not expressly approved by the party
responsible for compliance could void the user's authority to operate this equipment.
This device complies with Part 15 of the FCC Rules. Operation is subject to the
following two conditions: (1) This device may not cause harmful interference, and (2)
this device must accept any interference received, including interference that may
cause undesired operation.
IMPORTANT NOTE:
Radiation Exposure Statement:
This equipment complies with FCC radiation exposure limits set forth for an
uncontrolled environment. This equipment should be installed and operated with
minimum distance 23cm between the radiator & your body.
This transmitter must not be co-located or operating in conjunction with any other
antenna or transmitter.
Country Code selection feature to be disabled for products marketed to the
US/CANADA
Operation of this device is restricted to indoor use only.

BW1257 User Guide
Page 4 of 28
Copyright.............................................................................................................................................2
Notice ..................................................................................................................................................2
Trademarks .........................................................................................................................................2
Federal Communication Commission Interference Statement ...........................................................3
CONTENTS ............................................................................................................................................4
ABOUT THIS GUIDE..............................................................................................................................5
Purpose...............................................................................................................................................5
Prerequisite Skills and Knowledge......................................................................................................5
Conventions Used in this Document...................................................................................................5
CHAPTER 1 – INTRODUCTION............................................................................................................6
Features Highlight...............................................................................................................................6
CHAPTER 2 – HARDWARE INTRODUCTION......................................................................................7
Package..............................................................................................................................................7
Hardware and LED Indication..........................................................................................................7
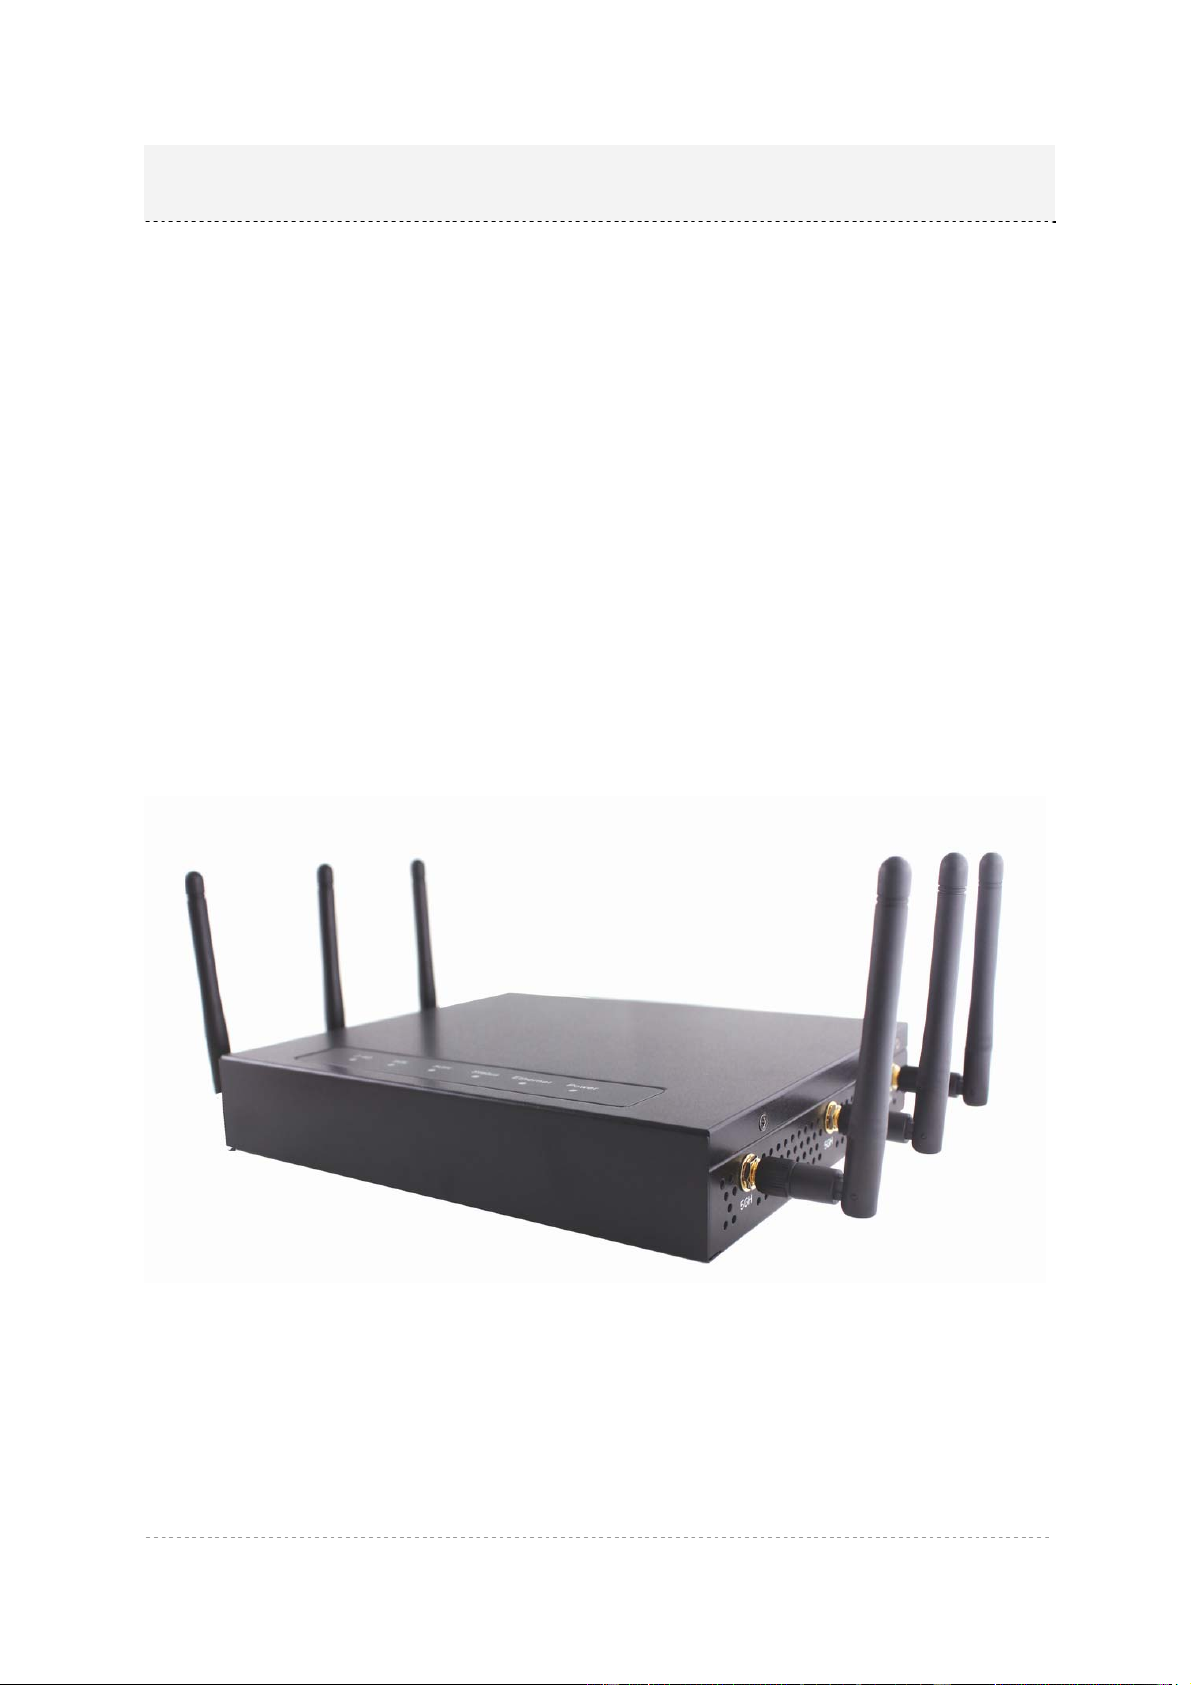
General Overview............................................................................................................................7
Front panel.......................................................................................................................................8
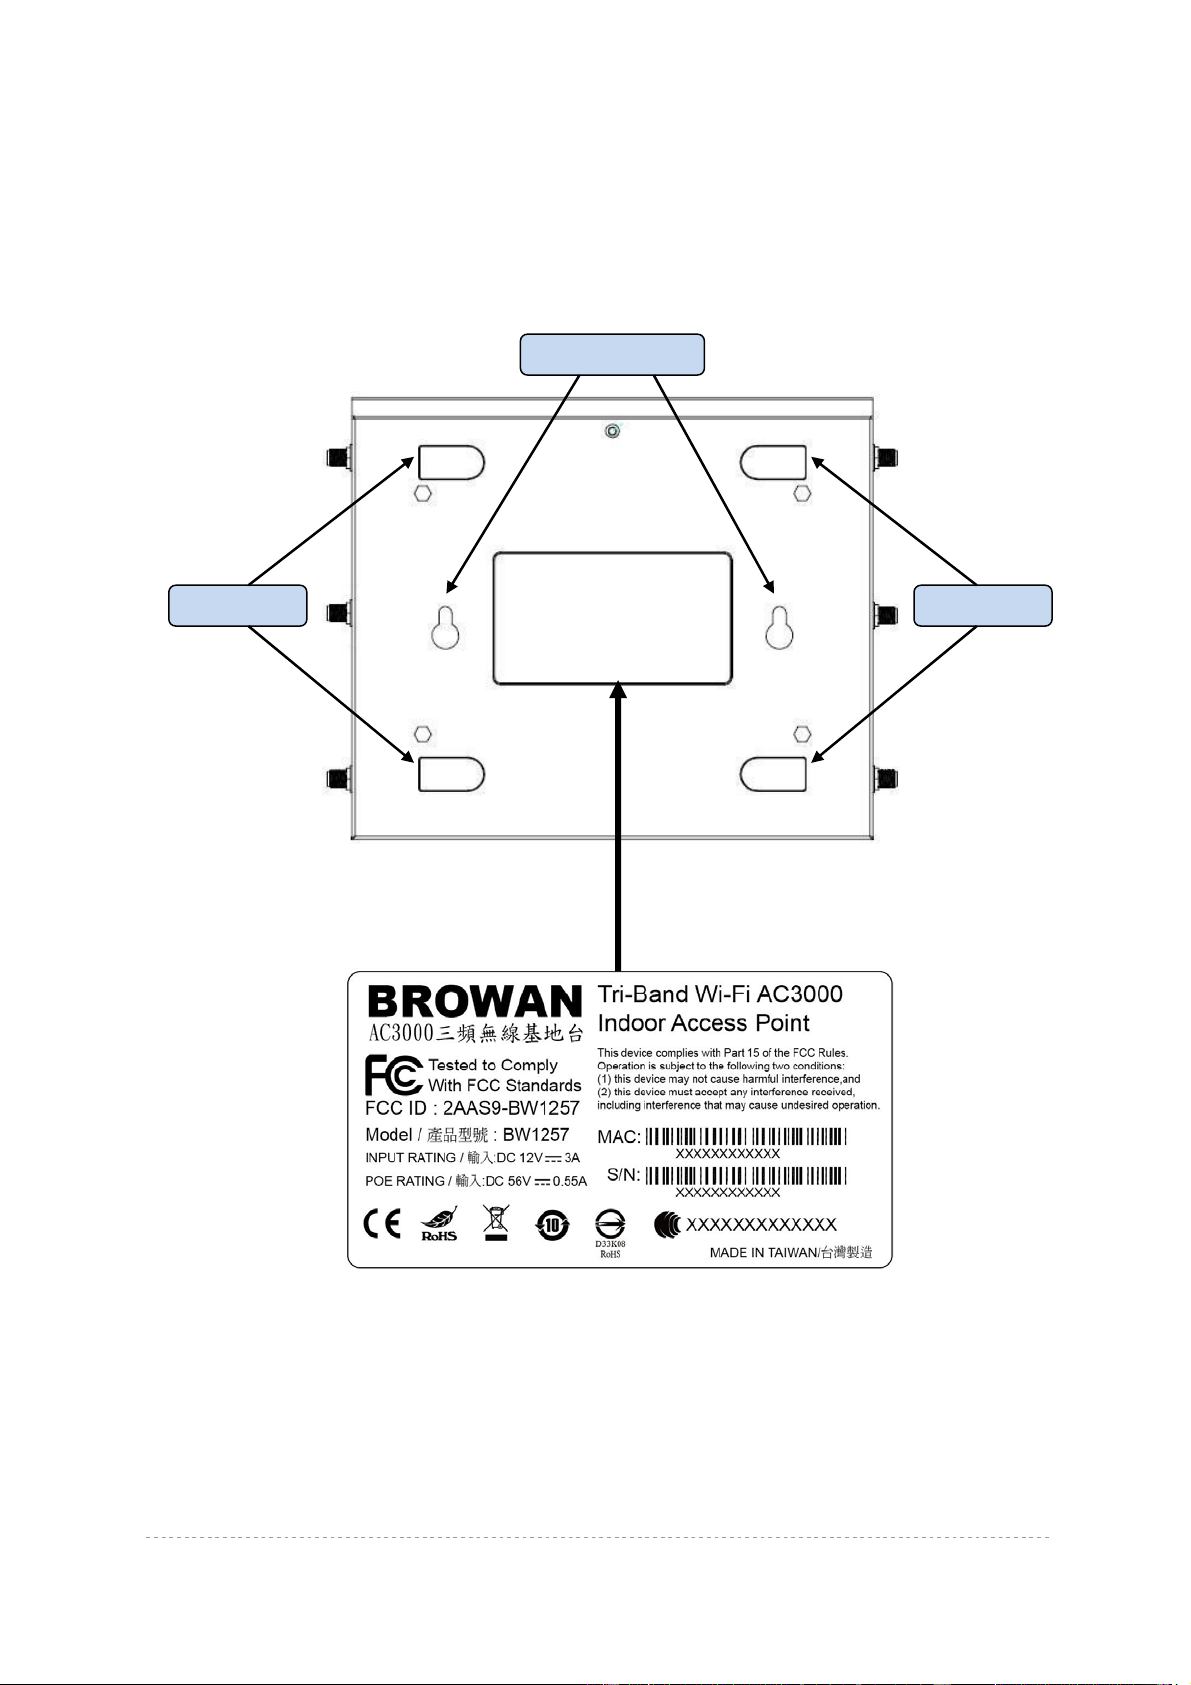
Bottom Cover...................................................................................................................................9
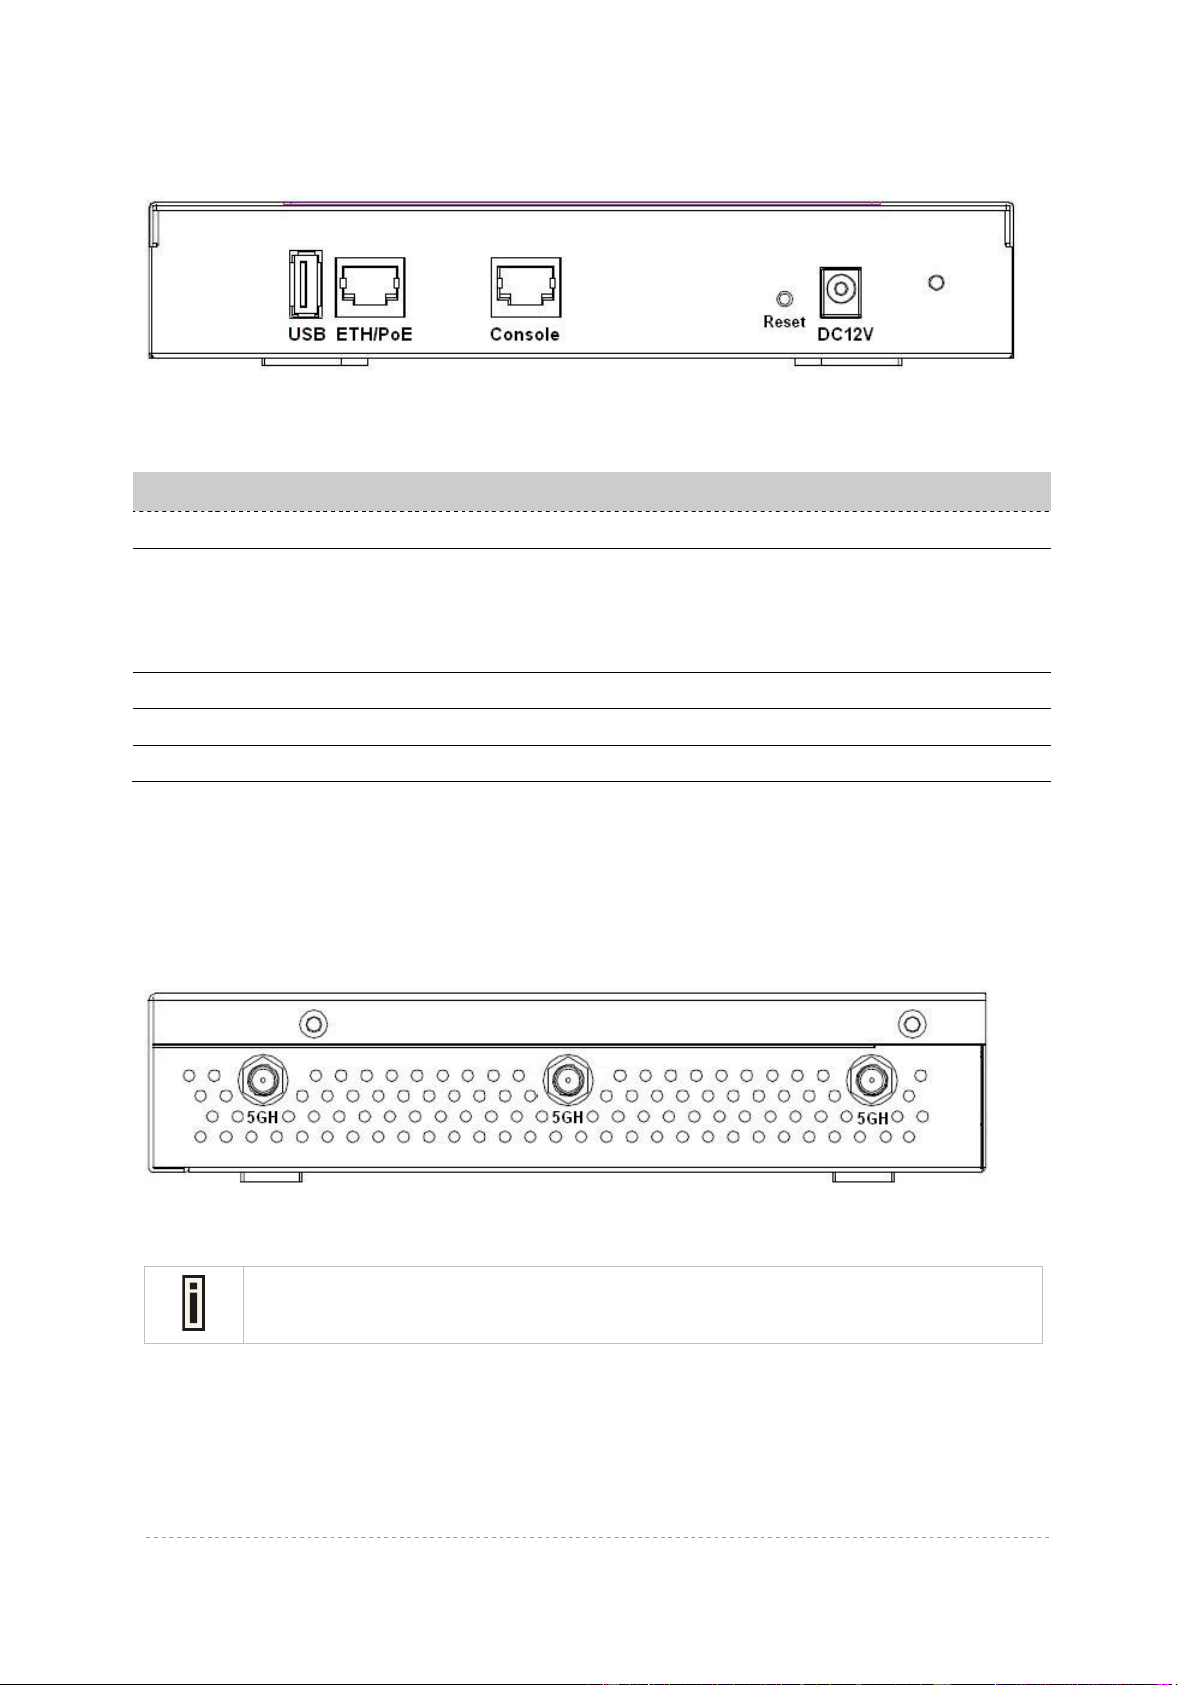
Rear panel .....................................................................................................................................10
Right side:......................................................................................................................................10
Left side: ........................................................................................................................................10
CHAPTER 3 – REFERENCE MANUAL...............................................................................................12
How to Log In...................................................................................................................................12
Quick Setup .....................................................................................................................................13
Device Management........................................................................................................................16
System Status ...................................................................................................................................17
System Status | Operating Status..................................................................................................17
System Status | System Setting ....................................................................................................18
System Status | Runtime Traffic....................................................................................................19
Device Setting...................................................................................................................................20
Device Setting | Wireless Setting...................................................................................................20
Device Setting | Ethernet Setting...................................................................................................24
Device Setting | Advance Setting ..................................................................................................26
Connected Devices...........................................................................................................................27
Account..............................................................................................................................................28
Contents

BW1257 User Guide
Page 5 of 28
Purpose
This document provides information and procedures on hardware installation, setup,
configuration, and management of the high performance Indoor Access Point
BW1257.
Prerequisite Skills and Knowledge
To use this document effectively, you should have a working knowledge of Local
Area Networking (LAN) concepts and wireless Internet access infrastructures. In
addition, you should be familiar with the following:
Hardware installers should have a working knowledge of basic electronics and
mechanical assembly, and should understand related local building codes.
Network administrators should have a solid understanding of software installation
procedures for network operating systems under Microsoft Windows 95, 98,
Millennium, 2000, NT, and Windows XP and general networking operations and
troubleshooting knowledge.
.
Conventions Used in this Document
The following typographic conventions and symbols are used throughout this
document:
Very important information. Failure to observe this may result in
damage.
Important information that should be observed.
Additional information that may be helpful but not required.
bold Menu commands, buttons and input fields are displayed in bold
code File names, directory names, form names, and system-generated
output such as error messages are displayed in constant-width type
<value> Placeholder for certain values, e.g. user inputs
[value] Bracket for field format, limitations, and/or restrictions
About This Guide

BW1257 User Guide
Page 6 of 28
Thank you for choosing the Indoor Access Point BW1257.
The BW1257 supports Tri-Band technology, establishing simultaneous connections
with 2.4GHz, 5GHz Band 1, and 5GHz Band 4 wireless network frequencies, and is
fully compliant with the 802.11a/b/g/n and 802.11 ac Wi-Fi standard. It is a high
performance WiFi Access Point, providing high-speed data rate (Tri-Band having a
maximum speed of 3000Mbps in total), high reliability, security, and feature rich
software functionalities, suitable for places such as small and medium business
enterprises, popular hotspots, and public spaces.
With the use of three independent wireless modules, wireless applications may
expand its flexibility, interference to devices are significantly reduced, and greater
signal coverage can be achieved.
Features Highlight
zSupports IEEE802.11a/b/g/n and 11ac Wi-Fi standard
zTri-Band 2.4GHz, 5GHz Band 1, and 5GHz Band 4 working simultaneously
zSupports up to 16 BSSID – “Virtual AP” for each WiFi radio
zLayer2 Isolation for Peer to Peer client access protection
zMAC Access Control List (ACL)
zVLAN tag per SSID
zAnti-Interference with Dynamic Channel Allocation (DCA)
zHidden SSID to block unauthorized access
zUser limitation for radio connection
zSupport wireless encryption : WEP, WPA2-PSK, WPA/WPA2-PSK, WPA2-
Enterprise, WPA/WPA2-Enterprise
zCompliant with 802.3at PoE(Power-over-Ethernet)
zNTP for clock Synchronization
zGRE Client for VPN
zAdjacent access point scanning
zAnti-DDOS attack
zSupports TR-069 protocol.( CPE WAN Management Protocol)
zAP Reboot/Reset to factory default
zFirmware upgrade via management GUI
Chapter 1 – Introduction

BW1257 User Guide
Page 7 of 28
This chapter provides the hardware introduction and package contents of Access
Point BW1257.
Product Package
Hardware Introduction (Outlook, LEDs, Connectors)
Package
The product package contains:
Access Point (BW1257, 1 unit)
Antennas (Dual-band Dipole Antennas with RP-SMA connector, 6 units)
Ethernet patch cable (Cat5 UTP, 1 unit)
External power supply (Output: 12VDC/3A, 1 unit)
Hardware and LED Indication
General Overview
Figure 1 – General Overview
Chapter 2 – Hardware Introduction

BW1257 User Guide
Page 8 of 28
Front panel
There are six indicator lights (LEDs) on the front panel that show the status of
various networking and connection operations.
Figure 2 – LED Indicator Lights
LED Indicator Lights
LED Indication
Power Solid Green: Unit powered-on and operating
Off : Unit powered-off
Ethernet Solid Green : Network speed of 1000Mbps
Solid Red-Amber : Network speed of 10/100Mbps
Flashing : Transmitting data
Off : Powered-off or Ethernet connection is unavailable
Status Solid Green : Unit powered-on and operating
Flashing : Upgrading AP firmware
5GH Solid Green : Radio enabled and operating
Flashing : Transmitting data
Off : Powered-off or Radio disabled
5GL Solid Green : Radio enabled and operating
Flashing : Transmitting data
Off : Powered-off or Radio disabled
2.4G Solid Green : Radio enabled and operating
Flashing : Transmitting data
Off : Powered-off or Radio disabled
Table 1 – LED Indication

BW1257 User Guide
Page 9 of 28
Bottom Cover
The Bottom Cover of the BW1257 consists of the following items:
1. Back Label with MAC address, S/N, model name, certification…etc.
2. Rubber Feet
3. Wall mount holes
Figure 3 – Bottom Cover
Back Label
Wall mount hole
Rubber foo
t
Rubber foo
t

BW1257 User Guide
Page 10 of 28
Rear panel
Figure 4 – Rear Panel I/O Port
A list of the ports and buttons are explained in the following table:
Table 2 – BW1257 Ports
Right side:
Three separate RP-SMA antenna ports for 5GHz High Band. (5GH)
Figure 5 – SMA Antennas Ports (5GH)
The antennas included in the package are 2.4G/5G Dual Band Omni-
Directional Antennas.
Left side:
Three separate RP-SMA antenna ports -------- Two for 2.4GHz and 5GHz Low Band
(2G/5GL). Another one is for 5G High Band and Bluetooth (5GH/BT).
Item Connector Description
1 DC12V For power supply 12V DC input
2 Reset Button to Reboot or Reset device
Press reset button to reboot device, or keep
pressing for more than 7 seconds to restore
factory default configuration.
3 Console For console connection(RJ-45 interface)
4 ETH/PoE RJ-45 Ethernet port and PoE power supply.
5 USB USB 2.0 interface(reserved)

BW1257 User Guide
Page 11 of 28
Figure 6 – SMA Antenna Ports(2G/5GL, 5GH/BT)
The antennas included in the package are 2.4G/5G Dual Band Omni-
Directional Antennas.

BW1257 User Guide
Page 12 of 28
This chapter describes how BW1257 is configured via Web Interface.
How to Log In
1. Use the enclosed Ethernet patch cable to connect the ETH port of the Access
Point to your laptop/PC.
2. Configure your laptop/PC network as follows:
IP address: 192.168.2.10
Netmask: 255.255.255.0
Gateway: 192.168.2.2
3. Open browser (eg. IE, Chrome)
4. Enter Access Point IP address in the browser (http://192.168.2.2) to log into the
system.
5. The default administrator user name and password are as follows:
Administrator: admin
Password: admin01
Figure 7 – Log Into AP Web Interface
BW1257 can accept power from either DC12V or PoE (Power-over-
Ethernet) according to 802.3at standard. The maximum power
consumption is 25 watts.
The default network is DHCP client. BW1257 has another fixed IP
address of 192.168.2.2 for management purposes.
Chapter 3 – Reference Manual

BW1257 User Guide
Page 13 of 28
Quick Setup
A Quick Setup Wizard for IP configuration will pop-up after logging into the system.
You can follow the step-by-step configuration guide as displayed or simply skip the
process by clicking “Cancel”.
The Quick Setup Wizard will display the current network status after
logging into the system.
Figure 8 – Quick Setup
Custom DNS: The system allows you to configure Custom DNS Servers under
DHCP client mode. You can manually input two Custom DNS Servers by placing a
check next to the “Custom DNS” item, two blank fields will be displayed underneath
for manual input. You may also choose to apply default DNS Servers automatically
by selecting the “Use recommended DNS” option on the lower right-hand area of
the window.

BW1257 User Guide
Page 14 of 28
Figure 9 – Configure DNS Server
Static IP: You may set Static IP manually by clicking the “DHCP” button, associated
parameter fields will be displayed underneath accordingly. Fill in the network
parameter as follows.

BW1257 User Guide
Page 15 of 28
Figure 10 – configure static IP
IP: IP address of device
Netmask: IP address class. To divide an IP address into subnets and specify the
network's available hosts
Gateway: IP address of the network node that connects two networks
Primary DNS: IP address of the Primary Domain Name Service
Secondary DNS: IP address of the Secondary Domain Name Service
Click “Save” to confirm the setup.
Once confirmed, the Setup will take effect immediately without having to
reboot the device.

BW1257 User Guide
Page 16 of 28
Device Management
After logging into the Web interface, you may see main menu tabs displayed in the top
banner as follows:
-System Status
-Device Setting
-Connected Devices
-Account
Figure 11 – Login Menu
The different menu categories will be explained in the following sections:

BW1257 User Guide
Page 17 of 28
System Status
This category displays information regarding the operating status and contains functions to
allow the firmware to be upgraded.
Figure 12 – Device Information
System Status | Operating Status
Shows device information such as firmware version, system uptime, associated clients, etc.
Router Information: Displays system uptime and firmware version.
Reboot: Click to reboot device.
Auto Reboot: Click to schedule automatic reboot.
Figure 13 – Setup Auto Reboot Time
Internal Network Device State: Displays the respective number of clients/devices related
to wired Ethernet and wireless connections.

BW1257 User Guide
Page 18 of 28
Management Device: Redirects to “Connected Devices” category of the menu.
System Status | System Setting
System time, firmware upgrade, and reset to factory default can be carried out in this part
of the category.
Figure 14 – System Setting
System Time: Displays the system time. Click “Update time” to refresh system time.
Firmware Upgrade: Displays current system firmware version. Upgrade firmware by
clicking “Click to upload firmware”, select file, and then click “Start Upgrade” to initiate
the upgrade.
Figure 15 – Upgrade Firmware
Reset to Factory Settings: Click “Reset” to restore original default settings.
Figure 16 – Reset Factory Default Settings

BW1257 User Guide
Page 19 of 28
System Status | Runtime Traffic
Displays network traffic and data statistics.
Figure 17 – Network Traffic Statistics
Wan: Shows the bandwidth performance and traffic usage of the Ethernet interface.
WiFi: Shows the bandwidth performance and traffic usage of the WiFi interface.
Download: Shows the download traffic for every 2 seconds and total network traffic for
every ten minutes.
Upload: Shows the upload traffic for every 2 seconds and total network traffic for every ten
minutes.
Maximum: The maximum download/upload network traffic.

BW1257 User Guide
Page 20 of 28
Device Setting
The Device Setting category is to configure the parameters for Wireless, Ethernet, and
Advance settings.
Device Setting | Wireless Setting
WiFi Radio Setting: This page is to configure the wireless parameters for WiFi Radio
2.4G, 5G Low, and 5G High. Each radio frequency has its own set of parameters. Please
click on the respective tabs and modify the designated fields and pages accordingly.
Figure 18 – 2.4G/5G Low/5G High Setting
The 2.4G, 5G Low, and 5G High Radio Setting includes:
Radio: Radio enabled / disabled. [ON / OFF]
Wireless Mode: The 802.11 wireless mode. [802.11a/b/g/n/ac]
HT Mode: HT Mode [HT20/40/80]
Channel: Channel selection. [2.4G / 5G Low Band 1 / 5G High Band 4]
Tx Power: Transmit power
WiFi Interfaces Setting: This page is to configure the SSID and parameters of each
wireless interface. Each radio supports up to 16 BSSID (virtual AP). Take the 2.4G WiFi
Interface for example in the following pages.
Table of contents
Popular Wireless Router manuals by other brands

Cisco
Cisco Universal Broadband Router Cisco uBR10012 Software configuration guide

Globalstar
Globalstar 9600 user guide

NETGEAR
NETGEAR WNR1000v2 - Wireless- N Router user manual

Linksys
Linksys WRT54G3GV2-VF Quick installation

TRENDnet
TRENDnet TEW-714TRU Quick installation guide

Belkin
Belkin F5D92304 - Wireless G Plus MIMO Router user manual