BTR E-DAT modul System User manual

Montageanleitung
Termination Instructions
System
24x8 Cat.6a Patchfeld
24x8 Cat.6a Patch Panel
Hinweis / Note
GPassend für:
- E-DAT modul 24x8 Patchfeld
GSuitable for:
- E-DAT modul 24x8 Patch panel
Liefereinheit: 10 Stück
Packing unit: 10 pcs
Staubschutzklappen, gelb 816979-0105-I
Dust protection, yellow
Staubschutzklappen, blau 816979-0106-I
Dust protection, blue
Ausführung Bestell-Nr.
Version P/N
Staubschutzklappen
für E-DAT modul System
Dust protection
forE-DAT modul System
Staubschutzklappen, grün 816979-0107-I
Dust protection, green
Staubschutzklappen, rot 816979-0108-I
Dust protection, red
Zubehör
Accessories
Hinweis / Note
Liefereinheit: 10 Stück
Gewicht: 350 g
Packing unit: 10 pieces
Weight: 350 g
E-DAT modul System
8(8) Cat.6a Modul 130910-I
E-DAT modul System
8(8) Cat.6a module
Ausführung Bestell-Nr.
Version P/N
E-DAT modul System 8(8) Cat.6a Modul
E-DAT modul System 8(8) Cat.6a module
BTR NETCOM GmbH
Im Tal 2
78176 Blumberg / Germany
Tel. +49 7702 533-0
Fax +49 7702 533-433
www.btr-netcom.com 052007/10.000/13/L/899 017

System System
Kabelkonfektion
Cable Preparation
Kabelmontage
Cable Connection
Paar-Schirmfolie einkerben und entfernen.
Cut and remove the shield foil of the wire pairs.
Je nach Austritt des Kabelendes Adernpaare separieren ...
Separate the wire pairs on each end according to their
exit from the sheath ...
... und nach dem Bild anordnen, um die Adern später
leichter in das Ladestück einführen zu können.
... and arrange the pairs as shown on the photos to
facilitate insertion to the loader.
Kunststoffmantel ca. 25 mm (max. 30 mm) abisolieren.
Remove about 25 mm (max. 30 mm) of the plastic sheath.
Geflechtschirm nach hinten legen ...
Fold braided shield backwards ...
... und gleichmäßig um den Kunststoffmantel drehen.
... and wrap it evenly around the plastic sheath.
max.
30 mm
5 mm
weiß/braun
white/brown
weiß/blau
white/blue
weiß/grün
white/green
weiß/orange
white/orange
weiß/braun
white/brown
weiß/orange
white/orange
weiß/blau
white/blue
weiß/grün
white/green
Kabelseite 1 / cable end 1 Kabelseite 2 / cable end 2
weiß/grün
white/green
weiß/blau
white/blue
weiß/orange
white/orange
weiß/braun
white/brown
weiß/grün
white/green
weiß/orange
white/orange
weiß/blau
white/blue
weiß/braun
white/brown
2
1a
1b
3
4a
4b 6
Kabelbinder zur Zugentlastung anbringen und Über-
länge entsprechend abschneiden.
Fit a cable tie and cut off the excess length.
Die Adernpaare weiß/braun und weiß/orange in die un-
teren Öffnungen des Ladestücks einführen ...
Insert the wire pairs white/brown and white/orange in
the lower wire guides of the loader ...
... die Adernpaare blau/weiß und grün/weiß oben in das
Ladestück einlegen.
... and the wire pairs blue/white and green/white in the
upper wire guides of the loader.
7a
Zum Entfernen der überstehenden Adern einen geeig-
neten Seitenschneider verwenden ...
Use an appropriate wire cutter to cut the excess length
of the wires ...
7b
... und die Kabeladern bündig abschneiden.
... and cut the wire ends flush.
Mit einem ungeeigneten Seitenschneider lassen sich die
Kabeladern nicht bündig abschneiden. Dies führt zu
Problemen beim späteren Zusammenfügen der beiden
Gehäuseteile.
The wires cannot be cut really flush with an inappropri-
ate wire cutter. Excess wire will cause problems when
the two housing parts are assembled.
5a
7 weiß/white
8 braun/brown
3 weiß/white
6 orange/orange
5b
4 blau/blue
5 weiß/white
2 grün/green
1 weiß/white

Einbauvariante A
Mounting Version A
10
Das fertig angeschlossene Modul von hinten am oberen
Teil der Modulaufnahme einhaken und nach unten ein-
rasten.
Fasten the assembled module into the upper border of
the opening and click it downwards into place.
11
Kabel in die entsprechende Halterung einlegen.
Insert the cables into the designated clamping fixture.
12
Potentialausgleich anbringen. Erdungsset liegt der Ver-
packung bei.
Install the potential compensation, an earthing kit is
enclosed.
Oberseite / topside
Unterseite /
bottom side
Einbauvariante B
Mounting Version B System
Kabelmontage
Cable Connection
8
9
Eine Zange in der Modulmitte ansetzen und das Modul
zusammendrücken, bis das Gehäuse geschlossen ist.
Place pliers in the middle of the module and press until
the housing is closed.
Wird die Zange zu weit hinten angesetzt, kann es pas-
sieren, dass das Ladestück verrutscht und die Schneid-
klemmen im Inneren des Moduls beim Zusammen-
drücken beschädigt werden.
If the pliers are placed too far back, the loader may slip
slightly and consequently damage the ID contacts when
the housing parts are pressed together.
Beim Zusammenfügen der Gehäuseteile, das Ladestück
gerade auf das Gehäuseunterteil setzen.
When the two housing parts are assembled make sure
that the loader is correctly aligned with the lower housing.
Montagevorbereitung
Die leeren Modulaufnahmen lösen (siehe “Demontage
der einzelnen Komponenten”) und die Kabel von hinten
durch den Tragrahmen führen.
Preparation
Detach the empty module retaining plates (see
"Disassembly") and pass the unterminated cable
through the opening from the rear of the panel.
Kabelkonfektion und Kabelmontage durchführen (Schrit-
te 1 bis 9).
Prepare the cable and connect it to the module (steps 1
to 9).
10a
Modulaufnahme oben auf das Modul haken...
Hook in the retaining plate on top of the module ...
10b
... und nach unten einrasten.
... and click it downwards into place.
11
Anschließend diese Einheit an der Unterseite der Steckplät-
ze am Tragrahmen einhaken und nach hinten einrasten.
Then hook in this unit at the bottom of the front opening
of the frame and click it backwards into place.
12
Potentialausgleich anbringen. Erdungsset liegt der Ver-
packung bei.
Fit the earthing lead. An earthing kit is enclosed with
each packing unit.

System System
Demontage
Disassembly
Öffnen des Moduls
Opening the Module
Einheit aus dem Tragrahmen herausziehen.
Pull the unit out of the patch panel frame.
Lösen des Moduls
Klemmblech auf der Unterseite des Moduls mittels Schrau-
bendreher eindrücken und Modulaufnahme abnehmen.
Detach the Module
Use a screw driver to press down the metal locking
latch at the bottom of the module and remove the
retaining plate.
Lösen der Modulaufnahme
Modulaufnahme entriegeln, hierzu Sichtfenster öffnen
und einen flachen Schraubendreher in die obere Öff-
nung schieben und drehen.
Detach Retaining Plates
To remove the module retaining plate open the label
window and insert a small flat screwdriver into the
upper opening and rotate the screwdriver …
Ladestück mit einem kleinen, flachen Schraubendreher
entriegeln ...
Unclip the loader using a small, flat-bladed screwdriver ...
... und beide Gehäuseteile voneinander trennen.
... and separate the two housing parts.
Beschaltungshinweise
Pin/Pair Assignment
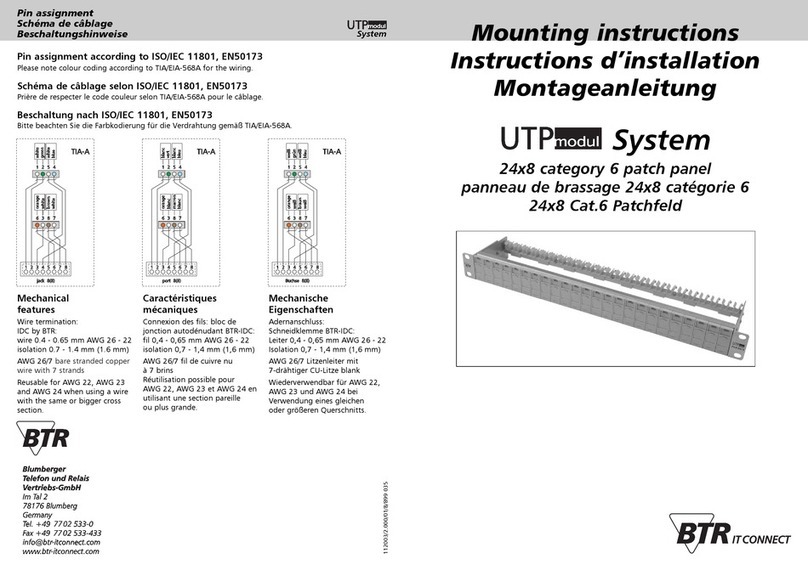
Beschaltung nach ISO/IEC 11801, EN50173
Bitte beachten Sie die Farbkodierung für die Verdrahtung gemäß TIA/EIA-568A.
Pin/pair assignment according to ISO/IEC 11801, EN50173
Please note colour coding for wiring per TIA/EIA-568A.
Mechanische Eigenschaften
Adernanschluss:
Schneidklemme BTR-IDC:
Leiter 0,4 - 0,65 mm
AWG 26 - 22 Isolation 0,7 - 1,4 mm (1,6 mm)
AWG 26/7 Litzenleiter mit 7-drähtiger
CU-Litze blank
Wiederverwendbar für AWG 22, AWG 23 und AWG 24 bei
Verwendung eines gleichen oder größeren Querschnitts.
Mechanical Features
Wire termination:
IDC by BTR:
wire 0.4 - 0.65 mm AWG 26 - 22
insulation 0.7 - 1.4 mm (1.6 mm)
AWG 26/7 bare stranded copper wire with 7 strands
Reusable for AWG 22, AWG 23 and AWG 24 when using a wire
with the same or bigger cross section.
Hinweis für Verwender und Monteure
Unsere Anschlusssysteme und Verteilerprodukte für strukturierte Gebäudeverkabelungen entsprechen den gül-
tigen Normen EN 50173-1:2002 und IEC 60603-7. Bei Komplettierung der Anschlüsse muß der Verwender/Mon-
tagebetrieb prüfen und beachten, dass nur Patch- und Anschlusskabel, die die EN-/ IEC-Normen erfüllen, verwendet wer-
den. Lassen Sie sich ggf. vom Lieferanten den Nachweis geben, dass die eingesetzten Kabel und Stecker der Norm entspre-
chen. Die Verwendung von nicht normgerechten Komponenten bedeutet den Verlust der Mängelrechte auch innerhalb der
Lieferkette unserer Produkte. Die Installation ist nur von Fachpersonal durchzuführen. Hierbei sind die Sicherheitsanforde-
rungen nach EN 60950 zu beachten. Bitte beachten Sie auch, dass keine starken mechanischen Einwirkungen und Bean-
spruchungen beim Ein- und Ausstecken des Benutzerkabels nach oben, unten oder seitlich auf den elektrischen Kontaktbe-
reich der Steckverbindung (z. B. durch Ziehen am Kabel u. a.) erfolgen. Für dadurch entstehende Schäden haften wir nicht.
Bitte übergeben Sie diesen Hinweis auch an den Endverbraucher.
Achtung!
Ausstecken (Ziehen des RJ45-Steckers) nur bei zuvor ausgeschaltetem Gerät ohne Spannung. Ausstecken, insbesondere
wiederholtes Ausstecken unter Spannung (bei Verwendung von Power over Ethernet PoE) kann zu Schäden an den
Kontakten der RJ45-Steckverbindung führen.
Notes for user and installer
Our termination systems and patch products for generic cabling meet the active standards EN 50173-1:2002 and IEC
60603-7. The user or installer has to check and take care to use solely patch and termination cables that meet the EN-/IEC
standards when completing the installation. If necessary ask your supplier to certify that the installed cables and plugs
meet the standards. The use of non-standard components means the loss of rights accruing from defects even within the
supply chain of our products. Installation only by qualified personnel. Electrical Safety per EN 60950. Furthermore, please
pay attention that the electric contact area of the plug connection is not exposed to high mechanical effects or strain (e.g.
by pulling the cable etc.) when the user cable is plugged in or out upwards, downwards or sidewards. We do not take over
liability for any damage. Please give this note to end users, too.
Attention!
Before unplugging the RJ45 plug make sure that the device is switched off and is no longer energised. Unplugging, par-
ticularly repeated unplugging of an energised device (when using Power over Ethernet PoE) may damage the contacts of
the RJ45 plug connection.
Other BTR Network Cables manuals
Popular Network Cables manuals by other brands

Tripp Lite
Tripp Lite N002-100-BL Specification sheet

Tripp Lite
Tripp Lite N314-05M Specification sheet

Tripp Lite
Tripp Lite P580-010 Specification sheet

Tripp Lite
Tripp Lite N261-014-AQ Specification sheet

Tripp Lite
Tripp Lite N002-014-GN Specification sheet

Tripp Lite
Tripp Lite N201-001-BK Specification sheet