Buffalo Tools EC47Q User manual

Page 1
ITEM # EC47Q
47 QUART
ELECTRIC COOLER/FREEZER
INSTRUCTION MANUAL
READ ALL INSTRUCTIONS AND WARNINGS BEFORE USING THIS PRODUCT.
This manual provides important information on proper operation & maintenance. Every effort
has been made to ensure the accuracy of this manual. These instructions are not meant to
cover every possible condition and situation that may occur. We reserve the right to change
this product at any time without prior notice.
IF THERE IS ANY QUESTION ABOUT A CONDITION BEING SAFE OR UNSAFE,
DO NOT OPERATE THIS PRODUCT!
Questions? Problems? Call Customer Service!
If you experience a problem, have questions or need parts for this product, call Customer
Service at 1-636-532-9888, Monday-Friday, 8 AM - 4 PM Central Time. A copy of the sales receipt
is required.
FOR CONSUMER USE ONLY – NOT FOR PROFESSIONAL USE.
KEEP THIS MANUAL, SALES RECEIPT & APPLICABLE WARRANTY
FOR FUTURE REFERENCE.
To register your product warranty, please visit
buffalotools.com or scan the QR code.

Page 2
PRODUCT FEATURES
• High-efficiency DC compressor and conversion module
• CFC free
• Great heat insulation
• Cooling Temperature Range: minus 4°F ( minus 20°C) to 68°F (20°C)
(when based on 77°F / 25°C room temperature environment)
• Intelligent battery protection system helps prevent draining your battery
• LED display control panel for temperature setting
• Interior LED light
•
Capacity: 47 quart (approx. 11.75 Gallon)
• Power Consumption: 60W
• Suitable for AC, DC: 12/24V, 100v-240V
• Economy and Max Mode Settings
• Material: PP + ABS
• Two Interior Compartments

Page 3
Failure to obey these warnings could result in malfunction of your
device and possible
injury for yourself and other users.
• Do not operate the device if it is visibly damaged.
• Do not block the gaps of the device with things like pin, wire, etc.
• Do not expose the device to rain or soak it in water.
• Do not place the near open flames or other heat sources (heaters, direct sunlight, etc.)
• Do not store explosive substances like spray cans with flammable propellants in the device.
• Before starting the device, ensure that the power supply line and the plug are dry.
• Check if the voltage specification on the type plate matches that of the energy supply.
• Once unpacked, before turning on, the unit must be placed on a flat surface for 6 hours.
• Make sure that the device stays horizontally when it is running. The tilt angle must be less
than 5° for long time running and be less than 45° for short time running.
• The refrigerator must be well ventilated for heat dissipation and make sure to keep some
space around it.
• The device can be used by children aged 8 or over, as well as by persons with reduced
physical, sensory or mental capabilities or a lack of experience and/or knowledge,
providing they are supervised or have been taught how to use the device safely and are
aware of the resulting risks.
• Children must be supervised to ensure that they do not play with the device.
• Never pull the plug out of the socket by the cable.
• Disconnect the device or switch it off when you turn off the engine. Otherwise you may
discharge the battery.
• Set suitable temperature for food or medicine stored in the device.
• Food is suggested to be stored in its original packaging or in suitable containers.

Page 4
SPECIFICATIONS
Rated Voltage DC
12V / 24V
Rated Power Input
60 Watt
Capacity
47 Quart /
1.5 Cu. Ft
Sound Noise Level
45 dB
Climate Class
T / ST / N / SN
Temperature Range
-4°F / -20°C - -
77
°F
(25
°C
)
PRODUCT
FEATURES
•
CFC free and great heat
insulation.
• DC12/ 24V or AC
100~240V (using the
adapter) power supply.
• Fast cooling to -20°C/ -4°F
(based on 25°C/ 77°F
room temperature).
•
Intelligent battery
protection system.
•
Digital display control
panel for temperature
setting.
•
Built-in LED light, cup
holder
•
High-efficiency DC
compressor and
conversion module.
•
Includes 1) AC plug
to power using electric
outlet
•
Includes 1) DC plug
(to power using car
battery)

Page 5
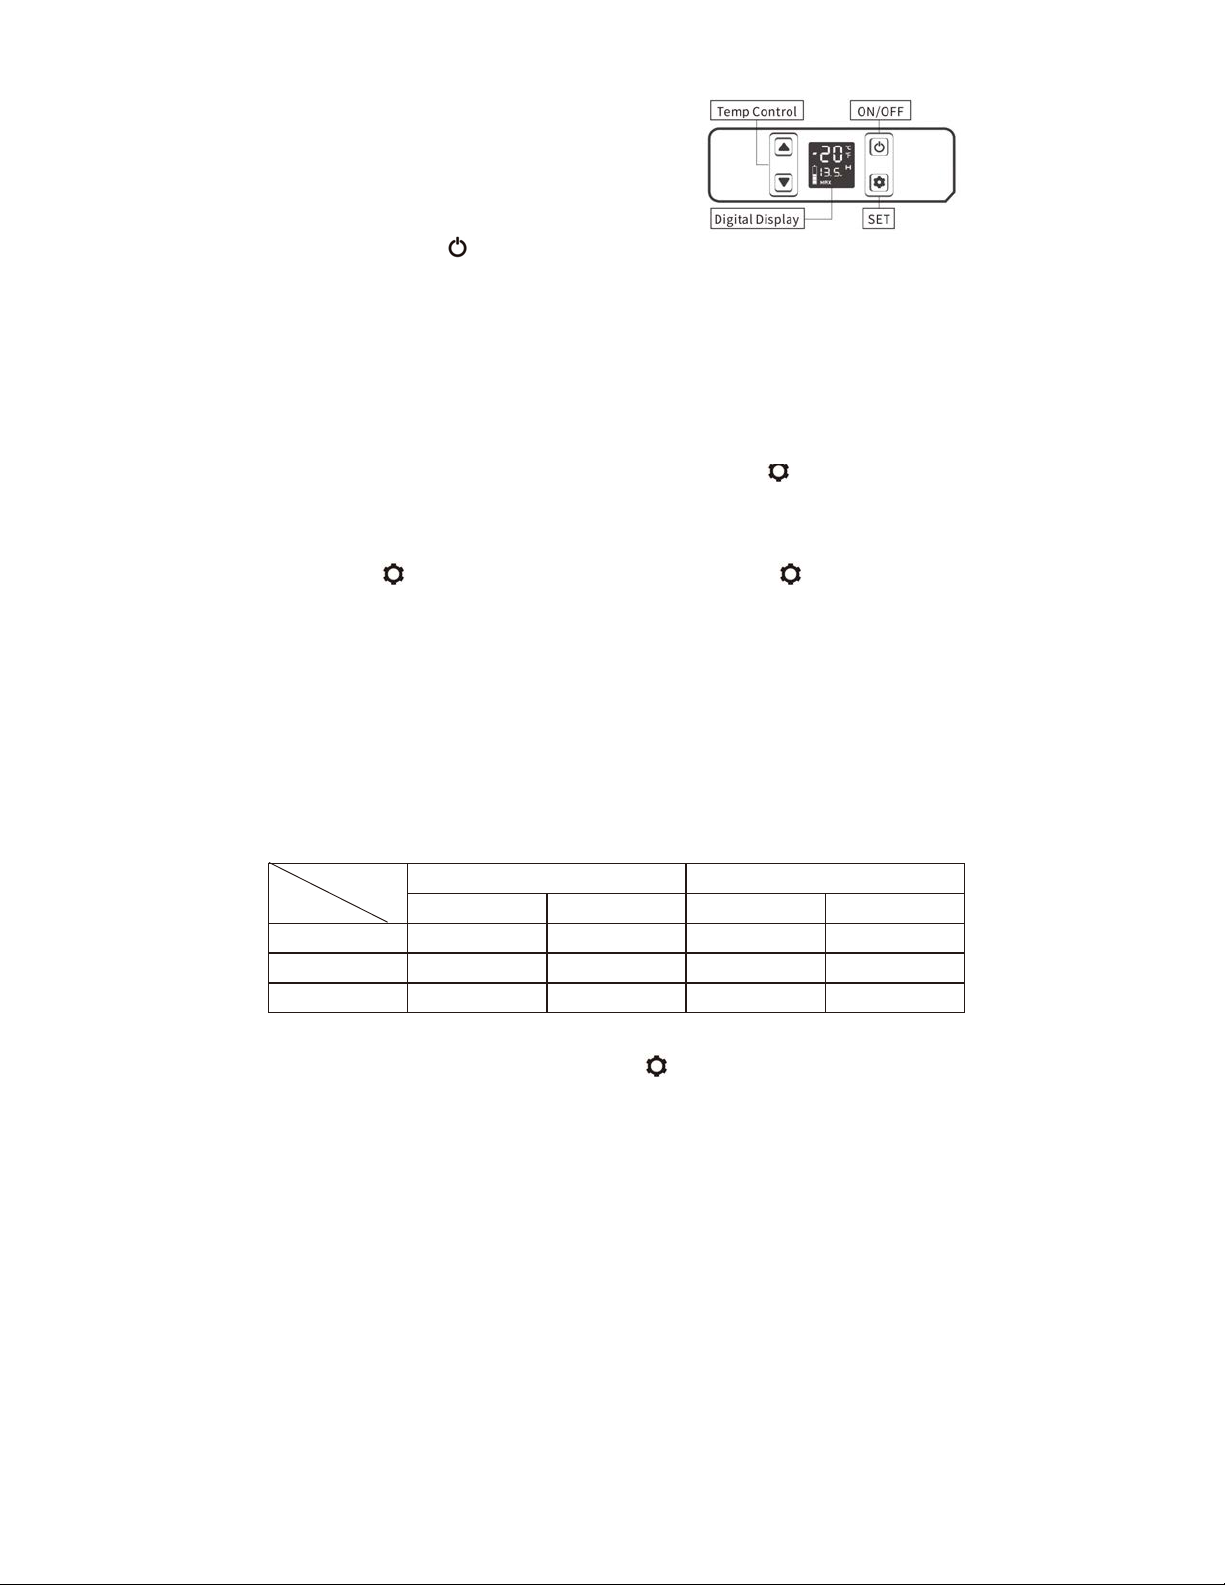
FUNCTION AND OPERATION
• Power Supply: connect to either DC 12V/ 24V or
AC 100~240V power supply.
•
Display Screen Initialization: the screen will be on
for 2 seconds after connecting to
the power supply.
• Power On/Off: press to turn unit ON/OFF.
•
Temperature Setting: press the button !or "for temperature setting, press the
button !to increase or press "to decrease the temperature. The setting will be saved
automatically after stopping operating for 4 seconds. (Note: the temperature displayed is the
current temperature of the compartment. Temperature setting range: minus 4 to 68°F (minus
20°C to 20°C)
•
MAX to ECO mode: With Power on, press settings button to switch between MAX (fast
cooling) and ECO (Energy Saving Mode). (*Factory setting is MAX.)
•
Change °C to °F: With Power off, press and hold Setting button for three seconds until
•
E1
displays, keep pressing
settings button
until E5 displays, then press
!
or
"
to select
Celsius or
Fahrenheit. (*Factory setting is °C)
•
Battery Protection Mode (
Intelligent Battery Protection)
: With power on, press and hold
settings button for three seconds until screen flashes, then press again to select
protection mode H (High), M (Middle) and L (Low) (*Factory setting is H.) ,(M or L should be
set when it is connected to a portable battery or other back-up battery. A battery is NOT
included with this unit.)
NOTE: Due to the different output voltages between vehicles, H should be set when the
product is connected to car power, and M or L should be set when it is connected to a
portablebattery or other back-up battery.
The battery gear should be set from H to M or from M to L if there is a voltage protection
code F1 shown on the panel. The battery gear should be set to H if the product keeps
working after turning off the car engine, or the product may drain the battery.
Voltage Reference for Power Consumption Protection Mode
(
Intelligent Battery Protection)
INPUT
MODE
DC 12V
DC 24V
CUT OUT
CUTIN
CUT OUT
CUTIN
L
8.5V
10.9V
21.3V
22.7V
M
10.lV
11.4V
22.3V
23.7V
H
11.lV
12.4V
24.3V
25.7V
*the voltage is theoretical value, there may be a deviation in different scenarios.
•
To Reset: Power off the cooler then long press for 3 seconds until E1 displays,
then quickly long press both !"at same time until the screen displays " 888 ".

Page 6
Recommended Temperature For Common Foods
Drinks
Fruits
Vegetable
Delicatessen
Wine
Ice cream
Meat
5° (41° F)
5~8° (41 ~ 46°F)
3~10°C / 37~50°F
4°C / 39°F
0°C / 50 °F
0°C / 4°F
8°C / 0°F
Cleaning:
•
Unplug the device first to avoid electric shock.
•
Use wet cloth to clean the device and dry it.
•
Do not soak the device in water and do not wash it directly.
•
Do not use abrasive cleaning agents as these can damage the device.
Storage:
If the device will not be in use for a long time, follow these steps:
•
Turn off the power and unplug from electric socket.
•
Remove all the items stored in the device.
•
Put the device in a cool and dry place.
•
Leave the lid slightly open to prevent odors from forming.
Defrosting:
Humidity can form frost in the interior of the cooling device or on the evaporator.
This reduces the cooling capacity. Defrost the device to avoid this.
•
Switch off the device.
•
Take out the contents of the device.
• Keep the lid open.
•
Wipe off the defrosted water.
Never use hard or sharp tools to remove ice or to loosen objects which
have frozen in place.

Page 7
TROUBLESHOOTING
Issues
Suggestions
Refrigerator does not work
Check if the switch is on.
Check if the plug and socket are connected well.
Check if the fuse has been burnt.
Check if the power supply is malfunctioned.
Switching on/off the fridge frequently may cause start delay of the
compressor.
Refrigerator compartments
are too warm
The door is opened frequently.
A large amount of warm or hot food was stored recently. Wait for
the refrigerator to reach its selected temperature.
The refrigerator has been disconnected for a period of time.
Food is frozen
The temperature was set too low, increase the temperature.
There is a "water flow"
noise from inside the fridge
It's a normal phenomenon, caused by the flow of refrigerant.
There are water drops
around the refrigerator
casing or door gap
It's a normal phenomenon, the moisture will condense to water
when it touches a cold surface of the refrigerator.
The compressor is slightly
noisy when starting
It's a normal phenomenon, the noise will be reduced after the
compressor warms up.
Code Fl displayed
Possible cause: low voltage to fridge.
Adjust the battery protection from H to M or from M to L.
Code F2 displayed
Possible cause: condenser fan is overloaded.
Disconnect power to fridge for 30 minutes & re-start.
Code F3 displayed
Possible cause: the compressor starts too frequently.
Disconnect power to fridge for 30 minutes & re-start.
Code F4 displayed
Possible cause: compressor not kicking in.
Disconnect power to fridge for 30 minutes & re-start.
Code F5 displayed
Possible cause: overheating of the compressor & electronics.
Disconnect power to fridge for 30 minutes & re-start.
Code F6 displayed
Possible cause: no parameter can be detected by the controller.
Disconnect power to fridge for 30 minutes & re-start.
Code F7 or F8 displayed
Possible cause: temperature sensor is faulty .
Contact manufacturer for service.

Page 8
202205
Table of contents