Burmester 089 User manual

OWNER´S MANUAL
TOP LINE
CD PLAYER
089
HIGH END MADE IN GERMANY
BURMESTER AUDIOSYSTEME GMBH • KOLONNENSTR. 30G • 10829 BERLIN • GERMANY
TEL +49/(0)30/78 79 68 – 0 • FAX +49/(0)30/78 79 68 – 68 •E-MAIL: mail@burmester.de • www.burmester.de

VERSION 1.0 from 4/6/2009

Dear Audiophile,
Thank you for choosing this Burmester audio component. We sincerely appreciate your trust in us.
You have purchased a unit which excels in musical fidelity and combines uncompromising manufacturing
quality with technical innovation and the highest degree of operating flexibility.
We recommend reading this user manual at least once in its entirety before initial operation. This will enable
you to make full use of all capabilities of this outstanding audiophile instrument.
Should you have any further questions, please contact your dealer or us directly.
Talk to us about your special requests, even if they seem out of the ordinary. We happily accept technically
reasonable challenges.
Enjoy your enhanced listening pleasure.
Your Burmester Team

T A B L E O F C O N T E N T S
UNPACKING AND SETTING UP 1
FUNCTIONAL OVERVIEW OF CD PLAYER UNIT 2
FRONT PANEL 2
REAR PANEL 3
FIRST STARTUP 4
CONNECTIONS 5
HOOKUP TO AN ANALOG AMPLIFIER 5
HOOKUP TO A DIGITAL AMPLIFIER 5
HOOKUP OF A DIGITAL SOURCE COMPONENT 6
HOOKUP OF AN ANALOG SOURCE COMPONENT 6
ADDITIONAL CONNECTIONS 6
OPERATING CONTROLS 7
THE FUNCTION INDICATORS 8
SYSTEM SETUP 9
OPERATING THE SYSTEM SETUP 9
SHORT DESCRIPTION OF THE MENU ITEMS 10
DESCRIPTION OF THE MENU ITEMS OF THE SYSTEM SETUP 11
REMOTE CONTROL 12
PROGRAMMING A FAVOURITE TRACK SELECTION OF A CD 14
BURLINK 15
CONNECTIONS 15
COMMANDS 15
GENERAL INSTRUCTIONS 16
TECHNICAL SPECIFICATIONS 18
SECURITY NOTICE 18

1
UNPACKING AND SETTING UP
CAUTION: The CD player 089 is shipped inside a plastic protective cover. Make sure that children do not play
with it to avoid the danger of suffocation.
Unpacking To avoid damaging the housing, please do not use pointed or sharp tools to open the box.
Please make sure that the content of the box is complete. If something is missing or you
notice any damage while unpacking, do not hook up the unit. Instead, contact your
authorized dealer.
Content of boxes The two boxes should contain the following:
•1 box with the CD player 089
•1 CD clamp
•1 AC power cord
•1 Remote control
•1 owner’s manual
Packaging We recommend to keep the original packing in case the unit needs to be shipped in the
future.
Setting up Too low or too high temperatures may cause damage inside of the CD player.
Therefore we recommend you leave the unit to adapt to room temperature, before
using it for the first time.
Carefully remove the unit from its packaging and set it up in an appropriate location. To
protect the 089 from overheating make sure that the location offers sufficient air circulation
around the unit. Also, avoid excessive exposure to sun, dust and humidity.
Please make sure that your desired location for the preamp is stable enough to carry its
weight.
Ventilation ducts and openings in the housing serve to keep the unit cool. They must not be
covered up with magazines, table cloth, curtains etc.
If the 089 has to be operated in an extremely warm environment it may be necessary
to supply additional ventilation. Avoid operating the unit in an excessively humid
environment like bath rooms etc.

2
FUNCTIONAL OVERVIEW OF CD PLAYER UNIT
FRONT PANEL
(1) Sliding cover (13) SKIP >>| button for selecting the next
(2) INPUT LEDs indicate the selected input tracks
(3) SYNC LED indicates a correct data stream input (14) PROGRAM LED illuminates when a music
(4) TRACK display indicates the current track program has been selected and saved
(5) OPERATING MODE display (15) IR receiver for commands of remote control
(6) REPEAT display (16) AUDIO LED shows up sampling of 192kHz
(7) TIME display shows elapsed or remaining time (17) STOP button
(8) SCAN- and REPEAT AB display (18) PLAY/ PAUSE button
(9) VOLUME display shows the current volume (19) VOLUME down button decreases the
(10) INPUT button for input selection volume
(11) DISPLAY button selects display brightness (20) VOLUME up button increases the volume
(12) SKIP |<< button for selecting the previous tracks (21) POWER switch
(22) POWER LED lights up red when the unit is on

3
FUNCTIONAL OVERVIEW OF CD PLAYER UNIT
REAR PANEL
(23) BURLINK interface RS-232 with check LEDs (33) Digital audio output RCA (75
)
(24) BURLINK interface USB with check LEDs (34) Digital audio input TORX
(25) MMI slot for future upgrades for optical fiber cables
(26) Analog audio input right channel (bal.) (35) Digital audio input RCA (75
)
(27) Analog audio input left channel (bal.) (36) Analog audio output right channel (bal.)
(28) AC mains switch (37) Analog audio output (unbal.)
(29) AC mains terminal (38) Analog audio output (unbal.)
(30) REMOTE output for analog recording unit (TAPE)
(31) REMOTE input (39) Analog audio output left channel (bal.)
(32) Digital audio output TOTX for optical fiber cables
(40) CD clamp

4
FIRST STARTUP
CAUTION: Before connecting the unit, please check if the input voltage data on the rear panel, underneath the AC
mains terminal (29) is equal to the local voltage of your wall outlet. Make sure the ground lead in your power outlet
is working correctly. A missing or faulty ground is extremely dangerous!
In case of doubt contact a licensed electrician. or your power supply company.
• Connect your preferred in- and outputs of the CD player with your HiFi system. Please refer to the chapter
CONNECTIONS.
• Make sure, that the AC mains switch (28) on the rear panel of the CD player is set to OFF position.
• Connect the AC power cord into the AC mains terminal (29) and plug it into the wall outlet.
• Switch the AC mains switch (28) to ON position.
• With the POWER switch (21) on the front panel of the CD player the unit is switch on.
• During the first startup, you have to decide if the ANALOG OUTPUTS (36), (37), (38) and (39) will run with
defined (FIX) or adjustable (VARIABLE) volume level.
CAUTION: If the CD player is connected directly to a power amplifier or active loudspeakers, you must
choose the setting VARIABLE ! ! ! The setting FIX may destroy your loudspeakers, because the CD
player delivers the maximum volume level to the outputs ! ! !
• Open the sliding cover (1) on the top of the CD player, put a CD onto the turntable with the printed side
upwards and afterwards put the CD CLAMP (40) onto the CD.
• After closing the sliding cover, the CD player reads the information track of the CD and shows the number of
tracks and the total playing time of the CD on the display.
• By pushing the PLAY/PAUSE button (18) on the front panel of the unit or on the remote control, the CD player
starts playing.
• If you have chosen the VARIABLE setting, the volume level can be regulated with the buttons VOLUME+ and
VOLUME- on the front panel of the unit or on the remote control.
• Detailed information about the manifold functions of the CD player, are available in the following chapters of this
owner’s manual.
!
!

5
CONNECTIONS
All connection terminals are located on the rear panel. While connecting the CD player, all components of the music
system must be turned off.
CAUTION: Before connecting the unit, please check if the input voltage of the 089 is equal to the local voltage of
your wall outlet. Make sure the ground lead in your power outlet is working correctly. A missing or faulty ground is
extremely dangerous!
In case of doubt contact a licensed electrician.
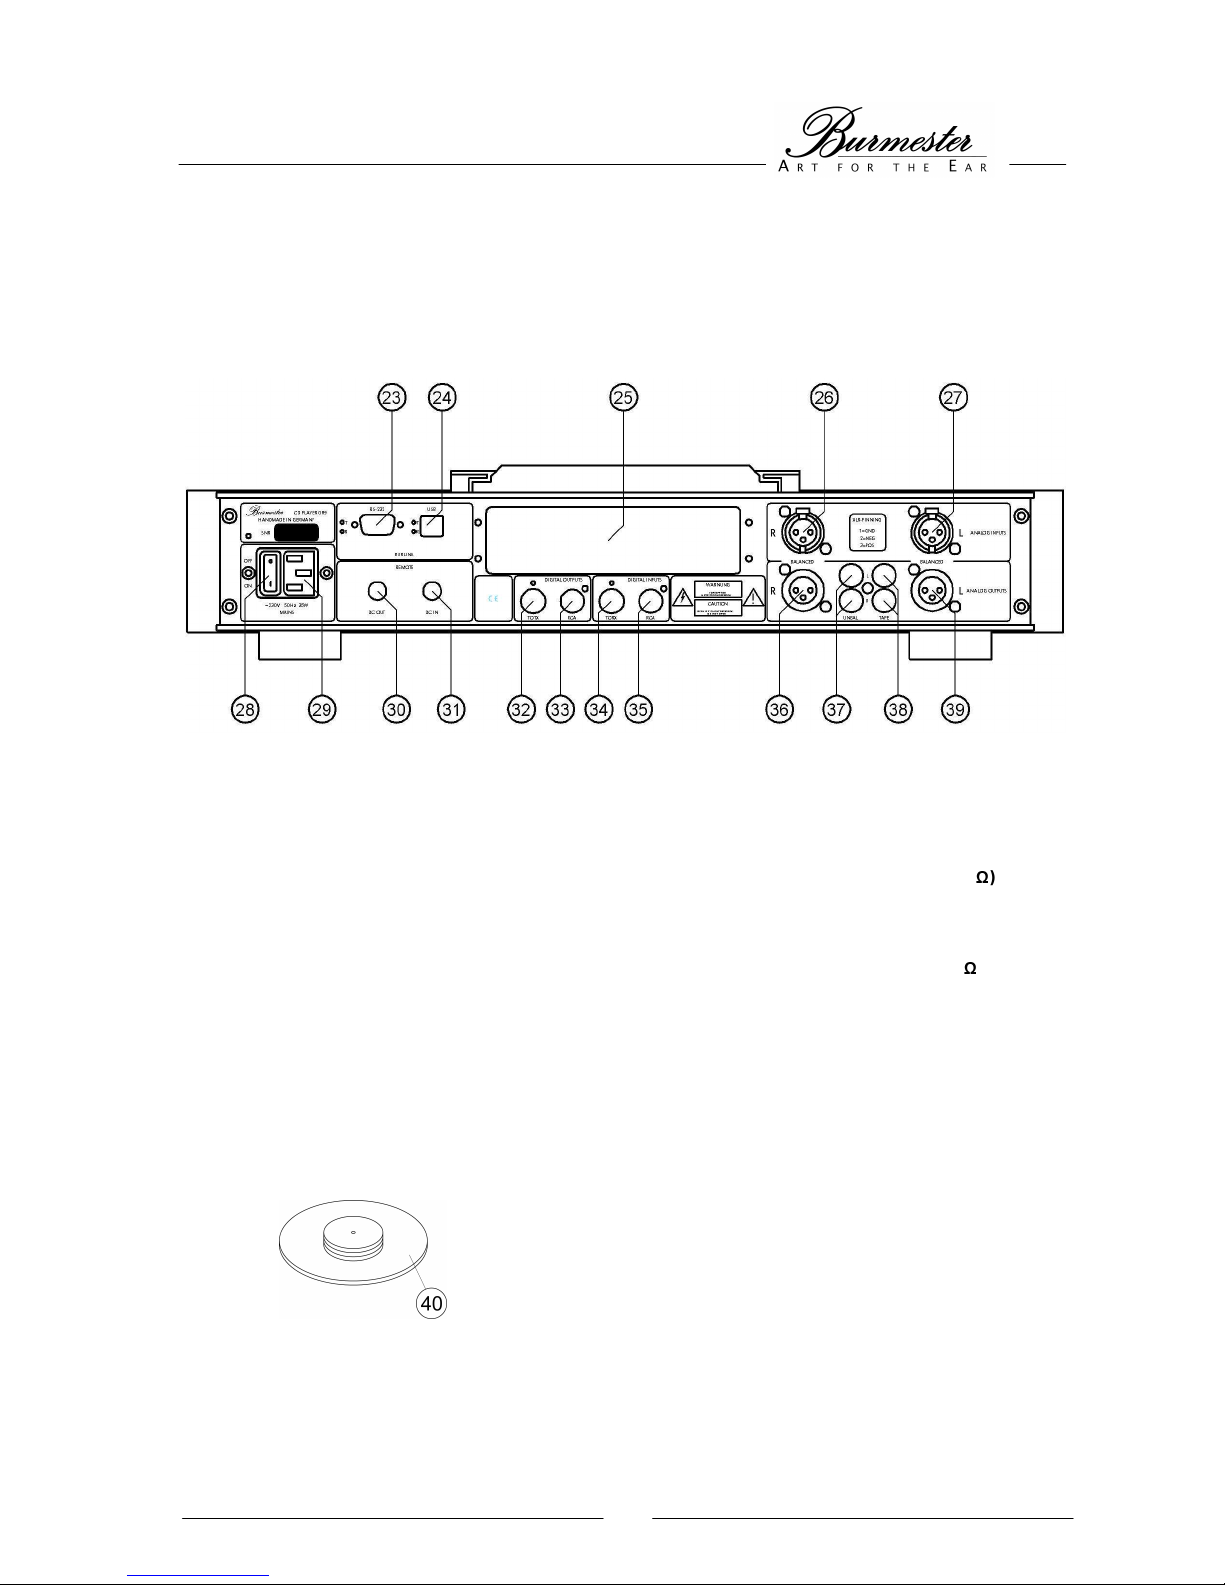
AC mains terminal Make sure the AC mains switch (28) is set to OFF. Connect the appliance connector of the
power cord to the AC mains terminal (29). Then plug the power cord into the wall outlet.
There are various possibilities to connect the CD player, depending upon the kind of audio components and auxiliary
devices used. For the best connections please refer to the owner’s manual of your audio components or auxiliary
devices. Following the various connection possibilities are explained:
CONNECTING AN ANALOG AMPLIFIER
Analog outputs To connect an analog preamp, integrated amp or power amp the 089 offers balanced as
well as unbalanced outputs (ANALOG OUTPUTS). If your amplifier provides balanced
inputs, connect them to the terminals BALANCED R (36) and BALANCED L (39).
Unbalanced connections can be made using the terminals UNBAL (37). An analog
recording device may be hooked up to the terminal TAPE (38).
For reasons of superior sound we recommend using balanced connections whenever
possible. If you connect the CD player to an analog preamplifier or integrated amplifier, we
recommend choosing the setting FIX in the SYSTEM-SETUP. You will find this setting in the
menu item OUTPUT.
CAUTION: If the CD player is connected directly to power amplifiers, you must choose
the setting VARIABLE ! ! ! The setting FIX may destroy your loudspeakers,
because the CD player delivers maximum level to the outputs ! ! !
The pinning of the balanced outputs are: PIN1=GND, PIN2=NEG, PIN3=POS.
CONNECTING A DIGITAL AMPLIFIER
Digital outputs The player provides two DIGITAL OUTPUTS for connecting a digital amplifier:
The terminal TOTX (32) sends optical signals via optical fiber cable with plugs according to
TOSHIBA norm.
The terminal RCA (33) requires a 75ohms coax cable with RCA plugs.
Choose whichever connection sounds best to you if your amplifier allows both types of
hookup.
CAUTION: The terminal RCA (33) must not be connected to the analog input of an amplifier
because this could damage the amp or the loudspeakers.
!
!

6
CONNECTING A DIGITAL SOURCE COMPONENT
Digital inputs The CD player 089 offers two DIGITAL INPUTS for the connection of external digital source
components such as DAT recorders or CD players:
The terminal TORX (34) receives optical signals and requires an optical cable with plugs
according to TOSHIBA norm.
The terminal RCA (35) receives electronic signals and requires a 75ohms coax cable with
RCA plugs.
Choose whichever connection sounds best to you if your amplifier allows both types of
connection.
CAUTION: The digital inputs of the 089 can process PCM stereo data with a sample rate up
to 192kHz. For sample rates above 96kHz the player needs to be switched to 192kHz mode
by pressing the AUDIO button on your remote control.
CONNECTING AN ANALOG SOURCE COMPONENT
Analog inputs The CD player 089 offers a balanced ANALOG INPUT for the connection of external analog
source components such as a phono preamplifier or a FM-tuner for example.
The analog input terminals (26) and (27) are balanced connectors. If your analog source
component offers only unbalanced connectors, you need two RCA to XLR connectors,
which you can order at your local dealer.
The pinning of the balanced inputs are: PIN1=GND, PIN2=NEG, PIN3=POS.
ADDITIONAL CONNECTIONS
REMOTE Connecting DC OUT (30) to the corresponding DC IN jack of another BURMESTER-unit
offers to switch on or off this other unit simultaneous by the 089. In this case, the 089 has
the master function.
Connecting DC IN (31) to the corresponding DC OUT jack of another BURMESTER-unit
offers to switch on or off the 089 simultaneous by the other unit. In this case, the 089 has
the slave function.
MMI slot (optional) The MMI slot (25) offers to integrate future developments into the CD player 089, for
example a multi media interface.
BURLINK To the BURmester-LINK interface plugs (23), (24) a computer system like PC,
CRESTRON, AMXe.g. can be connected to the CD player 089. The computer system
allows a comfortable control of your HiFi system using an individual programmable touch
panel for example. With the LEDs beside the plugs named Tand R(Transmit and Receive)
you can check whether data exchange is working.

7
OPERATING CONTROLS
With the exception of the AC mains switch, which is located on the rear panel, all operating controls are located on
the front panel of the CD player.
AC mains switch The AC mains switch (28) which turns AC power to the unit on and off is located on the
rear panel of the power supply unit above the AC mains terminal. By switching to the ON
position the standby transformer is powered up.
POWER switch The POWER switch (21) switches the CD player on and off, provided the AC mains switch
is in the ON position.
With the POWER switch (21) set to “OFF“ all functions of the CD player are powered down.
Flipping the POWER switch (21) from “OFF“ to “STBY“, the POWER LED (22) lights up
orange. This shows that the unit is in standby mode.
When the POWER switch is in “STBY“ position the unit can be turned on and off by pushing
up the POWER switch, by pushing the POWER button on the BURMESTER remote control,
the BURLINK interface or by the DC IN jack.
In operating mode (ON) the POWER LED (22) lights up red and all functions of the CD
player are activated.
PLEASE NOTE: Always switch off the 089 with the POWER switch first before bringing the
AC mains switch into OFF position.
INPUT button Pushing the button INPUT (10) sequentially changes the digital signal source between the
external inputs ANALOG INPUTS, RCA, TORX, MMI (optional) on the back panel or the
internal CD transport. The selected input is indicated by an illuminated INPUT LED (2) on
the front panel of the CD player.
PLAY/PAUSE button Pushing the button PLAY/PAUSE (18) starts playback of the CD. Playback of the CD can
be interrupted by pushing the button PLAY/PAUSE (18) again.
STOP button Pressing the button STOP (17) will stop playback of the CD. To restart the CD from the
beginning, press the PLAY/PAUSE button.
SKIP >>| button By briefly pressing the button SKIP >>| (13) playback is advanced to the beginning of the
following track. By pressing it several times you can skip ahead one step at a time.
SKIP |<< button By briefly pressing the button SKIP |<< (12) playback is returned to the beginning of the
playing track. By pressing it several times you can skip back step by step.
VOLUME buttons With the buttons VOLUME + (20) and VOLUME - (19) you can select the volume of the
analog outputs. This can only be done, if the menu item OUTPUT in the SYSTEM-SETUP is
set to VARIABLE (refer to chapter SYSTEM-SETUP).
The selected volume will be shown on the right of the alphanumeric display.
DISPLAY button Pushing the button DISPLAY (11) varies the brightness of the alphanumeric display in four
steps between “max. brightness“ to “off“.
If brightness is selected to “off“, the display will light up only when any controls are used to
change settings. After a few seconds it automatically switches off again.
In SETUP mode display lights up on “max. brightness“ permanently.

8
THE FUNCTION INDICATORS
POWER LED The POWER LED (22) of the CD player lights up orange, if the CD player is in standby
mode. The LED lights up red, when the unit is switched on.
AUDIO LED The AUDIO LED (16) illuminates, when the internal sample rate of the D/A converter is
switched to 192kHz.
PROGRAM LED The PROGRAM LED (14) illuminates, when the PROGRAM function has been activated.
(see chapter “ HOW TO PROGRAM A FAVORITE TRACK SELECTION”)
SYNC LED The SYNC LED (3) indicates a correct data stream input.
INPUT LEDs The INPUT LEDs (2) shows, which input is selected.
Alphanumeric display The alphanumeric display shows the current track of the CD in the TRACK display (4) and
the playing time in the TIME display (7).
The TIME display (7) can be switched to:
- lapsed time of the current track
- lapsed time of the CD
- remaining time of the CD
by pushing the MODE button on the remote control.
If you have set up the volume regulation, the VOLUME display (9) will show you the current
volume.
You have the possibility to display the operating mode (Play, Pause, Stop) of the internal
CD drive. For it you must set the menu item DISPLAY in the SYSTEM SETUP to
MAXIMUM.

9
SYSTEM SETUP
The SYSTEM SETUP menu of the CD player 089 allows the easy programming of certain basic settings.
All settings of the SYSTEM SETUP will be saved automatically after leaving the SETUP and remain after switching
off the unit.
The SYSTEM SETUP can be operated only with the button MENU and the navigation buttons
,
,
,
of the
remote control.
If the unit is switched off inadvertently while the SYSTEM SETUP menu is active, all settings that were made will be
saved.
OPERATING THE SYSTEM SETUP
Activating SETUP Press the button MENU to activate the SYSTEM SETUP. The alphanumeric display will
show SYSTEM-SETUP for approx. two seconds, followed by the first menu item.
Select menu item With the navigation buttons
and
you will choose the menu item you want to change.
Change settings With the navigation buttons
and
you change the setting of the selected menu item.
Leaving SETUP Pressing the button MENU deactivates the SETUP and all settings will be saved. The CD
player switches off and then on again. Whatever option for AUTOPLAY is selected the CD
player will only read the CD’s content (AUTOPLAY = OFF) or start playing immediately
(AUTOPLAY = ON).
The SETUP deactivates automatically, when no command is sent for app. 15 seconds.

10
SHORT DESCRIPTION OF THE MENU ITEMS
MENU ITEM SHAORT DESCRIPTION DEFAULT
AUTO The CD player automatically starts playback of the CD
after switching on (ON) or not (OFF) OFF
OUTPUT You can choose between defined (FIX) or adjustable
(VARIABLE) output level of the analog outputs. VARIABLE
SERIAL-NR. After switching on it shows the type and the serial
number of the unit, when item is set to ON OFF
DISPLAY You can select the quantity of information shown in the
alphanumeric display. MINIMUM
RC-INPUT Setting YES enables the buttons STATION+/- of the
remote control to change the inputs NO
INIT-VOLUME You can select the initial volume level, if you have
selected the adjustable output (VARIABLE) in the menu
item OUTPUT. 01
DEFAULTS Press the button OK, when you want to load the default
settings

11
DESCRIPTION OF THE MENU ITEMS OF THE SYSTEM SETUP
AUTO You can choose, if the CD player should start playback directly after switching on the unit.
OFF The unit reads only the table of content and remains in STOP mode.
ON The unit begins playing the CD directly after switching on.
OUTPUT You can choose between defined (FIX) or adjustable (VARIABLE) output level of the
analog outputs.
CAUTION: If the CD player is connected directly to power amplifiers, you must choose
the setting VARIABLE ! ! ! The setting FIX may destroy your loudspeakers,
because the CD player delivers maximum level to the outputs ! ! !
VARIABLE The CD player has an adjustable output level.
FIX The CD player has a defined output level.
SERIALNUMBER You can choose, if the type and the serial number of the unit will be shown in the
alphanumeric display after switching on the player.
OFF The type and the serial number will not be shown.
ON The type and the serial number will be shown after switching on.
DISPLAY During playback the alphanumeric display shows the current track number, the playing time
and, if activated (OUTPUT = VARIABLE), the current volume level. Additionally, you have
the possibility to display the operating mode (Play, Pause, Stop) of the internal CD drive.
Therefore you have to set this menu item to MAXIMUM.
MINIMUM The display shows only track, time and, if activated, the volume level.
MAXIMUM The display shows additionally the operating mode of the CD drive.
RC-INPUT If you want to change the inputs of the CD player with the buttons STATION +/- of the
remote control, you should set this item to YES. Is this item set to NO, you can change the
inputs with the INPUT buttons on the front of the unit only.
NO Change of inputs with the remote control is not possible..
YES Change of inputs can also be done with the remote control.
INIT-VOLUME You can select the initial volume level in this menu item. This adjustment is only valid, when
the menu item OUTPUT is set to VARIABLE.
The setting range is between volume level 01 to the maximum of 20.
If set to LAST, the 089 remembers the last volume right before turning off the device,
limiting the value to 20 for safety reasons.
DEFAULTS If you want to set all menu items to default, incl. the display brightness, you should press
the button OK of the remote control after selecting this menu item. The alphanumeric
display will show CHANGED to confirm the setting.
!
!

12
REMOTE CONTROL
POWER The POWER button switches the CD player on or off, provided the Mains switch is set to
ON and the power switch on the front panel is set to STBY.
DIM Pressing the DIM button varies the brightness of the alphanumeric display in four steps
between “max. brightness” to “off”.
If brightness is selected to “off”, the display will light up only when any controls are used to
change settings. After a few seconds it automatically switches off again.
AUDIO With the AUDIO button you can choose the rate of the internal sample rate converter:
96kHz and 192kHz respectively. The setting to 192kHz will be indicated by the illuminated
AUDIO LED (16).
REPEAT Pressing the REPEAT button once or several times causes a track or the complete CD to
be repeated. The repeat mode is shown in the alphanumeric display:
- a simple arrow shows the repeating of one track
- a returning arrow shows the repeating of the complete CD
MENU With the MENU button you can activate or leave the SYSTEM SETUP.
Numbers 0 to 9 The numerical keypad serves to select a track directly. The playback of the selected track
begins automatically after the selection.
Navigation buttons With the navigation buttons
you can select and set menu items in the SYSTEM
SETUP (see chapter SYSTEM SETUP) and programming a favorite track selection of a CD.
PLAY/PAUSE Pressing the PLAY/PAUSE button starts playback of the CD. The playback can be paused
by pressing the PLAY/PAUSE button again.
STOP The playback of the CD can be stopped by pressing the STOP button.
For a restart of the CD at the beginning, press the PLAY button.
SKIP >| By briefly pressing the SKIP >| button playback is advanced to the beginning of the
following track. By pressing it several times you can skip ahead one track at a time.
SKIP |< By briefly pressing the SKIP |< button playback is returned to the beginning of the playing
track. By pressing it several times you can skip back track by track.

13
SEARCH >> Briefly pressing the button SEARCH >> alternately activates the slow or the fast forward
mode. To switch back to normal playback mode, press the button PLAY/PAUSE.
SEARCH << Briefly pressing the button SEARCH << alternately activates the slow or the fast backward
mode. To switch back to normal playback mode, press the button PLAY/PAUSE.
VOLUME By pressing either the VOLUME + or VOLUME – buttons you can adjust the sound level.
The level is shown in the VOLUME display (7). Pressing the corresponding button on your
remote control lowers or rises the output volume.
Remember that this feature is only available if the menu item OUTPUT in the SYSTEM
SETUP is set to VARIABLE.
STATION With the buttons STATION + and STATION – you can select the external inputs ANALOG,
RCA, TORX, MMI (optional) or the internal CD drive. A lit INPUT LED (2) indicates the
selected input.
Input selecting with the STATION buttons is only possible, when the menu item RC-INPUT
in the SYSTEM SETUP is set to YES.
MODE The TIME display (7) can be changed by pressing the MODE button between:
- showing the elapsed playing time of the current track
- showing the elapsed playing time of the current CD
- showing the remaining playing time of the current CD
PROGR. With the button PROGR. you can activate or deactivate the programming mode for an
individual track selection of a CD.
OK This button confirms your selection of a track while programming a favorite track selection
of a CD.
Confirming the SETUP DEFAULT item resets the device to factory setting.
CLEAR With the button CLEAR you can delete a favorite track program.
All other buttons of the remote control have no functions in respect to the 089.

14
Activating the
programming mode
Arranging a
program
Saving a
program
Playback of the
program
Selecting a defined
program space
Programming a
track
Deleting a
program
To start the program function, press the PROGR. button of the remote contr
ol. The
alphanumeric display will show PROGRAM shortly and then the programming mode starts.
The display shows now PRG: 01 TCK: 00 whereby PRG stands for program space, TCK
stands for the track which should be programmed on this program space.
The selection of a track will be done with the arrow button
for the following tracks and
for the previous tracks. Press the button OK
of the remote control, if you selected the
desired track. This track will be saved on the selected program space. The display s
hows
then SAVED
to confirm the programming. Afterwards the following program space will be
activated for programming.
To save your favorite track program and leave the programming mode press the button
PROGR. of the remote control.
If your programming is
invalid, because the content of all program spaces is 00 for example,
the PROGRAM LED (14) remains dark.
If your programming is valid, the PROGRAM LED (14) will light up.
When you have left the programming mode and the PROGRAM LED (14)
is on, you can
start your favorite track selection by pressing the button PLAY/PAUSE.
Press the button
of the remote control. In front of the program space number an arrow
shows you that you can select a program space. The selection will be done with the arrow
button
for the following program spaces and
for the previous tracks.
Press the button
of the remote control. In front of the track number an arrow
shows
that you can choose a track for the selected program space. The selection of a track will be
done with the arrow button
for the following tracks and
for the previous tracks Press
the button OK
of the remote control, if you got the desired track. This track will be saved on
the selected program space. The display then shows SAVED to confirm the pr
ogramming.
Afterwards the following program space will be activated for programming.
A programmed track selection can be deleted by pressing of the button CLEAR
of the
remote control or by opening the sliding cover. If the program is deleted, the PROGRA
M
LED (14) turns dark.
If you wanted to delete a program while being in the programming mode, you must also
press the button CLEAR. Afterwards the display shows CLEAR?
. If you want to delete the
program really, you have to press the button OK.
PROGRAMMING A FAVOURITE TRACK SELECTION OF A CD
A total of 50 tracks from a CD can be programmed for playback in a selected order. Programming can only be done
using the remote control. The program plays the tracks in the selected order.

15
BURLINK
CONNECTIONS
Connecting to the BURLINK interface can be either done with the 9 pin D-SUB connector (RS-232) or with the USB
connector.
RS-232 configuration: 9600Baud, 8bit, parity: none, 1 stop bit, no hardware handshake
A USB device driver needs to be installed when using the USB connector. System requirements for using the USB
software are either WINDOWS 2000 or WINDOWS XP operating system.
COMMANDS
Following are listed the possible commands to control the CD player 089. All commands needs to be sent in capital
letters finished with a “carriage return“ \r .
POWON\r switches the unit on
POWOFF\r switches the unit to standby mode
VOLUP\r increases the volume by one step
VOLDN\r decreases the volume by one step
PLAY\r starts playback of the CD
PAUSE\r pauses playback of the CD
STOP\r stops playback of the CD
SKIPFW\r skips forward to the following tracks
SKIPBW\r skips backward to the beginning of the current and previous tracks
FORW\r starts search forward slow
BACKW\r starts search backward slow
FORWR\r starts search forward fast
BACKWR\r starts search backward fast
KEY0 to KEY9\r for direct track selection
REPEAT\r switches on the repeat modes (Track, Disc) or off
CLEAR\r deletes a favorite track selection program
AUDIO\r switches between a sample rate of 96kHz and 192kHz
AUDIO96\r switches to a sample rate of 96kHz
AUDIO192\r switches to a sample rate of 192kHz
DMODE\r opens and closes the SYSTEM SETUP
INP+\r switches the inputs of the CD player
INP-\r switches the inputs of the CD player
DIM0\r switches the display brightness to maximum
DIM1\r switches the display brightness to middle
DIM2\r switches the display brightness to low
DIM3\r switches the display to off mode
DIM\r switches the brightness step by step (0,1,2,3,0,1,2....)
TYPE\r shows the type of the unit
VERSION\r shows the software version of the unit
INFO\r shows the content of the alphanumeric display

16
GENERAL INSTRUCTIONS
Please read these instructions and the owner´ s manual carefully and keep these instructions safely with the
owner´ s manual of your component.
If you have any questions, we ask you to contact your dealer.
Operating temperature An operating temperature that is too high or too low may cause malfunctioning. We
therefore recommend letting the unit sit for a while after unpacking and before connecting
and operating it.
Setting up When choosing a place for your equipment please observe the following:
- Avoid direct sunlight.
- Do not subject the equipment to excessive heat, cold, humidity or dust.
- Provide adequate air circulation; avoid placing the equipment in enclosures.
- Slots and other openings in the housing are for ventilation. They must not be covered up.
- Please note that the component is not exposed to dripping water or splash water, also
don´ t place boxes with liquid in onto your component.
- Open flames like candles should not be placed on top of any electronic unit.
Mains voltage - Check before operating the unit to see if the mains voltage setting shown on the back
panel below the AC mains input conforms to the voltage of your household power supply.
Any change should only be done by an expert only.
- For AC connection please use only the three-pronged power cable provided.
The grounding pin should not be bypassed under any circumstances. Connect the
component only to a wall outlet with fully functional grounding pin.
Comm. Operation - Before installation switch off all components of a stereo system. Switch them back on only
after making sure that any and all connections have been made correctly and completely.
- Never try to operate the equipment when it has obviously been damaged or if liquid has
gotten into it.
Terminals The pins of the connecting terminals on the back panel should not be touched by fingers
under any circumstances. Static discharges may damage the electronic circuitry inside the
unit.
Interconnects We supply custom-made balanced as well as unbalanced interconnect cables and speaker
cables of any length to ensure highest-quality signal paths for our components. The
impedance of our cables is ideally matched to all BURMESTER components.
For the cleanest power supply we recommend our triple-shielded power cord BURMESTER-
POWER.
IR receiver The IR receiver receives signals from the BURMESTER remote control and must not be
covered up by objects.
Heat development Be careful when touching the housing – it may get quite warm during operation.
Reset If the unit does not react when pressing the control buttons on the front it may be reset to
normal operation by switching it off and back on using the AC mains switch in the back.
Table of contents
Other Burmester CD Player manuals