Cadenceberge CAD-HD4000 User manual

1
4K Video Capture
MODEL NO: CAD-HD4000
User’s Manual

2
Safety Precautions
1. Do not disassemble the unit.
2. Please note that the device and/or plugged in USB drives
may become very warm during use.
3. Do not operate the unit around water or rain. Do not operate
the unit around any kind of machines or appliances (other
than computers).
4. Turn off and unplug the unit when not in use.
5. Use only the included accessories with the device.
6. Do not connect high powered, amplified audio outputs to the
“in” ports of the device.
7. Follow all copyright laws in your country. You are
responsible for your own use of this device.

3
What’s In The Box?
a. HD Video Capture Box Ultimate (1080P Edition)
b. HDMI Cable
c. AV Adapter
d. Power Adapter
e. Power/USB Cable
f. User’s Manual
Device Diagram & Explanation (continued on next page)

4
1. LED Indicator: A red light appears when the device is either turned on
or charging. A red light blinks when the device is recording.
2. Power Button: Hold down to turn the device on or off. To turn off/on
the device’s LCD only, press the button with a single press.
3. Headphone/Microphone Jack: Input for microphone/headset or
output for headphones
4. AV IN: Input jack for RCA input (from VCR, camcorder, etc.)
5. HDMI IN: HDMI input port.
6. HDMI OUT: HDMI output port.
7. USB: Plug in a USB hard drive or USB flash drive.
8. Panel Buttons:
9. Menu/Back: Press this button to enter or exit menus.
In playback mode: press to delete a recording.
10. Vol+/-,Mic+/-: Press these buttons to control
Speaker/Microphone volumes
11. Mode: Press this button to switch among
Record/Photo/Playback modes.
12. Rec/Stop: A single press will start/stop recording in recording mode.
In photo/snapshot mode, press to capture a snapshot.
13. USB Power / PC: Power input (or connect to PC for live
streaming/PC recording)
14. Micro SD card slot: Insert an SD card (up to 128GB) –with gold
contacts facing you –for recording or playback.

5
Quick Start Guide –Normal Recording Mode
1.
IMPORTANT: Read the note on page #6 before continuing!
2.
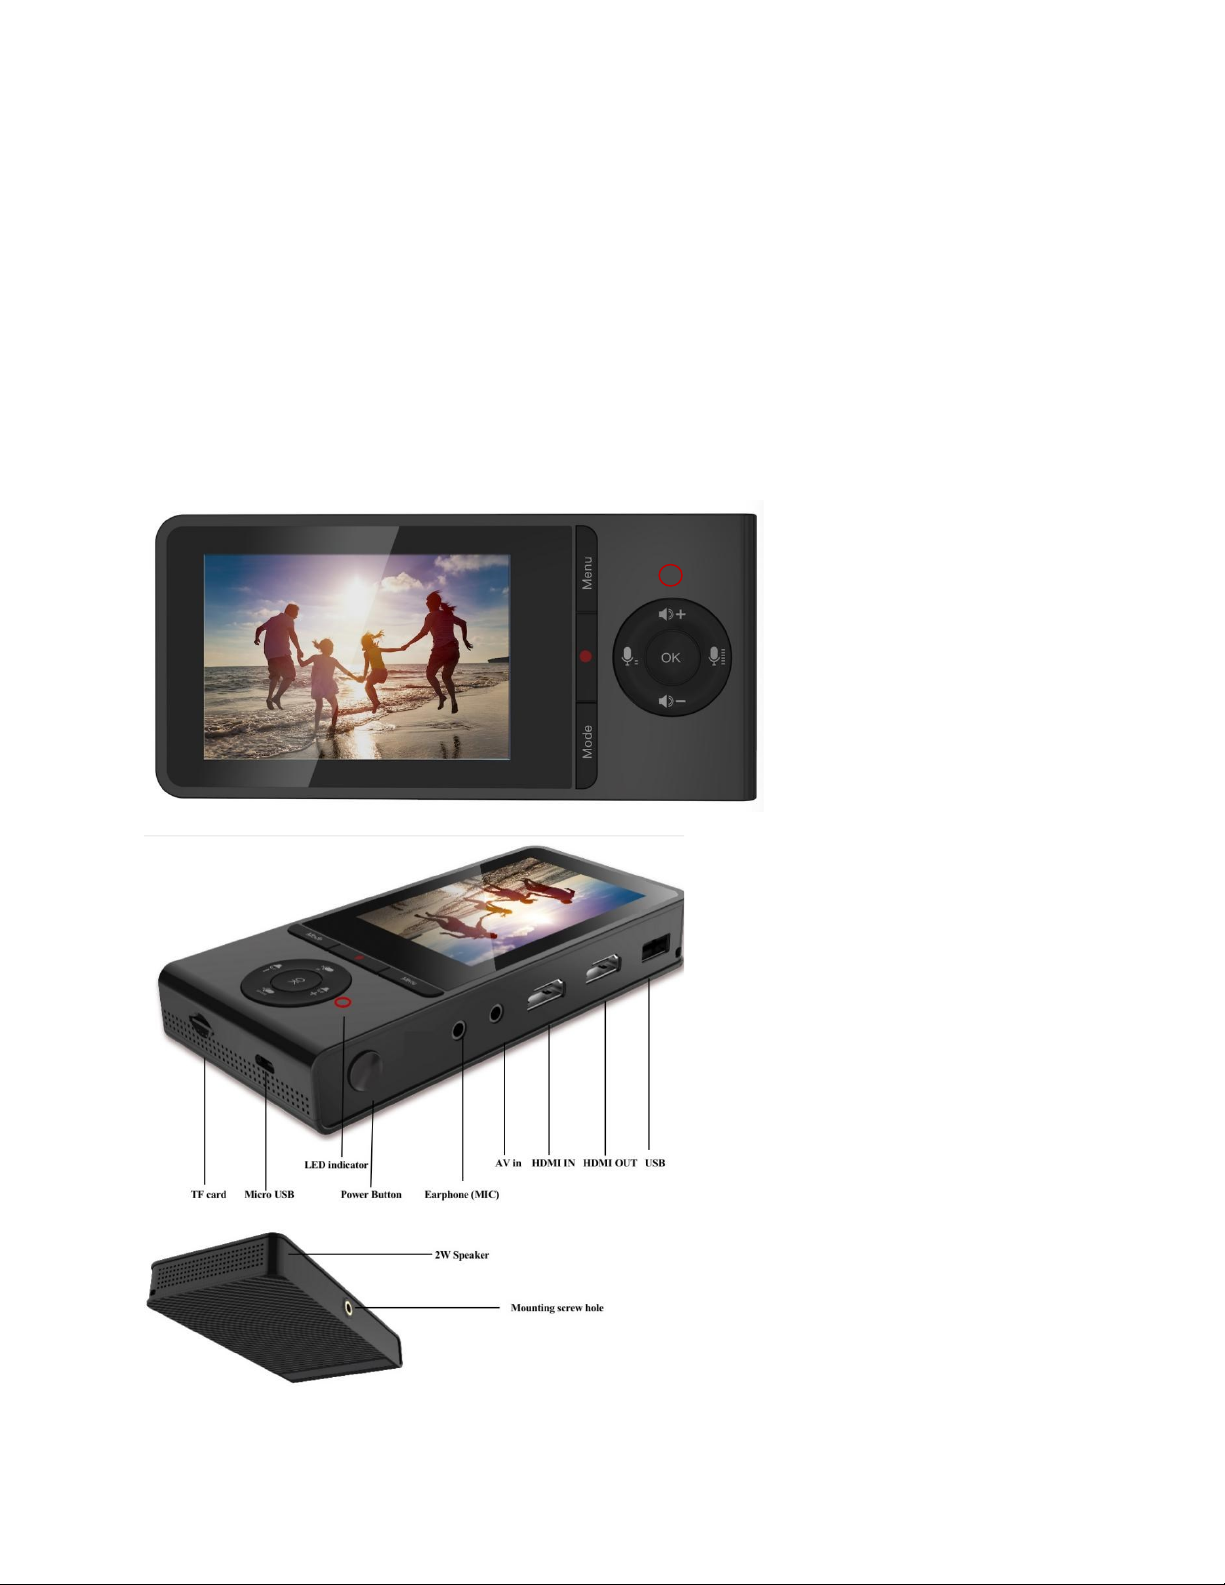
Connect the power adapter to the “USB Power / PC” port of the HD
Video Capture Box Ultimate. Plug in the power adapter to any power outlet.
3.
Turn on the HD Video Capture Box by holding down the power button
for several seconds. (The power button is located on the top of the device,
on the right side.)
4.
Using the included HDMI cable, connect your video source to the HD
Video Capture Box Ultimate. Plug it into the HDMI IN port (the third port
from the left).
NOTE: If you are connecting a VCR, camcorder, etc., use the AV cable
to plug into the AV IN port (the second port from the right). In the device
main menu, set “Video Source” to “AV” and press OK.
5.
If there is a signal from the HDMI cable, you should see video on the
LCD screen.
!! VERY IMPORTANT !! If your video source has HDCP (content
protection), the video will NOT appear or be recordable. This does
NOT mean the device is defective. This simply means that this device
complies with federal law and does not record from content protected
video sources. For gaming systems and cameras, you may be able to
turn off HDCP in your system/camera’s settings.
If you want the HDMI signal to “pass through” to your TV, use another
HDMI cable to connect your TV to the HDMI OUT port (the second port
from the left).
6.
Plug in a 128GB or smaller USB flash drive or hard drive into the
USB port (top left port) on the HD Video Capture Box, or insert a microSD
card into the microSD card slot on the right side of the device (gold
contacts facing toward you). NOTE: We highly recommend starting with a
brand new, “SanDisk” USB 3.0/microSD drive.

6
7.
Press the “Record” button on the HD Video Capture Box.
8.
To stop recording, press the “Record” button again. (Or to pause
recording, press the “OK” button. To resume recording, press the“OK”
button again.)
9.
To play back recordings on your device, press the “Mode” button
TWICE to go to “Playback” mode. You can press ▲▼ to adjust the volume.
10.
To play back or transfer recordings to your PC or Mac, use one of
the two methods below:
A)
Remove the USB drive or microSD card from your HD Video
Capture Box and plug it into your computer. Browse the drive and go
to the “video” folder. You will find your recordings in this folder.
B)
Connect your HD Capture Box to your PC using the micro USB to
USB cable. Turn on the device. Turn on your device and open the
Menu on your device. Scroll down to “USB Mode” and press “OK.”
Select “PC Storage Mode” and press “OK.” Press “Menu” to exit the
menu. Browse the new drive on your PC and go to the “video” folder.
You will find your recordings in this folder.

7
Quick Start Guide –Live Streaming or Recording
with OBS (PC Only)
1.
IMPORTANT: Read the note on page #6 before continuing!
2.
Connect the included micro USB cable to the “USB Power / PC” port on
the HD Video Capture Box. Plug the other end into your PC. (Macintosh not
supported.)
3.
Turn on your device and open the Menu on your device. Scroll down
to “USB Mode” and press “OK.” Select “PC Streaming Mode” and press
“OK.” Press “Menu” to exit the menu.
4.
Download & install the OBS software from www.OBSproject.com.
5.
Open the OBS software.
6.
Click Scenes
Add Scene
and enter a name.
7.
Click Sources
Add Video Capture Device
Device Selection, and
select “UHD UVC Camera.” (You may need to also click Sources
add
Audio Capture Device
Device Selection and select “UHD UAC Audio” to
add the audio as well.)
8.
ClickSettings
Audio
DesktopAudio Device,andchooseyour
speaker/sound card.
9.
Now you can start recording or live streaming your HDMI video source.

Device Specifications
Supported Video Resolutions
Input
4096x2160
(30P)
3840x2160
(30P)
1920x1080
60p)
1920x1080
(50p)
1920x1080
(30p)
1920x1080
(25p)
1920x1080
(24p)
1280x720 (60p)
1280x720 (50p)
720x480 (60p)
720x576 (50p)
HDMI Output
1920x1080 (60p)
Recording
USB Flash Drive/MicroSD Card Recording:
3840x2160 (30P). 1920x1080 (60p). 720x480 (60p).
PC Recording:
3840x2160 (30P). 1920x1080 (60p). 720x480 (60p).
Output format
MP4 (H.264/H.265)
CVBS standards (input)
NTSC,
PAL
Input signals
HDMI, AV, MIC, USB
Output signals
HDMI, Micro USB, MicroSD, USB, Headphones, Speakers
Supported file system
FAT32, NTFS, exFAT
Recording capacity
Maximum 32GB per file (NTFS/exFAT), Maximum 4 GB per file
(FAT32)
Recording Bitrate
1080P: 20 Mbps
Maximum storage capacity
128GB (USB Flash drive), 128GB (MicroSD card), 4 TB (HDD)
Power supply
DC 5V, 2A
Table of contents