Caldwell 720001 User manual

Product #720001 #721122 Instructions #1037402
Care & Usage Instructions
#721122 Premium Kit Contents:
1 - Chronograph
1 - Tripod
2 - Sun Shades
2 - IR LED Strips
1 - Carrying Case
1 - 15’ Audio Jack Cable
1 - Battery pack
1 - LED Strip splitter cable
4 - Rods
#720001 Chronograph Contents:
1 - Chronograph
2 - Sun Shades
1 - Carrying Sack
1 - 15’ Audio Jack Cable
4 - Rods

CHRONOGRAPH CONTENTS:
A - Chronograph
B - Sun Shades
C - Carrying Sack
D - 15’ Audio Jack Cable
E - Rods
PREMIUM KIT CONTENTS:
All Chronograph contents plus:
F - Tripod
G - Battery pack
H - LED Strip splitter cable
I - IR LED strips
J - Carrying Case
K - 110Volt AC Adapter
A.
C.
D.
F.
G.
H.
I.
B. E.
CONTENTS
J.
K.

SAFETY AND WARNINGS
READ THOROUGHLY ALL DIRECTIONS AND SAFETY INSTRUCTIONS
INCLUDED IN THE PACKAGE. FAILURE TO COMPLY MAY RESULT IN AN
UNSAFE FIREARM CONDITION THAT MAY CAUSE PROPERTY DAMAGE,
PERSONAL INJURY OR DEATH.
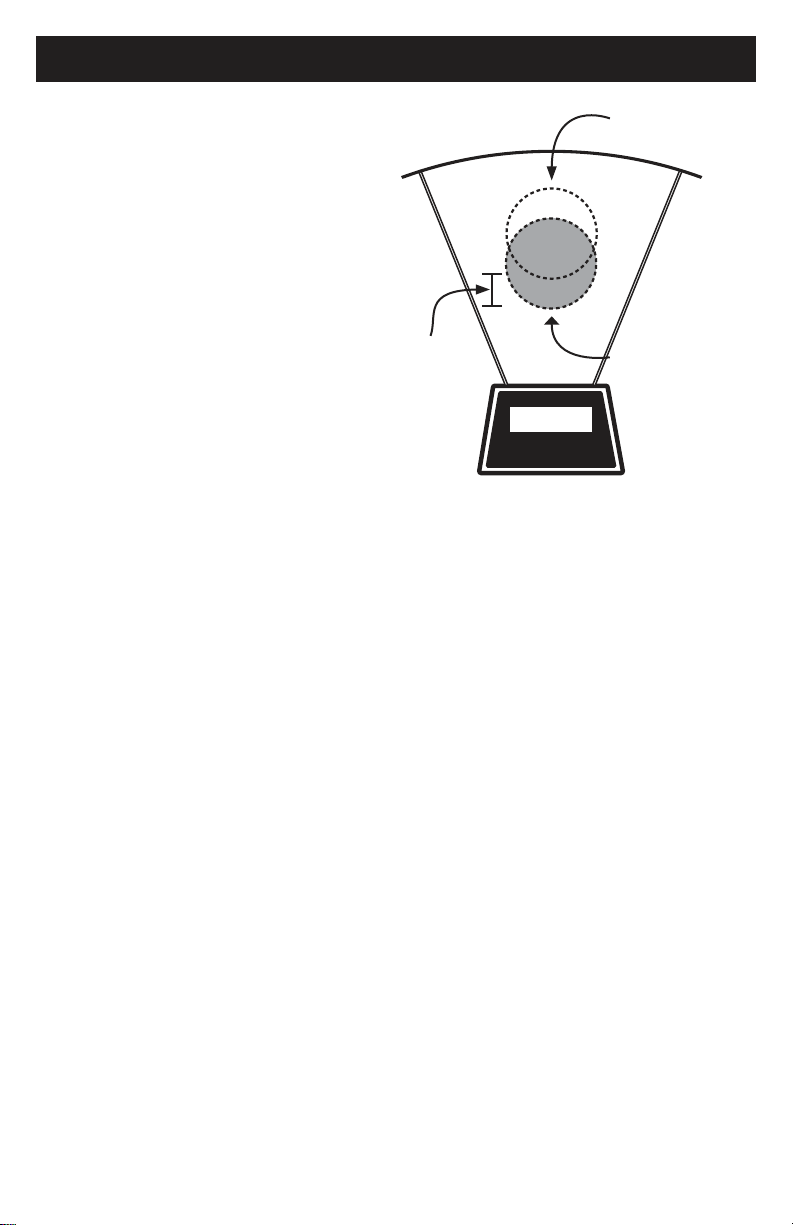
TARGET MUST HAVE A SAFE BACKSTOP. ALWAYS
FOLLOW ALL APPLICABLE SAFETY RULES WHILE USING THE
CHRONOGRAPH, INCLUDING BUT NOT LIMITEDTO:
1. FIREARM AND SHOOTING SAFETY RULES
2.AIRGUN, PAINTBALL GUN SAFETY RULES
3.AMMUNITION RELOADING SAFETY RULES
4.ARCHERY SAFETY RULES
IF YOU ARE NOT FAMILIAR WITH APPLICABLE RULES FOR YOUR
APPLICATION CONSULT THE MANUFACTURER(S) OF THE FIREARM,
AIRGUN, PAINTBALL GUN, BOW OR RELOADING EQUIPMENT/
COMPONENT…
VELOCITY MEASUREMENTS SHOULD NOT BE USED
TO CALCULATE COMBUSTION PRESSURES IN YOUR CARTRIDGE OR
CHAMBER. AGAIN, DO NOT EXCEED PUBLISHED MAXIMUM POWDER
LEVELS INYOUR AMMUNITION.
DO NOT TRY TO PROTECT YOUR CHRONOGRAPH
WITH ARMOR PLATING. BULLET RICOCHET FROM HITTING THIS
PLATING COULD CAUSE PROPERTY DAMAGE, PERSONAL INJURY OR
DEATH. CHRONOGRAPH COMPONENTS ARE REPLACEABLE.
ALL CHRONOGRAPH UNITS HAVE INHERENT UNCERTAINTY WHEN
RECORDING VELOCITY MEASUREMENTS. SEVERAL UNCONTROLLABLE
VARIABLES CAN AFFECT EACH MEASUREMENT AND CONTRIBUTE TO
THIS UNCERTAINTY, INCLUDING SUNLIGHT INTENSITY, SUNLIGHT
ORIENTATION, CLOUD COVER, WIND, SHADOWS, AND GROUND
REFLECTIVITY OF CEMENT, WATER,OR SNOW,ETC. WHEN COLLECTING
DATA, BE SUSPICIOUS OF ANY DATA POINTSTHAT HAVE GREATERTHAN
4% DIFFERENCE FROMTHAT AMMO’S AVERAGE STRINGVELOCITY.
SPECIAL CARE SHOULD BE TAKEN WHEN SHOOTING CERTAIN TYPES
OF AMMUNITION. GAS CHECKS, WADS, SABOTS, ETC. CAN SEPARATE
AND IMPACTYOUR CHRONOGRAPH CAUSING DAMAGETOTHE DEVICE.
AS WITH ANY ELECTRONIC DEVICE, WATER CAN DAMAGE CERTAIN
COMPONENTS. TO PREVENT DAMAGE, DO NOT USE CHRONOGRAPH
OUTSIDE WHEN IT IS RAINING WITHOUT BEING PROTECTED.

SPECIFICATIONS
• Velocity range 1 to 9000 FPS
• Power requirements: 9v battery (Not Included)
• Operating temperature: 20 – 120 degrees F
• Smart Phone Interface
ASSEMBLY
¼ - 20 threaded insert for tripod mounting
9V battery and spare battery compartment.
(batteries not included)
Rod and Sun Shade
attachment
Sun Shade Rod Pockets
Projectile Sensors
1. Install a 9 volt battery
2. Insert rod ends into Rod Pockets on the Chronograph housing
3. Install Sun Shades on ends of rods, be sure to seat rod ends all the way
into pockets on Sun Shades

OPERATION
MPS< >OFF< >FPS
1. Place Chronograph on stable surface at the appropriate height for ring projectile
through the shooting window.The Chronograph may be mounted on top of a
Tripod using the ¼-20 threaded insert.
2. Position the unit 10 to 15 feet in front of the muzzle of a rearm or
if using with a bow, at least one full arrow length in front
3.Align the Chronograph:
a. Height, so that the projectile travels through the center
of the shooting window
b.Tilt Angle, so projectile travels parallel to the top surface of the housing
c. Left/Right, so that projectile is in line with housing
4.Turn the unit on by selecting feet per second (FPS) or meters per second
(MPS) with the power switch
5. (Optional) Connect to smart phone via included audio cable
6. (Optional) Install Light Kit
a. Remove Sun Shades and place LED Strip Housings on top of Rods
b. Connect LED Strip Splitter Cable to each LED Strip
c. Connect the Splitter Cable to either the Battery Pack or
the 110 Volt AC Adapter
d. Rotate the switch on the Splitter Cable to on, one visible
red LED in each strip will illuminate.
NOTES (Premium kit ONLY):
Infrared (IR) LEDs provide the highest level of performance with the Chronograph sensors,
IR light is not visible to the human eye so one visible red LED is included in each light strip
for easy visual conrmation that the light kit is on and working.
The high output LEDs consume battery power rapidly, use high quality Alkaline or Lithium
batteries. Depending on battery type and environmental conditions a set of batteries will
only provide optimal light output for approximately 2 hours.
As a set of batteries loses power the red LEDs may still be partially visible even though the
IR LEDs are not putting out an optimal level of light. If you notice errors or inconsistent
readings, switch to 110 power or replace the batteries.
Use The 110 Volt AC adapter instead of batteries whenever possible.

READING THE DISPLAY
Initial “ready” screen after startup sequence
-[ ]-
14 Projectile velocity reading – ready for next shot
Duplicate reading alert (alternate ashing with shot
velocity – ready for next shot
Error Alert .
Err2: Projectile not recorded by front sensor
Err3: Projectile not recorded by rear sensor
– ready for next shot
Low battery alert – change battery
SMART PHONE CONNECTION
1. Go to the appropriate application marketplace for your smartphone/
mobile device and search for “Caldwell Ballistic Precision Chronograph”.
2.Alternatively, http://www.battenfeldtechnologies.com/ provides direct
links to the appropriate apps for the different mobile platforms supported
by Caldwell.
3. Once the app is installed you will see the Caldwell Ballistic Precision app
icon in your smartphone home screen.
USB Port
(Factory use only)
3.5mm TRRS
Jack (Smartphone
connection)
Connect 15’ audio jack cable to side
of Chronograph then connect other
end to smartphone headphone jack.
APP FUNCTIONS
• Instant read out
• Note Log
•Temp, BP,Avg, SD, Min, Max, Spread, Shot/sec
• Save, email and text Shot Groups
• Imperial/Metric Units
• Zip Code location

TIPS
1. Understand the ight of your bullet
will be lower than your sight picture.
Most scopes are mounted 1.5” higher
than the centerline of the barrel.
Always aim higher than the middle of
the shooting area.
Scope Height
(Usually 1-3”)
Point of Aim
(Sight Picture in Scope)
Actual Bullet Path
2. Avoid low light conditions, such
sunrise and sunset. During these
times the extreme low angle of the sun
can cause added variation due to
reections and low levels of light. Use
of optional light kit will improve
function in these conditions.
3. Clean Lenses. Remove build-up of dust on the sensors. Use a Q-tip or canned air
to clean the lenses, being especially careful not to scratch them.
4. Ensure chronograph is level. This will make sure that the projectile height as it
passes over each sensor opening is the same.
5. Use a stable platform for the chronograph. A table will also work and so will a
dedicated metal stand.A tripod works well to position and align the chronograph
6. Avoid shooting over reective surfaceslike snow or some types of sand. May
be able to reduce reection by laying out a large, dark colored tarp under the
chronograph setup in such instances.
7. You’ll get the best readings with even lighting. Best case scenario is overcast
skies, where the light is already diffused by clouds.
8. Remove Sun Shades in heavy overcast or shaded conditions. The Sun Shades
are only necessary in sunny or partly cloudy conditions,andby removing them in other
conditions you’ll allow more light into the chronograph.
9. On sunny days place the chronograph in the shadow of a building or opaque
wall. Ensure the sensors have a clear view of the sky, but the chronograph itself is in
the shade. You could alternatively add sun shields to create a shadow. The goal is to
eliminate direct sunlight on the chronograph, while still ensuring the sensors have a
direct view of the sky. However, avoid placing the chronograph in the shade of a tree.
The uneven sunlight that lters through the tree will cause more problems
than it will solve.

10. Avoid orescent lighting. Florescent lighting will inadvertently trigger the projectile
sensors and give false readings.
11. Stand one arrow length away for bows and crossbows. Shoot arrows over the
projectile sensors evenly so the arrow passes the same height over both sensors. Blunt
arrow tips work best.
12. For shotguns stand only 5 feet away. Shotgun blast may affect the projectile
readings. Watch out for ying wads that might damage the chronograph.
13. Paintball guns can be red from any distance. You should be careful that no
paint splatter gets on the projectile sensors.
14. Optional Light Kit Infrared (IR) LEDs provide the highest level of performance
with the Chronograph sensors, IR light is not visible to the human eye so one
visible red LED is included in each light strip for easy visual conrmation that
the light kit is on and working.
The high output LEDs consume battery power rapidly, use high quality Alkaline or
Lithium batteries. Depending on battery type and environmental conditions a set
of batteries will only provide optimal light output for approximately 2 hours.
As a set of batteries loses power the red LEDs may still be partially visible even
though the IR LEDs are not putting out an optimal level of light. If you notice
errors or inconsistent readings, switch to 110 power or replace the batteries.
Use The 110 Volt AC adapter instead of batteries whenever possible.
TIPS cont.
Table of contents
Other Caldwell Watch manuals