3
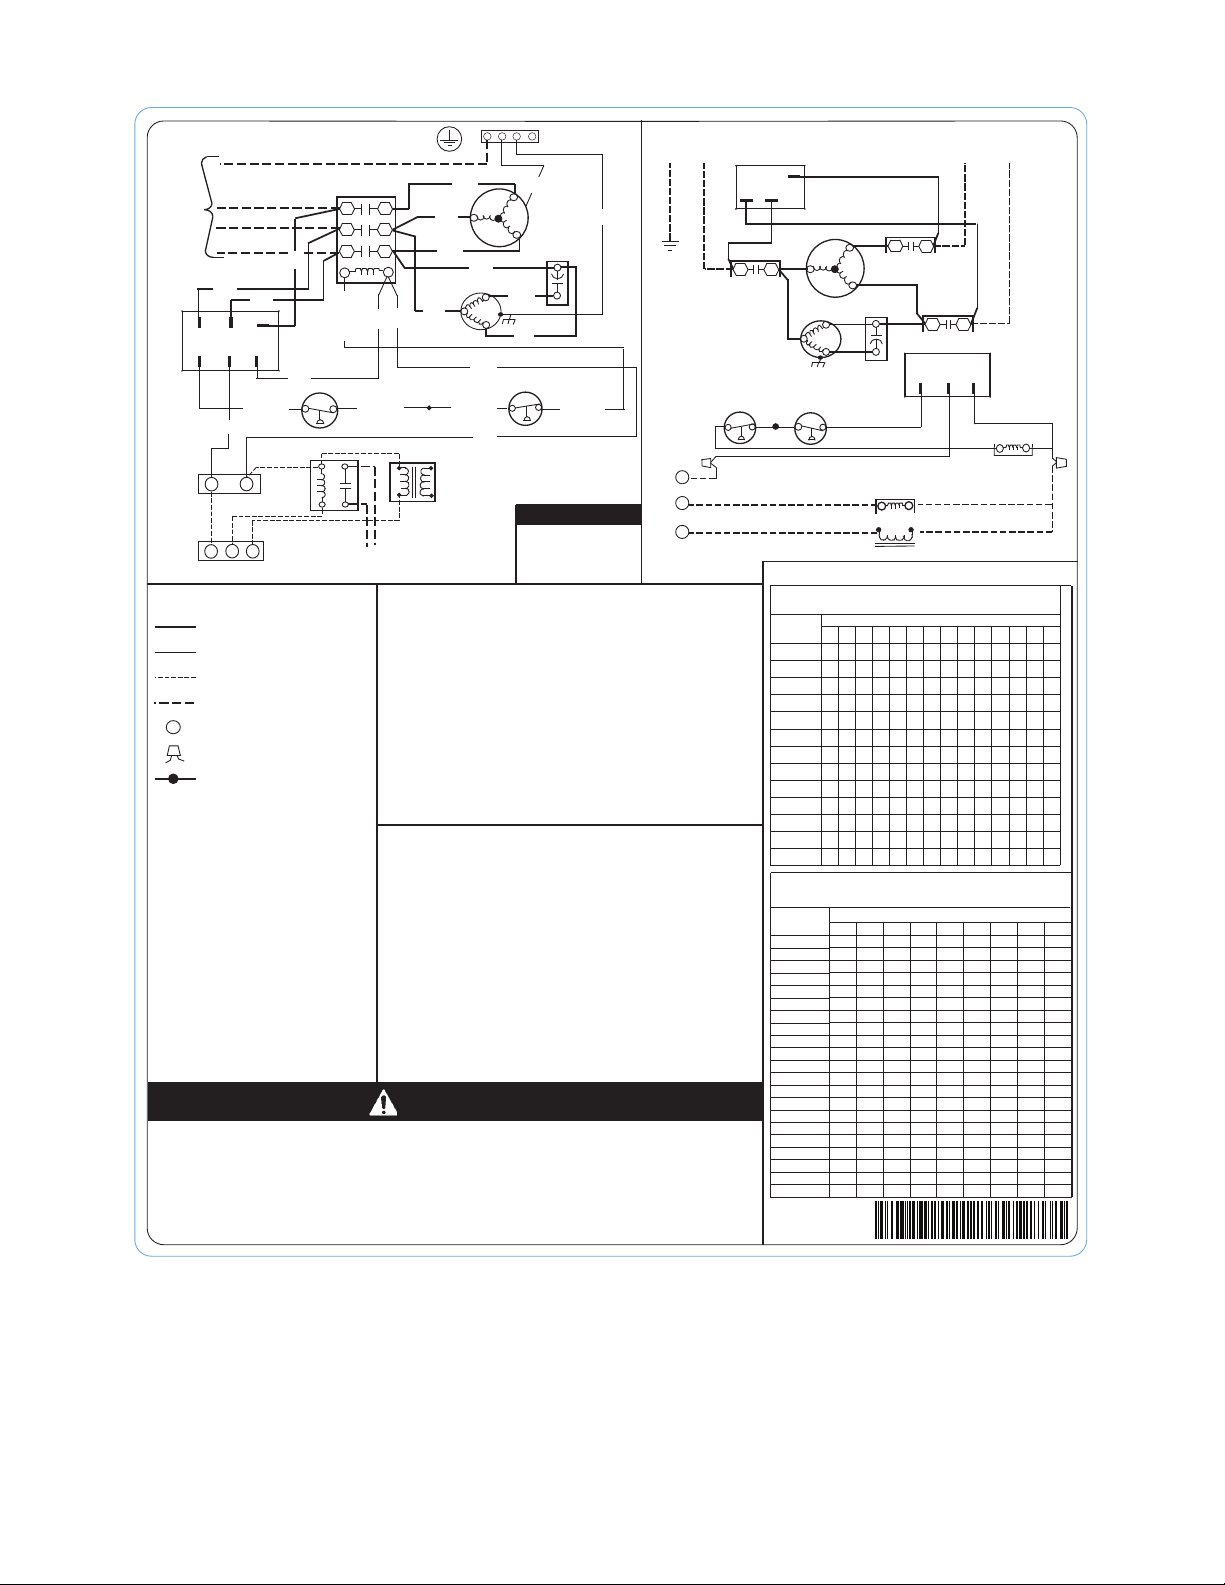
- LEGEND -
CAUTION
EVAPORATOR ENTERING AIR °F WB.
TEMP °F
OUTDOOR
50
TABLE I-SUPERHEAT CHARGING TABLE
(SUPERHEAT °F AT LOW-SIDE SERVICE PORT)
52 54 56 58 60 62 64 66 68 70 72 74 76
55 9 12141720232629323537404245
60 7 10121518212427303335384043
65 -- 6 101316192124273033363841
70 -- -- 7 1013161921242730333639
75 -- -- -- 6 9 12 15 18 21 24 28 31 34 37
80 -- -- -- -- 5 8 12 15 18 21 25 28 31 35
85 -- -- -- -- -- -- 8 11 15 19 22 30 3326
90 -- -- -- -- -- --
--------------
-- -- -- -- -- -- --
--
--
--
--
--
----
--
----
--
----
--
------
--
-- --
--
5 9 13 16 20 24 27 31
95 6 101418222529
100 8 1215202327
5 9 13 17 22 26
611152025
8141823
--
--
-- --
-- -- --
105
110
115
91898785838179777540
89878583817977757338
87858381797775737136
85838179777573716934
83817977757371696732
81797775737169676530
79777573716967656328
77757371696765636126
75737169676563615924
73716967656361595722
71
696765636159575520
69676563615957555318
67656361595755535116
65636159575553514914
63615957555351494712
61595755535149474510
5957555351494745438
5755535149474543416
5553514947454341394
5351494745434139372
5149
474543413937350
85.782.479.276.073.070.067.164.2
SUCTION PRESSURE AT SERVICE PORT PSIG.
TEMP. °F
61.5
SUPERHEAT
(MEASURED AT LOW-SIDE SERVICE PORT)
TABLE II-REQUIRED SUCTION TUBE TEMPERATURE °F
PRM LED INDICATOR
OFF: NO 24VAC
ON: OK
FLASH: PHASE PROBLEM
NOTE
OFM
400 3Ø
POWER
SUPPLY
A1
A2
*LPS
BLU/PNK
*HPS
INDOOR BLOWER MOTOR
EXTERNAL
POWER
SUPPLY
24 V
(NOTES #4)
BRN
YEL/PNK BLU/PNK
YEL/PNK
C
R
SEE NOTE #11
A3
T2
T1
T3
BLU
YEL
CAP
COMP
IFR
BRN
L3L1 L2
CONT 24 COM
PRM
BLU/PNK
BRN
BLK
YEL
BRN
BRN
A1
EQUIP
GND
OFM
A2
COMP
CAP
A3
T2
T1
T3
L3 L1
L2
PRM
BRN
BLU
1. Operate Unit A Minimum Of 10 Minutes Before Checking Charge.
2. Measure Suction Pressure By Attaching A Gage To Suction Valve Service Port.
3. Measure Suction Temperature By Attaching An Accurate Thermister Type Or Electronic
Thermometer To The Suction Line At Service Valve. Measure Outdoor Air Dry-Bulb
Temperature With A Thermometer.
4. Measure Outdoor Air Dry-Bulb Temperature With A Thermometer.
5. Measure Indoor Air (entering Indoor Coil) Wet Bulb Temperature With A Sling
Psychrometer.
6. Refer To Table I. Find Outdoor Temperature And Evaporator Entering Air Wet-Bulb
Temperature. At This Intersection Note The Superheat.
7. Refer To Tabel II. Find Superheat Temperature Located In Step 6 And Suction
Pressure. At This Intersection Note Suction Line Temperature.
8. If Unit Has A Higher Suction Line Temperature Than Charted Temperature, Add
Refrigerant Until Charted Temperature Is Reached.
9. If Unit Has A Lower Suction Line Temperature Than Charted Temperature, Remove
And Recover Refrigerant Until Charted Temperature Is Reached.
10. If Outdoor Air Temperature Or Pressure At Suction Valve Changes, Charge To New
Suction Line Temperature Indicated OnChart.
11. This Procedure Is Valid When Indoor Air Flow Is Within ±21% Of Its Rated CFM.
COOLING ONLY CHARGING PROCEDURE
*MAY BE FACTORY OR FIELD INSTALLED
CONNECTION DIAGRAM SCHEMATIC DIAGRAM (LADDER FORM)
T2 L2
CONT
T3 L3
CONT
L1 T1
CONT
CONT
L2 T2
L1 T1
L3 T3
BLK
BLK
YEL
YEL
336013-101 REV. C
1. Symbols Are Electrical Representation Only.
2. Compressor And Fan Motor Furnished With Inherent Thermal Protection.
3. To Be Wired In Accordance With National Electric N.E.C. And Local Codes.
4. N.E.C. Class 2, 24 V Circuit, Min, 40 Va Required, 60 Va On Units Installed With LLS.
5. Use Copper Conductors Only. Use Conductors Suitable For At Least 75ºC (167ºF).
6. If Indoor Section Has A Transformer With A Grounded Secondary, Connect the
Grounded Side To The BRN Lead.
7. If Any Of The Original Wire, As Supplied Must Be Replaced, Use The Same Or
Equivalent Wire.
8. Check All Electrical Connections Inside Control Box For Tightness.
9. Do Not Attempt To Operate Unit Until Service Valves Have Been Opened.
10. Do Not Rapid Cycle Compressor. Compressor Must Be Off 3 Minutes To Allow
Pressures To Equalize Between High And Low Side Before Starting.
11. It Is Imperative To Connect 3Ø Field Power To Unit With Correct Phasing. The Phase
Rotation Monitor Will Not Allow The Contactor To Be Energized If The Phasing Is Not
Correct. If Phasing Is Reversed, Simply Interchange Any Two Of The Three Power
Connections On Field Side.
NOTES:
CONT
CAP
COMP
GND
IDF
*HPS
IFR
*
LPS
LVTB
OFM
PRM
CONTACTOR
CAPACITOR
COMPRESSOR
GROUND
INDOOR FAN
HIGH PRESSURE SWITCH
INDOOR FAN RELAY
LOW PRESSURE SWITCH
LOW VOLTAGE TERMINAL BLOCK
OUTDOOR FAN MOTOR
PHASE ROTATION MONITOR
FACTORY POWER WIRING
FACTORY CONTROL WIRING
FIELD CONTROL WIRING
FIELD POWER WIRING
COMPONENT CONNECTION
FIELD SPLICE
JUNCTION
GRY
GRN/YEL
GND
GRY/YEL
*LPS
*HPS
IFR
THERMOSTATINDOOR
Y
G
R
CR
EXTERNAL POWER SUPPLY 24 V
CONT
PRM
CONT 24V COM
1. Compressor damage may occur if system is overcharged.
2. This unit is factory charged with R410A in accordance with the amount shown on the rating plate. The charge is adequate for most systems using
matched coils and tubing not over 15 feet long. The best performance will be achieved when the unit operates with a suction gas superheat at the
compressor inlet of 5 ºF at normal rating conditions of the air conditioning and refrigeration institute (ARI). This chart may be used to approximate
the charge if ARI rating conditions cannot be obtained. ARI rating conditions are equivalent to DOE test “A” conditions. See product data literature
for required indoor air flow rates and for use of line lengths over 15 Ft.
3. Relieve pressure and recover all refrigerant before system repair or final unit disposal. Use all service ports and open all flow-control
devices, including solenoid valves.
TO INDOOR THERMOSTAT
YGR
LVTB
YC
Fig. 3 – 38CKE048--060 --X--9 400--50--3


 - A User manual")


 null")