Centrales LCD7023PBAB0 User manual

This service information is designed for experienced repair technicians only and is not designed for use by the general public.
It does not contain warnings or cautions to advise non-technical individuals of potential dangers in attempting to service a product. Products
powered by electricity should be serviced or repaired only by experienced professional technicians. Any attempt to service or repair the product
or products dealt with in this service information by anyone else could result in serious injury or death`
SERVICE MANUAL
Twin-tub washing machine
Model: LCD7023PBAB0
WARNING

1
Chapter 1: CONTENTS
1.
Contents 1
2.
Features 2
3.
Specifications 3
4.
Safety precondition 4
5.
Warning and cautions 5
6.
Installation and accessory parts 6
6-1.Dismantleandinstallation 6
6-2.PointsofAttentioninAfter-salesService 9
7.
Appearance brief introduction 10
7-1.Net dimension 10
7-2.Name parts 11
8.
Maintenance
service
and
check
method 12
8- 1.Wash parts 12
8- 2.Spin parts 13
8- 3.Spin parts 14
9.
Trouble-shooting Answer to question 17
10.
Wiring diagram 18
Model NO: LCD7023PBAB0
Service Manual

2
Chapter 2: FEATURES
Features
Full plastic cabinet
Full plastic twin-tub integrated with cabinet,
no rustiness for be affected with damp.
Choose water current and washing time
Choose spinning time
Separate washing and spinning
Full plastic washing tub and spinning tub
Concavo-convex on veins in Tub side
Special drain lid
Wide range voltage design,not be afraid of fluctuating.
Unique Wash-board design ,more clean
Model NO: LCD7023PBAB0
Service Manual

3
Chapter 3: SPECIFICA TIONS
Model
Free standing
Built under
MABE60-186
x
EAN code
/
Energy efficiency class
Features for use
Wash capacity
kg
7.0
Spin capacity
kg
4.5
Level/Volume
L
5/52L 4/47L 3/42L 2/37L 1/32L
Preset
H
x
Residual da mpness
%
<115
Control model
timer
controller
x
Normal c omputerized
x
Fuzzy computerized
x
Frequency conversion
x
Service fe atures
Programs
2
Short cycle
x
Inlet heating select
x
Heating selection
x
Spinning cycle (selector)
x
Spinning cycle (variable)
x
Start/Pause
x
Automatic balancing
Aesthetics
x
—
Cabinet material P=Plastic/Z=Zincking/C= Cold )
P
Rolled stainless steel
x
Inner drum(stainless steel=s/plastic=p)
P
Drain type
down
Door (glass=g / plas tic=p)
x
Adjustable feet
x
Technical data
Voltage/frequency
V/ Hz
127V/60Hz
Wash power
W
380
Spin power
W
160
Special function
x
Air-Bubble
x
Feet wheel
Wat er fall current
x
Dimension s (measurem ents)
Height / built under
mm
910
Width
mm
775
Depth / with open door
mm
440
Dimension s packed ( measurements packed)
Height
mm
942
Width
mm
792
Depth
mm
477
Net weight
kg
About 21
Gross weight
kg
About 24.5
20'Container load
Sets
58
40'Container load
Sets
116
40H'Con tainer load
Sets
168
Model NO: LCD7023PBAB0
Service Manual

4
Service Manual
Issue
Model NO: LCD7023PBAB0
Rev.
Chapter 4: safety precondition
Please insert the power cord into
special receptacle with rated vol-
tage. Be sure to use single-phase
three pins receptacle. The earthing
terminal of the receptacle must be
earthed reliably. If possible, please
adopt electric leakage protector.
When the machine is normally
using, please put the power plug
at the location easily to be insert-
ed and extracted by hand. Besure
to pull the plug off when there's
power failure, or the machine is
being moved, cleaned or when it
is idle.
If the power cord is bad, to avoid risk it is required to replace it by the
technicians of our special shop or the after-sale service department.
Keep the pin of the power plug clean.
Warning sign
Forbidding sign
Contents marked with that symbol are related to the safety of the
productandtheusers.Pleaseoperateinstrictconformitytothecontents.
Contents marked with that symbolare actionsforbidden toperform.
Performing of those actions may result in damage of the machine
or injure the personal safety of theuser.
Do not put the machine at damp
place like the bathroom . Never
wash it with water. Do not place
wet laundries on the controlpanel.
Do not use water hotter than 50 C .
In case the washing machine is installed
on ground with carpet , do not block the
ventilation hole with carpet.
Do not wash water-proof laundries like
the raincoat, bike covers etc. to avoid
abnormal vibrations in spinning.
Ventilation hole at
the bottom of the
washing machine
Do not let the machine share one receptacle
with other electric appliances. If the power
plug is damaged, or the plugging into the
receptacle is loose, do not use the plug any
more.

5
Issue
Rev.
Chapter 5: WARNING AND CAUTIONS
Do not stretch hands into the working
machine. It is dangerous even if the
rotation is slow. Takespecial care of
the children.
Do not decompose, repair or alter the
machine by yourself.
Do not put any hot or heavy items
( such as the kettle with hot water )
on the washing machine.
Do not wash laundries with volatile
materials (such as thinner, petrol etc.).
Handicapped or children without care
shall not use the machine.
Keep the machine away from direct
sunlight and heat source like the
heater.
Please put down the drain hose before washing and connect the water inlet pipe properly.
It is suggested to use foamless washing powder.
Please don t use the washer in the environment below 0 C. If the washer is below 0 C, the
washer s water inlet system and draining system will be frozen ,then result in the damaged
of the whole machine. If the washer has below 0 C, please be sure to ensure the washer is
placed under the room temperature for 2~4 hours and then use .
Model NO: LCD7023PBAB0
Service Manual

6
Issue
Rev.
Chapter 6: INSTALLATION AND ACCESSORY PARTS
6.1
Dismantle and installation
Please install and adjust the machine according to the requirement of
the manual. It is very important to your security and correct operating
the machine.
Install the lint filter
Usage of the drain hose
Place the bottom side of the lint filter into the
overflow filter, then push the top side into the
overflow filter.
After installation, please double check to
make sure that the lint filter is installed in the
correct location; otherwise it may fall off
during operation.
overflowfilter
lint f ilte r
Thedrainageshallbesmoothwiththedrainhose.
1.The height of the drain hose shall be
less than 10cm , or the drainage will
not be smooth enough and cause
incomplete drainage.
<10cm
2.Do not tramp or press the drain hose.
3.If the drain hose is too long, cut it at mid point.
To make smooth drainage, cut the front end of
the hose slantingly.
4.If extra drain hose is needed , please make
separate purchase. The inner diameter of the
extra hose shall not less than 30mm, and the
length shall not exceed 1.5m.
> 30mm
<1.5m
5. If the extra hose is too long, cut it either
at point A orB.
Figure 1
A B
Model NO: LCD7023PBAB0
Service Manual

7
Issue
Rev.
Figure 2indicates the ex factory installation
position of the drainhose.
Soft item
Extendthedrainhosefromthesideofspintub.
Figure 2
Put soft items on the ground. Lean the machine
down gently with the front surface facing the
ground. Take off the drain hose from the cabinet.
Takethe hose out of the fixing groove.
(See to Figure 3).
Soft item Figure 3
Embedthedrainhoseintothegroovealongtheside
ofthespintubintheorderof(1)~(4),headingforthe
side of the spin tub. (See to Figure 3).
Embed the drain hose into the groove with
hands. Take care not to damage the drain
hose in fastening the fixing clamp.
Figure 4
Extend to the
spin tub side
Embed into the
groove in turn
Model NO: LCD7023PBAB0
Service Manual

8
Issue
Rev.
Dismantling and installation of the base frame
Dismantle the back cover. Loosen the wires. Loosen the
fastening screw of the spin tub shaft. Separate the shaft
from the brake wheel. Loosen the brake hook. Take off
the brake cable frame from the installation groove of the
twin-tub. Take off the V-belt. Take out the drain hose from
the groove of the base frame. Loosen the fastening screw
between the base frame and the cabinet to dismantle the
base frame component.
Dismantling and installation of the control panel component
Loosen the fastening screws. Pull towards the direction
indicated in the figure to dismantle the control panel. In
installation the beard shall lock into the installation hole
of the major frame. (Figure 5)
Figure 5
Dismantling and installation of
the spin tub
Dismantle the Major frame component.
Loosen the fastening screw of the spin tub
shaft. The spin tub then can be taken out.
In installation, be sure to inlay the bulge of
the inner lining of the brake wheel into the
groove of the spin tub shaft. (Figure 6
Figure 6
Spin tub shaft
Bearing seat
Oilite bearing
Inner lining of
the bearing seat
Fastening screw
Inner lining of the
brake wheel
Fastening screw of
the brake wheel
Brake wheel
Spin motor shaft
Model NO: LCD7023PBAB0
Service Manual

9
Issue
Rev.
Dismantling and installation of the bearing seat
Once the bearing seat is taken off, it can not be utilized again. Therefore do not dismantle
it as far as possible. In case that it has to be replaced, please dismantle it as per following
sequence, then install a new bearing seat.
Dismantle the spin tub . Then pull out the bearing seat.
Cut off the inner lining claw inside the bearing seat with cutting pliers and take it out.
Install the new bearing seat and inner lining.
The bearing seat is an inlay component. Be sure to aim the claw of the inner lining at the
hole of the tub then push it in. Please use suitable tools and add even pressure around
the tub.
After inlay the bearing seat, check if the claw is installed to proper position from the outside
of the twin-tub (Figure 7).
Right Wrong Figure 7
6.2
Points of Attention in After-salesService
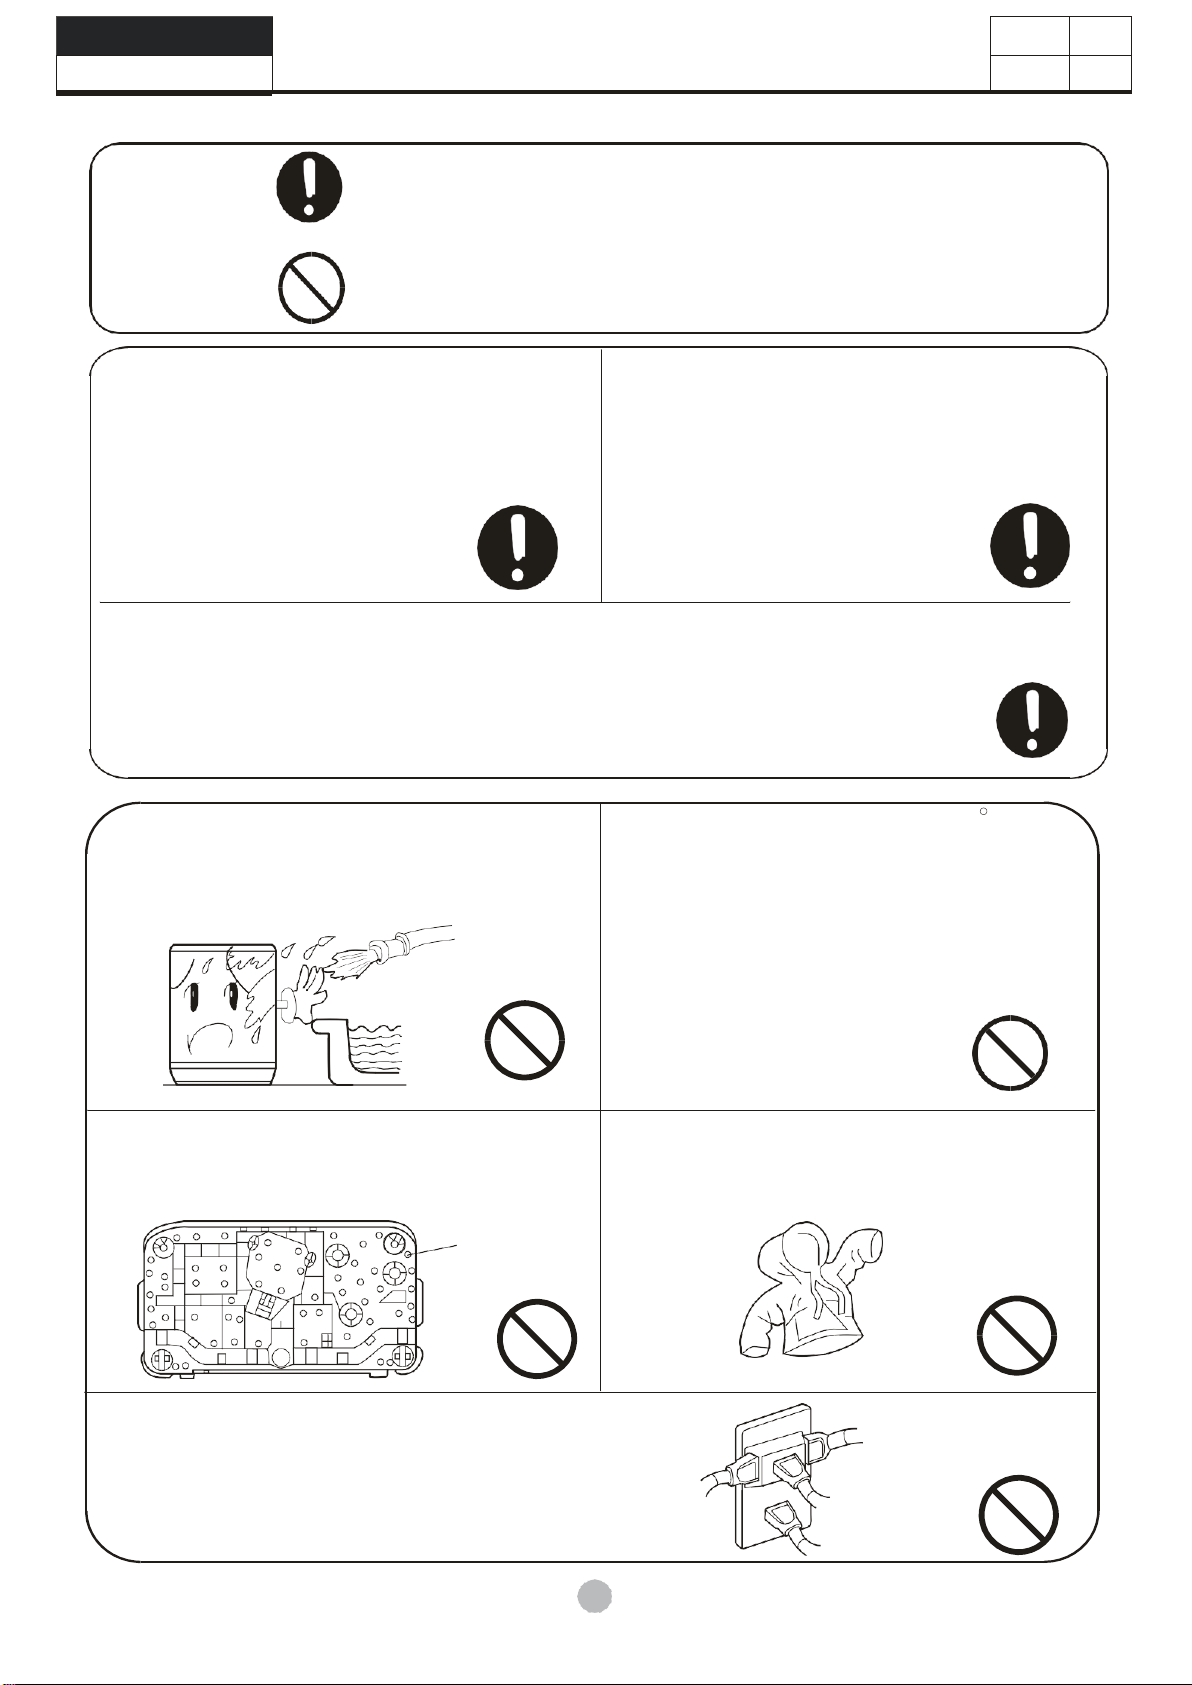
Be sure to switch off the power during dismantling or repair.
Be sure to use insulated wiring terminals and insulation box in connection of the wires, and
crimp and fix to proper position with suitable tools.
In welding connections with electric iron, be sure to twist the wires before welding, and insulate
with insulation tapes.
In welding the wires with electric iron, be sure not to touch the resin part and insulation part of
each switch.
The inlay connection wires and terminals shall not be loose or drop.
Do not make the wires touch the moving parts like the belt, pulley of the motor, brake bar etc.
Do not make the wires touch the sharp edges and high-temperature area.
In case that there are metal parts with the wires, do not make the wires touch the metal parts.
Insulation materials are needed between them.
After assembly, the washing machine shall act normally. Check if it leaks and if the sound and
vibration are normal.
Model NO: LCD7023PBAB0
Service Manual

10
Issue
Rev.
Chapter 7: APPEARANCE BRIEF INTRODUCTION
7.1
Net dimension
Unit
mm
Figure 8
height: 910mm / width:775mm /depth:440mm
Model NO: LCD7023PBAB0
Service Manual
910

11
Issue
Rev.
7.2
Name of parts
Wash tub cover
Water-filling entrance Wash selector
Wash timer Outer cover of the spin tub
Wash tub
Water level adjusting lever
Pulsator
Spin timer
Inner cover of the spin tub
Spin tub
Power cord
Drain hose Cabinet
Major frame
Figure 9
Model NO: LCD7023PBAB0
Service Manual

12
Issue
Rev.
Chapter 8: MAINTENANCE SERVICE AND CHECK METHOD
8.1
Wash part
Insert the power plug , but the machine does not work
Check if the wash timer is opened? NO Open the wash timer.
YES
Check if the power source isavailable? NO Switch on the power.
YES
Check if the contact between
the plug and receptacle isgood? NO Replace the plug
or receptacle.
YES
Check if the powersupply
cord is good No Replace with newpower
supply cord.
YES
Check if the inlayof
the connecting wire
terminal is good?
NO Inlay the connecting
wire again.
YES
Check if the fuse is good? NO Replace the fuse.
YES
Check if the capacitor NO
is good? Poor contact or inferior
inside of the wash timer NO Check if the motor is good?
NO YES NO
Replace the capacitor Replace the wash timer Replace the motor
Model NO: LCD7023PBAB0
Service Manual

13
LCD7023PBAB0
Service Manual
Issue
Rev.
8.2
Spin part
Check if the spin timer
is opened ?
YES
NO Open the spin timer.
Check if the power source
is available? NO Switch on the power.
YES
Check if the contact between
theplugandreceptacleisgood?
NO Replace the plug
or receptacle.
YES
Check if the power supply
cord is good?
NO Replace with new
power supply cord.
YES
Check if the inlay of
the connecting wire
terminal is good? NO Inlay the connecting
wire again.
YES
Check if the fuse is good? NO Replace the fuse.
YES
Check if the capacitor
is good?
YES Check if the micro-switch is closed?
NO Repair the micro-switch,
make it closed.
NO YES
Replace the capacitor. Check if the motor is good NO Replace the motor.
YES
Check if the brakesystem
is detached?
NO
Repair the brake system.

14
Issue
Rev.
8.3
check noise and others
There is metal rubbing noise in braking
N
The washing noise is too large
The pulsator only rotates towards one direction
Is the motor noise large?
YES
Replace the motor.
NO
Is the motor fastened tightly?
NO
Fasten the motor tightly.
YES
Is the belt too loose
or too tight?
YES
Adjust the tension of the belt.
NO
Is the radiating pulley loose?
YES
Fasten the radiating pulley.
NO
Is the pulsator rubbing the
bottom of the twin-tub?
YES
Adjust the gap between the
pulsator and the twin-tub.
Is the wiring of
the wash timer proper?
NO
Adjust the wiring to
proper position.
YES
Replace the wash timer
If the brake arm
has brake block ?
O Add the brake or replace
the brake arm.
Model NO: LCD7023PBAB0
Service Manual

15
Issue
Rev.
The spinning noise is too large
Ifthe washing machine
is set horizontally?
Yes
No
Set the machine horizontally.
If the sundries fall off between the
spin tub and twin-tub
Yes
Clean the sundries
No
If there is different noise
duringthespin-tub running.
Yes
Add the oil between the bearing and the
spin-tub. If the bearingis rustiness it
must be changed.
No
If the spin-tub fixing screw and
brake wheel fixing screw is
fastened tightly?
No
Ifthe damping spring is fastened
tightly or crackly?
Yes
No
Fasten the screw.
Adjust or change the damping spring.
No
Ifthere is different noise when
the motor is running?
Yes
Change the spin motor.
Model NO: LCD7023PBAB0
Service Manual

16
Issue
Rev.
Not draining
Set the switch to drain, the machine
does not work.
Check if the select knobinstall? Yes Install the knob again.
No
Check if the select knobshatter? Yes Replace the knob .
No
Check if the Drain pullback
band loosened orsnapped? Yes Replace or adjust the drain
pullback band .
No
Check if there isanything
in the drain valve ?
Yes Clean the sundries in drain valve.
No
Check if there isanything Yes
block up the drainoutlet on
the washing tub side ? Clean the sundries in tub.
Model NO: LCD7023PBAB0
Service Manual

17
Issue
Rev.
Chapter 9: Trouble-shooting answer to question
(If there's breakdown, please pull off the power plug before checking) The following
phenomena are not breakdowns sometimes. Please confirm again before sending
it to repair. If there are real breakdowns, please come to the special maintenance
department or after-sale service department of our company. Do not repair it by yourself.
Phenomena
The reason
Model NO: LCD7023PBAB0
Service Manual
The machine does
not act.
Is there power failure?
Is the power plugloose?
Is the pulsator twisted by foreign materials?
The draining does not
work
Is the drain hose frozen?
Is the drain hose blocked by foreign material?
Are there laundries falling to the outer side of
the spin tub?
There's abnormal
sound during washing
Are there hair pin, coins or metal items brought
inside the tub?
There's abnormal
Is the machine slanting?
Is the gland pressed evenly?
Are there laundries falling to the outer side of
the spin tub?
Are the laundries in spin tub too much?
sound and violent
vibration during
spinning
There may be some
It is the water remained in the factory inspection
of performance.
water flowing out of
the drain hose in the
first use of the
machine.

w
red
brown
brown
Grey
purpl
e
fuse
Yellow/gree
n
red
yello
w
purpl
e
yellow
red
purpl
e
Grey
Grey
was
h
moto
r
spi
n
moto
r
blue
capacito
r
brown blue
yello
w
ash
timer
orange
orange
microswitc
h
spin timer
Purple
Orange
Purple
Micro Switch
C2
M
Grey
1
Brown
Spin
Motor
Brown
S2
a
Red
Fuse
S1
C1
b
M
1
Blue
Wash
Motor
Brown
S3
Wash
Timer
Yellow
Blue
Yellow/gree
n
Spin timer
Issue
Rev.
Chapter 10: WIRING DIAGRAM
Figure 11
There is overload protector installed in the motor. In case that the motor is overload or meets
breakdown in working, the protector will act and stop the motor. When the breakdown is
removed, the motor will resume normal working.
Actual Circuit Diagram
Control
Panel
Cabinet
Figure12
Model NO: LCD7023PBAB0
Service Manual
Table of contents